Using a scientific calculator
Use 'Print preview' to check the number of pages and printer settings.
Print functionality varies between browsers.
Printable page generated Thursday, 25 April 2024, 2:04 AM
Using a scientific calculator
Introduction
The course describes some of the main features of a scientific calculator and encourages you to use your calculator, both for everyday arithmetic and for more complicated calculations that use the function keys as well. Key sequences, which describe which keys to press, are included in all the activities, so you can try out the ideas straightaway.
Due to the wide range of scientific calculators available, for the purposes of this course we will be concentrating on the Casio fx-83ES model. Other calculators may function differently to the methods described within this course.
This calculator is used on the Open University courses Starting with maths (Y182) and Discovering mathematics (MU123), but would also be useful for many other courses requiring the use of a scientific calculator.
This OpenLearn course is an adapted extract from the Open University course MU123 Discovering Mathematics.
Learning outcomes
After studying this course, you should be able to:
understand the basic functions on your calculator
understand which calculator functions are needed for a given problem
understand what may go wrong when entering calculations and know how to fix them
apply knowledge of calculator functions to a range of mathematical calculations.
1 Getting to know your calculator
The first 11 sections describe how to use the calculator and how to perform different types of calculations. Section 12 contains a calculator reference guide that you can refer to as needed for some of the main key sequences.
This course is not an exhaustive list of all the calculator’s features. If you are using a different calculator, you should use the corresponding features of your own calculator to do the activities in this guide. You may need to refer to your calculator manual to do this.
You may be able to download the manual for your calculator from the manufacturer’s website.
The first step in using your calculator effectively is to make sure that you are familiar with the layout of the keys on the keypad, and that you can understand the information on the display.
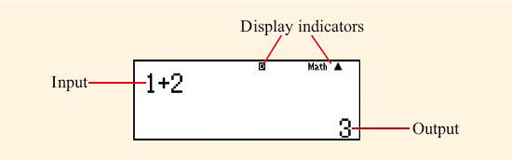
Figure 1 shows the different parts of the Casio fx-83ES calculator.

If you are using a different model of calculator, make sure that you can identify similar functions on your model.
The calculator is switched on using the ![]() key at the top right-hand corner of the keypad. Figure 2 shows the different elements of this calculator’s display.
key at the top right-hand corner of the keypad. Figure 2 shows the different elements of this calculator’s display.
Throughout this section, calculator keys will be indicated using the symbol on the key enclosed in a box, for example ![]() .
.
The lower half of the keypad contains the number keys, keys for the basic operations of addition, subtraction, division and multiplication, and the ![]() key, which is pressed when you want the calculator to display the result of the calculation you have entered. The keys
key, which is pressed when you want the calculator to display the result of the calculation you have entered. The keys ![]()
![]() used to insert brackets into a calculation are in the centre of the row above the number keys.
used to insert brackets into a calculation are in the centre of the row above the number keys.
Many keys on the calculator have more than one use. The main function of a key is printed in white on the key itself. The second function of the key is printed in yellow above the key, and is accessed by pressing the ![]() button before pressing the key. When you press the
button before pressing the key. When you press the ![]() button, the symbol ‘
button, the symbol ‘![]() ’ appears at the top left-hand corner of the calculator display to remind you that the button has been pressed. It disappears when you press another key. Some keys also have a third function, printed above the key in red. These functions allow numerical values stored in the calculator memories to be used within calculations and are accessed by pressing the
’ appears at the top left-hand corner of the calculator display to remind you that the button has been pressed. It disappears when you press another key. Some keys also have a third function, printed above the key in red. These functions allow numerical values stored in the calculator memories to be used within calculations and are accessed by pressing the ![]() button before the appropriate key. When the
button before the appropriate key. When the ![]() button is pressed, the symbol ‘
button is pressed, the symbol ‘![]() ’ is shown at the top of the calculator display. You will learn how to use the calculator memories later in section 4.
’ is shown at the top of the calculator display. You will learn how to use the calculator memories later in section 4.
The calculator manual describes this second function as the ‘alternate’ function of the key.
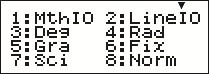
Some calculator operations are accessed through a system of menus that are displayed on the calculator screen, as shown in Figure 3. The required menu option is selected by pressing the number key associated with the option, as given on the calculator screen.
When describing how to use various calculator functions, this guide gives the exact keys that you need to press using the symbols shown on the keys. This is known as a ‘key sequence’. If the key sequence accesses the second function of a key, or a function from a menu, the name of this function will be given in brackets at the appropriate point in the key sequence. Names in brackets are thus not keys that you press but simply describe the function that is accessed using the previous key sequence. For example, to turn off the calculator, press ![]()
![]() (OFF). In this notation, (OFF) is not a key that you press, but is the name of the second function of the
(OFF). In this notation, (OFF) is not a key that you press, but is the name of the second function of the ![]() key, which is accessed with the
key, which is accessed with the ![]() key.
key.
The calculator has many modes of operation that affect how mathematics is entered and displayed. These will be described later in this guide, but before progressing any further you should reset your calculator to the default course settings.
Activity 1 Initialising your calculator
To initialise your calculator to the default course settings, turn it on and then enter the following two key sequences:
![]()
![]() (CLR)
(CLR) ![]() (Setup)
(Setup) ![]() (Yes)
(Yes) ![]()
![]()
![]() (SETUP)
(SETUP) ![]() (Norm)
(Norm) ![]()
Note that in the first key sequence, ‘CLR’ (which is short for ‘clear’) is the second function of the ![]() key, and ‘Setup’ is the name of the on-screen menu option corresponding to the
key, and ‘Setup’ is the name of the on-screen menu option corresponding to the ![]() key. ‘Yes’ is the name of the on-screen menu option corresponding to the
key. ‘Yes’ is the name of the on-screen menu option corresponding to the ![]() key. This key sequence clears all previous ‘setup’ settings on the calculator.
key. This key sequence clears all previous ‘setup’ settings on the calculator.
In the second key sequence, ‘SETUP’ is the name of the second function of the ![]() key, and ‘Norm’ (short for ‘normal’) is the on-screen menu option corresponding to the
key, and ‘Norm’ (short for ‘normal’) is the on-screen menu option corresponding to the ![]() key. Pressing the key
key. Pressing the key ![]() selects to use ‘Normal 2’ mode, which will be described in more detail in section 5.
selects to use ‘Normal 2’ mode, which will be described in more detail in section 5.
Note the difference between ‘SETUP’, the second function of the ![]() key, and the menu option ‘Setup’.
key, and the menu option ‘Setup’.
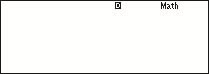
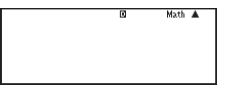
Your calculator will now be working in ‘Math’ mode, and the word Math will be shown near the right-hand side of the top of the calculator display, as shown in Figure 4 below. Math mode is the recommended way of using your calculator during this course as it allows mathematics to be entered and displayed in a similar way to how you would write it on paper.
1.1 Basic calculations
Basic calculations are entered into the calculator in exactly the same order as they are written on paper, as demonstrated in the following activity. The calculator displays the calculation that you enter. When you press ![]() , the answer is displayed at the bottom right of the screen.
, the answer is displayed at the bottom right of the screen.
Activity 2 Sums, differences, products and quotients
Use your calculator to work out the answers to the following calculations.
Answer

Note that the calculator uses the BIDMAS rules. These say that any expression within Brackets should be calculated first, then any Indices (often called powers), followed by Divisions and Multiplications and finally Additions and Subtractions.


To calculate this correctly you need to remember to insert the brackets into the calculation using the

 keys.
keys.
You may have noticed that in part (4) of the above activity, the calculation was too long to fit on the calculator display. In such circumstances, the symbols ‘![]() ’ or ‘
’ or ‘![]() ’ appear at the left or right of the display to indicate that there is more information in that direction. This information can be seen by scrolling left or right using the
’ appear at the left or right of the display to indicate that there is more information in that direction. This information can be seen by scrolling left or right using the ![]() and
and ![]() keys, which are found at the left and right sides of the large cursor control button (labelled with the word ‘REPLAY’) located under the calculator screen.
keys, which are found at the left and right sides of the large cursor control button (labelled with the word ‘REPLAY’) located under the calculator screen.
If you type a very long calculation into your calculator, then you may see the cursor (which is usually shown as ‘ ![]() ’) change to ‘
’) change to ‘![]() ’. This means that you are allowed to type only at most 10 more characters. If you encounter this, you should break your calculation into smaller parts.
’. This means that you are allowed to type only at most 10 more characters. If you encounter this, you should break your calculation into smaller parts.
The cursor is a flashing symbol indicating where the next item entered into the calculator will appear.
1.2 Fractions or decimals?
In Activity 1 you set up your calculator to use Math mode. In this mode, when the result of a calculation is not a whole number, it will be displayed as a fraction, such as ![]() , wherever possible.
, wherever possible.
To obtain the answer in decimal form, you need to press ![]()
![]() instead of
instead of ![]() , or you can toggle between the fractional and decimal outputs using the
, or you can toggle between the fractional and decimal outputs using the ![]() key.
key.
Remember, your calculator is in Math mode if the word Math is shown at the top of the calculator display. If your calculator is not in Math mode, repeat the steps of Activity 1.
Activity 3 Fractions and decimals
Use your calculator to find ![]() in both fractional and decimal forms.
in both fractional and decimal forms.
Answer
In Math mode, calculating ![]() gives the result
gives the result ![]() .
.
Converting this to a decimal using ![]() gives 0.1814671815.
gives 0.1814671815.
1.3 Powers
There are several keys on the calculator that enable you to perform calculations involving powers. For small powers such as squares or cubes there are dedicated buttons, ![]() and
and ![]() , which are located in the function key area of the keypad. These are used in a similar manner to how you would write mathematics; for example, to enter
, which are located in the function key area of the keypad. These are used in a similar manner to how you would write mathematics; for example, to enter ![]() you would press
you would press ![]()
![]() . The display also shows the maths in the same way as you would write it on paper.
. The display also shows the maths in the same way as you would write it on paper.
To calculate higher powers, for example ![]() , you need to use the more general power key
, you need to use the more general power key ![]() . This is again used in a natural way. To enter
. This is again used in a natural way. To enter ![]() , you use the key sequence
, you use the key sequence ![]()
![]()
![]() . Note that after you press the
. Note that after you press the ![]() key, a small box is shown on the calculator display containing the flashing cursor (‘
key, a small box is shown on the calculator display containing the flashing cursor (‘ ![]() ’), which enables you to enter the power in the correct place. To move the cursor away from this box and back to the main line of the display once the power has been entered, press the right arrow key
’), which enables you to enter the power in the correct place. To move the cursor away from this box and back to the main line of the display once the power has been entered, press the right arrow key ![]() at the right-hand side of the large cursor control button.
at the right-hand side of the large cursor control button.
Other models of calculator may have the button ![]() instead of
instead of ![]() and may not have specific
and may not have specific ![]() and
and ![]() keys.
keys.
Activity 4 Calculating powers
Calculate each of the following using your calculator.
Answer


Here you need to use the general power key
 .
.
Remember to use the right arrow key
 after inputting the power 8 to move out of the power position before entering the rest of the expression. If you obtained the answer 2243822356, you have calculated
  by mistake.
1.4 Making corrections
If you make a mistake when entering a key sequence into the calculator, you can use the editing facilities to correct your error.
The ![]() and
and ![]() keys on the large cursor control button enable you to move the cursor (shown on the display as ‘
keys on the large cursor control button enable you to move the cursor (shown on the display as ‘ ![]() ’) within a calculation on the calculator screen. Characters can then be inserted at the cursor location simply by pressing the appropriate buttons, and items to the left of the cursor can be deleted using the
’) within a calculation on the calculator screen. Characters can then be inserted at the cursor location simply by pressing the appropriate buttons, and items to the left of the cursor can be deleted using the ![]() key. This can be done either before or after the
key. This can be done either before or after the ![]() key has been pressed. To re-evaluate an edited calculation, simply press
key has been pressed. To re-evaluate an edited calculation, simply press ![]() at any time.
at any time.
In some circumstances, however, it may be easiest to abandon what you have typed and start again, by pressing the ‘all clear’ ![]() key!
key!
If a severe error is made when entering a calculation into the calculator, it may prevent the answer being calculated at all, as the calculation may not make mathematical sense. In such circumstances a ‘Syntax Error’ will be displayed as shown in Figure 6. The Syntax Error screen gives you two options:
- Press
 to abandon the calculation and clear the screen
 - press either
 or to return to the erroneous calculation with the editing cursor placed at the point of the error, ready for a correction to be made

Other types of calculator error that you may encounter are:
- ‘Math Error’, when the calculation you entered makes mathematical sense but the result cannot be calculated, such as attempting to divide by zero, or when the result is too large for the calculator to handle.
- ‘Stack Error’, when your calculation is too complex to be handled in one go – in such circumstances, try to break the calculation into a number of simpler ones.
Section 4 considers how you might do this.
In these cases, the calculator will display a screen similar to that for the Syntax Error, allowing you to either abandon or correct your calculation.
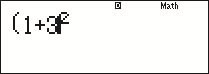
Activity 5 Making corrections
Enter the following key sequence into your calculator in an (erroneous) attempt to calculate ![]() :
:
![]()
![]()
![]()
![]()
![]()
![]()
What should the correct answer be, and why does this key sequence not give it?
Use the calculator editing functions to correct the inputted key sequence.
Answer
The correct value of ![]() is 16. The key sequence given did not close the bracket before squaring the expression, so only the 3 was squared, giving
is 16. The key sequence given did not close the bracket before squaring the expression, so only the 3 was squared, giving ![]() .
.
When correcting the expression, be careful to ensure that the cursor is immediately after the 3, and the same height as it – shown below – before inserting the missing bracket. Otherwise, the bracket may be inserted within the power.
2 Using your calculator for negative numbers
There are two different mathematical uses for the minus sign (-):
- as the symbol for subtraction, as in

- to indicate a negative number such as
 .
.
Corresponding to these there are two different minus sign keys on the calculator:
 , which is used for the operation of subtraction, as in

 , which is used for negative numbers, e.g.
  .
.
In fact, some calculators permit the ![]() key to be used for both purposes, but many other calculators require the equivalent of the
key to be used for both purposes, but many other calculators require the equivalent of the ![]() key to be used for negative numbers. For this reason we shall use
key to be used for negative numbers. For this reason we shall use ![]() to input negative numbers throughout this guide.
to input negative numbers throughout this guide.
Note that if you attempt to use ![]() for subtraction, for example
for subtraction, for example ![]()
![]()
![]() , you will generate a Syntax Error.
, you will generate a Syntax Error.
Activity 6 Subtraction and negative numbers
Calculate each of the following using your calculator. In each case, give your answer as a decimal not as a fraction.
Answer

Remember to press

 to obtain a decimal answer.


You may have been surprised that the correct answer to part (5) is negative. According to the BIDMAS rules, the squaring is performed first, then the negative taken. If we wanted to calculate the square of ![]() , we write this mathematically as
, we write this mathematically as ![]() and would need to use the brackets when evaluating it on a calculator.
and would need to use the brackets when evaluating it on a calculator.
3 Using your calculator for fractions
When your calculator is in Math mode, as recommended, fractions are entered using the ![]() button in the left-hand column of the function key area of the calculator keypad. This displays a fraction ‘template’ on the display – as shown in Figure 8 below – that contains boxes that need to be ‘filled in’. When the button is first pressed, the cursor is located in the top box ready for you to enter the numerator. To move to the bottom box to enter the denominator, use the cursor down key
button in the left-hand column of the function key area of the calculator keypad. This displays a fraction ‘template’ on the display – as shown in Figure 8 below – that contains boxes that need to be ‘filled in’. When the button is first pressed, the cursor is located in the top box ready for you to enter the numerator. To move to the bottom box to enter the denominator, use the cursor down key ![]() . If there are further parts of a calculation to be entered when the template has been completed, the right cursor key
. If there are further parts of a calculation to be entered when the template has been completed, the right cursor key ![]() can be used to move out of the denominator in preparation for the input of the rest of the calculation.
can be used to move out of the denominator in preparation for the input of the rest of the calculation.

Remember, your calculator is in Math mode if the word Math is shown at the top of the calculator display. If your calculator is not in Math mode, repeat the steps of Activity 1.
Mixed numbers such as ![]() can be entered similarly using the mixed number template obtained using the key sequence
can be entered similarly using the mixed number template obtained using the key sequence ![]()
![]()
![]() . This template provides three boxes to fill, one for the whole number part, and one each for the numerator and denominator of the fractional part.
. This template provides three boxes to fill, one for the whole number part, and one each for the numerator and denominator of the fractional part.
Any fractional answers to calculations will automatically be displayed in lowest terms.
Activity 7 Fractions
Use your calculator to:
- express
 in its simplest form
 - calculate
 of 190.
Answer

- of 190 can be written
 , which is equal to
  or 71.25.
The decimal answer can be obtained by using
 .
.Remember to use the cursor right key
to move the cursor out of the denominator of the fraction before entering the multiplication sign. If you obtained the answer  , you calculated
  by mistake.
You may have noticed that the results of both these exercises were displayed on the calculator as top-heavy fractions. This is the default behaviour of the calculator in Math mode. You can toggle between a top-heavy fraction and its mixed number equivalent using the key sequence ![]()
![]()
![]() .
.
The default behaviour of the calculator can be changed as follows:
- To set the calculator to use mixed numbers by default, use the key sequence
 (SETUP)
 (ab/c).
 - To set the calculator to use improper or top-heavy fractions by default, use the key sequence (SETUP) (d/c).
Here, the ![]() key is used to access part of the on-screen menu that is not initially visible.
key is used to access part of the on-screen menu that is not initially visible.
Activity 8 Mixed numbers
Use your calculator to:
- express as a mixed number in its simplest form
- express
 as a top-heavy fraction.
Answer

Remember to use
 to toggle between the top-heavy fraction and mixed number answers.
Remember to use the template obtained using

 and to use the cursor arrow keys to move between the boxes when inputting the mixed number.
4 Doing longer calculations using your calculator
The volume of wood (in cubic metres) contained in a log of length ![]() metres with a distance around its middle of
metres with a distance around its middle of ![]() metres is given by the formula
metres is given by the formula
![]()
For a log of length 1.5 m with a distance around the middle of 92 cm, this becomes
![]()
In this section we consider several different approaches that can be used to evaluate this and other more complex expressions using different functions on your calculator. While the first method – considered in Activity 9 – is probably the most straightforward for this relatively simple expression, it is useful to see how you might use other calculator functions when you are faced with more complicated expressions to evaluate.
The expression for the volume of wood requires the value of ![]() . You could enter an approximate value for
. You could enter an approximate value for ![]() by hand, but this is time-consuming and may be prone to error. The calculator has an approximation for
by hand, but this is time-consuming and may be prone to error. The calculator has an approximation for ![]() built into it, which is obtained using the key sequence
built into it, which is obtained using the key sequence ![]()
![]()
![]() .
.
The ![]() key is located on the bottom row of the keypad.
key is located on the bottom row of the keypad.
Activity 9 Using the fraction key
The most obvious way of calculating ![]() is to enter it as a fraction on your calculator.
is to enter it as a fraction on your calculator.
What key sequence is needed, and what is the final answer to 3 significant figures?
Answer
![]() (to 3 significant figures).
(to 3 significant figures).
The key sequence used was ![]()
![]()
![]()
![]()
![]()
![]()
![]()
![]()
![]()
![]()
![]()
![]()
![]()
![]()
![]()
![]()
![]() .
.
Note that it is not strictly necessary to include the multiplication between the 4 and the ![]() in the denominator since if the sign is omitted, it will be assumed by the calculator.
in the denominator since if the sign is omitted, it will be assumed by the calculator.
Another way to carry out the calculation in Activity 9 is to use the ![]() key.
key.
Activity 10 Using the  key
key
You will not obtain the correct answer to the calculation
![]()
if you type
![]()
into your calculator and press ![]() . Can you explain why? Insert a pair of brackets into the expression with the ÷ sign so that it will give the correct answer. Then type this new expression into the calculator and check that you obtain the same answer as in the activity above.
. Can you explain why? Insert a pair of brackets into the expression with the ÷ sign so that it will give the correct answer. Then type this new expression into the calculator and check that you obtain the same answer as in the activity above.
Answer
Typing ![]() into the calculator and pressing
into the calculator and pressing ![]() will not give the correct answer because the calculator will follow the BIDMAS rules and divide
will not give the correct answer because the calculator will follow the BIDMAS rules and divide ![]() by 4 and then multiply by
by 4 and then multiply by ![]() , instead of dividing by
, instead of dividing by ![]() .
.
To obtain the correct result, you have to type ![]() . (Alternatively, you can type
. (Alternatively, you can type ![]() .)
.)
(Note that on some later models of the calculator, the correct answer is obtained without adding the brackets to the denominator; however it is good practice to add the brackets to ensure the correct calculation is carried out).
4.1 Reusing a previous result
An alternative approach to our calculation is to calculate the denominator of the fraction first, and then divide the numerator by this.
You could write down the answer to the first part of the calculation on paper, and enter it into the calculator again. However, it is possible that you may make an error either in writing down the number or in typing it into the calculator. A better method is to use the fact that the calculator retains the last calculated answer, which can then be inserted in the subsequent calculation using the ![]() key located at the bottom of the keypad.
key located at the bottom of the keypad.
Note that the ![]() key only remembers the result of your last calculation.
key only remembers the result of your last calculation.
Activity 11 Bottom first!
Use your calculator to calculate the value of the denominator of ![]() , then complete the calculation by finding the value of
, then complete the calculation by finding the value of ![]()
![]() to 3 significant figures.
to 3 significant figures.
Answer
The value of the denominator is 12.566…, and the final answer is 0.101 to 3 significant figures.
4.2 Using the calculator memory
A variation on the above method is to break the calculation into two parts, and use the memory functions of the calculator to store the result of the first part. The calculator memory is particularly useful when you want to calculate the values of several expressions that have a common part. This common part need be entered only once and its value reused several times subsequently. For example, rewriting the formula for the volume of wood contained in a log as
![]()
we can see that no matter what the values of ![]() and
and ![]() , the formula always requires the value of
, the formula always requires the value of ![]() . If we wished to calculate the volume of wood contained in several different logs, it might be efficient to calculate the value of
. If we wished to calculate the volume of wood contained in several different logs, it might be efficient to calculate the value of ![]() once, store it in memory and reuse this value in the subsequent calculations.
once, store it in memory and reuse this value in the subsequent calculations.
The calculator has several different memories. We shall first consider the ‘M’ memory, which is accessed using the ![]() key (and its associated functions) at the bottom right-hand corner of the function key area.
key (and its associated functions) at the bottom right-hand corner of the function key area.
Before using the calculator memory, it is good practice to always clear any previous data stored in the calculator using the key sequence ![]()
![]() (CLR)
(CLR) ![]() (Memory)
(Memory) ![]() (Yes)
(Yes) ![]() .
.
Note that this clears all the calculator memories.
To store the result of an expression just calculated (i.e. an answer displayed in the output area of the calculator screen) in the ‘M’ calculator memory, use the key sequence ![]()
![]() (STO)
(STO) ![]() (M). Here we are using the second function of the
(M). Here we are using the second function of the ![]() (or recall) button, which is called ‘STO’ (or store). After selecting the store function, we need to tell the calculator which memory the value is to be stored in. These memories are labelled in red on some of the calculator keys, and the ‘M’ memory is obtained by pressing the
(or recall) button, which is called ‘STO’ (or store). After selecting the store function, we need to tell the calculator which memory the value is to be stored in. These memories are labelled in red on some of the calculator keys, and the ‘M’ memory is obtained by pressing the ![]() key. We could read the key sequence as ‘store the current result into the M memory’.
key. We could read the key sequence as ‘store the current result into the M memory’.
Once ![]() (or
(or ![]()
![]() (STO)) has been pressed, the display indicator RCL (or STO) is shown on the display to indicate that the calculator is waiting to know which memory to recall (store) the value from (in).
(STO)) has been pressed, the display indicator RCL (or STO) is shown on the display to indicate that the calculator is waiting to know which memory to recall (store) the value from (in).
To display the current contents of the ‘M’ memory, press ![]()
![]() (M). The value stored in memory can also be used as part of a subsequent calculation by inserting the ‘letter’ M into the appropriate point of the expression using
(M). The value stored in memory can also be used as part of a subsequent calculation by inserting the ‘letter’ M into the appropriate point of the expression using ![]()
![]() (M). For example, to find the square of the value currently stored in the ‘M’ memory,
(M). For example, to find the square of the value currently stored in the ‘M’ memory, ![]() , we can use the key sequence
, we can use the key sequence ![]()
![]() (M)
(M) ![]()
![]() .
.
When there is a value stored in the ‘M’ memory, the display indicator M is shown at the top of the display.
Activity 12 Using memory
Store the value of ![]() in the ‘M’ memory of the calculator and then use this stored value to evaluate
in the ‘M’ memory of the calculator and then use this stored value to evaluate ![]() to 3 significant figures.
to 3 significant figures.
Answer
The value of ![]() (which equals 0.0796 to 3 significant figures) can be calculated using
(which equals 0.0796 to 3 significant figures) can be calculated using ![]()
![]()
![]()
![]()
![]()
![]()
![]()
![]() and stored in the ‘M’ memory using the key sequence
and stored in the ‘M’ memory using the key sequence ![]()
![]() (STO)
(STO) ![]() (M).
(M).
This value can then be used to find the final result using ![]()
![]()
![]()
![]()
![]()
![]()
![]()
![]()
![]()
![]()
![]()
![]() (M)
(M) ![]() , which gives 0.101 to 3 significant figures, as expected.
, which gives 0.101 to 3 significant figures, as expected.
4.3 Other ‘M’ memory operations
The value stored in the ‘M’ memory can also be changed by adding or subtracting the result of a further calculation:
- To add the result of the latest calculation to the value currently in the memory, press
 .
. - To subtract the value of the latest calculation from the value currently in the memory, use the key sequence (M-).
Expressions can also be stored in, added to or subtracted from the memory at the same time as they are evaluated by replacing the ![]() at the end of a calculation with one of the memory access sequences. For example, to calculate
at the end of a calculation with one of the memory access sequences. For example, to calculate ![]() and store the result straight into the memory, use the key sequence
and store the result straight into the memory, use the key sequence ![]()
![]()
![]()
![]()
![]()
![]()
![]() (STO)
(STO) ![]() (M).
(M).
To clear the ‘M’ memory alone, simply store the value 0 in it using the key sequence ![]()
![]()
![]() (STO)
(STO) ![]() (M).
(M).
4.4 Other memories
The calculator also has 6 other memories, labelled ‘A’, ‘B’, ‘C’, ‘D’, ‘X’ and ‘Y’, which are accessed using several of the keys in the lower half of the function key area of the calculator. Each memory name is printed in red above the key used to access it.
These memories can be used in exactly the same way as the ‘M’ memory, except that there are no equivalents to the ‘add to memory’ (![]() ) and ‘subtract from memory’ (
) and ‘subtract from memory’ (![]()
![]() (M-)) functions, and no display indicators.
(M-)) functions, and no display indicators.
5 Scientific notation on your calculator
Displaying numbers in scientific notation on your calculator
If the result of a calculation is a number greater than or equal to ![]() (i.e.
(i.e. ![]() ), the calculator will automatically display the result using scientific notation. For example, calculating
), the calculator will automatically display the result using scientific notation. For example, calculating ![]() gives the answer
gives the answer
![]() ,
,
which is displayed on the calculator screen as it is written here.
Small numbers are also automatically displayed using scientific notation. However, how small the number needs to be for this to happen depends on the mode the calculator is working in:
- ‘Norm 1’ mode uses scientific notation for any number less than
 but greater than
  .
. - ‘Norm 2’ mode uses scientific notation for any number less than
 but greater than
  .
.
‘Norm’ is short for ‘normal’.
In Activity 1 you will have already set your calculator to use Norm 2 mode, and we suggest that for the moment you continue to use this. To change the mode, use the key sequence ![]()
![]() (SETUP)
(SETUP) ![]() (Norm) followed by
(Norm) followed by ![]() (for Norm 1) or
(for Norm 1) or ![]() (for Norm 2).
(for Norm 2).
You can also set the calculator to always display results using scientific notation with a set number of significant figures using the key sequence ![]()
![]() (SETUP)
(SETUP) ![]() (Sci) followed by the number of significant figures required, for example
(Sci) followed by the number of significant figures required, for example ![]() . When your calculator is set in this fashion, the display indicator SCI is displayed at the top of the screen. To cancel such a setting, use one of the key sequences given above to return to a ‘Norm’ mode.
. When your calculator is set in this fashion, the display indicator SCI is displayed at the top of the screen. To cancel such a setting, use one of the key sequences given above to return to a ‘Norm’ mode.
5.1 Inputting numbers in scientific notation to your calculator
Numbers expressed in scientific notation can be input directly to the calculator by using the ![]() key on the bottom row of keys. For example,
key on the bottom row of keys. For example, ![]() can be entered using the key sequence
can be entered using the key sequence ![]()
![]()
![]()
![]()
![]()
![]() .
.
Activity 13 Calculating with scientific notation
Use the scientific notation functions of your calculator to calculate each of the following, giving your answer in both scientific and ordinary forms.
Answer
 or 85570
 or 0.129258
 or 2343750
6 Powers and surds on your calculator
Inputting fractional and negative powers
In Activity 4 you saw how to use the ![]() key to input powers on the calculator. The
key to input powers on the calculator. The ![]() key can be used with other functions, such as the fraction template
key can be used with other functions, such as the fraction template ![]() , to calculate fractional and negative powers.
, to calculate fractional and negative powers.
Activity 14 Calculating more powers
Calculate each of the following using your calculator, giving your answer correct to 3 significant figures.
Answer
 (to 3 significant figures) using the key sequence
  .
. (to 3 significant figures) using the key sequence
  .
. (to 3 significant figures) using the key sequence
 .
.
6.1 Using roots on your calculator
Just as there are keys on your calculator for entering powers, roots can also be entered directly. Square roots can be calculated using the ![]() key. For example,
key. For example, ![]() can be entered using
can be entered using ![]()
![]() . Cube roots are entered using the second function of this key. For higher roots, such as fourth or fifth roots you need to use the more general
. Cube roots are entered using the second function of this key. For higher roots, such as fourth or fifth roots you need to use the more general ![]() template, which is the second function of the
template, which is the second function of the ![]() key. This template is filled in by using the number and arrow keys (
key. This template is filled in by using the number and arrow keys (![]() and
and ![]() ) in a way similar to that used when the fraction template is completed.
) in a way similar to that used when the fraction template is completed.
Activity 15 Calculating roots
Calculate each of the following using your calculator, giving your answer correct to 3 significant figures.
Answer
 (to 3 significant figures) using the key sequence
 .
. (to 3 significant figures) using the key sequence
  .
. (to 3 significant figures) using the key sequence
 .
. or 18.4 (to 3 significant figures) using the key sequence (and using to find the decimal result).
You will notice from the result of Activity 15, part 4 that the calculator sometimes presents answers using surds.
This is true only if the calculator is in the recommended Math mode.
To find the decimal equivalent of an answer like this, you can use the ![]() or
or ![]()
![]() keys that you used earlier to find the decimal forms of fractional answers.
keys that you used earlier to find the decimal forms of fractional answers.
6.2 Inserting a missing root
Sometimes when entering into your calculator an expression involving roots, you may accidentally forget to press the appropriate function key. However, moving the cursor to the correct point and pressing the missing key, as in section 1, will not work as this simply inserts an empty template.
If you wish to edit an expression to insert a missing root, first move the cursor to the correct place – that is, to the left of the number. Then activate the ‘Insert’ function by pressing ![]()
![]() (INS), and finally press the appropriate root key.
(INS), and finally press the appropriate root key.
7 Trigonometric ratios on your calculator
There are various different units in which an angle can be measured, degrees being one of the possibilities. Before using your calculator to find the values of the trigonometric ratios of angles measured in degrees, you need to ensure that it is set to use the correct units.
Always check that your calculator is using the correct system of angle measurement before using trigonometric ratios.
Your calculator is set to use degrees if the display indicator ![]() is shown at the top of the screen. If you see the indicator
is shown at the top of the screen. If you see the indicator ![]() or
or ![]() , then your calculator is set to use different units for measuring angles.
, then your calculator is set to use different units for measuring angles.
To set your calculator to work in degrees, use the key sequence ![]()
![]() (SETUP)
(SETUP) ![]() (Deg).
(Deg).
To calculate the sine, cosine or tangent of an angle, press the ![]() ,
, ![]() or
or ![]() key and then type in the size of the angle. Note that the
key and then type in the size of the angle. Note that the ![]() ,
, ![]() and
and ![]() keys automatically open a bracket for you. If you are simply calculating the sine, cosine or tangent of an angle, just press
keys automatically open a bracket for you. If you are simply calculating the sine, cosine or tangent of an angle, just press ![]() after entering the angle – there is no need to close the bracket. If you are using these ratios as part of a larger calculation, then you will need to remember to close the bracket yourself (by pressing
after entering the angle – there is no need to close the bracket. If you are using these ratios as part of a larger calculation, then you will need to remember to close the bracket yourself (by pressing ![]() ) before entering the remainder of the calculation.
) before entering the remainder of the calculation.
Some older models of calculator require the angle to be input first, followed by the ![]() ,
, ![]() or
or ![]() button.
button.
Activity 16 Trigonometric ratios on your calculator
Calculate the value of each of the following using your calculator, giving your answers correct to 3 significant figures.
Answer
 (to 3 significant figures). If you got 0.657, then your calculator is currently set to calculate in radians, so reset it to work in degrees using (SETUP) (Deg).
 (to 3 significant figures).
 or
or  or 0.707 (to 3 significant figures).
 (to 3 significant figures).
 (to 3 significant figures).
Remember to close the bracket that pressing
 opens before entering the ‘+5’. If you obtained the answer 0.845 (to 3 significant figures), you probably calculated
  instead.
Note that when entering this expression in your calculator, it is possible to omit explicitly entering the multiplication between the 2 and
 since the calculator will assume it.
 .
.Note that
 means first find the sine of
  , then square the answer. The key sequence to enter into the calculator is thus
  . The first is necessary to close the bracket automatically opened when pressing , and the second closes the bracket opened at the start of the sequence. Since the calculator evaluates the sine as soon as it encounters the first closing bracket, it is possible to enter this expression using the alternative sequence , but this is not recommended as the former is more clear.
It is a property of trigonometric ratios that for any angle
 ,
,  .
.
You will notice from the answer to part (3) that the calculator displays the ratios of some angles as fractions, involving surds where needed, and not in decimal form.
The decimal form can be found using ![]()
![]() or
or ![]() .
.
8 Finding angles from trigonometric ratios
Inverse trigonometric values can be found using the second functions ![]() ,
, ![]() and
and ![]() of the
of the ![]() ,
, ![]() and
and ![]() keys. These functions are used in a similar manner to
keys. These functions are used in a similar manner to ![]() ,
, ![]() and
and ![]() .
.
Activity 17 Finding angles from trigonometric ratios
Calculate the value of each of the following expressions using your calculator, where possible, giving your answers correct to 1 decimal place.
Answer
 .
.If you obtained the answer
 or 0.5236 (to 4 decimal places), then your calculator is set to work in radians. Make sure that you are working in degrees.
 (to 1 decimal place).
 (to 1 decimal place).
- The calculation
 is not possible, and your calculator will give a ‘Math Error’. There is no angle whose sine is 2, because the hypotenuse is always the largest side of a right-angled triangle, and hence the maximum value the sine of an angle can be is 1.
In part (1) of the activity above, you used your calculator to find an angle whose sine is 0.5. This is not the only angle whose sine is 0.5, but you can use this angle to find the other angles. Similar remarks apply to parts (2) and (3).
9 Radians on your calculator
Your calculator can be set to calculate trigonometric functions using the radian measure for angles, instead of degrees, by using the key sequence ![]()
![]() (SETUP)
(SETUP) ![]() (Rad).
(Rad).
When in this mode, the display indicator ![]() is shown.
is shown.
Activity 18 Radians on your calculator
In this activity, the angles are measured in radians. Find the values of the following expressions, giving your answers correct to 3 significant figures.
Answer
Remember to set your calculator to work in radians before entering these calculations.
 (to 3 significant figures).
 .
.Remember:
 can be input to the calculator using
 .
. or 0.785 (to 3 significant figures).
Notice from the final example in this activity that where an answer is a simple (possibly fractional) multiple of ![]() , the answer is displayed in terms of
, the answer is displayed in terms of ![]() rather than as a decimal number.
rather than as a decimal number.
10 Logarithms on your calculator
Logarithms to base 10 of numbers can be found using the ![]() key. For example,
key. For example, ![]() can be calculated using the key sequence
can be calculated using the key sequence ![]()
![]()
![]()
![]()
![]() . Note that as with the trigonometric functions, the
. Note that as with the trigonometric functions, the ![]() key automatically opens a bracket that must be closed if you are using the calculated logarithm as part of a longer calculation.
key automatically opens a bracket that must be closed if you are using the calculated logarithm as part of a longer calculation.
The second function of the ![]() key
key ![]() , accessed using
, accessed using ![]()
![]()
![]() , can be used as an alternative to
, can be used as an alternative to ![]() when calculating powers of 10.
when calculating powers of 10.
Activity 19 Calculating logarithms
Use your calculator to find the values of the following.
![]() ,
, ![]() ,
, ![]() (1 billion) ,
(1 billion) , ![]()
Answer
All the calculations are logarithms to base 10, so we use the ![]() key.
key.
![]() ,
, ![]() ,
, ![]() (1 billion)
(1 billion) ![]() ,
, ![]() .
.
11 Natural logarithms and powers of e on your calculator
Natural logarithms, for example ![]() , can be evaluated on your calculator using the
, can be evaluated on your calculator using the ![]() key. The second function of this key (
key. The second function of this key (![]()
![]()
![]() ) permits the calculation of powers of
) permits the calculation of powers of ![]() . Note that an approximate value for
. Note that an approximate value for ![]() itself can be obtained using the key sequence
itself can be obtained using the key sequence ![]()
![]() (
(![]() ).
).
Remember that ![]() means the same as ln. Some calculators have a
means the same as ln. Some calculators have a ![]() key instead of
key instead of ![]() .
.
Activity 20 Calculating natural logarithms and powers of e
Calculate the value of each of the following using your calculator, giving each answer to 3 significant figures.
Answer
 (to 3 significant figures).
 (to 3 significant figures).
 (to 3 significant figures).
Notice that this is about three times the answer to part (2). In fact, the exact value of
 is precisely three times the exact value of
  . This is because
  , and for any base of logarithm,
  . This is an important result for logarithms. In this case we have
  .
. (to 3 significant figures).
To calculate this answer correctly, you need to remember to close the bracket after the 3 on your calculator display.
 (to 3 significant figures).
12 Calculator reference guide
Calculator modes
General modes
The calculator can operate in several different modes:
- COMP, which is used for general calculations
- STAT, which is used for statistical calculations
- TABLE, which is used for generating tables of numbers.
COMP is short for ‘computation’, and STAT is short for ‘statistics’.
Comp mode is selected by using the key sequence ![]()
![]() (COMP).
(COMP).
Mathematics modes
There are two different ways in which mathematics can be input to and displayed on the calculator:
- Math mode, in which fractions are entered and displayed in their proper mathematical form – for example,
 – and some irrational numbers are displayed as surds (such as
  ) or multiples of (such as
  ).
). Math mode is selected by using the key sequence
(SETUP) (MthIO). - Linear mode, in which fractions such as are entered and displayed using a linear notation – for example, 2
 3 – and all irrational numbers (such as and ) are displayed as decimal approximations.
 Linear mode is selected by using the key sequence
(SETUP) (LineIO).
Put simply, an irrational number is one that cannot be expressed as a simple fraction.
You know that you are in Math mode if the word Math is shown near the right-hand side of the top of the calculator display. If this is not shown, you are using Linear mode.
In Math mode, you can force an answer to be displayed as a decimal using ![]()
![]() , or you can toggle between the mathematical and decimal outputs using
, or you can toggle between the mathematical and decimal outputs using ![]() .
.
Fraction display modes
It is possible to set the calculator so that answers that are top-heavy fractions (such as ![]() ) are always displayed as mixed numbers (such as
) are always displayed as mixed numbers (such as ![]() ).
).
- To set the calculator to display as mixed numbers, use the key sequence (SETUP) (ab/c).
- To set the calculator to display as top-heavy fractions, use the key sequence (SETUP) (d/c).
Decimal display modes
The calculator can be set to display decimal numbers in various different ways:
- Normal 1 (Norm 1) mode uses scientific notation for any number less than 0.01 but greater than −0.01, and otherwise displays answers to however decimal places they have, subject to the maximum that will fit on the display. This mode is entered using (SETUP) (Norm).
- Normal 2 (Norm 2) mode uses scientific notation for any number less than 0.000000001 but greater than −0.000000001, but otherwise displays answers to however many decimal places they have, subject to the maximum that will fit on the display. This mode is entered using (SETUP) (Norm).
- Scientific notation mode (Sci) displays all decimal numbers in scientific notation using a specified number of significant figures. This mode is entered using (SETUP) (Sci) followed by the number of significant figures required, for example . When your calculator is set in this mode, the display indicator SCI is shown.
- Fixed decimal place mode (Fix) displays all decimal numbers to a given number of decimal places (unless scientific notation is needed to fit the result on the display). This mode is entered using (SETUP) (Fix) followed by the number of decimal places required, for example . When your calculator is set in this mode, the display indicator FIX is shown.
12.1 Display indicators
These are symbols shown on the calculator display to indicate its current state of operation.
| Symbol on display | Meaning |
|---|---|
| The |
| The |
M | A value is stored in the ‘M’ memory. |
STO | The STORE key ( |
RCL | The RECALL ( |
| The calculator is set to measure angles in degrees. |
| The calculator is set to measure angles in radians. |
| The calculator is set to measure angles in gradians. |
FIX | The calculator is set to display answers to a fixed number of decimal places. |
SCI | The calculator is set to display answers in scientific notation with a fixed number of significant figures. |
Math | The calculator is set to use Math mode for input and display. |
STAT | The calculator is in statistics mode. |
| There is more information available than can be displayed, and this can be accessed using the up/down cursor keys. |
| The line displayed is longer than can fit on the display. Other parts of the line can be displayed by scrolling using the left/right cursor keys: |
12.2 Common operations
| To | Key sequence |
|---|---|
| Turn on |
|
| Turn off |
Note that the calculator will automatically turn off if not used for about 6 minutes. |
| Adjust the display contrast |
|
| Restore the factory settings |
|
| Clear the contents of all memories |
|
| Restore the default settings and clear all memories |
|
| Cancel a calculation, or exit menus |
|
| Obtain an answer |
|
| Obtain a decimal answer in Math mode |
|
| Toggle between exact and decimal answers in Math mode |
|
| Toggle between displaying fractions as improper fractions or mixed numbers in Math mode |
|
| Use the result of the previous calculation… |
|
| … e.g. to find 42 minus the previous result |
|
| Store a value in ‘M’ memory |
|
| Clear a value stored in the M memory |
|
| Add a value to that in the ‘M’ memory |
|
| Subtract a value from that in the ‘M’ memory |
|
| Display the value stored in the ‘M’ memory |
|
| Use the value in the ‘M’ memory in a calculation… |
|
| … e.g. to find 42 minus the value in the ‘M’ memory |
|
| Set angles to be measured in degrees |
|
| Set angles to be measured in radians |
|
Set answers to be displayed to 3 decimal places (To use a different number of decimal places, replace |
|
Set answers to be displayed in scientific notation with 3 significant figures (To use a different number of significant figures, replace |
|
| Cancel any display rounding settings |
|
The A, B, C, D, X, Y memories are used similarly to the M memory, except that these have no ‘add to’ and ‘subtract from’ functions.
12.3 Entering mathematics
| To enter | Key sequence |
|---|---|
|
|
|
|
|
|
|
|
|
|
|
|
|
|
| In Math mode: In Linear mode: |
| In Math mode: In Linear mode: |
|
|
|
|
|
|
|
|
|
|
|
|
|
|
|
|
|
|
|
|
![]() and
and ![]() are mathematical constants.
are mathematical constants.
When using trigonometric functions, ensure that your calculator is set to use the correct units: degrees or radians.
![]() and
and ![]() are calculated in a similar way to
are calculated in a similar way to ![]() .
.
Conclusion
This free course provided an introduction to studying Mathematics and Statistics. It took you through a series of exercises designed to develop your approach to study and learning at a distance and helped to improve your confidence as an independent learner.
Keep on learning

Study another free course
There are more than 800 courses on OpenLearn for you to choose from on a range of subjects.
Find out more about all our free courses.
Take your studies further
Find out more about studying with The Open University by visiting our online prospectus.
If you are new to university study, you may be interested in our Access Courses or Certificates.
For reference, full URLs to pages listed above:
OpenLearn – www.open.edu/ openlearn/ free-courses
Visiting our online prospectus – www.open.ac.uk/ courses
Access Courses – www.open.ac.uk/ courses/ do-it/ access
Certificates – www.open.ac.uk/ courses/ certificates-he
Newsletter – www.open.edu/ openlearn/ about-openlearn/ subscribe-the-openlearn-newsletter
Acknowledgements
Grateful acknowledgement is made to the following:
Course image: kaboompics.com in Pexels made available under Creative Commons Public Domain 1.0 Licence.
Figure 1: © Casio Electronics Co Ltd.
Don't miss out:
If reading this text has inspired you to learn more, you may be interested in joining the millions of people who discover our free learning resources and qualifications by visiting The Open University - www.open.edu/ openlearn/ free-courses