An introduction to music theory
Use 'Print preview' to check the number of pages and printer settings.
Print functionality varies between browsers.
Printable page generated Friday, 19 April 2024, 10:18 PM
An introduction to music theory
Introduction
This free course, An introduction to music theory, introduces you to the basic concepts of western music notation and music theory that you need to know before you embark on the Open University course A224 Inside music. It covers ground similar to that found in the syllabus of the Associated Board Theory Grades 1–3 (ABRSM, 2018).
Sound files have been provided for all the music notation examples as it is important for you to be able to listen to the sounds represented by the notation. There is an audio bar below each notated example; click on the button on the left side to play and pause the relevant sound file.
This free course is recommended preparatory material for the Open University course A224 Inside music.
Tell us what you think! We’d love to hear from you to help us improve our free learning offering through OpenLearn by filling out this short survey.
Learning outcomes
After studying this course, you should be able to:
understand the basic building blocks of musical theory and notation
understand music theory to the level demanded by Grade 3 of the Associated Board of the Royals Schools of Music theory syllabus
understand music theory to a level required to move on to Open University Level 2 Music offerings, e.g. A224 Inside Music.
1 The content
The course begins with a brief introduction to the fundamental elements of western music notation – the staff, clefs and note names. It then moves on to consider the notation of rhythm and of pitch. In addition, the basic form of the chord (the triad) is included, together with a list of the most frequently used performance directions that you will find on notated music (scores). Each section ends with interactive activities that will help you assess how far you understand individual topics or concepts.
Even if you feel that you are already familiar with these concepts it is worthwhile reading through the sections of this course systematically to find out whether there is something that you hadn’t come across before or that you had forgotten.
1.1 Working through the course
If you are starting this course completely from scratch with no knowledge of music theory, tackle each section one by one, and spend as long as you need working on each. Be prepared to undertake a little study each day or alternate day – ‘a little often’ is a good guideline. This will prove much more beneficial than studying large chunks at a time.
In addition, make sure that you understand each of the topics you have studied before you attempt the following one. Learning about staff notation and other facets of music theory is a cumulative process. Spend a reasonable amount of time on each topic so that you can master it before going on to the next.
Although this course contains interactive activities that test your knowledge, it is suggested that you reinforce your knowledge with the use of ear-training activities (often called ‘trainers’), where musical sounds are linked to visual symbols. Once you feel you have understood a topic, you could try using a trainer to reinforce your knowledge through practice. Their use will create ‘oases’ in the learning process where ‘doing’ will help facilitate ‘understanding’, and will also provide feedback as to how you are getting on.
There are several sites on the internet that provide trainers. These include activities such as interactive drills that focus on specific areas of staff notation ranging from a straightforward naming of notes to recognising complex rhythms and chords. A list of ear trainers is provided at the end of this course in Section 10.
2 The basics
2.1 The staff
The idea of placing notes on a set of horizontal lines – the staff –to show the relationship of various pitches with each other – staff notation – emerged in western music towards the end of the ninth century. Originally, each pitch was allocated its own line, but the Italian music theorist, Guido of Arezzo, who lived during the early eleventh century, suggested that lines should be drawn for every other pitch, so that alternate pitches sat on the lines and the remaining pitches were placed in the intervening spaces between the lines.
This principle was soon adopted and has remained in force in traditional western music notation to the present day. The number of lines included in the staff has varied depending on the range of the music being notated. However, the norm has evolved as the five-line staff, shown in Example 1.
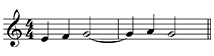
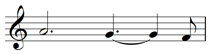
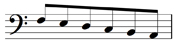
Example 1
As shown in Example 2, if we place pitches in the form of note heads on the staff, information about the relationship of the pitches with each other is produced.
Example 2
2.2 Clefs
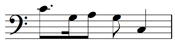
As it stands, the first note in Example 2 could be any pitch we care to choose.
Example 2 (repeated)
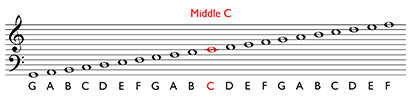
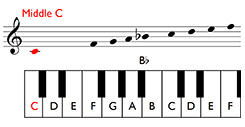
So if we wish to specify a particular pitch or series of pitches we need some sort of guide – a sign that will enable us to indicate the specific pitch. That sign is supplied by a clef (from the Latin, clavis, meaning ‘key’). From the eleventh century onwards, several Roman letters, including c and f, were used systematically for clefs, with g subsequently becoming increasingly common. In a stylised form, g, with flamboyant curls and flourishes, is still used as the treble or G clef, and signifies that a note placed on the second line from the bottom is G (see Example 3).
Example 3

And this is not any G, but specifically the one above middle C. (We’ll come to an explanation of middle C in a moment.)
As Example 4 shows, the other notes are named with letters from the alphabet, A–G, with A returning after G has been reached.
Example 4

Notice that as the notes are placed higher and higher up the staff, the pitch becomes higher and higher as well. Notice too that we read music from left to right, and with a whole page of music, from top to bottom. This reflects the way we read words in western culture.
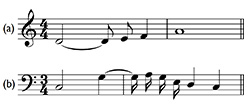
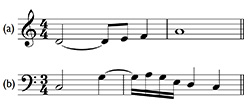
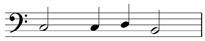
The letter, f, in a stylised form and in a mirror image, is now used as the bass or F clef.It signifies that a note placed on the second line from the top is F, and specifically the F below middle C (see Example 5).
Example 5

2.3 The great staff
We can call a staff with a treble clef a treble staff for short, and a staff with a bass clef a bass staff. And if we place the former above the latter and insert an additional line in between, we create what is called the great (or grand) staff as shown in Example 6.
Example 6
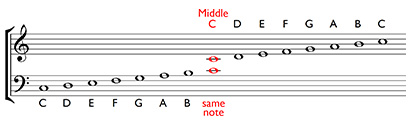
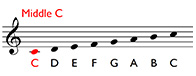
There are two points about the great staff. Firstly, it demonstrates the relationship between the bass and treble staves. Secondly, the additional line at the midway point is the line for middle C. The central importance in the great staff of the middle C line is one reason for middle C’s name, and its position roughly halfway along the keyboard is another.
2.4 Middle C and ledger lines
Sometimes keyboard music has been notated using very large staves. However, if you have too many lines, the staff is not easy to read. Therefore, with keyboard music, the treble and bass staves are conventionally separated out – there is a substantial gap between the bottom line of the treble staff and the top line of the bass staff and there is no middle C line. Instead, middle C is notated using a ledger line. Middle C has its own little section of staff, long enough to make the position of the note clear, and this has to be written in for each of its appearances.
While this separation of the upper and lower staves is a good idea because it helps visual orientation, it has a drawback. And that is that middle C can be notated on both staves, in different positions on each staff. Example 7 shows that (i) the different visual positions of middle C on each staff represent one and the same sound and (ii) the gradual incline of the pattern of the notes as the pitch rises is fractured temporarily.
Example 7
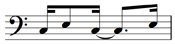
Other notes close to middle C can also be notated on either staff by using more and more ledger lines (Example 8).
Example 8
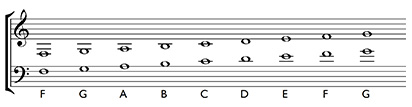
Choosing which staff to use depends on the context. For instance, if you were notating a violin part, you would need the treble staff. So if you wanted to write the lowest note on the violin, the lower G on the top staff in Example 8, you would need the G that sits below the upper staff and has two ledger lines.
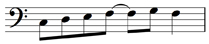
The concept of ledger lines can also be applied at the top of the treble staff and at the bottom of the bass staff (Example 9).
Example 9

However, the more ledger lines you use, the more difficult it is to read the notes at a glance, and you have to ‘count up’ the ledger lines – together with the spaces between them – to work out what the note is, and this can be a laborious process.
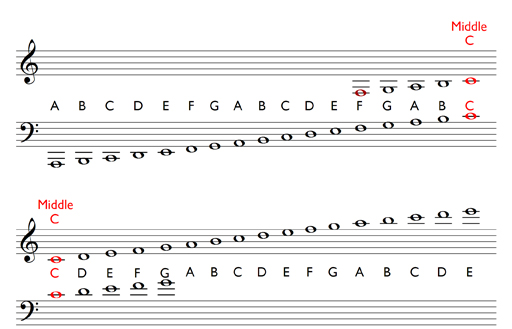
Example 10 shows all the note names mentioned above.
Example 10
2.5 Writing notes
Although much of the note-writing in Inside music involves using the software package, Sibelius First, it is worthwhile considering briefly the conventions used when writing staff notation by hand on manuscript paper (the name for pages with staves printed on them). Fundamentally, when writing music, you are trying to communicate with a reader and legibility is therefore important.
You should bear in mind the following guidelines when writing notes on paper.
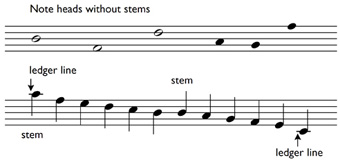
- Note heads are oval in shape (some open, some filled in – we’ll see the reason for this later) and should sit centrally on a line or in a space so that no confusion can arise as to the pitch notated.
- Most notes also need stems, and these should be vertical and should be roughly the same height as the height of the staff.
- In addition, note stems should go down on the left-hand side for note heads on the top two lines of the staff and in the top two spaces, and up on the right-hand side for note heads on the bottom two lines and in the bottom two spaces. Stems for note heads on the middle line can go up or down.
- Ledger lines should run parallel to the lines of the staff.
Example 11 provides examples of these points.
Example 11
2.6 Reading notes
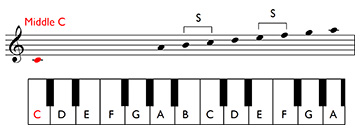
How do you become proficient at reading notes? This takes time and practice. You really need to practise for a few minutes each day, identifying notes on both the treble and bass staves, including notes that are written both above and below these staves with up to three ledger lines.
However, there is a tradition with staff notation of using mnemonics to remember the names of the notes on the staves. Two of these are impossible to beat: FACE for the spaces on the treble staff from bottom to top, and All Cows Eat Grass for the spaces on the bass staff from bottom to top (Example 12).
Example 12
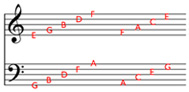
For the lines on the staves, from bottom to top, perhaps you could create your own mnemonic based on the letters E… G… B… D… F… for the treble staff and G… B… D… F… A… for the bass.
Mnemonics are useful and help accelerate the learning process.
2.7 Review 1
Once you feel you are familiar with the position of the notes on the treble and bass staves, try the following activities.
If you find these activities difficult, do not be disheartened. Remember that in order to be able to read the names of notes at a glance requires practice over a period of time. Some people find reading symbolic languages easier than others, but everyone has to spend some time in order to become familiar with note names. Of course, if you play an instrument and read notation on a daily basis, then that is a great help when learning note names. However, don’t forget the usefulness of mnemonics and trainers (Section 10). In addition, regular application, a little at a time, is the best approach.
Group 1 tests your knowledge of writing notes, Groups 2–4 test your reading of note names on the treble and bass staves and Groups 5 and 6 test your reading of notes with up to three ledger lines.
Group 1: writing notes
Activity
a.
Note heads are circular in shape.
b.
A stem for a note head on the second space from the top of the staff goes down on the right-hand side.
c.
A stem for a note head on the second space from the top of the staff goes down on the left-hand side.
d.
Ledger lines are horizontal.
e.
A stem for a note head on the bottom line of the staff goes up on the left-hand side.
f.
A stem for a note head on the middle line of the staff can go up or down.
g.
Note heads are oval in shape.
The correct answers are c, d, f and g.
Group 2: identifying note names on the treble staff
Activity 1
a.
1
b.
2
c.
3
The correct answer is b.
Answer
2 is correct. On the treble staff, the pitch in the third space from the bottom is C.
1 is incorrect. On the treble staff, the pitch in the second space from the bottom is A.
3 is incorrect. On the treble staff, the pitch on the second line from the bottom is G.
Activity 2
a.
1
b.
2
c.
3
The correct answer is c.
Answer
3 is correct. On the treble staff, the pitch on the fourth line from the bottom is D.
1 is incorrect. On the treble staff, the pitch on the bottom line is E.
2 is incorrect. On the treble staff, the pitch on the middle line is B.
Activity 3
a.
1
b.
2
c.
3
The correct answer is a.
Answer
1 is correct. On the treble staff, the pitch on the second line from the bottom is G.
2 is incorrect. On the treble staff, the pitch in the bottom space is F.
3 is incorrect. On the treble staff, the pitch in the top space is E.
Activity 4
a.
1
b.
2
c.
3
The correct answer is c.
Answer
3 is correct. On the treble staff, the pitch on the top line is F.
1 is incorrect. On the treble staff, the pitch in the second space from the bottom is A.
2 is incorrect. On the treble staff, the pitch on the bottom line is E.
Group 3: identifying note names on the bass staff
Activity 1
a.
1
b.
2
c.
3
The correct answer is b.
Answer
2 is correct. On the bass staff, the pitch in the third space from the bottom is E.
1 is incorrect. On the bass staff, the pitch in the second space from the bottom is C.
3 is incorrect. On the bass staff, the pitch on the top line is A.
Activity 2
a.
1
b.
2
c.
3
The correct answer is a.
Answer
1 is correct. On the bass staff, the pitch in the bottom space is A.
2 is incorrect. On the bass staff, the pitch on the fourth line from the bottom is F.
3 is incorrect. On the bass staff, the pitch in the top space is G.
Activity 3
a.
1
b.
2
c.
3
The correct answer is b.
Answer
2 is correct. On the bass staff, the pitch on the middle line is D.
1 is incorrect. On the bass staff, the pitch on the second line from the bottom is B.
3 is incorrect. On the bass staff, the pitch on the bottom line is G.
Activity 4
a.
1
b.
2
c.
3
The correct answer is c.
Answer
3 is correct. On the bass staff, the pitch on the top line is A.
1 is incorrect. On the bass staff, the pitch on the fourth line from the bottom is F.
2 is incorrect. On the bass staff, the pitch on the second line from the bottom is B.
Group 4: identifying clefs for notes on both the treble and bass staves
Activity 1
Match ‘Treble clef’ and ‘Bass clef’ to the notes to make them A and D.
Using the following two lists, match each numbered item with the correct letter.
Treble clef
Bass clef
a.

b.

- 1 = b
- 2 = a
Activity 2
Match ‘Treble clef’ and ‘Bass clef’ to the notes to make them C and F.
Using the following two lists, match each numbered item with the correct letter.
Bass clef
Treble clef
a.

b.

- 1 = a
- 2 = b
Activity 3
Match ‘Treble clef’ and ‘Bass clef’ to the notes to make them E and A.
Using the following two lists, match each numbered item with the correct letter.
Treble clef
Bass clef
a.

b.

- 1 = a
- 2 = b
Activity 4
Match ‘Treble clef’ and ‘Bass clef’ to the notes to make them G and F.
Using the following two lists, match each numbered item with the correct letter.
Bass clef
Treble clef
a.

b.

- 1 = a
- 2 = b
Group 5: identifying note names of notes with ledger lines
Activity 1
a.
1
b.
2
c.
3
The correct answer is c.
Answer
1 is incorrect. The pitch that sits below the first ledger line below the treble staff is B.
2 is incorrect. The pitch that sits below the second ledger line below the bass staff is B.
3 is correct. The pitch on the first ledger line above the treble staff is A.
Activity 2
a.
1
b.
2
c.
3
The correct answer is c.
Answer
3 is correct. The pitch on the first ledger line below the bass staff is E.
1 is incorrect. The pitch on the first ledger line above the bass staff is C.
2 is incorrect. The pitch above the first ledger line above the treble staff is B.
Activity 3
a.
1
b.
2
c.
3
The correct answer is b.
Answer
2 is correct. The pitch below the first ledger line below the bass staff is D.
1 is incorrect. The pitch on the third ledger line above the treble clef is E.
3 is incorrect. The pitch on the first ledger line above the treble clef is A.
Group 6: identifying more note names of notes with ledger lines
Activity 1
a.
Yes
b.
No
The correct answer is b.
b.
The note on the second ledger line below the treble staff is the A below middle C; the note above the top line of the bass staff is the B below middle C.
Activity 2
a.
Yes
b.
No
The correct answer is a.
a.
They are both the F above middle C.
3 Rhythm and metre
3.1 Time values
As well as a pitch name, each note has a rhythmic value, called a time value, note value or duration. Those most commonly found in present-day usage are shown in Example 13.
Example 13
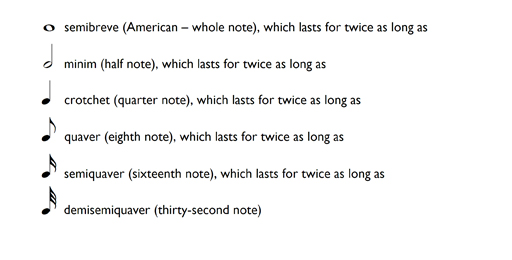
Notice that in order to differentiate these symbols for time values:
- all have stems apart from the semibreve
- the note heads of the semibreve and minim are open, whereas those for the shorter values are filled in
- the quaver has a flag (or tail), always drawn on the right-hand side of the stem, the semiquaver has two flags and the demisemiquaver, three.
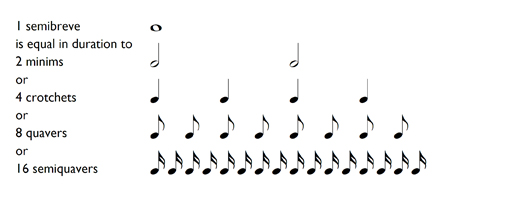
You will probably have noticed too that the duration of each time value is half that of the one above. Therefore two minims last the same duration as a semibreve; two crotchets last the same duration as a minim; and so on. This also means that four crotchets last the same duration as a semibreve, as do eight quavers or sixteen semiquavers. Example 14 maps out these relationships:
Example 14
3.2 Triplets
In Section 3.1, Example 14, you saw that as you move down the list of time values from semibreve to semiquaver, each successive time value is half the length of the one above (for example, you saw that a quaver is half the length of a crotchet). However, you can divide a time value not only by two but by any number you want. The most frequent division you will come across, the next in frequency to the default division of two, is where a time value is divided into three equal components – say a crotchet divided into three quavers or a minim divided into three crotchets. This is called a triplet. As you can see and hear in Example 15, the crotchet is divided into three triplet quavers, the minim into three triplet crotchets.
Example 15
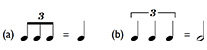
At this stage, you needn’t worry about this in any detail. However, notice in Example 15 how triplets are notated with a figure three over or under the relevant notes, the figure often being combined with either a curved line or square bracket.
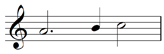
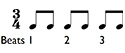
3.3 Time signatures
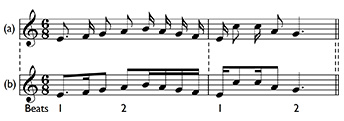
The rhythm of a piece of western music – whether it is simple or complex – is underpinned by a steady pulse or beat, and these beats are grouped together to give the music’s metre. The music examples in this section include a click track to help you follow the beats. The most common groupings are in twos, threes and fours and these groupings are created by a pattern of stronger and weaker stresses. Thus, a three-beat pattern would consist of strong-weak-weak beats. In notated music, each group is marked out by a bar line – so from now on we will talk about how many beats there are in each bar.
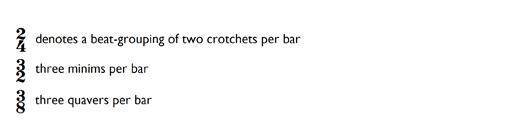
Time signatures, which consist of two numbers aligned vertically, are placed at the opening of a piece of music to signify which metre is being used. (The time signature is then omitted for the rest of the piece, unless it is changed to another.) In the time signatures discussed in this section, the lower figure can be understood as the value of each beat expressed in relation to a semibreve (whole note). The number 2 represents a minim (half note), 4 represents a crotchet (quarter note), 8 represents a quaver (eighth note), and so on. The upper figure tells you the number of beats in the bar.
- In 2/4 there are two crotchets per bar. The lower number, 4, represents a crotchet because there are 4 crotchets (quarter notes) in a semibreve (whole note), and the upper number tells you that there are 2 beats, i.e. two crotchets, in a bar.
- In 3/2 there are three minims per bar. The lower number, 2, represents a minim because there are 2 minims (half notes) in a semibreve, and the upper number tells you that there are 3 beats, i.e minims, in a bar.
- In 3/8 there are three quavers per bar. The lower number, 8, represents a quaver because there are 8 quavers (eighth notes) in a semibreve, and the upper number tells you that there are 3 beats, i.e. quavers, in a bar.
Example 16 summarises the meaning of these three time signatures.
Example 16
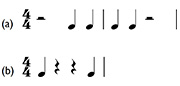
Example 17 shows various straightforward rhythms in different time signatures.
Example 17
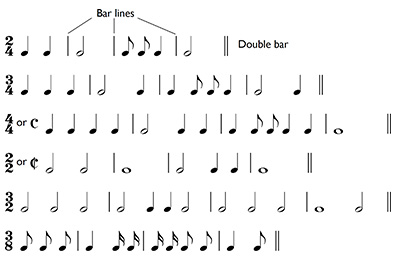
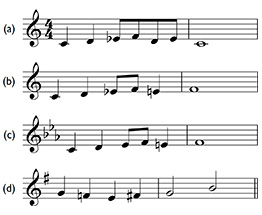
Notice in Example 17 that 4/4 can also be written as C (Common time), and 2/2 as a C with a vertical stroke through it (alla breve). Notice too that each bar includes the correct number of time values to make up the required number of beats shown by the upper number of the time signature, and that each bar’s group of beats is marked off with a bar line for ease of reading. Finally, the concluding bar line is written as a double bar.
Consider Example 17 carefully, spending as much time as you need in order to become proficient at adding together the number of beats in each bar, as signified by the top number of the time signature. (Pay particular attention when there are shorter values present such as quavers and semiquavers.) Additionally, make sure that you have identified the beat correctly as shown by the bottom number in the time signature – is it a minim (2), a crotchet (4) or a quaver (8)?
3.4 Review 2
The following activities begin with Group 1 – a series of activities that asks you to identify note values. In Group 2, one or more time values from a bar has been omitted, and you will therefore have to work out what they are. You need to be absolutely sure as to the length of each time value and how each fits together with the other time values in each bar.
Group 1: time values
Activity 1
a.
A minim has an open note head and a stem.
b.
A crotchet lasts twice as long as a quaver.
c.
Four semiquavers equal two crotchets in length.
d.
A semibreve lasts as long as four crotchets.
e.
A quaver has a flag drawn on the left-hand side of the stem.
f.
Six triplet quavers equal two crotchets in length.
g.
A demisemiquaver has three flags.
The correct answers are a, b, d, f and g.
Group 2: identifying omitted time value(s)
Activity 1
a.
quaver
b.
crotchet
c.
minim
The correct answer is b.
Answer
The time signature, 2/4, has two crotchet beats per bar. Since the first bar contains only one crotchet, another is needed.
Activity 2
a.
crotchet
b.
minim
c.
semibreve
The correct answer is c.
Answer
The time signature, 4/4, has four crotchet beats per bar. Since the second bar contains no rhythmic value, a semibreve (which is equal to four crotchets) is needed.
Activity 3
a.
quaver
b.
crochet
c.
minim
The correct answer is c.
Answer
The time signature, 3/4, has three crotchet beats per bar. Since the third bar contains only one crotchet, a minim (which is equal to two crotchets) is needed.
Activity 4
a.
quaver/crotchet
b.
quaver/minim
c.
crotchet/minim
The correct answer is b.
Answer
The time signature, 2/4, has two crotchet beats per bar. Since the second bar contains only a crotchet and a quaver, another quaver is needed to make up the two crotchet beats. The third bar lacks a value and therefore a minim (which is equal to two crotchets) is required.
Activity 5
a.
crotchet/minim
b.
crotchet/semibreve
c.
minim/semibreve
The correct answer is c.
Answer
The time signature, 4/4, has four crotchet beats per bar. Since the first bar contains only two crotchets, a minim (which is equal to two crotchets) is needed. The third bar lacks a value and therefore a semibreve (which is equal to four crotchets) is required.
Activity 6
a.
minim/quaver
b.
crotchet/quaver
c.
minim/crotchet
The correct answer is a.
Answer
The time signature, 3/4, has three crotchet beats per bar. Since the first bar contains only a crotchet, a minim (which is equal to two crotchets) is required. The second bar contains only a minim (which equals two crotchets) and a quaver, and therefore another quaver is needed to make up the three crotchet beats.
Activity 7
a.
semiquaver
b.
quaver
c.
crotchet
The correct answer is a.
Answer
The time signature, 3/8, has three quaver beats per bar. Since the first bar includes only two quavers and a semiquaver, another semiquaver is needed to make up the three quaver beats.
Activity 8
a.
crotchet
b.
minim
c.
semibreve
The correct answer is c.
Answer
The time signature, 3/2, has three minim beats per bar. Since the second bar includes only one minim, a semibreve (which equals two minims) is needed to make up the three minim beats.
3.5 Dots and ties
In Section 3.1, Example 14 we outlined the time values of each type of note. Here is a reminder of those note values:
Example 14 (repeated)
However, a time value of each type of note can be lengthened (and therefore changed) through the use of:
- a dot or
- a tie.
A dot after any value extends that value by half as much again. Therefore a dotted crotchet lasts for a crotchet plus a half a crotchet (i.e. a quaver). In other words, as shown in Example 18, it lasts for the duration of three quavers in total.
Example 18
The dot is placed to the right of the note head, in the same space if the note head is in a space, or above the line if a note head is on a line. Example 19 summarises these principles.
Example 19
As you learned in Section 3.3, bar lines mark off groups of beats according to the time signature. In 4/4 time, therefore, there cannot be any more than four beats per bar. If we want to extend a time value where the lengthened value crosses a bar line, a tie can be used, as shown in Example 20. In this particular example, the effect of the tie is the same as if we had used a dot: the value of the minim is increased by a half (because it is joined to a crotchet which is half the value of a minim).
Example 20
However, as shown in Example 21, a tie can also be used to increase a value by a different fraction. So as Example 21 (a) shows, a minim can be tied to a quaver, the quaver being a quarter of the minim’s value; and as shown in Example 21 (b), a crotchet can be tied to a semiquaver, the semiquaver being a quarter of the crotchet’s value. Either can take place within a bar or across a bar line.
Example 21
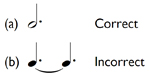
You can tie any number of adjacent notes together in this way – but the tied notes must always have the same pitch. The ties must also be placed on the ‘outside’ of the note heads as you can see in Example 21.
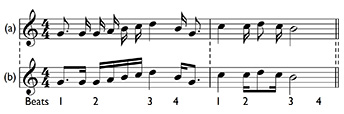
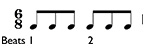
3.6 Grouping and beaming notes
So far, when writing notes with flags such as quavers and semiquavers, each one has been written separately. However, for ease of reading, groups of quavers and semiquavers are joined or ‘beamed’ together. Thus, the previous example should more properly be written as shown in Example 22. In Example 22 (a) the two quavers are beamed together with a single beam, and in Example 22 (b) the four semiquavers are beamed together with a double beam. (Demisemiquavers would need a triple beam.)
Example 22
In Example 22 (a) and (b) the beaming joins together notes that belong to a single beat, and this is a useful rule of thumb to follow when beaming notes together, especially with more complex examples, as demonstrated in Example 23, which shows one line of music twice – once unbeamed (Example 23 [a]) and once beamed (Example 23 [b]).
Example 23
However, the following groupings shown in Example 24 are also used. Although these groupings break the ‘show each beat’ rule, they are treated as conventions.
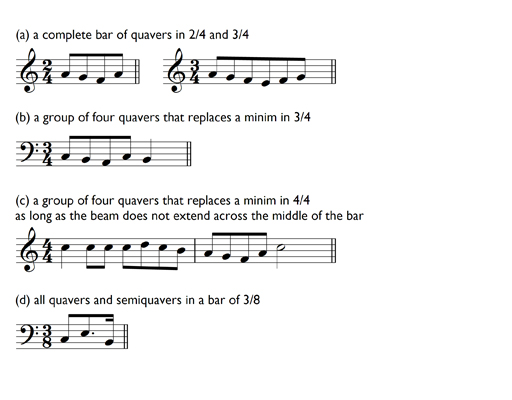
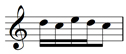
Conventions that break the ‘show each beat rule’
- Example 24 (a) Where there is a complete set of quavers in a bar of 2/4, these can be beamed together with one beam rather than with two beams as two sets of two quavers. A similar convention is allowed for a complete set of quavers in a bar of 3/4 – only one beam is needed.
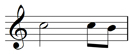
- Example 24 (b) In 3/4, where four quavers ‘replace’ a minim, only one beam is needed instead of two.
- Example 24 (c) Similarly, in 4/4, where four quavers ‘replace’ a minim, only one beam is needed instead of two. However, in 4/4, the beam joining the four quavers cannot extend across the middle of the bar.
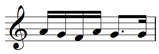
- Example 24 (d) In 3/8, all quavers and semiquavers in a bar can be beamed together.
Example 24
There are several exceptions to the ‘show each beat’ rule here and it will take you time to absorb them. Perhaps the best way to tackle this is to pause for a moment or two and examine Examples 23 and 24 carefully once more so that you become familiar with how the beaming looks visually. Sometimes visual information can be easier to access than verbal information, particularly if the latter is extensive and detailed. So pause for a little now, and make an effort to familiarise yourself visually with the beaming patterns.
3.7 Review 3
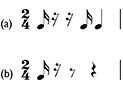
Now try the activities in Group 1 on time signatures and beaming covered so far in this section. What is the time signature for each of the five bars? First of all, identify the beat – is it a minim, crotchet or quaver? Then count how many beats there are in the bar. Where relevant, thinking about the beaming might help you.
Group 1: identifying time signatures
Activity
Match the time signatures, 3/2, 2/4, 3/4, 4/4 and 3/8 to bar numbers 1–5.
Using the following two lists, match each numbered item with the correct letter.
3/4
2/4
4/4
3/2
3/8
a.Bar 5
b.Bar 3

c.Bar 1
d.Bar 2
e.Bar 4
- 1 = c
- 2 = d
- 3 = b
- 4 = e
- 5 = a
Answer
Bar 1: 3/4 There are three crotchet beats made up from a minim plus two quavers.
Bar 2: 2/4 The beaming shows two crotchet beats.
Bar 3: 4/4 The time values add up to four crotchets in total. Notice that the first two quavers cannot be beamed together since the beam would cross the middle of the bar.
Bar 4: 3/2 The dotted minim plus crotchet gives two minims and the bar is completed with another minim.
Bar 5: 3/8 There are three quaver beats. Notice that the four semiquavers plus the quaver can all be beamed together.
3.8 More time signatures: compound time
The time signatures considered up to now – 2/4, 3/4, 4/4, 2/2, 3/2 and 3/8 – are all examples of simple time. In simple time, each beat can always be divided into twos, or multiples of two. And simple time signatures are described fully according to how many beats in a bar there are as follows:
- 2/4 and 2/2 are called simple duple time since there are two beats to each bar
- 3/8, 3/4 and 3/2 are called simple triple time since there are three beats to each bar, and
- 4/4 is called simple quadruple time since there are four beats to each bar.
Example 25 a shows a bar of 3/4 time, where there are three beats to the bar, and each beat is divided into two.
Example 25 (a)
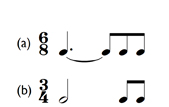
When the beat is divided into threes, the term compound time is used.
For example:
- in 6/8, there are 6 quavers per bar, but these 6 quavers are grouped in two groups of three – so it is called compound duple time. 6/4 is also called compound duple time, there are 6 crotchets per bar and these 6 crotchets are grouped in two sets of three.
- In 9/8 there are 9 quavers per bar, grouped in three groups of three – so it is called compound triple time.
- In 12/8 time there are 12 quavers per bar, grouped in four groups of three – so it is called compound quadruple time.
Example 25 (b) shows a bar of 6/8 time. There are two beats to the bar, and each beat is divided into three.
Example 25 (b)
But what is the reason for this different way of grouping the notes in each beat in compound time? This is because in compound time signatures, the beat is a dotted note such as a dotted minim (in say, 6/4) or a dotted crotchet (in, say, 6/8) rather than a minim or a crotchet in simple time signatures such as 3/2 or 3/4. We can see how this affects the beat division if we consider the bars of 3/4 time and 6/8 time together.
Examples 25 (a) and (b)
If we count the number of quavers in a bar of 3/4 and in a bar of 6/8, the answer is the same, six. However, in 3/4 there are three crotchet beats per bar, each beat divided into two quavers. In 6/8 there are two dotted crotchet beats per bar, each beat divided into three quavers. So 3/4 is simple triple time and 6/8 is compound duple time. In both art and popular music, composers have explored the variable beat produced by moving between these two time signatures.
3.9 Grouping and beaming notes in compound time
As with grouping notes within a single beat in simple time, beaming together quavers and semiquavers that belong to a single beat is a useful guideline to follow when grouping notes together in compound time. As you learned in the previous section, the beat in such compound time signatures as 6/8 or 9/8 is the dotted crotchet (equivalent to three quavers), so with these time signatures all quavers and semiquavers within a beat must be beamed in groups of three quavers. Example 26 shows how several notes that comprise a single beat are beamed together in 6/8 time.
Example 26
As you can see from Example 26, the extent of the beat is always shown in the beaming – each group of beamed notes adds up to three quavers (a dotted crotchet). Beaming together quavers in groups which do not add up to three quavers would suggest a different time signature where the extent of the beat is a different time value. Thus the rhythm in 6/8 in Example 27 (a) cannot be written as in Example 27 (b), because Example 27 (b) suggests 3/4 time. In Example 27 (b) the quavers are beamed together in twos rather than threes, and this signifies a crotchet beat and hence 3/4.
Example 27
When we consider time values that last for two beats rather than a single one in compound time, the ‘show the dotted beat rule’ no longer applies. For instance, time values that last for two beats in 6/8, 9/8 and 12/8 are written as Example 28 (a) rather than Example 28 (b).
Example 28
Hence, a note lasting a full bar in 6/8 is written as shown in Example 29.
Example 29
Finally, notice that a note lasting a full bar in 9/8 time is written as shown in Example 30, and in 12/8 time as in Example 31.
Example 30
Example 31
As with beaming in simple time, you can see that there is a set of conventions to follow when beaming in compound time. So, once again, take a few moments to study carefully the visual patterns involved in Examples 26 and 27.
3.10 Review 4
The following three groups of activities focus on identifying simple and compound time signatures, and time values in compound time.
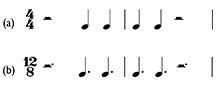
Group 1: identifying compound time signatures
Activity 1
Match the time signatures, 6/8, 9/8 and 12/8 to bar numbers 1–3.
When identifying compound time signatures, count how many dotted crotchet beats there are in a bar. Don’t forget that a dotted crotchet is equivalent to three quavers and that thinking about the beaming might help you.
Using the following two lists, match each numbered item with the correct letter.
6/8
9/8
12/8
a.Bar 2

b.Bar 1
c.Bar 3
- 1 = b
- 2 = a
- 3 = c
Answer
Bar 1 – 6/8. There are two dotted-crotchet beats in the bar. The beam joining the first three notes shows conveniently the extent of the first beat, and the straightforward crotchet/quaver rhythm comprises the second beat.
Bar 2 – 9/8. Despite the rhythmic complexity introduced by the ties, the beaming clearly shows three dotted-crotchet beats.
Bar 3 – 12/8. Notice that the rhythmic value that extends through the first two full dotted-crotchet beats is notated with a dotted minim (not two tied dotted crotchets), but the division of the second pair of dotted-crotchet beats has to be shown using a tie.
Group 2: identifying simple and compound time signatures
Activity 1
When identifying simple and compound time signatures, identify the beat first – is it, for example, a minim? Then count how many beats there are in the bar. Remember, too, to consider the beaming.
Match the time signatures, 3/2, 2/4, 3/4, 4/4, 6/8, 9/8 to bar numbers 1–6.
Using the following two lists, match each numbered item with the correct letter.
3/2
4/4
6/8
3/4
9/8
2/4
a.Bar 1
b.Bar 6
c.Bar 5

d.Bar 2
e.Bar 4
f.Bar 3
- 1 = a
- 2 = d
- 3 = f
- 4 = e
- 5 = c
- 6 = b
Answer
Bar 1:3/2 There are three minim beats in the bar.
Bar 2:4/4 There are four crotchet beats in the bar. Notice that the beaming for the quavers cannot extend across the middle of the bar.
Bar 3:6/8 The beaming shows the first dotted-crotchet beat, and the second consists of a quaver/crotchet rhythm.
Bar 4:3/4 Six quavers in 3/4 can all be beamed together. In 6/8 the beaming of the quavers would have to show the division of the bar into two dotted crotchets: the first three quavers and the last three would be beamed separately.
Bar 5:9/8 The beat is a dotted crotchet and there are three of them.
Bar 6:2/4 Despite the rhythmic complexity, the beaming shows two crotchet beats.
Group 3: identifying omitted time values in compound time
Activity 1
a.
crotchet/dotted crotchet
b.
crotchet/crotchet
c.
dotted crotchet/dotted crotchet
The correct answer is a.
Answer
The time signature, 6/8, has two dotted-crotchet beats per bar. In the first bar, following the first dotted-crotchet beat which is conveniently beamed, we need a crotchet to make up the second dotted-crotchet beat. The three quavers that open the second bar add up to another dotted-crotchet beat and therefore we need a dotted crotchet to complete the bar.
Activity 2
a.
dotted crotchet/dotted semibreve
b.
dotted minim/semibreve
c.
dotted minim/dotted semibreve
The correct answer is c.
Answer
The time signature, 12/8, has four dotted-crotchet beats per bar. In the first bar, since two dotted-crotchet beats are already present, another two are required. A single time value for this would be a dotted minim. The time value that would extend throughout the second bar is a dotted semibreve.
Activity 3
a.
crotchet/quaver
b.
crotchet/dotted crotchet
c.
crotchet/crotchet
The correct answer is c.
Answer
The time signature, 9/8, has three dotted-crotchet beats per bar. Since, in the first bar, the fourth and fifth quavers are not beamed together, they are showing the division between the second and third beats. Therefore the second beat needs a crotchet before the fourth quaver to make up the second dotted-crotchet beat and the third beat needs a crotchet after the fifth quaver to make up the third dotted-crotchet beat.
4 Rests
4.1 Values and dots
Just as sound is important in music, so is silence, and therefore every time value has an equivalent symbol for silence – a rest. Here they are in Example 32:
Example 32
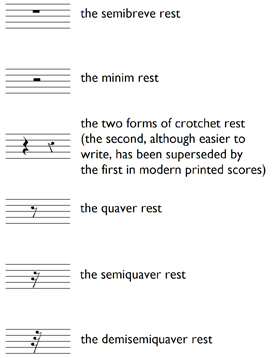
Notice that the number of flags on the quaver, semiquaver and demisemiquaver rests is the same as the number of flags for their respective time values. In addition, the crotchet, quaver, semiquaver and demisemiquaver rests sit in the middle of the staff.
The same principle regarding dots applies to rests as well as to time values – the dot makes the rest half as long again. And the dot is placed after the rest in the third space from the bottom. Example 33 shows these principles in action.
Example 33
4.2 Grouping rests
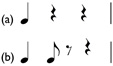
When grouping notes, we saw that the main aim was to achieve ease of reading. The same applies when grouping rests, although there are some exceptions to this rule, which are explained below. Generally, however, the rule of showing each beat still applies. Thus, in a bar of 3/4, a crotchet is not followed by a minim rest, but by two crotchet rests, as shown in Example 34 (a). And a crotchet and quaver are followed, not by a dotted crotchet rest, but by a quaver and a crotchet rest, as shown in Example 34 (b). Each beat is shown clearly.
Example 34
Grouping rests: the exceptions to the ‘show each beat’ rule
In a bar of 4/4, if two crotchets are either preceded or followed by two crotchets-worth of rests, then a minim rest can be used – as Example 35 (a) shows. This rule reflects the rule for beaming four quavers in 4/4, since, as we noted in Section 3.6, you can beam together a minims-worth of quavers.
In 4/4, you also cannot group rests across the middle of a bar. Crotchets at each end of a 4/4 bar are separated by two crotchet rests and not a minim rest, as shown in Example 35 (b). This is a similar concept to the rules for beaming quavers in 4/4 – you cannot beam across the middle of a bar.
Example 35
Where rests are included that total less than a beat, you need to group in half-beats. Therefore, two semiquavers at each end of a crotchet beat should be separated by two semiquaver rests, not a quaver rest, as shown in Example 36 (a). And a single opening semiquaver should be followed by a semiquaver rest and then a quaver rest, as shown in Example 36 (b).
Example 36
Again, as with the previous discussions of grouping note values, this grouping of rests might seem unnecessarily complicated. But the overall aim with grouping both note values and rests is to try to ensure that the graphic layout on the page is as easily readable as possible (once, that is, you have learned the rules and the exceptions to the rules!). Therefore, the design of staff notation has evolved so that the reader can recognise not only each individual note, but ‘blocks’ of information, such as that contained in each beat, or even in each bar. This helps to facilitate the reading process, which is particularly important in fast tempos.
4.3 Grouping rests in compound time
In compound time, you should follow the ‘show each beat’ principle as in simple time. As you learned in Section 3.8, when dealing with such compound time signatures as 6/8, 9/8 and 12/8, the beat is a dotted crotchet, so each beat’s rest can be written either as a dotted crotchet rest or as a crotchet rest followed by a quaver rest, as in Example 37.
Example 37
However, in 12/8, which has four beats per bar like 4/4, two dotted crotchet-beat rests at either the beginning or the end of the bar can be written as dotted minim rests, as in Example 38.
Example 38
You can see the parallel with 4/4 – Example 39 shows the 4/4 example (Example 35) compared with the 12/8 example.
Example 39
4.4 More on grouping rests
In general it is better to write as few rests as possible bearing in mind the show each beat rule (and with such small time values as semiquaver rests, the show each half beat rule shown in Section 4.2 in Example 36). When you have to read more than three or four quaver or semiquaver rests in a row, or indeed a mixture of these, it is difficult to assess quickly just how long the cumulative length of these rests should be. Therefore, providing you follow the rules for grouping and the exceptions to these, use as few rests as possible.
Occasionally, and rather intriguingly, you can have a rest within a beat that is beamed, as shown in Example 40. This makes the beat easier to read.
Example 40
Finally, the only saving grace about grouping rests, is:
For every time signature we’ve discussed, a rest for a whole bar is a semibreve rest, even for compound time signatures.
With the grouping of rests it takes time to become adept at organising each beat correctly. As with beaming, you will become familiar with how rests are grouped through looking at music on a regular basis. You will find that you gradually absorb the visual patterns created by the grouping of rests to the point where you can spot immediately a rest that has been used incorrectly. But this takes time, of course. Even so, try the following three groups of activities in which you are asked to identify missing rests. These exercises will help you to come to grips with at least some of the conventions involved.
4.5 Review 5
Group 1: identifying a single omitted rest in simple time
Activity 1
a.
quaver rest
b.
crotchet rest
c.
minim rest
The correct answer is c.
Answer
Since the two crotchets take up the first half of the first bar in 4/4, the second half can have a minim rest.
Activity 2
a.
quaver rest
b.
crotchet rest
c.
minim rest
The correct answer is b.
Answer
Since there is already a minim in the second bar, a crotchet rest is needed in 3/4 to make three crotchet beats overall.
Activity 3
a.
semiquaver rest
b.
quaver rest
c.
crotchet rest
The correct answer is a.
Answer
The second beat in the first bar already contains a semiquaver together with a quaver. Therefore a semiquaver rest is needed to complete the second beat.
Group 2: identifying two single omitted rests in either compound or simple time
Activity 1
a.
semiquaver rest/dotted minim rest
b.
quaver rest/dotted minim rest
c.
quaver rest/semibreve rest
The correct answer is c.
Answer
The second beat in the first bar consists of a crotchet and therefore needs a quaver rest to make up the dotted crotchet beat in 6/8. For the second bar, a whole bar’s rest in 6/8 is written as a semibreve rest.
Activity 2
a.
quaver rest/semibreve rest
b.
quaver rest/dotted minim rest
c.
semiquaver rest/dotted minim rest
The correct answer is a.
Answer
Since the time values in the first bar add up to two and a half crotchet beats, a quaver rest is required to complete the bar. For the second bar, a whole bar’s rest in 3/4 is written as a semibreve rest.
Group 3: identifying three single omitted rests in either simple or compound time
Activity 1
a.
crotchet rest/quaver rest/dotted crotchet rest
b.
crotchet rest/crotchet rest/crotchet rest
c.
quaver rest/quaver rest/dotted crotchet rest
The correct answer is a.
Answer
Since the first and third beats in the first bar consist of two dotted crotchets, the two missing rests need to add up to a dotted crotchet – a crotchet rest plus a quaver rest – thereby completing the bar in 9/8. The second bar also consists of time values that total two dotted crotchets and therefore a dotted crotchet rest is needed to make up the bar.
Activity 2
a.
crotchet rest/crotchet rest/minim rest
b.
quaver rest/quaver rest/dotted minim rest
c.
quaver rest/crotchet rest/dotted minim rest
The correct answer is c.
Answer
Since the beat is a dotted crotchet in 12/8, the first beat needs a quaver rest to complete it, and the fourth beat a crotchet rest. (Notice how in the first bar the two quavers are not beamed together. Therefore the second quaver marks the beginning of the fourth beat.) A dotted minim rest, which lasts for two dotted crotchet beats, is required to complete the second bar, which already includes a dotted minim extending across the first two dotted crotchet beats in the bar.
Activity 3
a.
semiquaver rest/quaver rest/quaver rest
b.
semiquaver rest/semiquaver rest/quaver rest
c.
quaver rest/semiquaver rest/crotchet rest
The correct answer is b.
Answer
Since the first beat in the first bar begins and ends with a semiquaver, two semiquaver rests are needed to make up the first crotchet. (Remember the guideline: where rests totalling less than a beat are included, group in half-beats.) And since the first beat in the second bar begins with a quaver, a quaver rest is needed to make up the crotchet beat.
5 Pitch
5.1 Notes of the bass and treble staves: a reminder
Having considered rhythm, metre and rests in Sections 3 and 4, we can now return to the discussion of pitch, begun in Section 2, and examine how scales and key signatures are formed.
In Section 2 you’ll remember that we looked at the treble and bass staves and the role of clefs. We also identified note names from the bottom of the bass staff to the top of the treble staff. Finally we looked at the use of ledger lines up to a maximum of three, both above and below the treble and bass staves. Here, as a reminder, is the complete range of notes that we identified.
Example 10 (repeated)
5.2 Semitones and tones, and the scale of C major
If we take a section of the complete range of notes we named, starting at middle C and proceeding up to one of the other Cs, we have the ascending scale of C major (Example 41).
Example 41
Visually, the steady progression of the note heads climbing up the staff suggests that the note heads and the sounds that they signify are equidistant from each other. This idea seems reinforced if you play the scale on a keyboard – you simply play up the white notes from middle C up to the next C.
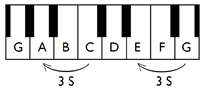
However, you will spot immediately from Example 42 that there are black notes on the keyboard as well as the white ones. You will also notice that although these are set back from the white ones, they alternate with the white ones, or at least do so for much of the time.
Example 42
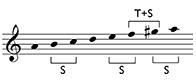
For instance, you can see from Example 42 that there is a black note between the C and the D, and then another one between the D and the E. But there isn’t one between the E and the F. As we shall see in a moment, this is crucial.
The distance between two notes is called an interval, and the interval between the C and the black note set slightly back and to its right is a semitone. The interval between this black note and the D is also a semitone. Two semitones add up to a larger interval, called a tone, and so, because we have gone up two semitones in total, the interval between C and D is a tone. The interval between D and E is also a tone – we’ve seen that there is also a black note set between these two notes. However, between E and F there is no black note, and so the interval here is only a semitone.
If we now continue up the scale to the next C, we can identify the intervals between each pair of notes:
| C–D | Tone | |
| D–E | Tone | |
| E–F | Semitone | no black note in between |
| F–G | Tone | |
| G–A | Tone | |
| A–B | Tone | |
| B–C | Semitone | no black note in between |
This pattern of tones and semitones – we can represent it symbolically as T T S T T T S – provides the structure of the C major scale, and all major scales. It is therefore a good idea to memorise this structure (which is called the intervallic structure of the major scale).
5.3 Semitones and tones, and the scale of G major
We saw in the previous section that if we start at middle C and follow the T T S T T T S pattern we generate the scale of C major. Middle C (and any other C) in the C major scale is called the tonic or key note – it tells you the key. What if we start on a different note, a different tonic? If we begin on G instead and follow the same intervallic structure, we generate the following notes:
| G–A | Tone |
| A–B | Tone |
| B–C | Semitone |
| C–D | Tone |
| D–E | Tone |
| E–F♯ | Tone |
| F♯–G | Semitone |
The notes generated are the same as for C major, except for one. There is an F♯ instead of an F. (Example 43).
Example 43
The qualifying label, ‘sharp’, indicates that the note has been raised a semitone, and this is represented by the symbol, #, placed before the note and on the same line or in the same space as the note head. We needed to raise the F a semitone to F♯ because the interval required at this point in the pattern is a tone. E–F, as we know from our examination of the scale of C major, is only a semitone; we therefore need an additional semitone to make up the tone required by the pattern, T T S T T T S. And a tone above E is not F, but F♯.
Summary: tones, semitones and scales
- i.The intervallic structure for all major scales is T T S T T T S.
- ii.We can therefore use this pattern to generate a major scale starting on any note – after our examination of C major, we tried a G.
- iii.The major scales generated, apart from C major, will use a mixture of white and black notes on a keyboard.
5.4 Major scales having key signatures with sharps
Example 44 shows the major scales starting on C, G, D, A and E.
Example 44
Notice, firstly, that:
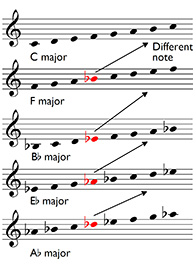
If we compare two scales that lie next to each other in the list, for instance, C major and G major, the only different note in the lower scale is the seventh note.
Both scales contain Cs, Ds, Es and so on, but in G major, we have F♯ (and not F as in C major) and this F♯ is the seventh note up the G major scale. Similarly, the note in D major that is different from those in G major is C♯, also the seventh note, and so on.
Secondly, notice that:
In each scale, the number of notes prefaced by sharps increases by one each time. C major has none, G major has one note prefaced by a sharp, D major two, A major three and E major four.
In order to avoid writing a sharp before every F in, say, a piece in G major (that is, a piece based on the scale of G major), a key signature, as shown in Example 45, is supplied at the beginning of each staff. At the opening of a piece, the key signature comes after the clef but before the time signature. The patterning of the sharps in the key signatures is logical, at least as far as four sharps. However, only the F♯ on the top line of the treble staff is shown, not the F♯ in the bottom space, and, similarly, only the C♯ in the third space from the bottom is written in, not the C♯ on the first ledger line below the staff. Although this is far from logical, it at least simplifies the visual information being presented.
Example 45
Before leaving this section, have another look at Example 44, and confirm how each scale is generated by the T T S T T T S pattern. Also, identify which notes need sharps in the different scales. Then consider the key signatures in Example 45 and how these relate to the scales in Example 44.
5.5 Semitones and tones and the scale of F major
So far, the scales we have discussed have, apart from C major, included notes prefaced by sharps. However, if we start a scale on notes different from those we’ve already tried, the generating pattern T T S T T T S can involve the use of flats instead of sharps. You’ll remember that a sharpraises a note by a semitone; conversely, a flat, shown by the symbol, ♭ , lowers a note by a semitone. As with the sharp sign, #, the flat sign, ♭, is written before the note to which it applies, and is placed on the same line or in the same space as the note head. Both sharps and flats are called accidentals and will be covered in more detail in Section 6.
Here is the series of notes generated if we start on F:
| F–G | Tone |
| G–A | Tone |
| A–B♭ | Semitone |
| B♭–C | Tone |
| C–D | Tone |
| D–E | Tone |
| E–F | Semitone |
Here, the only note that is different from those in C major is the B♭. (C major has B.) But B♭ was necessary here because the third interval in the T T S T T T S pattern is a semitone, not a tone, and therefore the note a semitone below B is required, i.e. B♭, not B. On a keyboard, as you can see from Example 46, this is the black note set back between A and B.
Example 46
You may have wondered why one black note is a sharp (as we saw with F♯) and another is a flat, the B♭. The answer is that notes on a keyboard can be called different things depending on their context. Major (and, as we shall see, minor) scales are seven-note (heptatonic) scales, and each note has a different letter name. Thus, the seven letter names in F major are F G A B(♭) C D E. They are not called F G A A(♯) C D E, because this would mean A comes twice and there is no B. On the keyboard, then, B♭ and A♯ are the same note, but when writing the scale of F major, B♭ is used, not A♯.
5.6 Major scales having key signatures with flats
Example 47 shows the major scales starting on C, F, B♭, E♭ and A♭.
Example 47
Again, as with the group of major scales with sharps in Example 44, there are two points worth noting.
Firstly:
If we compare two scales that lie next to each other in the list, for instance, C major and F major, the only different note in the lower scale is the fourth note.
Both scales contain Cs, Ds, Es and so on, but in F major, we have B♭ (and not B as in C major), and this B♭ is the fourth note up the F major scale. Similarly, the note in B flat major that is different from those in F major is E♭, also the fourth note, and so on.
Secondly:
In each scale, the number of different notes prefaced by flats increases by one each time. C major has none, F major has one note prefaced by a flat, B flat major two, E flat major three and A flat major four.
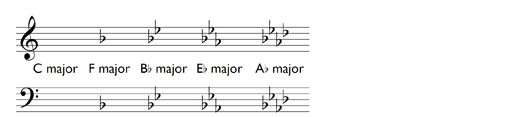
Example 48 shows the key signatures for these keys.
Example 48
Now that we have discussed the major scales with up to four sharp and four flat key signatures, have a look at the summary chart of these scales and their key signatures in Example 49. Work through this chart at a pace that allows you to pass quickly over those scales that you feel you know, but spend more time over those you are less sure of. Always bear in mind the overriding principle – T T S T T T S.
Example 49

Now try the following two activities that assess your knowledge of key signatures of up to four flats or four sharps, and of the major scales that have these key signatures.
5.7 Review 6
Group 1: identifying key signatures of up to four sharps or four flats
Activity 1
Match the keys of C major, G major, D major, A major, F major, A flat major to the key signatures below.
Using the following two lists, match each numbered item with the correct letter.
G major
F major
A major
C major
A flat major
D major
a.

b.

c.

d.

e.

f.

- 1 = b
- 2 = e
- 3 = c
- 4 = a
- 5 = d
- 6 = f
Answer
G major The key signature for G major has one sharp.
F major The key signature for F major has one flat.
A major The key signature for A major has three sharps.
C major The key signature for C major has neither sharps nor flats.
A flat major The key signature for A flat major has four flats.
D major The key signature for D major has two sharps.
Group 2: identifying major scales with key signatures of up to four sharps and four flats
Activity 1
Match the key signatures of one sharp, two sharps, one flat, two flats to the major scales below. With each activity, don’t forget to check which clef is being used. Each scale starts on its tonic or key note.
Using the following two lists, match each numbered item with the correct letter.
Two sharps
Two flats
One flat
One sharp
a.

b.

c.

d.

- 1 = d
- 2 = a
- 3 = c
- 4 = b
Answer
D major You need to add a key signature of two sharps to make this a D major scale beginning on the tonic.
B flat major You need to add a key signature of two flats to make this a B flat major scale beginning on the tonic.
F major You need to add a key signature of one flat to make this an F major scale beginning on the tonic.
G major You need to add a key signature of one sharp to make this a G major scale beginning on the tonic.
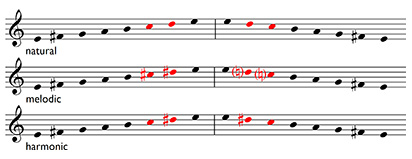
5.8 Minor scales: the natural form
The major scale is only one of the group of scales used in both western art and western popular music as the basis of composition. Another is the minor scale. As we’ve seen, the major scale has only one form generated by the intervallic pattern, T T S T T T S. By contrast, the minor scale has three forms, which all use the same key signature:
- natural
- melodic
- harmonic.
We know that the key signature for C major has no sharps or flats. For the A minor scale, this is the same. Here is the natural form of the scale:
Example 50
You’ll notice that it is similar to the major scale in that it can be played on a keyboard using only the white notes. The only difference is that it begins not on C, but on A. However, this alters the intervallic structure. Instead of T T S T T T S, we get:
| A–B | Tone |
| B–C | Semitone |
| C–D | Tone |
| D–E | Tone |
| E–F | Semitone |
| F–G | Tone |
| G–A | Tone |
We can represent this symbolically as T S T T S T T.
5.9 Minor scales: the melodic and harmonic forms
The second form of the A minor scale, the melodic form, has two types of intervallic structure – the ascending structure is different from the descending structure. The descending pattern is the same as the natural form covered in the previous section. The ascending pattern is as shown below:
| A–B | Tone |
| B–C | Semitone |
| C–D | Tone |
| D–E | Tone |
| E–F♯ | Tone |
| F♯–G♯ | Tone |
| G♯–A | Semitone |
Symbolically, this ascending structure can be represented as T S T T T T S.
Example 51 shows the A minor melodic scale, both ascending and descending.
Example 51

In the ascending version, notice that the need to raise both the F and the G to F♯ and G♯ respectively does not affect the key signature – these sharpened notes are simply ignored. Instead, when F♯s or G♯s are required in the music, the sharps have to be written in for each note, or at least as often as is necessary. We’ll consider the guidelines for how to deal with this in Section 6 on accidentals and we’ll also discuss the role of another accidental, the natural, shown by the symbol ♮. In Example 51, the bracketed naturals remind us that, whereas in the ascending scale the F and G become F♯ and G♯ respectively, in the descending form the G and F remain as G and F.
The third and final form of the A minor scale is the harmonic minor (which has the same intervallic structure both ascending and descending). It contains elements from both the ascending form of the melodic minor (the G♯) and the descending form (the F). The consequence of this is that the interval between F and G♯ is a tone plus a semitone, an interval that we haven’t met in a scale before:
| A–B | Tone |
| B–C | Semitone |
| C–D | Tone |
| D–E | Tone |
| E–F | Semitone |
| F–G♯ | Tone + semitone |
| G♯–A | Semitone |
Symbolically, this ascending structure can be represented as T S T T S T + S S.
The A minor harmonic scale is shown in Example 52. Again, the need to raise the G to G♯ does not affect the key signature, which, as you know, has no sharps or flats.
Example 52
It is true that minor scales are more complicated than major ones. However, the differences between the three forms are less complex than a quick glance might suggest. If we compare the three forms of the A minor scale (see Example 53), you can see that these differences relate to only two questions: (i) whether the sixth note and/or seventh note up the scale is sharpened, and (ii) whether the ascending and descending forms of the scale are the same. So the differences are not as great as it might first appear. The first five notes of each of the three forms (when ascending, and the last five notes when descending) are exactly the same, and, as noted earlier, the descending form of the melodic minor has the same intervallic structure as the natural minor.
Example 53

5.10 Relative minor and relative major
Because the scales of C major and A minor have the same key signature, they are clearly related. Indeed, the key of A minor is called the relative minor of C major. Conversely, C major is called the relative major of A minor. If we look at the relationship between C and A on a keyboard in Example 54, we can count the number of semitones between them (it’s quicker to do this counting from C down to A rather than C up to the higher A). The result is three – C–B, B–B♭, B♭–A. So the relative minor of a major key, and the minor key that has the same key signature, is three semitones lower than its major counterpart.
By following this principle, we can work out the relative minor key of G major, the second major key we examined in Section 5.3. Look at Example 54 again. Three semitones down from G, namely: G–F♯, F♯–F and F–E is E. E minor is thus the relative minor of G major and has the same key signature, one sharp.
Example 54
If we now follow the intervallic patterns we discovered in the various forms of the minor scale – the pattern of the natural form was T S T T S T T, for instance – we can generate the three forms of the E minor scale shown in Example 55. Fundamentally, we have only one different note from those we had in the scale of A minor, the F♯. However, with the three different forms (natural, harmonic and melodic) the same question arises with regards to the sixth and seventh notes up the scale – should one or both be sharpened or not?
Example 55
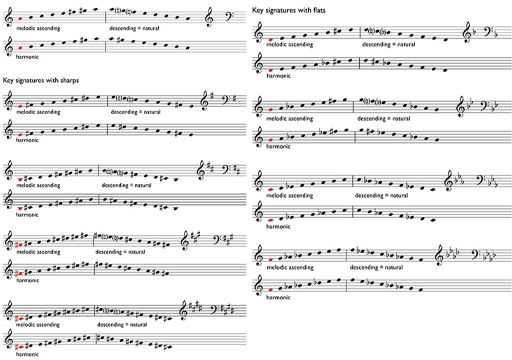
You can find a summary chart of the minor scales with up to four-sharp and four-flat key signatures in Example 56. Study this carefully – minor scales, especially those with three or four flats or sharps, are more difficult to grasp than their relative-major counterparts. So take time over this.
Example 56
The following two activities assess your knowledge of minor key signatures of up to four flats and four sharps, and of the minor scales that have these key signatures. Try them now.
5.11 Review 7
Group 1: identifying minor key signatures of up to four sharps or four flats
Activity 1
Match the keys of C minor, G minor, D minor, E minor, B minor, F minor to the key signatures.
Using the following two lists, match each numbered item with the correct letter.
E minor
D minor
G minor
C minor
F minor
B minor
a.

b.

c.

d.

e.

f.

- 1 = c
- 2 = f
- 3 = a
- 4 = b
- 5 = d
- 6 = e
Answer
E minor The key signature for E minor has one sharp. Remember that if you wrote out the three forms of the E minor scale, you would have to consider whether to sharpen the sixth and/or seventh notes of the different forms of the scale. If you wish, refer to the chart of minor scales (Example 56) to check how to write out the three forms of this scale.
D minor The key signature for D minor has one flat. As in the previous example, if you wrote out the three forms of the D minor scale, you would have to consider whether to sharpen the sixth and/or seventh notes of the different forms of the scale. Note that, since the sixth note of the scale is B♭, to sharpen it, i.e. to raise it a semitone, would bring you to B (not B♯). Check this by referring to the chart of minor scales (Example 56).
G minor The key signature for G minor has two flats. You might want to refer to the chart of minor scales (Example 56) to check how to write out the three forms of this scale.
C minor The key signature for C minor has three flats. You might wish to refer to the chart of minor scales (Example 56) to check how to write out the three forms of this scale.
F minor The key signature for F minor has four flats. Refer to the chart of minor scales (Example 56) to check how to write out the three forms of this scale.
B minor The key signature for B minor has two sharps. If you wish, refer to the chart of minor scales (Example 56) to check how to write out the three forms of this scale.
Group 2: identifying minor scales with key signatures of up to four sharps and four flats
Activity 1
Match the key signatures of one sharp, two sharps, one flat, three flats to the scales below.
With each activity, don’t forget to check which clef is being used. Each scale starts on the tonic or key-note.
Using the following two lists, match each numbered item with the correct letter.
One flat
Two sharps
One sharp
Three flats
a.

b.

c.

d.

- 1 = c
- 2 = b
- 3 = a
- 4 = d
Answer
D minor You need to add a key signature of one flat to make this a D minor scale starting on the tonic. The C♯ in the second bar is the sharpened seventh making this the harmonic form of the D minor scale.
B minor You need to add a key signature of two sharps to make this a B minor scale starting on the tonic. Both the sixth and seventh notes of the scale are sharpened which means that this is the ascending melodic form of the scale.
E minor You need to add a key signature of one sharp to make this an E minor scale starting on the tonic. Neither the sixth nor seventh notes of the scale are sharpened making this the descending melodic or natural form of the scale (remember that both the natural and the melodic forms of the scale have the same descending pattern).
C minor You need to add a key signature of three flats to make this a C minor scale starting on the tonic. Both the sixth and seventh notes of the scale are sharpened, i.e. raised a semitone – the key signature has A♭ and B♭ but the scale requires A and B – and therefore this is the ascending melodic form of the scale.
6 Accidentals, degrees of the scale and intervals
During the discussion of scales, several topics were touched upon that now need a little further explanation:
- accidentals
- degrees of the scale
- intervals.
We’ll begin this section with accidentals.
6.1 Accidentals
While examining the structures of the G major and F major scales, we noted that the symbol for the sharp is a #, and that for the flat, a ♭. These symbols are called accidentals. With the discussion of minor scales, you discovered the third accidental you need to know, the natural, ♮. You will have noticed it in some of the music examples and in the chart of minor scales in the previous section (Example 56).
While the role of the sharp is to raise a note a semitone, and the flat is to lower a note a semitone, the natural ‘cancels’ a previous sharp or flat. It lowers a sharpened note by a semitone, or raises a flattened note by a semitone. Naturals can therefore be used in a particular bar to cancel sharps or flats that have appeared earlier in the bar. Naturals can also be used to cancel sharps or flats that appear in the key signature. As you know, sharps or flats in a key signature dictate which notes are sharpened or flattened throughout a piece (unless the key signature is changed at some point), but you can use naturals to cancel the sharps or flats of notes as you proceed.
6.2 Accidentals in practice
Let’s look at some examples to see how accidentals work in practice. In Example 57 (a), the key signature is for C major (no sharps or flats), but we want to have E♭ s. We therefore add a flat before the first E to lower it a semitone to E♭. Accidentals, unless cancelled, last throughout a bar, and so the second E will also be an E♭.
If we want to write an E♮ rather than an E♭ later during the bar as in Example 57 (b), we have to cancel the earlier flat by writing a natural before the second E.
Example 57
Example 57 (c) will produce exactly the same melody as Example 57 (b), but uses the C minor key signature. The first E will be E♭ because of the E♭ in the key signature (and does not therefore need a flat), but the second E will need a natural to raise it a semitone from E♭ to E♮.
Finally, in Example 57 (d), the first F needs a natural to cancel the effect of the F♯ in the key signature, but the second F then needs a sharp to cancel the effect of the natural before the first F.
Three final points (which mostly reinforce what you’ve learned already):
Accidentals in practice: summary
- Notice that we use ‘sharpen’ to mean ‘raise by a semitone’. So, we can say: ‘We need to sharpen A♮ to become A♯’. But we can also say: ‘We need to sharpen A♭ to become A♮’. (We saw this principle in operation in the previous activity, in the D minor answer for Group 1 Activity 1 in the previous review.) Conversely, we use ‘flatten’ to mean ‘lower by a semitone’.
- When identifying notes without accidentals, it is tempting to say simply, ‘This is C’. However, always remember that this is a shorthand for saying, ‘This is C♮’.
- Key signatures consist of groups of accidentals that are either sharps or flats. There is never a mixture.
6.3 Identifying the degrees of the scale
During the discussion of scales I needed to talk about not only accidentals but also degrees of the scale. I needed to be able to identify certain degrees of the scale, and therefore used a phrase such as ‘sixth or seventh note up the scale’. However, there are several ways of referring to the degrees of the scale:
- the ordinal numbers already noted
- cardinal numbers with carets above; and
- names that reflect the importance of a particular note within a scale.
Here are the different systems displayed side by side, assuming that the scale is ascending:
| Ordinals | Cardinals, with carets above | Names |
|---|---|---|
| First degree | 1̂ | Tonic, or key note |
| Second | 2̂ | Supertonic |
| Third | 3̂ | Mediant |
| Fourth | 4̂ | Subdominant |
| Fifth | 5̂ | Dominant |
| Sixth | 6̂ | Submediant |
| Seventh | 7̂ | Leading note |
The names of the notes in the scale need explanation. In tonal music the most important note in the scale is the tonic or key note. In the scale of C major, for instance, the tonic, as you know, is C: the tonic signifies the key of the scale. The second most important note is the dominant, the fifth degree of the scale (see Example 58). Note that in this example the C major scale is notated from F, via C up to G so that the relationships between the names for the degrees of the scale are more clearly expressed.
Example 58

Next comes the subdominant, which has a ‘mirror’ position to that of the dominant. The dominant is five notes above the tonic; the subdominant is five notes below (sub, Latin for ‘under’). The mediant sits between the tonic and the dominant (medius, Latin for ‘middle’), and the submediant between the tonic and the (lower) subdominant. The supertonic lies immediately above the tonic (super, Latin for ‘above’, ‘over’), and, finally, the leading-note rises up to the tonic (see Example 59).
Example 59

6.4 Intervals
The final topic that arose during the discussion of scales was intervals. We noted how major scales are constructed from two intervals, the semitone and the tone, and how the harmonic form of the minor scale includes another interval, the tone plus semitone, i.e. three semitones. There is no reason why you couldn’t, in theory, count up larger and larger intervals in semitones. However, as the size of intervals increases, identifying them by counting semitones becomes impractical.
To make things easier, intervals are identified by labels that consist of two determinants, quality and number. You can calculate the number of an interval by regarding the lower note as the tonic and then counting up the degrees of the scale. Thus, as shown in Example 60, the interval C–E would be a third, C–G a fifth and C–B a seventh. C to the same C is a unison; C to the C eight notes higher, an octave. Note that the two notes in the interval can be sounded together as a harmonic interval, or in succession as a melodic interval.
Example 60

The quality of an interval can be perfect, major,minor, augmented or diminished.
So, for instance, you can have a perfect fourth, a major third, an augmented sixth.
However, for our purposes, here I comment only on the perfect fifth, which consists of seven semitones, e.g. C–G in the C major scale, and the minor third, which consists of three semitones, e.g. A–C in the A minor scale (see Example 61).
Example 61
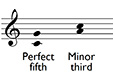
6.5 The perfect fifth, the minor third and the circle of fifths
The perfect fifth
While discussing scales, you might have wondered why I described them in the order I chose. From a starting point of C major, the pattern for major scales with sharp key signatures was G, D, A and E, with the key signature for each scale adding an additional sharp to the previous one. The pattern for major scales with flat key signatures was F, B♭, E♭ and A♭, with the key signature for each scale adding an additional flat to the previous one. You might have guessed that this gradual increase in the size of the key signatures governed my choice. And you would have been right.
But my choice was also governed by the related fact that each successive major scale with a sharp key signature starts on the note a perfect fifth above the previous one, and each successive scale with a flat key signature starts on the note a perfect fifth below the previous one. So G major, with one sharp in its key signature, begins on the note a perfect fifth above C, which has no sharps or flats in its key signature. And D major, with two sharps in its key signature, begins on the note a perfect fifth above G. And so on. Conversely, F major, with one flat in its key signature, begins on the note a perfect fifth below C, and B♭ major, with two flats in its key signature, begins on the note a perfect fifth below F. And so on.
This sequence of keys, extended to cover a whole series, is better understood as a diagram, the circle of fifths, shown in Figure 1.
The major keys sit outside the circle and their corresponding relative minors (which have the same key signature) inside the circle. You should take a little time to explore this diagram (although bear in mind that you need a working knowledge of major and minor keys of only up to four sharps and four flats before you start Inside music).
Figure 1 The circle of fifths
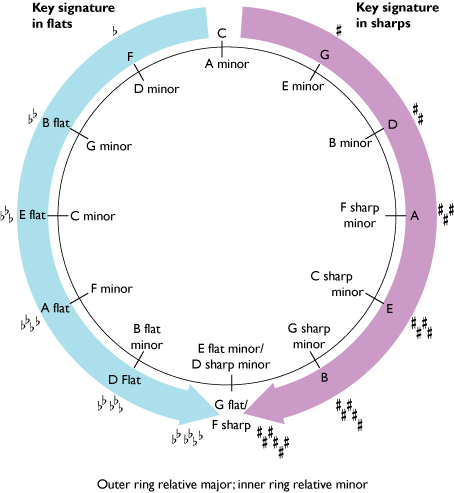
The minor third
As you may remember, and as shown in the diagram of the circle of fifths above, the tonic of a relative minor scale can be found by counting down three semitones from the tonic of its major equivalent, for instance, the tonic of C major down to the tonic of A minor. This interval, A–C, consisting of three semitones, we can now name as a minor third.
7 Harmony: the triad
Our discussion of intervals, notably harmonic intervals, is the first time in this course that we have moved from discussion of one sound at a time to two sounding together. But the exploration of the combination of sounds to form harmony is one of western music’s major contributions to music worldwide, and we therefore need to consider a basic feature of harmony, the triad.
A triad is, as its name implies, a collection of three notes sounding together. Triads are constructed from two thirds placed one on top of the other. Starting from C, for instance, and in C major, a triad would also include the notes E and G; starting from G, the notes B and D. Triads can, in fact, be constructed on any note of the scale, as shown in Example 63. In order to identify these triads, you can simply use the names of the degrees of the scale on which they are constructed. Therefore C–E–G in C major is the tonic triad since it is built on the tonic, C; D–F–A in C major is the supertonic triad since it is built on the supertonic, D. And so on.
Example 63

The three notes in the triad, from the bottom up, are called the root (since this is the basis of the triad), the third and the fifth. The fifth is (except in one case, in the triad on the leading-note) a perfect fifth.
Notice in Example 63 that the intervals of a third that are used to construct triads are sometimes major (i.e. consisting of four semitones) or minor (i.e. consisting of three semitones). Thus with the tonic triad, C–E–G, the lower interval, C–E, is a major third but the upper interval, E–G, is a minor third. However, with the supertonic triad, D–F–A, the lower interval, D–F, is a minor third but the upper interval, F–A, is a major third. Triads are labelled as major or minor depending on this arrangement.
- Where the major third is the lower interval, as in the tonic, subdominant and dominant triads, the triad is a major triad.
- Where the minor third is the lower interval as in the supertonic, mediant and submediant triads, the triad is a minor triad.
The triads in a minor key follow a different pattern of major and minor; these will be explained in Inside music, as will the triad on the leading-note, which in both major and minor keys is a diminished triad.
A good deal of the material in Inside music deals with harmony. So spend some time familiarising yourself with triads, their names, and how they are constructed from major and minor thirds – it will be time well spent.
8 Scores: performance directions
So far, we have considered such elements of notation as pitch and rhythm, but there are other instructions on scores (notated music) relating to performance that you need to be able to understand. These can be divided into five main categories:
- dynamics
- tempo
- articulation
- expression
- special signs.
The first thing to note about performance directions is that almost all of them are relative rather than absolute. This means that while bearing their meaning in mind, performers interpret them within limits. The second thing to note is that the meaning of some performance directions has changed over time. Indeed, some performance directions have even had more than one meaning during a particular period. For instance, from the seventeenth century to the middle of the eighteenth century, presto could mean either fast, or faster than allegro. And, finally, although the performance directions listed here are selected from the traditional Italian ones, a comprehensive collection would have to include performance directions in other languages too.
8.1 A selected list of performance directions
| Direction | Interpretation |
|---|---|
| fff | louder than ff |
| ff (fortissimo) | very loud |
| f (forte) | loud |
| mf (mezzo forte) | (literally) half loud |
| mp (mezzo piano) | (literally) half soft |
| p (piano) | soft |
| pp (pianissimo) | very soft |
| ppp | softer than pp |
| crescendo (cresc.) | gradually becoming louder |
| decrescendo (decresc.) | gradually becoming softer |
| diminuendo (dim.) | gradually becoming softer |
| sf/sfz (sforzando) | (literally) forced: sudden loudness accentuating a note |
| Direction | Translation | Interpretation |
|---|---|---|
| largo | large, broad | very slowly |
| larghetto | diminutive of largo | slow, but not as slow as largo |
| grave | heavy, serious | very slow, solemn |
| adagio | at ease, leisurely | slowly, or very slowly |
| lento | slow | slowly |
| andante | at a walking pace | at a medium walking pace |
| andantino | diminutive of andante | slightly faster than andante, although sometimes slightly slower |
| moderato | moderate, restrained | moderately |
| allegretto | diminutive of allegro | fairly quick, but not as quick as allegro |
| vivace | flourishing, full of life | lively |
| allegro | merry, cheerful | fast |
| presto | ready, prompt | very fast (although originally only fast) |
| Direction | Interpretation |
|---|---|
| accelerando (accel.) | gradually becoming quicker |
| a tempo | in time |
| ma non troppo | but not too much |
| rallentando (rall.) | gradually becoming slower |
| ritardando (rit. or ritard.) | gradually becoming slower |
| ritenuto (rit. or riten.) | (literally) held back: a more localised slowing down |
| Direction | Interpretation |
|---|---|
| legato | smoothly |
| semi-staccato | a little detached, less so than staccato |
| staccato (stacc.) | detached |
| tenuto | held |
| Direction | Interpretation |
|---|---|
| agitato | agitated |
| cantabile | in a singing style |
| dolce | sweet |
| espressivo (espress. or espr.) | expressive |
| grazioso | graceful |
| leggiero | light |
| molto | very, much |
| poco | a little |
| semplice | simple |
| senza | without |
| sostenuto | sustained |
| subito | sudden |
Special signs
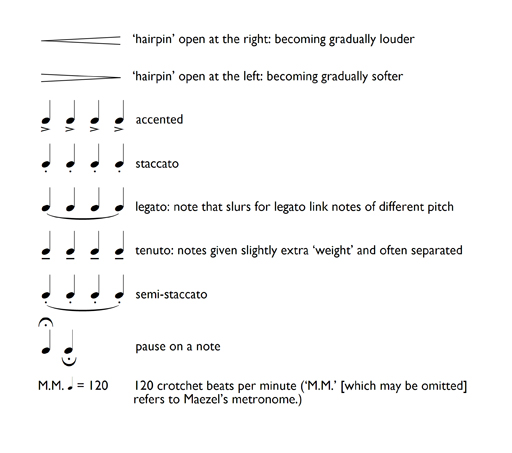
8.2 Following piano scores
The music examples you have studied so far have been written on only one staff, and you have been able to hear the corresponding sounds for many of the examples. However, as you become proficient at reading music, you may want to tackle scores such as piano scores, where you need to be aware of two staves being used simultaneously. Furthermore, you may want to follow piano scores while listening to the music.
What does ‘follow’ mean in this context? Well, it certainly doesn’t mean that you have to register consciously every notated detail of the passage in the score as you listen. Rather, it means that you need to be able to synchronise in a general way what your eye is seeing on the score and what your ear is hearing in the music. At first, even that might not be possible. The relentless progress of the music might be too much for you to cope with. This is to be expected. Even at a basic level, following a score needs practice. You need to become familiar with the idea of scanning the notation as you hear the music, of focusing on the melody while being aware of the accompaniment, of identifying on the score points at which, for whatever reason, the music does something substantially different from what it had been doing previously.
In order to prepare yourself for following a score, think about the following:
- What is the extent of the passage you wish to follow? Glance through the passage quickly noting the opening and closing bars.
- What is the speed of the music? – see the tempo marking – and how many beats are there in a bar? – see the time signature.
- Are there any repeated passages? These will be marked in two ways, either (a) with repeat marks (if the player has to repeat a passage from the beginning, the opening repeat marks are omitted); or (b) first- and second-time bars (Example 64).
- Do you need to turn a page? If so, try to imagine what is happening in the music for a few bars after the page turn so that, when you turn, you are not caught out.
Example 64
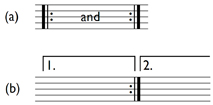
8.3 Following piano scores in practice
As you follow the two staves of a piano score, the upper staff will use, for the most part, the treble clef (and be played by the pianist’s right hand), and the lower staff, the bass clef (and be played by the pianist’s left hand). Basically, you need to follow the upper staff, because this is usually where the melody is. Concentrate on the way the rise and fall of the melody is reflected in the higher or lower position of the note heads on the staff. The ups and downs of the melody should correspond to the ‘undulations’ of the notated melody line. As you become familiar with both the sound and sight of a passage, you will be able to keep an eye on both the melody and the accompaniment as the music progresses. You will also be able to spot if the melody moves down to the lower staff, which happens from time to time.
In addition, keep a look out on the score for the changes in dynamics that you hear, or for places where there are rests in both staves. Sudden changes of loudness in the music or moments of silence, might help you to keep abreast of where you should be on the score, or help you find yourself if you are lost. Be prepared, too, for a possible change of clef, particularly with the lower staff. If the majority of notes that appear on the lower stave are above middle C, then a composer will more than likely change the clef from the bass to the treble.
Don’t be disheartened if you can’t follow a score at your first attempt. You will need several attempts (for each score) simply to become familiar with both the music and the score, and this needs a little time. But as you practise following scores, you will gradually become more proficient, and you will be able to understand more and more of the notation you are ‘reading’ and how this relates to the sounds you are hearing.
9 Review
As a final review, the following four groups of activities contain questions that relate to a selection of the different features of staff notation.
Group 1: identifying various different elements
Mozart, Piano Concerto in C minor, K491
Activity 1
a.
very slow
b.
smoothly
c.
slow, but not as slow as largo.
The correct answer is c.
Answer
Largo means very slow, and the Italian term for ‘smoothly’ is legato.
Activity 2
a.
E flat major
b.
A flat major
c.
C minor
The correct answer is a.
Answer

All the notes in the melody are contained within the scale of E flat major, and B naturals are absent, suggesting that C minor, the minor key with the same key signature as E flat major, is unlikely. A flat major is incorrect since it has a key signature of four flats, not three.
Activity 3
a.
octave
b.
sixth
c.
seventh
The correct answer is b.
Answer
The last note in the second bar is a B♭ and the first in bar 3, a G. If we count up the scale starting from the B flat (B♭–C–D–E♭–F–G) we find that the interval is a sixth.
Activity 4
a.
B♭
b.
B
c.
A♭
The correct answer is a.
Answer
On the treble staff the note sitting on the first ledger line above the staff is a B. However, the key signature of three flats signifies that all Bs in this extract (unless modified by accidentals) are B♭s.
Activity 5
a.
submediant
b.
leading note
c.
supertonic
The correct answer is b.
Answer

Since the melody is in E flat major with E♭ as the tonic, D is the seventh note up from E♭ (E♭–F–G–A♭–B♭–C–D). It is therefore the leading note.
Group 2: identifying various different elements
Gershwin, ‘I got rhythm’
Activity 1
a.
G minor
b.
F major
c.
B flat major
The correct answer is c.
Answer

The two-flat key signature suggests either B flat major or its relative minor, G minor. There is no F♯, the leading note in G minor, and therefore B flat major seems more likely. F major is incorrect since it has a key signature of only one flat.
Activity 2
a.
There are four crotchet beats in the bar
b.
There are two minim beats in the bar
c.
There are two semibreve beats in the bar
The correct answer is b.
Answer
C with a vertical stroke through it is an alternative way of writing the time signature 2/2, where the lower figure 2 represents a minim beat and the upper figure specifies the number of beats in the bar, i.e. 2.
Activity 3
a.
submediant
b.
dominant
c.
subdominant
The correct answer is b.
Answer

Since the melody is in B flat major with B♭ as the tonic, the F is the fifth note up from B♭ (B♭–C–D–E♭–F). It is therefore the dominant.
Activity 4
a.
a tie
b.
a slur
The correct answer is a.
Answer
A tie joins consecutive notes that are the same, and is a rhythmic device. Its use here means that the first C, a quaver, is tied to the next C giving an overall time value of quaver plus minim.
Activity 5
a.
dotted crotchet rest
b.
crotchet rest
c.
quaver rest
The correct answer is b.
Answer
Although the time signature has two minim beats, it is easier to work out the required rest by counting in crotchets. In bar 3, the first C tied to the second produces a dotted crotchet and this is followed by another dotted crotchet. The two dotted crotchets added together equal three crotchets. Therefore we need a crotchet rest to make up a total of four crotchets for the bar.
Group 3: identifying various different elements
Beethoven, Symphony No. 6 in F major, Op. 68 (‘Pastoral’)
Activity 1
a.
fast
b.
fast but not too much
c.
fast with vigour
The correct answer is b.
Answer
Traditionally, the English equivalent for the Italian tempo indication Allegro ma non troppo is Fast but not too much. Fast is Allegro, and Fast with vigour, Allegro con brio.
Activity 2
a.
dominant
b.
submediant
c.
subdominant
The correct answer is b.
Answer

Correct. Since the melody is in F major with F as the tonic, the D is the sixth note up from F (F–G–A–B♭–C–D). It is therefore the submediant.
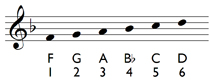
Activity 3
a.
The note is to be played staccato.
b.
The rhythmic value of the note is lengthened by a half.
c.
The note is to be played tenuto.
The correct answer is a.
Answer

The position of the dot is crucial. Below or above the note head signifies that this dot is a sign for staccato. A dot after the note head means that it is associated with rhythm – the note’s rhythmic value would then be lengthened by a half. A tenuto mark is a short line, not a dot, either above or below the note head.
Activity 4
a.
third
b.
fourth
c.
fifth
The correct answer is b.
Answer

The second note, its note head placed in the lowest space of the treble stave, is an F. Therefore if we count up the scale from the middle C to the F (middle C–D–E–F) we find that the interval is a fourth.
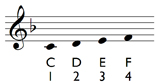
Activity 5
a.
The note should be played getting gradually softer.
b.
The note should be played with an accent.
c.
The player should pause on this note.
The correct answer is c.
Answer
The sign above the G is a pause mark. Refer to Special signs for the sign for getting gradually softer (a ‘hairpin’), and the sign for an accent.
Group 4: identifying triads in major keys
Note that you will need to work out which major key is being used first.
Activity 1
Match Tonic triad in E flat major, Subdominant triad in A major, Tonic triad in D major to the triads below.
Using the following two lists, match each numbered item with the correct letter.
Tonic triad in D major
Tonic triad in E flat major
Subdominant triad in A major
a.

b.

c.

- 1 = a
- 2 = c
- 3 = b
Answer
Tonic triad in D major. The key signature of two sharps signifies the major key of D major. The notes of the triad, the root, third and fifth, are D F♯ A, which means that this is the tonic triad in D major.
Tonic triad in E flat major. The key signature of three flats signifies the major key of E flat major. Bearing in mind that this is the bass stave, the notes of the triad, the root, third and fifth, are E♭ G B♭, which means that this is the tonic triad in E flat major.
Subdominant triad in A major. The key signature of three sharps signifies the major key of A major. The notes of the triad, the root, third and fifth, are D F♯ A. Since the root, the D, is the fourth above the tonic, A, it is the subdominant note, and therefore the triad is the subdominant triad in A major.
10 Trainers for eye and ear
If you search for music theory sites on the internet, you’ll find several that provide interactive drills, often called trainers. These aim to help you improve particular skills that are involved when using staff notation. They are useful for coordinating your eye and your ear, that is, coordinating looking at notation while listening to sounds. Admittedly you need regular practice to make headway with the drills. However, with steady application (and a degree of patience) you will find that, through using these drills, your eye and ear will become much more proficient at identifying different aspects of the music you are looking at and listening to.
Indeed, many aspects of staff notation lend themselves to drills. It is a relatively straightforward process to create drills for note-naming, identifying rhythms, scales, key signatures, intervals, chords and so on. In addition, drills for improving a particular skill can vary in scope. With note-naming, for instance, a drill might ask you to identify notes on the treble staff, or on the bass staff, or both; it might also include notes with ledger lines. A drill for a particular skill can also have different levels of difficulty from which you can choose.
10.1 How to use trainers
Before you start to practise a drill you need to become familiar with the various possibilities available. On a website these are sometimes defined in a separate window/web-page called ‘Settings’ (or similar). Once you’ve located this page, and you are sure that the choices you have made will produce the drill that you require, you will have to make a realistic assessment of the level of difficulty that you can cope with. Don’t be over-ambitious! It is better to underestimate your proficiency to start with, otherwise you may well find the drills too difficult and you will soon lose heart.
Even when everything is set up, it might take a little time to become familiar with the way a drill works and how you should respond. Some drills where you are required to enter notes with pitch and rhythmic values on a stave need a little pre-practice. So be prepared to have one or two trial runs just to become ‘at home’ with the drill, before you start in earnest.
Note that the programs that make drills possible on websites are associated with Flash or Java. So you will need Adobe Flash Player and/or the Java Runtime Environment installed on your computer.
10.2 Where to find trainers and recommended reading
You may know of others, but these are some websites currently available that contain drills for eye and ear training:
Note that these sites and others also provide tutorials on many aspects of staff notation, which you could use to supplement your knowledge, or reinforce what you have learned already. However, as with all websites, it is prudent to compare the information on a few different sites in order to assess the accuracy and reliability of the information found on them.
Recommended reading
Rather than the internet, you might like to consult reference material in hard copy. In which case you could try:
Taylor, E. (1989) The AB Guide to Music Theory, Part I, London, Associated Board of the Royal Schools of Music.
The Associated Board also publishes graded workbooks and booklets with model answers. The workbooks for Grades 1–3 would be relevant for this course. You can find a list of these workbooks here: ABRSM workbooks.
Conclusion
This free course provided an introduction to studying music. It took you through a series of exercises designed to develop your approach to study and learning at a distance and helped to improve your confidence as an independent learner.
References
Acknowledgements
This free course was written by Trevor Bray.
Except for third party materials and otherwise stated (see terms and conditions), this content is made available under a Creative Commons Attribution-NonCommercial-ShareAlike 4.0 Licence.
The material acknowledged below is Proprietary and used under licence (not subject to Creative Commons Licence). Grateful acknowledgement is made to the following sources for permission to reproduce material in this free course:
Course image rhodesj in Flickr made available under Creative Commons Attribution 2.0 Licence.
Every effort has been made to contact copyright owners. If any have been inadvertently overlooked, the publishers will be pleased to make the necessary arrangements at the first opportunity.
Don't miss out
If reading this text has inspired you to learn more, you may be interested in joining the millions of people who discover our free learning resources and qualifications by visiting The Open University – www.open.edu/ openlearn/ free-courses.