Use 'Print preview' to check the number of pages and printer settings.
Print functionality varies between browsers.
Printable page generated Thursday, 16 July 2026, 2:53 AM
Labour and Delivery Care Module: 4. Using the Partograph
Study Session 4 Using the Partograph
Introduction
Among the five major causes of maternal mortality in developing countries like Ethiopia (hypertension, haemorrhage, infection, obstructed labour and unsafe abortion), the middle three (haemorrhage, infection, obstructed labour) are highly correlated with prolonged labour. To be specific, postpartum haemorrhage and postpartum sepsis (infection) are very common when the labour gets prolonged beyond 18–24 hours. Obstructed labour is the direct outcome of abnormally prolonged labour; you will learn about this in detail in Study Session 9 of this Module. To avoid such complications, a chart called a partograph will help you to identify the abnormal progress of a labour that is prolonged and which may be obstructed. It will also alert you to signs of fetal distress.
In this study session, you will learn about the principles of using the partograph, the interpretation of what it tells you about the labour you are supervising, and what actions you should take when the recordings you make on the partograph deviate from the normal range. When the labour is progressing well, the record on the partograph reassures you and the mother that she and her baby are in good health.
Learning Outcomes for Study Session 4
When you have studied this session, you should be able to:
4.1 Define and use correctly all of the key terms printed in bold. (SAQs 4.1 and 4.3)
4.2 Describe the significance and the applications of the partograph in labour progress monitoring. (SAQs 4.1 and 4.2)
4.3 Describe the components of a partograph and state the correct time intervals for recording your observations and measurements. (SAQs 4.1 and 4.3)
4.4 Describe the indicators in a partograph that show good progress of labour, and signs of fetal and maternal wellbeing. (SAQ 4.3)
4.5 Identify the indicators in a partograph for immediate referral to a hospital during the labour. (SAQ 4.3)
4.1 The value of using the partograph
The partograph is a graphical presentation of the progress of labour, and of fetal and maternal condition during labour. It is the best tool to help you detect whether labour is progressing normally or abnormally, and to warn you as soon as possible if there are signs of fetal distress or if the mother’s vital signs deviate from the normal range. Research studies have shown that maternal and fetal complications due to prolonged labour were less common when the progress of labour was monitored by the birth attendant using a partograph. For this reason, you should always use a partograph while attending a woman in labour, either at her home or in the Health Post.
In the study sessions in this Module, you have learned (or will learn) the major reasons why you need to monitor a labouring mother so carefully. Remember that a labour that is progressing well requires your help less than a labour that is progressing abnormally. Documenting your findings on the partograph during the labour enables you to know quickly if something is going wrong, and whether you should refer the mother to the nearest health centre or hospital for further evaluation and intervention.
4.2 Finding your way around of the partograph
The partograph is actually your record chart for the labouring mother (Figure 4.1). It has an identification section at the top where you write the name and age of the mother, her ‘gravida’ and ‘para’ status, her Health Post or hospital registration number, the date and time when you first attended her for the delivery, and the time the fetal membranes ruptured (her ‘waters broke’).
What is the difference between a woman who is a multigravida and one who is a multipara?
A multigravida is a woman who has been pregnant at least once before the current pregnancy. A multipara is a woman who has previously given birth to live babies at least twice before now.
On the back of the partograph (if you are not using another chart), you can also record some significant facts, such as the woman’s past obstetric history, past and present medical history, any findings from a physical examination and any interventions you initiate (including medications, delivery notes and referral).
4.2.1 The graph sections of the partograph
The graph sections of the partograph are where you record key features of the fetus or the mother in different areas of the chart. We will describe each feature, starting from the top of Figure 4.1 and travelling down the partograph.
- Immediately below the patient’s identification details, you record the Fetal Heart Rate initially and then every 30 minutes. The scale for fetal heart rate covers the range from 80 to 200 beats per minute.
- Below the fetal heart rate, there are two rows close together. The first of these is labelled Liquor – which is the medical term for the amniotic fluid; if the fetal membranes have ruptured, you should record the colour of the fluid initially and every 4 hours.
- The row below ‘Liquor’ is labelled Moulding; this is the extent to which the bones of the fetal skull are overlapping each other as the baby’s head is forced down the birth canal; you should assess the degree of moulding initially and every 4 hours

- Below ‘Moulding’ there is an area of the partograph labelled Cervix (cm) (Plot X) for recording cervical dilatation, i.e. the diameter of the mother’s cervix in centimetres. This area of the partograph is also where you record Descent of Head (Plot O), which is how far down the birth canal the baby’s head has progressed. You record these measurements as either X or O, initially and every 4 hours. There are two rows at the bottom of this section of the partograph to write the number of hours since you began monitoring the labour and the time on the clock.
- The next section of the partograph is for recording Contractions per 10 mins (minutes) initially and every 30 minutes.
- Below that are two rows for recording administration of Oxytocin during labour and the amount given. (You are NOT supposed to do this – it is for a doctor to decide! However, you will be trained to give oxytocin after the baby has been born if there is a risk of postpartum haemorrhage.)
- The next area is labelled Drugs given and IV fluids given to the mother.
- Near the bottom of the partograph is where you record the mother’s vital signs; the chart is labelled Pulse and BP (blood pressure) with a possible range from 60 to 180. Below that you record the mother’s Temp °C (temperature).
- At the very bottom you record the characteristics of the mother’s Urine: protein, acetone, volume. You learned how to use urine dipsticks to test for the presence of a protein (albumin) during antenatal care.
You learned about giving IV (intravenous) fluid therapy to women who are haemorrhaging in Study Session 22 of the Antenatal Care Module.
What can you tell from the colour of the amniotic fluid?
If it has fresh bright red blood in it, this is a warning sign that the mother may be haemorrhaging internally; if it has dark green meconium (the baby’s first stool) in it, this is a sign of fetal distress.
4.2.2 The Alert and Action lines
In the section for cervical dilatation and fetal head descent, there are two diagonal lines labelled Alert and Action. The Alert line starts at 4 cm of cervical dilatation and it travels diagonally upwards to the point of expected full dilatation (10 cm) at the rate of 1 cm per hour. The Action line is parallel to the Alert line, and 4 hours to the right of the Alert line. These two lines are designed to warn you to take action quickly if the labour is not progressing normally.
![]() You should refer the woman to a health centre or hospital if the marks recording cervical dilatation cross over the Alert line, i.e. indicating that cervical dilation is proceeding too slowly. (The Action line is for making decisions at health-facility level.)
You should refer the woman to a health centre or hospital if the marks recording cervical dilatation cross over the Alert line, i.e. indicating that cervical dilation is proceeding too slowly. (The Action line is for making decisions at health-facility level.)
4.3 Recording and interpreting the progress of labour
As you learned in Study Session 1 of this Module, a normally progressing labour is characterised by at least 1 cm per hour cervical dilatation, once the labour has entered the active first stage of labour.
Another important point is that (unless you detect any maternal or fetal problems), every 30 minutes you will be counting fetal heart beats for one full minute, and uterine contractions for 10 minutes.
You should do a digital vaginal examination initially to assess:
- The extent of cervical effacement (look back at Figure 1.1) and cervical dilatation
- The presenting part of the fetus
- The status of the fetal membranes (intact or ruptured) and amniotic fluid
- The relative size of the mother’s pelvis to check if the brim is wide enough for the baby to pass through.
Thereafter, in every 4 hours you should check the change in:
- Cervical dilatation
- Development of cervical oedema (an initially thin cervix may become thicker if the woman starts to push too early, or if the labour is too prolonged with minimal change in cervical dilatation)
- Position (of the fetus, if you are able to identify it)
- Fetal head descent
- Development of moulding and caput (Study Session 2 in this Module)
- Amniotic fluid colour (if the fetal membranes have already ruptured).
You should record each of your findings on the partograph at the stated time intervals as labour, progresses. The graphs you plot will show you whether everything is going well or one or more of the measurements is a cause for concern. When you record the findings on the partograph, make sure that:
- You use one partograph form per each labouring mother. (Occasionally, you may make a diagnosis of true labour and start recording on the partograph, but then you realise later that it was actually a false labour. You may decide to send the woman home or advise her to continue her normal daily activities. When true labour is finally established, use a new partograph and not the previously started one).
- You start recording on the partograph when the labour is in active first stage (cervical dilation of 4 cm and above).
- Your recordings should be clearly visible so that anybody who knows about the partograph can understand and interpret the marks you have made.
If you have to refer the mother to a higher level health facility, you should send the partograph with your referral note and record your interpretation of the partograph in the note.
Without looking back over the previous sections, quickly write down the partograph measurements that you must make in order to monitor the progress of labour.
Compare your list with the partograph in Figure 4.1. If you are at all uncertain about any of the measurements, then re-read Sections 4.2 and 4.3.
4.4 Cervical dilatation
As you learned in Study Session 1 of this Module, the first stage of labour is divided into the latent and the active phases. The latent phase at the onset of labour lasts until cervical dilatation is 4 cm and is accompanied by effacement of the cervix (as shown in Figure 1.1 previously). The latent phase may last up to 8 hours, although it is usually completed more quickly than this. Although regular assessments of maternal and fetal wellbeing and a record of all findings should be made, these are not plotted on the partograph until labour enters the active phase.
Vaginal examinations are carried out approximately every 4 hours from this point until the baby is born. The active phase of the first stage of labour starts when the cervix is 4 cm dilated and it is completed at full dilatation, i.e. 10 cm. Progress in cervical dilatation during the active phase is at least 1 cm per hour (often quicker in multigravida mothers).
In the cervical dilatation section of the partograph, down the left side, are the numbers 0–10. Each number/square represents 1 cm dilatation. Along the bottom of this section are 24 squares, each representing 1 hour. The dilatation of the cervix is estimated by vaginal examination and recorded on the partograph with an X mark every 4 hours. Cervical dilatation in multipara women may need to be checked more frequently than every 4 hours in advanced labour, because their progress is likely to be faster than that of women who are giving birth for the first time.
In the example in Figure 4.2, what change in cervical dilatation has been recorded over what time period?
The cervical dilatation was about 5 cm at 1 hour after the monitoring of this labour began; after another four hours, the mother’s cervix was fully dilated at 10 cm.
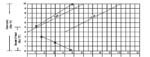
If progress of labour is satisfactory, the recording of cervical dilatation will remain on, or to the left, of the alert line.
If the membranes have ruptured and the woman has no contractions, do not perform a digital vaginal examination, as it does not help to establish the diagnosis and there is a risk of introducing infection. (PROM, premature rupture of membranes, was the subject of Study Session 17 of the Antenatal Care Module.)
4.5 Descent of the fetal head
For labour to progress well, dilatation of the cervix should be accompanied by descent of the fetal head, which is plotted on the same section of the partograph, but using O as the symbol. But before you can do that, you must learn to estimate the progress of fetal descent by measuring the station of the fetal head, as shown in Figure 4.3. The station can only be determined by examination of the woman’s vagina with your gloved fingers, and by reference to the position of the presenting part of the fetal skull relative to the ischial spines in the mother’s pelvic brim.
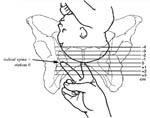
As you can see from Figure 4.3, when the fetal head is at the same level as the ischial spines, this is called station 0. If the head is higher up the birth canal than the ischial spines, the station is given a negative number. At station –4 or –3 the fetal head is still ‘floating’ and not yet engaged; at station –2 or –1 it is descending closer to the ischial spines.
If the fetal head is lower down the birth canal than the ischial spines, the station is given a positive number. At station +1 and even more at station +2, you will be able to see the presenting part of baby’s head bulging forward during labour contractions. At station +3 the baby’s head is crowning, i.e. visible at the vaginal opening even between contractions. The cervix should be fully dilated at this point.
Now that you have learned about the different stations of fetal descent, there is a complication about recording these positions on the partograph. In the section of the partograph where cervical dilatation and descent of head are recorded, the scale to the left has the values from 0 to 10. By tradition, the values 0 to 5 are used to record the level of fetal descent. Table 4.1 shows you how to convert the station of the fetal head (as shown in Figure 4.3) to the corresponding mark you place on the partograph by writing O. (Remember, you mark fetal descent with Os and cervical dilatation with Xs, so the two are not confused.)
When the baby’s head starts crowning (station +3), you may not have time to record the O mark on the partograph!
Station of fetal head (Figure 4.3) | Corresponding mark on the partograph |
|---|---|
| –4 or –3 | 5 |
| –2 or –1 | 4 |
| 0 | 3 |
| +1 | 2 |
| +2 | 1 |
| +3 | 0 |
What does crowning mean and what does it tell you?
Crowning means that the presenting part of the baby’s head remains visible between contractions; this indicates that the cervix is fully dilated.
4.6 Assessing moulding and caput formation

The five separate bones of the fetal skull are joined together by sutures, which are quite flexible during the birth, and there are also two larger soft areas called fontanels (Figure 4.4). Movement in the sutures and fontanels allows the skull bones to overlap each other to some extent as the head is forced down the birth canal by the contractions of the uterus. The extent of overlapping of fetal skull bones is called moulding, and it can produce a pointed or flattened shape to the baby’s head when it is born (Figure 4.5).

Some baby’s skulls have a swelling called a caput in the area that was pressed against the cervix during labour and delivery (Figure 4.6); this is common even in a labour that is progressing normally. Whenever you detect moulding or caput formation in the fetal skull as the baby is moving down the birth canal, you have to be more careful in evaluating the mother for possible disproportion between her pelvic opening and the size of the baby’s head. Make sure that the pelvic opening is large enough for the baby to pass through. A small pelvis is common in women who were malnourished as children, and is a frequent cause of prolonged and obstructed labour.

![]() A swelling on one side of the newborn’s head is a danger sign and should be referred urgently; blood or other fluid may be building up in the baby’s skull.
A swelling on one side of the newborn’s head is a danger sign and should be referred urgently; blood or other fluid may be building up in the baby’s skull.
4.6.1 Recording moulding on the partograph
To identify moulding, first palpate the suture lines on the fetal head (look back at Figure 1.4 in the first study session of this Module) and appreciate whether the following conditions apply. The skull bones that are most likely to overlap are the parietal bones, which are joined by the sagittal suture, and have the anterior and posterior fontanels to the front and back.
- Sutures apposed: This is when adjacent skull bones are touching each other, but are not overlapping. This is called degree 1 moulding (+1).
- Sutures overlapped but reducible: This is when you feel that one skull bone is overlapping another, but when you gently push the overlapped bone it goes back easily. This is called degree 2 moulding (+2).
- Sutures overlapped and not reducible: This is when you feel that one skull bone is overlapping another, but when you try to push the overlapped bone, it does not go back. This is called degree 3 moulding (+3). If you find +3 moulding with poor progress of labour, this may indicate that the labour is at increased risk of becoming obstructed.
![]() You need to refer the mother urgently to a health facility if you identify signs of an obstructed labour. You will learn more about this in Study Session 9.
You need to refer the mother urgently to a health facility if you identify signs of an obstructed labour. You will learn more about this in Study Session 9.
When you document the degree of moulding on the partograph, use a scale from 0 (no moulding) to +3, and write them in the row of boxes provided:
0 Bones are separated and the sutures can be felt easily.
+1 Bones are just touching each other.
+2 Bones are overlapping but can be separated easily with pressure by your finger.
+3 Bones are overlapping but cannot be separated easily with pressure by your finger.
In the partograph, there is no specific space to document caput formation. However, caput detection should be part of your assessment during each vaginal examination. Like moulding, you grade the degree of caput as 0, +1, +2 or +3. Because of its subjective nature, grading the caput as +1 or +3 simply indicates a ‘small’ and a ‘large’ caput respectively. You can document the degree of caput either on the back of the partograph, or on the mother’s health record (if you have it).
Imagine that you are assessing the degree of moulding of a fetal skull. What finding would make you refer the woman in labour most urgently, and why?
If you found +3 moulding and the labour was progressing poorly, it may mean there is uterine obstruction.
4.7 Uterine contractions
You already know that good uterine contractions are necessary for good progress of labour (Study Session 2). Normally, contractions become more frequent and last longer as labour progresses. Contractions are recorded every 30 minutes on the partograph in their own section, which is below the hour/time rows. At the left hand side is written ‘Contractions per 10 mins’ and the scale is numbered from 1–5. Each square represents one contraction, so that if two contractions are felt in 10 minutes, you should shade two squares.
On each shaded square, you will also indicate the duration of each contraction by using the symbols shown in Figure 4.7.

4.8 Assessment and recording of fetal wellbeing
How do you know that the fetus is in good health during labour and delivery? The methods open to you are limited, but you can assess fetal condition:
- By counting the fetal heart beat every 30 minutes;
- If the fetal membranes have ruptured, by checking the colour of the amniotic fluid.
4.8.1 Fetal heart rate as an indicator of fetal distress
The normal fetal heart rate at term (37 weeks and more) is in the range of 120–160 beats/minute. If the fetal heart rate counted at any time in labour is either below 120 beats/minute or above 160 beats/minute, it is a warning for you to count it more frequently until it has stabilised within the normal range. It is common for the fetal heart rate to be a bit out of the normal range for a short while and then return to normal. However, fetal distress during labour and delivery can be expressed as:
- Fetal heart beat persistently (for 10 minutes or more) remains below 120 beats/minute (doctors call this persistent fetal bradycardia).
- Fetal heart beat persistently (for 10 minutes or more) remains above 160 beats/minute (doctors call this persistent fetal tachycardia).
4.8.2 Causes of fetal distress
There are many factors that can affect fetal wellbeing during labour and delivery. You learned in the Antenatal Care Module (Study Session 5) that the fetus is dependent on good functioning of the placenta and good supply of nutrients and oxygen from the maternal blood circulation. Whenever there is inadequacy in maternal supply or placental function, the fetus will be at risk of asphyxia, which is going to be manifested by the fetal heart beat deviating from the normal range. Other factors that will affect fetal wellbeing, which may be indicated by abnormal fetal heart rate, are shown in Box 4.1.
You learned about hypertensive disorders of pregnancy, maternal anaemia and placental abruption in Study Sessions 18, 19 and 21 of the Antenatal Care Module, Part 2.
Box 4.1 Reasons for fetal heart rate deviating from the normal range
Placental blood flow to the fetus is compromised, which commonly occurs when there is:
- Hypertensive disorder of pregnancy
- Maternal anaemia
- Decreased maternal blood volume (hypovolemia) due to blood loss, or body fluid loss through vomiting and diarrhoea
- Maternal hypoxia (shortage of oxygen) due to maternal heart or lung disease, or living in a very high altitude
- A placenta which is ‘aged’
- Amniotic fluid becomes scanty, which prevents the fetus from moving easily; the umbilical cord may become compressed against the uterine wall by the baby’s body
- Umbilical cord is compressed because of prolapsed (coming down the birth canal ahead of the fetus), or is entangled around the baby’s neck
- Placenta prematurely separates from the uterine wall (placental abruption).
With that background in mind, counting the fetal heart beat every 30 minutes and recording it on the partograph, may help you to detect the first sign of any deviation for the normal range. Once you detect any fetal heart rate abnormality, you shouldn’t wait for another 30 minutes; count it as frequently as possible and arrange referral quickly if persists for more than 10 minutes.
4.8.3 Recording fetal heart rate on the partograph
The fetal heart rate is recorded at the top of the partograph every half hour in the first stage of labour (if every count is within the normal range), and every 5 minutes in the second stage. Count the fetal heart rate:
- As frequently as possible for about 10 minutes and decide what to do thereafter.
- Count every five minutes if the amniotic fluid (called liquor on the partograph) contains thick green or black meconium.
- Whenever the fetal membranes rupture, because occasionally there may be cord prolapse and compression, or placental abruption as the amniotic fluid gushes out.
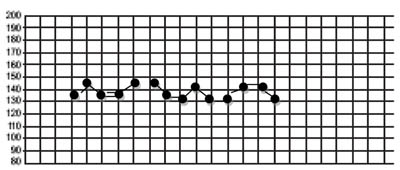
Each square for the fetal heart on the partograph represents 30 minutes. When the fetal heart rate is in the normal range and the amniotic fluid is clear or only lightly blood-stained, you can record the results on the partograph, as in the example in Figure 4.8. When you count the fetal heart rate at less than 30 minute intervals, use the back of the partograph to record each measurement. Prepare a column for the time and fetal heart rate.
4.8.4 Amniotic fluid as an indicator of fetal distress
Another indicator of fetal distress which has already been mentioned is meconium-stained amniotic fluid (greenish or blackish liquor). Lightly stained amniotic fluid may not necessarily indicate fetal distress, unless it is accompanied by persistent fetal heart rate deviations outside the normal range. The following observations are made at each vaginal examination and recorded on the partograph, immediately below the fetal heart rate recordings.
If the fetal membranes are intact, write the letter ‘I’ (for ‘intact’).
If the membranes are ruptured and:
- liquor is absent, write ‘A’ (for ‘absent’)
- liquor is clear, write ‘C’ (for ‘clear’)
- liquor is blood-stained, record ‘B’
- liquor is meconium-stained, record ‘M1’ for lightly stained, ‘M2’ for a little bit thick and ‘M3’ for very thick liquor which is like soup (see Box 4.2).
Box 4.2 Extent of meconium staining
![]() Refer the woman in labour to a higher health facility as early as possible if you see:
Refer the woman in labour to a higher health facility as early as possible if you see:
- M1 liquor in latent first stage of labour, even with normal fetal heart rate.
- M2 liquor in early active first stage of labour, even with normal fetal heart rate.
- M3 liquor in any stage of labour, unless progressing fast.
4.9 Assessment of maternal wellbeing
During labour and delivery, after your thorough initial evaluation, maternal wellbeing is followed by measuring the mother’s vital signs: blood pressure, pulse, temperature, and urine output. Blood pressure is measured every four hours. Pulse is recorded every 30 minutes. Temperature is recorded every 2 hours. Urine output is recorded every time urine is passed. If you identify persistent deviations from the normal range of any of these measurements, refer the mother to a higher health facility.
Summary of Study Session 4
In Study Session 4, you have learned that:
- The partograph is a valuable tool to help you detect abnormal progress of labour, fetal distress and signs that the mother is in difficulty.
- The partograph is designed for recording maternal identification, fetal heart rate, colour of the amniotic fluid, moulding of the fetal skull, cervical dilatation, fetal descent, uterine contractions, whether oxytocin was administered or intravenous fluids were given, maternal vital signs and urine output.
- Start recording on the partograph when the labour is in active first stage (4 cm or above).
- Cervical dilatation, descent of the fetal head and uterine contractions are used in assessing the progress of labour. About 1 cm/hour cervical dilatation and 1 cm descent in four hours indicate good progress in the active first stage.
- Fetal heart rate and uterine contractions are recorded every 30 minutes if they are in the normal range. Assess cervical dilatation, fetal descent, the colour of amniotic fluid (if fetal membranes have ruptured), and the degree of moulding or caput every four hours.
- Do a digital vaginal examination immediately if the membranes rupture and a gush of amniotic fluid comes out while the woman is in any stage of labour.
- Refer the woman to health centre or hospital if the cervical dilatation mark crosses the Alert line on the partograph.
- When you identify +3 moulding of the fetal skull with poor progress of labour, this indicates labour obstruction, so refer the mother urgently.
- Fetal heart rate below 120/min or above 160/min for more than 10 minutes is an urgent indication to refer the mother, unless the labour is progressing too fast.
- Even with a normal fetal heart rate, refer if you see amniotic fluid (liquor) lightly stained with meconium in latent first stage of labour, or moderately stained in early active first stage of labour, or thick amniotic fluid in all stages of labour, unless the labour is progressing too fast.
Self-Assessment Questions (SAQs) for Study Session 4
Now that you have completed this study session, you can assess how well you have achieved its Learning Outcomes by answering the following questions. Write your answers in your Study Diary and discuss them with your Tutor at the next Study Support Meeting. You can check your answers with the Notes on the Self-Assessment Questions at the end of this Module.
Read Case Study 4.1 and then answer the questions that follow it.
Case Study 4.1 Bekelech’s story
Bekelech is a gravida 5, para 4 mother, whose current pregnancy has reached the gestational age of 40 weeks and 4 days. When you arrive at her house, she is already in labour. During your first assessment, she had four contractions in 10 minutes, each lasting 35–40 seconds. On vaginal examination, the fetal head was at –3 station and Bekelech’s cervix was dilated to 5 cm. The fetal heart rate at the first count was 144 beats/min.
SAQ 4.1 (tests Learning Outcomes 4.1, 4.2 and 4.3)
- a.What does it mean to say that Bekelech is a ‘gravida 5, para 4 mother’?
- b.How would you describe the gestational age of Bekelech’s baby?
- c.Which stage of labour has she reached and is the baby’s head engaged yet?
- d.Is the fetal heart rate normal or abnormal?
- e.What would you do to monitor the progress of Bekelech’s labour?
- f.How often would you do a vaginal examination in Bekelech’s case and why?
Answer
- a.As a gravida 5, para 4 mother you know that Bekelech has had 5 pregnancies of which 1 has not resulted in a live birth.
- b.At 40 weeks and 4 days the gestation is term (or full term).
- c.Bekelch’s cervix has dilated to 5 cm and she is having four contractions in 10 minutes of 35-40 seconds each, so she has entered the active phase of first stage labour. At -3 station, the fetal head is not yet engaged.
- d.The fetal heart rate is within the normal range of 120-160 beats/minute.
- e.As Bekelech’s labour is in the active phase and her cervix has dilated to more than 4 cm, you immediately begin regular monitoring of the progress of her labour, her vital signs, and indicators of fetal wellbeing distress. You record of all these key measurements on the partograph (refer again to Figure 4.1 and Section 4.2.1).
- f.You decide to do vaginal examinations more frequently than the advisory four hours, because Bekelech’s labour may progress quite quickly as she is a multigravida/multipara mother. And you keep alert to the possibility of something going wrong, because Bekelech has already lost one baby before it was born.
SAQ 4.2 (tests Learning Outcome 4.2)
Give two reasons for using a partograph.
Answer
Two key reasons for using a partograph are because:
- a.If used correctly it is a very useful tool for detecting whether or not labour is progressing normally, and therefore whether a referral is needed. When the labour is progressing well, the record on the partograph reassures you and the mother that she and her baby are in good health.
- b.Research has shown that fetal complications of prolonged labour are less common when the birth attendant uses a partograph to monitor the progress of labour.
SAQ 4.3 (tests Learning Outcomes 4.1, 4.3, 4.4 and 4.5)
- a.What indicators of good progress of labour would you record on the partograph?
- b.What indicators of fetal wellbeing would you record on the partograph?
- c.How often should you measure the vital signs of the mother and record them on the partograph in a normally progressing labour?
- d.What are the key indicators for immediate referral?
Answer
- a.Good progress of labour is indicated by: a rate of dilation of the cervix that keeps it on or to the left of the alert line; evidence of fetal descent coinciding with cervical dilation; and contractions which show a steady increase in duration and the number in 10 minutes.
- b.Fetal wellbeing is indicated by: a fetal heart rate between 120-160 beats/minute (except for slight changes lasting less than 10 minutes); moulding (overlapping of fetal skull bones) of not more than +2; and clear or only slightly stained liquor (C or M1).
- c.In a normally progressing labour, you would measure the mother’s blood pressure (every 4 hours), pulse (every 30 minutes), temperature (every 2 hours) and urine (every time it is passed), and record them on the partograph.
- d.Indicators for immediate referral include: slow rate of cervical dilation (to the right of the Alert line on the partograph); poor progress of labour, together with +3 moulding of the fetal skull; fetal heartbeat persistently below 120 or above 160 beats/minute; liquor (amniotic fluid) stained with meconium, depending on the stage of labour, even with normal fetal heart rate: (refer M1 liquor in latent first stage; M2 liquor in early active first stage, and M3 liquor in any stage, unless labour is progressing fast.