
2.3 Using finder charts to identify target and reference stars
The first thing you will have noticed about your image is that it contains a large number of stars. Before you can make the aperture photometry measurements it is important to make sure that you are measuring the correct stars.
In each image you will need to identify which star is the target (your chosen variable star) and which star is the reference star. This is especially important when combining results, as you will do in order to make the light curve; for the results to be consistent, everyone needs to use the same reference star!
If the telescope has moved exactly to the coordinates that you specified, the variable star you have chosen should be in the very centre of the image. Sometimes there are minor variations in the telescope drive and the target may not be exactly in the centre, so it is important to be sure that you are measuring the correct star. The reference will be another star in the same image, not necessarily near the centre.
To help you to identify these stars in your images we have produced finder charts for each of the variable star targets listed at the end of Week 7.
From the list, select the chart that corresponds to the variable star that you are investigating and save a copy to your computer. You may want to print this out and work from a paper copy.
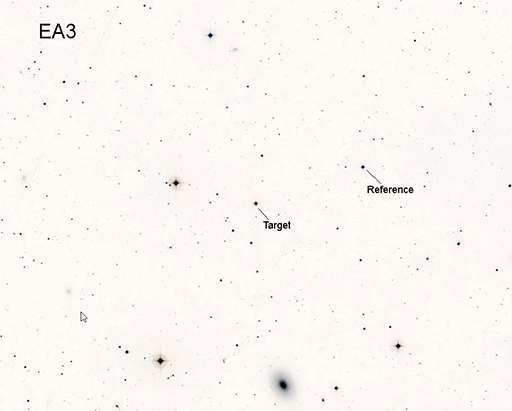
One thing that you will notice about the finder charts is that they are negative images, with black stars on a white background. This makes them easier to use when printed out.
First, take a look at the finder chart and image in Figure 2 and see if you can identify the target and reference stars:
This short video goes into more detail on how to match up the stars in your images with those on the finder charts by looking for patterns in the stars near the target and the reference.
Transcript
Now do the same with your own image and the corresponding finder chart from the list. Having identified the correct stars in your image, you are now ready for the next step – the aperture photometry.
Because of the way that the telescope moves, sometimes the images from COAST are rotated by 180 degrees compared to the finder chart. If this has happened to one of your images, use the Flip X and Flip Y options in the telescope.org Edit window and in the photometry tool (on the Image tab) as needed to make the pattern of stars in your image match the pattern in the finder chart.