Week 3: Sugar, yeast and life
Use 'Print preview' to check the number of pages and printer settings.
Print functionality varies between browsers.
Printable page generated Thursday, 12 March 2026, 10:52 AM
Week 3: Sugar, yeast and life
Introduction
Transcript
Welcome to Week 3. This week, you will be conducting experiments using living organisms. You might be wondering if you need special licences or ethics committee approval, but as the organisms involved are only single-celled fungi, you don’t need to worry. This week, you will be experimenting on yeasts.
As single-celled organisms, yeasts are tiny; only a few, to a few tens, of micrometres (10-6 m) across. Yet despite their size, they have had a huge impact on our culture, having been used for thousands of years in the manufacture of leavened bread, beer and wine (although some of us think it reached its culinary peak in the manufacture of Marmite).
The uses we have put yeasts to might seem trivial, but for many centuries throughout the history of human culture, water supplies were often unsafe to drink, due to the presence of pathogens. It was often the case that the only safe beverage to drink was beer or wine, so the use of yeasts has been pivotal in lowering mortality rates.
3.1 Experiment 4: Yeast experiment
Living organisms, like yeasts, need food and oxygen in order to survive and thrive. In this experiment, you will test some conditions that can affect their growth. What variables might you be able to change in this experiment?
You will add the living yeast organisms to sugary solutions at different temperatures. You will also cover one glass of your sugary solution with cling film.
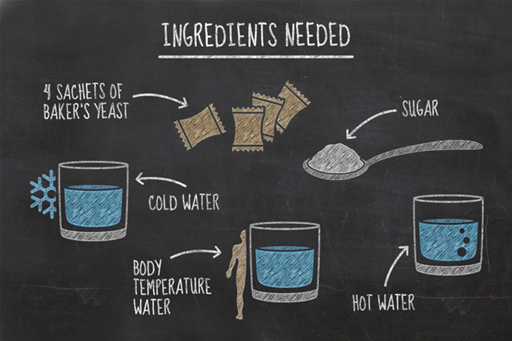
To carry out this experiment, you will need:
- four glasses
- four sachets of baker’s yeast
- sugar
- water
- a kettle
- a marker pen
- cling film
- your activity booklet.
As with experiments in the previous weeks, you will want to carry this out somewhere that it won’t be disturbed by family members or pets. The experiment shouldn’t take more than half an hour or so to carry out, so you won’t need to be vigilant for too long.
What results do you expect to see in this experiment? Try to write down a hypothesis that you will be testing.
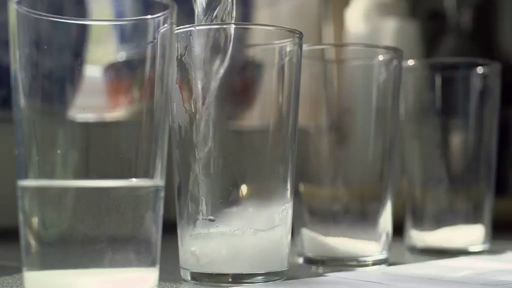
3.1.1 The experiment
Follow Janet’s instructions in the video (or use your activity booklet PDF) to conduct the experiment. You will need about 1 tablespoon of sugar and approximately 200 ml of water in each large glass. This sugar will act as food for your yeasts to consume.
Transcript
Take care to label your glasses with which variables you’ve changed – you don’t want to get them mixed up. If the environmental conditions are suitable, the yeasts will grow and multiply quite quickly – you shouldn’t need more than 30 minutes to complete this experiment. Remember that boiling water can crack glassware, so be careful to let the water cool a bit first.
Carefully observe and record which glasses have conditions suitable for the yeasts to grow and which ones have conditions that restrict its growth.
You will have the opportunity to discuss your results in the next section.
3.1.2 What were your results?
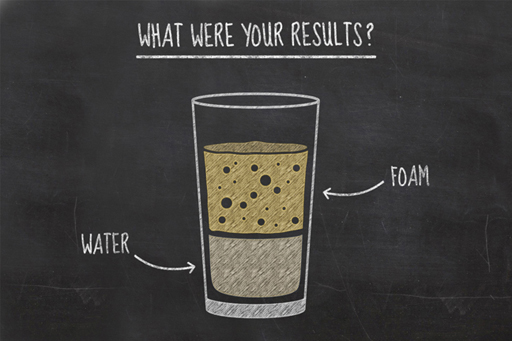
You should now have completed this week’s experiment and be ready to share your findings with your fellow learners.
Activity 3.1 Experiment 4
Post your results and findings in the course forum thread for this activity
- Were your results similar to Janet’s or were there any differences?
- Which environments promoted yeast growth and what environments hindered yeast growth?
- How do the results of your two experiments at body temperature conditions compare?
- Did you notice any changes with time? If you needed to, how could you display these results?
While it is nice when an experiment goes according to plan, it is often more interesting from a scientific point of view when something odd and unexpected happens. It usually means that there is something exciting going on, or that you need to think about ways to tighten up your experimental skills – both of which are good things. Never feel bad if an experiment goes a bit wonky, that is where the cutting edge stuff happens!
3.1.3 Yeast experiment explained
You’ve seen the results of the yeast experiment, but what do these results mean?
Yeasts are microscopic, single-celled organisms, and are a type of fungus that is found all around us, in water, soil, on plants, on animals and in the air. Like all organisms, when yeasts are put in the right type of environment they will thrive; growing and reproducing.
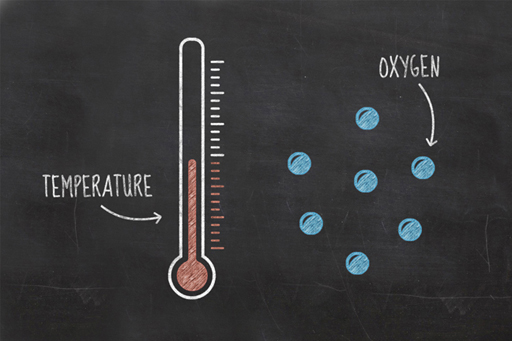
Your experiments were designed to help you identify which environment promotes the most yeast growth. The first three glasses in your experiment contained different temperature environments (cold water, hot water and body temperature water). At very low temperatures the yeast simply does not grow but it is still alive – if the environment were to warm up a bit, it would gradually begin to grow. At very high temperatures the cells within the yeast become damaged beyond repair and even if the temperature of that environment cooled, the yeast would still be unable to grow. At optimum temperatures the yeast thrives.
Your third and fourth glasses both contained environments at optimum temperature (body temperature) for yeast growth, the difference being, the fourth glass was sealed. The variable between these two experiments was the amount of available oxygen. You may have been surprised by your results here, thinking that a living organism in an environment without oxygen cannot survive? However, you should have found that yeast grew pretty well in both experiments.
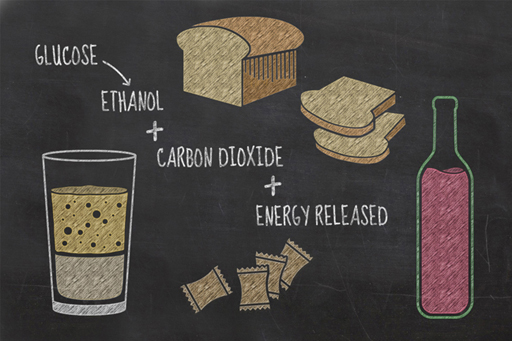
To understand why yeast was able to thrive in both conditions we need to understand the chemical process occurring in each glass during the experiment. In the three open glasses, oxygen is readily available, and from the moment you added the yeast to the sugar solution it began to chemically convert the sugar in the water and the oxygen in the air into energy, water, and carbon dioxide in a process called aerobic respiration.
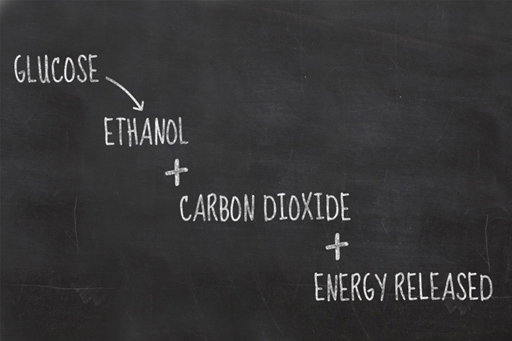
Yeast is a slightly unusual organism – it is a ‘facultative anaerobe’. This means that in oxygen-free environments they can still survive. The yeast simply switches from aerobic respiration (requiring oxygen) to anaerobic respiration (not requiring oxygen) and converts its food without oxygen in a process known as fermentation. Due to the absence of oxygen, the waste products of this chemical reaction are different and this fermentation process results in carbon dioxide and ethanol.
Depending on how long you monitored your experiment for and how much space your yeast had to grow you may have noticed that, with time, the experiment sealed with cling film slowed down. This is for two reasons; firstly because less energy is produced by anaerobic respiration than by aerobic respiration and, secondly, because the ethanol produced is actually toxic to the yeast. As the ethanol concentration in the environment increases, the yeast cells begin to get damaged, slowing their growth.
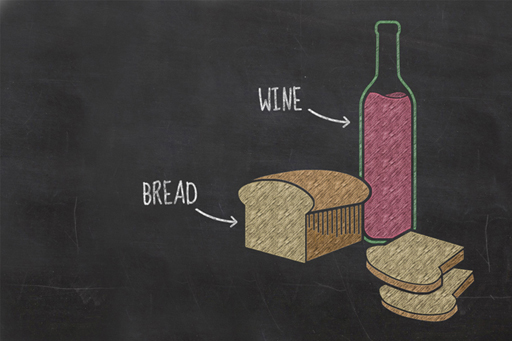
The ethanol produced is a type of alcohol, so it is this process that allows us to use it to make beer and wine. When used in bread making, the yeast begins by respiring aerobically, the carbon dioxide from which makes the bread rise. Eventually the available oxygen is used up, and the yeast switches to anaerobic respiration producing alcohol and carbon dioxide instead. Do not worry though; this alcohol evaporates during the baking process, so you won’t get drunk at lunchtime from eating your sandwiches.
3.2 Altering variables
You have now conducted another experiment, one which had several different variables. Variables are parts of an experiment that can be kept the same, or changed in order to test different outcomes.
In the yeast experiment, you actually performed two separate tests at the same time; one regarding the temperature and another regarding available oxygen. Note that in each case you only altered one variable (either temperature or oxygen availability).
You could repeat the yeast experiment, keeping both temperature and oxygen availability constant but altering a different variable, i.e., fixing a previously changing variable and changing a previously fixed variable. By performing a combination of these experiments the optimum conditions for yeast growth can be determined.
You should now be starting to think like an experimental scientist and considering ways that an experiment can be altered so that different hypotheses can be tested.
Takes some time now to think which other variables you could test and why.
3.3 Yeast – who needs it?
You’ve seen yeast in action and had a look at the science behind it, but where has it come from? Human society has used it for at least 7000 years. Its use in brewing is first thought to have taken place in ancient Iran and possibly even earlier in China. The oldest surviving beer recipe dates back to a 3900-year-old Sumerian poem.
The earliest brewing may well have been accidental, as wild yeasts in the air and on the ground may have contaminated cereal crops, causing them to undergo spontaneous fermentation, possibly in leftover pots of gruel. As time passed these brews would have been replicated and, to a degree, standardised.
Without fermented beverages, historical populations might have been afflicted with more waterborne diseases than are recorded, due to the boiling step in the production process.
Around the same time yeasts were being used in brewing, they began to be used as raising agents in bread making. As far back as 30,000 years ago, humans were crushing up cereal crops and baking them as flatbreads, but records show that from a few thousand years ago the ancient Egyptians began using yeasts to leaven bread, although the extent to which their rather dense loaves actually rose is uncertain.
The Romans, Greeks, Gauls, and Iberians are all recorded as making leavened breads. By the Middle Ages bread had become a staple across Europe, not only as food, but also as a type of plate, known as a trencher. These trenchers were made from a slice of stale bread, on which the food was placed. The trencher would soak up the juices to be eaten later or given to the poor.
In modern times, bread comes in a dizzying array of types, light to dark, pure and refined, coarse and grainy, sliced and unsliced to name but a few. Interestingly, sliced bread is a fairly recent invention.
Early attempts to pre-slice bread were met with doubt as it was thought that the bread would go stale too quickly. In 1928, Otto Rohwedder sold his latest invention to a bakery in Chillicothe, Missouri, a device to slice and wrap loaves of bread. In 1928, an advert was run on the back page of the local newspaper proclaiming it to be ‘the greatest forward step in the baking industry since bread was wrapped’. This may be the origins of the phrase, ‘the best thing since sliced bread’, suggesting that the best thing prior to sliced bread was wrapped bread!
3.4 Week 3 quiz
Check what you’ve learned this week by taking this end-of-week test.
Complete the Week 3 quiz now.
Open the quiz in a new window or tab then come back here when you're done.
3.5 Week 3 summary
Congratulations on completing Week 3. Who knew yeast was so important in human history?
While the experiments you’ve carried out over the last three weeks have been necessarily simple enough for you to perform at home, with little risk of accidentally constructing a doomsday device or incinerating your pets or family, they are important experiments in explaining how the world around us works. Hopefully, you’ve also developed skills in carrying out scientific experiments and how you can identify and alter variables to test a hypothesis further.
In the final week of the course, the difficulty level ramps up a notch, as you will be using some household items to separate and extract the DNA from a living organism!
To conduct next week’s experiment, you will need:
- kiwi fruit (or another fruit of your choice)
- methylated spirits, chilled in freezer for 30 minutes (or vodka or strong white rum)
- fine sieve or filter paper
- salt
- washing-up liquid
- measuring beaker
- a paperclip.
Remember, methylated spirits are extremely hazardous and should only be used with adult supervision.
You can now go to Week 4.
Acknowledgements
This course was written by Hazel Rymer.
Except for third party materials and otherwise stated in the acknowledgements section, this content is made available under a Creative Commons Attribution-NonCommercial-ShareAlike 4.0 Licence.
Every effort has been made to contact copyright owners. If any have been inadvertently overlooked, the publishers will be pleased to make the necessary arrangements at the first opportunity.
Don't miss out:
1. Join over 200,000 students, currently studying with The Open University – http://www.open.ac.uk/ choose/ ou/ open-content
2. Enjoyed this? Find out more about this topic or browse all our free course materials on OpenLearn – http://www.open.edu/ openlearn/
3. Outside the UK? We have students in over a hundred countries studying online qualifications – http://www.openuniversity.edu/ – including an MBA at our triple accredited Business School.