
1 Minerals and the crystalline state
1.1 Introduction
Rocks are made of minerals and, as minerals are natural crystals, the geological world is mostly a crystalline world. Many large-scale geological processes, such as the movement of continents and the metamorphism of large volumes of rock during mountain building, represent the culmination of microscopic processes occurring inside minerals. An understanding of mineral structures and properties allows us to answer questions such as, 'Why is quartz so hard?' and 'Why is quartz so often the dominant type of sand grain on a beach?' and 'How can solid rocks bend into huge folds, or flow like a liquid over geological time?' Minerals and rocks are also, of course, natural resources that provide the inorganic raw materials for almost everything humans use. A good scientific understanding of their origins, occurrence and properties helps to maximise their potential benefits to humanity. In this course, you will look at mineral and rock specimens in various ways (Box 1).
Box 1 Mineral and rock specimens in the Digital Kit and Virtual Microscope
In this course, we will often refer to mineral specimens and rock specimens in the Digital Kit [Tip: hold Ctrl and click a link to open it in a new tab. (Hide tip)] and the Virtual Microscope. You may find it easier to open them in separate tabs in your browser, which you can do by holding down the 'Ctrl' button before left-clicking on the link with your mouse (or equivalent for non-mouse users). To get back to this course please press the back button in your browser.
Activity 1.1 Introduction to the Digital Kit
Task 1
This activity is designed to familiarise you with the operation and content of the Digital Kit, which provides access to images and information about the mineral and rock specimens used in this course.
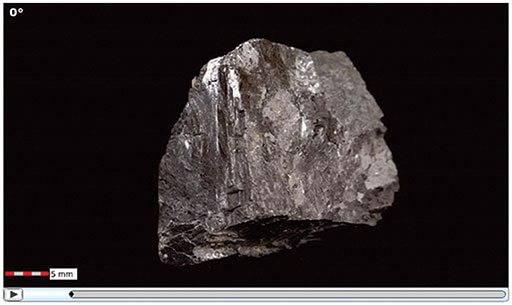
Open the Digital Kit and you should see a screen similar to the one shown in Figure 1. We will use the mineral galena to illustrate the Digital Kit, but this may not be the image that appears the first time you access the Digital Kit.
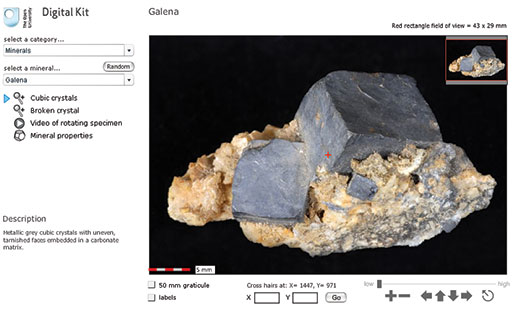
The screen is divided into the field of view of the specimen and several functional areas that control the images, including a main viewing window, zooming and panning facilities, and buttons/hyperlinks to other images, video clips and mineral properties.
In the upper left-hand corner, the catalogue of specimens can be accessed via two drop-down menus. Click the upper menu to select from the categories of minerals, rocks or fossils. Select 'Minerals' for this demonstration.
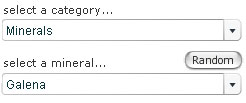
The lower drop-down menu lists different minerals in alphabetical order. Select 'Galena' from the menu.
A very useful feature of the Digital Kit is a 'Random' button (adjacent to the catalogue), which can be used for self-test and revision purposes. When clicked, a random mineral, rock or fossil is presented, depending on which of these three categories is already selected. There are two stages of working in random mode: clicking the 'Clue' button gives the description (at the bottom of the left-hand column), and clicking 'Reveal' gives the name as well.
Once the specimen (galena, in this case) has been selected, a series of buttons and a description of the mineral appear below the two drop-down menus, as shown here for galena. Several views and, in most cases, a video clip of a rotating image are available for each specimen (see below). Finally, a mineral properties page is given for each mineral.
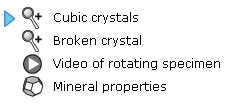
For this demonstration, select the 'Cubic crystals' view.
- A short description of each specimen appears below the menus.
The main window shows the full specimen view when initially selected from the menu. At the centre of the field of view (at any magnification) is a small cross. As explained below, the coordinates of this cross are given, allowing specific points in the image to be identified.
The image can be manipulated either by zooming in and out, or by panning around the specimen at different magnifications. As the main image is zoomed or panned, the inset image in the top right-hand corner shows its location as a red rectangle. The dimensions of the field of view displayed are given in millimetres in the top right above the viewing window.
The image can be moved in several different ways, by:
- clicking and dragging the image itself
- using the arrows on the right below the viewing window (further explained below)
- clicking and dragging the red rectangle in the inset image
- clicking and holding down the arrow keys on the keyboard you are using.
The image magnification can be varied by zooming in and out of the field of view. This can be achieved in various ways:
- A set of image manipulation controls on the right below the viewing window contains all the zooming and panning functions. These are explained in point 5, below.
- If you wish to zoom into a specific point on the image, simply click on it and it then becomes the new centre of the image at a higher magnification. Another click zooms in further.
- Zooming in and out can also be achieved using the computer keyboard. Press the 'A' key to zoom in, and the 'Z' key to zoom out.
A 5 mm scale bar at the bottom left-hand corner of the viewing window shows millimetre increments.
Below the viewing window on the right-hand side are a series of image manipulation controls. Click on the '+' to zoom in, and the '−' to zoom out. Click on one of the four arrows to move the viewing window across the image in the direction indicated. The circle containing an arrow resets the window to the full specimen view. Above the controls, a magnification slide bar indicates the zoom level. The magnification slider can be clicked (it will go black as the mouse passes over it) and dragged to the right and left to zoom in and out of the specimen. You will find this very useful.

We recommend that you try all the ways of moving an image and changing its magnification, to see which are best for you.
Below the viewing window on the left-hand side are two tick boxes.
When the '50 mm graticule' box is selected, a 50 mm graticule is superimposed over the image, allowing direct measurement of features anywhere on a specimen once the features are moved to the centre of the field of view. Clicking on either of the two curved arrows rotates the graticule to enable features to be measured in any orientation.
When the 'labels' box is selected, labels are superimposed on the specimen, identifying particular features. These labels are shown only at the lowest magnification. If the 'labels' box is clicked when at a higher magnification, the image reverts to the lowest magnification and the labels are shown.
The location of the small central cross (the 'cross hairs') is constantly displayed below the viewing window as X and Y coordinates. The sample can be moved to a specific location by typing its X and Y coordinates into the boxes and clicking the 'Go' button. This useful feature allows locations of particular features to be communicated between different users.

When a 'Video of rotating specimen' button is selected (a right-pointing arrowhead in a circle), a video clip window replaces the zooming and panning window.
After the video clip window is launched, a dark-grey fill extends across the bar below the image, indicating that the clip is loading into the computer's memory. The button at the bottom left starts (or pauses) the video clip. A particular position in a rotation video clip can be specified using the number of degrees shown at the top left (e.g. 60°) of the video clip window.
- Finally, when the 'Mineral properties' button is clicked, a range of mineral properties is displayed.

| Crystal system | cubic |
| Formula | PbS |
| Colour | dark grey to grey-black |
| Lustre | metallic to dull |
| Form | cubes and octahedra; also massive, granular |
| Cleavage | 3 perfect cubic |
| Fracture | subconchoidal |
| Hardness | 2.5 |
| Relative density | 7.6 |
| Types | |
| Common occurrence | hydrothermal vein |
| Comments | opaque; colour, form, density, cleavage and lustre can be diagnostic |
Now answer the following questions to help you find your way around the Digital Kit.
Question 1.1.1
In the Digital Kit select 'Galena' and 'Broken crystal'. Zoom in on the specimen and pan around to explore the features on the broken surface. How many cleavage orientations does galena exhibit? Look at the video clip of the rotating galena specimen, which will help you to perceive the cleavages more easily in three dimensions. Confirm your answer by selecting 'Mineral properties'.
Question 1.1.2
- a.Go to 'Quartz' and select 'Variety amethyst'. How long is the amethyst crystal on the far left? Measure it using the graticule.
- b.Go to 'Garnet' and select 'Red crystals in gneiss'. Go to coordinates X = 1860, Y = 930. Is any red garnet visible at the point denoted by the cross hairs?
Answer
- a.It is about 16 mm. Note that there are large divisions on the graticule every 10 mm.
- b.No, garnet is not visible at this point, only a white mineral is visible at the stated coordinates.
Question 1.1.3
- a.Which of the following minerals has the highest density and which the lowest density: garnet, gypsum and quartz?
- b.Which of the following minerals is the hardest, and which is the softest: galena, hematite and pyrite?
- c.Supply the missing words in the following statements.
- i.Selenite is a variety of the mineral ___________
- ii.The mineral ___________ may have a form described as 'kidney-shaped'.
- iii.Chert is a variety of the mineral ___________
- iv.Pure pyrite contains ___________chemical elements.
Answer
- a.Garnet has the highest density (3.6-4.3); gypsum has the lowest density (2.3). Quartz is in between (2.65). (Density values quoted are relative to water.)
- b.Pyrite is the hardest (6-6.5), galena the softest (2.5). Hematite has hardness 5-6.
c.
- i.Selenite is a variety of the mineral gypsum.
- ii.The mineral hematite may have a form described as 'kidney-shaped'.
- iii.Chert is a variety of the mineral quartz.
- iv.Pure pyrite contains two chemical elements. (These are iron and sulfur.)
Take a look at the granite in Figure 2a and examine the granite rock specimen in the Digital Kit. This rock is composed of three distinct types of crystal, each of which is a different mineral: shiny black biotite mica (cf. Digital Kit); cloudy orthoclase feldspar (cf. Digital Kit); translucent grey quartz (cf. Digital Kit).
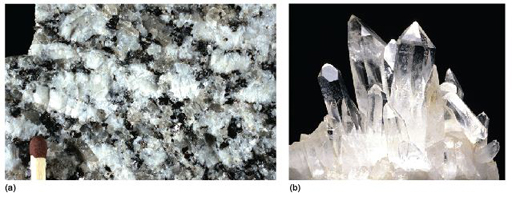
The junction between any two adjacent crystals in the rock is called a grain boundary. Grain boundaries occur where crystals develop in contact with each other - here, during the cooling and crystallisation of magma to form granite. Grain boundaries also develop when minerals grow in the solid state during metamorphism. Where the crystals form an interlocking mass, as in granite or marble, they rarely have the opportunity to develop good crystal faces. By contrast, the best-formed crystals are often ones that have grown into cracks or cavities (such as a gas bubble in a lava flow). Figure 2b shows several such quartz crystals that have grown into a cavity.
Crystals may be objects of great beauty, in part because of their almost perfectly flat crystal faces and geometric shapes. This regular external appearance is caused by a highly ordered internal arrangement of atoms, known as the crystal structure, which leads to distinct (and to some extent predictable) physical and chemical properties.
Minerals, by definition, are solid substances. Before looking at the crystalline world in more detail, the next section considers briefly the various physical states that matter can have, and the transition from one state to another - concepts that remain relevant at various stages throughout the course.