1.7.1 Making and using field sketches
How do we start to make sense of a rock exposure? Drawing a sketch is one of the best ways to start, as it forces you to notice many aspects of the exposure. It also helps you to build up a picture of which aspects are significant and which are incidental or even irrelevant to a geological study. The aim of a field sketch is that it provides a record of your observations (along with notes taken at the same time, and also perhaps a photograph to record details). A sketch is complementary to a photograph because it allows you to highlight and label the significant features. However, your sketch need not be a work of decorative art.
Activity 8 Sketching a geological exposure
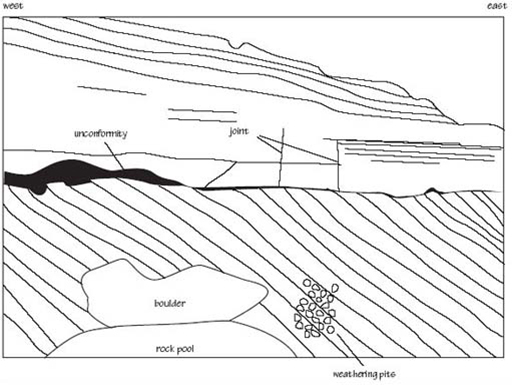
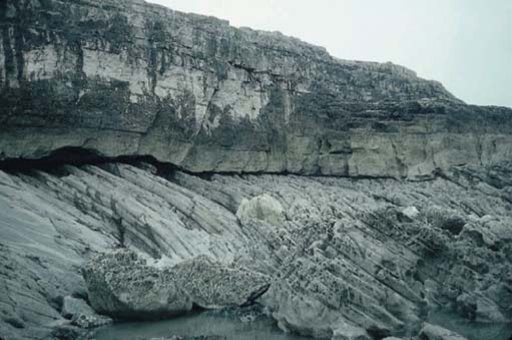
Now look at Figure 16, a photograph of a coastal rock exposure of sedimentary strata. The rock is far from featureless, and we'll explore the visible features by first sketching the exposure, and then working through our sketched observations to develop some ideas about the history of the rocks. Use a pencil, and follow the general guidelines 1–5 below. Spend no more than 15 minutes doing this.
Spend a minute or so looking carefully at the rock face to begin to recognise some general details.
Now it is time to start committing some of your observations to paper! Draw in the skyline and the base of the exposure. (In Figure 16 this extends to the bottom of the photograph.) This marks out the area that you have to concentrate on.
Sketch in the main features using simple lines wherever possible. If necessary, rub out and redraw particular areas until you're happy with them. Part of the skill of making successful geological observations of complex exposures is to follow any key feature (the top or bottom of a sedimentary bed, for instance), as far as you can with your eye until it disappears from view. Similarly, the skill of making an effective geological sketch is to draw a discrete, continuous line (where the feature is continuous), rather than to sketch a vague series of unconnected lines. Ignore shadows from sunlight and features such as loose boulders, fallen branches, etc. You can indicate any patches of vegetation using your own simple symbols for grass, trees, etc.
Label the features you have drawn.
Add a scale, the approximate orientation, for example by marking west on the left and east on the right, and a title including information identifying the location.
Once you have finished, compare your sketch with the one provided in the answer below.
Answer