Quick-start guide
7. Setting up a Moodle book
7.1. Adding text to your Moodle book
Having set up a Moodle book you are presented with a new page: Add new chapter.
On this page, add a Chapter title. (Since this is the start of the book you could type 'Introduction' here.)
Then add text to the Content field. The editor includes icons for various formatting functions. You can click on the Reveal or hide additional toolbar items icon (three dots at the end of the first row) to reveal a second row of functions.

- Top row: Source code Pro, Undo, Redo, Align left, Align centre, Align right, Justify, Reveal or hide additional toolbar items.
- Middle row: Bold, Italic, Font colour, Background colour, Font size, Ordered list, HTML Transcript.
- Bottom row: Image, Multimedia, Insert H5P content, Image description, Link, Unlink, Embed media, No glossary auto-link, Preview, Import Word file, Left to right, Right to left, Decrease indent, Increase indent, Bulleted list, Numbered list.
When you've finished click on Save changes.
This generates a Table of contents at the top of the left-hand side of the screen. The title of the first chapter will appear here and the content will appear in the main area of the screen.
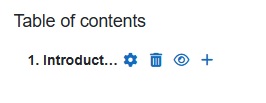
To add another chapter, click on the + (add or plus) symbol alongside the chapter you've just created in the Table of contents.
This will take you back to the Add a chapter page.
Again, fill in the Chapter title and Content fields, and click on Save changes.

As you add more chapters you can:
- change the order of the chapters by clicking on the arrow icon
- edit a chapter by clicking on the cog icon
- delete a chapter by clicking on the dustbin/trashcan icon
- hide or reveal a chapter by clicking on the eye icon
- add a new chapter by clicking on the plus icon.
You will also see forward and back arrows at the top of each chapter to move through your book.
We've focused here on adding text to your course content. Now you're going to look at adding links to the text.
Before you move on
- Try to avoid excessively long pages. Some of your content may need to be split over more than one chapter.
- Later on you'll want to test your learners in a quiz. As you add course content think about what you'll want to test your learners on.
- If you refer to other people's ideas, make a note of where you got them from – you'll need them for your references list.
In depth
- The book above automatically includes chapter numbering. If you don't want numbering or want to look at what other options are available, click on Appearance.
- If an individual chapter is too long you may want to use subchapters. If you look at this book's table of contents you'll notice that this subchapter, Adding text to your Moodle book, is part of the chapter Setting up a Moodle book.
- If you are co-authoring the course, you'll need to be able to invite another author to collaborate on the course content.