How to identify community owned solutions
| Site: | OpenLearn Create |
| Course: | 6 Community Wetland Management |
| Book: | How to identify community owned solutions |
| Printed by: | Guest user |
| Date: | Sunday, 26 July 2026, 1:57 AM |
1. Introduction
This training unit is divided into activities that provide step-by-step instructions to identify community owned solutions. It builds on the understanding you will have already gained of community engagement (Unit 1) and participatory engagement techniques (Unit 2). These are all important in identifying community owned solutions for community management.
Activities 1 and 2 are used to engage the community you are part of or working with and activities 3 to 5 are the steps to identify the challenges the community face and to highlight existing solutions the community already are using to cope with these challenges. Ideally these activities are all done face-to-face with as many people from all sections of the community as possible. If you are unable to do this, you can also connect with community members online or by phone.
2. Activity 1 - Community introduction meeting
It is important to introduce the community engagement that is going to take place with the community and for the community to select the team that will undertake the later activities. If you are a community member then either organise a meeting or talk to your fellow community members in person, online or via the phone explaining the following. See more information about how to organise a meeting in Unit 2.
Objectives
To communicate the key aims, concepts and techniques underpinning the community engagement process; to explain the programme of activities; to select the community team.
Duration
1-2 hours
Who should be involved?
Representatives from all sections of the community or the whole communityProcess
Step 1
Introduce community engagement and the concepts of community viability and community owned solutions from what you have learnt and using resources from Unit 1.
Step 2
Introduce the provisional programme of activities
Step 3
Select community members that will work on later activities. Ideally at least 4 people will be selected but an ideal number is 10. It is important that these people represent the whole community in terms of age, gender, ethnic background etc.
3. Activity 2 - Community history
Activity 2 familiarises the community team with the range of participatory and visual methods that can be used to identify community owned solutions. This is done through an investigation of the community’s history such as when and how the community was founded and how it has developed through time. This can be organised at a meeting of the community team or online if a meeting is not possible.
Objectives
To demonstrate and practice the key principles of Participatory Drawing and storyboarding: to express ideas and tell a story through drawings; to illustrate the importance of sharing material with others.
Duration
2-3 hours
Who should be involved?
The community team selected in Activity 1Process
Step 1
Introduce the concept of storyboarding by giving the community team examples from Unit 2.Step 2
Introduce participants to the story they are going to tell. The objective is to get the community team to understand and tell the history of the community.
Step 3
Discuss ideas. If you have enough people, divide the community team into two groups, of 4 or 5 depending on numbers, and ask them to interview each other within the group to explore the history of the community.
Step 4
Draw storyboard boxes. Ask the groups to draw boxes on a piece of paper or online (it can be 4-6 boxes to start with). Note: instead of drawing 4-6 boxes, steps of the story can also be drawn on individual pieces of paper or sticky notes and stuck on a wall as well as in chat boxes using online meeting software. This method gives a bit more flexibility to integrate changes and make the story evolve.
Step 5
Draw community history in boxes. Ask each group “How would you start the story of your community?” and ask them to draw that first idea in the first box. Ask them about what would be the next step of the story, and ask them to draw it in the second box. Continue until each group has completed their story of the history of the community.
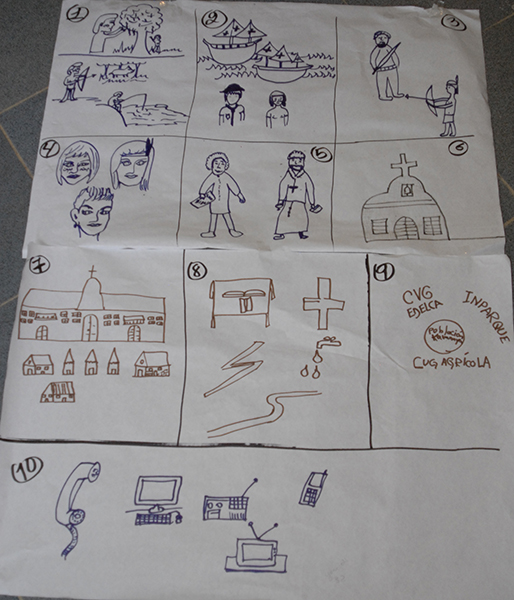
Step 6
Group presentations. Ask the groups to explain their storyboard to another group.
Step 7
Storyboard changes. If the groups want, make changes to the storyboard to integrate suggestions or changes.
Step 8
Introduce participatory video. If you are meeting face-to-face or online then this can be done at the end of the session or as a separate session.
Step 9
Introduce how to use the video mode on mobiles or tablets that was demonstrated in Unit 2. Begin training of the community team in how to take video clips.
Step 10
Filming of community history. Ask the community team to film their community history to demonstrate their storyboard. This activity can be as long or as short as the time available but is just a chance for the community team to become familiar with using the equipment demonstrated in Unit 2.
Step 11
Edit the film. Introduce how and ask the community team to edit their videos of their community history.
Step 12
Discussion with the community team. Give the community team the chance to feedback on what went well and what didn’t go well with recording their community history.
4. Activity 3 - Community viability
Activity 3 introduces the concept of community viability and explores community viability in your community as you have learnt in Unit 1
Objectives
To introduce the idea of community viability; to explore how community knowledge and its associated practices have developed in order to cope with current challenges
Duration
1-2 hours
Who should be involved?
The community team selected in Activity 1Process
Step 1
Introduce the concept of community viability, that you learnt about in Unit 1, to the community team. Explain the six different categories of community viability, and how they contribute to overall community viabilityStep 2
Split the community team into two groups of 4 or 5 depending on numbers.Step 3
Explore community viability. Ask each group to use the community viability diagram examples (from Unit 1) and ask them to identify whether the examples are relevant to the situation in their community or not. If a strategy is not relevant, then it should be removed. Also get the groups to discuss whether any strategies are missing and should be added or not.Step 4
Draw up a table with 4 columns and as many rows as you have strategies. Get each group to list the strategies in the first column. Discuss whether each strategy uses community knowledge or not. Record in the second column whether they do or not.Step 5
Ask both groups to present their strategy lists to the other group and agree a combined list.Step 6
Ask each community team member to rank, in their opinion, the 5 most important strategies by putting a mark by the strategy in a third column.5. Activity 4 - Community owned solutions
Activity 4 introduces community owned solutions and identifies which strategies your community currently use are community owned solutions.
Objectives
To introduce the idea of community owned solutions; to provide examples of community owned solutions identified and recorded by communities; to highlight the importance of sharing community owned solutions
Duration
1 hour
Who should be involved?
The community team selected in Activity 1Process
Step 1
Introduce the idea of community owned solutions from information provided in Unit 1.Step 2
Assess which strategies are community owned solutions. From Activity 3 establish to what degree the agreed ‘important’ strategies are community owned solutions. Use the simple checklist of ‘what are community owned solutions’ given in Unit 1. Ask community team members to describe whether each strategy is a community owned solution by using the following categories: yes, no, maybe and putting their answer in a fourth column.
Step 3
Introduce the community owned solutions videos. Show 1 or 2 of the community owned solutions video examples and ask the community team members to consider:
- What does the video show?
- What is the message?
- Whose perspectives are represented?
- What are the assumptions?
- What ideas or views are missing?
Step 4
Ask the community team members to reconsider the strategies and discuss together which ones are community owned solutions. Update the answers in the fourth column.
Step 5
Ask the team to select their top two community owned solutions and plan to record the community owned solutions with participatory video. If you are meeting face-to-face or online then this can be done as a separate session or when the community team has time to do it.
Step 6
Produce a storyboard to explain to others the steps involved in carrying out the community owned solution.
Step 7
Filming of the community owned solution. Ask the community team to film their community owned solution following their storyboard.
Step 8
Edit the film. Ask the community team to edit their videos of their community owned solutions.
Step 9
Screen the community owned solutions with the wider community, either at a meeting or online, and get their feedback on the films. Edit them if the community feels they do not reflect the situation correctly.
6. Activity 5 – Challenges
Activity 5 focuses on identifying the challenges the community faces now and, in the future, and identifying solutions to these.

Objectives
To discuss and identify the key challenges facing the community now and in the future.
Duration
2 hours
Who should be involved?
The community team selected in Activity 1Process
Step 1
Divide the community team into two groups of 4 or 5, depending on numbers, and ask them to discuss the current and future challenges or changes the community face.Step 2
List the challenges and ask each group to present their lists and then combine the lists into one.
Step 3
Ask each community team member to rank the full list of challenges in terms of importance based on their potential impact on peoples’ lives and the environment. Ask them to rank the importance of each challenge from 1 (not important) to 3 (important).
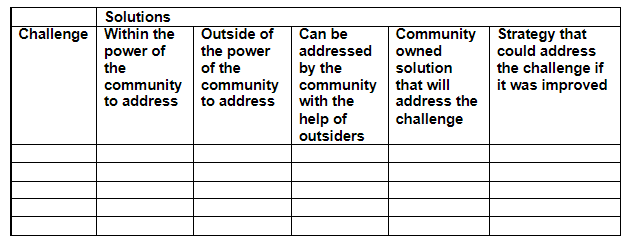
Step 4
Get each group to discuss whether the most important challenges are within the power of the community to solve, outside the power of the community or can be addressed by the community with help from others. Ask them to fill out the first 4 columns within the Challenges and Solutions table below.
Step 5
Discuss whether any of the community owned solutions identified will help deal with any of the future challenges or changes. Fill in the community owned solutions column in the table below.
Step 6
Look again at the Community Viability diagrams produced in Activity 3, Step 3. Look at the strategies that the community team did not think were important and were not community owned solutions. Do any of these strategies have to be improved or changed to cope with future challenges to the community? Fill in the strategy column in the table below.
Step 7
Hold a community meeting face-to-face or online to discuss the current and future challenges for the community and which strategies the community currently have that need changing or need improving. Ask the community members for feedback and suggestions.
Step 8
Produce a video of the challenges facing the community.
Challenges and solutions table