
2 The circle in life versus the circle in mathematics: vocabulary
You can probably think of quite a few barriers to using intuitive learning in school geometry. This unit starts with one of them: how to make mathematical language more accessible and less reliant on ‘rote learning’ (memorisation).
A circle is a simple yet unique geometric shape. It has no vertices or corners, and all points on a circle are the same distance from the centre.
In order to explore geometry for Classes IX and X, students must become acquainted with new vocabulary in order to describe elements and concepts relating to the circle properly. (More activities around mathematics vocabulary can be found in the unit Building mathematical resilience: similarity and congruency in triangles.) This specific vocabulary is not much used outside of the mathematics classroom, and can therefore seem alien to students who may not know these words in the language that they use every day outside school. Often they have been asked to learn this vocabulary using rote learning. The vocabulary is shown in Figure 1.
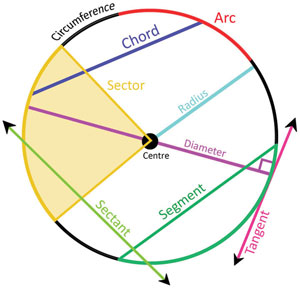
Note that the circumference of a circle means the length around it. It is a concept relating to calculations with the circle; therefore, is not an element of the circle as such.
Activity 1 aims to make students aware of the various terms that are used in relation to circles in a different way than simply learning the words by rote. It requires students to represent these terms and concepts physically and, in doing so, develop an image and a memory of them. The activity also asks students about variance and invariance: ‘What is the same?’ and ‘What is different?’, as well as ‘What has to stay the same?’ and ‘What can be changed?’ Working on invariance is a very useful teaching tool when learning geometry. Watson et al. (2013, p. 108) even claim that it:
is especially relevant and important in geometry. Most theorems in geometry can be seen as resulting from the study of what change is permitted that leaves some relationships or properties invariant.
Before attempting to use the activities in this unit with your students, it would be a good idea to complete all (or at least part) of the activities yourself. It would be even better if you could try them out with a colleague, as that will help you when you reflect on the experience. Trying the activities yourself will mean that you get insights into learners’ experiences that can in turn influence your teaching and your experiences as a teacher. When you are ready, use the activities with your students. After the lesson, think about the way that the activity went and the learning that happened. This will help you to develop a more learner-focused teaching environment.
Activity 1: Enacting the circle
For this activity, ask the students to sit in a circle (Figure 2). If your class is large, you might have 20–30 students in the circle and the other students watching. This activity will work best if you take your students outside, where there is more space. The activity is in two parts: the first is to give students instructions to move in certain ways; the second asks you to repeat the activity several times but with slight differences.

Part 1: Enacting terms associated with a circle
Instruct a student to move in certain ways to enact a term (how to do this is in the list below) but without telling them the name of the term. All students shout out to guess the name of the term. Then ask another student to describe how the term was enacted. To make the activity even more interactive, you could also ask students for their ideas on how they would enact the term.
Here is how the students could enact a term:
- Radius: Ask the student to get up, walk to the centre of the circle and then return to their position.
- Arc: Ask the student (S1) to name another student (S2); then ask S1, S2 and the fewer number of students sitting between S1 and S2 to raise their hands.
- Diameter: Ask the student (S1) to name the student sitting diametrically opposite to them (S2). Both students stretch their hands forward towards each other; alternatively, ask them to hold a piece of string between them.
- Chord: Ask the student to name any other student; both students stretch their hands toward each other or use string.
- Segment: Ask the student to name any other student; both students stretch their hands toward each other or use string. The fewer students sitting between the two students push their hands forward to fill in the gap.
- Sector: Ask the student to name any other student; both students move to the centre, shake hands and return to their positions.
- Circumference: Ask the student to get up and walk around the outside of the circle counting their steps aloud. The student then shouts out ‘the circumference of this circle is ... steps’.
Part 2: Building confidence with the vocabulary
This part of the activity builds on Part 1 and aims to give students the chance to become confident in naming each idea through repetition. During this part of the activity, students can also be encouraged to think about the properties of the terms and concepts in terms of variance and invariance (what can change and what cannot) by asking students questions such as the following:
- What is the same and what is different between (for example) an arc and a chord?
- Can you make another circumference?
- If you make another chord, what has to stay the same, and what can be changed?
Before the lesson you need to plan the questions you will ask the students. You can substitute the circle vocabulary in the questions above with other elements of circles.
Call the name of a student, and then name a term associated with circles that you want the student to enact. If the student cannot remember how to do it, ask whether anyone else remembers and can tell the student. After each student’s action, all students shout out the name of the term and another student describes how the term was enacted.
Repeat this several times, moving onto asking the variance and invariance questions.
At the end of the activity, tell you students to write a definition for each of the terms in their books. Then swap books and evaluate each other’s answers so that everyone has a record of good definitions.
You may also want to have a look at the key resource ‘Using questioning to promote thinking [Tip: hold Ctrl and click a link to open it in a new tab. (Hide tip)] ’.
Case Study 1: Mrs Chakrakodi reflects on using Activity 1
This is the account of a teacher who tried Activity 1 with her secondary students.
It was a good exercise to encourage the students to get acquainted with the various terms involved in circles. They loved the enacting, although they were reluctant at first because we had not used similar activities before. I first gave them the instructions to enact the diameter and an arc. Before giving the next instruction, I asked them for their ideas on how to enact the term. At first this discussion was somewhat chaotic, because they were not really listening and building on each other’s ideas. So I asked them to first practise saying what they wanted to say with a partner. This worked really well and their ideas became really good, matching what was suggested in the activity.
The reaction to the questions about variance and invariance was amazing. It made all of us, including me, think differently about these terms and concepts: suddenly, the connections became clear, as did the role of certain elements of a circle such as the centre. Interestingly, after a while the students posed these questions without my intervention. So much better than simply learning the vocabulary by rote! This approach also showed the students that actually working on geometry does not need to be hard.
We then went in the classroom and worked on studying this vocabulary on paper. Students worked in groups of four and each group was assigned a different term or concept to prepare a presentation on what they had understood. This was then shared and other groups had to ask at least one question each. This way, each group tried to understand their own topic well and had to answer questions on it. They also had to listen to and understand what the others were saying, as well as ask questions. Their questions and answers showed that they were making connections between the topics.
Reflecting on your teaching practice
When you do such an exercise with your class, reflect afterwards on what went well and what went less well. Consider the questions that led to the students being interested and being able to progress, and those where you needed to clarify. Such reflection always helps with finding a ‘script’ that helps you engage the students to find mathematics interesting and enjoyable. If they do not understand and cannot do something, they are less likely to become involved. Use this reflective exercise every time you undertake the activities, noting, as Mrs Chakrakodi did, some quite small things that made a difference.
Pause for thought Good questions to trigger reflection are:
|
1 Intuitive learning