Use 'Print preview' to check the number of pages and printer settings.
Print functionality varies between browsers.
Printable page generated Thursday, 9 July 2026, 6:30 AM
3 Digital technologies at each stage of design thinking
3 Digital technologies at each stage of design thinking

In the design of a sustainable city example, reference was made to different digital applications teachers can use to teach each stage of design thinking. In this section, you will have the opportunity to use these applications and reflect on how they can be used to teach design thinking.
You will experiment with the following applications:
- nQuire for students
- ChoiCo
- SorBET
- MaLT2
- GearsBot.
These applications can be accessed via the Exten(DT)² platform – a single online space where you can create activities for your students and assign each of these applications. So, to access the above applications from the platform, you need to log in as a student after creating an activity and assigning a specific tool to each activity (details in Section 3.6). All applications are free to use in teaching and provided by the Exten(DT)² project.
3.1 nQuire for students – an application for doing research
nQuire for students can be accessed via the Exten(DT)² platform or independently through nQuire for students.
nQuire for students has been developed by The Open University in the UK for use by schools, teachers, and students. It is a password-protected environment where students can design, manage, pilot, and improve their own studies, while they can collect data from other students. Teachers can review studies created by students and provide feedback as to how these could be improved.
nQuire for students can help students develop basic research skills related to designing, piloting, and improving a research study. It can be used in ‘Stage 1: Empathise and Understand’, and in ‘Stage 4: Sharing and Feedback’ of the Exten(DT)² Digital Design Thinking Model.
If you need help using nQuire for students, watch these short videos:
Transcript: Video 2 How to create a mission on nQuire for students
Transcript: Video 3 How to provide feedback on a pilot project
Transcript: Video 4 How to make changes on a pilot project based on feedback

 Activity 4 Try nQuire for students
You are a student taking part in the design thinking project:
Energy consumption at my school
Follow the below steps, to trial nQuire for students:
Log in to nQuire for students.
Create a class and add students. Video 5 details how (note the student username and password):
Transcript: Video 5 How to create a class and share student accounts − for teachers
- Log in as a student so as to experience how students can create a mission in nQuire for students. While doing so, you can deliberately leave some errors in your mission, such as lack of clarity in questions, punctuation errors, etc. You can correct this error after getting teachers' feedback as explained in Step 5.
To familiarise yourself with nQuire, try a study another person has created:
Now create your own study about the issue you examine:
- i.Go to ‘Create Mission’ from the menu under your username.
- ii.Under the ‘Start’ dropdown menu, add a ‘Mission big question’ which is the main question your mission is aiming to find out.
- iii.Under ‘Mission image’, upload an image you have the rights to use – yours or someone else’s who has agreed to its use on this site.
- iv.Under the ‘Build’ dropdown menu, add at least three questions that would help you find out what other people are thinking/feeling about the problem. Try three different types of responses.
- v.Under the ‘Finish’ dropdown menu, click ‘Start pilot’ to check if your study works well in pilot mode.
- vi.To try out how to leave feedback to a mission created by your students, log in as a teacher using your teacher account, click on the accordian next to your profile, go to my school, click on class name and select the study, i.e. in pilot mode, and leave some feedback by adding comments to the study (see ‘Comments’ to the right-hand side of the study). In your feedback, consider:
- − Are the questions well formulated?
- − Can they be improved? If so, in what ways?
- − Are there any mistakes?
Watch Video 6 on how to provide feedback.
Transcript: Video 6 How to provide feedback on a pilot project
- Again log in as a student and revise the mission based on your comments which you gave as a teacher – see Video 7. Afterwards, end the pilot and request its launch.
Transcript: Video 7 How to make changes on a pilot project based on feedback
- Now, log in as a teacher, go through the mission and approve it if you are happy with the revisions made – see Video 8.
Transcript: Video 8 How a teacher approves a mission and how a student share it with other survey participants
Reflections on nQuire for students
Could you explain how you would use this application with your students after working through this activity? What would you ask students to do using nQuire for students? What would it be your role in the process?
Comment
You can use nQuire for students in many ways – as a starting point it is good to ask students to try a study you’ve created for them and ask them to share their thoughts.
Next you can ask them to create their own study, after watching some of the videos above, or show them how to create a study directly. Students could then take part in a study created by other students or collect data for their study by asking other students to take part in it.
3.2 ChoiCo – creating games with consequences
ChoiCo can be accessed via the Exten(DT)² platform or independently through ChoiCo.
Note: If you access ChoiCo independently, you will not be able to save and publish the game you create – you’ll only be able to save it locally on your personal hard drive.
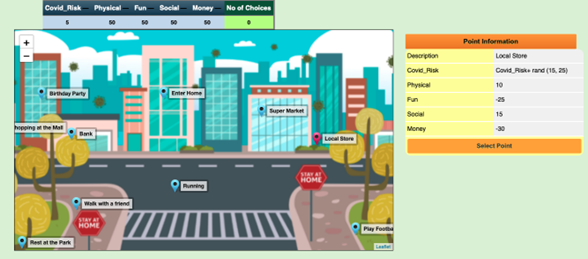
It is an online game environment that can help students understand complex problems. Students can play existing games or design and modify their own games. Each game has a set of rules and a set of consequences. Players are asked to make decisions about a topic such as ‘Where shall I go to avoid getting Covid-19?’ that will help them stay in the game for longer and win.
ChoiCo can help students develop decision-making skills, empathy, argumentation, and systems thinking. As game designers, students can decide the rules of the games and the consequences of certain choices. This can help them develop skills such as computational thinking, creativity, communication, flexibility, and critical thinking.
In design thinking, ChoiCo can be used:
- to ‘define and ideate’ (Stage 2)
- for ‘rapid prototyping and iteration’ (Stage 3)
- to ‘respond and deliver’ on work (Stage 5).
If you need help when using ChoiCo, watch these short videos on the ChoiCo video resources page.
Activity 5 Try ChoiCo
You are a secondary school student taking part in the design thinking project:
Energy consumption at my school
Follow the below steps, to trial ChoiCo.
Go to ChoiCo.
To familiarise yourself with ChoiCo, try a game already created about Covid-19:
Amend the game by pressing ‘Edit’
- i.Delete a game field (the elements relating to consequences).
- ii.Add a new game field.
- iii.Add values to the new game field created.
- iv.Delete a choice.
Now create your own game about the topic of the design thinking project ‘Energy consumption at my school’.
- i.Define how the game will be to achieve your goal
- ii.Think about (ideate):
- Where the game will take place? (map area)
- What choices the player will have?
- What fields will be affected by their choices? (game fields)
- How they will be affected? (database values)
- When the game will end? (end rules)
3.3 SorBET – creating classification games
SorBET can be accessed via the Exten(DT)² platform or independently through SorBET.
Note: If you access SorBET independently, you will not be able to save and publish the game you create – you’ll only be able to save it locally on your personal hard drive.
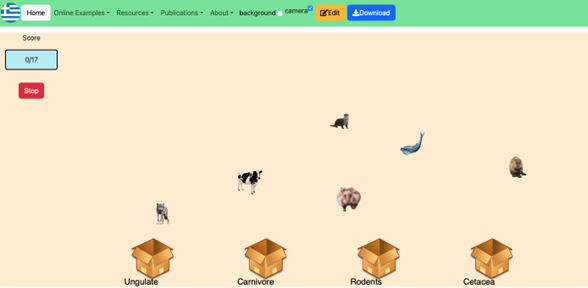
SorBET is an online game environment that allows students to play existing games or design and modify Tetris-like classification games. Gamers are asked to sort falling items into categories. To achieve that, players need to identify the characteristics of each item and match them with one of the categories.
SorBET allows the design and modification of game elements such as density, speed, rules, object, and category definitions. Students can develop skills such as classification, and critical and computational thinking.
In design thinking, SorBET can be used:
- to ‘define and ideate’ (Stage 2)
- for ‘rapid prototyping and iteration’ (Stage 3)
- to ‘respond and deliver’ on work (Stage 5).
If you need help using SorBET, view the SorBET User Manual.
Activity 6 Try SorBET
You are a student taking part in the design thinking project:
Energy consumption at my school
Follow the below steps, to trial SorBET.
Select a game already created from this SorBET JSON files list and download it to your computer.
Go to SorBET.
Press ‘Load Game’ and open the file you downloaded in step 1.
Change the game by pressing ‘Edit’:
i.Add 2–3 new ‘objects’ (rows) using the ‘+’ button in the top left of the screen.
ii.Add a new ‘Category’ (column) using the ‘+’ button in the top right of the screen.
iii.Press ‘Play’ on the top menu bar to see the effect adding new objects and categories has on the game.
Now try to create a new game:
i.Define how the game works to enable you to achieve your design thinking goal of ‘Energy consumption at my school’.
ii.Think about (ideate):
- What will be the game categories (boxes)?
- What will be the objects that the players will have to categorise?
- Will some categories overlap (i.e. some objects belong to more than one category).
- How will the game raise awareness on the issue to the players?
3.4 MaLT2 – designing and printing 2D and 3D shapes
MaLT2 can be accessed via the Exten(DT)² platform or directly through MaLT2.
The programme allows students to create and share animated 2D and 3D models (shapes). The models can vary from simple cubes to complex DNA models, jewels, and trees. Shapes produced in MaLT2 can be printed using a 3D printer.
MaLT2 uses text-based programming and dynamic manipulation and it builds on concepts from mathematics, engineering, art, and computer science to allow students to experiment, tinker, and create models. Logo textual programming, dynamic manipulation, 3D graphics, and camera navigation are integrated into the programme. It presents three basic elements:
- The ‘command editor’ where students can write programs in order to navigate their avatar (a sparrow) on the scene.
- The ‘3D scene’ where the sparrow moves as the commands are executed.
- The ‘variation tool’ where the user can make dynamic changes to shapes by moving a number of sliders, that vary between a max and min limit.
In design thinking, MaLT2 can be used:
- to ‘define and ideate’ (Stage 2)
- for ‘rapid prototyping and iteration’ (Stage 3)
- to ‘respond and deliver’ on work (Stage 5).
If you need help using MaLT2, watch these short videos on the MaLT2 video resources page.

Activity 7 Try MaLT2
You are a student taking part in the design thinking project:
Biodegradable cup decorations
Follow the below steps, to trial MaLT2.
Go to MaLT2.
To familiarise yourself with ‘MaLT-ext’ try these steps to first create ‘a cube’ –
i.Copy this code to the white box on the top right, this will define a square:
To square
forward 60
forward 60
right 90
forward 60
right 90
forward 60
right 90
forward 60
right 90
End
This will define a square.
ii.To preview the square in the main blue box, type ‘square’ on a new line in the white box above.
iii.Select it and press ‘play’ (green button).
iv.To create a cube, you should repeat the square four times.
v.First define a cube using the code provided below.
to cube :a
repeat 4 [square :a forward :a down 90]
end
(You can change the value such as square 60 or square 90 or square 30.)
vi.To execute, type 'cube 60' on the new line in the white box, select the code inserted for cube along with the new line 'cube 60', and press the green button.
vii.Press the cube (it becomes green) for the slider to show:
Now try to create a 3D letter or shape that could be used to decorate a cup.
i.Define how the model will be to achieve your goal.
ii.Think about (ideate):
- How the model would look like if printed with a 3D printer, e.g. is it possible to be printed?
- What shapes will constitute the final model, e.g. a square and a curved line?
- How usable will be if printed, e.g. can you attach it to a cup?
Reflections on MaLT2
How would you use MaLT2 with your students? Can you think of one shape you would ask them to create and how this relate to a problem they try to solve as part of a design thinking project?
Comment
MaLT2 can be used to create any 2D or 3D shape. It is important that the process of creation is linked to the design thinking challenge the students are trying to solve.
An example is a project on biodegradable material where students learn about which materials degrade easily in the environment and which don’t. They then decide to create items that are biodegradable using MaLT2, print them out using a 3D printer, and sell them to their peers. These items could be anything such as jewellery or lunchboxes. This can raise awareness amongst students about buying or using items that are environmental friendly.
3.5 GearsBot – a virtual robotics environment
GearsBot can be accessed via the Exten(DT)² platform or independently through GearsBot.
Note: If you access GearsBot independently, you will not be able to save and publish your creation – you’ll only be able to save it locally on your personal hard drive.
It is an application that supports a 3D robotics simulator using either drag-and-drop blocks of code or Python. An example of a design thinking project using GearsBot can be that students choose the ‘world’ of ‘fire rescue’ and try to improve how a robot is constructed and controlled to complete a rescue mission.
In design thinking, GearsBot can be used:
- to ‘define and ideate’ (Stage 2)
- for ‘rapid prototyping and iteration’ (Stage 3)
- to ‘respond and deliver’ on work (Stage 5).
For help using GearsBot, watch Video 9.
Transcript: Video 9 GearsBot Mini Tutorial
Activity 8 Try GearsBot
Go to GearsBot.
Select the ‘Worlds’ > Line Following Challenges > Simple Curves
Select the ‘Robot’ > Single Sensor Line Follower
Write the block codes as shown in the image X below. For this, click on motion and control tabs under blocks to gain specific block codes, link them as shown in image X and modify the content as shown below. Finally, run the code in the simulator.
After running the codes in the simulator, you will see the following.
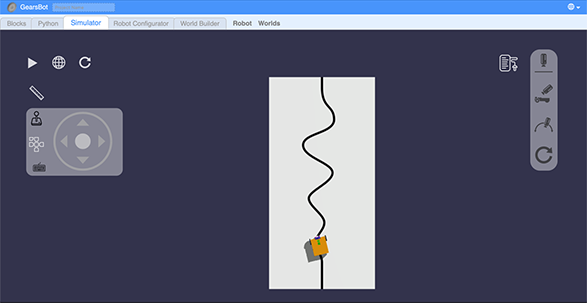 GearsBot screenshot after the simulator is run
Define and ideate how the robot will achieve your goal (i.e. Fire Rescue). Think about the following questions:
- Which scenario does the ‘Line’ map stand for you? (e.g. does it represent a part of the school where someone is trapped after a fire breakout? Does it represent the place where rescue supplies need to be distributed?)
- What should the robot look like? (e.g. does the Single Sensor Line Follower robot look like a good fit? What changes are needed?)
- What functions are needed to make this robot move in the most efficient way?
- What fire rescue problems can such a robot solve?
Continue with GearsBot and create a first demo of your robot based on what you defined before:
- i.Change the code (from what is shown in the example) to control the movements of the robot, like, adding the ‘move steering’ block, or duplicating the previous sequences (e.g. move the tank with left speed X and right speed Y for Z rotations) and then adjust the speed and rotation.
- ii.Change the challenge of ‘Simple Curve’ to other more complex challenge maps that fit your chosen scenario.
- iii.Change the listed ‘Robot’ to make it fit the chosen scenario by going to ‘Robot Configurator’ and change the colour or size of the robot, or add more sensors.
Test your demo by playing your robot in the ‘Simulator’ and test its functionality and while testing, write down any new ideas or things that don’t work well.

3.6 The Exten(DT)² platform
The Exten(DT)² platform is a password-protected online platform that teachers and students can use to implement design thinking projects. Students can access all technologies, MaLT2, ChoiCo, SorBET, nQuire for Students, and GearsBot via this platform. Any artefacts students produce using these technologies such as online games are automatically stored on the platform and easily accessible whenever they visit it.
When you can access the Exten(DT)² platform, log in as an educator.
If you need help using the Exten(DT)² platform, watch Video 10.
Transcript: Video 10 Using the Extend(DT)² platform
Activity 9 Create activity cards on Exten(DT)²
You are a teacher and access the Exten(DT)² platform to create learning activities for your students for a design thinking project you are preparing. Remember that each learning activity can be represented with an activity card.
First of all, to sign in as an educator in this platform, you must have have a username and password since this platform is the password-protected. Your username is your email that you have used to register for this course. Check your email sent by info@extendt2.com to obtain the password. You may find the following in your email:
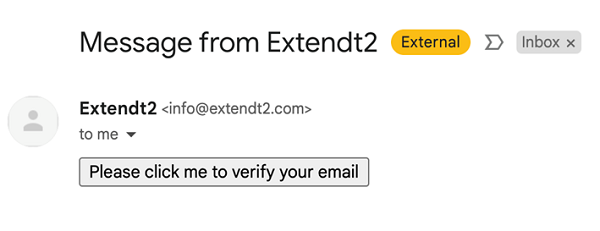
Click on the box that says ‘Please click me to verify your email’. After you click on it, you will get the password for you to log in to the Exten(DT)² platform.
Visit the Exten(DT)² platform.
Log in to the platform as an ‘Educator’. The Exten(DT)² administrator has created some Group accounts for students, such as Group 1 students, Group 2 students and Group 3 students. You will be able to add these groups to the students group you will create.
Create a group of students by clicking on ‘Groups’.
Click on ‘Create group’, give a group name such as, Energy Issue Group 1, Energy Issue Group 2 etc., add a short description to the group (possibly 3 pseudonames of students as you are going to involve pupils in a group) and click the ‘Save’ button.
Click on ‘Add group members’ and select pupil groups (Group 1 students, Group 2 students) to add them to a specific group that you have created.
(Note: Only an institution administrator can register new learners. Teachers can only assign already registered learners into groups.)
- i.Click on ‘Go back’ and select ‘Activities’.
- ii.Click on ‘Create activity’ and give it a name and a short description.
- iii.Now choose a digital tool for this activity from the drop-down menu. This is the tool students can access and interact with.
- iv.Click on the activity you have created.
- v.Click on ‘Add groups’, select the group you would like this activity assigned to and click on ‘OK’.
3.7 Authorable learning analytics dashboard
The authorable learning analytics dashboard will be available soon. We will update you once it is accessible.
Next, move onto 4 A design thinking project using digital technologies.