Use 'Print preview' to check the number of pages and printer settings.
Print functionality varies between browsers.
Printable page generated Tuesday, 7 July 2026, 7:48 PM
Project life cycle
1 Project life cycle
Activity 2: Your role in the surveillance process
Activity 3: Communication
You will learn more about communicating with AMR surveillance professionals beyond your workplace in the Communicating AMR data to stakeholders module. But for now, take a moment to note down anyone outside of your current workplace that is involved in your AMR work.
You will find that each project you work on will vary slightly. Authors and partners have their own ways of working and different needs, and Corporate & Commercial try to adapt to meet these needs. However, there is a general flow to the stages of a project and this is illustrated in Figure 1.
In this you will look at who does what, starting with an overview of the whole process which we will then break down into detail. As mentioned above, each project is individual so be ready for some flexibility in the process.
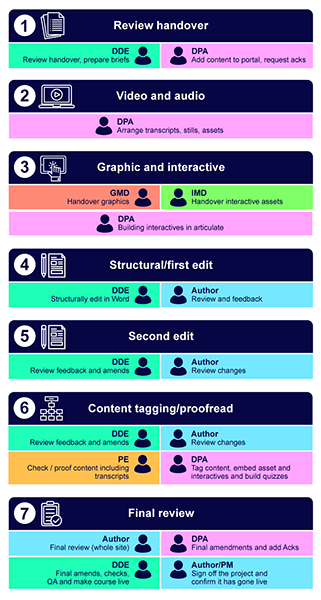
The flow chart in Figure 1 shows the main stages of a project. Depending on the project’s needs, there will either be a Digital Development Editor (DDE) or an Assistant Editor (AE), and they will carry out the first stage. If your project has a
Figure 1 gives the overview of the process from handover to the site going live. It implies a linear process, but in practice this is not the case, as some things can happen in tandem and others happen throughout the process.
There are various acronyms used to identify the roles mentioned in Figure 1. They are:
- DDE − Digital Development Editor
- AE − Assistant Editor
- DPA – Digital Production Assistant
- V&A Producer − Video and Audio Producer
- GMD − Graphic Media Developer
- AW − Art Worker
- IMD − Interactive Media Developer
- PM − Project Manager
- SPM − Senior Project Manager
Now, let's move on and start looking at the detail.
Activity: Simple Q&A
Has Philip been harmed or abused?
Answer
Yes, Philip has been harmed and abused. Both ‘aggressive language’ and being hit can cause physical and emotional harm. These are examples of poor coaching practice and are a form of abuse. Philip will probably remember being humiliated in front of others forever.
Activity with multiple choice
a.
Having medical or allergy information for children when you take them away on trips.
b.
Ensuring all staff and volunteers agree to clear codes of conduct and ethical standards.
c.
Having a requirement for players to do three media events per year.
d.
Not training in extreme weather conditions.
The correct answers are a, b and d.
Answer
Safeguarding includes all of the statements above except for: Having a requirement for players to do three media events per year.
Video via dog

Transcript
Video via YouTube
Transcript
Liam interactive
Tick the items that you think our young people mentioned to us.
Storyline interactive
1.1 The stages of a project
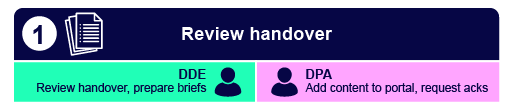
1.1.1 Review handover
Once the author has completed their part, they will hand over the content in a Word document to the DDE/AE. At this stage, the DDE/AE will most likely supply you with any content that needs adding to the Production Portal. You won’t need to tag anything in
The
Note that the asset register is a working document and changes to assets, as well as additions and possibly deletions, are likely throughout the production process. You need to ensure that the asset register is kept up to date, and the
Make sure all the information is clear about where the image has come from and who owns the copyright of the image. More about that in the next section.
1.1.2 Asset and Portal work
When the
- copyright owner
- location of image (website URL where the original image sits)
- a copy of the image.
Of course, the more detail that we can provide to the Licencing team the better, and the quicker you will get your assets to clear. More about this can be found in ‘The Production Portal: a guide for ‘Projects’ users’ and ‘Examples of portal listings and checklist’.
Once you have uploaded all the assets, go back to the asset register and compare it to the course content. This is to check you have captured all the assets needed.
Images will need to be resized appropriately, depending on what they are going to be used for:
| Image type | Image size |
|---|---|
| Course banner (OLC) | 785 x 350 pixels (width x height) |
| Course image (OLC) | 670 x 500 pixels (width x height) |
| Collection image (OLC) | 850 x 398 pixels (width x height) |
| 600 pixels wide or less (it can be any height) | |
| Web thumbnail (XML to be rendered to OLC) | Maximised image can be any size 600 px wide or less (.small dog image) |
| 580 pixels wide (it can be any height) | |
| Web thumbnail (XML to be rendered to Learn9) | 1082 pixels wide (view larger image) 580 px wide (.small dog image) |
If the assets are not yet ready, then you should add a placeholder in the appropriate spot. For example, if there is an image that is in the process of image research, the DPA can insert this placeholder image:
If an asset is a stock image then you can insert a watermarked, low-resolution version of the image which will then be replaced by a high-resolution image when it has been cleared by Rights. Another way of showing that we are waiting for clearance to use an image is by using an editor comment.
Image shall be inserted once copyright has been cleared and high-resolution image is provided.1.1.3 Video and audio
This stage may have started prior to handover, as producing the video and audio assets can take some time.
If the project requires creation of new video and audio assets, the
Accessibility
As part of keeping the materials accessible, video and audio assets need transcripts, and videos also require closed captions (sometimes referred to as ‘subtitles’). These are produced by a company called 3Play Media and we can access their portal directly once the files have been created. You can read more about this in the section on 3Play Media. The transcript file needs checking, as sometimes there are words marked as 'inaudible' or an incorrect spelling is picked up. This will be done by an Editor, so make sure to tell them it’s ready. Some Editors have access to 3Play Media and will edit the files directly on the site. Others do not, and will need you to download the transcript first. Make sure to check this with your Editor.
Once the files have been checked by the DDE/AE and any changes have been made on the 3Play Media site, you will need to download the transcript and closed caption files and keep them in a folder, ready to go in the relevant places in the XML. This process is for only video and audio files that the client requires transcription for. For YouTube videos that we link and embed to, we do not traditionally go and get the transcription for this. If the client requires a transcription for a YouTube video, they will alert the
1.1.4 Graphics and interactives

As you’ve read previously, the DDE will have identified where there is a need for interactives in the course. Most often, these are created by an IMD using HTML5.
However, Corporate & Commercial are increasingly making use of Articulate 360 – particularly its application ‘Storyline 360’ – to create more basic interactives.
You will learn more about Storyline 360 in the section on Articulate 360, but for now its important to know that you may be asked to use this at some point.
Note
As a
Now that all of these elements have come together, it’s time to tag!
1.1.5 Content tagging

The DDE/AE has been working hard with the client on getting the content edited and, now they have a clean document (or as clean as possible), they will ‘mark it up’ as described in the next section 'Mark up and oXygen'. This document will then be passed to the you (the
You will use the marked-up Word file to create the
Comments and queries
Whilst tagging the document, the Editor might ask you to leave an ‘editor comment’. This is to flag any issues or queries for the client. You can also add your own editor comments for issues that you may have. Do try to flag your issues with the Editor and get them resolved before it goes back to the client, but if you do need to leave a comment in the XML, make sure to add you initials to it so it’s clear it’s from you. Editor comments will show up on the website and must all be resolved prior to the site going live.
[Editor: This is an editor comment.]
As you can see above, an editor comment displays in pink. Note in the contents on the left of the screen, there is clear indication that editor comments are present, so it is easy to check if they are all sorted. Figure 7 shows this, the number one in brackets (1) after 'Project life cycle' indicates one editor comment overall and the next one in brackets (under '1.1.5 Content tagging') shows where the comment is.

Editor comments can be used for a number of reasons; these include (but are not limited to):
- Unresolved query for the author.
- Acting as a placeholder for images or other assets.
- Query from the
DPA that has cropped up during tagging (again, if your query is for the Editor, try to bring this up with them directly rather than through an editor comment).
The
1.1.6 Final Review
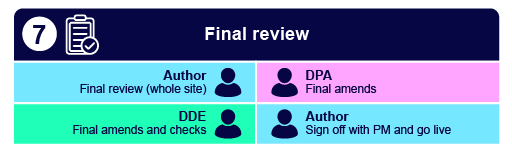
At Step 7 – Final Review, the
- editing the text
- editing the quiz and or quiz questions
- adding more images
- taking away images.
These amendments will come from your Editor.
The last stage of production is the proofread. This is generally done by an Assistant Editor and is a thorough check of the work to make sure no typos have slipped through and that all commas are in the right place!
As a
Once the Assistant Editor has completed the proofread, the author will review the whole site and flag any last-minute issues. You will make any changes you can and then the
- All assets are correct. No more placeholders and double check the assets have been put onto the portal and cleared correctly.
- All links work. Including Olinks and Cross Ref links (more about them later on).
- Check there are no more editor comments and they have been all resolved.
- Check any quizzes.
Once all the above has been actioned, your course is ready to go live!
1.1.7 Documents – what to expect
Creating courses is very much a team effort. As a result, it is very important to ensure that everything is clearly recorded and saved in a communal location. This is where the dog server is used. All documents are saved in a folder on the dog server (\\dog\PrintLive\Corporate). Note that ‘dog’ is just a name used to identify this particular server – no actual canines are involved! Your Project Manager will ensure that you know which folder on dog to use and the correct folder structure has been put in place.
Tip
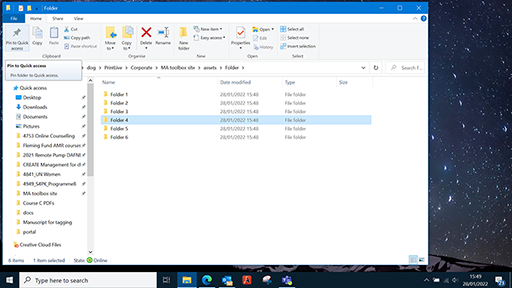
It can be hard to remember where a folder is on dog. You can pin folders in File Explorer to Quick Access. Here’s how to do so:
- Open File Explorer (folder icon on the taskbar).
- Navigate to the folder that you want to pin to Quick Access.
- Select that folder by clicking on it.
- Click the ‘Home’ tab.
- Click the ‘Pin to Quick Access’ button. The selected folder is now listed in Quick Access.
- You can also pin a folder by right-clicking it and selecting 'Pin to Quick Access' in the right-click menu.
The table below shows the documents you are likely to receive or create for a course.
| Document | Description | Creator |
|---|---|---|
| Specification form (Word) | Details of the course including key contacts, learning points, desired outcome (type/length of course), handover, go live dates and other detail. | Course owner and/or Project Manager |
| Badge or Statement of Participation setup (Word) | Full details of the statement of participation (SoP) or badge awarded at the end of the course − this is put together by the author and PM and handed over to the OpenLearn Create Producer. | Course owner and/or Project Manager |
| Asset register (Excel) | Detailed list of all the assets in the course. These include images, infographics, interactives, videos etc. All assets must be on this form to ensure they get added to the production portal. This is a working document and will be added to as production progresses. | Author/Project Manager/DDE |
| Glossary (Word) | All glossary terms listed and defined. The | Author |
| Artwork brief (Word) | Also known as | DDE |
| Quiz (Word) | Most courses have a quiz. The | Author |
| Editing brief (Word) | Noting editing requirements and decisions, specific spellings, anything that is different to OU House Style or particular issues to be aware of. Note – this may be very brief, e.g. 'we're still working on Table 3', or 'ignore xyz'. | DDE |
As noted previously, all projects are slightly different so the above list may vary, but these are the main documents to give all the information needed to be able to create a course.