Use 'Print preview' to check the number of pages and printer settings.
Print functionality varies between browsers.
Printable page generated Sunday, 12 July 2026, 4:14 PM
Section 6: Assessing reading to support planning
Introduction
In this section you will:
- look at a tool that assesses reading development
- develop strategies for assessing children’s reading levels and ways of recording them
- consider different strategies for supporting children in moving to the next level.
In Section 5 you focused on using storybooks to support your work as an early reading teacher. You began to think about how different stories are helpful for different children. Some children need lots of repetition; others need to practise letters and sounds; still others find reading easy and need to be given more opportunities to extend their reading choices. In order to be able to plan an effective reading lesson, you need to be able to assess your children and work out how to help them.
This section is not about the formal, summative assessment of reading. How reading is assessed in your country will depend on the systems and processes that have been put in place, and will be different for each country.
This section is about the ongoing formative assessment that effective teacher of reading do all the time to plan their teaching. If you have a large class, you will not be able to assess individual children’s reading as often as you might like to, but there is plenty that you can do that will make a difference and help you to be an effective teacher of reading.
Stages of reading development
It is important that as a teacher of early reading, you are aware of how your children are progressing. We have devised a chart that shows the stages of reading development. It summarises what we see as the key steps in developing as a fluent, independent reader. The chart sets out what you might expect a child to be able to do at each stage of their development, from pre-reader to a more independent reader, providing some examples to illustrate what each stage means.
Activity 6.1a: Looking at the stages of reading development
Download the chart ‘Stages of reading development’ and carefully read each section. Discuss the chart with a colleague, and consider the following questions:
- Do the six steps form a logical progression that you recognise? Could a similar chart be created for your ‘home‘ language?
- Think of a beginner reader in your class. How do you know they are at this early stage of early reading development?
- Think about children you have taught, or are currently teaching, and identify one at each of these stages of reading development. Think about what you could do for each child to help them move on.
- Read Case Study 6.1 below. Discuss the case study with a colleague and jointly plan how you might do something similar in your class.
Case Study 6.1: Reading development in Anne’s class
Anne teaches a Grade 2 class in Nanyuki, Kenya. She has recently attended a course on early reading and has returned to school with the chart showing stages of reading development. Anne decides to practise using the chart by choosing three children who she knows are reading at different levels. She chooses I Like to Read, an eight-page storybook from Level 1 on the ASb website that has short sentences, phonically regular words and common words. She downloads the book onto her phone.
At lunchtime, Anne sits down with each child in turn and asks them to share a few pages of the book with her. She has a tick chart ready so that she can record what she learns about each child. If the child is struggling, Anne helps them.
- Hellen can read the first page well. She stumbles over ‘who’, but can work out ‘can I read to’. She uses her knowledge of letters and sounds to read ‘asleep’. She reads ‘who’ correctly the second time. She struggles with the word ‘busy’, but reads it correctly the second time. She breaks ‘grandmother’ and ‘grandfather’ into syllables.
- Florence talks about the boy sitting on a nice chair, reading a book. Anne reads ‘Who can I read to?’ with her. Florence says the baby is asleep and mama is cooking. She is looking at the pictures and not trying to read the words.
- Moses uses his finger to point to words. He takes his time and tries to read each word one after the other. He knows that the storybook’s title is I Like to Read and can use that information to work out what it says on page 1. He struggles with ‘who’ but slowly works out ‘can I read to’. He needs help with page 3 as he wants to read ‘baby’ but doesn’t see a ‘b’, but he can read ‘my’ and ‘ is’.
After each child leaves, Anne uses the stages of reading development chart to decide the reading stage of each child. Anne feels more confident using the chart and decides to repeat the process with more children.
Activity 6.1b: Identifying stages of reading development (if possible, do this activity with a partner)
Something to think about: Is the chart showing stages of reading development helpful to your thinking about children as readers? Why, or why not? Are there things you would add or take away from it and if so, why?
Assessing reading in your classroom
In order to assess children’s reading skills, you need to develop the habit of noticing. You need to watch, listen, ask questions and carefully observe children at work. By adopting the active approaches described in the case studies in this course, you will be able to:
- listen to children as they talk in pairs or groups
- walk around the room, watching and listening while they are working on a task
- learn a lot from the questions they ask you.
Remember that children are using their reading skills in most lessons, not just in literacy lessons.
As you develop your skills in active teaching, you will find that there are many, often unexpected, opportunities to gather information about your children. They will tell you something, solve a problem or ask a question that tells you something new about their literacy development.
However, you should also aim to deliberately assess your children in a systematic way. A good strategy is to focus on five to six children in each literacy lesson. As you plan the lesson, think about how the activities that you are designing will enable children to demonstrate one or more of the skills on the chart.
Read Case Study 6.2 and then try the activity that follows. Notice how Patrick involves all his children in the activities, but uses the opportunity to concentrate on six of them.
Case Study 6.2: Patrick’s Grade 1 class
Patrick is a newly qualified Grade 1 teacher in Kampala, Uganda. He is very keen on child-centred learning and his class are very used to working in pairs using think/pair/share.
Patrick knows that most of his children are still ‘pre-readers’ and he wants to find out who is developing the skills of a beginning reader. He designs a series of lessons to focus on two objectives linked to the stages of reading development chart. Patrick will make notes on three pairs of children in each lesson.
- Focus 1: Can children recognising some words in a patterned text?
- Focus 2: Can children use the first letters of words to predict or begin sounding out a new word?
Patrick is keen to use ICT in his classroom. He has borrowed the school’s overhead projector to show a Storybook in his English lessons. He has chosen Friends, a book with repetitive phrases, high-frequency and phonically regular words, and has downloaded the book on to his phone, projecting to a blank wall.
Lesson 1: pages 1–3
The whole class is encouraged to talk about the pictures. First they think about the pictures on their own, and then they talk about them in a pair. Each pair shares their ideas with another pair. Finally Patrick asks a few groups to share their thoughts. The class reads the first three pages as a chorus. Patrick emphasises how the first letter helps you to remember the names, especially Zizi, Lele and Sisa. Can the children see the letters repeated? Who in the class has a name starting with the same letters? The whole class is excited to recognise letters and familiar words that they have worked on and to have these extra friends in a book!
Lesson 2: pages 4–7
The whole class re-reads pages 1–3 and remembers the names of the friends. The whole class reads page 4 all together: ‘My friend Zizi likes to play soccer.’ Children act out the soccer playing! Patrick emphasises reading from left to right and looking at the first letter of each word. Patrick has cards with each of the seven words – ‘My’, ‘friend’, ‘Zizi’, ‘likes’, ‘to’, ‘play’ and ‘soccer’ – written on a separate card. Children come up to the front of the class and hold the cards up to make the sentence.
Now Patrick gives the class a think/pair/share activity. Page 5 is projected on the wall (or revealed on a large pre-prepared poster sheet): ‘My friend Lele likes to swim.’ Patrick pastes some paper over the word ‘swim’. Patrick holds up a ‘think’ card. All children must look at the picture for 20 seconds and think about what it says. Can they recognise the pattern? Then he holds up the ‘pair’ card and children talk to their partners about page 5.
Patrick moves to observe and make notes on his chosen three pairs of children: who is recognising the pattern of words? After the whole class ‘shares’, Patrick uncovers the word ‘swim’. Children think and pair to discuss what the word might say, and Patrick observes again: are any of the six children using the first letter ‘S’ to read the word ‘swim’? Are children using context and picture to work out the word? Patrick changes the slide to page 6 and then page 7, both followed by think/pair/share. By the end of this lesson all of the children have been involved, and Patrick has closely observed and made notes on six children. (You will find out more about making notes in next part of this section of the course.)
Something to think about: Do you think that lessons 1 and 2 achieved the two focus areas that Patrick planned for?
Lessons 3–10: pages 8–17
These lessons repeat the format of lesson 2, but look at new pages of repetitive text.
Patrick is able to observe new pairs of children in each lesson. Lessons 5–10 gradually develop work on the book, using cut-up words to recreate text. By the end, the whole class acts out the book using actions and word cards.
After ten lessons, Patrick has closely observed all 60 of his children and has noted down who are beginning readers, who are still at the pre-reading stage, and even who is becoming a more independent reader. Patrick uses this information to plan future lessons.
Activity 6.2: Focusing on a few children
Think about your next literacy lesson and choose an appropriate focus from the ‘stages of reading development’ chart.
- Devise an activity so you can carefully observe four to six children at work. Discuss your plan with a colleague.
- Think about how you could use your observations from this activity to plan future lessons. Record your ideas in your study notebook.
- If you get the chance to try your activity, consider the following questions:
- How well did it work?
- Did it give you an opportunity to notice children’s reading skills?
- Were you able to place children in the categories identified in the chart from pre-reader to independent reader?
Recording progress
In Case Studies 6.1 and 6.2 teachers are given a ‘snapshot’ of children’s reading development at a specific moment in time.
It is challenging for teachers, especially those with large classes, to:
- record each child’s progress over a year to ensure that they are moving forward with their reading
- use this record to make notes about ‘next steps’ for children
- create a record that can be useful to the next teacher, as children move up a grade.
In the next two case studies, you will see how teachers have devised ways of recording progress so that they can remember how children are developing and therefore plan appropriate activities for them.
Activity 6.3: Keeping records
Read the Case Study 6.3. As you read, note down the following in your study notebook:
- What opportunities will you have in a typical week to assess reading outside of literacy lessons?
- Why do you think Anne put the three target children in different groups?
- How does Anne use the information she gained through this process?
Case Study 6.3: A reading record book
Anne (see Case Study 6.1) decides to use the ‘stages of reading development’ chart in all her lessons – not just in English lessons. By doing this she can quickly make a note of how children are progressing with their reading.
As shown in Figure 6.1, Anne has made a class list in her mark book that includes six ruled columns labelled ‘Pre 1’, ‘Pre 2’, ‘Beg 1’, ‘Beg 2’, ‘Ind 1’ and ‘Ind 2’, as in the chart. There is also space for her to make notes for three reading assessments a year, plus an extra notes column.
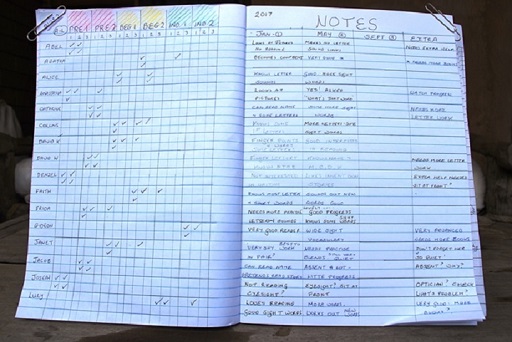
Anne decides to observe four to six children each day during two separate lessons. With 60 children in her class, she can complete the class list in ten to fifteen days. She selects children alphabetically because this makes note-taking easier. Today it will be: Frida, Gideon and Janet in the first lesson, and Jared, Joseph and Lucy in the second.
Anne is doing a science lesson on parts of plants. She has written a title, ‘Parts of a plant’, and has drawn a plant on the board with the first letter of four key words: ‘leaf’, ‘stem’, ‘root’ and ‘flower’. She goes over the key words with the whole class and writes up the words in large print.
Anne then divides the class into small groups of four. Each group has a real plant to look at and four pieces of card with these four words on one side and the initial letters on the other side. Groups are asked to talk about the plant, take a card each and rehearse the names of each part. They then swap cards in the group and help each other to become confident with the words and plant parts. Every five minutes they change their plant with another group and repeat the cards activity. The whole class is busy and engaged. This gives Anne time to move to the groups that Frida, Gideon and Janet are in. Anne has a copy of the cards and a Grade 1 textbook with more writing about plants. She asks each of the three children questions appropriate to their reading level:
- Can you read the four initial letters ‘l’, ‘s’, ‘r’ and ‘f’?
- Can you read the words ‘leaf’, ‘stem’, ‘root’ and ‘flower’?
- What is the title of the diagram? (The answer is ‘Parts of a plant’.)
- Can you read this line from the Grade 1 textbook? (It’s a question that the children are not familiar with: ‘What parts of a plant do we eat? Root, leaf, stem, flower, seed or fruit?’)
Anne knows Frida is lively and likes to try and answer in class, but she finds reading difficult. She notices that Frida uses her finger to follow words and mostly starts at the left. Anne finds that Frida cannot give her the sounds of ‘P’, ‘L’ or ‘R’, but does know the sound of ‘F’ (for Frida!) and ‘S’ or ‘snake’ – a sound they’ve just been practising in class. Anne notes Frida down as ‘Pre 2’ and notes that Frida needs a lot more practice on initial sounds and a few sight words.
Anne knows that Gideon always puts his hand up to read from the board. She is confident he can read the words and the title, and quickly checks this. But can he read a question from the textbook that he hasn’t seen before? She shows him the textbook and asks him to read the first sentence. Gideon doesn’t use his finger and reads quite confidently: ‘What parts of a plant do we eat? Root, leaf, stem, flower, seed or fruit?’ ‘Seed’ and ‘fruit’ are new words: Gideon uses his knowledge of phonics to read ‘seed’, and blends ‘fr’ together to begin ‘fruit’. He hesitates – ‘–uit’ is an unusual spelling – but he makes a guess from the context and reads ‘fruit’. Anne notes Gideon down as ‘Ind 2’ and makes a note that she must give him extra books to extend his reading.
Janet is a very quiet girl who never puts her hand up. Anne is not sure how well she is progressing, but on her own, Janet is happy to have a go at reading. She uses her finger from left to right and knows all the initial letter sounds. She can slowly read the four familiar words. She struggles with the title ‘Parts of a plant’, as she reads ‘plant’ twice. She uses her finger on the textbook but can’t read ‘what’, and needs help from Anne to move across the rest of the sentence and recognise the familiar words in a different context. Anne notes Janet down as ‘Beg 1’ and makes a note that Janet will work best in a pair, not a large group, and is ready to begin blending sounds.
Whilst working with Frida, Anne notices that one of Frida’s group, Collins, is very eager to help Frida get the right answers. Although Collins is not on Anne’s target list today, she also quickly makes a note in the mark book that he knows all his initial letters and some sight words, and is now working at the ‘Beg 2’ level: Anne needs to check up on that!
Anne spends about five minutes with each child and is also able to keep an eye on the class’s group work. She then resumes the whole class lesson. After morning playtime, she will make notes on Jared, Joseph and Lucy’s reading progress during the literacy lesson.
It takes Anne two to three weeks to complete the class list; some days she is not able to cover as many observations, and some days she can do more. She is pleased with how much better she knows the children’s reading stages: who needs extra help and who needs to move to the next step. With this detailed information she can plan for some differentiated activities in future lessons, such as grouping children with others of a similar reading ability. The colours on the chart are useful here, for example in creating red, yellow and green groups. Anne can also plan for spending extra time with (red group) pre-readers. She decides to use this reading record book to add extra notes throughout the week – whenever she notices something specific about individual children, for example. Anne plans to repeat this detailed assessment of every child at least once a term, and will eventually pass her record book on to the Grade 3 teacher so that they will be well informed about each child’s reading progress.
Anne created a page in her mark book to record her assessments. In the next activity, you will analyse and critically review Anne’s records.
Activity 6.4: Analysing Anne’s records
Look carefully at Figure 6.1.You will notice that Anne needs several pages for her 60+ class – the page shown in the figure has room to make notes on 16 children. On the left-hand page she has drawn red, yellow and green columns linked to the categories in the stages of reading development chart. She can add ticks to show the children’s reading level. On the right-hand page she has divided the pages into three main school terms. She can make short notes when she observes a child’s reading.
Can you answer the following questions?
- Which four children are independent readers?
- Look at the ‘Extra’ column on the right-hand page. What is Anne reminding herself to do for these independent readers?
- Which three children are still at the ‘Pre 1’ stage of reading?
- What has Anne written in the ‘Extra’ column for Denzel and Joseph?
- Anne writes that Janet is ‘very quiet’. Why might this worry Anne?
- Which child may be ready to be an independent reader by the third term: Alice or Catherine? Give a reason.
- Give two reasons why this record book helps Anne to track her class’s reading progress.
- Give two reasons why this record book will be helpful for the Grade 3 teacher next year.
Would you find Anne’s record sheet useful? What changes (if any) would you suggest?
Here are two downloadable resources to help you think about how to record progress in reading. If you have a large class, then Anne’s record will work best for you. If you have a small class, then it might be possible for you to create an individual record for each child.
If you have a mobile phone with a note-taking app, you may prefer to keep records on that. At the end of term, you would then be able to email your notes to another teacher.
Activity 6.5: Keeping reading records
Martin works in a small village school. He has 25 children in his class, with Grades 1 and 2 mixed together. He uses a record book like Anne’s for six months but finds it doesn’t have enough space to make detailed notes about each child.
Martin doesn’t have many children, but he does have the added challenge of a multi-grade class. So he decides to adapt the ‘stages of reading development’ chart and make a single-page record sheet for each child.
Look at Martin’s individual reading record for Paxima and consider the following:
- Look at Martin’s individual reading record for Paxima. In April, what sort of opportunities does he need to provide for Paxima to develop her reading? What should he be looking for?
- Do you think that you could also create individual record sheets for your class? Could you do this for each child? Would you do this only for children who you wish to monitor more closely?
- Could you use a note-taking app on your phone to keep records about your children? What would the advantages be of doing this? What would be the challenges?
- Discuss records with your colleagues. What are the advantages and disadvantages of whole class records and individual records? Think about the sort of records that would be useful you.
Strategies to assess children’s reading
In order to carry out formative assessment, you need to ensure that the children are actively engaged in an activity. Carefully read through Table 6.1, which summarises some strategies to assess reading.
| Preparation before lessons | Strategies during lessons | Next steps |
|---|---|---|
| Plan to use child’s prior learning – from class or homework tasks. | Keep a copy of the ‘stages of reading development’ chart to hand while walking around the classroom. | Review all children’s progress in reading. Highlight focus children’s learning successes. |
| Collaborate with colleagues; discuss reading activities and assessment strategies. | As you teach the whole class, observe how well children are reading. Make notes when you can. | Identify next steps for the reading activity and include them in next week’s planning. |
| Choose which lessons to make notes on reading progress (not just in English lessons). | Observe children working in groups and assess their collaboration skills, listening skills and speaking skills. Make notes when you can. | Look for opportunities to revisit the learning, such as sharing stories or practising reading aloud. Ask and answer questions about the stories. |
| Decide which aspects of reading will be the focus for assessment. | Join in with a group, listen and check focus children’s response to the reading task. | Visit the ASb website to find some more books for the class. |
| Create a whole-class record book (and single child record sheets, if appropriate). | Ask the children questions about the reading task and responses to their own learning. | Ask the children to write their own stories and post them to the ASb website. |
| Laminate a copy of the ‘stages of reading development’ chart to keep on the teacher’s desk. | Make sure to notice the reading progress in all lessons, such as science, maths and home language opportunities. | Look at the reading record book frequently. Which children are of concern? Plan to work in a small group with these children. |
| Use the ‘stages of reading development’ chart to plan a reading focus for your lessons, for example reading aloud. | Do not always ask the good readers to answer: use paired or small group activities so that every child is involved. | For children with reading problems, plan extra small group lessons or extra help during lessons. |
| Organise class into mixed-ability groups. | Make notes on the progress of the focus child in the record book. | In some lessons, plan activities to focus on different stages of reading and group readers, such as in red (‘Pre’), yellow (‘Beg’), green (‘Ind’) pairs or groups. |
| Decide which child to assess before a lesson begins. Identify these children as ‘focus’ child. | During small group or pair work, walk around the classroom to observe how children are reading. | Use the ‘stages of reading development’ chart to plan for next steps. |
| Plan into the lesson pair or small group reading activities. | If adults or older children are helping groups (for example, leading a shared reading story), give them a written copy of the lesson focus so that they don’t forget the focus of the learning. | Use children’s pictures and sentences to create storybooks for the class to enjoy. |
| Arrange for extra adults or an older child to help with small group work. | Ask adults or older children to share their observations of the child’s learning in reading. | Identify the good readers and find extra reading books. Ask the community for help. Download storybooks from the ASb website onto a phone or school laptop. |
| Choose a story to read aloud. Decide on five questions (open and closed) to ask as you read the story. | Read aloud the story to the class. Ask the five questions and let children share their ideas in pairs before answering. | Make a note of which children answered the questions. Create a new list of children to ask ready for the next lesson. |
Activity 6.6: Strategies to assess reading
Now read Case Study 6.4. As you read, write down the opportunities that the teacher, Mrs Ndaba, will have to assess the children’s reading. Use Table 6.1 to help you.
Discussion
The activity in ‘Stories taken apart and put together’ gives all the children the chance to read aloud in a safe environment. The independent readers are able to help the others. You can listen as you walk around and note who is having difficulty reading their sentence. If you focus on one group and listen to the discussion, you will be able to tell who has understood the story and how they decide which order the sentences should be in.
If you were to replicate ‘Collecting local stories’, as you moved around the room you would see what the children decided to draw or write. This would tell you how well they understood the stories. By listening to pairs talking, you would be able to assess some of the beginning readers as they read the words written by the independent readers.
Now read Case Study 6.4 and try the activity that follows.
Case Study 6.4: Two examples of using stories
Stories taken apart and put together
Mrs Ndaba’s Grade 6 class had brought stories from home and illustrated them. On each page, they had written a sentence and drawn a picture to match it. The pages had been tied together to make books.
Her colleague, Ms Mdlalose, who taught the Grade 3s, had seen the illustrated stories, and asked to borrow them for a reading activity with her children. Mrs Ndaba came and watched.
Ms Mdlalose divided her class into five groups. She gave each group a story but she untied the pages. She then gave each child in the group one page of the story, making sure that she mixed the order of the pages. Each child had to read the sentence on their page to the group. The group discussed the sentences to decide which order the sentences should go in.
Ms Mdlalose asked one child from each group to read their group’s story to the class and they commented about the order. As a class, they selected their favourite story and prepared a five-minute drama to perform this story.
Collecting local stories
I asked my Grade 2 children to learn a story from their family members or neighbours. I gave them about a week to collect and learn the story. I then invited one or two children a day to tell their story to the class, using different voices, gestures and actions to accompany it. Not everyone was confident enough to do this, so I let them choose whether or not they wanted to. For each story, I wrote a few key words on the chalkboard.
The children told their stories in their local language. Afterwards, I asked the class to draw pictures of the key events or main characters in a story they had heard. If they were confident, I encouraged them to write down some of the key words. Working in pairs, I let the independent readers share their words and pictures with a beginning reader, getting the beginning reader to try and read the written words. Sometimes I challenged them to think of key words in the story that begin with a certain letter. (For example, Baron told a story about a monkey, so I asked them to try and find words beginning with ‘m’.)
By sharing the stories from their communities with their peers, this activity builds connections among the children in the class.
Supporting progression
As you become more confident at assessing the children’s level of reading, you will be able to plan more effectively and ensure they have the opportunity to improve their reading skills.
The ASb website has hundreds of books that support teaching reading and extend children’s enjoyment of books.
Activity 6.7: Analysing stories to support reading development
It is important to be able to identify stories that are suitable for children at each of the six stages of development.
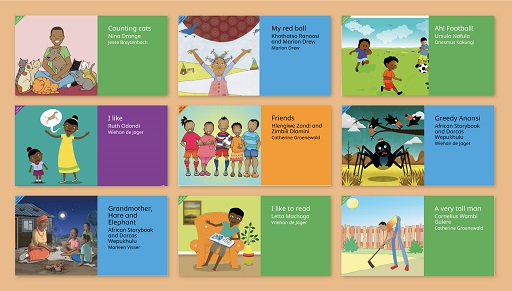
- Download the reading development template and look up the following nine titles on the ASb website:
- Counting cats
- My red ball
- Ah! Football!
- I like
- Friends
- Greedy Anansi
- Grandmother, Hare and Elephant
- I like to read
- A very tall man
Which books will be most suitable for the six stages of reading development? (Early Years Teachers will want to choose from Level 1 (first words) and Level 2 (first sentences).)
- Identify which of these nine books should go in the pre-reader, beginner and independent reader columns in the template.
- Note that some titles have several versions of text on the ASb site.
- You can use them at different stages of reading development.
- Research the site and find at least one or two more books for each column. Add them on the ‘Researched title 1’ and ‘Researched title 2’ lines of the table.
- You may want to look for titles in your home language.
- Plan to use at least one of these titles next term.
- Your choice may depend on the age and reading level of your class.
- Share your choice of books with a colleague.
- Explain to your colleague how you will use the books.
Discussion
The books for pre-readers are My red ball, I like and Counting cats.
The books for beginner readers are I like to read, Friends and A very tall man.
The books for pre-readers are Greedy Anansi, Ah! Football! and Grandmother, Hare and Elephant.
Creating your own storybook
In this final activity, before you submit your assessment, you will have the chance to try African Storybook’s new app called African Storybook Maker. The African Storybook Maker app will allow you to create storybooks offline using a mobile phone or tablet. The app was created with children in mind; if they have access to a device, they can also create their own storybooks.
A good Storybook
In Section 3 you considered what makes a good storybook. Remember, a good storybook:
- is enjoyable.
- is authentic because it relates to children's contexts and realities.
- has good illustrations that support the text, and that may also suggest other meanings or feelings and extend the text.
- is not necessarily ‘real’ but is logically developed. In other words, make believe that is believable or nonsense that makes sense.
- has interesting language – rhyme, rhythm, repetition, word play.
- has suspense (or danger) to encourage children to say, ‘What will happen next?’ or ‘What if…?’
- has something unexpected, against the rules, or a ‘twist in the tail’.
- has a beginning, middle and end.
Creating your own storybook
The African Storybook Maker app allows anyone to create a storybook offline on a mobile phone or tablet.
You don’t need data to create the storybook. You only need connectivity to download the app and to publish your story on the website. Once the app is on your device, you can create a story in any language.
Before you use the African Storybook Maker app, draft your story on paper. It could be one you have made up, or one that was told to you as a child. Draw your own pictures or take photographs to illustrate your story. Use these questions to guide your writing:
- Who are the characters?
- What do they do in the story?
- Where does the story take place?
- What happens?
- How does it end?
- Is it a good ending? Why/why not?
- Is it a good story? Why/why not?
Activity 6.8: Learning to use the African Storybook Maker app.
Download the African Storybook Maker app from your app store. Follow these three steps to create a picture storybook:
- Enter the title of the storybook, the name of the writer/s, select the language of the book, choose a colour for the book cover and select/add a picture for the cover.
- Type the words, add a picture or do both to each of the pages of your storybook. Each page has a place for a picture and up to 50 words of text.
There are three ways to illustrate the storybooks. You can:
- take photographs
- draw a picture or use one from your image library
- select from the free-to-use African Storybook images in the app.
- When you are online, click the ‘publish’ button. From the website you will also be able to download and print the book you’ve just created.
You can also download the resource on how to use the African Storybook Maker app.
Creating stories with children
Once you are confident in using the app, you can use it with your children. This will help them to appreciate the structure of a good storybook and will develop their creativity. You can help them develop stories based on:
- their daily routines
- songs and rhymes they know
- incidents that have happened in their lives
- imaginary adventures based on other stories they have read.
Children can write their own stories, or work in pairs. You can also create a single story with a group of children, like this:
Children can speak out the story while you write it down. Then, children draw their own pictures to match the words. Here is an example of a storybook written in Sesotho (Lesotho), called Sun, Moon, Wind and Rain which children illustrated themselves:
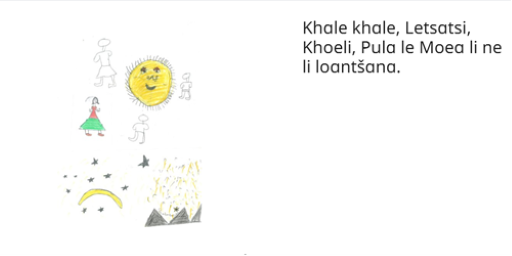
You can take photographs of the children’s pictures to publish. They can also choose pictures from the app to use with their story.
When your story is finished you can show the children how you publish it in the African Storybook Maker app. They can learn how to do this themselves, too.
Children can speak out their story while you capture it on the app.
Once you have created a storybook with them you can click the publish button on their behalf. Their story can then be viewed or downloaded on the African Storybook website for their enjoyment.
End-of-course assessment
During Teaching early reading in Africa you have considered:
- how to support children’s early reading
- some specific approaches to teaching reading
- the way stories support children’s meaning making
- useful ways to assess early reading in order to inform planning.
You are now familiar with the ASb website, the African Storybook Reader and the African Storybook Maker apps, and are hopefully aware that teachers can add stories to the site, or adapt existing stories to different reading levels or alternative languages. Anyone can upload stories to the Community area of the website. The website team then selects stories that are suitable to be published on the main website. This process of academic review ensures that the overall quality is maintained. In the final activity of this course, we want you to review a book and, if you feel confident enough, make a contribution to the ASb website.
Activity 6.9: Using the ASb website
Part 1
Select a story from the ASb website that you have used with a group of children. Write a sentence in answer to each of the following points:
- The title of the story, the language and the level
- How did you introduce the story?
- Write down three questions that you used to support children’s understanding of the story?
- What activities did you do to support word reading and/or reading for meaning?
If you are studying on your own and do not have access to a class, you can still do this activity by telling us how you would use your chosen story when you are next in a classroom. Share your review with a colleague. If you feel confident enough, you could translate a story on the ASb website, or create your own story.
When you’ve done this, visit this page to confirm completing this part of the activity.
Part 2
Post a comment on this blog to reflect on your learning on this course. Write 200–400 words on your journey, in particular:
- what you have enjoyed
- what challenges you have faced
- how you approached the assessments (Activities 3.10 and 6.9)
- how you will use what you have learnt in the future.
Final words
Whether you have studied Teaching early reading in Africa – with African Storybook on your own or with a group of colleagues, we hope that it represents the start of your journey to become a reflective, confident, informed and enthusiastic teacher of early reading. You can return to the course at any point and you can keep and adapt the downloadable resources. This course represents the start of a learning journey rather than the end.
As your confidence grows and you become more familiar with the ASb website and ASb Reader and ASb Maker apps, consider making your own contribution by translating, adapting or even writing your own story. If you do that you can tell us about it by re-visiting your blog post.
Teaching early reading is one of the most important jobs in teaching. If children can read fluently and make meaning from what they are reading, by the time they encounter a wider curriculum with a range of different subjects they will have the best possible chance of achieving success at school and giving themselves a range of options as they move into the adult world.
Now that you have completed this course, you may want to complete the post-course survey.