Use 'Print preview' to check the number of pages and printer settings.
Print functionality varies between browsers.
Printable page generated Tuesday, 14 July 2026, 3:19 PM
Study Session 4 Inclusive WASH Facilities
Introduction
In Study Sessions 1 and 2 you were introduced to the challenges facing people with disabilities and the barriers to inclusion. In Study Session 3 you also learned about the different WASH issues affecting women. You may recall from Study Session 1 that many national policies and programmes state that services should be available ‘for all’ without going into further detail about how this could be achieved. In this study session, we look more closely at practical matters and how to make WASH facilities inclusive for all.
You will learn about the features of appropriate inclusive WASH facilities for households and how to assess the accessibility and safety of existing facilities. The study session concludes with an outline of the process for planning and implementing inclusive WASH.
Learning Outcomes for Study Session 4
When you have studied this session, you should be able to:
4.1 Define and use correctly all of the key terms printed in bold. (SAQ 4.1)
4.2 Identify appropriate inclusive WASH facilities for households and institutions. (SAQs 4.2 and 4.3)
4.3 Carry out an accessibility and safety audit. (SAQ 4.1)
4.4 Describe the steps in planning and implementing inclusive WASH facilities. (SAQ 4.4)
4.1 What is an inclusive WASH facility?
From Study Session 1, you know that inclusive WASH facilities are safe, accessible and usable by everyone in the community.
Who are the members of the community?
Communities are made up of people of all ages and types, including persons with disabilities of many different kinds, elderly and frail people, children (who may also have a disability), pregnant women, injured people and people living with long-term illnesses including HIV/AIDS.
Any community is made up of people with different needs, and inclusive facilities are expected to address these needs. Thinking about what the different needs are and how they can be met is part of the process of making WASH facilities inclusive.
If a public water point has a ramp, does that make it inclusive?
No. A ramp is not the only feature of an inclusive water facility. A ramp would help wheelchair users and people who have difficulty with steps but this is not enough on its own. The facility would also need an even path leading to it, taps installed at different heights including some that could be reached from a sitting position, and possibly other features to make it usable by everyone in the community.
The practical requirements of appropriate and inclusive WASH facilities vary with the situation. For individual households, it is the needs of the family members that are important but for public facilities the needs of the whole community should be considered. The next two sections look at each of these in turn.
4.2 Appropriate and inclusive facilities for households
(Note: This section and Section 4.3 borrow from other sources for recommendations for inclusive WASH facilities. The main source, and recommended further reading, is the Compendium of Accessible WASH Technologies by Jones and Wilbur available from: https://washmatters.wateraid.org/ publications/ compendium-of-accessible-wash-technologies)
4.2.1 Access to water for households
In Ethiopia, a water connection from town waterlines to individual households is common in larger towns. People in these households have the benefit of a piped water supply on their premises. In rural Ethiopia, house connection is not common and even in urban areas a large number of households use water from communal facilities. This means that when we talk about appropriate, inclusive water facilities for households we are generally talking about communal water facilities including handpumps, protected springs and tap stands. The main features of inclusive communal water facilities are:
- Paths to and from the facility are wide and have a non-slippery surface.
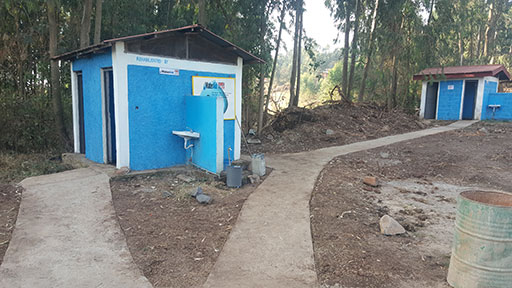
- Concrete ramp (Figure 4.1), wide enough for a wheelchair (minimum 80 cm) and does not slope too steeply (not more than 1 in 12, see Study Session 2, Figure 2.5).
- The concrete apron around a handpump is broad and level, with plenty of room for wheelchair users.
- Fences must not block access.
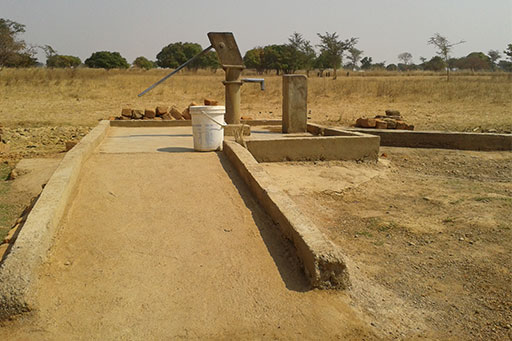
Apart from the slope and even surface, what other features of the ramp in Figure 4.1 makes it safer for users?
The raised sides help wheelchair users and visually impaired people be aware of the edges and stop them rolling or falling off the ramp. There is also a pedestal on the right for resting a water container so lifting can be split into two actions by resting midway through.
4.2.2 Access to sanitation for households
The specific requirements for household latrines will vary with the needs of the family members but it is worth thinking ahead to the future. The circumstances will change over time as babies are born and grow up, people may get sick or suffer injury, and inevitably grow old and may become infirm or have weak eyesight.
Recommendations for household latrines are:
- That they are located within 15 metres of the house with a clear, level path.
- To accommodate a member of the family who is visually impaired, guide string or rope can be stretched from the house to the latrine and to the handwashing facility (Figure 4.2). Alternatively, landmark posts (wood or metal) or large stones can be placed along the edges of the path. These can be painted white to make them more noticeable.
- Many people with physical impairments may need a larger floor area than usual and have handrails and a raised seat (see Section 4.3.2 and Figures 4.4 and 4.5).
- Handwashing facilities (water and soap) should be close to the latrine and positioned so that all household members can reach them.
In some places, if the land is sloping and space is limited, it may be necessary to have steps leading to the facility. As you read in Study Session 2, steps will always be a barrier to wheelchair users but they can be made less of a problem for others. Jones and Wilbur (2014) recommend:
- Steps should be low and deep from front to back.
- They should be regular in size, with height 15–17 cm and depth 28–42 cm.
- Concrete steps can be roughened or marked with cross-hatching while the concrete is still wet to reduce the risk of slipping.
- Steps should have a handrail on one or both sides.

Look at Figure 4.3. What features of these steps are good for accessibility? Can you recommend any improvements?
The steps are low and deep and have cross-hatching in the concrete to make them less slippery. Possible improvements are a handrail to the side and a raised edge at the sides of each step.
4.3 Appropriate and inclusive facilities for institutions
Many of the required features for accessibility for institutions are the same as they are for households but it is even more important to include them in public facilities because of the variety of people in the wider community.
4.3.1 Access to water for institutions
Schools and health institutions may get their water from a well or handpump or they may have piped water supply to taps. The general accessibility requirements of a wide, even path, no steps, and gently sloping ramp will be familiar to you by now. In addition, for institutional water facilities, there should be a sufficient number of taps for all the users and these should be installed at different heights to enable persons with physical disabilities and children to reach them. This will allow access for handwashing as well as for drinking and other water uses.
4.3.2 Access to sanitation for institutions
Again, the basic principles of wide paths and level surfaces apply but for latrines in schools and health institutions there are additional requirements. Schools should have separate latrine blocks for boys and girls each with at least one cubicle that is accessible by students with disabilities. The recommended dimensions in the Design and Construction Manual are cubicle width of at least 1.5m with a door at least 90cm wide (Ministries of Health, Education and Water and Energy, 2012). In addition, girls, including girls with disabilities, need appropriate menstrual hygiene facilities where they can safely and discreetly dispose of sanitary products and wash as required. Health institutions should have similar facilities for menstrual hygiene management. They also need to have facilities that accommodate all the different types of people who may visit including pregnant women, elderly people, people who are sick and may be weak, and people with many different types of impairment. The requirements are:
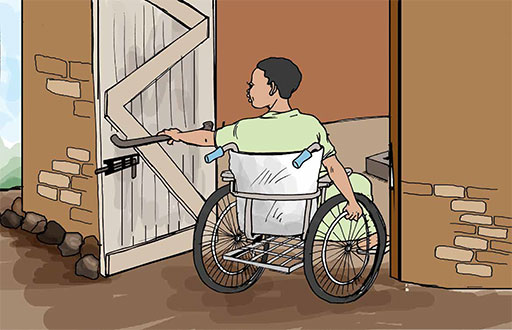
- A wide door that can be opened and closed easily (Figure 4.4).
- Enough space inside the latrine for wheelchair users or someone who uses crutches or someone who needs help from a carer.
- Handrails at the sides of the toilet and possibly other supporting devices.
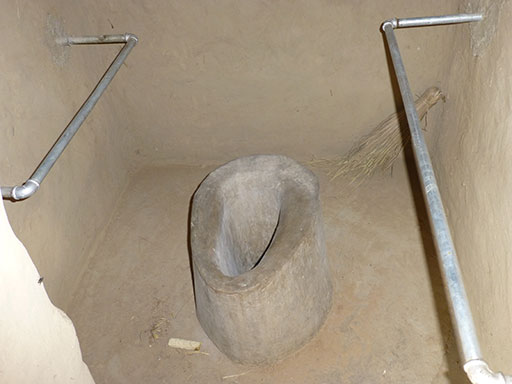
- A seat for those who cannot squat (Figure 4.5).
- Access to handwashing facilities with a water supply and soap.
4.4 Accessibility and safety audit
Many existing institutional and household facilities are not inclusive but it may be possible to adapt them with relatively simple modifications. The first step is to assess the situation. An accessibility and safety audit is a tool used to evaluate water and sanitation facilities and identify possible adjustments and improvements. The audit includes both accessibility questions (how easy or difficult is it for people of all ages and abilities to get to and use the facility?) and safety questions (is there something about the facility or a place on the path to it that may not be safe for some users, such as people who use crutches, girls, women and small children?).
The audit may be initiated by the service provider (government and non-government), NGOs, Disabled Persons Organisations (DPOs) or other stakeholders. However, the auditing activity itself should be a participatory process involving the users of the facility as well as the providers. Accessibility and safety audits may be organised in a partnership arrangement between different organisations, for example a water bureau or NGO could partner with a local DPO (WaterAid/DDSP, n.d.). (You will learn more about participation and partnership in Study Session 5.)
The process described in the following sections may appear quite elaborate and require a lot of resources. It’s important to note that this may not be necessary. Auditing is a flexible process and can still be highly effective with a much lighter touch.
4.4.1 Steps in conducting an accessibility and safety audit
Figure 4.6 suggests the main steps to take. Each of these steps is described in more detail below.
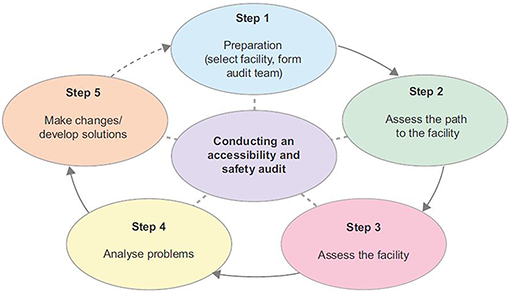
Step 1 Preparation for the audit process
The first step in preparation is identifying the facility to be audited, which could be a water point or latrine at household or community level, or within an institution such as a school or health centre/post. You can also use the same basic process to audit accessibility in any public building or office.
Preparation also includes selecting the team of people to conduct the audit and the key aspect is ensuring all the different users are represented. The audit team should include people of different ages, genders and abilities, as appropriate for the facility being audited. For example, for community facilities this should include men and women of different ages, children, and people with a range of impairments including those who use a wheelchair or crutches, and people with visual impairments. For a school water point, the team could include teachers, other staff, students (boys and girls) with and without disabilities, a representative from the local education office, and the school director. If possible, it may also be helpful to include engineers who have the capacity to design the facility based on the information obtained from the audit process.
If you were organising an audit team for a rural health post, who would you want to be included in the team?
You would need to include the health extension workers based at the health post and representative members of the community: men and women, old and young including children, persons with disabilities of different types, and pregnant women. You could also involve engineers and officials from the water or health bureau.
Once the team is decided, they will probably need some training. This need not be complicated but everyone must understand the purpose of the audit and what they are expected to do. For a larger team, there are specific roles to be allocated, either by asking for volunteers or assigning roles to individuals. The roles include the coordinator (who may be you!), measurer, interviewer, note-taker, drawer of diagrams, and photographer. You may also need to consider asking someone to represent a type of user who is not available for the team. For example, frail older people may not be able to participate in the audit themselves but someone else could have the role of considering their needs.
Table 4.1 shows the items of equipment needed for the roles in a larger team. Some other items may sometimes be useful. For example, if there is no wheelchair user in the team, a wheelchair could be used by a person without a disability for the audit activity.
| Role of team member | Equipment |
| Co-ordinator | Notebook and pen |
| Interviewer | Notebook and pen/voice recorder |
| Note taker(s) | Notebook and pen each |
| Measurer | Tape measure |
| Drawer of diagrams | Notebook, pencil and eraser |
| Photographer | Camera |
Note that a simpler audit can be undertaken by a smaller group without the need for as much equipment. For example, distances can be measured by pacing out or using a stick rather than using a tape measure. A less formal assessment can be very effective if the task is approached by a small group with enquiring and open minds.
If you are carrying out an audit of a community water point but you don’t have a visually impaired person in your team, how could you identify their accessibility and safety problems?
You can ask someone from the team to cover their eyes with a cloth (blindfold) so they have a similar experience to someone who cannot see.
Step 2 Assess the path to the facility
The action starts with assessment of the path that leads to the facility. The audit team walk or wheel along the path and make notes about who can access the facility and who cannot, and what the difficulties are. Questions to be considered include:
- What is the path made of?
- How wide is it? Is it wide enough for all users?
- Is the path clean and clear of debris such as fallen branches that could trip people up?
- Are slopes too steep?
- Are there parts of the path which make girls, boys or women feel unsafe? If so, what is the cause and what could be done about it?
Notes in answer to the questions are made by the note taker as the team progresses. In assessing the path make sure the challenges for everyone in the team are noted. The measurer, photographer and diagrammer also do their part as the team moves along. The interviewer can ask questions of users who are not part of the audit team and record their responses too. Any suggestions for improvements should be recorded. It’s important to take a note of suggestions as and when people make them because they may be forgotten later.
Step 3 Assess the facility
In this step everyone in the team checks out how easy or difficult it is for them to use the facility itself. As before, notes, measurements, drawings and photographs should be taken. Questions for this step will be different for water points and latrines and will vary with the needs of the location (school, health centre, etc.). These are some example questions for auditing latrines:
- If there are steps, are they a manageable height? Is there a handrail for support?
- Is the entrance flat and wide enough for a wheelchair user to enter?
- Is there a secure door? Is it easy to open? Does it open inwards or outwards?
- Inside, is there a raised seat? Are there handrails for support? If yes, are they positioned appropriately? Are they at the right height?
- What are the dimensions of the space inside each cubicle?
- Are the latrines clean (floors, walls, doors)?
- Do all groups of people feel safe when using the latrine? (particularly adolescent girls, women and children of different ages)
- Are there facilities for girls and women to dispose of sanitary protection waste? And washing facilities for menstrual hygiene?
- Is water available for handwashing? Is there soap? Can water and soap be reached by someone sitting in a wheelchair? And by a small child?
Note that in answer to these and similar questions about physical accessibility problems, it is advisable to be as precise as possible because details will help when identifying solutions for the problem (Jones, 2012). For example, terms like ‘not accessible’ are unhelpful but specific notes such as ‘slope of the ramp is too steep’ or ‘handrails are too high’ are much more useful, and even more so if measurements are included.
Step 4 Analyse the problems
When the assessment is complete, the audit team meet to bring together the various notes and other records. They discuss the results and make a list of all the problems encountered. The team can then move on to the next step of finding solutions.
Step 5 Make changes and develop solutions
Some suggestions for change will have been noted during the audit, other solutions may emerge from discussions afterwards. One thing to keep in mind is whether suggested solutions are feasible. Local circumstances including the nature of the location and the availability of funds may make some options unrealistic, at least at the current time.
One way to manage the process of identifying feasible changes is to group them into short-term, medium-term and long-term options. Short-term solutions are those which can be done immediately or that do not need further planning and allocation of resources. Examples could be removing debris from a path or adding a guide rope leading to a latrine. Medium-term solutions need some planning and resources. Examples here include putting in a handrail or installing a ramp and, if funds are available, could be more. For projects that are already in progress with a fixed budget, it may be possible to make adjustments by shuffling resources from one budget line to another. Long-term solutions are more substantial and require consultation with the community, planning and allocation of adequate resources.
Conducting accessibility and safety audits can bring other longer-term benefits. The process can change attitudes and awareness among participants, including the service providers. This can encourage change in the policies and procedures of a given organisation and help them shift from conventional service provision to inclusive service provision.
Some time after the audit is completed and changes have been made, it is advisable to return and repeat the process to check that the situation has improved. This is indicated in Figure 4.6 by the dotted arrow from Step 5 back to Step 1.
(Note: This description of accessibility and safety audits is adapted from resources prepared by WaterAid and the Water, Engineering and Development Centre (WEDC) at Loughborough University in the UK. For further details including worksheets for conducting audits go to https://wedc-knowledge.lboro.ac.uk/ collections/ equity-inclusion/ general.html)
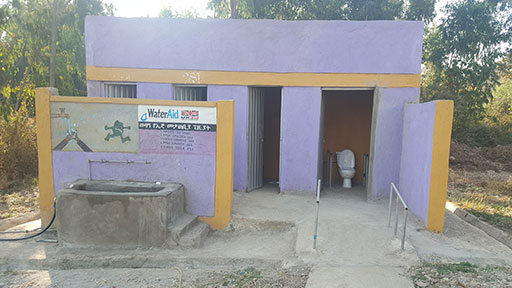
Is the facility in Figure 4.7 inclusive? Explain your answer.
It has some features of inclusive sanitation, that is, a level concrete path but there appears to be a small step up from the path into the latrine. Also, it would not be convenient for wheelchair users to use the handwashing facility because the path does not extend to the washbasin. In addition, there are no markers on the path to help visually impaired people to follow it.
4.5 Steps in implementation for inclusive WASH
Although there are government guidelines for the design of inclusive WASH facilities for schools and health institutions, these recommendations are frequently not followed. There is a widespread lack of awareness of inclusive designs and why these are needed among WASH sector actors responsible for planning and implementing new WASH services including government offices at all levels and many NGOs. Even if they are aware, these people frequently have a misplaced belief that design modifications to improve accessibility will be expensive. In fact, if the changes are incorporated into the design from the start, the costs are usually minimised and only a small addition to the total budget may be required. For example, the additional costs of making a school latrine accessible have been found to be less than 3% of total costs (Jones, 2011).
The recommended steps for implementing inclusive WASH are as follows.
Step 1 Planning
Generally, bottom-up approaches to planning will be more inclusive than top-down methods. Top-down means decisions are made at higher levels of governments and organisations, and are largely guided by the availability of resources. A bottomup approach to planning originates at community level and provides a chance for local demand or development needs to be recognised. Planning offices at all levels (federal, regional, zonal and woreda) should find ways to enable excluded people, or organisations representing them, to proactively participate in the planning process. For example, a district Finance and Economic Cooperation office may organise a planning team that includes representatives from WASH offices and DPOs.
One tool that can contribute to inclusive planning at community level is the accessibility and safety audit. Findings from these audits can be used to raise awareness among the planners, decision makers and the community at large.
Step 2 Design
At this stage, the WASH service provider should refer to the government guidelines and construction manuals for design specifications for water and sanitation facilities. They should also think of engaging persons with disabilities in their discussions about the design. Again the findings from an accessibility audit would be very helpful to initiate such discussion. With input from suitably trained and qualified designers and engineers, inclusive features like the ones described in Sections 4.2 and 4.3 should be considered at the earliest stage. As noted above, incorporating inclusive design features at this stage will keep costs to a minimum.
Step 3 Procurement and contract
When the design has been decided, the next step is the procurement (buying) of the equipment, materials and services required for construction of the WASH facility. For example, the service provider will identify items to be purchased such as pipes, taps, cement, and slabs and they may need to add handrails, seats and ramp materials to their list.
The procurement team will also prepare the contract to be signed with the construction company. It is important that the contract includes details of all the inclusive features that have been specified under Step 2. The procurement team should also check whether the contractor (staff of the construction company) is fully aware of these features and has previous experience in constructing WASH facilities with inclusive design.
Step 4 Contract management
This step involves overseeing the construction process to ensure compliance with the contract specifications signed under Step 3. Contract management involves frequent and regular checking of the construction process, and if anything compromises the quality or deviates from contract specifications, the procurement team should take prompt action.
Step 5 Monitoring and evaluation
When the facility has been built, its function and accessibility should be monitored so that its effectiveness and the success of any inclusive design features can be evaluated. Joint monitoring visits involving both the provider and users are recommended. Repeating the accessibility and safety audit of the newly constructed facilities is one of the tools that could be used. Sometimes details that nobody has noticed during the construction process may need to be changed to improve accessibility, for example door handles or gates opening in or out. If it is found that the facility does not meet the accessibility specifications of the contract it may be necessary to withhold final payment from the contractor.
Summary of Study Session 4
In Study Session 4, you have learned that:
- WASH facilities are inclusive when they are safe to use and accessible to all.
- The main features of accessible WASH facilities are a wide and level path, an entrance with a ramp and enough space for wheelchair users.
- Specific requirements for inclusive water and handwashing facilities include taps positioned at different heights; for toilets they include cubicles with wide doors that open outwards, have sufficient space inside and are fitted with handrails and a seat.
- Healthcare institutions should have facilities suitable for older people and others who may be weak and infirm, for pregnant women and people of all ages with all types of impairment.
- Schools need separate sanitation facilities for boys and girls that are suitable for children of different ages and abilities. They should also include appropriate facilities for menstrual hygiene management by adolescent girls.
- An accessibility and safety audit is a participatory tool used to identify problems associated with WASH facilities and to generate ideas for solving the problems.
- There are five steps in conducting an accessibility and safety audit: preparation, assess the path, assess the facility, analyse problems and make changes or develop solutions.
- Implementation of inclusive WASH should involve all users of the facility. Inclusive design features should be incorporated from the start of the process.
Self-Assessment Questions (SAQs) for Study Session 4
Now that you have completed this study session, you can assess how well you have achieved its Learning Outcomes by answering these questions.
SAQ 4.1 (tests Learning Outcomes 4.1 and 4.3)
- a.What is the objective of an accessibility and safety audit?
- b.Why is it described as a participatory process?
- c.Outline the steps in conducting an accessibility and safety audit.
Answer
- a.The objective of an accessibility and safety audit is to identify barriers to accessibility to a facility and anything that may make people feel unsafe when using it. The audit is followed by plans and actions that modify the facility so that it is accessible to persons with disabilities and others who have difficulty because of their age or condition.
- b.The audit is a participatory process because it involves, or should involve, the participation of all types of people from the community, including persons with disabilities, other men and women of all ages, children, etc.
- c.There are five suggested steps to be followed for an accessibility and safety audit: (i) preparation (select facility, form audit team), (ii) assess the path to the facility, (iii) assess the facility, (iv) analyse problems and (v) make changes or develop solutions.
SAQ 4.2 (tests Learning Outcome 4.2)
Imagine you are a part of a team that helps communities and institutions conduct accessibility and safety audits and gives advice on possible actions to take.
- a.The 90-year old grandfather in a family is frail and has lost his sight. The family is planning a new latrine. What features do you advise them to include in the new facility?
- b.A health centre plans to modify its sanitation facilities. What is your general advice to make a health institution sanitation facility inclusive?
Answer
- a.They should dig the new latrine no more than 15 metres from the house and construct a smooth, even path to it. It should have markers along the sides of the path or a guide rope stretched from the house to the latrine. The latrine should have a permanent or moveable seat, and handrails. They should also consider handwashing facilities next to the latrine.
- b.The health centre team would need to consider all features of inclusive institutional sanitation: an even path to the latrine block, a wide ramp on the entrance, enough space inside, levelled floors, at least one permanent seat, handrails, doors, and handwashing facilities. They should also consider separate facilities for men and women and appropriate arrangements for menstrual hygiene management for female patients and staff.
SAQ 4.3 (tests Learning Outcome 4.2)
Look at the latrine block in Figure 4.8. What features of this facility make it inclusive? Are there any features that are not inclusive?
Answer
Inclusive features:
- There is a smooth ramp into the latrine block which also has handrails on both sides of the slope.
- The cubicle on the right has a door that is wider than standard width. It also has handrails inside the cubicle and a raised seat.
Unfortunately, there are also features that make the facility less accessible:
- The cubicle door opens inwards so it would be impossible for a wheelchair user to get into the cubicle and close the door behind them.
- There are steps between the latrines and the water taps on the left so it would not be possible for wheelchair users and some others to wash their hands after using the latrine.
SAQ 4.4 (tests Learning Outcome 4.4)
- a.Imagine you are an advocate for inclusive planning and you got a chance to meet with the water and health planning office. What would you like to discuss at the meeting?
- b.Imagine you are a procurement head and it is your responsibility to review the contract documents for a new facility before they are signed. Outline what you should check while reviewing the contract.
Answer
- a.There are many topics you might like to discuss including the design and construction guidelines for inclusive WASH in schools and health institutions; the low level of awareness about inclusion; the need to consult with users; and the fear of increased costs for design modifications. You could describe how costs can be minimised if accessible features are incorporated from the start of the design and construction process.
- b.As a reviewer, you would check that the contract document specified any inclusive features that had been identified and agreed and also that the contract had sufficient detail to ensure they were constructed correctly. The contractors will be monitored for compliance against these specifications during and after construction, so you would need to check that the requirements were clearly stated.