Resource 3: Turning pupils’ stories into a ‘Big Book’
![]() Teacher resource for planning or adapting to use with pupils
Teacher resource for planning or adapting to use with pupils
What you will need
- Some large sheets of ‘newsprint’ (approx 60 cm x 85 cm)
- Some fat wax crayons
- A pencil
- Thick felt tip pens
- A fat sewing (or embroidery) needle
- Some thin string
- A glue stick
- Some smaller pieces of plain white paper
- A large sheet of card, or poster paper, or a ‘chart’
- The beginning of the story that you told your pupils
- The rest of the story, which your pupils have dictated to you
How to make a Big Book
Making books can really motivate children to want to read and write more for themselves. With younger pupils, you may want to do more preparation beforehand, limiting the tasks they are involved with to specific aspects (see below). Older pupils, depending on their experience, will be able to undertake many more of the tasks themselves (as in Activity 2).

- First of all, read through the whole story carefully and make sure it is complete and properly punctuated.
- Decide how much text (writing) you want to put on each double-page spread. If you have Primary 1s and it is the beginning of the school year, you may want to make sure that there are no more than two or three sentences on a double-page spread. In some parts of the story you may only want to write a phrase. If you are working with older pupils, you can write more.
- Think about what illustrations or drawings you need to accompany the text. This will help you to decide how long you think the book will be, and how many pages it will have.
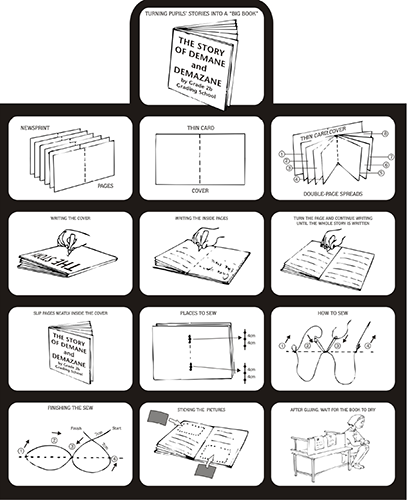
- Take your sheet of thin card, and fold it in half. This will be the cover of your book. If a book made of newsprint pages has a card cover, it lasts much longer.
- Write out the whole story on an A4 sheet of lined paper and put the text for each double-page spread on a new line. This will be really helpful when you write out the text on the actual pages.
- Fold each sheet of newsprint in half. Slip the sheets together and make sure that they are neat, and fit nicely. Don’t fasten the sheets together yet.
- Now decide where you are going to put the text. Will you put it on the left-hand page of each double-page spread? Or will you write on the right-hand pages? Will you write at the top of the pages? Or will you write at the bottom? Will each double-page spread look a little different? Perhaps you will choose to write right across the double-page spread sometimes? You will have to make decisions about this.
- Now take the folded newsprint pages. Work at a large table. Use the fat black wax crayon and write neatly the title of the story on the outside of the first sheet. Write the title just as it would look on the very first page in a book that you would buy in a shop. You want your book to look professional.
- Underneath, in smaller letters, write the names of all the pupils who created the story, or your class. (If this is the whole class, it will be very difficult to fit in 50+ names, so just name the class if you can’t fit in all of the names!)
- Next, open the first sheet of newsprint. This will be your first double-page spread. Write the first sentence(s) or phrase(s) on this double-page spread, using the fat black wax crayon. You must leave enough space for the illustrations or drawings.
- When you have written the text for this double-page spread, turn over to the next double-page spread, and write the next sentence(s), or phrase(s), with the black wax crayon. Carry on in this way, until you have written out the whole story.
- Take the ‘cover’ of your book. You need to decide where you want the title. It’s a good idea to leave space for an illustration. Will you write the title at the top, or at the bottom? When you have decided, write the title lightly in pencil. When you are happy with the way it looks, write over the pencilled words with a felt tip pen.
- Slip the newsprint pages neatly inside the ‘cover’.
- Now sew the pages and cover together. There are several ways that you can do this, but the following way works very well:
- Open out your book so that the cover is at the bottom, and the middle double-page spread is on top. With a big book, it is a good idea to mark two places on the crease in the middle, where you can sew. Mark one place in the top half of the crease, and mark another one in the bottom half. In each place, make three spots. These spots should be about 4 cm apart.
- Thread your needle with a piece of thin string about 50 cm long. Push the point of the needle through the middle of one of the sets of three spots, right through all the newsprint pages and the cover. Pull the string through firmly, but leave a piece of string about 7 cm hanging and follow the chart.
- Cut the string attached to the needle, about 7 cm from where it has come through the pages. Now tie the two 7-cm ends together firmly.
- Repeat the process at the opposite end of the crease.
- Make a list of the illustrations that you need. Decide if you are going to ask specific children to make the illustrations, or whether you want your whole class to be involved. Pupils can work well in pairs to create the pictures. Plan how to organise the drawings.
- Choosing the pictures. Read through the whole text with your pupils. Hold the pages open, and read the story aloud. Read the story so that it sounds interesting.
- Tell your pupils that you want them to make the pictures. As you read through the text a second time, pause on each double-page spread and discuss the picture that it needs. As you and your class decide what is needed on each page, assign each illustration to a specific pupil, or pair of pupils.
- Give them time to make the pictures carefully. Involve the pupils in sticking them in the book.
- Even beginner readers can memorise the story, and have a sense of where each picture goes. Underneath each picture, write the name(s) of the pupils who made the picture. Continue in this way until all the pictures have been glued in and labelled.
- When all the illustrations have been glued in, read the book with your pupils. We are sure that both you and your pupils will feel very proud of their efforts.
Adapted from: Umthamo 2, University of Fort Hare Distance Education Project
Resource 2: A checklist for pupils – to use when editing their work for a book


