Use 'Print preview' to check the number of pages and printer settings.
Print functionality varies between browsers.
Printable page generated Monday, 29 June 2026, 10:48 PM
Module 2: Secondary Science – chemistry
Section 1 : Elements, compounds and mixtures
Theme: Probing students’ understanding
Learning Outcomes
By the end of this section, you will have:
- used an activity to probe students’ understanding of definitions of elements, mixtures and compounds;
- planned questions at different ability levels to help students observe and interpret a demonstration related to elements, mixtures and compounds;
- used students’ drawings or models to probe their understanding of formulas of compounds and elements.
Introduction
At the end of teaching a topic, teachers usually set a test or exam to find out what the students have learned. They are often dismayed to discover that it is not as much as they expected but by this time it is too late to help students. A good teacher will find out what students understand as they go along, and what the students are finding difficult and help them to make progress.
This unit has three short activities that will fit into your normal teaching about elements, mixtures and compounds and will show you how to find out what your students understand. Being able to recite definitions of key words like ‘element’, and ‘compound’ does not necessarily mean that your students understand what they mean. Don’t worry – the activities won’t prevent you from finishing the syllabus; they are fairly short and will help your students to learn. Once you have tried these activities, you will be able to adapt them when you teach other topics.
1. Teaching for understanding
Students have their own ideas about a topic and an effective teacher takes account of these ideas when teaching. So a good way to start teaching any topic is to find out what your students already know about the topic. You may be surprised about what they have learnt from newspapers, adults, peers, older brothers and sisters and observations. Often their ideas are not the same as the scientific ideas we want them to understand.
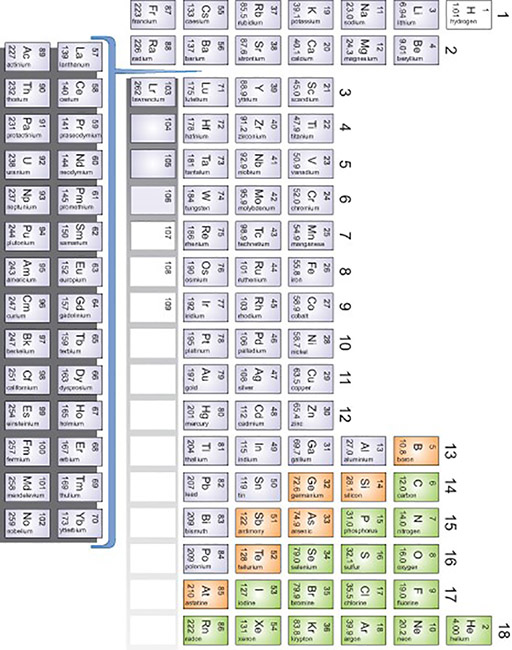
In this topic we will start by talking about the chemical elements and how they are the building blocks from which all other substances are made. (Resource 1 shows the periodic table with all the elements). To find out about the students’ ideas, you could ask them if they know what an element is and if they know the names of any of the common elements. They will probably have heard of iron, carbon and sulfur, but there may be others.
Case study 1 shows how one teacher helped her students to understand the definitions of elements, compounds and mixtures. Students need time to think about new words and to understand them. You will be pleased if they can remember and recite the definitions, but you need to be sure that they understand what the words really mean. That is more difficult to measure! You can use the ideas in this unit whenever you introduce new words or scientific terms. In Activity 1 we represent atoms as circles, and atoms of different elements by different coloured circles. This activity will help students understand these definitions and remember them. Organise the activity so that the students have the opportunity to talk to each other as they work out the answers. Encourage them to explain their answers to the questions.
Case study 1: Group work to probe understanding
Miss Mene had taught her Form 9 class the definitions of ‘element’, ‘mixture’ and ‘compound’, but wanted to make sure that they really understood these key ideas in chemistry. She decided to use a card-sorting activity that would give the students an opportunity to discuss their ideas. She used Resource 2 to make 12 sets of cards out of some old food packets. Each card had a diagram that represented an element, a mixture or a compound. It took quite a long time to make the cards so she persuaded her colleague who taught the next level of junior secondary to help her, and offered to share the resource with her. Miss Mene organized the students into groups of four, giving each group a set of cards. Using the information she had already given them, they had to sort the cards into three piles (elements, mixtures and compounds). Two groups then came together to check each others’ piles and discuss any differences. If they disagreed on anything they had to explain their reasons and agree on the answer.
Miss Mene found that they identified the elements, but she had to explain the difference between compounds and mixtures again.
Her colleague had to teach her class a topic on chemical reactions. She borrowed the cards to help her students revise the definitions that they had learned last year. They struggled at first, but the activity really helped them when they started the new topic on chemical reactions.
Activity 1: Think-pair-share
This activity will help you to find out whether your students understand the definitions that you have taught them.
Copy the diagrams on to the board or make one copy for each pair of students (Resource 2).
Instruct the students to work in pairs to identify which diagrams represent the elements, the compounds and the mixtures. Tell them they have to be able to explain their choices.
Next, direct each pair to compare their answers with another pair. If they disagree, they have to discuss the example with each other and agree on the right answer.
As they work, walk round and listen carefully to what they are saying. Use questioning to find out whether the students understand the reasons for their answers.
At the end of the activity you can revise the definitions and be confident that they are understood.
2. Using questioning to enhance a demonstration
One of the reasons why chemistry is difficult is that we cannot see the things we are talking about. It is full of abstract ideas. You can help your students to understand chemical words and ideas by using experiments and models to help them develop pictures of things that they cannot see. A popular experiment for teaching about elements and compounds is heating iron and sulfur to make iron sulfide (Activity 2). But there are other experiments that you can do, as Case study 2 shows. While you are doing the demonstration, you can find out if your students understand what they are seeing by asking them a series of questions. It is important to make sure that your questions challenge them. Resource 3 reminds you about the different types of questions that you should be asking. It is a good idea to plan the questions that you could ask before the lesson. Think about how you will respond to their answers. You could ask several students the same question then ask them to select the best one. You could also ask a follow-up question: ‘Why do you think that?’
After the demonstration you can check their understanding by asking them to write a short paragraph about the experiment, using the key words. By letting the students write about the experiment in their own words, you will really be able to see if they understand the key ideas. You could let them read each others’ and give feedback.
Case study 2: Demonstrating a mixture
Mr Okumbe did not have any sulfur, but he wanted to use an experiment to help his students understand the difference between a compound and a mixture. One afternoon he set out a demonstration on the distillation process for his Form 9 class (Resource 4). He gathered his students around the front bench and showed them the apparatus. The students examined the ink available and recorded its physical properties, e.g. blue in colour, a dark liquid. He then mixed the ink with water in a test-tube and asked the students the following questions:
- What happens to the ink when mixed with water?
- Does the test-tube get warm or cool down?
- What is the colour of the mixture?
- Is it possible to get the ink back from the mixture?
Mr Okumbe heated the mixture in the flask and as it got to the boil, he collected the liquid which passed through the tube into the boiling tube immersed in a beaker of cold water. The mixture was heated until most of the water in the flask evaporated. As the process was going on, he posed questions to the students. He asked some easy questions which encouraged them to watch carefully, but he also asked lots of ‘why’ questions which made them think. When he asked harder questions, he gave the students plenty of thinking time. Sometimes he asked them to discuss the answer with their neighbour, before volunteering an answer.
At the end of the lesson he asked his students to try and think of other mixtures that could easily be separated. Someone suggested salt water and they started talking about where the salt they use at home comes from and how it can be produced on a large scale. Mr Okumbe explained that along the coast of Kenya and Tanzania, there are many places where salt is produced by evaporating sea water.
Activity 2: Demonstrating Iron and Sulfur
In this activity, you will demonstrate the reaction of iron and sulfur. Resource 5 explains the details of the experiment. Before the lesson, plan a set of questions that you will ask your students, which will help them to think about the experiment.
Gather your students round the front.
Start with some simple questions:
- What is an element?
- Which one is the metal?
- What is the evidence that this is a metal?
Get your students to make predictions:
- What will happen if I mix them together?
- What will happen if I heat the mixture?
Ask some open ended questions with more than one answer:
- How could I separate the mixture?
Give them time to discuss the answer with their neighbour before they respond.
When you complete the demonstration ask some harder (higher order) questions:
- What has happened?
- How do we know that this is a new substance?
- Can you explain the difference between an element and a compound?
Finally, set them the task of writing a short paragraph about the experiment that includes the three key words – element, mixture and compound.
3. Using pair work to support understanding
Careful questioning, providing opportunities for students to discuss their ideas, and open-ended writing, are all techniques that will help you to find out the level of understanding in your class. Another helpful approach is to get your students to make a model or draw a picture to explain a scientific idea or principle.
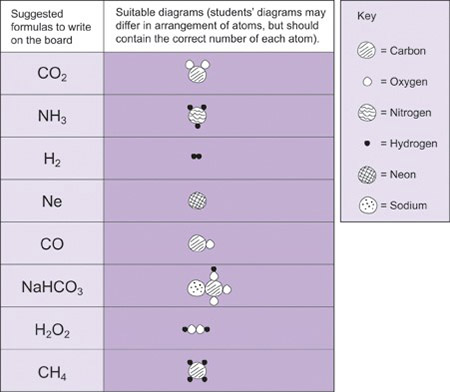
As your students develop their understanding of chemical compounds, you will be introducing them to chemical formulas. Chemical formulas provide a universal way for chemists to talk to each other, and it is important that your students understand what they mean. We cannot see the molecules, so making a model or drawing a picture will help your students to imagine what they might look like. Resource 6 contains some examples of simple formulae that you could use in order to develop your students’ understanding of the concept. When your students are working on the activity, it is important that you move around the room and listen to their conversations. You will find out a great deal about their thinking! If they have a problem, ask leading questions rather than just tell them the answer.
Case study 3: Pair work on formulas
Mrs Ogutu of Tiengre Secondary School, Kenya decided to review previous work on chemical symbols and formulas. She spent a brief moment explaining to the students that chemistry knowledge is easily communicated through use of symbols and formulas. She referred to the periodic table poster that the class had made and wrote on the board the formulas of some compounds made from the elements in the periodic table. She set the activity up as a game, asked the students to work in pairs and distributed some pebbles she had collected (she could have used plasticine instead). She told each student to secretly choose three compounds from the board and to model them using pebbles to represent the atoms. Their partner then had to work out the molecules or formulas which the models represented. She gave the students opportunities to repeat the exercise until they gained confidence in identifying the formulas of the compounds and elements.
While the students were working she moved round the classroom watching carefully what they were doing. Mrs Ogutu noticed that Sammy thought the number referred to the atom after the number so he had put water with one hydrogen and two oxygen atoms. She didn’t say anything because she wanted to see if the students could work it out for themselves, and so watched carefully. Sammy’s partner, Cornelia, was confused at first but realised what he had done. Mrs Ogutu watched as Cornelia explained formulas to Sammy. Just before the end of the lesson, she asked him to make a model of H2S and was delighted that he got it right.
Activity 3: Interpreting formulas
The aim of this activity is to reinforce what the formulas actually mean in terms of atoms.
Use formulas that your pupils need to know for the exams. Write the formulas of some elements and compounds on the board (Resource 6 has some suggestions but you could make up your own). Divide the students into pairs and tell each pupil in secret to choose one of the formulas and to draw a diagram to represent it, using circles to represent the atoms. They should then challenge their partners to identify the formula. Ask the students to repeat this several times until they are confident. At the end of the activity, gather the class round the front and ask them which ones they found difficult and what they have learnt from the activity.
You may choose to extend this to discuss how the diagrams and symbols can both be used to represent the reaction between iron and sulfur.
Resource 1: The Periodic Table
![]() Background information / subject knowledge for teacher
Background information / subject knowledge for teacher
Periodic table
Resource 2: Diagrams of elements, mixtures and compounds
![]() Teacher resource for planning or adapting to use with pupils
Teacher resource for planning or adapting to use with pupils
Elements compounds and mixtures
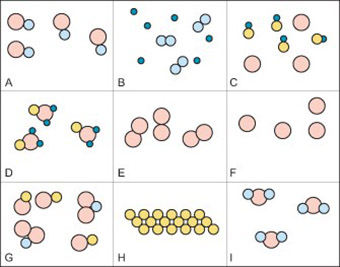
Answers – for teacher’s use
- A.a compound
- B.a mixture of two elements
- C.a mixture of a compound and an element
- D.a compound
- E.an element
- F.an element
- G.a mixture of two compounds
- H.an element
- I.a compound
Resource 3: Questioning
![]() Teacher resource to support teaching approaches
Teacher resource to support teaching approaches
Questioning
Good questioning is really important and is not as simple as it first may seem. It can help you develop good relationships with your students, it can help your students to organise their thoughts and therefore help them to learn, and it can provide you with valuable insights into their thinking. Good questions can promote thought, encourage enquiry and help with assessment.
By thinking carefully about the sorts of questions that you can ask, you will improve your teaching.
It is helpful to think of questions as being ‘open’ or ‘closed’ and ‘person’ or ‘subject-centred’.
Closed questions have a single correct answer. They can reassure students and help you to find out what they remember. But too many closed questions can limit the opportunities to explore thinking and develop understanding. They are often undemanding and can be quite threatening if the student lacks confidence.
Open questions have no right answer, or several right answers. They give you opportunity to find out what your students are thinking, and can be less threatening for some students.
Subject-centred questions ask things like ‘what goes into a plant?’ and ‘what sort of rock is this?’
Person-centred questions focus on the student and are less threatening and more learner-friendly: ‘What do you think goes into the plant?’ ‘What do you notice about the rock?’
A committee of educators chaired by Benjamin Bloom devised a taxonomy of types of questions in which they identified ‘lower order questions’ and ‘higher order questions’. Research shows that lower order, recall-type questions tend to dominate classrooms. This leads to an emphasis on remembering facts and reduces the opportunities for creativity, thinking and developing understanding (see table).
It is important that you plan your questions appropriately. When you are doing a practical demonstration, for example, or introducing a new topic, write out a list that includes some lower order and some higher order questions. This way, you will be using questions to help your students to learn. Just like every aspect of teaching, you need to practise! You also need to think about how you respond to your students’ answers. Try and give them time to think, ask several students the same question or let them discuss the answer before they respond.
Conventionally, students are asked to put their hands up when they answer a question. You probably find that the same students frequently put their hands up and some do so very rarely. It can be very effective to ask specific students to answer your questions and not to ask them to put their hands up. Everyone will have to listen as they know that they might get asked. When you first start doing this, make sure that you direct easy questions at students who you know will find the work difficult. If they can successfully answer some of your questions, they will become more confident.
| Type of questions | Purpose | Examples |
| Lower order questions | ||
| Recall | To see what your students remember | Who is? What are? Where are? When did? |
| Comprehension | To see if your students understand what they can remember | Explain why? What are the differences between? What is meant by? |
| Application | To see if your students can use their knowledge | How would you classify these invertebrates? What is the evidence that this is a metal? |
| Higher order questions | ||
| Analysis | To help your students think critically To see if they can make deductions and draw conclusions | Why? What do you think will happen if? What do your results show? What would be the effect on? |
| Synthesis | To help your students create new ideas from existing information | What would happen if there was no friction? Suppose the Earth rotated at half the speed? |
| Evaluation | To encourage your students to form opinions and make judgments | How effective is? Which is best and why? What do you think? |
Resource 4: Distillation apparatus
![]() Teacher resource for planning or adapting to use with pupils
Teacher resource for planning or adapting to use with pupils
Distillation apparatus

Resource 5: Background knowledge for heating Iron and Sulfur
![]() Background information / subject knowledge for teacher
Background information / subject knowledge for teacher
Using iron and sulfur to demonstrate the difference between a mixture and a compound
Gather your students round the front. Demonstrate the properties of iron (magnetic, sinks in water) and sulfur (not magnetic and floats in water). Mix them together and ask your students to suggest how they might be separated. Based on their responses, demonstrate that it is easy to separate them by using a bar magnet or putting the mixture in water (iron sinks and sulfur floats). When you heat them together, they glow bright red (exothermic) and a new substance (iron sulfide) is formed, which cannot easily be separated.
Heat the mixture in a boiling tube. (If possible use 5.6 g of iron and 3. 2 g of sulfur, or a similar ratio). The boiling tube will glow red as they react. When the reaction has finished, wrap the tube in a towel (to make sure that hot glass does not burn you) and break it with a hammer. Ask students to predict if the substance formed can be separated as before. Ask them to draw their conclusions on the demonstration. Indicate that a new compound has been formed by heating and that it cannot be separated into iron and sulfur.
Reaction between iron and sulfur
Elements, mixtures and compounds
Elements are substances that are made from one type of atom. An element cannot be broken down into any other substance. There are 92 naturally occurring elements and everything in the universe is made from these basic building blocks. Common examples include carbon, sulfur, oxygen, iron, copper, aluminium. Elements are represented by symbols.
Compounds are substances made from atoms of different elements joined by chemical bonds. They can only be separated by a chemical reaction. Common examples are water (H2O), salt (sodium chloride, NaCl), methane (CH4). The symbols indicate which elements the compounds contain and the number tells you the ratio in which the atoms of the elements combine.
A mixture is made by simply mixing together elements and compounds. No new chemical bonds are formed. Mixtures can be separated using techniques such as filtration, chromatography, evaporation, magnetisation, flotation and distillation.
Atoms are the basic building blocks. In the activities in this unit, we represent the atoms by circles. By shading the circles differently and drawing them different sizes, we can represent different types of atom.
A molecule is a group of atoms that are chemically joined together. It is possible for a molecule to be an element (e.g. oxygen, O2) or a compound (e.g. water, H2O). You can tell the difference because in an element there is only one type of atom.
Adapted from BBC Bitesize revision, www.bbc.co.uk/schools/ks3bitesize/science/chemical_material_behaviour/compounds_mixtures/revise1. shtml
How can you tell when a chemical change has taken place?
- A new substance is formed (a compound) which looks different from the starting materials and has different properties.
- There is an energy change – the reaction mixture gets hot or cold.
- It is difficult to reverse the process.
When a compound is formed, a chemical bond is made between the atoms. There are different kinds of chemical bond; covalent bonds as in methane, CH4,and water, H2O, and ionic bonds as in sodium chloride, NaCl. The properties of a substance are determined by the type of bonds between the atoms and molecules.
Useful analogies
- You can consider the elements to be like the letters of the alphabet. They can be joined together in different ways to give different words (compounds).
- The elements are like bricks. You can join them together in different ways to make new structures.
Other contexts in which you could use these ways of probing students’ understanding
- Acids, bases and salts – matching definitions with words, demonstrating how to make a salt, predicting reactions.
- Separation techniques – choosing a method to separate a mixture and explaining why it works.
- Naming pieces of apparatus – matching the apparatus with its uses.
- Physical and chemical change – understanding definitions and classifying examples.
- Chemical bonding – understanding definitions, building models to represent molecules or ionic crystals.
Resource 6: Common chemical formulas
![]() Teacher resource for planning or adapting to use with pupils
Teacher resource for planning or adapting to use with pupils
Section 2 : Acids, bases and salts
Theme: Making science practical
Learning Outcomes
By the end of this section, you will have:
- organised students in small groups to carry out scientific investigations;
- set up a ‘circus’ of short experiments (a laboratory parade) to illustrate neutralisation;
- organised children into groups to collect data and present it appropriately.
Introduction
Practical work is a really important part of being a scientist and can help students to learn. There a lots of different types of practical work including demonstrations; investigations in which students plan, carry-out and analyse their own experiment and experiments designed to help students learn specific skills or understand scientific ideas. Gaining first hand experience of materials, organisms and processes can increase understanding and assist retention of knowledge. Shared experiences and real objects may also be helpful for students who find English difficult. All practical work requires careful planning and some improvisation. In this unit the activities are all linked to the topic acids, bases and salts. They involve students taking part in an open-ended practical investigation, a circus of short experiments and a practical activity designed to illustrate theory in which they are required to make very careful observations. The activities should fit into your normal teaching. They describe ways of organising familiar experiments that put the students at the centre of their learning.
1. Organising group work to make and evaluate an indicator
Sometimes, especially when they are learning a specific technique, students will need detailed instructions about what to do. However, if they are going to develop an understanding of what it means to be a scientist and the confidence to think for themselves, then you need to give them the opportunity to take part in open-ended investigations. During the planning, carrying out and evaluating of an experiment your students will really have to think about what they are doing and why they are doing it. Extracting an indicator from a plant is a good opportunity to let your students think for themselves. They need to know examples of acids and alkalis, but they are unlikely to be asked to describe the method in great detail. If they don’t do quite as you expect then it doesn’t really matter; they will get a great deal of satisfaction from working it out for themselves.
It is likely that some of your students will have heard of the term ‘acids’. The first activity describes an experiment in which they will make an indicator from flower extracts and use it to test different substances. This topic is a good opportunity for you to ‘let go’ and take a risk! You will show them what to do, but not give them detailed instructions (Resource 1 provides some background for the teacher and Resource 2 explains the importance of doing a risk assessment). Leave them to plan the details in their groups. They will get the most out of this sort of activity if you give them the opportunity at the end to think critically about what they did and how they could have done it better.
Case study 1: Groups plan their experiment
Mr Otieno, a student teacher at Achego Secondary School, prepared a class practical and evaluated it for one of the assessments tasks on his BEd (Science) course. In a previous lesson, the class had tested various household substances with litmus. Now he wanted them to make their own indicator. On Monday morning, Mr. Otieno walked into class with a bundle of leaves and flowers from different plants. He gathered the class round the front and showed them how to extract the colour from a plant. He asked the students to form six groups of about seven students. Each group was to consist of both boys and girls and it had to contain at least two girls. He asked each group to choose a leader. Mr Otieno asked the students to draw a plan for making and testing the indicators from the plant material. The leader had to make sure that everyone had a job. He then asked each leader to come to the front bench to collect a set of flowers (red flowers and blue flowers) and green leaves plus the apparatus they needed.
When the students were working, Mr. Otieno moved from one group to the other posing questions and making sure that everyone was involved – particularly the girls, who he had noticed often hung back.
He asked the students to test the indicators with a variety of household substances and to record their observations in their exercise books. He asked each group to decide which flower made the ‘best’ indicator and to explain how they decided. Ernest’s group thought the red flower was best because it gave a very dark colour. Mary’s group thought the blue one was best because there was a big difference between the colour in acid and the colour in alkali. It also distinguished between a weak acid and a strong acid.
Activity 1: Evaluating the experiment
Gather your class round the front. Show them how to make an indicator and test it.
Their task is to prepare at least two different indicators and to use them to test a variety of substances. Divide them into groups and get them to make a plan. They should make a list of the apparatus they need to collect and decide who does what job. Each group should choose a leader. When you are satisfied with their plan they can start. They should make and test at least two different plants. While they are working, you should move around the room and ask them questions about the method.
At the end of the activity give them the chance to look at the samples that other people have prepared. Ask each group to evaluate their experiment.
- Did they get some good samples?
- Did they manage to test several different substances?
- What have they learnt from the experiment?
- Did the leader do a good job?
- Did everyone make a contribution?
- How could they have improved their experiment?
- Did they make efficient use of the time available?
By encouraging them to think about the activity in this way, you will ensure that next time you ask them to work in groups on an open-ended activity, they will do it better.
2. Organising a ‘circus’ of experiments
Organising a multi-step task in a group is demanding so don’t worry if your students were not very efficient. They need practice in working in this way. In the next activity, your students will also work in groups, but this time they will have 8 minutes to complete a task at a ‘station’ and then they have to move on to the next one. This sort of practical work is helpful if you don’t have enough equipment for the whole class to do an experiment at the same time. In Case study 2, the teacher uses this sort of activity to organise revision of the topic. Activity 2 and Resource 3 show how you could use this method to teach your students some of the everyday examples of neutralisation. In this sort of exercise each station does not need to involve apparatus. Students have the opportunity to talk about the ideas behind the activities, which can be a very powerful way of learning. This sort of activity takes quite a bit of preparation as each station will need an instruction sheet, but when you have done it once you can keep the instructions and use them again. It might not work perfectly the first time you try it, but that doesn’t matter. Afterwards, think carefully about what went well and what didn’t, so that you can improve on it next time.
Case study 2: A revision circus
Mr Mandela had a few lessons left before his students had to sit the end of term exam. He decided to organise a revision lesson. He set up eight different stations round the room. Each station had an activity from one of the topics that they needed to revise. He chose the activities carefully, so that some of the most difficult aspects of the work were covered. The activities included a card sorting activity, a matching activity for which students had to match definitions and scientific words, some simple experiments (based on reactions they needed to know), a list of simple questions and a past exam question. One of the stations involved some simple practical work: students had to mix some copper carbonate with an acid in a test-tube and write a chemical equation for the reaction. Mr Mandela thought that if they could see the reaction, it would help them remember the equation. He divided the class into groups. He had noticed that when doing practical work, the boys tended to take over while the girls watched. So he divided his class into groups of girls and groups of boys. The students had eight minutes at each station.
Mr Mandela found that the students were very engaged and quite noisy – but they were talking about the activities and arguing about the answers! He moved round the room, providing help if necessary and checking their answers. At the end of the lesson, they had covered a lot of the work and they could not believe that revision could be such fun.
Activity 2: Understanding neutralisation
Before the lesson, set out a number of stations around the room. At each station there should be a set of instructions that the students can follow, making it clear what they have to do and posing some questions (Resource 3). Divide your class into groups and send each group to one station. If you have a very large class, you can set up two versions of some of the stations. Make sure they all start together. After eight minutes (you may decide to make it longer or shorter, depending on the activities) tell them to stop work and move them on to the next station. It is important that they all move together. Keep going until each group has visited every station. While they are working you should move around the room and listen to their conversations and maybe ask some questions to make them think. At the end, gather them round the front and ask each group to report on one of the activities. You could finish by asking them to write a summary of what they have learnt in their exercise books.
3. Investigating reactions of acids
One of the reasons that teachers sometimes give for not doing practical work in their classes is that it takes up too much time and they will not be able to finish all the work they need for the exam. But the exam questions often assume that the students have done, or at least talked about, practical work. Having the opportunity to handle equipment and different substances can help students to retain factual knowledge. A carefully designed experiment can be used to illustrate scientific ideas. Case study 3 and Activity 3 describe two slightly different experiments, but the principle is the same: the practical illustrates the theory you want them to learn. Case study 3 involves an experiment that is very relevant to the exam and shows how the teacher helps the students to make the connection between what they are learning in class and the exam questions they will have to answer. Activity 3 describes a class experiment in which your students make a sample of a salt. In both cases the emphasis is on following the instructions carefully, making observations and working accurately.
Resource 4 provides background for both experiments and Resource 6 contains some general information about organising practical work.
Case study 3: Observing acids and metals
Mrs Boke was going through Kenya Certificate of Secondary Education Chemistry past examination papers and came across a question on the reaction of metals with acids. She decided to investigate this reaction with her lower secondary class. She assembled a variety of metals available in the school laboratory and within her environs and organised her class into five groups according to ability level. She chose a leader for each group and asked the group leaders to collect the metals and acids from the front bench and distribute them between the groups. Mrs Boke wrote clear instructions on the chalkboard. She asked each group to follow the instructions and add a few drops of hydrochloric acid to the test tube containing the metal. As the students were performing the experiments, she wrote a number of questions on the chalkboard to guide them. For example, does it fizz? How fast does fizzing occur? What happens to the metals? Does the test tube get hot? Does the solution change colour? Do different metals react at the same rate?
After the experiment, she asked the group to record their observations for each reaction and used the observations to determine the rate of reaction of metals with acids.
She asked the groups to construct a reactivity series in their notebooks for the metals tested. She also asked the groups to test for the gas produced. While the students were carrying out the experiments, Mrs Boke spent most of her time with the group with the weakest students to ensure that they followed the instructions, that every student got involved and each recorded the observations in their exercise books.
Towards the end of the lesson, Mrs Boke picked up the chemistry examination paper and read to the class the question on the reaction of metals with acids. The class discussed the question by relating it to what they did in the experiment. Many of the students left the class satisfied with what they had done in the class practical and realised that most of their class activities are relevant to the KCSE examinations.
Activity 3: Think-pair-share to make a salt
When an acid reacts with a base, a salt is formed. Salts are useful substances (Resource 4) and your students will need to know how they are made. Before the lesson, write out the steps for the experiment on the board (Resource 5). Number each one, but write them in the wrong order. At the beginning of the lesson, ask each student to put the steps in the right order. Then get them to compare their answers with a friend and agree the correct order. Each pair should then compare with another pair and so on, until the class agree on the correct order for the steps. This will ensure that they really engage with the method and are more likely to do the experiment successfully and remember the method. This technique is called ‘think–pair–share’ and you will find that it is useful in many contexts.
If you have enough apparatus they could perform the experiment themselves, otherwise you could demonstrate the method, getting your students to take part. Make sure you ask lots of questions to keep them interested in the demonstration.
Resource 1: Making indicators from plants
![]() Background information / subject knowledge for teacher
Background information / subject knowledge for teacher
Extraction and testing of flower indicators
A lot of local flowers make good indicators to test for acids and alkalis. You can collect some flowers yourself or ask your students to bring some in. Hibiscus usually works very well as do red, violet, yellow or pink flowers. To extract the colour you can use ethanol, white spirit or petroleum ether. If you don’t have those then, for some flowers, hot water will work.
Apparatus per group
Flowers (collected by students or yourself); beaker, jam jar or tin can; 5 test-tubes + rack OR a white plate; mortar and pestle; teat pipette or drinking straw to add drops; candle spirit burner or Bunsen burner; tripod stand or improvised support for the beaker or can; glass rod or stick for stirring; 5 test solutions (e.g. wood ash solution, sodium hydroxide; lemon juice; hydrochloric acid; water; cleaning fluid, vinegar, bicarbonate of soda, toothpaste). For each of the substances, mix them with a few cubic centimetres of water.
Instructions
- Pick some flowers from one type of plant.
- Tear or cut them into small pieces.
- Put them into a tin or beaker or mortar and pestle. Add about 10 ml of solvent.
- Grind the petals until the liquid stops getting darker and decant the liquid into a test tube. This is the indicator.
DO NOT HEAT the spirit as it is highly flammable. Keep it away from naked flames.
If you don’t have a suitable solvent:
Place the petals in a beaker or a tin can.
Warm the beaker. Stir until the water becomes a deep colour. This is the indicator.
Pour the solutions you are testing into five different test tubes.
OR
Put a large drop of each solution you are testing onto a white plate. Make sure they are as far apart as possible.
- Add drops of the indicator to each solution you are testing.
- Note the colour the liquid goes in acids, alkalis and neutral solutions.
Notes for teachers
- See Risk assessment – Resource 2 .
- If the flower is large (e.g. hibiscus) one or two will be enough. More flowers will be needed if they are small.
- Ensure some groups do hibiscus or other local flowers that you know give good results. Bougainvillea does not dissolve and will need ethanol or another colourless spirit to extract the colour.
- You can filter or decant to separate the flower pieces from the solution, but this is not necessary.
Resource 2: Risk Assessment
![]() Teacher resource to support teaching approaches
Teacher resource to support teaching approaches
Risk assessment
When teachers do practical work they should consider the hazards of the experiment and risks linked to the group of children in the room. They should then consider safety precautions and the instructions they give to students. Every time you do practical work you must consider all the potential hazards and take the necessary precautions.
- If available, students should always wear safety goggles. If they are not available, you need to use very dilute solutions. The most dangerous chemical as far as eyes are concerned is sodium hydroxide. Above 0.5M it can cause permanent eye damage. Students must not use sodium hydroxide that is stronger than 0.1M, without safety goggles.
- In chemistry it is helpful to be able to heat chemicals. If you are able to do experiments using heat, you must have a fire extinguisher, a bucket of water or a bucket of sand available. Liquids that are very flammable should only ever be heated in a water bath.
- You need to have drinking water, running water (or a large bucket of water) and a first aid kit available if you are dealing with chemicals or glass.
Common laboratory accidents include:
- Chemicals in the eye. You must wash the student’s eye with large amounts of cold water.
- Burns. The area of skin that is burnt should be held under running cold water for at least 10 mins. If it still hurts, soak a paper towel or tissue in cold water and tell the student to hold the wet pad on the affected area. If it forms a blister, you will need to seek medical attention.
- Chemicals on the skin. If you limit your experiments to dilute solutions, the danger is irritation rather than blistering or burning. Wash the affected area with quantities of cold water. Do not be tempted to treat an acid burn with alkali or vice versa – you might make the situation worse.
- Splashes from demonstrations. When you do a demonstration, think carefully about how you position the students. Don’t let them get too close. If you have safety goggles, make sure the students are wearing them, especially if the solutions are stronger than 0.1 M.
- Chemicals in the mouth. If students are handling chemicals, they might spill them on their hands and then put their hands in their mouth. If this happens they should wash their mouths out with lots of water.
- Cuts for broken glass. If a student cuts themselves, the affected area should be raised above their heart to stop the bleeding, washed with clean water and covered with a plaster. If possible antiseptic cream should also be applied.
There are specific hazards associated with individual chemicals. The hazards are well documented and you should consult an experienced teacher, your university tutor or an appropriate manual whenever you do an experiment.
Resource 3: Neutralisation Circus
![]() Background information / subject knowledge for teacher
Background information / subject knowledge for teacher
Neutralisation circus
Suggested stations – instructions for the teacher
- Universal indicator – acid, 10 ml measuring cylinder, beaker, universal indicator, spatula or teaspoon, baking soda, stick or glass rod.
- Insect stings – a beaker of acid labeled ‘insect sting’, test-tubes in a rack, universal indicator, three beakers labeled ‘remedy 1’ (containing baking soda), ‘remedy 2’ (containing vinegar or lemon juice) and ‘remedy 3’ (containing sugar), spatulas or teaspoons.
- Indigestion – two different types of indigestion (anti-acid) tablet, mortar and pestle (or spoon and plate), two beakers (one containing acid), methyl orange indicator, teat pipette, glass rod or stick to stir.
- Neutralisation – a bottle of acid and a bottle of alkali or approximately the same strength, beaker, 10 ml measuring cylinder, universal indicator, teat pipette, stirring rod.
- Lemon juice – several lemons, baking powder, teaspoon, the names of the chemicals involved on separate pieces of paper or card, some ‘+’ and ‘→‘ signs and a piece of paper with some word equations written out (just the reactants) for the students to complete.
- Acidic soil – some soil mixed with citric acid (or any solid acid), spatulas or teaspoons, 10 ml measuring cylinder, test-tubes in a rack, filter funnel, beaker, filter paper, universal indicator, fertiliser 1 (containing sugar), fertiliser 2 (containing lime), fertiliser 3 (containing solid citric acid).
- Mix and match – pieces of card or paper with the numbers 1–14, 14 pieces of paper with the names of colours written on them (or coloured paper if you can get it), 14 pieces of paper with a ranges of substances written on whose pH you hope the students will know – water, hydrochloric acid, sodium hydroxide, lime, lemon juice, etc.
Suggested stations – instructions for the students
- Universal indicator – Pour 10 ml of acid provided into a beaker and add three drops of universal indicator. Add baking soda, half a spatula at a time. Stir after each addition. Record the colours that you see and explain what is happening. When the colour does not change any more, add a few drops of acid. Keep going until it goes back to the original colour. Rinse out the beaker ready for the next group.
- Insect stings – Transfer 1 ml of ‘insect sting’ into a test-tube. Add universal indicator. Add one of the suggested remedies and note the colour change. Repeat until you have tried all the remedies and decide which ones would be suitable to use to remove the ‘sting’.
- Indigestion – Crush an anti-acid tablet and transfer it to a beaker with a few drops of indicator. Add acid, a little at a time, until the indicator remains red. Repeat for a different type of tablet. Which tablet neutralises the most acid?
- Neutralisation – Your task is to find out exactly how much alkali is needed to neutralise 10ml of the acid. Measure out 10 ml of acid, add some indicator and add the alkali very slowly. If you have time, do it twice and take an average of your results. At the end you will compare your results with the rest of the class.
- Lemon juice – Wash your hands. Dip your finger in some lemon juice and put it in your mouth, so that your mouth has an acid taste. Lick your finger and dip it into some baking powder. Place your finger on your tongue. What do you taste? Can you explain what has happened? Arrange the words provided to make a word equation for the reaction. If you have time, try some more word equations.
- Acidic soil – Place 1 spatula of soil in a test tube, add 10ml of water. Place your finger on the end and shake the tube. Filter the solution, or let it settle and pour off the liquid. Add a few drops of universal indicator. Divide the solution between three tubes and add one spatula of fertiliser to each one. Which fertiliser would be best for neutralising the soil?
- Mix and match – Place the numbers of the pH scale in order on your desk. For each number, add a colour and an example of a substance with that pH. Check your answers. Which ones did you get right?
Resource 4: Reacting acids and metals
![]() Background information / subject knowledge for teacher
Background information / subject knowledge for teacher
Reacting metals and acids
You will of course know that metals differ in their reactivity. This is illustrated by the reactivity series, which is usually displayed as a league table with the most reactive metal at the top. Usually we regard a metal as reactive if, when it is added to acid, it produces lots of bubbles and the temperature of the acid solution increases.
Common metals for reacting with acids (in order of reactivity) would be magnesium, zinc, iron, tin and copper; i.e. one from the top, three from the middle and one from the bottom of the reactivity series. Magnesium is reactive enough to show significant effervescence without being dangerous, copper is unreactive but not expensive as are silver and gold.
All of the metals above hydrogen in the reactivity series will, produce hydrogen gas from acids. However, the reactions become progressively less vigorous as you go down the reactivity series. The choice of acid is usually hydrochloric acid of concentration 1 mol dm-3 but some metals react better with sulfuric acid; e.g. zinc. Iron reacts but only very slowly. Tin also reacts so slowly that it is difficult to see the reaction. Concentrated acids should not be used.
| magnesium | + | hydrochloric acid | → | magnesium chloride | + | hydrogen |
| Mg(s) | + | 2HCl(aq) | → | MgCl2(aq) | + | H2(g) |
| zinc | + | sulfuric acid | → | zinc sulfate | + | hydrogen |
| Zn(s) | + | H2SO4(aq) | → | ZnSO4(aq) | + | H2(g) |
| iron | + | hydrochloric acid | → | iron(II) chloride | + | hydrogen |
| Fe(s) | + | 2HCl(aq) | → | FeCl2(aq) | + | H2(g) |
| tin | + | hydrochloric acid | → | tin(II) chloride | + | hydrogen |
| Sn(s) | + | 2HCl(aq) | → | SnCl2(aq) | + | H2(g) |
Copper is below hydrogen in the reactivity series and will therefore not displace dilute acid so there is no reaction.
As you can see from the above equations the reactions produce salts. You can introduce your pupils to the reactions of metals with acids in one lesson to establish the fact that some displace hydrogen from acids, by collecting and testing for the gas with a lighted splint, and then, perhaps, extending their understanding by isolating one of the salts in the next lesson. For example, zinc granules will react with dilute sulfuric acid (0.5 mol dm-3) to produce zinc sulfate which can then be isolated by crystallisation by evaporating off the excess solvent in an evaporating basin as shown in the diagram below. If you decide to use zinc and sulfuric acid to make a salt, then adding a few drops of copper sulfate will speed the reaction up.
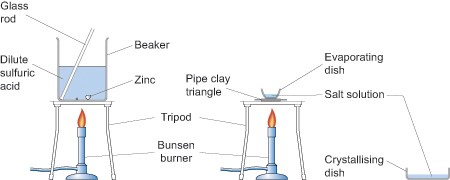
Health and safety
Obviously this experiment involves heating so great care needs to be taken when handling apparatus which should be left for a sufficient time after heating for them to have cooled down.
Arrange the class so that pupils work in pairs or small groups. No pupils should be seated if they or members of their group are heating anything.
When heating the evaporating basin the Bunsen flame should be blue but the gas tap adjusted so that there is a low flame for gentle heating. When the water level in the basin has been reduced by about a half place a glass stirring rod in the solution and then hold it up to cool. If small colourless crystals begin to form on the rod stop heating and allow the basin to cool naturally. If no crystals form continue heating until they do. Do not continue heating past the point at which crystals are observed at the edge of the solution.
1. 0 mol dm-3 HCl is a low hazard at this concentration.
0.5 mol dm-3 H2SO4 is an irritant at this concentration.
Resource 5: Making Salts
![]() Background information / subject knowledge for teacher
Background information / subject knowledge for teacher
Making salts
Salts are very useful chemicals. Here are some that you and your students might have come across:
- sodium chloride – table salt used for flavouring food
- ammonium nitrate – fertiliser that provides nitrogen
- calcium sulfate – plaster of Paris
- magnesium sulfate – Epsom salts, a laxative
- iron II sulfate – used in iron tablets (to treat anaemia)
- monosodium glutamate – food additive
- potassium nitrate – used in explosives
- copper sulfate – used in agriculture as a fungicide
- calcium citrate – food additive (preservative).
Making a salt from an acid and a carbonate
Here are the steps for the experiment in the correct order:
- Measure 25 ml of 0.5 M sulphuric acid or hydrochloric acid into a beaker
- Use a teaspoon or spatula to add copper carbonate. Stir after each addition.
- Add the solid until the fizzing stops
- Filter the mixture to remove unreacted copper carbonate (or decant the liquid into an evaporating basin).
- Heat the solution until crystals just begin to appear.
- Leave the solution to cool.
- Pour off the liquid and dry the crystals between pieces of filter paper (or tissue paper).
Resource 6: Practical Work
![]() Teacher resource to support teaching approaches
Teacher resource to support teaching approaches
Practical work
Introduction
Practical work is an important part of learning about science and learning to be a scientist.
The TESSA materials consider practical work in science involves pupils finding out, learning and verifying through observation and experiment, using skills and methods that are used by scientists in the real world. There are different types of practical work, which serve different purposes. Over time, a good teacher will make sure that their students experience different types of practical work.
Purposes of practical work
Different types of practical work and particular experiments will meet different objectives, but the benefits of practical work include:
- Developing practical skills and techniques such as how to use a microscope.
- Gaining first hand experience of materials, organisms and processes that may increase their understanding of science and help the retention of knowledge.
- Developing inquiry skills, such as control of variables, analysis and recording of data and looking for patterns.
- Motivation and enjoyment.
- Encouraging and promoting higher levels of thinking. Pupils can be asked to predict and explain when presented with problems and phenomena.
- Communication skills. Practical work may provide a context for the development of communication skills. The link to shared experiences and real objects may be very helpful for learners with limited proficiency in English.
Types of practical work
- Demonstrations – A teacher may decide to do a demonstration for reasons of safety or due to lack of time or resources. They may also be the most suitable method for consolidating understanding or providing challenge. Try to actively involve pupils through questioning or through participating in conducting the experiment or activities before or during the demonstration (e.g. predicting if statements are true or false and then using observations to confirm or change their decision).
- Structured practical – Pupils do an experiment in groups. The teacher may give them instructions to follow, advice on recording and analysis and questions to help them relate their observations to theory. These may be suitable for practising skills and techniques, supporting particular inquiry skills, and gaining experiences.
- Rotating (circus) practical – Pupils in groups move from one experiment to the next at ‘stations’ in the classroom. The experiments should be related and instructions should be brief. Similar questions at each experiment will help pupils gradually build their understanding of a key concept, e.g. particle theory of matter or adaptation. Some of the stations may include a card sort or problem to solve rather than an experiment.
- Investigation – Pupils plan, carry out and analyse their own experiment. They may have freedom to choose what they investigate or the teacher may limit the materials available or specify a topic to investigate. The teacher has a role as a facilitator rather than teacher. They will usually give pupils guidance on ‘the scientific method’ or carrying out a ‘fair test’.
- Problem solving – this is similar to an investigation, but pupils have more freedom of approach. It may be a practical problem, such as dropping an egg from the top of a building without breaking it, which can be solved in a number of ways. This can be motivating and a good vehicle for the promotion of communication skills.
Organising practical work
Whenever you are planning an experiment, you should try it out yourself before the lesson. Simple experiments are often more complicated than you might think. You will also need to do a risk assessment. This means thinking about the potential hazards and taking steps to reduce them.
When dealing with chemicals other than water, students should wear safety goggles. If safety goggles are not available, you need to use very dilute solutions (0.1 M). The chemical that is most likely to cause permanent eye damage is sodium hydroxide (above a concentration of 0.4 M).
You will need to think about how your students will get the apparatus they need. The things you might consider could include:
- Give them an activity to do at their desks and, while they are doing it, you distribute the apparatus they will need.
- Spread out the different items around the room and ask one person from each group to collect what they need. By spreading it out, you will avoid the potentially dangerous situation of lots of people gathering in the same place.
- Give out the chemicals yourself with a teaspoon on to small pieces of paper that they can take back to their place. This will ensure that they get the right amount and will avoid a lot of mess!
Section 3 : Combustion
Theme: Science lived – relevant and real
Learning Outcomes
By the end of this section, you will have:
- supported learners to use science ideas to reflect on the fuels that are used in their homes and why certain fuels are better in certain situations;
- organised pupils into groups to plan an investigation to test and compare two common fuels;
- developed students’ ability to make links between scientific principles and their everyday lives by considering how electricity can be generated.
Introduction
Science is all around us. Too often, young people see science as something learnt from a textbook that is not relevant to their everyday lives. Activities like baking cakes and growing vegetables and mending a bicycle all involve scientific principles. Making connections between the science they learn in school and the things they do at home can help to reinforce the scientific principles that your students need to learn. It might also help them to understand some of the problems that they and their families face. Resource 1 gives some strategies that you can use in order to help your students make these connections.
A lot of the ideas in chemistry are abstract and relate to things that we can’t see, but there are many connections with the ‘real’ world. Cooking is all about chemical change; extracting useful substances from raw materials involves understanding the chemical properties of the substances; making new materials and medicines involves understanding how different substances can react together; and the properties of the different materials that we use all the time depend on the way in which the molecules are arranged. In this unit, we have used the topic of combustion to illustrate how you can focus on the real-life applications of scientific ideas, but you could apply these ideas to many other topics.
1. Thinking about common fuels
Students often see science as something that they do at school and not necessarily related to their lives. An effective way of demonstrating that this is not the case is to start with the everyday context and use it to draw out the scientific principles. Asking students about things outside school that are important can get them engaged and interested – especially if some controversy is involved. Most real-life situations are actually quite complicated and it is easy to find yourself talking about chemistry, physics or biology, or even wider issues. This will help to keep your students interested in science and help them to see how science can help them to understand the world.
In this unit, we start with aspects of science that are relevant in the home, and move on to consider issues of wider importance to society. In Case study 1, instead of starting with the theory of combustion, the teacher tells her students about something she read in the newspapers. She uses the story to explain the theory of combustion. In Activity 1, you are encouraged to start by asking students how they cook their food at home.
Case study 1: Using a news item to stimulate discussion
Mrs Onyango of Egerton secondary school, Kenya realised that her students had heard of and used different types of fuels at home and in school. She asked the class to name different fuels they knew of and found out that almost every student had used one type of fuel or the other. Mrs. Onyango then gathered her class round the front and told them a story (Resource 2).
Mrs Onyango asked her students some questions: where might the oil have come from? How is oil processed? What might have caused the explosion? What would be formed when it burnt? She explained that aircraft fuel is produced by distilling oil. The oil is imported from the Middle East, processed and then the kerosene is sent by pipeline to Nairobi airport. She explained that kerosene is a ‘hydrocarbon’ and asked her students to write a word equation to explain the combustion reaction. She drew the fire triangle on the board. She extended the discussion to other fires and asked her students about the different ways of putting a fire out. For each suggestion that they made, she related their ideas to the fire triangle. For example, putting water on a fire, removes the heat; putting a blanket over a fire, removes the oxygen.
In about 20 minutes, Mrs Onyango had covered some of the important ideas about fuels and combustion. She noticed that the story really helped to keep her students interested. For homework, she asked them to write a set of safety instructions for people working in a filling station, and to include a reason for each rule
Activity 1: Organising a brainstorm
Gather your class round the front and ask them what fuels they use at home. Write the names on the board. (Resource 3 provides some background information on brainstorming.) The point of this activity is to help your students realise that they already know quite a lot about fuels and combustion. Ask them to tell you any other fuels that they have heard of. Write these on the board as well. Ask them which fuel is the ‘best’. Ask several different students and get them to justify their decision. Resource 4 contains information about common fuels and some questions you might ask to help them decide what makes a good fuel. Divide your class into groups. Write some questions on the board and ask your students to work in groups to answer the questions for each fuel. In some villages, people use charcoal rather than wood. Ask your students why this might be and how charcoal is made. At the end, ask them which fuel is ‘best’ for cooking.
2. Planning how to test fuels
An effective way to convince students that the science that they are studying is relevant to their everyday lives is to perform experiments using substances that are familiar to them. For example, when learning about acids and alkalis, they can test substances at home, such as foods, cleaning materials, toothpaste and soap. They can investigate the properties of metals by using objects from home. For this topic, they can do a proper scientific investigation to compare the amount of heat given out by different fuels (see Resource 5). You should choose fuels that are commonly used for cooking such as wood, kerosene, charcoal and liquid petroleum gas (LPG). In Case study 2, the teacher has very little equipment, but this does not stop her from helping her students to plan an experiment. Activity 2 describes an experiment you can do if you have some equipment such as spirit burners, metal cans, a measuring cylinder or jug and some means of measuring time.
Case study 2: Which is best?
Mrs Atieno of Sengera Girls Secondary School, Kenya, wanted to get her students to plan an experiment to test different fuels and compare the amount of heat given out. However, she did not have enough equipment for everyone to do the experiment. She believes that it is important for her students to learn to think for themselves – she wishes she had had that opportunity when she was at school.
She introduced the experiment by asking them which was better, kerosene or wood? Luci suggested kerosene but Jess said wood, because it is much cheaper. Luci argued that that is not necessarily the case, as you need more wood; kerosene has a hotter flame. They agreed to test their ideas by measuring how long it took for a set quantity of water to boil, using a known amount of fuel. Mrs Atieno divided them into groups and gave each group a set of questions to help them plan the detail of the experiment.
She managed to gather enough equipment for a demonstration. She had a tin lid to put some wood on, some mineral wool, a tin can and some wire to make a handle. She made a tripod out of sticks to hang the tin can from, and she had a stopwatch on her mobile phone.
She chose one group to carry out the demonstration and encouraged the other students to ask them questions. She asked them how they could make sure the heat was not wasted and was delighted when Ella suggested putting a box round the experiment to exclude the draughts.
Activity 2: Comparing different fuels
Remind your students that there are many different fuels and that we use different ones for different jobs, but they all release energy when burnt. In this class practical, students will test different fuels and compare the amount of energy they give out. You should choose fuels that they are familiar with and use at home and suggest that they test the fuels by using them to heat water. Divide your students into groups. Write a set of prompt questions on the board and get them to plan their investigation (Resource 5). When they have a plan, let them prepare the experiment. You will need to do a risk assessment before the lesson. (See C2 Making Science practical, Resource 2 .)
Make sure you don’t tell them what to do – just keep asking questions. The resource also provides an alternative experiment if you do not have the equipment needed to do an investigation.
3. How do we generate electricity?
Cooking is just one activity that requires energy that usually comes from wood, charcoal or LPG. Many parts of Africa do not have a regular and reliable supply of electricity and this is a problem for industries and hospitals in particular. The most common way to make electricity is to burn coal, oil or gas to generate steam which is then used to drive a turbine. Coal, oil and gas are expensive and eventually they will run out. They also produce a great deal of pollution.
There are alternative ways to produce electricity, other than burning fuels, which your students should be aware of. (Resource 6 provides some background information on how electricity is produced). It is a good idea – especially with secondary school children – to make science relevant to everyday life by introducing them to some of the big issues that face society. The teacher in Case study 3 gets her students to consider the advantages and disadvantages of alternative sources of electricity. Activity 3 involves students working in groups to solve a problem.
Case study 3: Working in groups to make a decision
Mrs Asantesked her class if they knew some ways in which electricity could be generated. She collected their ideas on the board. She encouraged them to talk about the problems that often arise. Joseph told them how his father worked at a small hotel and was responsible for the small diesel generator. It keeps breaking down, and last week, the price of diesel was so expensive that the manager cut the number of hours the generator was used. A number of guests had complained!
Then Mrs. Asante gave them some information about the different ways of generating electricity. She had written the information on large pieces of paper before the lesson (see Resource 6) and she stuck them to the walls so they could all see them. She also borrowed some books from a nearby school that the students could refer to. The class had to work in groups and decide which method would be the best in their town or village. She asked them to consider the advantages and disadvantages of each method and to make a suggestion about the method that the government should develop in their region. Each group had to present their ideas to the rest of the class. They chose two people to present the information. They had to say what method they had chosen, why they had chosen it, and what the disadvantages might be.
Activity 3: Comparing diesel and solar power
In this activity students consider the advantages of solar panels over diesel generators. Start by gathering the class around the front and brainstorming the advantages and disadvantages of each method for generating electricity. The solar panels will probably seem much more attractive! However, the initial costs are very high. Resource 6 contains some background information on the approximate costs of each method of generating electricity. Ask the class to work in pairs to work out how long it would take for the solar panels to become cost effective. For older children, you could just write the table on the board and let them work out what to do. Alternatively, you could provide support by asking questions to guide them.
You will find that it takes over 10 years. However, there are other advantages of solar panels, such as electricity is available for more than four hours a day and no pollution is produced in the form of fumes or carbon dioxide. At the end of the lesson, ask each student to write a few sentences explaining what they have learnt from this exercise.
Resource 1: Making Science relevant
![]() Teacher resource for planning or adapting to use with pupils
Teacher resource for planning or adapting to use with pupils
Making science relevant to everyday life
Introduction
The TESSA resources are underpinned by a view that science is not just an activity that is carried out by people in white coats in a laboratory. It not only helps students make sense of the world but it is also taking place all around them. Many everyday activities involve scientific principles. It is important that students get the opportunity to apply their scientific knowledge to an understanding of their own environment and that they understand that the skills they develop in science are relevant to some of the problems they face in everyday life.
Possible strategies
Class discussion
Use local examples where possible, but also encourage students to draw on their own experience in the classroom.
Practical work
- Use local examples and materials, e.g. hibiscus indicator; local minibeasts for work on classification or adaptation; wood and kerosene to compare calorific content of fuels.
- Give students a challenge using scrap materials, e.g. obtain clean salt .
Research projects
Students find information from local newspapers or magazines, or interview adults in the community, e.g. brewers, mechanics or health workers. This could be the basis of a poster, oral presentation or role play.
Making use of the school grounds
Besides the obvious opportunities for ecological investigations, the grounds are a source of teaching examples in other topics, e.g. corrosion, structures and forces. Take pupils to see them or ask them to find examples or collect data for analysis.
Day visits
Visit local industries, agricultural sites or museums. The effective teacher will link this to classroom work both before and after the trip.
Homework
Write about examples of science around them (e.g. chemical change in the kitchen or forces on the football field) or to bring materials to the classroom.
Writing tasks
Use local issues as a stimulus for creative written work, e.g. a letter to a newspaper or radio script on local environmental or health issues.
Discussion tasks
- Interviews – one child could be the ‘expert’ and the interviewer can ask questions as if it was a news item on the radio.
- Pupils come to a decision about a local issue, e.g. health promotion or energy supply.
You should create a file for yourself and keep any newspaper and magazine articles that you find that contain science or are about scientific issues. Every time you start a new topic, ask yourself how it relates to everyday life and help your students to make those connections.
Resource 2: News item on fuels
![]() Teacher resource for planning or adapting to use with pupils
Teacher resource for planning or adapting to use with pupils
Benjamin’s story
Benjamin Njau lived in Sinai, a large settlement near to Nairobi airport. At dawn one morning he went down to the river to collect water and noticed that the oil pipeline that runs through Mukuru (near the settlement) was leaking – aircraft fuel was pouring out into a storm drain. The pipeline carried fuel from the port of Mombasa to Nairobi airport. Benjamin was unemployed and desperate to find ways of making some money. He ran home and collected two jerry cans which he filled up with oil from the leaking pipeline. He would be able to sell the fuel in the city.
By this time, the word had spread, and many people had gathered to fill their cans. As Benjamin was leaving the area, suddenly there was a huge explosion. He could feel flames on his back as he ran as fast as he could away from the area. He was fortunate. He dropped his cans, but he managed to escape and was not hurt. He found out later that over a hundred people died in the explosion and numerous others were badly injured. A few days later it was revealed that the explosion was caused by a man who was helping himself to the fuel; he discarded a cigarette so he could fill up his can. It was a tragic tale that demonstrates, among other things, the importance of everyone understanding the dangers of flammable liquids.
Notes for the teacher
This story provides a starting point for talking about several different aspects of combustion and fuels with your class. Things to consider could include:
- Refining oil – where did the oil come from in the first place? What had been done to it to turn it into aircraft fuel? Liquid fuels are transported in pipelines – how are solids and gases stored and transported?
- Aircraft fuel is kerosene – a hydrocarbon. In order to burn completely it requires plenty of oxygen. Incomplete combustion produces carbon monoxide and carbon. (Do they ever get headaches if they spend a long time in a room with a kerosene burner? Is there a lot of soot on their kerosene heater at home?)
- Why did the fuel catch fire so easily? Introduce the fire triangle – you have to have heat, oxygen and fuel for a fire. Why are you asked to switch off mobile phones in a filling station?
What sorts of safety procedures should you take when handling fuels – especially liquids?
Resource 3: Brainstorming
![]() Teacher resource to support teaching approaches
Teacher resource to support teaching approaches
Brainstorming
What is brainstorming?
Brainstorming is a group activity that generates as many ideas as possible on a specific issue or problem then decides which ideas offer the best solution. It involves creative thinking by the group to generate new ideas to address the issue or problem they are faced with. Brainstorming helps pupils to:
- understand a new topic
- generate different ways to solve a problem
- be excited by a new concept or idea
- feel involved in a group activity that reaches agreement.
Brainstorming is particularly useful for helping students to make connections between ideas. In science, for example, it can help them to appreciate the links between the ideas they are learning in class and scientific theories.
As a teacher, a brainstorm at the start of a topic will give you a good idea about the extent and depth of knowledge already held by the class. It will not tell you about individuals’ understanding, but it will provide a wealth of collective ideas that you can refer back to as the topic progresses.
How to set up a brainstorming session
Before starting a session, you need to identify a clear issue or problem. This can range from a simple word like ‘energy’ and what it means to the group, or something like ‘How can we develop our school environment?’ To set up a good brainstorm, it is essential to have a word, question or problem that the group is likely to respond to. The teacher can gather the class round the board and run the session, or, in very large classes, divide the class into groups. The questions can be different for different groups. Groups themselves should be as varied as possible in terms of gender and ability.
There needs to be a large sheet of paper that all can see in a group of between six and eight pupils. The ideas of the group need to be recorded as the session progresses so that everyone knows what has been said and can build on or add to earlier ideas. Every idea must be written down, however unusual.
Before the session begins, the following rules are made clear:
- Everyone in the group must be involved.
- No one dismisses anyone else’s ideas or suggestions.
- Unusual and innovative ideas are welcomed.
- Lots of different ideas are needed.
- Everyone needs to work quickly; brainstorming is a fast and furious activity.
Running the session
The teacher’s role initially is to encourage discussion, involvement and the recording of ideas. When pupils begin to struggle for ideas, or time is up, get the group (or groups) to select their best three ideas and say why they have chosen these.
Finally:
- summarise for the class what they have done well
- ask them what they found useful about their activity. What did they discover in the brainstorming that they didn’t realise before?
Resource 4: Properties of common fuels
![]() Background information / subject knowledge for teacher
Background information / subject knowledge for teacher
Properties of common fuels
Your students will have come across various different fuels (although they might need some prompting). There is no ‘ideal’ fuel. Different fuels are better for different jobs. Liquid fuels are easy to light, but are therefore quite dangerous. Charcoal is quite difficult to light, but burns with a very hot flame. Each fuel has advantages and disadvantages.
Here are some questions that you could ask your students about the fuels that they are familiar with:
- What would the fuel be used for?
- Where does the fuel come from?
- Is the fuel cheap or expensive compared with others?
- Is the fuel easy to light?
- When we have used all the fuel that is available can we replace it?
- Does the fuel produce lots of smoke and soot?
- Does the use of the fuel affect the environment? If yes, how?
Here is some background information about some common fuels
| Fuel | Global reserves | Approximate energy content/ kJ g–1 | Effect on environment | Practical and safety issues | Renewable? |
|---|---|---|---|---|---|
| Wood | Difficult to put a figure on this but if the forests that provide wood fuel are re-planted at the same rate as they are cut down, then such fuel use should in principle be sustainable. | 0.15 | When forests are managed sustainably in this way the CO2 absorbed in growing replacement trees should equal the CO2 given off when the original trees are burned. The incomplete combustion of wood can release a mixture of greenhouse gases with a greater overall global warming effect than can be offset by the CO2 absorbed in growing replacement trees. Wood burning processes need to be made as efficient as possible. | Easy to light Safe to store Ash is produced | Renewable |
| Petrol/ diesel/ kerosene (crude oil) | Approximately 30 more years | 46 | Produces carbon dioxide gas, which contributes to the greenhouse effect. The other major atmospheric pollutants are oxides of nitrogen, which contribute to acid rain; carbon particulates and unburned hydrocarbon fuel. | Easy to light Safety issues – has to be stored carefully | Non-renewable |
| Coal | Approximately 190 more years | 35 | Contains sulfur as an impurity. This means that sulfur dioxide will also be emitted to atmosphere, which contributes to acid rain. | Hard to light Safe to store Produces ash | Non-renewable |
| Natural gas (methane) | Approximately 50 more years | 54 | Produces carbon dioxide and carbon monoxide. | Easy to light Safety issues No ash, but can produce carbon monoxide if not installed correctly | Non-renewable |
| Biofuels | A major source of bioenergy is alcohol (ethanol) produced by fermenting sugar cane or maize. The alcohol is often blended with conventional petroleum to form a mixture known as ‘Gasohol’. Also ‘biogas’ (methane) produced during the anaerobic respiration of manure and biological waste. | 30 (ethanol) | Both produce carbon dioxide and water vapour , which are greenhouse gases. However, biofuels are claimed to have a ‘neutral carbon footprint’ because, theoretically, the plants grown to produce them absorb as much carbon dioxide from the atmosphere as is emitted when the fuels is burned. | Easy to light Safety issues No ash or residue | Renewable |
40 (biogas is approximately 50% methane) | Renewable | ||||
| LPG (liquid petroleum gas) | Approximately 30 more years | 48 | Produces greenhouse gases when burnt. | Easy to light Difficult to store – stored under pressure No ash or residue | Non-renewable |
Resource 5: Teacher’s notes for investigating fuels
![]() Teacher resource for planning or adapting to use with pupils
Teacher resource for planning or adapting to use with pupils
Prompt questions for the investigation and teacher’s notes about the investigation
Questions that you could use to help your students plan an investigation
- Which fuels will you use and where would you obtain the fuels?
- What type of containers would you use to boil the water?
- How much water would you put in the container?
- How will you time how long it takes for water in each container to boil using different fuels?
- How much fuel would you start with?
- How will you measure how much fuel is used?
- What would be the cost of a quarter of a kilogram (250 g) of each fuel?
- How will you make sure the energy from the fuel is not wasted?
- How will you decide which is the best fuel?
Questions you could use to see if your students understand the investigation
- How will you measure the heat produced?
- What measurements will you need to make?
- How will you make sure it is a fair test?
- Why is it important to ensure that it is a fair test?
- How can you make you experiment as accurate as possible?
- How will you record your results?
- How will you decide which fuel gives out the most energy?
- Which fuel do you think will be the best? Why?
You could also get your students to think about where the fuel comes from, is it sustainable and how much pollution is caused by burning that fuel on a large scale?
Teacher’s notes
You need to test at least two fuels, e.g. wood and a liquid like ethanol or methylated spirit or kerosene. If you have spirit burners, put the liquid fuel in those and weigh them before and after the experiment to determine the mass of fuel burnt. If you don’t have spirit burners, use a teat pipette to measure a known volume of liquid fuel (a few millilitres) on to a piece of mineral wool. (You can use the density to calculate the mass). Break the wood into small pieces and burn a known mass on a bottle top or metal tin lid.
Measure 50 cm3 (or less if the containers are small) into a tin can. Measure the temperature of the water. Use the fuel to heat the water. Measure the temperature rise when a certain mass of fuel is burnt. If you don’t have a thermometer, measure the time taken for the water to boil.
The experiment can be made more accurate by preventing draughts, placing the tin can close to the fuel, etc. The aim is to calculate the temperature rise per gram of fuel burnt so you can make a direct comparison.
Useful equipment:
Wood, ethanol or methylated spirit, tin lids, tin cans, thermometers or stop watch, balance to weigh the fuel.
If you don’t have the equipment necessary to do the experiment, then you can burn fuels on a bottle top instead. For each one, get your students to suggest the features of a good fuel. While they burn, they could note down how easy it was to light, the amount of smoke produced, the amount of ash produced, whether it smells, the relative amount of heat given out (wave your hand above the burning fuel), the cost and any safety issues. This will still highlight the main issue: that there are lots of different fuels available and different ones are better for different jobs.
Resource 6: Generating electricity in Africa
![]() Background information / subject knowledge for teacher
Background information / subject knowledge for teacher
Generating electricity in Africa
You can use this information to create some posters that your students can refer to during the lesson.
Africa, as a continent, has huge natural fuel resources.
Fossil fuels include gas, oil and coal. New reserves are being found all the time, but once they have been used up they cannot be replaced. A recent discovery is the presence of gas under the sea bed, off the coast of Tanzania.
Fossil fuels are burnt to produce heat, which is used to heat water to generate steam to drive a turbine. In the process, carbon dioxide and other acidic gases are given off which can cause global warming and acid rain. Also, oil and gas have other uses, as a source of petro-chemicals, so it could be argued that they should not be burnt. However, fossil fuels are relatively cheap and burn to produce a lot of heat.
In addition to fossil fuel resources, the continent has huge potential for the development of alternative energy schemes based on renewable sources of energy.
Geothermal energy
The Rift Valley, which stretches south from Syria to Mozambique, has been targeted by the Kenya Electricity Generating Company (KenGen) as a site for one of the world’s largest geothermal energy projects.
The $1. 3bn (£830m) project, to develop 280 MW of geothermal power by 2013, is expected to be backed by the World Bank and will more than double KenGen's geothermal capacity.
http://www.businessgreen.com/ bg/ news/ 1804505/ kenya-tap-rift-valleys-geothermal-gold.
In this system, steam-gathering machines are used to drill down into the Earth’s crust and the steam that occurs naturally underground in some places (notably places where there are also volcanoes) is brought to the surface and used to drive turbines. There is very little pollution, but the system is expensive to install. It only works in certain places.
Hydroelectric power
Africa also has some of the largest rivers in the world that lend themselves to the utilisation of micro-hydro-power plants. A section through a typical installation is shown below. Hydro electric power uses gravity. Water, falling from a significant height, or flowing fast, is used to drive a turbine which produces electricity.
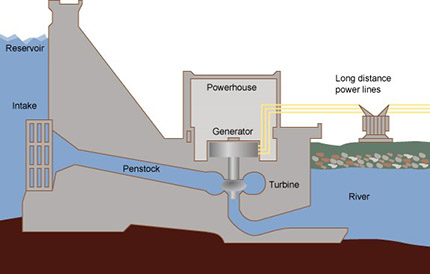
In fact, it has been claimed that such installations on the ‘Niger, Senegal, Congo, Orange, Limpopo, Volta and Zambezi rivers can generate enough electricity to meet all of Africa’s energy needs.’ (http://www.desertec-africa.org/ index.php?option=com_content&view=category&id=2&layout=blog&Itemid=2)
Wind power
Wind turbines can be installed in areas where the wind is reliable. The wind drives blades which in turn cause a conductor to move in a magnetic field, which generates electricity. They are expensive to build and quite a lot of turbines are needed to produce reasonable amounts of electricity. Some people complain about the appearance and the noise that they make, but they don’t produce any fumes or ash.
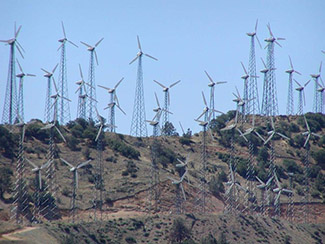
Solar power
also enjoys a great deal of sunshine and it is solar energy that produces, potentially, the greatest output of electricity through photovoltaic cells and concentrated solar power (CSP). Whereas PV converts the sun’s light directly into electricity, CSP concentrates the sun’s light, using mirrors that track the trajectory of the sun through the sky from sunrise to sunset, in order to heat water to produce steam that powers turbines and generates electricity. Again, it can be expensive to set up a solar energy plant, but once it is running, the costs are low. Solar panels are also quite delicate and susceptible to damage if not properly installed.
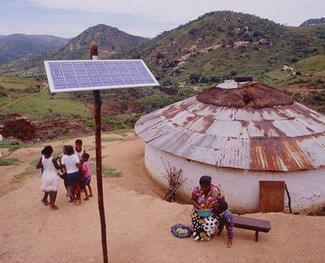
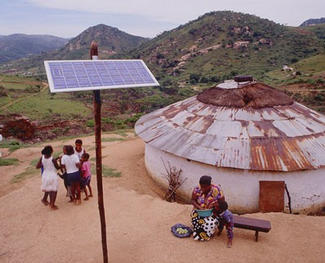
Many organisations in Africa have small diesel generators in order to compensate for unreliable supply from power stations. These use fossil fuels and therefore produce greenhouse gases.
| Diesel generator | Solar panels | |
|---|---|---|
| Initial price (very approximate) | £1000 | £20 000 (to produce 5kW) |
| Output | 5kW/230V | Variable – depends on the number of panels |
| Cost of diesel | £1. 40 per litre | NA |
| Amount of fuel used | £1 litre per hour | NA |
| Advantages | 5 kW is enough to run multiple items Relatively cheap to buy and install | No running costs other than maintenance No fuel costs Africa generally has a lot of sun and the sun is overhead Used to charge batteries so electricity is available after dark |
| Disadvantages | Noisy Can be unreliable if not properly maintained Price of diesel varies Produces CO2 and fumes | Very expensive to install Fragile – need to be on a roof or fenced in Low wattage produced |
Questions you could use to structure the task for children who might need help
If the diesel generator ran for 4 hours a day, how much diesel would be used each day?
How much diesel would be used in a year?
How much would this cost?
How many years would it take reach a total cost of £20 000 (the cost of solar panels)?
Section 4 : Atomic structures, chemical families and the periodic table
Theme: Problem solving and creativity
Learning Outcomes
By the end of this section, you will have:
- organised students into groups to design a poster to display on the wall;
- supported students in looking for patterns and making predictions;
- introduced your students to some of the problems and issues around the mining of natural resources and encouraged them to think about possible solutions.
Introduction
When your students start to look for a job, the qualifications that they have will obviously be very important. However, potential employers will also be looking for people who are creative and who are able to solve problems; they will be looking for people who can think for themselves. The case studies and activities in this unit are designed to show you how you can give your students the opportunity to be creative and to develop their ‘thinking skills’. Some general strategies are given in Resource 1 . You need to think about how you can create an atmosphere of excitement and enquiry in your classroom. If you can do this, students will ask questions and readily contribute their ideas. Students love dramatic demonstrations and amazing and unbelievable facts and will respond to your genuine enthusiasm about the subjects that you are teaching. Most people are naturally intrigued by the chemical elements so this is a good topic through which to tackle this issue.
1. Creating a stimulating learning environment
Creativity is about the ability to think, not just recall, but to apply, suggest, extend and model and create analogy. You can encourage your students to be creative by setting them open-ended tasks and giving them choices about how they present their work. For example, students who are particularly talented in the humanity subjects and who enjoy writing might like to write about science in the form of a newspaper article or a poem. That would not suit everyone, so that is why giving students a choice can be very helpful. As a teacher, being creative doesn’t necessarily involve dreaming up new and exciting activities – although it can do! Creative teachers can take ideas from these units or from their colleagues and adapt them for use in different contexts.
There are lots of interesting and fascinating facts about the chemical elements that will interest your students. Activity 1 will generate material that you could display in the classroom.
Case study 1: Making the classroom attractive
Mr Sibi had just started work in a large secondary school on the edge of a city slum in Kampala. He had very few resources and his classroom was dark and uninteresting. The biology teacher’s room was much nicer – she had brought in some plants and there were pictures of living creatures on the wall. Mr Sibi racked his brain about how to make his room more inviting for his students. He realised that chemistry is all around us but it is sometimes hard to spot. He went into the city and persuaded some of the smart hotels to give him the magazines they were going to throw away. He thought of aspects of life affected by the work of chemists and collected pictures to illustrate these, which he displayed in his room. He had sections on fertilisers, medicines, cosmetics, cleaning materials and processed foods.
At college he had heard about the ‘Read book project’, www.readinternational.or.tz (see Resource 2) so while he was in the city he visited an internet café and contacted the project by email. A few weeks later, some chemistry textbooks were delivered to his school and he set up a mini-library in the corner of his room. When he started the topic on the periodic table, he decided to get his students to make posters about the elements to add to his display. They worked in groups, using the books to find information. Each group selected an element and found out as much as they could about it. When they were displayed on the wall, Mr Sibi invited the headteacher to come and judge the posters.
Activity 1: Making posters
Students are usually very interested in the chemical elements. In this activity, they work in pairs or threes to do some research to produce a poster about an element of their choice.
Give them a list of the things you want them to include on the poster (Resource 2). If possible you could put a selection of chemistry books from the school library in the room, or borrow some from another school.
They should use the textbook as a starting point. You could give them homework as well and encourage them to collect pictures from magazines or to go to the local library or internet café or to ask people at home who might know something about the elements. They should make their posters as attractive as possible. Encourage them to be creative.
Display the posters on the wall of the classroom and invite the head of science to come and have a look at what your students have done.
2. Supporting students to find patterns
Being able to think creatively and solve problems involves making connections and predictions based on knowledge and understanding. Many scientific discoveries have been made as a result of the creativity of scientists, and the invention of the periodic table is a very good example.
Learning about the chemical elements and the periodic table provides a good opportunity for students to practise making predictions. A good chemist can apply his or her knowledge of a few elements and chemical trends to predict the properties of practically any element. Case study 2 involves the teacher being resourceful and borrowing a laptop to show students pictures of the reactions. However, if you have access to the chemicals, you should try and show them the real thing. She differentiates the task by asking students of different ability to do slightly different things. Resource 3 has some general information on differentiation. The story of the periodic table demonstrates how scientists need to be prepared to take a risk and be bold. So in Activity 2 students hear the story of how the periodic table was invented and have the chance to make predictions just like Mendeleev did. Resource 4 has some background information to help you.
Case study 2: Patterns in Group 1
When she finished her training, Mrs Sam found a job in a secondary school near to Winneba University. When she was teaching her students about the periodic table, she borrowed a laptop from the university. She went to an internet café and downloaded video clips of the reactions of lithium, sodium, potassium, rubidium and caesium with water. She showed her students the clips of lithium and sodium and asked them to predict how the other metals would react.
She divided the students into groups according to their ability. She encouraged the group of students who found chemistry difficult to describe what they thought they would see in as much detail as possible, whereas she expected some of the other groups to write full chemical equations for the reactions. Later, she showed them the reactions of potassium, rubidium and caesium so they could see if they had predicted correctly.
The group of students who usually struggled with chemistry had done very well and produced accurate descriptions of the reactions. They confidently explained their predictions to the rest of the class. Later on, when they were revising the equations for the exams, even though they found them difficult, this group remembered the lesson and were very motivated to try and understand the equations.
Activity 2: Classifying elements
Divide your class into groups. Give each group a set of cards. Each card has some information about an element. Ask them to devise a way of classifying the elements based on the information on the cards. They will need to be able to explain how they have classified the elements and why they did it that way. After 15 minutes give them the chance to share their ideas with each other. Gather the class round the front and explain how Mendeleev worked out the periodic table (Resource 4). Tell them the properties of silicon and tin and ask them to predict the properties of the element that would fit in between them. Finally, tell them the properties of germanium and see how close they were. Explain that a good chemist can use their knowledge of the periodic table to predict the properties of almost any element.
3. Where do elements come from?
Students can sometimes view science as a subject that has absolute answers that can lead to technological advances which, in turn, can be used directly to solve practical problems. In reality, many problems have cultural and economic perspectives that must be considered as well.
Most of the chemical elements are metals. Some of them are very useful and are in great demand. Having metal resources that can be mined, processed and sold is very important for some countries and can bring great wealth. However, if they are mined without due care of the environment or the workers in the mine, then serious long-term problems can be caused. Science can solve some problems – like how to extract a valuable metal from its ore – but can sometimes create new ones.
Case study 3 provides a specific example of an issue that arose in the Democratic Republic of the Congo and Activity 3 encourages you to let your students research a problem that is specific to your country. While this activity will take the students some time to complete, it does not take up much class time and it will give them an opportunity for independent learning. As a result of their research, they should be able to explain the scientific basis of the process and demonstrate that they understand the issues and problems that can arise. If you have access to libraries or computers these could be used in Activity 3. They will have practice in sorting through a range of information and presenting it in a poster or booklet to their colleagues. You could explain that this is an important way that scientists communicate their research to other scientists at international conferences.
Case study 3: Using a news item to stimulate discussion
Mrs Wambugu gathered her class round the front and read them an article from a newspaper (Resource 5). It described some of the problems that have arisen as a result of the demand for a rare metal that is required in the manufacture of mobile phones. Unfortunately this metal is found in an area inhabited by mountain gorillas. When she had read the article, she gave her students the chance to ask questions to make sure they understood the issues.
Then she divided the class into groups. She explained that the situation is obviously very complicated and she asked them to make a list of all the separate problems identified in the article. After about 10 minutes she asked each group for some suggestions and wrote them all on the board.
Finally, with all the class gathered round the front, they discussed some of the possible solutions.
The activity only took about half a lesson, but her students were still talking about it the next day and later on in the term. When they learnt about the different methods for extracting metals from their ores, they asked questions about where the ores came from and how they were mined.
Activity 3: Organising project work
Divide your class into groups of up to four students. Explain that you would like them to identify an issue to research about exploiting natural resources. Give them time in class to decide on the area they will research and to plan how they will carry it out. Access to a library or a computer would be helpful, but also encourage them to talk to their family and other friends to identify a local issue or concern. You could spend a short time with the whole class doing a brainstorming activity to generate ideas for suitable topics. Resource 6 has some ideas to start the students thinking. Tell them they have 3 weeks to do the research and prepare a poster, a set of leaflets or a scrapbook that will be displayed in the classroom. When they have done this allow them time in the lesson to go round the exhibition and to evaluate each others’ work. This is the sort of work that your students could show to a future employer to demonstrate their ability to process information.
Resource 1: Problem Solving and Creativity
![]() Teacher resource to support teaching approaches
Teacher resource to support teaching approaches
Problem solving and creativity
Through being resourceful and engaging and providing variety, you will be able to motivate your students. If you are willing and able to solve problems and be creative, you will be able to help your students develop these skills. And it is not as difficult as it might seem!
Creativity
Creativity is about the ability to think. It is not just about remembering, but also applying, suggesting, extending, modelling, and offering alternatives. It is something that you can model for your students. Students need to be encouraged to think differently and come up with original ideas. They also need to feel confident in the reception they will get before they make such suggestions.
Some teachers will naturally be very creative, but some will not – and that is fine as long as you are resourceful and willing to try new ideas. A creative teacher, for example, will take the TESSA Secondary Science units and apply the strategies we suggest to different contexts. You could use news items from radio, television or newspapers and relate this to the science you are teaching. You can set open-ended tasks and allow students to make choices about how they present their work. You may take some risks in your teaching. Above all, you will create an atmosphere of excitement and enquiry with dramatic demonstrations, enthusiasm or amazing and unbelievable facts.
Strategies to promote creativity
Get students to:
- write a story to illustrate a scientific principle
- draw a picture to illustrate a scientific principle
- make up a play
- make a model
- take part in a role play (e.g. be the particles in a solid, liquid or gas)
- make up a poem or a rap
- think up alternative explanations for something they see
- write a letter or newspaper article or podcast.
Problem solving
Helping students to develop problem-solving skills is a frequently cited goal of science teachers. As with creativity, you can model these skills in your own classroom. For example, if you can’t answer a student’s question, you can come back next lesson with a solution and explain how you worked it out and why you found it hard. Being able to solve problems involves developing thinking skills. There are various strategies that you can adopt to help children develop these skills (Wellington and Ireson, 2008):
- Encouraging student-generated questions. The act of asking questions requires engagement and creative thought, two core cognitive strategies.
- Being clear about ‘purpose’. Students should be encouraged to ask: what is this all about?’ ‘What does this relate to?’ ‘Why do you want us to do this?’ – rather than embark on activities in an unthinking, recipe-following fashion.
- Setting open-ended activities. Teachers should set activities that can be tackled in a variety of ways so that children have to think about how they will tackle the problem.
- Planning. Teachers need to provide opportunities for children to plan their problem-solving strategy in a systematic way.
- Paraphrasing. It is well known that you really get to know and understand ideas when you try to teach them to someone else. Giving children opportunity to paraphrase an explanation will help them to understand difficult ideas and to be aware of their own learning.
- Learning to learn (metacognition). Teachers can encourage children to become more conscious of their learning by getting them to think about why they don’t understand and what strategies helped them that might be useful in the future.
Reference
Wellington, J. and Ireson, G. (2008) Science learning, Science teaching. Abingdon: Routledge.
Resource 2: Making Posters
![]() Teacher resource for planning or adapting to use with pupils
Teacher resource for planning or adapting to use with pupils
Chemical families and the periodic table
Your pupils should include all the following information on their poster:
- the name of the element
- the symbol
- a description of what the element looks like, including its state at room temperature and its colour
- where it comes from
- what it is used for
- something about its properties – strength, hardness, reactivity.
They might also choose to include
- the melting point and boiling point
- how it is extracted
- the atomic number and mass number
- the number of protons and neutrons
- an explanation of its reactivity, i.e. why it is very reactive or why it is unreactive.
READ International
It is always easier to give your students the freedom to do activities like this if you have some books that they can refer to. It might be possible for you to borrow books from a neighbouring school, or, if you are in a city, to borrow books from a library.
Read International is a project based in the UK which collects un-used books from secondary schools in the UK and distributes them to schools in Tanzania and Uganda. The books they distribute are carefully sorted and checked to make sure they are relevant to the curriculum. Their contact details are:
READ International, 39–41 Coldharbour Lane, Camberwell, London, SE5 9NR, UK.
If you are not based in Tanzania or Uganda, it might still be worth contacting them to see if they know of other charities who do work in your country.
Resource 3: Differentiating Work
![]() Background information / subject knowledge for teacher
Background information / subject knowledge for teacher
Differentiating work for students of varying abilities
As you know, each pupil has different abilities. There can also be a significant difference in age between the oldest and youngest pupil in the class. Some students will learn more effectively by reading a book, some by carrying out a practical activity and some by listening to and absorbing spoken instructions. Some will understand the work very easily, some will take more time. Some will work very quickly through any task you set, some will work slowly. It is impossible for you as a teacher to take all the differences into account all the time, but there are things that you can do to support individuals within a class.
If you have a class of 40 or more pupils this might sound like a daunting task. There are two important things that you need to do to be able to effectively cater for everyone in your class:
- Know your students. You need to give them opportunities to work in groups and listen to their conversations; you need to mark their written work; you need to ask questions of individuals in class and you need to encourage them to ask you questions if they don’t understand or just want to know more. When you know who understands easily, who finds science difficult, who likes to talk, who likes to write, who likes to draw and who likes doing experiments, you will be in a much better position to help individuals.
- Know your subject. It is unrealistic to expect everyone to remember and understand everything that you do. Students who find science difficult will be overwhelmed if you try to tell them everything. You need to break each topic down into simple steps and make sure that everyone understands the most important ideas. You also need to know how to challenge students who have grasped the basic ideas.
You can cater for the range of abilities within your group in two main ways:
Differentiating by outcome
This involves setting some questions that get progressively more difficult. Everyone gets as far as they can. Alternatively, you can set open-ended tasks in which students demonstrate what they can do. This also enables you to give them a choice about how they present their work, which can be very motivating. You may find that the degree of support that you need to provide to individuals, pairs or small groups within the class varies significantly.
Differentiating by task
For this, you set different students, or groups of students, different tasks. For example, in a practical session some pupils could have instructions provided for them in written form and some could have them in diagram form and some could have a combination of both.
You could provide a set of questions that cover the basic ideas that you judge that everyone needs to understand and a set that are more challenging. The students who you expect to get a grade A could be given the more challenging ones.
Learning style
There is a lot of research that suggests that different students prefer to learn in different ways. The three learning styles that are more commonly referred to are visual, audio and kinesthetic, i.e. some students prefer diagrams and pictures, some learn best by listening and some prefer to be able to do things.
As a teacher you cannot be expected to cater for all the students all the time, but a good teacher will make sure that their lessons contain activities that cover all three learning styles.
There is a tendency to expect students to do a lot of listening. You should make sure that your students also get to do experiments or activities that involve moving around the room and talking about science. Encourage them to use mind maps and diagrams or pictures to summarise key ideas, rather than simply copying notes off the board.
Resource 4: Resource for classifying elements
![]() Background information / subject knowledge for teacher
Background information / subject knowledge for teacher
Elements
The first elements to be discovered were gold, silver, carbon and sulfur. This is because they occur naturally and are relatively unreactive. Gradually, as people became more interested in science, more and more elements were discovered. Chemists were keen to classify the elements and to understand the similarities and differences between them. They wanted to understand why some are reactive and some are unreactive. All sorts of suggestions were made, but there were always exceptions to the rule and none of the systems suggested were very helpful.
In 1869 a Russian scientist called Dimitrich Mendeleev came up with yet another suggestion. He placed the elements in order of increasing mass. Other people had also done this but it hadn’t worked very well. However, Mendeleev had what proved to be a brilliant idea. First of all, he realised that some of the elements were actually quite similar to each other: lithium and sodium for example, and bromine and iodine. He changed the order slightly so the elements which were similar formed a column. This meant that some of the elements were not all in order of increasing mass. He also realised that some of the elements might not yet have been discovered. So he left some gaps in his table. Furthermore, he made some predictions about some of the elements that had not been discovered. He predicted that there would be an element between silicon and tin, and was able to give quite a bit of detail about what he thought this element would be like. A few years later, germanium was discovered and it turned out that Mendeleev had been right! His predictions about its properties were very accurate. Much later, when scientists discovered the proton, they found that Mendeleev had put the elements in order of increasing atomic number.
Mendeleev was obviously a clever scientist but it was his creativity that led to this significant discovery.
Information for Activity 2
Make as many sets of 20 cards as you can, with information about the first 20 elements. (You could print off and cut out the ones below). Each card should contain:
symbol
atomic number
electron arrangement
mass number
appearance
state at room temperature
reactivity.
Give each group a set of cards and ask them to devise a way of classifying them. It does not matter if they don’t come up with the ‘right’ answer – the important thing is that they think about how you might classify elements. Some will sort them into solids, liquids and gases; some will sort them into metals and non-metals. Some might even group them according to reactivity. It is important that you let them devise their own method.
Hydrogen H Atomic No: 1 Mass No: 1 Electron arrangement: 1 Appearance: colourless, odourless State at room temperature: gas Reactivity: reactive; reacts explosively with oxygen | Helium He Atomic No: 2 Mass No: 4 Electron arrangement: 2 Appearance: colourless, odourless State at room temperature: gas Reactivity: completely unreactive | Lithium Li Atomic No: 3 Mass No: 7 Electron arrangement: 2,1 Appearance: soft, silvery metal State at room temperature: solid Reactivity: reactive; discolours in air, reacts with cold water, stored in oil | Beryllium Be Atomic No: 4 Mass No: 9 Electron arrangement: 2,2 Appearance: white, grey metal State at room temperature: solid Reactivity: does not appear reactive owing to a protective, layer of oxide |
Boron B Atomic No: 5 Mass No: 11 Electron arrangement: 2,3 Appearance: brown, black State at room temperature: solid Reactivity: chemically inert; only reacts with hot, concentrated acids | Carbon C Atomic No: 6 Mass No: 12 Electron arrangement: 2,4 Appearance: dark grey slippery solid, black powder or glass-like gem stone (diamond) State at room temperature: solid Reactivity: reacts with air if heated | Nitrogen N Atomic No: 7 Mass No: 14 Electron arrangement: 2,5 Appearance: colourless, odourless State at room temperature: gas Reactivity: unreactive; reacts with oxygen if heated with a platinum catalyst | Oxygen O Atomic No: 8 Mass No: 16 Electron arrangement: 2,6 Appearance: colourless, odourless State at room temperature: Gas Reactivity: reactive; reacts with metals and non-metals – sometimes requires heat |
Fluorine F Atomic No: 9 Mass No: 19 Electron arrangement: 2,7 Appearance: pale yellow, pungent smell State at room temperature: gas Reactivity: very reactive; can etch glass | Neon Ne Atomic No: 10 Mass No: 20 Electron arrangement: 2,8 Appearance: colourless, odourless State at room temperature: colourless, odourless Reactivity: completely unreactive | Sodium Na Atomic No:11 Mass No: 23 Electron arrangement: 2,8,1 Appearance: verysoft, silvery metal State at room temperature: solid Reactivity: very reactive; stored in oil, tarnishes rapidly in air, reacts with water (melts) | Magnesium Mg Atomic No: 12 Mass No: 24 Electron arrangement: 2,8,2 Appearance: silvery grey metal State at room temperature: solid (often kept as ribbon) Reactivity: reacts vigorously with air when heated, slowly with cold water, vigorously with steam |
Aluminium Al Atomic No: 13 Mass No: 27 Electron arrangement: 2,8,3 Appearance: shiny silver metal State at room temperature: solid Reactivity: tarnishes in air, forms a protective layer | Silicon Si Atomic No: 14 Mass No: 28 Electron arrangement: 2,8,4 Appearance: grey, shiny, solid State at room temperature: solid Reactivity: unreactive | Phosphorous P Atomic No: 15 Mass No: 31 Electron arrangement: 2,8,5 Appearance: Two forms: red phosphorous (powder) and white Phosphorous (pale grey solid – can be cut with a knife) State at room temperature: solid Reactivity: white phosphorous ignites in air and has to be stored in water; red phosphorous is unreactive | Sulphur S Atomic No: 16 Mass No: 32 Electron arrangement: 2,8,6 Appearance: yellow State at room temperature: solid Reactivity: burns when heated in air; reacts with metals when heated |
Chlorine Cl Atomic No: 17 Mass No: 35 or 37 Electron arrangement: 2,8,7 Appearance: green, yellowy, pungent smell. State at room temperature: gas Reactivity: reactive; reacts with metals, especially if heated | Argon Ar Atomic No: 18 Mass No: 40 Electron arrangement: 2,8,8 Appearance: colourless, odourless State at room temperature: gas Reactivity: completely unreactive | Potassium K Atomic No: 19 Mass No: 39 Electron arrangement: 2,8,8,1 Appearance: extremely soft, silvery metal State at room temperature: solid Reactivity: stored in oil, tarnishes in air, catches fire when it reacts with water | Calcium Ca Atomic No: 20 Mass No: 40 Electron arrangement: 2,8,8,2 Appearance: light grey metal State at room temperature: solid Reactivity: tarnishes in air, reacts with air on heating |
Resource 5: Mining Tantalum – a controversial issue
![]() Background information / subject knowledge for teacher
Background information / subject knowledge for teacher
Tantalum
Tantalum is a transition metal, required in the manufacture of cell phones. It is mined in The Democratic Republic of the Congo. The result of this mining is threatening the gorillas who live in the forests where the metal ore is found.
What is coltan?
Coltan, short for columbite-tantalite, is a metallic ore comprising niobium and tantalum, found mainly in the eastern regions of the Democratic Republic of Congo (formally Zaire). When refined, coltan becomes a heat-resistant powder, metallic tantalum, which has unique properties for storing electrical charge. It is therefore a vital component in the capacitors that control current flow in cell phone circuit boards.
Mining coltan
Eighty percent of the world’s known coltan supply is in the Democratic Republic of the Congo (DRC). Coltan is mined by hand in the Congo by groups of men digging basins in streams by scraping off the surface mud. They then ‘slosh’ the water around the crater, which causes the coltan ore to settle to the bottom of the crater where it is retrieved by the miners. A team can ‘mine’ 1 kg of coltan per day. The effect of this is to release mud which can travel downstream and cause the river to silt up and divert underground. In the long term, this can cause serious problems for farmers downstream.
The technology boom caused the price of coltan to increase considerably. A coltan miner can earn as much as US$200 per month, compared with a typical salary of US$10 per month for the average Congolese worker.
Gorillas
Part of the DRC is the last stronghold of the eastern lowland gorilla, which is in drastic decline. There is evidence suggesting that in the last five years eastern lowland gorillas have declined by 80–90%, with just 3000 or so animals left alive. But eastern DRC is a war zone, where factions vie for power across the borders of Rwanda, Burundi and Uganda. The British primatologist, Ian Redmond says: ‘To work in the park, the miners have to pay one spoonful of coltan to the military, and one spoon to the local chief. That means about $15. There are about 15 000 people working here, each paying $15 per week to the military who control the region. That's something in the region of $1m a month going into the pockets of the militia.’
Unwittingly, the users of mobile phones and other devices incorporating coltan are contributing to the apes' downfall.
Dr Jane Goodall, renowned for her four decades of work with chimpanzees, says the problem has become acute in the last 10 years, as big logging companies, especially European ones, and miners open up the forests. She says: ‘Hunters from the towns go along the roads and shoot everything – elephants, apes, monkeys, bats and birds. They smoke it, load it on to the trucks and take it into the cities. It doesn't feed starving people, but people who'll pay more for bushmeat.’
‘The pygmy hunters who've lived in harmony with the forest for hundreds of years are now being given guns and ammunition and paid to shoot for the logging camps. And that's absolutely not sustainable.
The animals have gone, the forest is silent, and when the loggers finally move what's left for the indigenous people? Nothing.’
Questions for your students to consider
The situation in the DRC is highly complex. You could ask your students to analyse the article and identify all the separate problems.
Clearly, there is no easy solution. But discussion will help your students to realise that governance and education are very important in solving problems caused by science and technology.
Some of the problems that they should be able to identify are:
- The method of collecting the ore releases mud which can cause problems downstream.
- The large salaries for the miners mean that they will take risks and this disrupts the local economy. People are less willing to do vital, but low paid jobs.
- Coltan mining removes the vegetation which is destroying habitats and threatening the survival of the mountain gorillas.
- The army take bribes, taking money out of the local economy.
- Nature’s balance is being upset, making it difficult for tribes who have lived for thousands of years in the forest to survive. They are being displaced, without a good alternative being available.
- When animals are killed, it can upset the food chain, threatening many species.
- This has a bad effect on the tourist industry. In other parts of Africa, the tourist industry has a very positive effect on the economy.
Resource 6: Elements found in Africa
![]() Background information / subject knowledge for teacher
Background information / subject knowledge for teacher
Elements found in Africa and their uses
| Element | Found where (figures in brackets represent the approximate proportion of current world reserves) | Uses |
| Gold | Botswana (16%) DRC (15%) RSA (7%) Angola (3%) | Jewellery, cell phones, calculators, personal digital assistants, global positioning system units (GPS) and satellites (as a lubricant – in the zero gravity of space oil-based lubricants would volatilise) and other small electronic devices. Most large electronic appliances such as television sets also contain gold. The electronic applications utilise gold’s excellent electrical conductivity. Gold is also widely used for dental fillings because of its lack of reactivity. |
| Aluminium | Guinea (as bauxite, 30%) | Aluminium is by far the most widely used non-ferrous metal: its uses are legion; it has excellent electrical and heat conductivity and strength to density ratio. This last property accounts for its many transport uses, including aerospace. It is also used in packaging; construction, e.g. window frames, roof and wall cladding; electrical transmission cables, cooking pans and utensils, drink cans and ships’ masts. |
| Manganese | RSA (77%) | Manganese is an essential component in many steels; including high tensile steel, which contains between 8 and 15% Mn. Manganese is also used to improve the corrosion resistance of the aluminium used to manufacture food cans. |
| Vanadium | RSA | Like manganese, vanadium is used mainly in alloy steels to improve their strength, such as high speed tool steel. Vanadium pentoxide is also an important catalyst in the industrial production of sulfuric acid by the contact process. |
| Carbon (diamond) | DRC (16%) Botswana (15%) RSA (8%) | Diamond has a high resistance to corrosion and is the hardest naturally occurring substance known. Artificially produced industrial diamonds are used for applications that make use of the properties mentioned above; e.g. cutting and drilling tools in mechanical engineering, geological ore processing and crude oil exploration |
| Copper | Zambia (3. 5%) RSA (0.9%) DRC (0.3%) | Copper has excellent heat and electrical conductivity that explains its major applications in heating systems for pipework and as the conducting medium in electrical wiring. Copper is also alloyed with nickel to produce hardwearing and corrosion resistant coinage. This property also explains its use in roofing and construction; e.g. the Statue of Liberty is clad in copper about 12 mm thick. |
| Cobalt | Zambia | Permanent magnets. Cobalt is also used in alloy steels to produce so-called ‘super alloys’ that have extremely high strength even at temperatures approaching their melting points. This means that they are widely used in jet engines. The isotope cobalt-60 is a gamma-ray emitter and used in radiotherapy and medical equipment and food sterilisation. |
| Chromium | RSA (84%) Zimbabwe (3. 4%) | Chromium has extremely high corrosion resistance that explains its use in steel alloying. 14% chromium or above produces stainless steel. Chromium oxide is used in the manufacture of magnetic tape used in cassettes. In the past, chromium compounds were also widely used to make paints and pigments, such as chrome yellow, but are less so nowadays due to concerns about their long-term environmental effects. |
| Platinum group metals (PGMs) which include Platinum, Osmium, Iridium, Palladium, Rhodium and Ruthenium | RSA (58%) | The PGMs are all extremely resistant to corrosion. This and their bright, attractive lustre, explains their use in the manufacture of jewellery. They all have several stable oxidation states which makes them ideal for use as catalysts in many industrial processes. They are used in the manufacture of motor vehicle catalytic convertors. |
| Uranium | Namibia (7%) Niger(6%) RSA(1. 5%) | Most uranium is used in the manufacture of nuclear weapon systems and nuclear reactors. However, relatively tiny amounts are also used in medical imaging and smoke detectors. Uranium accounts for about 5% of the world’s non-renewable energy sources. |
Questions that your students could consider
- Choose an element (e.g. aluminium, copper) and find out where it is mined and how it is extracted. What are the challenges and opportunities for local people?
- Choose an element that is mined in their country e.g. copper and find out about the history surrounding the industry. What are the lessons for the future?
- Open-cast mining – what is it and what are the environmental implications?
- Gold – what effect does the discovery of a valuable mineral have on a local area? How can the beneficial effects be maximised?
- Galamsey mining has become increasingly common amongst the youth in Ghana and other African countries. What are the dangers and environmental effects of this illegal activity?
Section 5 : States of matter
Theme: Dealing with challenging ideas in science
Learning Outcomes
By the end of this section, you will have:
- used an activity to probe students’ understanding of the key ideas in this topic that they encountered in primary school;
- organised your class into three groups to act out various scenarios which demonstrate understanding of how particles behave;
- supported students in developing a teaching resource or revision tool in order to link together ideas about particles.
Introduction
Being an effective science teacher involves being able to explain difficult ideas very clearly. There are a number of topics in science that are difficult to understand and difficult to explain. This is because the ideas are abstract and based on things that we cannot see. Students often have ideas that are ‘wrong’, particularly about the more abstract topics. Just explaining the ‘right’ idea might work in the short term, but often doesn’t last until the student has to take an exam. The ‘wrong’ ideas need to be identified and tackled before progress can be made. Often, simply explaining the ideas is not enough; you need to revisit them and consolidate understanding.
In this unit, the three activities build on each other and will enable you to help your students gradually develop their understanding. The first activity focuses on literacy and making sure that your students understand the key words. The second and third activities use different approaches to developing understanding. The purpose of the first activity is to find out and reinforce what they already know. The second activity extends their understanding so that they can explain processes such as dissolving, melting and evaporating in terms of how the particles behave. The third activity helps them to consolidate their learning by talking about the ideas and developing a concept map or a mind map.
1. Probing understanding
States of matter is a topic that your students will have learnt about at primary school, but don’t assume that they remember everything. They will have met some of the key words before, but some will be new.
In Case study 1, the teacher encourages her students to tell each other what they remember. Researchers have established a clear link between language and learning. When students talk about ideas, they have time to draw on their memory of what they have done before. It also helps them to practise using scientific words. You get the chance to listen to what they are saying and look at what they are writing, so that you are aware of their misconceptions (see Resource 1). You are far more likely to address their misconceptions in this way. Too often, when we use questions in a whole class discussion, we assume that because one student can give us a correct answer, the class as a whole understands the topic well. Activity 1 uses ‘think–pair–share’. Students work on their own first and then swap ideas with their partner. Each pair then talks to another pair until the whole class is talking. This method works well for students who are not confident about talking in front of the whole class.
Case study 1: Thinking about solids, liquids and gases
Mr Hausa teaches a class of 12-year-olds. Some of the students came from the primary school next door, but some came from different schools. He wanted to find out what they already knew about ‘states of matter’. Last year, he did a brainstorm with the whole class, but this year he had a much bigger class. First of all, he gathered them round the front and showed them a mixture of corn starch and water. He asked them whether it was a solid or a liquid (see Resource 6), in order to get them thinking. He divided the class into groups of four and gave each group a piece of paper. They had to work together to write down anything they could remember. He asked a few questions to get them going: what is special about a solid? What is it called when a solid turns to a liquid? They could draw pictures if they wanted. If a group was not doing very much then he asked them some more questions based on the primary school syllabus to get them going. While they were working, he went round with the corn starch and water so they could have a closer look. After 15 minutes he collected the pieces of paper. He found out that all the groups knew how the particles were arranged in a solid, but there were some strange ideas about liquids!
Activity 1: Think-pair-share
Before the lesson, write on the board or a large sheet of paper, the terms, definitions and examples given in Resource 2 . They should be in three columns (word, definition, example), but should be mixed up so that students have to match them up correctly. First ask them to work on their own to match them up correctly. Then they should compare answers with the person next to them.
Each pair should compare their answers with another pair. If they disagree, they have to discuss with each other and agree a set of correct answers. Once the group of four have agreed the correct answers, they should compare with another group, and so on. Eventually, through discussion the students will all agree on a set of correct answers. You should check through questioning that the students understand the reasons for their answers. At the end, individual students should come to the front and draw lines to join up the word with the correct definition and example.
2. Modelling atoms
Difficult ideas can often be helpfully illustrated using a role play. This can make something very abstract feel concrete and can help the students to understand. The danger, of course, is that an inaccurate model can introduce more misconceptions and difficulties at a later stage.
Resource 3 is about modelling in science. When you are using a role play to represent an idea, you should always get your students to explain what they are doing. By identifying the strengths and weaknesses of the model, you will also add to their understanding. The teacher in Case study 2 has a really big class. This can be discouraging and may put teachers off doing activities like role play. But she has come up with a plan of how to make it work. You could use her idea for other activities that would be difficult to do with a large number of students. Activity 2 describes a role play that your class should enjoy. You could set it up like a game, with some students acting out a process, and some guessing which process it is. This will make everyone concentrate and think about the ideas.
Case study 2: Working with a large class to do a role play
Mrs Lomwe had 80 students in her class. She was keen to do a role play to help them understand ideas about particles but was not sure how to organise so many students for a role play. She talked to some of the other teachers and between them they made a plan.
Mrs Lowme was fortunate to have some students who were natural leaders. She selected eight students and asked them to stay behind after school one day. She explained the purpose of the role play and that she wanted them to act as group leaders. She did the whole activity with the group of eight and showed them exactly what she wanted them to do. The idea was to get the students to behave as particles and to act out processes such as ‘condensation’ and ‘evaporation’.
The next day, she split the class into four groups, with two of the leaders in each group. Two groups stayed in the classroom, but two of the groups went outside. The leaders had to split their group in half. One half acted out one of the processes while the others had to guess which one it was. Then they swapped over. The students were encouraged to praise or criticise each others’ ‘shows’. If they thought it was good they had to explain why. If they thought it could be improved, they had to explain how. Many thought that the group acting out a liquid could have improved their performance if one or two of the students had left the group, showing that all liquids evaporate. But they liked the way the ‘particles’ kept bumping into each other.
Activity 2: Helping students model atoms
Divide your class into three groups. Draw a large square on the floor with chalk. Ask one group to act out being a solid. Get the other students to say two good things about the performance and one thing that could be improved. Repeat for a liquid and a gas, so each group gets a turn.
Then give each group the name of a process such as evaporation, condensation, freezing, melting or dissolving. Ask them to act out their process. The other groups have to guess which process it is. They have to explain why they think it is that process and say what is good about the performance. Research shows that students find it difficult to explain these processes in terms of the particles. This activity will help your students to understand the processes.
3. Making revision fun
One of the best ways to reinforce learning is to try and explain the ideas to someone else. Some people find that they only really understand a topic when they have to teach it. The same can apply to your students. Copying text and diagrams from the chalkboard will give them a good set of notes to learn, but it will not necessarily help their understanding.
Particle theory is really important and underpins ideas about chemical reactions and properties of materials. It is worth taking a bit of time to make sure that your students understand the ideas and how they link together. It might be helpful for them to produce a teaching resource that would be suitable for younger students or for someone who does not know much science. The teacher in Case study 3 sets such a task for homework so that it does not take too much time out of the lesson, but she does spend some time getting her students to think about what makes a good resource. Students are more likely to do well, if they know what you are looking for. Alternatively they could produce a resource to help them revise, such as a mind map or a concept map, as in Activity 3. Resource 5 explains some background to concept maps and mind maps.
Case study 3: Preparing a teaching resource
Mr Mumba had ten minutes left at the end of a lesson. He had just finished the topic on particle theory and wanted his students to make a teaching resource suitable for younger children for their homework. He gathered them round the front and explained what he wanted them to do. He suggested that they might make a poster, a leaflet or a small booklet. He asked them how they might judge such a resource. Able, a student, suggested that it should have pictures and diagrams. Lena thought it would be helpful if it had lots of real life examples and Sonia thought it was important to explain all the scientific words very clearly. Mr Mumba made a list of their suggestions on the board. Some children find it difficult to find time to do their homework because they have to do a lot of jobs around the house. So Mr Mumba arranged that anyone who wanted to could stay in the classroom after school to do the homework. Some students went and sat under a tree in the grounds and worked together on their posters. Mr Mumba did not mind; he realised that talking to each other about the ideas would help them to learn. Hari and Vincent made a poster in which Hari drew the diagrams and Vincent did the writing.
Activity 3: Making a mind map
You should explain to your students that one of the purposes of revision is to reinforce their learning. Simply reading through notes is not always as effective as they might think. A good thing to do is to draw a concept map, a mind map or a poster, or to make a summary of the key ideas on small cards or pieces of paper that can easily be carried around in a bag or a pocket. Divide the students into pairs and ask each pair to devise a revision tool that summarises the key ideas about particle theory. You could give them A4 paper or take a double-page from an exercise book to do this. They should be encouraged to use everyday examples to illustrate the ideas, to use pictures and diagrams and to think about how the ideas are linked together. If students understand how the key ideas link together, they will find it easier to remember the details.
Once they have completed the work they should swap with another group and use the evaluation criteria (Resource 4) to assess the quality of their work.
Resource 1: Misconceptions surround States of Matter
![]() Background information / subject knowledge for teacher
Background information / subject knowledge for teacher
Misconceptions
Children find it very difficult to understand just how small atoms and molecules actually are. A common misconception is that cells and atoms are comparable; in fact cells contain millions of molecules.
One way of introducing the idea of ‘magnitude’ is to use a football. If you measure the diameter of a football and divide it by 108, that gives the size of an atom. If you multiply it by 108, that gives the size of the Earth. If you have access to the internet, there is a website called ‘powers of ten’ which will help you to envisage the magnitude of atoms: http://micro.magnet.fsu.edu/ primer/ java/ scienceopticsu/ powersof10/.
Children also have misconceptions about the particle model for matter. Some of the common ones that you will find include:
- If a solid or liquid is heated, the particles get bigger. This is not the case. At higher temperatures, they move about more and take up more space, but they do not get bigger.
- Children tend to overestimate the space between the particles in liquids. They regard a liquid as half-way between a solid and a gas. This is not the case. The particles in a liquid are close together, although they are free to move and change place.
- Children confuse ‘melting’ and ‘dissolving’. Some children think that when a solid melts, the particles ‘pop’ or simply disappear.
- Children find it difficult to accept that most of a gas is empty space.
- Children assume that the particles will have the same properties as the solid, liquid or gas they make up and therefore will explode, contract, expand or change shape.
- When they see a diagram of a molecule such as oxygen (O2), children think it must be a compound because there are two atoms joined together. They do not always understand that if both the particles are the same then it is an element.
Resource 2: Think-pair-share Activity
![]() Teacher resource for planning or adapting to use with pupils
Teacher resource for planning or adapting to use with pupils
The words, definitions and examples are in the wrong order. Your students need to match them up correctly. You could get them to copy the lists as you have written them on the board and use a pencil to join the word with the correct definition and example. Alternatively, you could ask them to match the numbers and letters and when you have agreed the correct answers, ask them to copy the table with everything in the correct order.
| Key word | Definitions | Example |
| 1. melting | A. changing from a gas to a liquid | S. sugar disappearing into water |
| 2. evaporation | B. the liquid in which a solid dissolves to form a solution | T. when molten iron solidifies |
| 3. dissolving | C. changing from a solid to a liquid | U. water changing to water vapour |
| 4. solution | D. a solid that dissolves in a liquid to make a solution | V. salt water |
| 5. solute | E. changing from a liquid to a gas | W. when steam forms water on a cold surface |
| 6. solvent | F. the mixture formed when a solid ‘disappears’ into a liquid | X. the salt in salt water |
| 7. condensation | G. changing from a liquid to a solid | Y. ice changing to water |
| 8. freezing | H. when a solid is mixed with a liquid and seems to disappear | Z. the water in salt water |
Resource 3: Using Models in Science
![]() Teacher resource to support teaching approaches
Teacher resource to support teaching approaches
Using models in science
Using models or analogies is a very powerful way of helping children to understand scientific ideas. Used properly, models can also help to develop critical thinking. You can do this by helping children to evaluate the strengths and weaknesses of a model.
Some general principles to think about when planning lessons with models are:
- introduce the model early in the teaching of the topic, then use the model consistently until it is replaced by a more sophisticated one
- ensure students make links between the model and the real situation
- ensure students recognise the differences between the model and what it is illustrating
- encourage students to apply their understanding to explain new ideas
- encourage students to identify strengths and weaknesses in any model
- increase the sophistication of the model when necessary.
A useful approach when you are planning a sequence of lessons based on a model such as the particle model might be:
- Teach the original model explicitly – show which part relates to which, making sure students understand and picture it.
- Test the original model by applying it – students practise using the model to explain simple ideas. For example, explaining why gases can be compressed, liquids can’t be compressed, solids are hard, etc.
- Challenge the original model – by using it to explain more complicated things like melting, dissolving and evaporating.
- Develop a ‘better model’ – if necessary explore the development of a better model with the students or provide a more sophisticated one.
Once students have a good understanding of the particle model, this will help them to understand concepts such as why materials have different properties, osmosis, Brownian motion, density, elements, compounds and chemical change.
Resource 4: Marking criteria for posters
![]() Background information / subject knowledge for teacher
Background information / subject knowledge for teacher
Marking criteria
When you mark questions about scientific topics, it is easy to decide if it is right or wrong. You might correct the answers, or ask your students to correct them themselves. Whatever you do, you should make sure that you provide some feedback so that your students know how to improve.
Teachers sometimes don’t like setting open-ended tasks or project work because it is much more difficult to mark. However, these sorts of activities will help your students to learn and they will tell you a lot about your students.
To make it easier to mark projects, leaflets or posters, you need a set of criteria – things that you think are important. You should share the criteria with your students so they understand what is expected of them. You could even get them to suggest suitable criteria.
Once the criteria are clear, then you can mark the work – or you can encourage them to mark each others’. They will need to do this a few times to get used to it – but they will get better at it. At first, encourage them just to give positive feedback: ‘I liked the way you have ...’ or ‘You have made that really clear ...’ As they get more used to looking at each others’ work, they might be able to suggest improvements: ‘I really like the diagram that shows melting – it would have been good if you had done one for dissolving as well.’
Possible criteria for assessing a teaching resource, a leaflet or a poster:
- Is the information clearly laid out?
- Is the information presented logically so it would help the learner?
- Is the text well written?
- Have they made good use of diagrams?
- Are the key words clearly defined?
- Is the information scientifically correct?
- Is there evidence that the work is carefully planned?
For project work you might include:
- Is there evidence of independent research?
- Is the project clearly structured?
Resource 5: Revising with mind maps and concept maps
![]() Teacher resource to support teaching approaches
Teacher resource to support teaching approaches
Revision tools
Students find revision quite difficult. They will probably have an exercise book containing notes. One technique is to read through the notes and to try and remember them. However, this is not always effective. It can be difficult for students to concentrate when reading – especially if English is not their first language.
More active approaches to revision include making summaries on posters or on small cards (or small pieces of paper) that can easily be carried around. Students can invent questions and then work in pairs to test each other on the work. Two particular approaches are concept maps and mind maps.
Concept maps and mind maps are tools which help learners visualise a topic.
A concept map is a hierarchical diagram which shows the relationships between concepts. The concepts are usually represented by circles or squares. The shapes are connected by lines or arrows. Words on the arrows provide linking phrases, such as ‘leads to’, ‘results in’, ‘includes’, ‘necessary for’ or ‘shows’. Drawing a concept map is a good way of organising your thoughts. It helps you to understand how concepts are linked together and sometimes to see connections between concepts that you hadn’t thought of before.
A mind map is a diagram in which ideas and words are arranged around a key central word or idea. Mind maps can be put together quickly, often as a result of a brainstorming session. They can be very helpful for revision, especially for people who learn more easily by looking at pictures.
Mind maps and concept maps are only really helpful for the person who drew them. It is often the process of drawing them that is more helpful than the finished product.
Both techniques are helpful for revision.
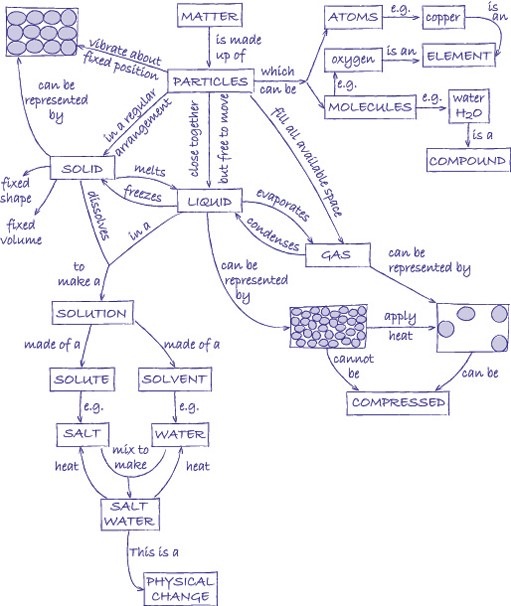
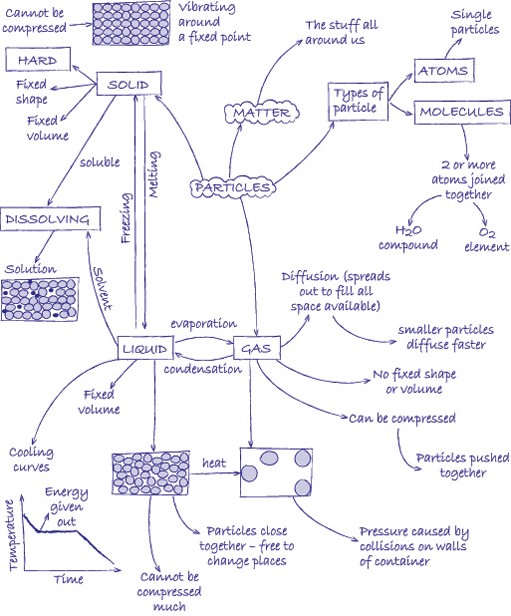
Resource 6: Corn starch and water
![]() Background information / subject knowledge for teacher
Background information / subject knowledge for teacher
Corn starch and water – a curious mixture!
Caution: Always dispose of the mixture in a rubbish bin. Do not put it down a sink as it will cause a blockage.
Your students will probably be familiar with the properties of solids, liquids and gases. They will be able to describe their properties and, classify a substance correctly on the basis of its properties. This is fine so long as a particular substance falls neatly into one or other of the categories. But what happens if it doesn’t? You have seen, for example, that sand, though composed of tiny grains of solid behaves, in some ways, like a liquid. Only one individual grain on its own would satisfy all of the criteria for a solid.
So some substances are definitely difficult to classify. However, you can use this as an opportunity to probe your students’ understanding of the nature of solids, liquids and gases. In this activity you will make a substance that is difficult to classify. The substance is made from water and cornstarch. In order to experiment with it you will need the following materials:
- One box of cornstarch, 450 g (16 oz), or equivalent (a powder with a high starch content)
- A large mixing bowl
- A jug of water
- A spoon
- A large plastic food bag
- Newspaper or similar to cover the floor
- Water
- Food colouring
- A cup or beaker.
Method
- Pour approximately 1/4 of the box (about 100 g, 4 oz) of cornstarch into the mixing bowl and slowly add about 1/2 cup of water. Stir. Sometimes it is easier (and more fun) to mix the cornstarch and water with your bare hands.
- Continue adding cornstarch and water in small amounts until you get a mixture that has the consistency of honey. It may take a few tries to get the consistency just right, but you will eventually end up mixing one box of cornstarch with roughly 1 to 2 cups of water. As a general rule, you're looking for a mixture of approximately 10 parts of cornstarch to 1 part water. Notice that the mixture gets thicker or more viscous as you add more cornstarch.
- Sink your hand into the bowl of cornstarch and water, and notice its unusual consistency. Compare what it feels like to move your hand around slowly and then very quickly. You can’t move your hand around very fast! In fact, the faster you thrash around, the more like a solid the mixture becomes. Sink your entire hand in and try to grab the fluid and pull it up. That’s the sensation of sinking in quicksand.
- Drop a small object into the cornstarch mixture and then try to get it out. It’s quite difficult to do.
- Slap the surface of the mixture hard. If you have used just the right proportions it will not splatter all over the place as you might have expected.
Explaining the properties of cornstarch ‘quicksand’
Cornstarch mixed with water is an example of a heterogeneous mixture. That’s a bit of a mouthful! Basically it means that both components of the mixture can be seen in the mixture, or they could be if the particles of cornstarch were not so small. Over time the particles settle out and sink to the bottom so do not pour any remaining mixture down a sink – the water will evaporate and leave a solid lump of matter that will block it.
In fact the cornstarch and water mixture acts like a solid sometimes and a liquid at other times. The mixture is in fact an example of a suspension – a mixture of two substances, one which is finely divided (the solid) dispersed in the other (the liquid).
When you slap the surface with your hand you force the long starch molecules closer together. It feels like a solid. This impact traps water molecules between the starch chains and forms a semi-rigid structure. When the pressure is released, the cornstarch flows again.
If you push your finger slowly into the mixture, it goes in easily and it feels like a liquid.
All fluids have a property known as viscosity – or resistance to flow. The more resistance to flow a liquid has the greater its viscosity is; e.g. honey,. Water has a low viscosity. Sir Isaac Newton proved that viscosity is affected by temperature. So, if you heat honey, its viscosity is less than that of cold honey. Cornstarch, water mixtures and quicksand are regarded as non-Newtonian fluids because their viscosities change when a force is applied, not when heat is applied.