Use 'Print preview' to check the number of pages and printer settings.
Print functionality varies between browsers.
Printable page generated Thursday, 9 July 2026, 7:57 PM
Module 1: Developing an Understanding of Place
Section 1 : Mapping the local environment
Key Focus Question: How can you use the local environment to develop pupils’ understanding of maps and place?
Keywords: local environment; maps; group work; symbols; investigation; game
Learning Outcomes
By the end of this section, you will have:
- used local resources to develop your skills in teaching about the physical features of home and school environments;
- used games to extend your pupils’ understanding of maps;
- used group work as a teaching and learning strategy to manage large and small classes.
Introduction
Most pupils have some understanding of the area in which they live. They know the quickest way to their friends’ houses or the local market. When developing their understanding of place and, in particular, their mapping skills, it is always important to start with what pupils know before you move on to what they don’t know. This gives pupils confidence, because you are using what they already understand.
Building on what your pupils know about the physical features of their home and school environments, ensure you move on to more formal mapping of their local surroundings. This provides a meaningful context to explore the symbols used in mapping. The activities in this section will help you encourage your pupils’ skills in observation and help transfer their knowledge into formal symbolic representations.
You will also develop your skills in using group work in your classroom.
1. Exploring the local area in groups
Most pupils know a lot about their local environment and may be able to map their understanding of where things are in their own way. First, it is important to develop your pupils’ abilities to observe their local environment and to make these activities meaningful for them .Explain that noticing the features in their surroundings enables them to locate places in relation to each other and to describe places clearly. Having a sense of direction helps pupils to find their way around. Once they understand their own environment, and their way around it, your pupils can begin to explore the wider world.
One way to start observing the local environment is to encourage your pupils to keep a notebook with them and to draw or write down any interesting things they see as they move around the local area. Another way is to work with your pupils to produce a class mural or picture on the classroom wall. Each day, a small number of pupils could add pictures (and words from older pupils) of things in the local environment.
In Case Study 1, one teacher shows how she organised a large class. Read this before you try Activity 1.
Case Study 1: A map of school and its surroundings
Mrs Kazimoto, a teacher at Dabanga Primary School in Tanzania, wants to develop her Grade 3 pupils’ skills at observing and identifying important features in the local area. She will then progress to drawing maps.
Mrs Kazimoto has a large class and so she divides them into eight groups of ten pupils. She knows that using group work will help her manage the class and ensure that all pupils participate. It will also develop their cooperative learning skills. (See Key Resource: Using group work in your classroom.)
She asks each group to list all the features of the school grounds that they see as they come to school, such as trees, buildings etc. She asks one person in each group to write down all the important information. After a few minutes, she stops the class and asks each group to read out one feature from their list, which she writes on the board. She keeps going round the class until they have read out all the features.
Next, Mrs Kazimoto hands out large pieces of paper to each group and asks them to mark in the middle a square for the school. Each pupil is then asked to place a feature on the paper in the correct place.
When each group has finished, Mrs Kazimoto sends them outside to see what they had in the right place and what they need to move or add. Their plans are modified and then displayed in the classroom.
Mrs Kazimoto sees that two groups have managed very well. The other groups have had to modify quite a few features and she plans to take these pupils out in groups to do some more simple mapping of the school ground and its features.
Activity 1: The journey to school – signs and signals
- Ask your pupils to observe and record in their notebook or exercise book 6–10 important things they see on their way to school the next day. Younger pupils might do drawings.
- In class, ask each pupil to arrange what they saw in the order they saw it.
- Explain to the pupils what a physical feature is.
- Ask the pupils to tick the physical features on their list.
- Ask them why some of the things they observed are not physical features. Would they expect to find these on a map? Discuss why this is so e.g. some things such as dogs and cats move, as do cars, so these are not (permanent) physical features.
- Ask the pupils from which direction they come to get to school i.e. North, South, East and West (N, S, E and W). You may have to explain about this and have a map ready for them to see or remind them about N, S, E and W.
- Based on the directions, form four groups, each comprising pupils who come from roughly the same direction. (See Key Resource: Using group work in your classroom.) If all your pupils came to school from only one or two directions, we suggest you take your pupils on a class walk to explore the other directions.
- Ask each group to make one joint list of the physical features found on their route home. Can they put them in the order in which they would see them on their way from school to home?
- Display the lists, according to the direction, on the walls of the classroom.
What other activities could you do to develop your pupils’ observation skills?
2. Using a game to introduce maps
Observing the features of an environment is a first step to producing a map. To help your pupils understand a map, you need to introduce them to the idea of symbols.
Case Study 2 shows how one teacher uses a game to help pupils learn about using symbols. By planning and devising a game around a topic of interest to the pupils, this teacher has made it much more likely that they will engage in the activity and therefore learn more. The use of a game will involve your pupils in active learning; it will be fun for them and will help them remember more. Read Case Study 2 before you plan and try Activity 2.
Case Study 2: Symbol treasure hunt
Miss Yaa Nsiah, a teacher of Class 5 pupils in CapeCoast, Central Region, wanted to build on pupils’ knowledge of direction and the local environment to introduce the idea of using symbols to represent physical features. She decided to hold a treasure hunt.
Before the lesson, she observed six physical features of the school, including the gates, the large tree and the head teacher’s office. She found six pieces of cardboard and drew one symbol on each to represent one feature (e.g. a desk for the head teacher’s office). She then numbered the card and added directions to the next symbol on each card. She placed the pieces of card at their specific locations.
In class, the pupils were divided into ‘search parties’ and given their first clues. They had to go outside the classroom, and turn in an easterly direction – the teacher helped by telling them this to get started. When they found the card at the feature this gave them the next direction to move in, and another symbol to find, and so on.
The pupils found this game very exciting. They were very involved in trying to work out what the symbols meant and move in the right direction. Miss Nsiah followed the groups around and was on hand to help any that were struggling with what the symbols meant or which direction to follow.
Everyone reached the final card. Miss Nsiah was pleased because she knew they had managed to interpret all the symbols and understand direction better.
Activity 2: Using symbols
- Begin your lesson with a brief explanation of the use and importance of map symbols. Ask pupils to give you examples of common symbols that they know that are used around them (e.g. on roads) and use these to build up a list of standard symbols. (See Resource 1: Map symbols for some examples.) You could build the list up over a week and make a classroom display.
- Ask pupils to think about why the geological survey department has used these symbols rather than words. This kind of questioning will help them to think of the value and importance of symbols. (See Key Resource: Using questioning to promote thinking.)
- Now ask each pupil to think of three physical features they see on their way to school (see Activity 1) and draw a symbol for each. After a few minutes, ask pupils to swap their symbols with a partner. Can the partners guess what the symbols mean?
- Ask some pupils to come and draw their symbols on the board. Can other pupils work out what they mean?
- Finish the lesson by seeing if the pupils can decide what makes a good symbol.
- List their reasons on the board.
3. Working together to create a map
Developing knowledge and understanding of the standard symbols that are used on maps worldwide will help your pupils explore physical features of any area in the world. It will also help them understand the way maps are constructed and their value in daily life, especially as they grow and travel to new areas.
However, it is important to use ways of working that involve pupils actively in exploring their surroundings and thinking deeply about the problem they are trying to solve. Using local resources and experts helps pupils understand more as the context has meaning for them. It may be possible for you to find someone who is knowledgeable about maps to come and speak to the pupils about how maps of their local area were drawn and explain the meaning of the symbols that depict local physical features.
Case Study 3 shows howone teacher worked with his pupils to understand local maps. Read this before you start the Key Activity.
Case Study 3: Analysing a map of the local urban area
Mr Chukwu is a teacher in an urban primary school in Western Region. He wanted his pupils to be able to study a map and recognise the physical features in any area.
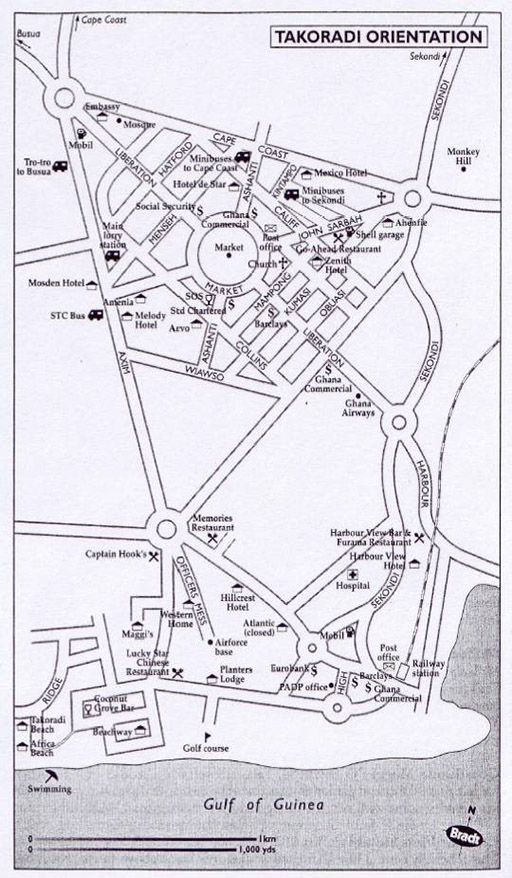
Mr Chukwu decided to use a real map of the city of Takoradi and so, two weeks before he planned to do the work, he visited the geological survey department to obtain a number of topo sheets of the area. He drew up a worksheet for his pupils to use based on the topo sheets. Because this work would involve symbols, he also drew up a chart of symbols, which he planned to display in the classroom.
As the geological survey department was only able to give him five topo sheets, he divided his class into five groups. Mr Chukwu showed his pupils the chart that identifies the symbols, and handed out a map and one of his prepared worksheets to each group. He had identified a number of roads, major buildings, some bus stations, a market and a hospital, all of which the groups had to find on the map.
Next, he asked the pupils to work out the scale. He explained that map scales compare the size of the map with the real size of a place. Mr Chukwu showed his pupils how to read the information shown on the scale statement and the scale bar.
When the groups had finished analysing the maps and completed the worksheets, they swapped their worksheets with other groups, and checked to see whether they had found the same answers. Where there were inconsistencies, Mr Chukwu asked the groups to confer and agree on an answer.
At the end of the lesson, he went through the symbols with the whole class. Where groups had come up with different answers, they discussed the reasons and agreed on a final answer.
Resource 2: Sample map and Resource 3: Questions for mapsgive examples of the types of resources that can be used.
Key Activity: Creating a big picture of the local area
- Tell the class that you are going to draw a large map together of the different routes they take to school and the physical features around the school.
- Divide the class into four groups according to the direction they take from their homes to school (N, S, E and W).
- Ask each group to list the physical features that they see on the way to school (see Activity 1).
- Mark four spaces on the ground – or on a large piece of paper or plain cloth – N, S, E and W.
- Ask pupils to volunteer to be the first to draw the features of their direction on the space provided.
- Then each group adds to what was not drawn by their fellow pupils.
- Once the big picture is completed, discuss with the pupils how they now have a large map of the whole area around the school in front of them.
- Ask the pupils from different groups to look at a map from another route and see if they can identify what the symbols mean.
- With younger pupils, you could first discuss the symbols to use and draw them on the board. Then ask them to use the symbols on their maps.
- Finally, ask pupils to draw their own small maps of the school and its surroundings, using the larger map as a guide.
Resource 1: Map symbols
![]() Background information / subject knowledge for teacher
Background information / subject knowledge for teacher
| Road: National freeway | Trigonometrical beacon | ||
| Road:National route | Urban built-up area | ||
| Road:Arterial route | Building (of significance or isolated) | ||
| Road: Main road | Bridge | ||
| Road: Secondary road | Cultivated land | ||
| Railway (showing a station) | Row of trees (where of significance) | ||
| River: Perennial (has water all year) | Wind pump | ||
| River: Non-perennial | Communication tower | ||
| Dam | Eroded area | ||
| Pan: Perennial | Boundary: International | ||
| Pan: Non-perennial | Boundary: Provincial | ||
| Pan: Dry | Boundary: Cadastral farm (original farm) | ||
| Canal | Boundary: Game reserve | ||
| Powerline (major lines only) | Boundary:State forest | ||
| Spot height (elevation at a point) | Contour | ||
| Churches | Tree: Deciduous | ||
| Tree: Palm | Tree: Evergreen |
Resource 2: Sample map
![]() Teacher resource for planning or adapting to use with pupils
Teacher resource for planning or adapting to use with pupils
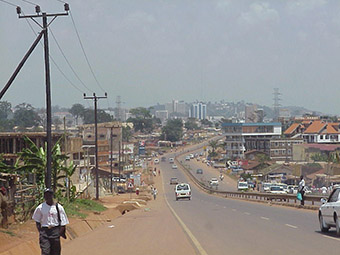
This is a map of an area in Takoradi
Resource 3: Questions for maps
![]() Teacher resource for planning or adapting to use with pupils
Teacher resource for planning or adapting to use with pupils
In your group look at the map of Takoradi and answer the following questions:-
a) If you wanted to buy petrol for your car, which three streets might you go to?
b) Which sport might you play if you were next to the beach?
c) Can you name two banks located within the area shown on the map?
d) What is next to the railway station?
e) Where is Takoradi market located?
f) If you wanted to take an STC bus out of Takoradi, which street would you go to?
g) If someone asked you for directions to Takoradi hospital, which hotel could you tell them that it’s near?
Acknowledgements
Grateful acknowledgement is made to the following sources:
Photographs and images
Resource 2: Sample map: Briggs, P., The Bradt Travel Guide: Ghana
Every effort has been made to contact copyright holders. If any have been inadvertently overlooked the publishers will be pleased to make the necessary arrangements at the first opportunity.
Section 2 : Human settlements and resources
Key Focus Question: What different activities can you use to explore why people settle in particular places?
Keywords: resources; case study; group work; settlements; debate; questions
Learning Outcomes
By the end of this section, you will have:
- used small group work and debate to help pupils understand the resources needed for living;
- used pictures and maps to explore the relationship between the availability of resources and human settlement.
Introduction
Every day of our lives we use resources of all kinds and as the population of the world increases there is great pressure on many of these resources.
As a teacher exploring these ideas with your pupils, it is important to start by finding out what they already know about the resources in their own environment. It is then possible to plan how to extend their knowledge and engage them in thinking more deeply about the issues. The Case Studies in this section show how some teachers explained these ideas and will help you think about what you will do in the activities.
1. Organising a brainstorming session
On their way to school, your pupils will see many natural resources that are used in everyday life. In this part, you will ask your pupils to brainstorm some of these natural resources and the ways people use them. By ranking them according to their importance for the people living in a particular environment, they will see how important these resources are. This will help your pupils develop their skills of observation and think about their role in using resources wisely. You will need to explore their understanding of the differences between natural resources and resources made by people.
You will also explore ways to use group work to manage your class. Working in this way helps them to share ideas and learn together.
Read Case Study 1 before trying Activity 1; these show different ways to find out what your pupils know. You can try both methods at different times in your classroom.
Case Study 1: Investigating the resources we need for living and development
Mr Kaizilege is a teacher at Kitahya Primary School, which is near the Ileme village in Tanzania. Most of his pupils come from the village.
The village is located in an environment that has many natural resources – trees, water, a quarry and cultivated fields. Mr Kaizilege hopes to develop his pupils’ abilities in observing and identifying the natural resources surrounding their village. He hopes this will help them understand their roles and responsibilities with respect to these local resources.
At the end of one day, he asks the pupils to note down all the resources they see in the village on their way home and bring their list to school. The next day, he divides the class into groups of eight and writes the following question on the board:
What resources do we have in our own environment?
One pupil in each group copies the question onto the middle of a piece of paper and each group shares their findings from the previous day’s observation exercise, drawing or writing their findings around the question. Mr Kaizilege displays these on the board, and together they reflect on how similar their brainstorms are. Mr Kaizilege suggests gaps that exist in their charts. For example, no one mentioned the quarry or the sun.
Mr Kaizilege then writes sentences on the board. Each sentence shows the use of one resource found in the village. He asks the groups to match each sentence to a resource. The groups share their ideas and reach agreement on them before copying them into their books.
Activity 1: Identifying local resources and determining their importance according to need
- Write ‘Local resources’ in the middle of the chalkboard. Make sure they are clear about what you mean by ‘resources’. Ask your pupils to spend three minutes talking to one other person about the resources they use in their village or suburb.
- Then ask different pairs of pupils to give ideas.
- Record their ideas in two lists on the board – ‘Natural resources’ and ‘Resources made by people’.
- Now divide the class into small groups and ask each group to discuss some differences between the natural resources and those made by people.
- Ask each group to feed back to the class. Discuss with the class the key points that they have made.
- Ask each group to rank the list of all the resources available in their village/suburb, from the most important to the community to the least important.
- Ask each group to present and defend their order to the rest of the class.
- As a class, agree on one ordered list. You might want to organise this as a vote.
- Ask them to think about which resources are readily available and which are more difficult to get hold of or more expensive.
Did the pupils have a clear sense of the difference between natural resources and those made by people? Does anyone need more help?
2. Group work to focus on settlements
People have traditionally settled in places where they can find natural resources such as water, fuel and access to food, perhaps land to grow crops or keep cattle or fish from the sea or a lake.
To help your pupils understand why people choose certain places to settle, you will use a historical example to explore the issues of water. You can then relate the key ideas to their own lives.
Using group work will increase the interaction and exchange of ideas, which will help pupils explore their thinking and develop their understanding more.
Case Study 2: Using early accounts of Uganda
Mrs Mpata was teaching her Primary 6 pupils about the relationship between natural resources and human settlements. She decided to use, as an example, the importance of water as a resource to explain the settlement of people on the shores of Lake Victoria in the Jinja area.
She prepared some notes about life in Uganda in ancient times and wrote these on the board. (See Resource 1: Natural resources and human settlement.) She asked the pupils in pairs to identify the major natural resource that exists in the Jinja area and to discuss why people settled in various places. They were able to identify Lake Victoria as the source of the Nile, and water as the natural resource in determining the settlement of people in the country.
Next, she asked her pupils to work in groups of eight and share with each other how important water is to the survival of their own village. She asked them to identify where the village gets its water from, and how this affects both the position of the village and the daily lives of the people. The groups shared their findings with the rest of the class, and Mrs Mpata wrote their ideas on the chalkboard. They discussed how important each idea was.
Mrs Mpata was very pleased with her pupils’ informed discussion – this meant that they understood the relationship between natural resources and human settlement.
Activity 2: Linking resources and settlement
Divide the class into groups and ask each group to think about the needs of early settlers (e.g. food, water, shelter). Ask one person in each group to list the ideas.
Ask each group to think what would be the best place for a settlement e.g. near a river, but away from flooding.
Ask each group to present its findings to the rest of the class and identify the common factors together.
Next, ask each group to think about and note down activities that might have been carried out by people in these settlements.
Now ask each group to design their own village. Give each group a large blank piece of paper. Ask them to mark these features on the paper:
- a river;
- houses;
- an area of high ground;
- a road or track.
Encourage them to use symbols on their maps and to include as many other features as they want.
Allow time at the end of the lesson for groups to present their village maps to each other and explain where the people in the village get their resources from.
3. Thinking about resources and the environment
Many resources are scarce and therefore need to be properly managed. Some resources, once used, cannot be replaced. Others are plentiful at the moment, but may not be if people do not look after them or use them wisely.
In Case Study 3, the teacher uses a class debate to explore one particular resource issue. If you have older pupils, you could try this strategy, choosing any topic which is relevant to your community. The success of the debate will depend on giving the pupils time to plan their speeches well and organising the class so that pupils are clear about their roles in the debate.
In the Key Activity, you are encouraged to use another way to explore a resource issue in your area.
Case Study 3: Debating resource management
Mrs Komuhangi wanted her Primary 6 pupils to explore the positive and negative effects of managing natural resources. She decided to hold a debate in her class on the issue of bush burning, which had been a problem recently in the local area.
She started the lesson by writing on the chalkboard: ‘Bush burning is harmful to the community’.
Mrs Komuhangi then explained how a debate works (see Resource 2: How to debate an issue). She asked for three volunteers to propose – or support – the motion and for three volunteers to argue against the motion. She explained to both teams that they must gather evidence to back up their points of view. To help them find the evidence, she encouraged each team to speak to older people in the community about why the community often burns the grass in their area. She also gave both teams some information that she found on the Internet, which looked at the role of bush burning in traditional communities in Africa, and some ways to manage bush burning (see Resource 3: Bush burning).
She gave the teams a week to prepare for the debate, including time in one lesson for all the class to think about the positive and negative aspects of bush burning. The rest of the class also tried to find out what they could from the local community and share this with both teams as appropriate. On the day of the debate, Mrs Komuhangi reminded the class of the rules of debating, and how important it was for them to ask questions if they did not understand.
At the end of the debate, a vote was taken and the motion was carried by a large majority. Mrs Komuhangi reminded the class that it was important to respect each other’s viewpoints and not to gloat as ‘winners’. She was pleased that both teams put forward interesting ideas to support or oppose the motion.
In the next lesson, Mrs Komuhangi asked her pupils to brainstorm ideas of how to develop community awareness of the negative effects of bush burning and provide alternative methods of managing the land in their community. She wrote their ideas on the chalkboard and encouraged the pupils to discuss the ideas with their families.
Key Activity: Comparing places
Choose one of the images provided in Resource 4: Different environments and pin it up in your classroom. If you have photographs from a visit to a different part of your country or have access to images in a textbook or magazine you could use these. Try to choose a place that is very different to the environment of the school.
- Explain to your pupils where the photograph is of.
- Organise them into groups of three/four and ask them to think of between four and six words to describe the place.
- After five minutes, ask each group to give you one word. Write these as a word bank on the board or on a sheet of newsprint.
- Next, ask your pupils to work in their groups and to list the features of this place that are similar and different to their own environment.
Resource 1: Natural resources and human settlement
![]() Teacher resource for planning or adapting to use with pupils
Teacher resource for planning or adapting to use with pupils
The shores of Lake Victoria
The Lake Victoria Crescent covers the areas directly influenced by the Lake environment. It receives an annual rainfall of 1,500 mm and it is characterised by fertile dark loam soils, favourable for agriculture. The area is gifted with a tropical climate and has tropical forests. The physical natural environment of this region has attracted settlement activities, such as industrialisation subsistence and commercial agriculture, and eco-tourism among others. It is no wonder that this area is highly populated and full of many economic activities, especially around Jinja, Masaka, Kampala, Mukono, Mayuge, Iganga and Mpigi district.
Resource 2: How to debate an issue
![]() Background information / subject knowledge for teacher
Background information / subject knowledge for teacher
A debate is a formal argument or discussion. One side proposes the topic or motion and the other side opposes it. There are three speakers for each side and there is a time limit within which they have to give their point of view. Debating is a formal activity and there are certain rules that must be followed:
- A chairperson introduces the topic and the six speakers.
- The first speaker from the team that is proposing the motion speaks first. The first speaker introduces the topic. They may speak for a limited time (such as a maximum of three or five minutes each).
- Next, the first speaker from the team that is opposing the motion speaks. This speaker also introduces the topic, but from the opposing point of view.
- They are followed by the second speaker from each side. The role of the second speaker is to enlarge on the argument by giving valid examples and evidence to back up their team’s point of view.
- The chairperson then opens the debate to the floor (the rest of the audience), who can question the speakers and challenge their arguments.
- The third speaker from the opposing team then sums up the team’s argument.
- The third speaker from the proposing team sums up the team’s argument.
- The class votes on the motion, based on the strength of the different arguments.
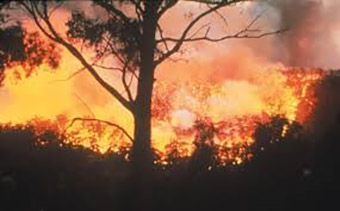
Resource 3: Bush burning
![]() Teacher resource for planning or adapting to use with pupils
Teacher resource for planning or adapting to use with pupils
Reasons for bush burning
A typical example of bush burning is when farmers burn their harvested fields to prepare their farms for the next planting season, or during dry seasons when farmers organise hunting parties for popular game often called ‘bush meat’. The bush is deliberately set alight to trap small animals during hunting. Other fires are caused by accidents during the dry season when most bushes and forests have dried up and are very combustible; cigarettes, matches, campfires etc. can spark up small fires that later grow bigger.
Bush burning management strategies
Bushfires can be managed by professional staff, such as rangers and park workers, with help from volunteers from rural areas. However, large fires are often of such a size that no conceivable firefighting service could attempt to stop the whole fire directly, and so other techniques are needed.
This might involve controlling the area that the fire can spread to by clearing control lines. Here the land is cleared of any vegetation either by controlled burning or digging a ditch. This takes time and does not happen often. This can interfere with the forest ecosystem.
Who is affected by bush burning?
Rural farming communities are rarely threatened directly by bush burning as the fires are usually located in the middle of large areas of cleared, usually grazed, land, where often there is very little grass left. People who live in urban areas that spread into forested areas are more open to threats of fire.
Adapted from: http://en.wikipedia.org/ (Accessed 2008)
Bush burning in Uganda
During every dry season, cattle keepers in Nakasongola district indiscriminately set fires on the vegetation so that it sprouts.
The fires destroy habitats for the animals that live underneath the inselbergs. Those that escape hide in burrows, but birds’ nests do not survive the fires.
‘Bush burning is the major environmental abuse in the district,’ says Joseph Kimeze, a 28-year-old herdsman from Wajjala, Nakasongola. He adds that the prolonged dry periods are always accompanied by indiscriminate bush burning.
‘We do not all burn the bushes for fun, but we want fresh grass for our animals,’ Kimeze says. ‘Once we burn the old vegetation, the pastures regenerate … [and] are good for grazing.’
Kimeze and others do not realise that by burning bush, they are exposing the already harsh terrain to more destruction.
Nakasongola has about 20 inselbergs scattered in Wajjala, Sasira and Kasozi parishes. They stand out at around 1,097 metres above sea level.
An inselberg is a German word meaning a rocky mountain. It is a unique rocky outcrop formed as a result of wind erosion. In Uganda, inselbergs are also found in Karamoja. They are usually endowed with peculiar ecological diversity.
The topography of Nakasongola district is generally flat and is characterised by minimal altitudinal differences, with poor drainage in the wide flat valleys and shores of Lake Kyoga. For the last two years, Nakasongola has been fighting fires, which have led to changes in species diversity.
Heat from the fire kills seeds scattered on the surface. There is a decrease in size of some perennial grasses. Fire changes the species of plants and animals that live in that ecosystem. There is soil compaction, soil erosion and reduced soil fertility, which are all signs of land degradation attributed to bush fires. The annual rainfall is less than 1,000 mm. The district experiences a high evaporation rate.
Jamesbond Kunobere, the Nakasongola district environment officer, says the cyclic nature of fires in the district is an evidence of increasing climatic instability and change in vegetation.
‘Because of the frequent fires, tall vegetation has given way to shrubs like Lantana camara and Acacia Senegalese. These species suppress the production of accessible and palatable forage.’ Kunobere says two of the most affected inselbergs were reafforested with pine in 2003. A lot of sensitisation has been carried out to discourage bush burning. ‘The district has plans to reafforest the remaining Wakibombo and Isungira inselbergs. The district needs more funding to afforest the remaining inselbergs to improve the catchment area.’
Kunobera says during the 2003 World Environment Day, the National Environmental Management Authority (NEMA) gave Nakasongola enough pine seedlings for two acres.
Other semi-arid areas of Uganda found in the cattle corridor of Kumi, Soroti, Katakwi, Moroto and Nakapiripirit districts also experience extensive bush burning and wind erosion during the dry season.
In response to the effects of drought, the district and development partners are promoting sustainable agricultural practices.
Water is being made available in the form of valley dams, in addition to promoting rainwater harvesting.
Different community and non-governmental based organisations are working hand-in-hand with the local government to promote tree-planting programmes.
Adapted from: The New Vision http://www.dip.go.ug/ english/ news (Accessed 2008)
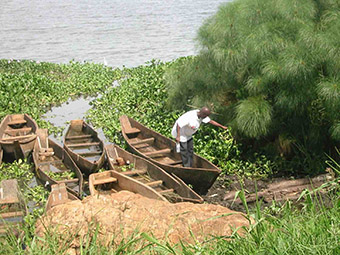
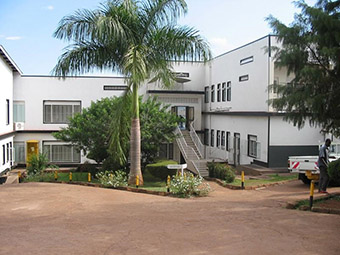
Resource 4: Different environments
![]() Teacher resource for planning or adapting to use with pupils
Teacher resource for planning or adapting to use with pupils
Acknowledgements
Grateful acknowledgement is made to the following sources:
Photographs and images
Fishing boats: http://www.sln.org.uk (Accessed 2008)
Hotel: http://www.pbase.com (Accessed 2008)
Rural Uganda: http://www.drake.edu/ news/ release/ images/ 20061010-01.jpg (Accessed 2008)
Urban Uganda: http://www.lam-s-sudan.org/ images/ Entering%20Kampala.jpg (Accessed 2008)
Text
Resource 3: Bush burning: Adapted from http://en.wikipedia.org/ (Accessed 2008)
Resource 3: Bush burning in Uganda: Adapted from The New Vision http://www.dip.go.ug/ english/ news (Accessed 2008)
Every effort has been made to contact copyright holders. If any have been inadvertently overlooked the publishers will be pleased to make the necessary arrangements at the first opportunity.
Section 3 : Investigating weather
Key Focus Question: How can you make the study of the weather more open-ended and activity based?
Keywords: problem solving; weather; group work; patterns; observations; brainstorming
Learning Outcomes
By the end of this section, you will have:
- developed pupils’ skills of observation, data collection and interpretation of weather patterns in order to predict and forecast the weather;
- used group work to encourage cooperative learning as pupils design and construct weather instruments.
Introduction
For many people, watching the weather is an important part of everyday life. For example, farmers need to be able to judge the best time to sow their crops and fishermen need to know when to set out to sea. The weather patterns are different across Sub-Saharan Africa and rainy seasons and sunny periods will vary. Encouraging your pupils to observe the changes and patterns – however small – will help them understand the link between the weather, people and their environment.
In this section, you will use group work to develop pupils’ cooperative and thinking skills. You will plan practical activities to encourage interaction between pupils.
1. Working in groups to explore the weather
There are many beliefs, poems and rhymes about the weather in different parts of the world, including Africa. Using these as a starting point to explore weather will stimulate your pupils’ interest in observing the local weather and encourage them to be more sensitive and responsive to the changes in their natural environment. For example, in Nigeria, the Yoruba people are said to have believed that lightning was a storm spirit who carried powerful magic. That spirit scolded them with fiery bolts of light shot from his mouth. Case Study 1 shows one way of using local sayings with your pupils.
When teaching about the weather, you have a rich resource outside the classroom. By asking your pupils to collect weather data and look for patterns in the data in Activity 1, you will be encouraging them to develop their skills of observation.
Case Study 1: Using folklore to discuss the weather
Mrs Ogun from Abeokuta in Nigeria wanted to teach her pupils about the weather and decided to begin by asking them to tell her what they already knew. The day before she started the topic, she asked her pupils to ask their families and carers for any rhymes and poems they knew about the weather and bring them to school.
The next day, she asked two or three pupils to recite or sing the rhymes they had found. She also wrote on the chalkboard a few folklores about the weather from other parts of Africa (see Resource 1: African folklore relating to weather, which includes the scientific explanation) and discussed the meaning of them, but not the scientific explanation.
Next, she asked why they thought there were so many different folklores about the weather. Her pupils suggested that people long ago did not understand why the weather changed and so created folklores to explain them;
Mrs Ogun asked the class why they thought it was necessary to understand weather patterns. They suggested the following ideas, which she wrote on the board:
- To know what clothes to wear.
- For farmers to know weather patterns, so they could plant their seeds, and harvest at the right times of the year.
- To plan for any disasters that might occur as a result of bad weather.
She asked the class to work in groups of six and, using any one of the ideas on the chalkboard, to create a little story or folklore about the weather. Some pupils wrote their stories and others decided to act them for the rest of the class.
Activity 1: Weather charts, forecasting and change
- Ask each pupil to record daily (twice a day) weather observations for five consecutive days for temperature, sky conditions, rainfall and wind speed. (See Resource 2: A weather observation chart.) Pupils will need to spend between five and ten minutes at the same time each day outside making these observations on their charts. With younger pupils, you may want to give them some words to help them describe the weather e.g. strong wind, breeze, calm.
- Show your pupils how to read a thermometer to record temperature. (If you do not have a thermometer, ask them to estimate the weather, e.g. very hot, warm, etc.)
- At the end of the week, ask them to work in groups of six and compare the data collected. How much do they agree? Are there any variations? If so, why do they think this is? (See Key Resource: Using group work in your classroom.)
- Next, ask them to predict the weather for the following week and record their predictions for display in the classroom. Ask them to include reasons for their predictions.
- Record the next week’s weather as before.
- At the end of the week, review the actual weather against their predictions. Discuss with them how accurate they were and how they could make their predictions more accurate.
2. Observing and recording the weather
The science of studying weather is called meteorology. Meteorologists measure temperature, rainfall, air pressure, wind, humidity, and so on. By looking at the data and patterns they find, they make predictions and forecasts about what the weather will do in the future. This is important for giving people advance notice of severe weather such as floods and hurricanes and is extremely helpful to many other people – farmers, for example.
This part explores how using local experts can stimulate pupils’ interest and show ways of – and the relevance of – studying the weather. Activity 2 uses problem solving as a strategy to help pupils think more deeply about weather.
If you live in an area with regular rainfall, you could also ask pupils to develop a device to measure the rainfall each day in a two-week period.
Case Study 2: A visit to a weather station
Mrs Mweemba was fortunate in that there was a local weather station a few kilometres away from the school and she was able to organise a field trip. A few weeks before the trip, having obtained permission from the head teacher and informed the parents, she phoned the weather station to arrange a date and explain what she would like to happen. The deputy in charge agreed to guide the class around the station, to show them the instruments and explain what they were used for. Mrs Mweemba explained that the class had just started learning about weather and had very little prior knowledge of weather instruments.
Before the visit, Mrs Mweemba told her pupils what they were expected to do, what they needed to take with them and what they would need to do to ensure their safety throughout the visit.
At the station, pupils saw various weather instruments, including a barometer, a rain gauge and wind scale tools. Mrs Mweemba encouraged her pupils to ask many questions. With the help of the station officer, they tried using some of the instruments. They were also able to look at some of the records and could begin to see patterns in the weather. The deputy gave Mrs Mweemba a copy of some data to use with her class.
Back in the classroom, Mrs Mweemba asked each group of six pupils to think about how they could set up their own smaller weather station and how they could organise taking observations regularly. The groups fed back and then the class drew up an action plan.
The lesson ended with a promise from the class to involve their community in the establishment of their weather station.
Activity 2: Measuring the wind
In advance make a wind vane and an anemometer. This can be done with simple materials and you could ask for help from someone in the community who is good with their hands. It is worthwhile spending some time on this as these teaching aids could be used by other teachers and in the years to come (see Resource 3: Measuring wind direction and speed for instructions on how to make these instruments).
- Pose a problem for your pupils to solve. Ask them: ‘Do you think that the wind is the same everywhere around the school grounds? How could you find out?’
- Let them talk in their groups about ways to investigate this.
- Go around and listen to their ideas, asking questions where appropriate. Use questions like: ‘Where could you stand to feel the maximum wind?’ ‘Where would you stand to feel the minimum wind?’
- Make sure each group prepares a plan. This should include the use of different sites around the school.
- When each group plan is ready, let them carry out the investigation. You could send them out one group at a time. They should record their observations in a chart (see Resource 4: Observational chart) for an example).
- Discuss the results with the whole class:
- Which parts of the school do they think are most windy?
- Which part of the school is least windy?
- Why are there differences between these places?
Ask your pupils how they could see if this is true all year round.
3. Using stories to think about the impact of the weather
While it is possible to collect weather data in the classroom for a certain period of time, it is less easy to explore the effects of weather over a longer period. ‘Climate’ describes the weather patterns at a place over a period of years.
One way to help pupils explore the longer-term effects of weather could be to use stories, as Case Study 3 does. Here, pupils are able to think about the wider issues. What would happen if certain weather situations persisted? The Key Activity uses another approach. Pupils are encouraged to think about the problems weather can bring.
Case Study 3: Looking at the effects of weather on the lives of different people
Mrs Mweemba was keen to explore with her Grade 5 pupils how weather could affect people and resources in different ways. She began by telling them a story about drought (see Resource 5: Kalulu story). Next, she decided to tell the class the story in Resource 6: How weather affected Mr Mubita and his family.
Having read out the story to her pupils, Mrs Mweemba organised them into their discussion groups. She then gave them a series of questions.
- What were the different types of weather experienced by Mr Mubita’s family?
- How many times did the weather change in the story?
- How did the farmer, Mr Mubita, feel about the sudden outbreak of rain?
- What impact did the rain have on Mr Mubita’s crops?
- What impact do you think a lack of rain in his area would have on Mr Mubita and his family?
- How would you feel if you experienced each of the weather types stated in this story?
Mrs Mweemba asked one pupil in each group to write down the main points from their discussion and another to feed back their ideas to the whole class at the end of the discussion time.
Key Activity: Exploring extreme weather
- Brainstorm with your pupils examples of extreme weather, e.g. hurricanes, droughts, floods, freezing temperatures, high winds, heat waves.
- Discuss with the class what happens in each case. Some pupils may know a lot about some of the examples.
- Divide your class into groups. Ask each group to take one example of extreme weather.
- They should then try to think about all the problems this weather situation would bring and write a short story to show how life would be affected.
- Give your pupils plenty of time and encouragement to devise the story. Ask questions such as ‘What would happen to the water supply?’ ‘Would you have fuel? Food?’
Resource 1: African folklore relating to weather – a teacher resource
![]() Teacher resource for planning or adapting to use with pupils
Teacher resource for planning or adapting to use with pupils
| Country or region and type of weather | Myth | Scientific explanation |
|---|---|---|
| Africa: Lightning | Folklore: People hit by lightning were thought by many ancient Africans to have incurred the anger of the gods. Lightning bolts were considered bolts of justice. | Science: Lightning occurs when electricity travels between areas of opposite electrical charge within a cloud, between clouds, or between a cloud and the ground. Lightning bolts between cloud and ground (‘bolts of justice’) start with electrons (negatively charged particles) zigzagging downwards from the cloud, drawing a streamer of positively charged ions up from the ground. When they meet, an intense wave of positive charge travels upwards at about 96,000 km (about 60,000 miles) per second! This process may repeat several times in less than half a second, making the lightning seem to flicker. |
Ethiopia: Wind | Folklore: Many people believed evil spirits dwelt in whirlwinds, so they would chase the wind with knives. | Science: The wind is caused by a complex collection of forces. Warming and cooling of the air causes changes in density, or pressure. Air tends to move from areas of high pressure to areas of low pressure. Even very small differences in pressure from one area to another can cause very strong winds. Friction from obstacles like trees, mountains and buildings affect winds, slowing them down, or creating updrafts, bottlenecks and so on. Also, Earth's rotation creates what is called the Coriolis effect, causing winds north of the equator to tend to curve to the right and winds south of the equator to curve to the left. |
Egypt: Sun | Folklore: Ancient Egyptians, boating on the Nile, believed that the sun sailed across the sky in a shallow boat. | Science: While the sun may seem to be sailing across the sky, it is we who are moving on Earth's surface as Earth rotates on its axis and orbits the sun. One rotation takes 23 hours 56 minutes, or one day, and one orbit takes 365.26 days, or one calendar year. |
Kenya: Thunder | Folklore: The god of thunder, Mkunga Mburu, is believed by some to travel the heavens on a huge black bull with a spear in each hand, ready to hurl them at the clouds to make the loud noises. | Science: The noise we call ‘thunder’ – a distinct crack, loud clap, or gentle rumbling – is caused when air that has been heated to more than 43,000 °F along a lightning stroke expands and then suddenly cools and contracts when the lightning stops. |
Nigeria: Lightning | Folklore: The Yoruba are said to have believed that lightning was a storm spirit who carried powerful magic. That spirit scolded them with fiery bolts of light shot from his mouth. He was believed to punish people for their wrongdoings by destroying things on the ground or by hitting someone with his bolts of light. | Science: Lightning occurs when electricity travels between areas of opposite electrical charge within a cloud, between clouds, or between a cloud and the ground. Lightning bolts between cloud and ground (‘bolts of justice’) start with electrons (negatively charged particles) zigzagging downwards from the cloud, drawing a streamer of positively charged ions up from the ground. When they meet, an intense wave of positive charge travels upwards at about 96,000 km (about 60,000 miles) per second! This process may repeat several times in less than half a second, making the lightning seem to flicker. |
Southeast Africa: Rainbows | Folklore: Many of the ancient Zulus thought of rainbows as snakes that drank from pools of water on the ground. According to legend, a rainbow would inhabit whatever pool it was drinking from and devour anyone who happened to be bathing there. | Science: Rainbows are by-products of rain. Raindrops act as tiny prisms when lit by the sun, bending light and separating it into its different colours. A rainbow's arch appears to dip down from the sky to meet Earth's surface. To see a rainbow, you must be standing with the sun behind you, looking at rain falling in another part of the sky. A rainbow may mean the rain is nearly over, since the sun must be peeping through the clouds to make the rainbow appear. |
Resource 2: A weather observation chart
![]() Pupil use
Pupil use
| Week 1: Actuals | ||||||
|---|---|---|---|---|---|---|
| Time of Day | Measurement | Day 1 | Day 2 | Day 3 | Day 4 | Day 5 |
| Morning | Temperature Sky conditions Rainfall Wind speed | |||||
| Afternoon | Temperature Sky conditions Rainfall Wind speed | |||||
Resource 3: Measuring wind direction and speed
![]() Teacher resource for planning or adapting to use with pupils
Teacher resource for planning or adapting to use with pupils
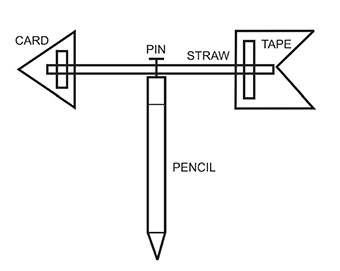
Making a wind vane to measure the direction of the wind
You will need:
- a straight pin
- a piece of card
- a straw
- scissors
- pencil (with eraser)
- tape
Do this:
- Cut the point and tail of an arrow out of a piece of card.
- Tape them onto the ends of the straw.
- Push the pin through the middle of the straw.
- Stick the pin into the eraser of the pencil. Make sure the straw can turn freely.
Making an anemometer to measure the speed of the wind
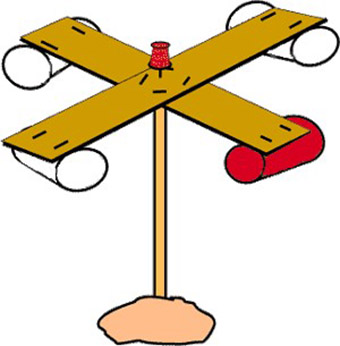
An anemometer is a device that tells you how fast the wind is blowing. A real one will be able to measure this accurately. Your model can give you an idea of how fast the wind is blowing, but will not be as accurate as a manufactured anemometer.
You will need:
- scissors
- four small paper cups (e.g. drinking cups)
- a marking pen
- two strips of stiff, corrugated cardboard – the same length
- a drawing pin
- a stick
- some clay
- a watch that shows seconds
Do this:
- Cut the rolled edges off the paper cups to make them lighter.
- Colour the outside of one cup with the marking pen so you can see it each time it spins around.
- Cross the cardboard strips so they make a plus (+) sign. Stick them together and mark the middle.
- Stick or pin the cross to the top of your stick through the middle point.
- Blow on the cups to make sure the cardboard spins around freely on the pin.
- Place the modelling clay on a surface outside, such as a wooden fence, a wall or a rock. Stick the sharpened end of the pencil into the clay so it stands up straight.
To measure wind speed:
Using the watch, count the number of times the coloured cup spins around in one minute. You are measuring the wind speed in revolutions (turns) per minute. Weather forecasters’ anemometers convert this speed into miles per hour (or kilometres per hour).
Resource 4: Observational chart
![]() Pupil use
Pupil use
| Site 1 | Site 2 | Site 3 | Site 4 | Site 5 | |
| Wind speed | |||||
| Wind direction |
Resource 5: Kalulu story
![]() Teacher resource for planning or adapting to use with pupils
Teacher resource for planning or adapting to use with pupils
This is a traditional story from Eastern Province.
Once upon a time, there was a terrible drought over all the country. No rain had fallen for many months, and the animals were likely to die of thirst. All the pools and watercourses were dried up. So the lion called the beasts together to the dry bed of a river, and suggested that they should all stamp on the sand and see whether they could not bring out some water. The elephant began, and stamped his hardest, but produced no result, except a choking cloud of dust. Then the rhinoceros tried, with no better success; then the buffalo; then the rest in turn – still nothing but dust, dust! At the beginning of the proceedings the elephant had sent to call Kalulu, the hare, but he said, ‘I don't want to come.’
Now there was no one left but the tortoise, whom they all had overlooked on account of his insignificance. He came forward and began to stamp; the onlookers laughed and jeered. But, behold, before long there appeared a damp spot in the river-bed. And the rhinoceros, enraged that a little thing like that should succeed where he had failed, tossed him up and dashed him against a rock, so that his shell was broken into a hundred pieces. While he sat, picking up the fragments and painfully sticking them together, the rhinoceros went on stamping, but the damp sand quickly disappeared, and clouds of dust rose, as before. The others repeated their vain efforts, till at last the elephant said, ‘Let the tortoise come and try.’ Before he had been at work more than a few minutes the water gushed out and filled the well, which had gradually been excavated by their combined efforts.
The animals then passed a unanimous resolution that the hare, who had refused to share in the work, should not be allowed to take any of the water. Knowing his character, they assumed that he would try to do so, and agreed to take turns in keeping watch over the well.
The hyena took the first watch and, after an hour or two, saw the hare coming along with two calabashes, one empty and one full of honey. He called out a greeting to the hyena, who answered, and asked him what he was doing there. The hyena replied, ‘I am guarding the well because of you, that you may not drink water here.’ ‘Oh,’ said the hare, ‘I don't want any of your water; it is muddy and bitter. I have much nicer water here.’ The hyena, his curiosity roused, asked to taste the wonderful water, and Kalulu handed him a stalk of grass which he had dipped in the honey. ‘Oh, indeed, it is sweet! Just let me have some more!’
I can't do that unless you let me tie you up to the tree; this water is strong enough to knock you over if you are not tied.’ The hyena had so great a longing for the sweet drink that he readily consented; the hare tied him up so tightly that he could not move, went on to the well, and filled his calabash; then he jumped in, splashed about to his heart's content, and finally departed laughing.
In the morning, the animals came and found the hyena tied to the tree. ‘Why, Hyena, who has done this to you?’ ‘A great host of strong men came in the middle of the night, seized me, and tied me up.’ The lion said, ‘No such thing! Of course it was the hare, all by himself.’ The lion took his turn at watching that night; but, strange to say, he fell a victim to the same trick. Unable to resist the lure of the honey, he was ignominiously tied to the tree.
There they found him next morning, and the hyena, true to his currish nature, sneered: ‘So it was many men who tied you up, Lion?’ The lion replied, with quiet dignity: ‘You need not talk; he would be too much for any of us.’
The elephant then volunteered to keep watch, but with no better success; then the rest of the animals, each in his turn, only to be defeated by one trick or another.
At last the tortoise came forward, saying, ‘I am going to catch that one who is in the, habit of binding people!’ The others began to jeer: ‘Nonsense! Seeing how he has outwitted us, the elders, what can you do – a little one like you? ‘ But the elephant took his part, and said that he should be allowed to try.
That night, the tortoise plunged into the well, and sat quite still at the bottom. When the hare came along and saw no one guarding the well, he sat down beside it, ate his honey, filled both his calabashes and went to bathe. But as he stepped into the water, he found his feet caught. The tortoise had tied the hare’s feet together, so he couldn’t run away!
The tortoise called the other animals, and they carried him off to the lion for judgement. The lion told the hare that in the future, he would only be allowed water if he had helped collect it. The hare apologized to all the animals, and offered to share his honey as a gesture of goodwill.
Adapted from original source: http://www.sacred-texts.com/ afr/ mlb/ mlb19.htm (Accessed 2008)
Resource 6: How weather affected Mr Mubita and his family
![]() Teacher resource for planning or adapting to use with pupils
Teacher resource for planning or adapting to use with pupils
Mr Mubita is a farmer in Choma. He has a wife and six children.
One day, Mr Mubita ’s family woke up to bright and sunny weather. On their way to the farm, the youngest child was complaining about the biting sun, and had to remove his shirt because of the heat.
In the afternoon, when everybody was working on the farm, rain started to fall. Everybody was soaked in the rainwater and had to stop work until the rain stopped about one hour later. Meanwhile, the youngest child was enjoying the change in the weather and running around the farmland playing with the water on the leaves of plants.
After the rain, the children suddenly realised that the weather had become cool. The cool weather encouraged the family to work for another two hours before they finally left for home.
Mr Mubita was not expecting rain that day and so was not happy that the rain disorganised some of his plans for the day on the farm, but thanked God that the rain would make his crops do well.
That night, the weather became very cold and the family had to make a huge fire and sit round it in order to keep warm before they went to bed.
Acknowledgements
Grateful acknowledgement is made to the following sources:
Photographs and images
Wind vane diagram: http://www.galaxy.net/ ~k12 (Accessed 2008)
Text
Resource 1: African folklore relating to weather – a teacher resource: Adapted from original source http://scijinks.jpl.nasa.gov/ weather/ (Accessed 2008)
Resource 5: Kalulu story: Adapted from original source: http://www.sacred-texts.com/ afr/ mlb/ mlb19.htm (Accessed 2008)
Every effort has been made to contact copyright holders. If any have been inadvertently overlooked the publishers will be pleased to make the necessary arrangements at the first opportunity.
Section 4 : Investigating the changing environment
Key Focus Question: How can you raise pupils’ awareness of the issues of resources and pollution in the environment?
Keywords: environment; group investigations; fieldwork; resources; global warming; pollution
Learning Outcomes
By the end of this section, you will have:
- used different strategies to raise awareness of pollution and climate change;
- used an investigative approach to help pupils understand the effects of pollution;
- used group work and simple fieldwork to develop young pupils’ understanding of local resources.
Introduction
Developing an appreciation in your pupils of their local environment and the need to preserve and protect it is important if they are to understand their responsibility to care for their environment as a whole. This section aims to help you to structure lessons and activities that will link care of the local environment to worldwide problems of pollution and weather change. To support your pupils, you should read about environmental issues as this will provide ideas for lessons and keep you up to date on key ideas.
By investigating issues such as pollution in real-life situations and by conducting experiments, your pupils will enjoy learning, as they are actively involved in activities that have meaning for them.
1. Exploring local plants
What do your pupils know about local resources? This part looks at raising your pupils’ awareness of natural resources – particularly plant resources – that are found in their local area.
A good way to do this is to bring in local experts to talk, as in Case Study 1. Experts bring a specialised knowledge from which both you and your pupils can learn. Using experts also makes learning exciting because it is different.
In Activity 1, you heighten your pupils’ awareness of their local environment through field trips in which they are actively involved in gathering data. (If you are working in an urban area, or it is not safe to let your pupils walk out near the school, you could change the activity to look at food in the market. Ask pupils to each name five foods from plants and to try to find out where the food was grown.)
Case Study 1: Exploring important local resources
Mrs Hlungwane teaches in Hoxane Primary School in Limpopo Province in South Africa and wants her pupils to develop their understanding of their own environment and its natural resources. She has read about local expertise and knowledge about medicinal plants, and thinks looking at local plants, including those used for healing, might be a good way to extend the idea of resources from Section 2. She decides to contact the seven local plant experts who live near the school and invites them to come and be interviewed by her pupils on a set date. They agree to bring some of the important plants growing in the area to show the pupils.
Mrs Hlungwane divides the class into seven groups, each to interview one of the visitors. She discusses with her pupils the importance of showing respect. Together they draw up a list of questions to ask. She suggests that they find out the following three things about each plant:
- what it is called;
- where it grows around the village;
- its food or medicinal properties.
Afterwards, having thanked their visitors and said farewell to them, each group reports back and Mrs Hlungwane writes this information on the chalkboard in three columns:
- Plants that I find near the school
- Is this plant cultivated?
- Do we use this plant? If yes, how do we use it?
(See Resource 1: Plant handout).
Next, they discuss how to protect these plants, as they are an important resource for the community. They decide that learning to identify the plants so that they do not pick them is important. Also, that they should not trample them or damage the locality where they grow.
Finally, Mrs Hlungwane asks the pupils, in groups, to make posters of the main plants, showing the uses of each plant and where it grows.
Activity 1: Finding out about local plant resources
- The table will help pupils focus on exactly what you want them to do.
- Ask each pupil to draw a table to record their observations. Draw the table on the board for them to copy.

- Send them out in pairs into the area surrounding the school for say 30 minutes and ask them to fill in at least five lines of the table. Walk around with your pupils and support them as they work.
- If pupils don’t know the names of plants, encourage them to describe and/or draw them for later identification.
- When they return to class, draw a big version of the table on the board.
- Go around the class and fill in all the pupils’ findings on the big table.
- Ask the pupils what they have discovered from today’s lesson about the natural environment and the kinds of resources it provides to the community.
2. Working in groups to investigate pollution
Because our natural environment can provide us with our livelihoods, you need to encourage your pupils to think about how to preserve the environment so that it continues to provide what we need.
To start your pupils thinking about the damage that is being done to the environment, you can actually show them the harmful effects of pollution. This is what the teacher in Case Study 2 does with her class. Activity 2 shows another way – conducting an experiment to show the effects of polluted water or lack of water on the growth of plants. Once your pupils can see the damage done by pollution, they will be in a better position to develop positive attitudes towards protecting and caring for the environment.
Case Study 2: Using a field trip to explore pollution
Mamadou Tanle, the Class 6 teacher in the Wa Catholic School, wants to develop her pupils’ awareness of the harmful effects of water pollution. (See Resource 2: Water issuesfor background information.) She realises that she can do this by taking them on a field trip to the local river, which is littered with rubbish.
At the river, she asks them to make a list of everything they can find that is polluting the water. Once the pupils have done this, they sit on the riverbank and Mamadou asks them a series of questions to encourage them to think beyond what they see. For example, she asks them: ‘How many people rely on this river as a water supply?’ ‘What would happen to all those people if the water from the river is contaminated? ‘What do they use this water for?’
Back in class, she asks each group to develop a strategy to help clean up the river and its surroundings. As she moves around, listening and helping, she is excited by the plans that they are coming up with. Ideas include involving the community and the school to combat pollution, not only at the river, but in other areas of the village as well. Mamadou feels she has achieved her aim of developing an awareness of the harmful effects of water pollution, and is pleased that she has encouraged an attitude of community-mindedness in her pupils as well.
Note: When planning field trips a teacher needs to be conscious of the culture/religion of the immediate environment. Field trips should not be undertaken to sacred places within the community if there is a taboo. In areas where pupils have to attend the secular schools and Koranic schools, the teacher must ensure that the pupils come back in good time to enable them to attend the Koranic schools.
Activity 2: An experiment on pollution
- To refresh or develop your own knowledge about water issues, read Resource 2. Try this activity yourself beforehand so you can help your pupils better.
- Ask your pupils to set up the experiment, which will run over five days, described in Resource 3: Maize seed experiment.
- Then ask each pupil to write down their predictions of what will happen to each seed over the five days.
- Ask them to check the progress of the three maize seeds every day.
- Pupils should make a formal record of their daily observations. You should also participate by making and recording observations of your own.
- On the fifth day, hold a detailed discussion with pupils about whether or not their predictions have been fulfilled. What has happened to each maize seed?
- Discuss the implications of the experiment in terms of pollution. Can you and your pupils think of other experiments to do around pollution?
3. Using newspaper articles to stimulate discussion
Most pupils are interested in what is happening around them and using local resources such as newspapers or radio can help to enhance your lessons.
The purpose of the Key Activity is to encourage pupils to think about how global weather changes can affect their local context, and to introduce them to the idea of global warming as a possible explanation of changes in the weather. In Case Study 3, the teacher used local news items as a starting point for teaching about the water cycle.
Once pupils are able to see the links between events, you are beginning to develop their critical thinking skills. Such insights will help them to make sense of the ever-changing world that they live in.
Case Study 3: Using local newspapers to introduce the water cycle
There had been lots of discussion about water in the local newspapers over the past week. Water restrictions had been introduced. The Kanji dam was running dry. There was crop failure in the north of the country.
Idrissu Mahama saw the opportunity to discuss issues about water supply with his class. He wrote this question on the board: ‘Where does all the rain go when the ground dries?’ and he then asked each group of pupils to talk about this for ten minutes. During this time, he went around the groups and encouraged everyone in each group to contribute their ideas.
Then Idrissu gathered his class round him and asked them to take turns to share their ideas. Together the class build up the understanding of the water cycle (see Resource 4: The water cycle).
Idrissu finished by drawing a diagram of the water cycle on the board and asking pupils to copy the diagram and label it.
Key Activity: Global warming
Read Resource 5: Global warming articles before the lesson.
Divide the class into small groups and then read the articles to the class or give each group a copy to read together.
Explain to your pupils about climate related rises in sea level (see Resource 6: Evidence of global warming in Ghana).
Ask each group to produce a poster or a short play to answer the following:
- What causes global warming?
- What effects will global warming have on the environment?
- What could we do to slow down global warming?
How will you ask pupils to evaluate their work?
You may want to share your pupils’ work on global warming with the school in an assembly.
Resource 1: Plant handout
![]() Pupil use
Pupil use
| PLANT SURVEY | ||
|---|---|---|
| Plants that I find near the school | Is this plant cultivated? | Do we use this plant? If yes, how do we use it? |
| Maize | Yes | Food |
| Thorn tree | No | A handle for a hoe |
| Rose | Yes | No |
| Mango Tree | Yes | Food |
| Eucalyptus Tree | Yes | Decorating |
| Nim Tree | No | Medicinal |
| Acacia | Yes | Firewood and charcoal |
| ||
| ||
| ||
| ||
Resource 2: Water issues
![]() Background information / subject knowledge for teacher
Background information / subject knowledge for teacher

The following text is adapted from ‘The looming national dilemma of water crisis in peri-urban areas in Ghana’ by Dr Kwasi Nsiah-Gyabaah. Details of the project can be found at: and can be found at: http://www.gwcl.com.gh/pgs/kumasi.php.
The water crisis
Although Ghana has abundant water resources, the country experiences chronic water shortages due to poor distribution of rainfall, prolonged drought and poor management of water resources. Throughout the country, destruction of watersheds, contamination, and overexploitation of underground water resources pose a serious challenge to agriculture, industrial development and the health of people in the urban and peri-urban areas.
Several studies show that exploited aquifers in the urban and peri-urban areas are already showing increasing presence of iron and nitrate pollution (DFID, 2000), and drinking water sources are also polluted through inappropriate disposal of domestic wastes especially human excreta. The three major problems affecting water resources in the urban areas with large population concentrations include:
- overexploitation;
- cutting down of trees in the watershed;
- misuse of water and wastage through bust pipes;
- pollution through agriculture and domestic waste disposal systems.
The survey revealed that the city depended on the surrounding region or peri-urban area to act as sink and disposal sites for domestic and industrial wastes. The peri-urban areas were not only affected by air pollution but also suffered from unplanned disposal of polluted water and illegal dumping of other wastes, especially night soil generated in the city. Water pollution negatively affected agricultural productivity and compromised the safety of fresh farm produce.
With rapid increase in the number of vehicles, vehicle repair shops and car washing bays, oil and water pollution was assuming an important significance as an environmental problem in the peri-urban area.
In 1977, a research project that was carried out to examine the effects of the growth of Kumasi on natural resources management observed that the main water supply problems related to:
- depletion of water resources through wanton destruction of trees at watersheds;
- contamination from hospital waste;
- degradation of watersheds through bush fires, housing encroachment, sand winning etc.;
- bacteriological contamination of rivers, streams and aquifers through inappropriate waste disposal systems;
- urban and rural run-off, soil erosion and siltation of water resources;
- pollution of rivers and streams by nitrates from fertilisers and traditional organic waste was increasingly causing serious environmental and health problems in the peri-urban area of Kumasi;
- the degradation of watersheds caused by human activities, especially housing development and agriculture, was becoming intensive, water resources were being altered, and little attention was given to conservation practices.
The problems related to water quality were:
- high turbidity levels and sediments within important basins such as the Sisa and Oda;
- increasing water resources pollution caused mainly by domestic wastes, industries, abattoirs, garages;
- pollution caused by increasing use of chemical fertilisers and toxic substances, especially in horticultural crop production for the urban market. Iron and arsenic pollution and heavy metal and other dangerous substances were threatening aquatic and human life.
In Kumasi, the Barekese Dam, a major source of water supply to the Kumasi metropolis, the sub-urban and rural areas, is being threatened by villagers' cutting trees and farming in its catchment areas. The trees that protect and feed the system are being destroyed. In Accra, some quarrying, negative agricultural and fishing practices, illegal physical development, and agricultural activities have put pressure on the Densu river, which feeds the Weija Dam, the source of water for the western area of Accra metropolis. Important streams that feed the Densu river have also been polluted and destroyed by these negative acts.
Bushfires, in addition to agriculture, are the major driving forces behind watershed degradation. The activities of vegetable crop farmers have been more devastating to water resources. Some farmers have been pumping water from the river to their farms, contributing to the dying up the river. According to available statistics, daily water production in Abesim had reduced from the original 1. 6 million gallons to 534,000 gallons a day (Ghanaian Times, Tuesday, 20 February 2001, p. 2). The situation has brought acute water shortages to Sunyani, Acherensua, Abesim and other areas. At Sunyani, some people have been walking long distances to get water, some from polluted sources.
The time has come for government officials and the relevant institutions to stop talking about the destruction of our water bodies and to take direct and positive actions against those who destroy such important natural resources.
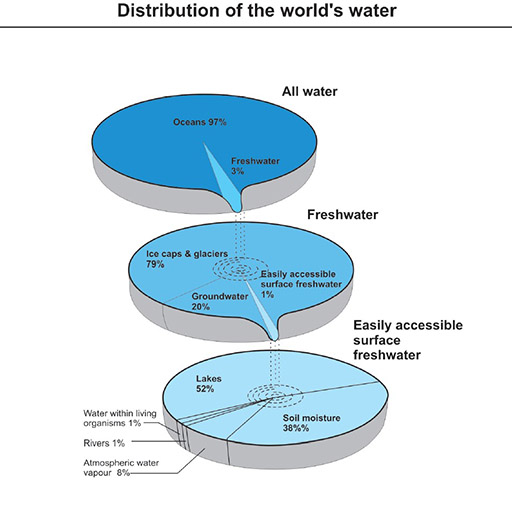
Resource 3: Maize seed experiment
![]() Teacher resource for planning or adapting to use with pupils
Teacher resource for planning or adapting to use with pupils
Equipment:
- three saucers, labelled 1, 2, 3
- soil
- three maize seeds
- water
- paraffin
Method:
On a Monday, set up three numbered saucers, each with its own maize seed buried in some soil.
Put water on saucers 1 and 2, and paraffin on saucer 3.
Each day for a week, put water on 1, do not put anything more on 2, put paraffin on 3.
Predictions:
What do you believe will happen to the seeds over the next five days?
___________________________________________________________
___________________________________________________________
___________________________________________________________
___________________________________________________________
Observations:
| 1 | 2 | 3 | |
| Day 1: | |||
| Day 2: | |||
| Day 3: | |||
| Day 4: | |||
| Day 5: |
Conclusions:
|
|
|
|
|
Resource 4: The water cycle
![]() Background information / subject knowledge for teacher
Background information / subject knowledge for teacher
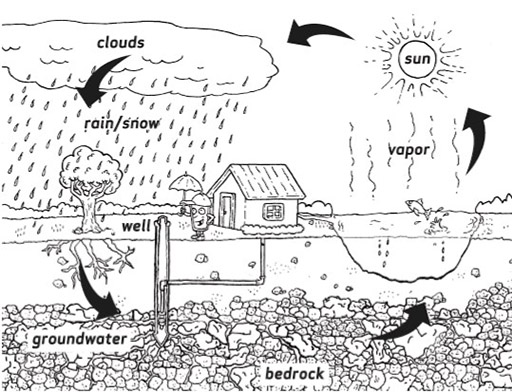
Resource 5: Global warming articles
![]() Background information / subject knowledge for teacher
Background information / subject knowledge for teacher
Article 1
Global warming is causing a set of changes to the Earth's climate, or long-term weather patterns, that varies from place to place. As the Earth spins each day, the new heat swirls with it, picking up moisture over the oceans, rising here, settling there. It is changing the rhythms of climate that all living things have come to rely upon.
What will we do to slow this warming? How will we cope with the changes we've already set into motion? While we struggle to figure it all out, the face of the Earth as we know it – coasts, forests, farms and snow-capped mountains – hangs in the balance.
Greenhouse effect
The ‘greenhouse effect’ is the warming that happens when certain gases in Earth's atmosphere trap heat. These gases let in light but, like the glass walls of a greenhouse, keep heat from escaping.
First, sunlight shines onto the Earth's surface, where it is absorbed and then radiates back into the atmosphere as heat. In the atmosphere, greenhouse gases (GHGs) trap some of this heat, and the rest escapes into space. The more GHGs are in the atmosphere, the more heat gets trapped.
Scientists have known about the greenhouse effect since 1824, and have calculated that the Earth would be much colder if it had no atmosphere. This greenhouse effect is what keeps the Earth's climate habitable. Without it, the Earth's surface would be an average of about 60 °F cooler. Humans can enhance the greenhouse effect by making carbon dioxide, a GHG.
Levels of GHGs have gone up and down over the Earth's history, but they have been fairly constant for the past few thousand years. Global average temperatures have stayed fairly constant over that time as well, until recently. Through the burning of fossil fuels and other GHG emissions, humans are enhancing the greenhouse effect and warming Earth.
Scientists often use the term ‘climate change’ instead of global warming. This is because as the Earth's average temperature climbs, winds and ocean currents move heat around the globe in ways that can cool some areas, warm others, and change the amount of rain and snow falling. As a result, the climate changes differently in different areas.
Aren’t temperature changes natural?
The average global temperature and concentrations of carbon dioxide (one of the major GHGs) have fluctuated on a cycle of hundreds of thousands of years as the Earth's position relative to the sun has varied. As a result, ice ages have come and gone.
However, for thousands of years now, emissions of GHGs to the atmosphere have been balanced out by GHGs that are naturally absorbed. As a result, GHG concentrations and temperature have been fairly stable. This stability has allowed human civilisation to develop within a consistent climate.
Occasionally, other factors briefly influence global temperatures. Volcanic eruptions, for example, emit particles that temporarily cool the Earth’s surface. But these have no lasting effect beyond a few years.
Now, humans have increased the amount of carbon dioxide in the atmosphere by more than a third since the industrial revolution. Changes this large have historically taken thousands of years, but are now happening over the course of decades.
Why is this a concern?
The rapid rise in GHGs is a problem because it is changing the climate faster than some living things may be able to adapt. Also, a new and more unpredictable climate poses unique challenges to all life.
Historically, Earth's climate has regularly shifted back and forth between temperatures like those we see today and temperatures cold enough that large sheets of ice covered much of North America and Europe. The difference between average global temperatures today and during those ice ages is only about 5 °C (9 °F), and these swings happen slowly, over hundreds of thousands of years.
Now, with concentrations of GHGs rising, Earth's remaining ice sheets (such as Greenland and Antarctica) are starting to melt too. The extra water could potentially raise sea levels significantly.
The climate can change in unexpected ways. In addition to sea levels rising, weather can become more extreme. This means more intense major storms, more rain followed by longer and drier droughts (a challenge for growing crops), changes in the ranges in which plants and animals can live, and loss of water supplies that have historically come from glaciers.
Scientists are already seeing some of these changes occurring more quickly than they had expected. 11 of the 12 hottest years since records became available occurred between 1995 and 2006.
Article 2
Article 2 looks at the impact of global warming in Africa.
The African continent is a rich mosaic of ecosystems, ranging from the snow and ice fields of Kilimanjaro to tropical rainforests to the Saharan desert.
Although it has the lowest per capita fossil energy use of any major world region, Africa may be the most vulnerable continent to climate change because widespread poverty limits countries’ capabilities to adapt.
Signs of a changing climate in Africa have already emerged: spreading disease and melting glaciers in the mountains, warming temperatures in drought-prone areas, and sea-level rise and coral bleaching along the coastlines.
The following show some related events:
- Cairo, Egypt – Warmest August on record, 1998. Temperatures reached 41 °C (105.8 °F) on August 6, 1998.
- Southern Africa – Warmest and driest decade on record, 1985–1995. Average temperature increased almost 0.56 °C (1 °F) over the past century.
- Senegal – Sea-level rise. Sea-level rise is causing the loss of coastal land at Rufisque, on the south coast of Senegal.
- Kenya – Mt Kenya’s largest glacier disappearing. 92% of the Lewis Glacier has melted in the past 100 years.
- World ocean – Warming water. The world ocean has experienced a net warming of 0.06 °C (0.11 °F) from the sea surface to a depth of 10,000 feet (3,000 m) over the past 35–45 years. More than half of the increase in heat content has occurred in the upper 1,000 feet (300 m), which has warmed by 0.31 °C (0.56 °F). Warming is occurring in all ocean basins and at much deeper depths than previously thought.
- Rwenzori Mountains, Uganda – Disappearing glaciers. Since the 1990s, glacier area has decreased by about 75%. The continent of Africa warmed by 0.5 °C (0.9 °F) during the past century, and the five warmest years in Africa have all occurred since 1988.
- Kenya – Deadly malaria outbreak, summer 1997. Hundreds of people died from malaria in the Kenyan highlands where the population had previously been unexposed.
- Tanzania – Malaria expands in mountains. Higher annual temperatures in the UsamabaraMountains have been linked to expanding malaria transmission.
- Indian Ocean, Persian Gulf, Seychelles Islands – Coral Reef bleaching. Includes Seychelles; Kenya; Reunion; Mauritius; Somalia; Madagascar; Maldives; Indonesia; Sri Lanka; Gulf of Thailand [Siam]; Andaman Islands; Malaysia; Oman; India; Cambodia.
- Kenya – Worst drought in 60 years, 2001. Over four million people were affected by a severely reduced harvest, weakened livestock and poor sanitary conditions.
- Lake Chad – Disappearing lake. The surface area of the lake has decreased from 9,650 sq mi (25,000 km2) in 1963 to 521 sq mi (1,350 km2) today. Modelling studies indicate the severe reduction results from a combination of reduced rainfall and increased demand for water for agricultural irrigation and other human needs.
- South Africa – Burning shores, January 2000. One of the driest Decembers on record and temperatures over 40 °C (104 °F) fuelled extensive fires along the coast in the Western Cape Province. The intensity of the fires was exacerbated by the presence of invasive vegetation species, some of which give off 300% more heat when burned compared to natural vegetation.
Adapted from original source: http://www.climatehotmap.org (Accessed 2008)
Resource 6: Evidence of global warming in Ghana
![]() Background information / subject knowledge for teacher
Background information / subject knowledge for teacher
The following symptoms provide evidence that global warming is occurring in Ghana:
- decreased rainfall, increased temperature and evaporation in dry areas;
- frequent spells of drought leading to water shortages;
- changes in planting dates of annual crops;
- increased fungal outbreaks and insect infestations due to changes in temperature and humidity;
- decrease in forest area and area under cultivation;
- decline in crop yield.
The potential effects of global warming in Ghana are:
- increased risk of food shortage and famine;
- reduction in ecosystem integrity and resilience, and decline in biodiversity;
- increased potential of malaria transmission, resulting in burdens on the country’s health care system.
Acknowledgements
Grateful acknowledgement is made to the following sources:
Photographs and images
Child carrying water across an open drain: http://images.google.com/ imgres?imgurl=http://www.grida.no/ aeo/ images/ img36s.jpg&imgrefurl (accessed 03/07/07)
Resource 4: The water cycle: http://www.epa.gov/ safewater (Accessed 2008)
Text
The water crisis: The text is adapted from The looming national dilemma of water crisis in peri-urban areas in Ghana and can be found at: http://www.gg.rhul.ac.uk/ kumasi/ Project_Related_Papers/ Cedar_IRNR/ Paper_7/ 3/ 3. html (Accessed 2008) or write to the author at:
Dr Kwasi Nsiah-Gyabaah Sunyani Polytechnic P O Box 206 Sunyani
Resource 5: Global warming articles: Adapted from original source: http://www.climatehotmap.org (Accessed 2008)
Every effort has been made to contact copyright holders. If any have been inadvertently overlooked the publishers will be pleased to make the necessary arrangements at the first opportunity.
Section 5 : Investigating other people and places
Key Focus Question: How can you help pupils explore similarities between different people and different places?
Keywords: research; cultures; places; environment
Learning Outcomes
By the end of this section, you will have:
- explored difference and similarity across different African contexts;
- used interactive strategies that allow the comparison of communities and practices across contexts;
- set up a focused classroom research activity using a range of resources.
Introduction
When teaching social studies, you are confronted all the time with questions of human diversity and commonality.
This section looks at how you can help your pupils compare lifestyle and economic practices across different contexts and cultures. This will help to develop important social studies thinking skills for you and your pupils.
1. Exploring similarities and differences between how people live and work
In primary school, older pupils are well able to work with the idea that objects in two different categories might still have a number of properties or features that make them similar. It is part of your role to help younger pupils understand this.
In this part, you are encouraged to develop this thinking in your pupils in relation to the tension between commonality and diversity among human beings. Case Study 1 and Activity 1 suggest ways of using group discussions to explore the different lifestyles of people in different places, but also to remind pupils of the shared humanity of people everywhere.
Case Study 1: Exploring differences between settlements
Ms Maryogo teaches geography in a remote rural village school in Tanzania. The inhabitants of the village are on the whole very poor. Mrs Maryogo wants to help her pupils to question the differences between communities and so sets them tasks that encourage them to think critically and discover truths about the world they live in for themselves.
Today, she has considered very carefully what she can expect her 11-year-old pupils to do and has prepared a series of images that reflect life in different communities (see Resource 1: Living in different communities).
In discussion in class, Ms Maryogo poses the following questions:
- What similarities are there between these places?
- What similarities are there between the people living in these places?
- What differences are there?
- Why are there these differences?
As pupils suggest answers to these questions, she encourages them to extend their ideas and think more deeply. She explores sensitively with them the feelings they have about living in their village.
(See also Key Resource: Using questioning to promote thinking.)
Activity 1: We are different, we are the same
Divide the class into groups of four or more. (If you are able to produce only a small number of copies of Resource 1 then the groups will need to be bigger.)
Give each group one scenario from Resource 1– schooling, swimming or shopping – to work with. Each group should make a list of the similarities between what people do in each situation, and the differences. Use only the evidence in the pictures.
Ask each group to write sentences which compare the situations, for example:
- In the market, the food goods are laid out in a round tray.
- In the shop, people push things around in trolleys.
They can display these sentences with the pictures and others in class can see what different groups have said about each picture.
Looking at their displays will help you assess how well they have understood the topic. You can use this to plan the next step in their learning.
If you have younger pupils, you could do this as a class activity, using two contrasting photos and asking questions to help focus their observations.
2. Organising group work to compare and contrast local areas
Providing opportunities for your pupils to question information about different situations will help pupils understand differences between communities. Case Study 2 and Activity 2 show different ways to organise pupils and use questioning to allow deeper thinking about similarities and differences.
Case Study 2: Using questions to compare localities
Mrs Onuorah has prepared a lesson on exploring differences and similarities between different local areas. She has prepared a brief information sheet on two different locations (see Resource 2: A comparison of Owo and Idodo). At the beginning of the lesson, she gives the sheet out to the class and asks them to work in their groups. She writes the following questions on the board:
- What are the differences and similarities between the two environments (Owo and Idodo)?
- Are there similar standards of living across the two environments?
While the groups are working, Mrs Onuorah moves around listening to their conversations and supports them in thinking more deeply. She asks questions related to what the pupils say in order to help their thinking, and picks up on their own ideas and interests.
Mrs Onuorah is always concerned that she is organised so she can focus more on developing her pupils’ understanding.
Activity 2: A comparison of two contrasting environments
This activity gives pupils an opportunity to reflect on different social contexts.
- You could use Resource 2 or make up your own contrasting environments (perhaps using magazine pictures).
- Give each group contrasting photographs or pictures. (See Key Resource: Using group work in your classroom.) Ask them to identify the features of each environment in terms of things like physical features, economic activities and what jobs people are doing. They may contrast the pictures with where they live. Ask them to note down important features and ideas about what is different and what is the same.
- Put two groups together and ask each group to share their ideas with the other group.
- Ask each group to make a presentation of their findings to the rest of the class.
3. Improving the local community
Having explored differences and similarities between geographical locations with your class, a next step could be to use these ideas by involving your pupils in thinking of ways to improve their environment. Case Study 3 shows how one teacher developed a school garden as part of her science and social studies lessons and the Key Activity helps pupils explore how their local environment can be improved.
Case Study 3: Developing the school environment
Mrs Madu teaches social studies to her Primary 4 and 5 class in Eastern Nigeria. She has been exploring similarities and differences in different locations. She wants her pupils to use this information to think about how they could improve their local environment around the school in a way that is sustainable (see Resource 3: Education for sustainable development).
After much discussion, her pupils decided they would like to make some places to sit in the garden, and also to paint on the playground or make games to play at break times.
She allowed the pupils to discuss in their groups what this would involve. They needed to think about:
- where to put the seats;
- what they would make them out of;
- gaining permission from the head teacher;
- involving parents and other community members;
- what games they wanted;
Together they made a plan of action, which was displayed on the wall. The head teacher asked to come and listen to their ideas.
Key Activity: Improving the environment
Ask your pupils what they like about their community and the school environment and list these on the chalkboard.
Next, ask them to brainstorm ways they could improve their school environment.
Ask them these two questions to start them talking:
- How could you make the school environment more interesting at play time?
- How could you encourage everyone to take pride in the school and protect it?
As each group feeds back their ideas, list the two most popular ones on the board.
When all the groups have fed back, go through each suggestion – summarising what it is.
Now ask your pupils (individually or in groups) to draw up a plan, that can be displayed in the wall, of the option for improving the environment that they would choose.
Resource 1: Living in different communities
![]() Teacher resource for planning or adapting to use with pupils
Teacher resource for planning or adapting to use with pupils

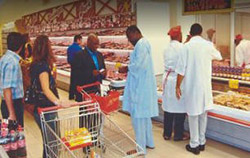
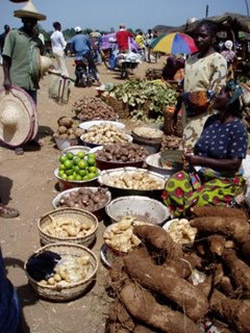
Resource 2: A comparison of Owo and Idodo
![]() Teacher resource for planning or adapting to use with pupils
Teacher resource for planning or adapting to use with pupils
Owo
Owo village lies about 8 km from the Enugu-Abakaliki expressway in Nkaru West LGA of Enugu state in Nigeria. Besides receiving sufficient and reliable rains throughout the year, the village is well served by natural springs.
The residents of Owo village are mostly mixed farmers. They grow a variety of crops including maize, sweet potatoes, bananas and vegetables like onions, tomatoes, lettuce, etc. They also raise poultry, goats and other small livestock.
In spite of being endowed with abundant natural resources, the residents of Owo have a very low standard of living. They receive low prices for their agricultural products.
Idodo
Idodo is a trading post on the Enugu-Abakaliki expressway. Because it is on a main commercial transport route, the residents were able, historically, to develop strong trading contacts with the cities. They have also built networks among truck drivers and other transporters, which enable them to move goods cheaply.
The residents of Idodo are mostly traders. They buy cheaply agricultural products, poultry and goats from surrounding rural villages and are able to sell them dearly in major urban areas like Enugu, Abakaliki and Oitsha.
As a result, the residents of Idodo enjoy higher standards of living compared to people in surrounding villages. Idodo has social amenities, including dispensaries, schools and piped water.
Resource 3: Education for sustainable development (ESD)
![]() Background information / subject knowledge for teacher
Background information / subject knowledge for teacher
What is education for sustainable development?
‘Education for sustainable development enables people to develop the knowledge, values and skills to participate in decisions about the way we do things individually and collectively, both locally and globally, that will improve the quality of life now without damaging the planet for the future.’
Sustainable development is an integral part of citizenship that will enable pupils to:
- understand that despite physical, material and cultural differences, there is a lot that connects us with the wider world;
- think critically and challenge injustice and inequalities;
- identify, respect and value diversity;
- develop a concern for and commitment to environmental issues and sustainable development;
- be willing to act to make the world a fairer and more sustainable place;
- take responsibility for their actions.
Both citizenship and ESD provide great opportunities for active, pupil-centred learning styles from which pupils get a sense of their role as global citizens. Such an approach to learning includes lessons that explore distant localities and environmental issues. Exploring the local community and then communities further afield will help pupils to expand their thinking about how different communities and cultures can be and how the same problem can be solved in many ways, and provide new ideas to try and test. ESD also explores ways to be more self-sufficient. This means making best use of the resources around you but not using them all up. Thinking about ways you can replenish or replant will ensure continuity. It means using only what you need.
Local resources are not everlasting but have a limit unless we try to share and use these wisely and replace, where possible, what we use.
Adapted from original source: http://www.bbc.co.uk/ (Accessed 2008)
Acknowledgements
Grateful acknowledgement is made to the following sources:
Photographs and images
Children playing football in front of urban building: http://www.jesuitmissions.org.uk/ (Accessed 2008)
Children standing in front of rural building: http://www.buffalofc.org/ (Accessed 2008)
Child in pond: http://www.cartercenter.org/ (Accessed 2008)
Group of children in pool: http://www.ifnc.org/ (Accessed 2008)
People in supermarket: http://www.zambeef.com/ (Accessed 2008)
Rural food market: http://ethnicloft.com/ (Accessed 2008)
Text
Resource 3: Education for sustainable development (ESD): Adapted from original source: http://www.bbc.co.uk/ (Accessed 2008)
Every effort has been made to contact copyright holders. If any have been inadvertently overlooked the publishers will be pleased to make the necessary arrangements at the first opportunity.