Use 'Print preview' to check the number of pages and printer settings.
Print functionality varies between browsers.
Printable page generated Thursday, 9 July 2026, 7:57 PM
Module 2: Science - Investigating Materials
Section 1: Investigating and classifying materials
Key Focus Question: How can you use games and investigations to help pupils identify and classify materials?
Keywords: properties; solid; liquid; gas; games; investigations
Learning outcomes
By the end of this section, you will have:
- used games to assess and develop pupils’ awareness of materials around them;
- explored ways of demonstrating properties of matter to pupils and helped them to classify materials around them;
- guided pupils to more independence in setting up their own investigations.
Introduction
Most of us take our material world for granted. Thinking scientifically can cause us to pay more careful attention to the matter around us. Have you ever stopped to think how many substances we come into contact with and use?
This section looks at how you can help pupils scientifically identify, sort, and classify the matter around them. Using games, labelling and simple investigations, you will help your pupils build a ‘mental’ map of the material world.
1. Using games to explore materials
What earthly substance are we most in contact with? Soil; plants; water; wood; concrete; cloth...?
Did you think of nitrogen? We live our lives immersed (totally surrounded) in the gas nitrogen (80% of the air).
We start this section by looking at the ‘big picture’ of the matter and materials that make up our world. Case Study 1 and Activity 1 describe games in which pupils name, describe, sort and group matter and materials. These fun activities will help you establish what the pupils already know, a key part of good teaching in any topic.
Case Study 1: The scavenger hunt game
Running a teacher development workshop in northern Nigeria, the presenter, Ismaila, thought it was time for useful fun. He suggested a scavenger hunt game.
To play this game, you divide pupils into groups of four or more. Each group gets the same list of items. They have to find them quickly and resourcefully and bring them back or use a camera to record that they have found the item. (See Key Resource: Using new technologies for more help.) The first group to be able to prove they have scavenged (collected) all items is the winner. See Resource 1: The scavenger hunt game for a sample of the list Ismaila used and the examples of how some of the groups met the challenge of finding some of the trickier items.
The game proved to be an exciting challenge that made the teachers think more carefully about what is around us and where it comes from. They saw the value of the task and enjoyed the next challenge of modifying and adapting the list for their own pupils. They all agreed to give the game a try in their own classrooms and reflect on its effectiveness in time for the next workshop.
Activity 1: Finding, naming and talking about kinds of matter
This activity is based on the game ‘musical statues’.
- Divide your class into groups of 10–12 pupils.
- Play music. The first group dances in a space in the centre of the classroom. Everyone else is the audience.
- Stop the music.
- The dancers freeze (anyone who moves is out and sits down).
- The teacher calls out the name of some sort of matter, e.g. ‘metal!’
The dancers unfreeze and rush to put a finger on something metal.
Anyone who touches a type of metal already touched is OUT!
The last one to find a metal of their own is OUT!
The ‘touchers’ take turns to tell something interesting about what they are touching.
If they can’t tell, or it is a repetition, they are OUT!
Pupils from the audience can ask questions about the thing touched.
If the ‘toucher’ can’t answer satisfactorily, they are OUT!
The survivors get another turn later.
- The next group comes to the centre, dances, freezes, rushes to touch a new substance (liquid, paper, wood, etc.) and try to survive the telling and the questioning.
Did this game allow you to assess and, at the same time, grow the pupils’ awareness of their material world?
2. Exploring properties of materials
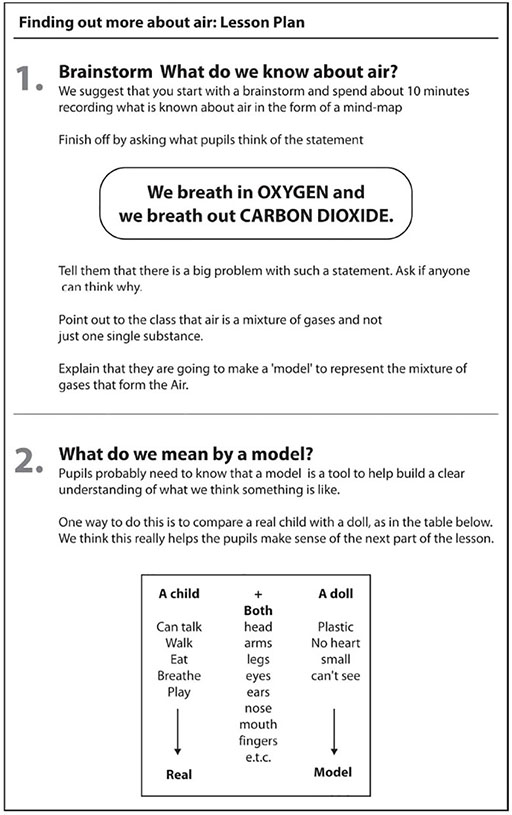
As you get to know your class, it is really useful to talk to your pupils about their personal characteristics, things they can do, their likes and dislikes, and their strengths and weaknesses. A nice way to summarise this sharing talk is to ask them to draw a careful full-length self-portrait and to label their distinguishing features in one colour. They could use other colours to list and record their other different types of characteristics.
Now they will be ready to do the same thing when they consider the properties of different common substances (kinds of matter) they know from their environment. Activity 2 explores one way of doing this, using pictures.
In Case Study 2, a teacher introduces the idea of properties and the three states of matter (solids, liquids and gases) by starting with a single property –compressibility. Is this different to the way you usually introduce this topic? What other topics could you explore using this approach?
Case Study 2: Comparing compressibility
Miss Yvonne Manu works with Primary 4 pupils and plans to introduce them to the idea of the three states of matter: solid, liquid and gas. But she doesn’t want to just tell them.
She carefully plans a lesson around the idea of compressibility. She shows them a small sponge, a ball of cotton wool, a soft square of cloth (like a yellow flannel duster) some water and a block of hard wood. With each in turn, Yvonne demonstrates how she can squeeze, force or press them down into the small hollow space of a clenched fist. All except the water and the block of wood. She cannot easily change the size or shape of the wood, and although she can change the shape of the water, she can’t change its size.
She follows this up with a lesson where she uses syringes to demonstrate compressibility in liquids compared to solids (sand) and air (see Resource 2: Lesson plan).
Activity 2: Using icons to identify and classify substances
To do this activity with the whole class, you need to find a large poster of a room, showing a range of different substances (for example, a shop, a clinic or a kitchen).
For group work you will need a large picture for each group – use a different picture for each group. (Look for pictures in magazines and catalogues.) Using different pictures gives the pupils a very real reason for reporting back, because each group has different information to share.
With your pupils, choose three suitable icons to use in this lesson. You will need icons to represent a solid (perhaps a picture of a block or cube – brown or black), a liquid (perhaps a droplet – blue) and a gas (perhaps a cloud of dots – grey or pencil).
Pupils draw these icons on bits of scrap card or cut out the shapes and colour them if possible.
Then they use small bits of sticky tape to mark solids, liquids and gases on their pictures.
Encourage discussion and feedback from each group. How did they identify liquids? Gases? See Resource 3: Sample of pupil’s work.
3. Organising investigations
Thinking and behaving scientifically is most evident when pupils investigate something practically.
Investigating is a key skill in science. It involves you and your pupils in:
- deciding on the question you are trying to answer;
- deciding what equipment to use;
- deciding what measurements and observations to take;
- deciding how to present your results and how they give you an answer to the problem.
Case Study 3 shows how teachers can lead a class investigation of an ‘unknown’ substance. If the pupils have experienced a teacher-led investigation, they will be better prepared to do their own independent investigations of other substances. So we strongly advise you to attempt the case study lesson plan given in Resource 4: Planning an investigation with your pupils before trying the Key Activity.
In the Key Activity you will support groups in planning, conducting and reporting on their own investigations of ‘unknown’ white powders.
Case Study 3: A teacher-led pupil investigation
A few years ago, some colleagues were running in-service primary science workshops in rural Northern Ghana. In one series of workshops, a science lesson was planned, tested, reflected on and improved collectively.
The heart of the lesson was the teacher guiding the step-by-step investigation of the properties of an ‘unknown’ powder (powdered clay). First, the teacher focused on developing the skills of observation and communication in her pupils. Then she asked: ‘What will happen if we add a few drops of water to the powder?’ Pupils’ answers led to more investigation, observation and communication. On reflection, it was clear that the pupils were thinking and acting scientifically.
Read the detailed plan of the lesson in Resource 4. Here you will also find a suggested follow-up arts and crafts and language lesson.
Key Activity: Investigating unknown white powders
- Tell pupils that each group (three/four pupils) will be getting a different ‘unknown’ white powder to investigate. Remind them about properties and the steps and processes of the powdered clay lesson from the case study.
- Guide them as they plan the steps of their own investigation for the next day. They must include the equipment they need in their plan and perhaps some predictions. Give them time to share and improve their plans in class.
- The next day, hand each group a different ‘unknown’, BUT safe to use, white powder, such as icing sugar, salt, soap powder, sodium bicarbonate, fruit salts, maize meal, flour.
- Support them as they do their investigations and plan how to report on their findings.
- Can they identify the substances?
How did you assess their work? What advice would you give to a colleague who is going to do this activity?
A follow-up language lesson could be reading details on the packaging of substances used (see Resource 5: Reading packaging).
Resource 1: The scavenger hunt game
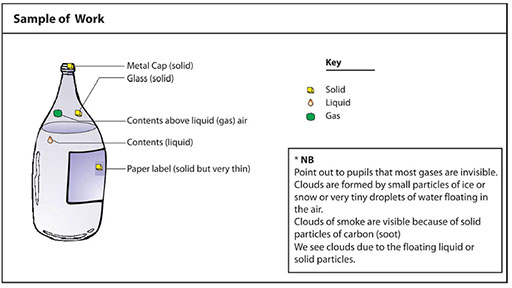
![]() Teacher resource for planning or adapting to use with pupils
Teacher resource for planning or adapting to use with pupils
Students were given the ‘list of items’ in the central column. The table then shows how Groups A and D solved the challenge of finding examples of the items.
| Group A – 12 minutes | List of items | Group D – 9 minutes |
| Ms Obiri’s diamond | The hardest of substances | A steel screw |
| Milk | From a cow | A shoe and a leather belt |
| Goat droppings from the road | Something eaten | A leaf eaten by an insect |
| Ohene cries and laughs | Something changed | A burnt match |
| Our group – four boys and three girls | A mixture | Air in an empty glass |
| Salt | Something pure | Sugar |
| Candle | Something that disappears | Water (evaporates) |
| Pencil | From a tree | Paper |
| Glass from sand | Something from something | Same paper |
| Sand again | From the mountains | The wind and the tap water |
Note: The good thing about this game is its open-endedness. There are not ‘right answers’ – just ‘good’ answers and ‘very good’ answers.
Resource 2: Lesson plan: Which can be compressed – solid, liquid or gas?
![]() Teacher resource for planning or adapting to use with pupils
Teacher resource for planning or adapting to use with pupils
Yvonne used the activity below as the basis for her lesson.
First she got her pupils to do a quick spider diagram of their observations and knowledge about sand and this is what one of the better groups produced.
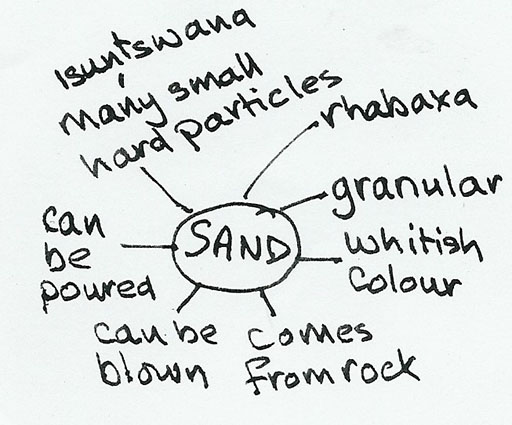
Then she decided that with an activity like this she could have given the pupils more ownership of the whole task. She made a worksheet (see below). She found that this change in approach really made a difference to the motivation, enthusiasm and learning of her pupils

Resource 4: Planning an investigation
![]() Background information / subject knowledge for teacher
Background information / subject knowledge for teacher
The plan of the lesson
Before the lesson, you need to find some dry clay and to crush, pound and grind it until it forms a fine dry powder. You don’t need much – just enough to give each group a heaped teaspoonful.
Step 1a – Investigation by observation, comparing and recording
Give each group a small dish or the flat lid of a jar to hold the powdered clay. Ask them to observe the substance carefully and to note down all their observations in the local language or English on paper or in their books.
(We found that it is important that the teacher doesn’t interfere with the groups at the start of the lesson. You need to give them a few minutes on their own to get started.)
Before the end of Step 1, ask these guiding questions to ensure that the observation has been thorough:
- Have you noted the colour of the substance?
- How does it feel?
- List other substances you know that are similar to this substance.
Step 1b – Communication
Ask the groups to feed back their observations. Summarise them on the chalkboard. This is a chance to bring languages together. If pupils answer in the local language, you can negotiate that the answers are written up in English.
At this point you can identify the substance as dry clay powder.
Step 2a – Prediction and recording
Get the groups to use a different colour or kind of pen/pencil for this step.
Hand out droppers with water, or show the class a small bottle of water. Here are the questions we prepared for this step:
- What will happen if we add just a few drops of water to this substance?
- Write down what you predict will happen if you add a few drops of water to the dry clay powder.
- How will the water change the clay?
- Write down all the changes that your group thinks will happen.
Then leave them to get on with the work. After about five minutes, you might give them a few prompts. Will the colour change? Will the appearance of the substance change? What will it feel like?
Step 2b – Communication
Add the pupils’ new work to the chalkboard using a different colour of chalk. Use English to record, and comment on their answers, extending the knowledge where necessary.
Step 3a – Investigation, observation and recording
Again, change the colour of the groups’ writing tools/pens.
Now let them add and mix a few drops of water. What changes do they see and feel? Were their predictions correct? Get them to investigate and write down what they notice.
Step 3b – Communication
For the third time, record the combined work of the groups on the board, using a third colour of chalk if possible.
Step 4 – Discussion
At this stage, ask the pupils to talk about and write down the things that damp clay can be used for. Record their suggestions on the chalkboard. Then get them to roll out a small snake from the damp clay in their dish/lid. Let them record or measure its length before they leave it in a safe place to dry. Ask pupils to record what they think will happen to the clay over the next few days.
You should now have a mind map on your board showing observations and predictions about clay.
Adapted from: Primary Science Programme Cross Curricular Work
Resource 5: Reading packaging
![]() Teacher resource for planning or adapting to use with pupils
Teacher resource for planning or adapting to use with pupils
Use these questions to help your pupils look at different packages.
http://www.assadsbakery.com/ shop/ images/ product_image_ab0282.jpg (Accessed 2008)
- What does the picture tell us?
- Does all the writing look the same?
- Who makes this product?
- What do we get in this packet?
- Where does it tell us what is inside?
- What do you see first? Why?
- What do you see next? Why?
- And then what do you see? Why?
Acknowledgements
Grateful acknowledgement is made to the following sources:
Photographs and images
Assad’s Bakery, The Laughing Cow packaging: http://www.assadsbakery.com/ shop/ images/ product_image_ab0282.jpg (Accessed 2008)
Text
Resource 4: Planning an investigation: Adapted from Primary Science Programme Cross Curricular Work
Every effort has been made to contact copyright holders. If any have been inadvertently overlooked the publishers will be pleased to make the necessary arrangements at the first opportunity.
Section 2: Exploring solids
Key Focus Question: How can you encourage pupil inquiry to explore properties and changes in solids?
Keywords: solids; inquiry; properties; investigation; rust; discussion
Learning outcomes
By the end of this section, you will have:
- supported pupils as they carry out their own science investigations (inquiry-based learning);
- explored different ways to present the results of their investigations;
- used informal discussion with your pupils to share ideas and develop interesting areas of inquiry.
Introduction
The emphasis in this section is on one state of matter – solids. We consider how to encourage pupils to inquire into the origin of the solids they encounter daily. You will help them learn about these solids and communicate what they learn to each other.
To do this we use an approach sometimes known as inquiry-based learning – learning by finding something out for yourself. This is very different from being told something, because the pupils have to wrestle with their own ideas and explain their thinking.
Inquiry-based learning
For solids we can ask: ‘Where does this come from?’ Or: ‘What are its properties?’ And: ‘Can it be changed?’ (This often involves much more active learning than simply listening and hoping to remember. And if we don’t know – or can’t find out yet – there is always the possibility that one day, we will be thrilled to come across the missing information.)
Some solid substances are found naturally; others are manufactured. For example sand is a natural material and glass is a manufactured material. In fact, glass is manufactured from sand. Do you know what the actual process involves? Try to find out, and you are doing inquiry-based science.
Similarly, wood is a natural material obtained from trees, and paper is made from wood. Certain wasps chew wood into pulp to process it into ‘paper’ that they use to build the cells of their nest. People have discovered how to do the same thing. You could extend your inquiry and experiment with making your own paper from pulped wood.
Good starting points for this approach are informal discussions where pupils share ideas, raise questions and develop threads of inquiry that interest them. Case Study 1 shows how one teacher encouraged inquiry in her pupils. In Activity 1, you take this further with a class display and accompanying books made by your pupils.
Case Study 1: A game – ‘I wonder where this came from…?’
Whenever Jessica in Kampala, Uganda, had a little spare time in the school day, she played ‘the wondering game’ with her class (or the children left behind while others went to choir practice). One pupil would have a turn to pick up something – anything – and ask, ‘I wonder where this came from?’ Then everyone would put their heads together and share what they knew and thought, agreeing and disagreeing and building ideas as they talked. It was very informal. But it always amazed Jessica that pupils would come back some days later with more information from home or having noticed something in a book or magazine.
The wondering game seemed to act like a key, opening the door to pupils’ curiosity. She wondered if there was a way to make this part of formal science lessons.
Activity 1: Zigzag information books
Interesting materials gathered by pupils can be displayed in a classroom ‘science museum’. Agreed facts for each material are written on cards to support the display, just like in a real museum. The display grows throughout the term.
When you have enough different materials, ask pairs of pupils to make little information books to add to the display (see Resource 1: Making a zigzag book).
Make sure that you give your pupils time and help to write drafts and plan the layout of the books they make, so that they can be really proud of their work. This also gives you a chance to ensure that the scientific information is accurate. Try to encourage titles like: The story of glass; How cement is made; From trees to books; Where does salt come from? How to make your own glue.
Older pupils could make the books for younger pupils to read.
What differences did you notice between the first drafts and the finished books? Did you ask pupils to comment on each other’s books?
2. Group work to investigate solids
In Section 1 we considered properties of matter when we compared the compressibility of solids, liquids and gases. Now we consider a few more properties in relation to solids.
Here is one to think about. Why is it that some solid objects feel cold to the touch and others don’t? Think of a wooden spoon and a metal spoon. When we first pick them up off the table, they must be at the same room temperature – yet the metal spoon feels colder.
Some materials carry, or conduct, heat better than others. Metals have the property of being good thermal conductors. The metal spoon conducts heat away from our hand and hence feels colder. The wooden spoon is a poor thermal conductor – it is a good thermal insulator.
In Activity 2 you investigate the property of solubility with your pupils. What other properties could you investigate? Electrical conductivity? Density?
Case Study 2 shows how a teacher with a large class supported groups of pupils to investigate one particular group of materials. (See Key Resource: Working with large classes)
Case Study 2: Properties of metals
On a Monday, Mrs Kapere brings from home a range of different metal items and displays them on her table at the front of the class. They include a gold ring, old silver and copper coins, iron, steel and brass nails and screws, and wires of different sorts.
While the rest of the class is busy with other work, she gathers the group that will inquire into and investigate the properties of metals around her. They handle and discuss what is displayed. They argue about whether metals bounce. They start to raise questions: Are all metals shiny? Which is the hardest/strongest metal? Is tarnishing and rusting a property?
Mrs Kapere also suggests some questions: Do all metals conduct electricity? What about magnetism? What are alloys? They realise that there are many properties to be investigated, but some at a later stage. (See Resource 2: Looking at properties of solids for more ideas about how to organise a lesson on solids.)
She supports them for the week as they prepare to present the results of their inquiry. Next week, another group will be supported when they do their work on a different set of substances such as plastics or wood.
Activity 2: Disappearing acts – the property of solubility
This builds on the work you may have done with pupils in the Key Activity of Section 1, where pupils investigated unknown white powdery substances.
- Start by discussing what happens when you add something soluble like sugar to your tea. How can you tell something has dissolved? Perhaps with older pupils you will use this as a chance to introduce terms like solvent (the hot liquid tea), solute (the sugar) and solution (the resulting sweet liquid).
- Give groups five different named substances and containers of water. Which of these substances are soluble in water? Ask them to make predictions and to record the results of their investigation in the form of a table using words like ‘slightly soluble’ and ‘readily soluble’. (See Key Resource: Using investigations in the classroom.)
- Finally, ask each group to plan their own investigation of a different variable (something that can change) that might affect solubility of sugar in water. Think of things like temperature of liquid (solvent); granular size of sugar (solute), stirring or shaking the container. You might want to suggest pupils think how to present their results as a graph. (See Resource 3: Lesson plan on solubility for more detailed advice.)
3. Investigating irreversible changes
Here, we build on the first two activities by now considering ways in which matter can be changed. In science there are two types of changes pupils should consider:
- reversible changes – called physical changes;
- irreversible changes (changes that cannot easily be reversed) – called chemical changes.
Wax melting with heat and then solidifying again is a physical change. Dissolved sugar can be regained if the liquid is evaporated, so this is also a physical change. (Resource 4: Disappearing ice cube race gives one idea for a classroom activity around a physical change.) But glass cannot be easily turned back into sand – so this is a chemical change.
Case Study 3 shows one way that pupils can be challenged to think about chemical changes through a series of guided demonstrations. (SeeKey Resource: Using explaining and demonstrating to assist learning.)
When iron and steel rust (a chemical change) the metal loses its shape and strength. In the Key Activity you use a competition to get your pupils thinking about how they could slow down this chemical change.
Case Study 3: Showing irreversible changes
Sam is an unqualified teacher volunteering in his rural village school. He believes that learning should be a combination of fun and seriousness. When the time comes to look at irreversible changes he sets up a series of activities.
First, he demonstrates what happens when a small cube of bread on the end of a wire pushed into a cork handle is toasted to a cinder over a flame. He asks his pupils to observe carefully. Eventually the bread gets dry enough to catch light and burn with a flame. He then asks: ‘When did it stop being bread?’ ‘What do you think has happened?’ ‘What solid substance are we left with if we grind the remains to a powder?’ Some of the pupils have heard of carbon and Sam explains this is what is left. He burns a small piece of wood and shows this, too, leaves carbon. He listens carefully to their answers and encourages questions based on their observations. In this way, he is able to assess their learning and thinking.
Next, he shows them a more obviously chemical change. He mixes tartaric acid powder and baking powder (sodium bicarbonate) and shows that no change happens. But then he adds water and asks them to observe. This gave rise to lots of questions. Why all the fizzing and bubbling? What is in the bubbles? What gas is given off? Have the substances changed? If we evaporated the water what would we get? He talks about how new substances have been made. For more details see Resource 5: Molecules and atoms.
Sam finishes the lesson by asking his pupils to each find three examples of chemical changes for tomorrow’s lesson. He is very pleased with the examples they give – some of the pupils even bring in materials to show how they have changed.
Key Activity: Slowing down an irreversible change
Show your class some metal articles that have rusted. Ask them: Where have they seen rust? What makes the iron or steel rust? What sort of change is this? Then tell them their challenge is to find out how to stop iron rusting.
Divide your class into groups. Give each group two iron nails (or other small pieces of iron) and tell them to clean the nails with sandpaper.
Then ask them to think how they will protect the iron from rusting. They should plan their investigation; what they will do, the equipment they will need and make predictions. Why do they think they have been given two nails?
The next day, ask the groups to set up their experiments. You will need to plan time for them to make observations over the next few weeks. After a few weeks, ask each group to report back on their investigation. Was their method successful? Where might it be used?
Resource 1: Making a zigzag book
![]() Teacher resource for planning or adapting to use with pupils
Teacher resource for planning or adapting to use with pupils
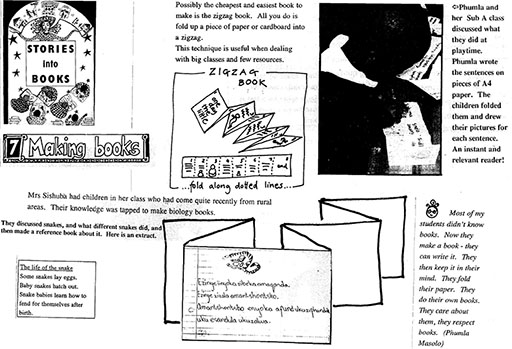
Original source: Stories into Books – D Dyer and A & V Kenyon (UCT 1990)
Resource 2: Looking at properties of solids
![]() Teacher resource for planning or adapting to use with pupils
Teacher resource for planning or adapting to use with pupils
Many objects are made from solids. Solids come in many different types, each with their own properties. The properties of the solid must be suitable for the object it is being used to make.
One activity for your pupils is to brainstorm all the different properties materials can have. Put out a display of objects around the classroom. Make a label for each object with some questions (see below for examples). Pupils, working in pairs, should spend 20 minutes looking at the objects and answering the questions about the materials to help them describe their properties.
Here are some suggestions for objects and labels for your display:
| Object | Label |
| Piece of copper wire | Pick up the wire. Can you bend it? Where have you seen it being used? What is able to pass through it? |
| Woven basket | How does the basket feel? Can you easily pull it apart? |
| Metal spoon | Pick up the spoon and think of three words to describe how it feels. What happens to the spoon if you put one end in a cup of very hot water? |
| Pottery cup | Can you change the shape of the pottery? Would it break if you dropped it? (DO NOT TRY THIS.) |
| Piece of glass | Can you see through the glass? What would happen if you dropped it? (DO NOT TRY THIS.) |
| Plastic bag | What happens if you drop water onto the plastic bag? Does it go through into the bag? Can you easily fold up the bag? |
| Wooden spoon | Can you bend the spoon? What happens to the spoon if you put one end in a cup of very hot water? |
| Piece of cotton fabric | Hold the material up to your face. Can you see through it? What does it feel like? |
| Small magnet and pins | Move the magnet over the pins. What happens? Where have you seen a magnet being used? |
As your pupils look at the objects you should move around the class talking to pupils about what they observe. At the end of the time, gather your pupils back together and ask different pupils to tell you what they observed about one of the objects. Build up a list of properties on your chalkboard or class wall. If your pupils aren’t familiar with these property words in English, let them use them in their own language. You could put the English words on a display in your classroom to help pupils learn them.
This is an example list:
Strong Hard Tough Rigid Flexible Transparent Opaque Melting point (high/low) | Insulator (heat and electricity) Shatterproof Magnetic Conductor (heat and electricity) Easy to cut Expensive/cheap: Cost Rough/Smooth Waterproof |
Make sure that your pupils can explain what each property means and ask them to draw a table in their books to show each property and an example of a material with that property e.g.
| Property | What it means | Example |
| Insulator | Does not let heat go through it | Wood |
Now set your pupils some problems around choosing materials. Here are some examples:
A: Isanga grows vegetables close to her house but she needs some way of protecting her young plants from birds. What sort of structure might she build? What materials should she use? Why should she choose these materials?
B: Gagwala wants to put a new top on the table in his kitchen; the old one is very uneven and covered in burn marks. What sort of material should he use for the new table top?
C: Samuel needs a bag to carry his books to school. What sort of material should he choose for the bag?
For each problem, pupils should think about what the object needs to do, and choose, from their list, the properties it must have. Then they can choose which material would be best in each case.
Resource 3: Lesson plan on solubility
![]() Teacher resource for planning or adapting to use with pupils
Teacher resource for planning or adapting to use with pupils
Disappearing acts
This is one way that you can talk to your pupils about the idea of solubility.
Think of a sweet like a strong mint or boiled fruit sweet. You put it into your mouth and enjoy the sweet pepperminty or fruity taste. But it doesn’t last forever. It gets thinner and smaller and eventually it is all gone. Where did it go? Into the solution of sugar and saliva you have been swallowing while the sweet is in your mouth. Your liquid saliva has been gradually dissolving (the process) the solid sweet as you suck it. The result of the dissolving process is a solution of sugar and saliva.
Perhaps you could have a competition in your class to see who can hold a soluble sweet in their mouth for the longest possible time. How did the winners do it?
One little chew and the sweet breaks up into smaller pieces – you have lost! Swirl it around in your mouth and you will have lost too! But if you can hold it in the cooler air on the tip of your tongue, where there is also less saliva, you might just be a winner.
Examples like this will give your pupils some ideas about the factors that affect solubility.
Investigating solubility
1. Each group of pupils chooses a factor around solubility to investigate. Some ideas are:
- temperature of the water (try hot, warm, room temperature and icy);
- changing the size of the sugar pieces (try four lumps: one lump, one lump broken into small pieces, one lump in grains and one lump which has been ground into powder);
- stirring (try no stirs, slow stirring and fast stirring).
2. Put these questions on the chalkboard to help your pupils plan their investigations:
- What do you want to find out?
- What do you predict will happen?
- What equipment will you need?
- What will you change each time?
- What will you keep the same (to make sure the test is fair)?
- What will you actually measure?
3. Make sure each group keeps all the other factors the same (constant). Only one factor must be different for each group. For example, if they are investigating stirring, they must use the same amount of water at the same temperature and the same amount of sugar each time.
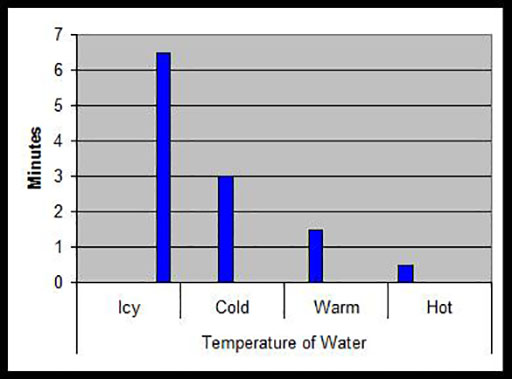
4. Ask your pupils to record their results in the form of a bar graph such as that below, which shows how many minutes it took for one spoonful of sugar to dissolve in the same volume of water at different temperatures.
Background knowledge for the teacher
Model of dissolving
This is a clearer picture of what happens when solid matter dissolves in liquid. A soluble solid comes into contact with a liquid solvent. The liquid ‘unglues’ the particles of the solid, so they can move, mix in and slip freely between the particles of the liquid.
The factors that affect the time it takes for a solid to dissolve are:
- temperature of solvent (faster in hot water);
- size of solute (faster with small grains);
- movement of solvent (stirring makes dissolving fast).
An example – dissolving salt
The teaspoon of salt is the solute. The water in the jar is the solvent. Once the salt is added, the process is called dissolving. The product of dissolving is a saline (salty) solution.
If more salt is added until no more will dissolve, we have a full or saturated solution.
Resource 4: Disappearing ice cube race
![]() Teacher resource for planning or adapting to use with pupils
Teacher resource for planning or adapting to use with pupils
Organise your class into groups of four or five.
1. For each group, choose someone to be an ‘independent observer’. This observer will report:
- how well the group worked together;
- exactly what the group did to solve the problem;
- how long they took to do it.
2. Here is the challenge: Each group has a medium-sized ice cube in a polystyrene/plastic cup. Find the best way to make the ice cube disappear without a trace, not even a single damp spot!
3. The group observer records the results in a table like the one below on the chalkboard.
4.Every minute, each group observer puts an ‘X’ if there is a trace of the ice cube left.
5.Before the race begins, give pupils time to talk and plan how they will get the ice cube to disappear.
Time: Mins
| 1 | 2 | 3 | 4 | 5 | 6 | 7 | 8 | 9 | 10 | Actions Taken | |
| A | |||||||||||
| B | |||||||||||
| C | |||||||||||
| D | |||||||||||
| E | |||||||||||
| F |
Group
6. Which group found ways to make their ice cube disappear the fastest? Who had the second best way? Which group was the least successful?
7. Give the observers a chance to report back on how well each group worked together. They could use an assessment scheme like this one to score each group.
5 Excellent | Everyone participated actively. Everyone paid attention, made suggestions and helped practically. Everyone co-operated well. |
4 Very Good | Most people participated and had a chance to do something to help. Everyone stayed interested. No one felt left out. |
3 Good | The group stayed together and got the work done. But some were a little quiet or didn’t get given a chance to help. |
1-2 Weak | The group was disorganised. One person took over. There was hardly any sharing of ideas and talk about what was happening. |
Follow up the ice cube race
Discuss the changes pupils saw as the ice cube disappeared. How does solid ice change (melt) to liquid water and eventually change (evaporate) into an invisible gas or vapour? These are called changes of phase. Finish the lesson by doing this quick quiz. Do this quick quiz:
- List the things you can do to speed up the process of getting solid ice to change into liquid water.
- What is the scientific term to describe the change from a solid to a liquid?
- List the things that speed up the process of turning liquid water into a gas like water vapour.
- What word do we use for the change from a liquid to a gas?
Answer hints:
Factors that affect melting and evaporation are:
- heat;
- size and shape;
- moving air;
- pressure.
Pupils could write a short report on what they learned in the race for homework.
Resource 5: Molecules and atoms
![]() Background information / subject knowledge for teacher
Background information / subject knowledge for teacher
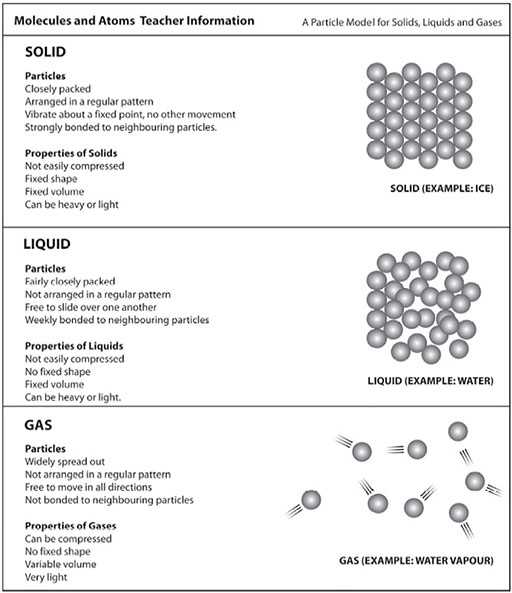
Original source: Primary Science, Developing Subject Knowledge, Jane Devereux
Acknowledgements
Grateful acknowledgement is made to the following sources:
Photographs and images
Making a zigzag book: Stories into Books – D Dyer and A & V Kenyon (UCT 1990)
Molecules and Atoms Teacher Information: Primary Science, Developing Subject Knowledge, Jane Devereux
Every effort has been made to contact copyright holders. If any have been inadvertently overlooked the publishers will be pleased to make the necessary arrangements at the first opportunity.
Section 3: Looking at liquids
Key Focus Question: How can you use different activities to investigate liquids?
Keywords: assessment; mind maps; demonstrations; investigation; surface tension; liquids
Learning outcomes
By the end of this section, you will have:
- used ‘big picture’ mind maps to see what pupils already know when starting a new topic
- undertaken practical classroom demonstrations to challenge pupils’ thinking
- planned different sorts of activities including investigations and drama to develop pupils’ understanding of the role of water.
Introduction
Whatever age you work with, it is always valuable to start a new topic with a thoughtful session where you build up a good picture of what the pupils already know. This can be recorded in the form of a mind map (see Key Resource: Using mind maps and brainstorming to explore ideas). Encourage pupils to share any questions and concerns they have. Knowing your pupils’ learning needs will really help you plan in a meaningful way. What sort of things must be planned? (See Key Resource: Planning and preparing your lessons.)
In this section we guide you through using a mind map and planning a series of activities around liquids and their properties.
1. Exploring prior knowledge through brainstorming and demonstrations
Because water is so important on Earth, we make it the emphasis when pupils learn about liquids. Case Study 1 tells how one teacher recorded pupils’ ideas about water on a mind map that would be added to throughout the topic. Could you use mind maps as a starting point for this topic? After making a mind map, or using another way to find out pupils’ understanding, practical demonstrations are important. These reinforce ideas and show how things work or happen.
In Activity 1 you undertake just one of the many possible teacher demonstrations that can be useful to show the properties of water – a waterwheel.
From ancient times people realised the power of flowing water. If water could be channelled to flow over or under the blades of a wheel, it makes the wheel spin. This can be used to drive other machines that do work like grinding meal or even generating electricity.
If you do not have access to sufficient water for this demonstration, we suggest you try another demonstration such as ‘How would you show there is water vapour in the air in the desert?’ (Resource 1: Surviving in the desert outlines this activity.)
Case Study 1: Building the big picture and raising questions
Afua in Winneba, Ghana, always starts a new topic in a relaxed way, by gathering her Grade 4 pupils around her. She sits on a low stool, with a large blank paper on an improvised trestle behind her. She discusses the topic informally – in this case ‘water’.
Afua asks pupils what they know about water. She encourages them to listen carefully to each other and add to each other’s comments. She does not treat any idea as ‘wrong’ but asks the class to think about it before adding the idea to the mind map, and discussing where it will go.
She ensures there is a sense of logic to the mind map. When Dora mentions ‘floods’, all agree water can be dangerous, and the word gets written with other examples of dangers. When pollution and dissolved poisons get discussed, these too are linked to ‘dangers’.
Later, they copy into their science notebooks the improved neater version Afua has made. While they do this they think about any gaps in their knowledge. Any questions are added to the mind map in a different colour. (See Resource 2: Sample mind map.)
Activity 1: Practical classroom demonstrations – waterwheels
This demonstration shows the power of flowing water to pupils in a dramatic, but simple way. Resource 3: Instructions for making a waterwheel shows you how modelling clay/prestik wrapped around a tube can hold blades of cardboard to represent a simple waterwheel. If the tube is free to revolve around a rod (axle) and a weighted string is fastened to the tube, then water poured over the blades will wind the string around the spinning tube and lift the weight.
We suggest you try this out before showing it to your pupils. Plan the questions you will ask them. These might include:
- Where have you seen this?
- What is the waterwheel doing?
- Where might this be useful?
You could extend the demonstration by finding out if altering the axle or the angle of the blades makes the wheel turn faster.
This demonstration integrates science and technology. When you stop pouring the water, there is a problem. The string will unwind. For technology, pupils might enjoy designing something to prevent the unwinding or using this device to do a job of work.
2. Focus on drinking water
Some people are predicting that future wars will be fought over water – an alarming thought. Water is our most precious resource. How do we ensure that pupils appreciate water and value using it wisely?
The amount of water found on Earth is about 1,400 million million litres. Most of it is found in three places:
- oceans and seas (97%);
- frozen, as ice (2%);
- underground (1%).
There is also some water in lakes and rivers, in the atmosphere and in living things.
Case Study 2 shows an interesting way of combining science and language in a drama activity about water supply. It is important to use a range of different types of activity in science as each pupil will have a preferred learning style – some will learn best through doing, some through seeing and some pupils will be happiest listening.
In Activity 2, you plan and carry out a demonstration that shows how to extract clean drinking water from salt water or dirty water. As with all demonstrations, we suggest you try this out before the lesson and think carefully about the questions you will ask the pupils during the demonstration.
Case Study 2: Thank you for a drink of water
Kholiswa Somyo integrates her pupils’ learning whenever possible. With ‘water’ she linked science to language by making a ‘big book’ with her class. She prepared everything carefully beforehand so that the combined lesson ran smoothly.
She started by involving one of the shyer pupils and developed a little classroom drama. She got Sipho to come to the front and said to him: ‘Nantsi ikomityi yamanzi.’ (Here is a cup of water for you.) Of course, the polite boy said: ‘eNkosi M’am, for the drink of water.’ To which, she surprisingly replied: ‘Don’t thank me! I only gave you the water. Thank the … ’ (and she pointed to the ikomityi).
So Sipho thanked the cup. ‘Don’t thank me,’ said the cup, ‘I only held the water. Thank the … ‘(‘Tap!’ a few children in the class said). ‘That’s right,’ said Kholiswa and got Thembinkosi to come and be the tap.
So Sipho went to thank the tap. ‘Don’t thank me,’ said the tap (Thembinkosi), ‘I only poured the water. Thank the … ’ (‘Pipes!’ called out many pupils).
And so the lesson went on, building up the story of the local water supply, but in reverse; pipes, reservoir, pump-house, and so on. (Read a more detailed description of this lesson with advice in Resource 4: Making a big book.)
Activity 2: Getting clean water
It is possible to make clean drinking water from dirty or salt water. Ask your pupils: How can we do this? Listen to everyone’s ideas and note them down on the wall or chalkboard.
Show your pupils how you can make salty dirty water drinkable. Heat a small quantity of water in a suitable container. Above the container place a piece of glass at an angle leading to another container. When the water boils it will turn to steam. The steam will condense on the piece of glass and drip into the second container. Explain these steps to your pupils. You will need to do this several times and put the important words on the board.
Ask the class to look at the new water and describe it. What is left in the first container? This process is called distillation.
Now ask your pupils to work in groups to do a design for a large-scale version of this experiment. How could they get enough clean water for their home? Ask them to present their ideas and as a class discuss the different proposals. (See Resource 1 for ideas.)
3. Solving problems through experiments
For the final part of this section, we build on the ideas in the first two sections to ask pupils to solve the problem in the Key Activity (read this now). This activity uses investigative skills – predicting, planning, recording and presenting findings. Does this kind of activity keep your pupils interested? Can you think of other topics in the science curriculum where you could use this? Share your ideas with your colleagues. Perhaps you could start a journal of investigations in your school.
Often, in science, the unexpected happens. In Case Study 2, one teacher uses a demonstration to challenge his pupils’ thinking – he shows that a metal needle floats. How is that explained? This type of activity gives you an opportunity to assess pupils’ understanding and to add to your original class mind map.
Case Study 3: A needle floats – exploring surface tension
Barnabas Ngcume had always been delighted by surprises as a child. In his science teaching he enjoyed finding unexpected ways to demonstrate the facts found in textbooks. This short demonstration certainly surprised his pupils and made them think carefully about the nature of water.
He gathered together an open glass bowl, two-thirds full of water, a few ordinary steel sewing needles, scissors and a double-ply sheet of toilet paper/tissue.
First, he asked the pupils to predict what would happen if you placed a needle on the surface of the water. They were all confident that it would sink. Barnabas let one of them try it – their prediction was right.
Next, he took another needle and cut a small rectangle of tissue slightly longer than the needle and about 2 cm wide. He peeled apart the two layers and rested the needle on one of the rectangles. Carefully he lay both on the water. ‘See! It floats,’ he told his class. They all said he was cheating. But then, as they watched, the tissue became waterlogged and sank, leaving the needle floating on the thin skin of the surface.
Barnabas didn’t give any explanation. He asked his pupils to discuss their thinking and questions in small groups. Then he asked them to suggest explanations for what they had observed and he shared some ideas about surface tension.
At the end of the lesson, some of his pupils added the new information to their original mind map about water. (Resource 5: Surface tension gives background information for you, the teacher.)
Key Activity: What is the best way to dry a cloth?
- Organise your pupils into groups of four.
- Give each group a piece of cloth or paper towel to wet and then cut up. Now ask them to think of the best way to dry the pieces of cloth. Should the cloth be crumpled up? Folded up? Spread out? In the sun? In the shade? In a draught?
- Each group should make a prediction and plan their experiment. What equipment will they need? What will they measure? How will they present their results?
- Discuss with your pupils the need to keep everything the same except the one thing they are investigating – here, this is their method of drying. So they will need to make sure that each piece of cloth is the same size and have the same amount of water on it at the start.
- When groups have their plan and their equipment, let them try their investigation.
- Each group should present their findings to the class; they should include the best way to dry the cloth and things that went wrong in their investigation.
Resource 1: Surviving in the desert
![]() Teacher resource for planning or adapting to use with pupils
Teacher resource for planning or adapting to use with pupils
Even if you are stranded in the desert with no water, you can collect water from the soil to drink if you have a clear piece of plastic sheeting and an empty jar or container. The diagram shows how you can do this:
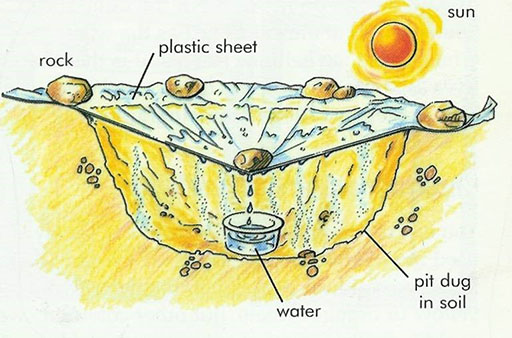
Can you explain how this works?
- The heat from the sun causes water in the soil to evaporate.
- The water vapour rises in the air.
- When it meets the cooler sheet it condenses and turns back to water.
- The water runs down the inside of the sheeting and collects in the jar.
Could you try this with your pupils?
Resource 2: Sample mind map
Preliminary activity – creating a mind map of all we know about water
![]() Teacher resource for planning or adapting to use with pupils
Teacher resource for planning or adapting to use with pupils
Pupils work in small groups, talking and thinking about different aspects of water, and creating a mind map of one particular aspect. The aspects set out include:
- properties of water;
- where water is found;
- pollutants;
- uses of water;
- sources;
- dangers;
- cultural beliefs.
This is a very valuable activity. Instead of testing what the pupils don’t know, they have an opportunity to share what they do know. They are encouraged to help one another, not to compete against one another. This is a good way to assess what the pupils know and how well they work as a group.
The following page shows a mind map of all the information teachers thought of at a workshop:

Resource 3: Instructions for making a waterwheel
![]() Background information / subject knowledge for teacher
Background information / subject knowledge for teacher
You will need a knitting needle, glass or plastic tube e.g. pen case (which the knitting needle can pass through), string (about 1. 5 m), modelling clay/prestik and stiff cardboard.
Cut out the eight blades for the waterwheel from cardboard – they should be rectangles about 6 cm by 4 cm.
Thread the knitting needle through the glass tube.
Tie the end of the string round the glass tube and cover the end with lump of prestik.
Then put a larger piece of prestik over this and stick the blades of your wheel into the prestik at regular intervals.
Tie a weight to the other end of your string.
Then try out your wheel. Hold the knitting needle and pour water over the blades on one side.
Resource 4: Making a big book
![]() Background information / subject knowledge for teacher
Background information / subject knowledge for teacher
Reasons for making a big book
- If the books are interesting, then pupils learn that reading is interesting.
- If the books are boring and carry little relevant meaning, pupils see reading as a chore that has little to do with them and their interests.
- If pupils get the chance to actually make a book, they can see themselves as authors, and this is a very powerful thing.
- If pupils never find themselves and their lives in the books that they read, then they learn that books have little to do with them and they are less likely to want to have much to do with books.
- In other parts of the world, many pupils are encouraged to make their own books at school (together or on their own). These pupils love reading and read well.
- There is also a trend to use very large books for the early stages of reading so that learning what reading is about can be a shared activity. With a large book, a teacher can help the whole class to become readers.
Thank you for a drink of water
This book tells the story in reverse of how a child gets a drink of water. It traces the story back to the original provider – the sun. You could adapt this story to your own setting such as a village camp or town and make your own book with your pupils. Make sure all your pupils are involved. Plan out each page and then organise different groups to complete each page. Your pupils could show their book to other pupils in the school.
Adapted from: Primary Science Programme Workshop Report – Kenyon & Kenyon (1996)
Resource 5: Surface tension – information for teachers
![]() Background information / subject knowledge for teacher
Background information / subject knowledge for teacher
If you had never seen a steel needle floating on the ‘thin skin’ of the surface of water, you might have been as surprised as your pupils are likely to be when you demonstrate this. But what is the explanation?
Think it out for yourself. Try to imagine the actual particles of water. In your mind’s eye, see them free to flow and move past and between each other. But they are always being held together by weak forces of attraction. This is happening in all directions. At any one moment in time, any one particle will have neighbours on all four sides (left, right, front and back). There will also be neighbours above and below. Do you get the picture?
Now think of a particle at the surface. It has no particles above it. That leaves the particles at the surface with extra attractive force to spare, so the particles at the surface will hold together more strongly. This creates a tough, fairly strong, temporary skin across the surface. Scientists agree to call this extra pull between surface particles of certain liquids, surface tension.
Water has a much higher surface tension than most other liquids. You might like to try the experiment with other liquids to show this.
Can your pupils think of other examples of surface tension?
Other examples include the shape of water droplets and insects walking on water.

A water droplet – surface tension changes their shape
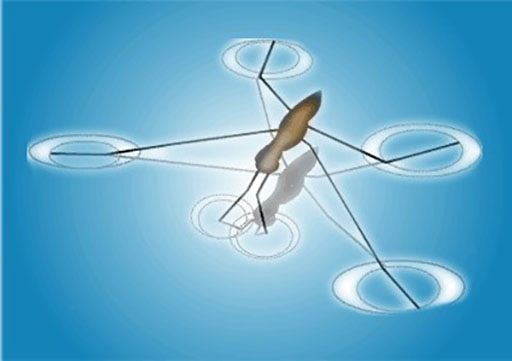
The insect can walk on the water because of the surface tension on the surface of the water.
Original source: http://citt.ufl.edu/ Marcela/ Sepulveda/ html/ en_tension.htm (Accessed 2008)
Acknowledgements
Grateful acknowledgement is made to the following sources:
Photographs and images
A water droplet: http://citt.ufl.edu/ Marcela/ Sepulveda/ html/ en_tension.htm (Accessed 2008)
Insect walking on water: http://citt.ufl.edu/ Marcela/ Sepulveda/ html/ en_tension.htm (Accessed 2008)
Text
Resource 4: Making a big book: Adapted from Primary Science Programme Workshop Report – Kenyon & Kenyon (1996)
Every effort has been made to contact copyright holders. If any have been inadvertently overlooked the publishers will be pleased to make the necessary arrangements at the first opportunity.
Section 4: Investigating air
Key Focus Question: How can you use models, experiments and discussions to help pupils build a picture of air?
Keywords: gases; air; particles; assessment; model; investigation
Learning outcomes
By the end of this section, you will have:
- considered how to support language learning in science;
- explored ideas about air and particles with your pupils;
- used different ways to assess your pupils.
Introduction
This section has two main purposes:
- to increase your own awareness of how language supports pupils as they think and behave scientifically;
to do this as you help pupils understand the nature of air and how it behaves.
1. Focus on language
Classroom teachers often resort to teaching science with talk in the mother tongue and writing and testing in the target language, such as Arabic, Kiswahili, English or French. Yet much valuable language learning can take place in science lessons because the language to be learned is ‘linked to action’.
This is the focus of Case Study 1. Even the action of ‘pointing out’ something in a short demonstration can help you assess pupils’ learning. What pupils say, as they point out something, reveals what they know. You follow this up in Activity 1 with a series of investigations in which the emphasis is on careful observations and deductions – what do pupils’ observations tell them about the nature of air? Encourage the use of lots of different descriptive words; this is an ideal time to reinforce language learning.
Case Study 1: ‘Ndiyakumsha’ – I have mastered it
Many teachers of younger pupils do not believe you can teach a whole science lesson through the medium of English. ‘The children will be lost,’ they say. At a recent workshop in South Africa, the co-presenter, Lawrence Manzezulu, challenged them to try.
We planned a lesson together (see Resource 1: An introductory ‘air’ lesson for a detailed lesson plan) with many opportunities where talk and thought could be linked to action. Nervously, a teacher volunteered to do the teaching, starting by explaining that she would only be speaking English – but pupils would be free to talk in whatever language they needed at the time.
She ended the lesson by asking what they had learned, and one pupil said (supporting his use of English with gesture) ‘We have learned, M’am, that air is up, down, in, out, all about.’ (That was an unforgettable teaching moment.) And the teacher said her first Xhosa word – ‘ndiyakumsha!’ (‘I have mastered it!’ in English.)
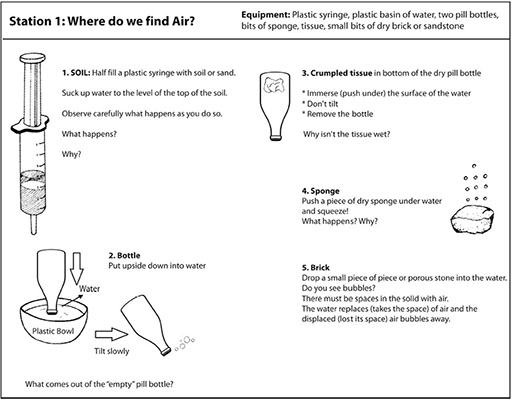
Activity 1: Air around us
Take a soccer ball (or other ball) and tell your pupils it represents the Earth. Hold it out in your left hand and move your right pointing finger slowly towards it from a distance as if it were a spaceship coming back to Earth. Tell pupils to raise their hands when they think the spaceship has reached the air. (Note when the hands go up.) Stop when you are a few millimeters from the surface of the ball. Tell them, ‘Here! Here is where the air starts.’ Did any pupils think or know that?
Now ask pairs of pupils to work through the small experiments in Resource 2: Air experiments to find out more about the air around them.
Ask pupils to record what they have found out about air:
- what it is like;
- how they know it is there;
- how it is different from water.
Are you surprised by their ideas? Listening to their ideas and observations gives you an opportunity to assess their understanding of what air is and how it behaves.
2. Exploring the properties of air
In the Key Activity of Module 1 Section 4, pupils observed and researched things that move in air. Activity 2 integrates well with that work and could be done at the same time. But you could start by observing and comparing non-living things, for example sheets of paper, parachutes, kites and airplanes. It can be useful to observe and compare things dropping, or falling through air. It begins to give pupils the idea that air must consist of small particles that are free to move, but nevertheless get in the way and push against things as they drop.
In Case Study 2, we read how a teacher uses a pupil’s question to get the class talking and thinking about how airplanes stay up. Activity 2 starts by getting the children observing using different languages, and then moves to a practical challenge where pupils’ thinking is revealed by what they do to solve a problem.
Case Study 2: What keeps a heavy airplane up in the sky?
When Paulina Kiyonga at KamonkoliPrimary School gave her pupils the chance to raise their own questions about air, Mutumba wanted to know what kept an airplane up in the air. Paulina got some advice from a colleague at nearby KamonkoliHigh School. Read his advice in Resource 3: What lifts an airplane?
Some of the demonstrations and activities he suggested really puzzled the pupils, especially the one where the table tennis ball could not be blown out of the funnel, no matter how hard David tried. Yet tiny Jimmy could hit the roof by blowing through a tube of cardboard. What impressed Paulina most was that her pupils even suggested some changes to the ‘blowing under the paper bridge’ activity. What would happen if the bridge were the other way up? She praised them and let them test this out as well.
At the end of the lesson, they gave a short presentation to the head teacher about this question.
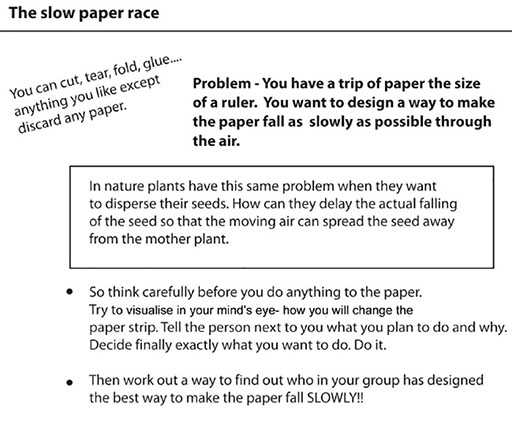
Activity 2: The exciting slow paper race
- First, demonstrate the ‘fast paper race’. Stand on your chair or table and hold high two identical sheets of A4 paper, labelled A and B.
- Ask pupils to guess which one will reach the ground first. Just before you drop them, crumple paper B into a tight ball. Repeat the action a few times asking the pupils to observe and compare carefully.
- Draw a two-column table on the board to record their observations and descriptions of how each paper fell. Pupils use the languages they know to describe the movement of the papers. This makes an excellent multilingual activity and gives you a chance to assess your pupils as they think and talk.
- Finish with the ‘slow paper race’. Give pairs of pupils identical long strips of paper about 30 cm x 5 cm. Their challenge is to modify (change in some way) the paper, so that it falls very slowly through the air. Which design falls slowest?
(Resource 4: The slow paper race gives additional ideas and advice.)
3. Using models to explain scientific ideas
The activities in this section will have begun to give the pupils some sense of what is called ‘the particulate nature of matter’. If you watch the way a sheet of paper cuts its way through the air as it falls, you can almost imagine the invisible particles getting in its way. Paulina mentioned particles when explaining the low pressure above the wing of an airplane.
It’s difficult to show pupils the particles in air – they are far too small to see even with a microscope, so we need to use models to help our pupils build a picture of what air is like. In the Key Activity, you use the pupils to be particles in the air. Many pupils enjoy learning by touching and doing, they enjoy being active and find it easier to remember what they have actually experienced.
In Case Study 3, one teacher builds a model to show how air is made up of a mixture of different particles and follows this up with investigations around breathing. Both types of approach give you the opportunity to assess your pupils’ learning.
Case Study 3: A model for air
Mabel Amooti really enjoyed science at high school, and she was enthusiastic about her pupils learning science in an active way.
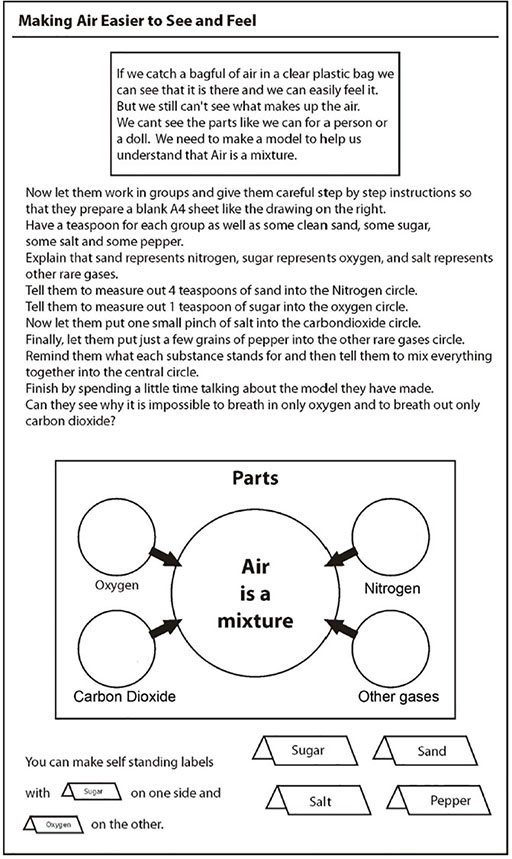
Her class had been looking at air and talking about how it was made up of different gases and how people breathe in oxygen and breathe out carbon dioxide. Mabel wanted to show that this isn’t right. You breathe in a mixture of gases and breathe out a mixture. It’s just that there is more oxygen in the air you breathe in and more carbon dioxide in the air you breathe out. How could she show this? The particles of each gas are invisible. To make it clearer, Mabel demonstrated with a model.
She used everyday granular solids (salt, pepper, sugar, sand) to represent the separate parts of air and then very clearly mixed them together. She was then able to show that it wasn’t possible to just inhale oxygen. Rather, all the gases go into our lungs but only the oxygen moves into the bloodstream. (Resource 5: Finding out more about air gives more detail about Mabel’s lesson plan.)
She followed this with two questions to her pupils:
- How many times do you breathe out in a minute?
- How much air do you breathe out in a normal breath?
She was delighted with their results. The class produced a lot of data. Together, they looked at the data and tried to answer questions such as: Who breathes faster, boys or girls? Older or younger pupils? and so on. They displayed their findings in charts on the wall using large sheets of newsprint.
Key Activity: What is air?
First, squirt a small amount of an air freshener into the air in one corner of your classroom. Tell pupils to put up their hands when they can smell it.
Ask: How has it got to your nose? Guide their discussion to ideas of particles; air is made up of very small particles, which are moving round all the time.
- Now tell your class that they will be air particles.
- Take them outside to a suitable space.
- Tell them they must freeze when you call ‘stop’.
- Ask them to run around.
- After a minute call ‘stop’.
- Ask: Where are you all? How are you arranged?
- Select five pupils to stand near you and give them each a hat.
- Now ask everyone to resume running.
- Call ‘stop’ after a minute.
- Ask: Where are the pupils with the hats? Have they spread out?
Gather your pupils round you and talk about this model. Who were the pupils with the hats? How will they move if the gas is hotter? colder?
Take your class inside and ask them to use these ideas to work in groups to draw a poster to show how cooking smells spread through a house.
Resource 1: An introductory ‘air’ lesson
![]() Teacher resource for planning or adapting to use with pupils
Teacher resource for planning or adapting to use with pupils
Note: Plan to start the double period/one-hour lesson just after a break, but do the introduction just before break.
Begin by giving one pupil a bucket and asking them to go outside to fetch you half a bucket of water. Then give another pupil a large clear plastic bag and ask them (you might want to pick a pupil who can take a joke) to go outside to fetch you half a plastic bag of air. This will surely cause a brief moment of puzzlement as it is of course a bit of a joke – but it proves a point – ‘air is all around us’. Insist that the air is fetched from outside. Then hand out three or four more clear plastic bags with which to catch air from:
- under a desk;
- in the far corner;
- by the window;
- from one pupil’s own lungs.
Emphasise to your pupils that air is all around us.
Divide the class into eight groups. Each group should choose a leader. Explain that when they come back after the break, they will take turns to work for ten minutes at each of four workstations to find out some more about air. This is called rotating group work.
During break time, set out the workstations with the necessary equipment, and a copy of the workcard for each station. Work cards are set out in Resource 2: Air experiments.
You could get the eight group leaders to help you do this so that they have been prepared for leadership roles in what is to come.
Then it is over to the groups to do the work. At the end of the lesson, ask pupils to summarise what they had to think about and what they feel they learned at each workstation.
Resource 3: ‘What lifts an airplane?’ Practical activities to carry out with your class
![]() Teacher resource for planning or adapting to use with pupils
Teacher resource for planning or adapting to use with pupils
The teacher at KamonkoliHigh Schoolmade Paulina photocopies of some notes from a primary science workshop that he had once attended.
These notes are copied for you below. Paulina worked through these activities with her class; they were fascinated and kept asking more questions.
One of the questions that children ask is ‘What keeps something heavy like an airplane up in the air?’ This is a really good question. Their teacher explained that there were a number of practical things that could be done to hint at how an airplane was lifted. But it does take quite careful explaining. One way to get people thinking is to compare blowing ping-pong balls with two different tools. You need the cardboard tube of a used toilet roll and a plastic funnel. You want to blow the ping-pong ball against the ceiling. Ask the class to predict which tool will be the best ping-pong ball blower – the toilet-roll tube or the plastic funnel. Then let them try. Now this is something to think about because the result is quite unexpected!!! What is happening in the funnel that holds the ball down so strongly? It can only be the air! Another teacher gives us another practical activity to try. Make a little bridge of paper by folding down two sides. Use a straw to flow air under the ‘bridge’. What do you predict will happen? What does happen? Why does the bridge collapse inwards and not bulge outwards? A third thing to try is to fold a sheet of A4 paper slightly off-centre, and then to glue down the two ends to form a model of the wing of a plane or a bird. Blow straight against the front edge and see what happens. The paper model lifts up. Why? | 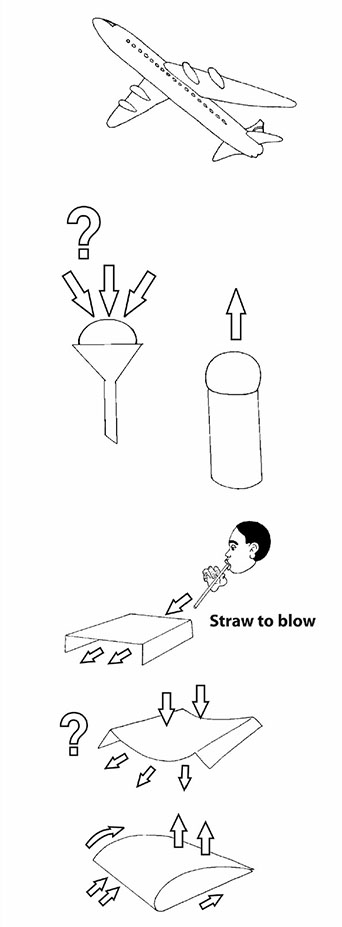 | |
Clues Think of a group or cluster of people walking along a road. They hear something dangerous behind them and start to run away. What happens to the arrangement of people? Yes. They tend to spread out as their speed increases. Now, try the same thing with a handful of marbles. First roll them slowly across a smooth surface and they tend to stay clumped together. Then roll them more speedily and they tend to spread out. When air is forced to move more quickly over a curved surface or through a narrow space, the particles spread out. This means that there is less pressure. So you can get a strong force or lift from the air on the other side. It can be useful to observe and compare things dropping or falling through air. First we tried paper races. We compared the way two identical bits of paper, labelled A and B, fall through air. Why does a crumpled sheet fall more quickly? Trying to find the best words to describe the observed movement of the flat sheet and the crumpled ball makes for an excellent multilingual language activity. Paper A (flat) Floats Wobbles Twists Dives Zigzags, like a leaf or a feather Paper B (crumpled) Drops Straight Fast Falls, like a stone | 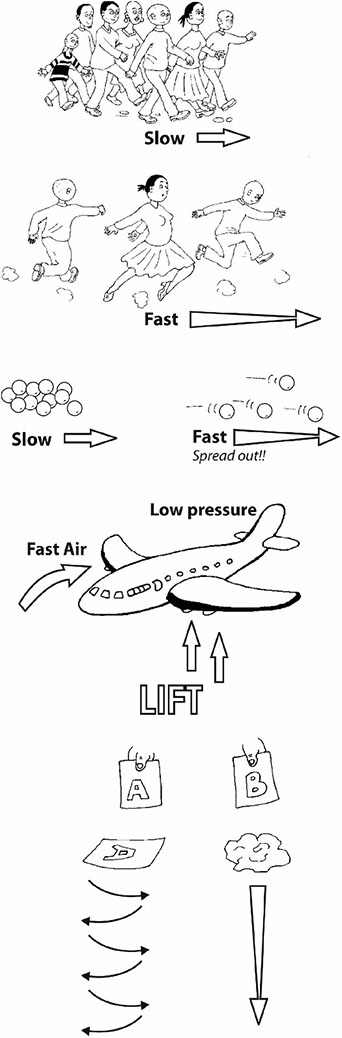 | |
Adapted from: Primary Science Programme Grade 4 Air Workshop Report
Resource 4: The slow paper race
![]() Teacher resource for planning or adapting to use with pupils
Teacher resource for planning or adapting to use with pupils
Adapted from: Primary Science Programme Grade 4 Air Workshop Report
Resource 5: Finding out more about air
![]() Teacher resource for planning or adapting to use with pupils
Teacher resource for planning or adapting to use with pupils
Acknowledgements
Grateful acknowledgement is made to the following sources:
Photographs and images
Resource 3 : ‘What lifts an airplane?’ Practical activities to carry out with your class : Adapted from Primary Science Programme Grade 4 Air Workshop Report
Text
Resource 4: The slow paper race: Adapted from Primary Science Programme Grade 4 Air Workshop Report
Every effort has been made to conta ct copyright holders. If any have been inadvertently overlooked the publishers will be pleased to make the necessary arrangements at the first opportunity.
Section 5: Wise use and reuse of materials
Key Focus Question: How can you develop responsible attitudes to material use and reuse?
Keywords: renewable; recycling; compost; projects; evaluating; values
Learning outcomes
By the end of this section, you will have:
- used different ways to develop responsible attitudes towards the use of material resources
- organised practical projects to reuse materials
- worked with your pupils to develop criteria to evaluate different products and processes.
Introduction
Teachers need to be aware of the importance of knowledge, skills and attitudes with regard to learning. Giving pupils the facts (knowledge) is the most straightforward, skills take more time and practice, but the most uncertain aspect is influencing values and attitudes. Think of a game of soccer. The whole crowd knows the facts (the basic rules of the game). A handful of players have the skill really well. But fairness, honesty, and dignity in defeat are all-important attitudes that are not always easy to come by.
This section introduces you to ways of developing responsible attitudes in your pupils towards the use and reuse of material resources.
1. Raising awareness of resources
So far in this module we have explored the origins of different materials, considered how they may be classified by their properties and how they may be processed and used in different ways depending on their states.
In this section, we try to make our pupils aware that we have limited supplies of many materials on the Earth. In Case Study 1, we read how a teacher introduces this idea by brainstorming a list of materials in terms of ‘renewable’ and ‘non-renewable’. (See Key Resource: Using mind maps and brainstorming to explore ideas.)
One very important resource that is in limited supply is crude oil. Do you know how many materials are made from crude oil? Crude oil is a mixture of liquids. It isn’t any use until the mixture has been separated at an oil refinery. The crude oil is boiled and each part of the mixture boils at a different temperature. This separation is called distilling and the different parts of the mixture are called fractions. Each fraction is then used to make different products.
In Activity 1, you use a diagram to help pupils appreciate how dependent we are on crude oil. You could follow this up with a display of products based on crude oil in your classroom – pupils could draw pictures or use images from catalogues or magazines.
Case Study 1: Getting the big picture
Amani in Khartoum, Sudan, draws a line down the middle of the chalkboard and writes the headings ‘Renewable’ on the left and ‘Non-renewable’ on the right. Then she helps her pupils through a brainstorm where they suggest names of materials and matter that are part of their everyday lives. They decide what family of substances each belongs to and where it fits on the board. (See Resource 1: Renewable and non-renewable resources for a typical result of such a whole class activity). They copy the final diagram and add to it over the next few weeks as they study renewable and non-renewable materials.
Activity 1: Unmixing mixtures – crude oil
Many sources provide a diagram explaining how crude oil is processed in a petrol refinery. (Resource 2: Products from crude oil gives an example.)
Remind your pupils about how water evaporates and leaves behind the impurities – Activity 2 in Section 3 – and then help them realise that other substances also evaporate to give gases. When they cool, these gases condense back to a liquid. Think of any cooking area; the walls and ceilings have to be cleaned of greasy deposits, formed when the vapours of hot fat and oils condense.
Explain that crude oil is a mixture of liquids called fractions; each fraction evaporates at a different temperature.
Analyse the diagram with your pupils – how many different ‘fractions’ are produced? How are the fractions different? What is made from each fraction?
Then divide your class into groups and ask each group to research a different group of products – they can find out uses, biodegradability (whether or not something rots away), safety. (See Resource 2 for suggestions for this type of work.)
2. Developing responsible attitudes
From the previous work, pupils will have begun to realise that we need to think carefully about using non-renewable resources. We need to start thinking how we can act to become part of the solution to this problem and not just part of making the problem worse. It is good to get pupils involved in positive action that benefits the environment in some way.
In Case Study 2, a teacher encourages the pupils to go out into their own community and think about the impact of people on their environment. (If you try the same activity and don’t have coloured paper, you could divide to the wall into two areas.)
In Activity 2, we suggest your class researches, designs and carries out a long-term compost-making project. You can start by introducing the terms ‘biodegradable’ (rots away) and ‘non-biodegradable’ (doesn’t rot away) and explaining what causes rotting – bacteria. Pupils will be able to give you many examples of materials in each of these groups – this could be a brainstorm activity.
Later, you might want to go into income-generating production of compost, which would involve systems for safely collecting local compostable waste and its subsequent sale or use in a school vegetable garden.
Case Study 2: Evidence of local and regional pollution
Looking at living things around the school has made Reuben Adekola’s pupils care more about the animals and plants in their environment.
Now he tries to do the same thing with awareness of the impact of people on our natural world. He talks to them about the idea of the ‘human footprint’. They discuss and list the harmful and helpful things they can think of that are happening in the local area. Then, he sets them a challenge. The whole back wall of the classroom is cleared to make space for a wall ‘newspaper’. Pupils go out into their environment as ‘reporters’ and come back with information and evidence in the form of notes and drawings. Anything that they feel is harming or not helping the environment is colour-coded on light brown card/paper, and the good things are written up/displayed on green paper. A glance gives an overall impression of the local situation: – mostly brown = BAD; mostly green = GOOD.
The pupils find so much information that the display spills over onto the side walls. They come with information from the media (press, radio and TV) about their own country and continent as well as across the world. The colour-coded display grows daily and raises discussion, argument and, most importantly, the attitude of concern.
Activity 2: Doing something positive with waste – composting
Read Resource 3: Making compost, which explains one method to do this.
Tell your pupils they are going to do a project in which they will do something positive with waste – composting. First they need to do some research about composting in their community in groups. What are their ideas? Can they think of anyone in their community who could help them? Could they ask this expert to visit their classroom or could they visit this person? (See Key Resource: Using the local community/environment as a resource.)
Gather together all the ideas for making compost from pupils and their research. You might add some of the ideas from Resource 3.
Then ask pupils to think: How will they assess which ideas are best? Give time for each group to develop a list of criteria.
Share criteria from each group and, in a class discussion, decide which are the most important. Pupils should write these in their books.
Now you are ready to make the compost. Each group could try a different method or you could all try one method. Don’t forget to give pupils time to plan (listing their equipment) and evaluate against the class criteria.
Did your pupils enjoy working in this way?
3. Group work with a focus on recycling
Pupils can explore other ways to recycle or reuse what would otherwise be waste material. People in poorer communities do this in very creative and imaginative ways out of necessity. Studies of people like the Khoi-san (Bushmen) in South Africa show how, in the past, they wasted almost nothing at all and made a minimal ‘human footprint’ on their natural world, treating it with enormous respect. How do we compare in modern times? (Resource 4: Ecological footprint gives information on calculating the size of your ‘footprint’ on the Earth.)
What kind of recycling is going on in your local community? Case Study 3 shows how one teacher and her pupils survey the local community for evidence of recycling.
In the Key Activity, we suggest you encourage your pupils to do an integrated science and technology exercise. They work at designing and making articles from waste and sell these at a special ‘entrepreneurial’ day to raise funds for the school or class.
Case Study 3: A recycling survey and challenge
Blossom Ubani involved her class in a tidy-up campaign around the school. She incorporated mathematics. They collected rubbish, sorted and tallied (counted) what they found. This gave them data to analyse. They presented their findings to the school in assembly, showing graphs and suggesting they make a school policy regarding pollution of the environment.
She followed this up with a survey of recycling in the local area. This was again presented in a school assembly. Her pupils showed the soccer balls that children had made from wrapped plastic, and the beautiful, useful handbags and purses that some local retired people had crocheted from strips of used plastic bags. Pupils also explained how the local game park had made their fences more visible to buck by attaching old lids of tins to the top strands of wire.
Finally, Blossom set her class a challenge: Devise criteria to test the balls in a competition to ‘make the best soccer/netball from waste material’. (See Resource 5: Criteria for appraising the best waste material ball.)
Key Activity: Making a product from waste
Here we suggest that pupils work in friendship groups to think of something that they could make from scrap and waste material. The product should have some value or use and perhaps could be sold at an ‘entrepreneurial’ day later in the year.
They might want to look at some old things, like corncob dolls, which were so popular in the past. How could these be updated? What about making toy cellphones for younger children? If you can crochet bags from strips of plastic, what about caps or ‘beanies’?
How will you get the pupils to account for the science in this work? As they work you need to move around the classroom talking to each group about what they have learned about matter and materials. They need to give evidence, or be able to tell, how they have thought about the properties and nature of the materials they use, and why have they chosen them. Ask them why they have chosen certain materials. What are their properties? Where do they come from? Are they renewable or non-renewable resources?
At the end, ask each group to present their product to the class. They should explain why they have chosen certain materials and if they are from renewable or non-renewable resources.
Resource 1: Renewable and non-renewable resources
![]() Background information / subject knowledge for teacher
Background information / subject knowledge for teacher
| Renewable resources | Non-renewable resources |
| Wood from planted trees – gum and pine | Wood from wild forest trees |
| Planted crops | Wild medicine herbs if too much is taken |
| Meat from farm animals | Threatened wild animals |
| Water (if we don’t pollute it) | Soil that has eroded won’t come back |
| Air | |
| ENERGY RESOURCES | |
| Water power (hydroelectricity) | Coal |
| Wind power | Oil |
| From the sun – solar energy | Petrol and diesel – from oil |
| Paraffin from oil | |
Note: You might see how the teacher has started by accepting most of the suggested items the pupils present and has tried where possible to use their own words. This gives them confidence to add more. If the teacher rephrases everything they suggest into textbook-type language many children get discouraged – accepting and working with their actual words is very important.
You might also have noticed how the teacher has steered the attention to energy aspects – by adding in a sub-heading. Depending on where they live, pupils might also know of natural gas, which is considered a non-renewable resource.
Resource 2: Products from crude oil
![]() Teacher resource for planning or adapting to use with pupils
Teacher resource for planning or adapting to use with pupils
This diagram shows an oil distillation column.
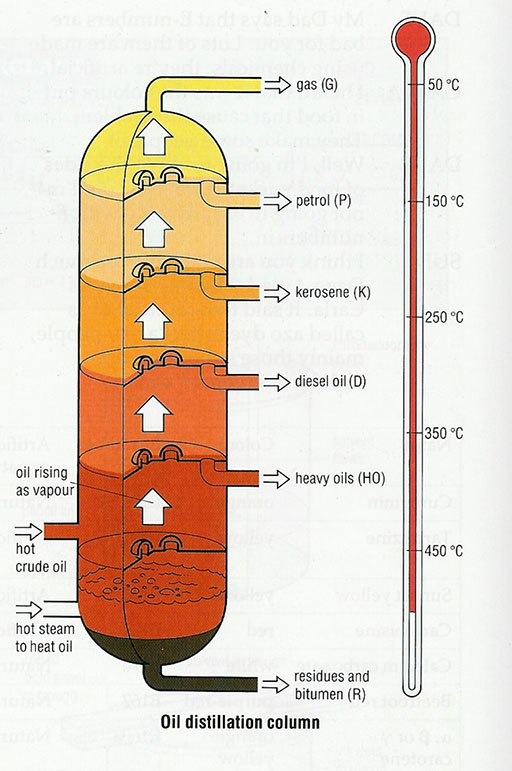
Original Source of diagram: Oxford Science Programme Book1, published by OxfordUniversity Press, p. 92 (1990)
| Uses of crude oil | |
| Fraction (or part) of the crude oil | Products from this fraction (sometimes after further treatment) |
| Gas (G) | Gas fuels, such as calor gas, making other chemicals |
| Petrol (P) | Fuel for cars, pesticides, drugs, plastics, fertilisers, detergents, solvents, making other chemicals |
| Kerosene (K) | Paraffin, jet fuel, white spirit |
| Diesel (D) | Fuel for trucks and buses, central heating oil |
| Heavy Oils (HO) | Lubricating oils and grease, waxes, polishes, making other chemicals |
| Residue (R) | Tar for road surfaces, waterproof roofing materials, fuel for power stations |
Teaching ideas
Teaching ideas would include making posters of products and by-products of crude oil using collages of magazine and newspaper adverts (you could show the products or brand names and symbols). Alternatively, you could make a display of empty containers. Products to consider include paraffin, diesel oil, petrol, lip balm, lipsticks, vaseline, lubricating oils, candles, tar and plastics.
Nigeria’s oil industry
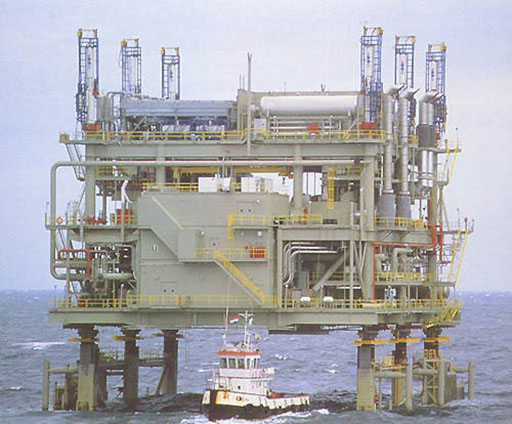
Image from http://www.offshore-technology.com/ projects/ ekpe/ images/ ekpe5.jpg (Accessed 2008)
As of September 2004, Nigeria was the largest oil producer in Sub-Saharan Africa, the fifth largest petroleum exporting country in the organisation of petroleum exporting countries (OPEC). Nigeria produces 30% of the total oil production in the African region. Oil income has historically provided about 95% of Nigeria’s foreign exchange earnings. The source of Nigeria’s wealth is the Niger Delta, a wetland of about 70,000 sq km. The Niger Delta is made up of nine oil producing states and has an estimated population of about 20 million people, amounting to about 16.7% of the Nigerian population (120 million).
Map of the Niger Delta
http://www.usip.org/ events/ 2005/ 1107_niger.html (Accessed 2008)
Adapted from: http://en.wikipedia.org/ wiki/ Nigeria_oil#Geology_and_reserves (Accessed 2008)
Resource 3: Making compost
![]() Background information / subject knowledge for teacher
Background information / subject knowledge for teacher
The best and cheapest way to make garden soil better is to make your own compost. It only costs effort and a little bit of time and care.
Choose an out-of-the-way part of the school garden that is quite sunny. Clear away any weeds and rubbish.
When you have an open space, one of the pupils can mark out a circle with a radius of about 75 cm. If this pupil stands in the centre of the circle and turns around while holding out a walking stick, a good circle will have been drawn.
Take spades and dig up the soil in the circle. Dig to the depth of the blade of the spade. Use a garden fork to make the soil in the circle loose.
Make a small pile of spare soil next to your circle by moving about a third of your loosened soil from the circle.
Stick a central pole or straight branch into the soil in the centre of the circle.
Now you can start the compost-making process. Put a layer of twigs and old leaves you have collected on top of the loose soil. The more you have the better.
Next, put down a layer of stalks and stems from plants and any kitchen waste (potato peelings, old tea bags or tea leaves, eggshells). You can even add shredded scraps of paper.
Then add a dry layer of grass cuttings, dry grass or old dry leaves.
Finish by putting a thin layer of soil on top. Use the loosened soil from the pile next to your compost heap.
Go on adding more layers:
- first stalks, stems, twigs and leaves;
- then kitchen waste and green cuttings;
- then dry grass, old leaves and manure (if you can find it);
- finish each layer with a last layer of soil.
Sprinkle a little water – but don’t make the compost heap too wet.
The height will drop as the matter rots down. Then you can add more layers over time. Always keep a layer of soil on the top – this deters the flies.
Resource 4: Ecological footprint
![]() Teacher resource for planning or adapting to use with pupils
Teacher resource for planning or adapting to use with pupils
Access the website below to take part in the ecological footprint quiz. This is displayed in many different languages.
http://www.myfootprint.org (Accessed 2008)
Overview
The ecological footprint is a tool that measures how much land and water area a human population needs to produce the resources it uses and to absorb its waste.
In order to live, we consume what nature offers. Every action has an impact on the Earth's ecosystems. This is of little concern as long as human use of resources does not exceed what the Earth can renew. But are we taking more?
Today, humanity's ecological footprint is over 23% larger than what the Earth can regenerate. In other words, it now takes more than one year and two months for the Earth to renew what we use in a single year. We are surviving by using up the Earth’s resource stores. We are both using up non-renewable resources such as minerals, ores and petroleum but also renewable resources such as fish stocks, animals, forests and groundwater – we are using these up faster than the Earth can resupply them. We depend on these ecological assets to survive. Livelihoods disappear, resource conflicts happen, land becomes barren and resources become increasingly costly or unavailable. This is made worse by the growth in human population, as well as by changing lifestyles that place more demand on natural resources.
By measuring the ecological footprint of a population (an individual, a city, a nation, or all of humanity) we can assess how much of the planet we are using, which helps us manage our resources more carefully. Ecological footprints enable people to take personal and collective action so that we live within what the Earth can regenerate.
The challenge and the goal: sustainability
Sustainability is a simple idea. It is based on the fact that when resources are used faster than they are produced or renewed, the resource is depleted (reduced in number) and eventually used up.
In a sustainable world, people’s demand on nature is in balance with nature's capacity to meet that demand.
Calculate your ecological footprint
Answer the following questions to see how big your ecological footprint is. Add up your points, indicated at the end of each question (for example [2]) to see if you are making a HIGH, medium or low impact on the environment around you. Remember, the smaller the footprint, the better!
1. How much of the food that you eat is processed, packaged and from far away?
a) Most of the food I eat is packaged and from far away. [3]
b) About half the food I eat is packaged. [2]
c) Very little. Most of the food I eat is unprocessed, unpackaged and locally grown. [1]
2. What is the size of your home?
a) 30 sq m or smaller [1] similar size to a large truck
b) 90–130 sq m [2] similar size to half a football pitch
c) 200 sq m or larger [3] similar size to a full football pitch
3. Do you bicycle, walk, or use animal power to get around?
a) Most of the time [1]
b) Sometimes [2]
c) Rarely [3]
4. On average, how far do you travel on public transportation each week (bus, train, ferry, shared taxi)?
a) 25–100 km per week [3]
b) 20 km per week [2]
c) 0 km per week [1]
5. On average, how far do you go by car each week (as a driver or passenger)?
a) 0 km per week [1]
b) 250–500 km per week [2]
c) 700 km or more per week [3]
6. Compared to people in your neighbourhood, how much waste do you generate?
a) About the same [2]
b) Much less [1]
c) Much more [3]
Now add up your points and refer to the table below.
| If you scored between 0–6 points, you currently have a low impact ecological footprint. Well done! See if you can improve your score by using some of the ideas below. | If you scored between 7–12 points, you currently have a medium impact ecological footprint. See if you can improve your score by using some of the ideas below. | If you scored between 13–18 points, you currently have a HIGH IMPACT ecological footprint. See if you can improve your score by using some of the ideas below. |
| Set up a group in your area to discuss issues and raise awareness about the impact humans have on the environment. |
|
|
Resource 5: Lesson plan: Finding the best waste material ball
![]() Teacher resource for planning or adapting to use with pupils
Teacher resource for planning or adapting to use with pupils
It is a good idea if you help your pupils to think about how you will judge the best ball before they start making balls from any safe, reasonably clean, waste material.
First, start with a brainstorm where you and your pupils list the qualities of a ‘good’ ball. Expect or work towards ideas such as:
A good ball is:
- properly round and the right size;
- rolls straight;
- bounces well;
- strong;
- soft enough to catch.
Your pupils might have some more ideas – make a list on the chalkboard.
Second, you and your pupils need to discuss how each quality can be measured.
- Properly round and the right size: Does the ball fit evenly through a special wire or cardboard hoop of the exact/right diameter no matter which way up it is? Can you hold it comfortably?
- Rolls straight: Measure by actually rolling – you need to decide how far to roll it along a line on the ground.
- Bounces well: You will need to drop the balls from the same height and measure how high they bounce back to compare them.
- Strong: This might have to be tested by actual use. How long before repair or replacement is needed?
- ‘Soft enough to catch’: Does it hurt your hands when you catch it?
Finally, you need to set scores for the tests you have established and then try them to see if it works (one example is given below).
You will need to develop this score sheet on the board with your pupils. You could divide your class into groups – each group to develop the scores for one property.
| SCORE for the BALL | 5 | 4 | 3 | 2 | 1 |
| Shape and size | Nearly perfect fit through hoop | Slight, but even gap <1 cm | Uneven gap >1 cm | Uneven fit with big gaps | Totally wrong size |
| Rolls straight | Perfectly along the straight line | <5 cm off the line | 5–10 cm off the line | >10 cm off line | Not on the line at all |
| Bounce from 1. 5 m | About 1 m | More than 50 cm | Between 25–50 cm | Only about 10–25 cm | Hardly any bounce at all |
| Strong – how long it lasts | Lasts more than 10 minutes | 5–10 minutes of use before it is damaged | Lasts for 2–5 minutes before it is damaged | Lasts for 2 minutes before it becomes damaged | Not even 1 minute of use before it needs repair |
| Soft enough to catch | Catch easily with no hurt | Occasionally causes stinging | Painful after a few catches | Some scratches | Damages your hands – scratches and stings |
Give each group time to find materials and make their ball.
Now ask each group to test their ball against the criteria. What is the score for each criteria? What is the overall score?
You may find that you and your pupils need to change the criteria once they have made their balls. This would show that they are developing critical thinking skills. They may also think of adding qualities, for instance, appearance. That also deserves some praise.
Acknowledgements
Grateful acknowledgement is made to the following sources:
Photographs and images
Oil distillation column: Oxford Science Programme Book1, published by Oxford University Press, p. 92 (1990)
Oil rig: http://www.offshore-technology.com/projects/ekpe/images/ekpe5.jpg (Accessed 2008)
Map of the Niger Delta: http://www.usip.org/ events/ 2005/ 1107_niger.html (Accessed 2008)
Text
Nigeria’s oil industry: Adapted from http://en.wikipedia.org/wiki/Nigeria_oil#Geology_and_reserves (Accessed 2008)
Ecological footprint: http://www.footprintnetwork.org (Accessed 2008)
Every effort has been made to contact copyright holders. If any have been inadvertently overlooked the publishers will be pleased to make the necessary arrangements at the first opportunity.