Use 'Print preview' to check the number of pages and printer settings.
Print functionality varies between browsers.
Printable page generated Thursday, 9 July 2026, 6:54 PM
Module 3: Secondary Science - Physics
Section 1 : Properties of matter
Theme: Probing students’ understanding
Learning Outcomes
By the end of this section, you will have:
- provided opportunities for students to develop understanding of the properties of matter through talking;
- planned questions at different ability levels in order to find out about your students’ understanding of the properties of matter;
- used students’ writing and drawings to probe their understanding of how particle theory explains the properties of solids, liquids and gases.
Introduction
At the end of teaching a topic, teachers usually set a test or an exam to find out what their students have learned. They are often dismayed to find that it is not as much as they expected but by this time it is too late to help students. A good teacher will find out what students understand as they go along and what the students are finding difficult and help them to make progress.
This unit has three short activities that will fit into your normal teaching about properties of matter and will show you how to find out what your students understand. Don’t worry – the activities won’t prevent you from finishing the syllabus; they are fairly short and will help your students to learn. Once you have tried these activities, you will be able to adapt them when you teach other topics.
1. Exploring students’ prior knowledge
Students have their own ideas about a topic and an effective teacher takes account of these ideas when teaching. So a good way to start teaching any topic is to find out what your students already know about the topic. You may be surprised about what they have learnt from newspapers, adults, peers, older brothers and sisters and observations. Often their ideas are not the same as the scientific ideas we want them to understand. Why do you think that is the case?
At primary school, students may have learnt that matter can be divided into solids, liquids and gases. They will not necessarily remember all the details, but they will certainly not be ‘empty vessels’. If teachers assume that they need to start from the beginning then students easily get bored and there is a danger that they will keep any misconceptions they have.
Activity 1 is designed to consolidate and extend their understanding and for you to develop your ability to probe understanding through questioning. It is important to make sure that your questions challenge your students. Resource 1 reminds you about the different types of questions that you should be asking. It is a good idea to plan the questions that you could ask before the lesson. Think about how you might respond to their answers. You could ask several students the same question then ask the students to select the best one. You could also ask a follow-up question: ‘Why do you think that?’
Resource 2 provides some background to the teaching activity described in Case study 1. The activities will help you to build on the knowledge and understanding that your students already have.
You start by revisiting ideas that they will have met in primary school, but then extend these to more substances, helping them to realise that lots of things around them are a mixture of a solid and a gas, or a solid and a liquid. For example, a sponge looks like a solid but doesn’t have all the properties of a solid.
Case study 1: Investigating a new substance
Mr Yaya planned a fun activity for his class (see Resource 2). When he was at college one of the lecturers showed him that if you mix corn starch and water in certain quantities they make a very peculiar substance. He went to an internet café and found a film on YouTube of someone walking on custard (a mixture of corn starch and water). Mr Yaya divided his class into groups and gave them a bowl of corn starch which they had to mix with water. He gave them 10 minutes to play with it. He then gathered them round the front and started asking them questions. He started with closed, easy questions based on their observations. What colour is the mixture? Does it smell? Then he asked some more open-ended questions. What have you discovered? Do you think it is a solid or a liquid? Why do you think it is a solid or liquid? He let several different students answer the same question. He asked them about particles. He found that several children remembered how the particles are arranged in a solid, but a lot were confused by liquids. He drew diagrams on the board and gave them another chance to experiment with the mixture. While they were working he asked them questions to make them think about whether it was a solid or a liquid and how the particles might be arranged. Finally he gathered them round the front and asked one group to argue in favour of it being a liquid and one to argue for it being a solid.
The students had a lot of fun and by the end, Mr. Yaya was confident that they remembered the properties of solids and liquids and how the particles were arranged in each one.
Activity 1: Using questioning effectively
You will need to collect a set of objects or pictures of objects that represent solids, liquids and gases. Some of them will be obvious, some will be more difficult to classify as they will be a mixture of a solid and a gas (e.g. a sponge) or a liquid and a gas (e.g. a picture of a cloud, bottle of fizzy drink) and some will be unusual (e.g. jelly or plasticine). Resource 3 has some suggestions. Before the lesson divide your objects (or pictures) into two groups – those that are obvious and those that are more complicated. Gather your class round the front. Ask easy closed questions that will help them remember the properties of solids, liquids and gases. Summarise the properties of solids, liquids and gases on the board. (You could ask one of the students to do this). If as a result of your questioning you find this is too easy for them, go straight on to the more difficult objects.
Good teachers will change their plan if necessary to stop the students getting bored. When you are confident that the properties of solids, liquids and gases are understood, introduce the second group of pictures or objects. Ask them to work in groups of four to discuss how the objects can be classified. Keep asking them why. Why can the sponge be compressed? Why does sand flow? Get each group to report back on one of the objects. Encourage the others to ask questions.
2. Using discussion to develop understanding
Talking about a problem is a good way to organise your thoughts and ideas. In Activity 2 you will provide your students with the opportunity to discuss the answers to a set of questions with each other. Listening to their conversations will give you insights into their thinking and help you to work out how best to support them. It will also provide an opportunity for the students who understand the topic quite well to help those that don’t. You should think about how to divide the class up. Will you let them work with their friends or will you organise the class so that they work with different people in mixed ability groups? Activity 2 is designed to help your students understand the particle model for matter. You can also begin to get them to make the link between the properties of the material and the forces between the particles. The case study describes a different way of organising the same activity. In both cases the aim is to promote discussion.
Case study 2: Organising a ‘card sort’
At a teacher education seminar, teachers worked together to plan practical, hands-on physics lessons that would help their students to understand the properties of materials. One of the student teachers, Mr Onsla, wrote cards with statements about particles (Resource 4). He then brought carton boxes into the classroom. He divided the class into groups of five, and asked each group to pick three boxes and to label each for the states of matter. On the side of each box the group then drew a diagram to show how the particles are arranged. Each student had three cards which they had to place in the correct box. The students had to explain why they placed a certain item in the specific box and the others could ask questions. The teacher noted that there were a lot of discussions among the students as they tried to make decisions.
Activity 2: Think-pair-share
Write the statements in Resource 4 on the board and then follow the steps suggested. (Each statement should be numbered for ease of discussion at the end).
- Students should work on their own to match the number to solid, liquid or gas.
- Students compare their answers with a friend and make sure that they agree.
- Each pair shares their answers with another pair and they discuss the answers until they all agree.
- The groups of four compare their answers with another group and discuss until they agree.
- Finally, ask one representative from each group of eight to report on their answers. Wait for the students to point out any errors – don’t do it yourself!
You can use this idea of think–pair–share with lots of different topics in science. It gives the students the opportunity to think for themselves, and it is a safe environment for them to make mistakes. They have to be able to justify their answers and students often find it easier to talk about their ideas than write them down. Talking also helps them to understand, and shows you what is going on in their mind.
3. Encouraging writing
One of the reasons why physics sometimes seems difficult is that we cannot see the things we are talking about. It is full of abstract ideas. You can help your students to understand ideas about physics by making the subject more concrete. You can do this through experiments and models. Giving your students the opportunity to write about their ideas is a very good way to find out what they understand. So getting them to write about an experiment in their own words can really help your students to understand and helps you to see what they do and don’t understand. Resource 5 provides suggestions about how you might use writing to elicit understanding. In Activity 3 you will carry out some demonstrations which your students will explain in their own words. You will provide some key words that you expect them to use and encourage them to use diagrams to explain their ideas. This will demonstrate how particle theory can be used to explain how solids, liquids and gases behave. Case study 3 shows how a teacher uncovered a significant common misconception amongst his pupils and used this to change his lesson plan.
Case Study 3: Using role play to support understanding
Mr Molu asked his class to use the particle model to explain why liquids flow, why solids are hard and why gases can be compressed. He realised when he read what they had written, that there was a lot of confusion, particularly about the liquids and his students did not get very high marks. The students complained that everything in physics is abstract and difficult. He decided to try to motivate the class and make everything as concrete as possible. The previous day he had downloaded a simulation of how particles of solids, liquids and gases are arranged. In a double lesson he started by showing the class the simulation. Then he divided the class into three groups and asked them to role-play the simulations. Each student represented a particle: some students worked together to act being a solid. Others acted being a liquid and or being a gas. They were to report to the entire class how it felt to be solid, liquid and gas. Mr Molu posed the following questions:
- How close are particles in each case?
- How did the particles move in each case?
After this each group discussed and drew the arrangements, which they later redrew on the chalk board. The class was very lively and the students said that for once they experienced joy from being in a physics class.
Activity 3: Effective demonstrations
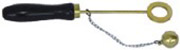
In this activity you will do some demonstrations that illustrate some of the properties of materials and get the students to explain the demonstrations in their own words. You should write some of the key words on the board. The demonstrations will depend on the equipment that you have, but could include the expansion of a solid when it is heated (ball and ring), the expansion of a liquid when it is heated (coloured liquid in a glass bottle), a needle floating on water, potassium permanganate dissolving in water.
The important thing is to give the students the chance to explain the ideas themselves. Resource 6 gives you some ideas. Use the demonstration to practise your questioning. Start by asking simple closed questions designed to make your students observe carefully and then get them to try and explain their ideas. By giving them the chance to explain the demonstrations in their own words, you will really be able to see if they understand.
Resource 1: Questioning
![]() Teacher resource to support teaching approaches
Teacher resource to support teaching approaches
Questioning
Good questioning is really important and is not as simple as it first may seem. It can help you develop good relationships with your students, it can help your students to organise their thoughts and therefore help them to learn, and it can provide you with valuable insights into their thinking. Good questions can promote thought, encourage enquiry and help with assessment.
By thinking carefully about the sorts of questions that you can ask, you will improve your teaching.
It is helpful to think of questions as being ‘open’ or ‘closed’ and ‘person’ or ‘subject-centred’.
Closed questions have a single correct answer. They can reassure students and help you to find out what they remember. But too many closed questions can limit the opportunities to explore thinking and develop understanding. They are often undemanding and can be quite threatening if the student lacks confidence.
Open questions have no right answer, or several right answers. They give you opportunity to find out what your students are thinking, and can be less threatening for some students.
Subject-centred questions ask things like ‘what goes into a plant?’ and ‘what sort of rock is this?’
Person-centred questions focus on the student and are less threatening and more learner-friendly: ‘What do you think goes into the plant?’ ‘What do you notice about the rock?’
A committee of educators chaired by Benjamin Bloom devised a taxonomy of types of questions in which they identified ‘lower order questions’ and ‘higher order questions’. Research shows that lower order, recall-type questions tend to dominate classrooms. This leads to an emphasis on remembering facts and reduces the opportunities for creativity, thinking and developing understanding (see table).
It is important that you plan your questions appropriately. When you are doing a practical demonstration, for example, or introducing a new topic, write out a list that includes some lower order and some higher order questions. This way, you will be using questions to help your students to learn. Just like every aspect of teaching, you need to practise! You also need to think about how you respond to your students’ answers. Try and give them time to think, ask several students the same question or let them discuss the answer before they respond.
Conventionally, students are asked to put their hands up when they answer a question. You probably find that the same students frequently put their hands up and some do so very rarely. It can be very effective to ask specific students to answer your questions and not to ask them to put their hands up. Everyone will have to listen as they know that they might get asked. When you first start doing this, make sure that you direct easy questions at students who you know will find the work difficult. If they can successfully answer some of your questions, they will become more confident.
| Type of questions | Purpose | Examples |
| Lower order questions | ||
| Recall | To see what your students remember | Who is? What are? Where are? When did? |
| Comprehension | To see if your students understand what they can remember | Explain why? What are the differences between? What is meant by? |
| Application | To see if your students can use their knowledge | How would you classify these invertebrates? What is the evidence that this is a metal? |
| Higher order questions | ||
| Analysis | To help your students think critically To see if they can make deductions and draw conclusions | Why? What do you think will happen if? What do your results show? What would be the effect on? |
| Synthesis | To help your students create new ideas from existing information | What would happen if there was no friction? Suppose the Earth rotated at half the speed? |
| Evaluation | To encourage your students to form opinions and make judgments | How effective is? Which is best and why? What do you think? |
Resource 2: Corn starch and water
![]() Background information / subject knowledge for teacher
Background information / subject knowledge for teacher
Corn starch and water – a curious mixture!
Caution: Always dispose of the mixture in a rubbish bin. Do not put it down a sink as it will cause a blockage.
Your students will probably be familiar with the properties of solids, liquids and gases. They will be able to describe their properties and, classify a substance correctly on the basis of its properties. This is fine so long as a particular substance falls neatly into one or other of the categories. But what happens if it doesn’t? You have seen, for example, that sand, though composed of tiny grains of solid behaves, in some ways, like a liquid. Only one individual grain on its own would satisfy all of the criteria for a solid.
So some substances are definitely difficult to classify. However, you can use this as an opportunity to probe your students’ understanding of the nature of solids, liquids and gases. In this activity you will make a substance that is difficult to classify. The substance is made from water and cornstarch. In order to experiment with it you will need the following materials:
- One box of cornstarch, 450 g (16 oz), or equivalent (a powder with a high starch content)
- A large mixing bowl
- A jug of water
- A spoon
- A large plastic food bag
- Newspaper or similar to cover the floor
- Water
- Food colouring
- A cup or beaker.
Method
- Pour approximately 1/4 of the box (about 100 g, 4 oz) of cornstarch into the mixing bowl and slowly add about 1/2 cup of water. Stir. Sometimes it is easier (and more fun) to mix the cornstarch and water with your bare hands.
- Continue adding cornstarch and water in small amounts until you get a mixture that has the consistency of honey. It may take a few tries to get the consistency just right, but you will eventually end up mixing one box of cornstarch with roughly 1 to 2 cups of water. As a general rule, you're looking for a mixture of approximately 10 parts of cornstarch to 1 part water. Notice that the mixture gets thicker or more viscous as you add more cornstarch.
- Sink your hand into the bowl of cornstarch and water, and notice its unusual consistency. Compare what it feels like to move your hand around slowly and then very quickly. You can’t move your hand around very fast! In fact, the faster you thrash around, the more like a solid the mixture becomes. Sink your entire hand in and try to grab the fluid and pull it up. That’s the sensation of sinking in quicksand.
- Drop a small object into the cornstarch mixture and then try to get it out. It’s quite difficult to do.
- Slap the surface of the mixture hard. If you have used just the right proportions it will not splatter all over the place as you might have expected.
Explaining the properties of cornstarch ‘quicksand’
Cornstarch mixed with water is an example of a heterogeneous mixture. That’s a bit of a mouthful! Basically it means that both components of the mixture can be seen in the mixture, or they could be if the particles of cornstarch were not so small. Over time the particles settle out and sink to the bottom so do not pour any remaining mixture down a sink – the water will evaporate and leave a solid lump of matter that will block it.
In fact the cornstarch and water mixture acts like a solid sometimes and a liquid at other times. The mixture is in fact an example of a suspension – a mixture of two substances, one which is finely divided (the solid) dispersed in the other (the liquid).
When you slap the surface with your hand you force the long starch molecules closer together. It feels like a solid. This impact traps water molecules between the starch chains and forms a semi-rigid structure. When the pressure is released, the cornstarch flows again.
If you push your finger slowly into the mixture, it goes in easily and it feels like a liquid.
All fluids have a property known as viscosity – or resistance to flow. The more resistance to flow a liquid has the greater its viscosity is; e.g. honey,. Water has a low viscosity. Sir Isaac Newton proved that viscosity is affected by temperature. So, if you heat honey, its viscosity is less than that of cold honey. Cornstarch, water mixtures and quicksand are regarded as non-Newtonian fluids because their viscosities change when a force is applied, not when heat is applied.
Resource 3: Background information on states of matter
![]() Background information / subject knowledge for teacher
Background information / subject knowledge for teacher
A solid
| A liquid
| A gas
|
Some examples of materials that are harder to classify
Some materials appear to be a single substance but aren’t:
- Sand (or powders, like flour). This flows (like a liquid) but is made of tiny bits of solid. There is air in the gaps between the sand particles.
- Modelling clay (e.g. ‘plasticine’) is a mixture of a solid and a liquid. It loses its oil as it gets older, and becomes, dry, hard and unworkable.
- A cloud floats in the air (like a gas) but is composed of many tiny droplets of water in air.
- A jelly is a mixture in which small amounts of a liquid are mixed into another material which is a solid.
- Toothpaste is a mixture in which there are small amounts of a solid mixed in amongst another material which is a liquid.
- A foam is a mixture in which there is a gas mixed into another material which is a liquid.
- A sponge is a solid with air or liquid mixed with it. As a result it can be compressed, unlike most solids.
- Some liquids (like tomato ketchup) are thick and do not flow very well, but if you shake them, they become thinner and flow easily.
Resource 4: Card sort activity
![]() Teacher resource for planning or adapting to use with pupils
Teacher resource for planning or adapting to use with pupils
Set of statements about solids, liquids and gases
| 1. Particles are held together by a strong force. | 2. Particles are moving freely in all directions. | 3. Particles are slipping past each other. |
| 4. Particles are not in an orderly structure, but are held very close together. | 5. Particles keep to a particular place in an orderly structure. | 6. The particles are spread out. Each particle moves in a straight line until it collides with another particle. |
| 7. Particles can only vibrate. | 8. Particles are constantly colliding with each other and changing position. | 9. Particles are in constant, rapid movement. |
| 10. Heating the substance makes the particles move around faster and collide more often. | 11. Heating the substance makes the particles vibrate more vigorously. | 12. Heating the substance makes the particles move around faster. |
| 13. Collisions make particles change speed and direction. | 14. Occasionally, one particle on the edge of a group will be knocked so hard it escapes from the group. | 15. Some particles are moving much more slowly than most, some are moving much more quickly. |
Answers for teachers
Solid: 1, 5, 7, 11
Liquid: 3, 4, 8, 10, 14, 15
Gas: 2, 6, 9, 12, 13, 15
Resource 5: Students’ writing
![]() Teacher resource to support teaching approaches
Teacher resource to support teaching approaches
Students’ writing
Getting students to write about their ideas is a good way to find out what they understand. Traditionally most of the writing that students do in science involves writing short answers to closed questions, or copying notes from the board. If this is all the writing that your students do, then you will be missing opportunities for them to demonstrate what they know and to be creative.
Writing in science should definitely not be restricted to answering questions and copying notes. There are a variety of ways in which you can use children’s writing to probe their understanding, develop their knowledge, motivate them and refine their skills. Some of these are summarised below.
DARTS
This stands for Directed Activities Related to Texts. As the name suggests the activities involve pupils working with texts that have been changed in some way. These activities provide a good alternative to simply copying off the board as the students will have to think about what they are writing.
One common approach is to provide some text with words missing. The students have to fill in the gaps. The missing words can be listed below, or not, depending on the abilities of the pupils. The first letter of the missing words can be supplied, which makes it a bit easier.
Other approaches are as follows:
- Sentences that link together to explain a process or phenomenon can be jumbled up and pupils have to decide their correct order.
- Sentences that have to be completed in order to provide complete definitions.
- Diagrams are provided which students have to label.
- A table is provided with some gaps to be filled in.
- A piece of text is provided in which students have to underline key words or definitions.
- A piece of text is provided and students have to use it to make a table or a diagram or produce a summary.
Word matching
You supply a list of scientific words, and definitions. Students have to match the right word with the correct definition.
Experiment write up
Encouraging your students to write about their experiments in their own words will show you how much they understand. A strategy that teachers often use is to provide some headings and some key words that their students should be trying to use so that they can structure their writing.
Concept map or mind map construction
This involves breaking down a complex idea, or process, into sections and linking them graphically to display their logical sequential relationships and how they contribute to an understanding of the whole. This is normally quite difficult and needs a lot of practice. Probably more significantly it requires a sound knowledge of the subject if the maps are to make sense.
Writing for different audiences
This sort of writing sometimes helps students who find science difficult, but who enjoy humanities. Examples include:
- Producing a poster. This will not only give pupils an opportunity to demonstrate their knowledge and understanding in writing but also enable them to use drawings and diagrams to illustrate science concepts.
- Producing an information leaflet on a particular topic that could be used by younger children.
- Writing a letter or a newspaper article to express a point of view. For example, arguing for an issue which involves explaining some scientific background such as vaccination, or preventing HIV.
Resource 6: Ideas for demonstrations
![]() Background information / subject knowledge for teacher
Background information / subject knowledge for teacher
Expansion of a solid: ball and ring
When both the ball and ring are at room temperature, the ball can be dropped through the ring. Heating the ball makes the metal expand, so it cannot pass through the ring. As the ball cools down, it contracts and will fit through the ring again.
Key words: solid, heating, cooling, expansion, expand, contraction, contracts particles, vibration, vibrate, energy
Expansion of a liquid: model thermometer
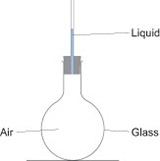
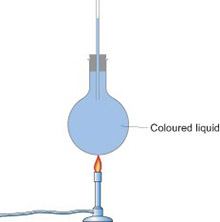
Fill a boiling tube with coloured water, then insert a narrow glass tube (inserted through a cork or bung) into the neck of the boiling tube: make sure the end of the glass tube is in the water. As you heat the water in the boiling tube, you should see the column of coloured liquid in the glass tubing get higher and higher, because the liquid is expanding as it is heated. This is how liquid-in-glass thermometers work.
Key words: liquid, heat expansion, expands, particles, movement, energy
Expansion of a gas: liquid in a tube/bubbling flasks
You can show this by using a test tube or boiling tube with a piece of capillary tubing inserted into it through a bung. The capillary tubing should have a very small amount of water in it. If you warm the tube with your hands, you should see the water rise up the tube: it is being pushed up by the air which is trapped inside the test tube.
Another way to do this is to use a boiling tube or round bottomed flask with a narrow glass tube inserted into it. Clamp the tube or flask so that the open end of the glass tubing is below the surface of a trough of water. When you warm the air in the flask with your hands, bubbles of air will come out of the tubing into the water.
You can demonstrate the opposite process – contraction of a gas as it cools – if you have an empty plastic drinks bottle with a screw top. Pour some hot water into the bottle, swirl it round, then pour it out again. Screw the top back on straight away. Leave the bottle to cool down and watch as it collapses (because the cooling air inside contracts).
Key words: gas, heating expansion, expands, contracts, contraction, particles, collisions, energy
Dissolving and diffusion
Potassium permanganate crystals in water
Get a glass trough, or a large glass beaker or glass bowl and put water in it to about 10 cm depth. The container must be on a steady surface, and give a good view of the contents either from the side or from above. It helps to have some white paper under the container and behind it, so it will be easier to see any colour changes in the water. Let the water settle completely, then drop one or two (no more) potassium permanganate crystals into the water. The colour spreads out slowly from the crystal and the crystal gets smaller as it dissolves in the water. Purple colour is evidence that there is some potassium permanganate in that bit of the water. If left long enough, the purple colour will spread throughout all of the liquid and the colour will be the same intensity, instead of being deepest near the crystal. The slow colour spreading is evidence of diffusion.
Key words: potassium permanganate crystal, solid, dissolving, dissolves, diffusion, particles, collisions, random
Perfume in air
Spray some strong perfume in one corner of the room. Ask your students to put their hand up when they can smell the perfume. The perfume particles will diffuse through the room, with the people nearest to where it was sprayed, smelling it first. Comparison with the potassium permanganate experiment shows that diffusion is faster in gases than in liquids.
Key words: diffusion, particles, collisions, spaces, random
Section 2 : Measurement
Theme: Making science practical
Learning Outcomes
By the end of this section, you will have:
- organised students in small groups to use apparatus to solve a problem;
- designed questions at different levels to enable students to participate in a practical demonstration;
- organised children into groups to collect data and present it appropriately.
Introduction
Organising practical work is an important part of being a science teacher. Gaining first hand experience of materials, organisms and processes can increase understanding and assist retention of knowledge. Shared experiences and real objects may also be helpful for students who find English difficult. All practical work requires careful planning and some improvisation.
In this unit we take the topic of measurement and illustrate three different ways of organising practical work: demonstration, a laboratory parade and solving a problem. Some of the ideas in this topic are demanding and in your class you will find that some students race ahead, whereas others find the ideas difficult. We have used these activities to show how you can differentiate the work and cater for students of all abilities. You need to be able to support those who are finding the work difficult and challenge those who are capable of taking it further. Resource 1 provides some ideas about the different ways of differentiating work.
1. Thinking about measurement in groups
Practical work has many purposes. It might be to learn a particular skill, or to help motivation and enjoyment. It can also be used to promote higher-order thinking skills and to encourage students to talk about science and communicate their ideas in a variety of ways. Resource 2 contains some general information about organising practical work. In the first activity, you will use the apparatus as a stimulus to promote thinking and talking. There is an opportunity for you to question students in groups while they are working and for you to target your questions at a level suitable for that group.
Case study 1: How will you organise groups?
Mrs Egwali gathered the basic instruments that were available in the school lab. She also borrowed some micrometer screw gauges from a neighbouring school. Previously she had asked the students to bring any measuring instrument that they could get from home and something that could be measured with their instrument. They bought things like tape measures, measuring jugs and simple scales. Mrs Egwali put the measuring instruments and some objects to be measured on the table. She also cut cards from manila paper and placed them on the table. She divided the students into groups of five. Each group had to work as fast as possible and follow a set of instructions:
- Pick one instrument and discuss its correct name among the group.
- Write the name on the card.
- Pick up the object it can measure accurately and write its name on the card.
- Place the cards next to the instrument and what it measures.
Mrs Egwali walked around while the students worked. They were actively involved except for two groups in which some students were quite passive. She reorganised the two groups and put the passive students together. It pleased her to note that when they were put together they became more involved. She realised that this was because their abilities were similar and they felt more confident. Before the lesson ended, she noted that no group had picked the micrometer. She demonstrated to them how it works and this led to a discussion about which instruments were the most accurate. Joshua had bought a spoon and a bag of sugar. Mary said that that wasn’t a very accurate way of measuring but Joshua said his mother’s cake was always perfect! Mrs Egwali explained that in science it was important to make accurate measurements. Some of the instruments had been given various names, so she asked students to choose the correct one.
Activity 1: Getting started with measurement
Before the activity gather as many pieces of measuring equipment as you can at the front of the class. Gather the students round the table and ask them to name as many pieces of equipment as they can.
Divide the class into groups and ask each group to work out what they think the instruments might be used for. (Resource 3 has some ideas of equipment you could use and questions you could ask while they are working.)
Ask the groups to report back. While they are working go round and ask some leading questions to help the students to work out the uses. If you have something like a micrometer, see if they can work out how to use it before you explain to them. Get them to think about when it might be used.
Ask each group to measure the length of an exercise book to the nearest millimeter. Collect all the measurements on the board. You will find some variation! Look at the list. Are there any readings you could reject as they are clearly inaccurate? What is the average? What is the range? Use these results to explain that it is important for scientists to measure things carefully.
After the activity, reflect on how you divided up the students. Did each group have questions of an appropriate level? Was it easy to decide who to put in what group? Do you always let them work with their friends?
2. Organising a ‘circus’ of experiments
Organising a laboratory parade (or circus of experiments) is a good way to enable students to perform their own experiments when you only have one set of apparatus. By devising a set of activities which are related, students move from station to station and gradually build up their understanding. Again, the students will be working in groups. You will need to decide how to organise the groups. You are also encouraged to think about ways of challenging the students who have a good understanding of the work.
By getting each group to measure the same objects and record their results on the board, you will be able to explain the concepts of ‘accuracy’ and ‘precision’. There is also an opportunity to calculate averages. Case study 2 describes a situation in which the teacher does not have very much equipment. Activity 2 shows what you can do with more equipment and Resource 4 gives you some specific ideas.
Case study 2: Making measurements
Mrs Otieno has limited access to measuring instruments and teaches in a mixed school. She had noticed that whenever they worked together the boys tended to do the work while the girls watched. She organised three stations for measuring the diameter of a pipe, the mass of small stones the students had brought from a nearby river and the volume of the same stones. With work stations for each measurement, she divided the class into groups of boys and girls. At the same time she had drawn a table on the board with a column for readings of volume, diameter and mass. She had three beam balances, three eureka cans, three measuring cylinders and three vernier calipers. Each group was asked to measure and record the value on the appropriate column on the board, within 5 minutes, and then move to the next station. In a previous lesson she had demonstrated how the vernier calipers, beam balance and measuring cylinder worked. The students enjoyed handling the apparatus, especially the girls who filled in their results before the boys. She also noted with a lot of pleasure how creative the students were in using the eureka can. There were variations in the readings. Mrs Otieno used this to help her students understand the idea of ‘uncertainty’ and the importance of using averages. She asked them to calculate the average for each of the three readings.
Activity 2: Thinking about ‘uncertainity’
Set up some different activity stations around the room. There are some suggestions in Resource 4 , but you may need to use different ones, depending on the equipment that you have available. Divide your class into groups and give them 4 or 5 minutes at each station. (Use a stop watch to time it.) While they are working, make a table on the board with a column for each station and ask one person from each group to write their measurements in the correct column. Emphasise that they should write their answer, even if it is different from the others. At the end gather them round the front and ask them to think about why some of the answers might be different. You could get them to calculate some averages and explain the difference between precision and accuracy. For the activities that used imprecise equipment (e.g. kitchen measuring jug) you could ask them to name a more accurate piece of equipment for doing the same job.
3. Solving measurement problems
Much of the practical work that goes on in schools and universities involves students following detailed instructions. In some contexts, this is very important but it can lead to students losing sight of why they are being asked to do a particular thing. It is good for students to have the opportunity to design their own experiments. In Activity 3 they have to design an experiment to solve a particular problem. There will be more than one solution. This would be an opportunity to divide your students into mixed ability groups. The students who find the work quite easy will be able to help those who find it more difficult and in doing so will consolidate their own understanding. In Case study 3 the teacher uses some amazing facts to motivate her students and gets them to do some estimating so they can get a ‘feel’ for different masses and lengths.
Case study 3: Estimating size
Mrs Nakintu went to an internet café and looked up some interesting facts about the Earth – she found the mass of the Earth and its circumference, the length and breadth of their country, the distance to the moon, the distance to the sun (see Resource 5). She started the lesson by putting her students in groups and asking them to guess the answers to the questions. To make it a bit easier she wrote three possible answers on the board for each question and they had to select the correct one. The idea was to help her students understand the range of measurements that can be made and to get them interested
She then gave them some everyday objects and asked them to guess the mass or the length. She also asked them to estimate the size of the room. Each group wrote their answers on a piece of paper and handed it in.
She gave the pieces of paper out (so each group had answers by a different group) and asked different students to make the measurements. She wrote the answers on the board and the groups marked each other’s work – 3 marks if they were within 10%, 2 marks if they were within 50% and 1 mark if they got the right order of magnitude. It did not take very long and the class enjoyed themselves.
Activity 3: Solving problems
This is a problem-solving exercise. Divide the class into eight groups. Choose four problems, so that pairs of groups are given the same problem. The problems involve using a combination of instruments or creative thinking to make a measurement that cannot be made directly.
Suggested problems could be finding the height of a tree, finding the volume of a stone, finding the mass of one sheet of paper, finding the area of the palm of your hand, finding the thickness of one piece of paper, finding the mass of a grain of rice, finding the pressure exerted by a student on the ground.
Students compare what they did and the answer they got with the other group and evaluate their own work. Groups who solve their problem easily can be given another one to do.
Resource 1: Differentiating Work
![]() Background information / subject knowledge for teacher
Background information / subject knowledge for teacher
Differentiating work for students of varying abilities
As you will, of course, understand, each pupil has different abilities. There can also be a significant difference in age between the oldest and youngest pupil in the class. Some students will learn more effectively by reading a book, some by carrying out a practical activity and some by listening to and absorbing spoken instructions. Some will understand the work very easily, some will take more time. Some will work very quickly through any task you set, some will work slowly. It is impossible for you as a teacher to take all the differences into account all the time, but there are things that you can do to support individuals within a class.
If you have a class of 30 or more pupils this might sound like a daunting task! There are two important things that you need to do to be able to effectively cater for everyone in your class:
- Know your students. You need to give them opportunities to work in groups and listen to the conversations; you need to mark their written work; you need to ask questions of individuals in class and you need to encourage them to ask you questions if they don’t understand or just want to know more. When you know who understands easily, who finds science difficult, who likes to talk, who likes to write, who likes to draw and who likes doing experiments, you will be in a much better position to help individuals.
- Know your subject. It is unrealistic to expect everyone to remember and understand everything that you do. Students who find science difficult will be overwhelmed if you try and tell them everything. You need to break each topic down into simple steps and make sure that everyone understands the most important ideas.
You can cater for the range of abilities within your group in two main ways:
Differentiating by outcome
This can involve providing a set of questions that get progressively more difficult. Everyone gets as far as they can. Alternatively, you can set open-ended tasks in which students demonstrate what they can do. This also gives you the opportunity to give them a choice about how they present their work, which can be very motivating. You may find that the degree of support that you need to provide to individuals, pairs or small groups within the class varies significantly.
Differentiation by task
This involves setting different students, or groups of students different tasks. For example, in a practical session some pupils could have instructions provided for them in written form and some could have them in diagram form and some could have a combination of both.
You could provide a set of questions that cover the basic ideas that you judge that everyone needs to understand and a set that are more challenging. The students who you expect to get a grade A could be given the more challenging ones.
Learning style
There is a lot of research that suggests that different students prefer to learn in different ways. The three learning styles that are more commonly referred to are visual, audio and kinaesthetic, i.e. some students prefer diagrams and pictures, some learn best by listening and some prefer to be able to do things.
As a teacher you cannot be expected to cater for all the students all the time, but a good teacher will make sure that their lessons contain activities that cover all three learning styles.
There is a tendency to expect students to do a lot of listening. You should make sure that your students also get to do experiments or activities that involve moving around the room and talking about the science. Encourage them to use mind-maps and diagrams or pictures to summarise key ideas, rather than simply copying not
Resource 2: Practical Work
![]() Teacher resource to support teaching approaches
Teacher resource to support teaching approaches
Practical work
Introduction
Practical work is an important part of learning about science and learning to be a scientist.
The TESSA materials consider practical work in science involves pupils finding out, learning and verifying through observation and experiment, using skills and methods that are used by scientists in the real world. There are different types of practical work, which serve different purposes. Over time, a good teacher will make sure that their students experience different types of practical work.
Purposes of practical work
Different types of practical work and particular experiments will meet different objectives, but the benefits of practical work include:
- Developing practical skills and techniques such as how to use a microscope.
- Gaining first hand experience of materials and processes that may increase their understanding of science and help the retention of knowledge.
- Developing inquiry skills, such as control of variables, analysis and recording of data and looking for patterns.
- Motivation and enjoyment.
- Encouraging and promoting higher levels of thinking. Pupils can be asked to predict and explain when presented with problems and phenomena.
- Communication skills. Practical work may provide a context for the development of communication skills. The link to shared experiences and real objects may be very helpful for learners with limited proficiency in English.
Types of practical work
- Demonstrations – A teacher may decide to do a demonstration for reasons of safety or due to lack of time or resources. They may also be the most suitable method for consolidating understanding or providing challenge. Try to actively involve pupils through questioning or through participating in conducting the experiment or activities before or during the demonstration (e.g. predicting if statements are true or false and then using observations to confirm or change their decision).
- Structured practical – Pupils do an experiment in groups. The teacher may give them instructions to follow, advice on recording and analysis and questions to help them relate their observations to theory. These may be suitable for practising skills and techniques, supporting particular inquiry skills, and gaining experiences.
- Rotating (circus) practical – Pupils in groups move from one experiment to the next at ‘stations’ in the classroom. The experiments should be related and instructions should be brief. Similar questions at each experiment will help pupils gradually build their understanding of a key concept, e.g. particle theory of matter or adaptation. Some of the stations may include a card sort or problem to solve rather than an experiment.
- Investigation –Pupils plan, carry out and analyse their own experiment. They may have freedom to choose what they investigate or the teacher may limit the materials available or specify a topic to investigate. The teacher has a role as a facilitator rather than teacher. They will usually give pupils guidance on ‘the scientific method’ or carrying out a ‘fair test’.
- Problem solving – this is similar to an investigation, but pupils have more freedom of approach. It may be a practical problem, such as dropping an egg from the top of a building without breaking it, which can be solved in a number of ways. This can be motivating and a good vehicle for the promotion of communication skills.
Organising practical work
Whenever you are planning an experiment, you should try it out yourself before the lesson. Simple experiments are often more complicated than you might think. You will also need to do a risk assessment. This means thinking about the potential hazards and taking steps to reduce them.
When dealing with chemicals other than water, students should wear safety goggles. If safety goggles are not available, you need to use very dilute solutions (0.1 M). The chemical that is most likely to cause permanent eye damage is sodium hydroxide (above a concentration of 0.4 M).
You will need to think about how your students will get the apparatus they need. The things you might consider could include:
- Give them an activity to do at their desks and, while they are doing it, you distribute the apparatus they will need.
- Spread out the different items around the room and ask one person from each group to collect what they need. By spreading it out, you will avoid the potentially dangerous situation of lots of people gathering in the same place.
- Give out the chemicals yourself with a teaspoon on to small pieces of paper that they can take back to their place. This will ensure that they get the right amount and will avoid a lot of mess!
Resource 3: Questions to ask about measurement
![]() Teacher resource for planning or adapting to use with pupils
Teacher resource for planning or adapting to use with pupils
Examples of measuring equipment and questions
Here are some general ‘prompt’ questions you could ask pupils about pieces of equipment they don’t recognise:
- Can you see any unit names on it? Or maybe just a letter? What does it stand for? What do we use that to measure?
- Does it look like something you could make electrical measurements with? Could you connect electrical equipment to it?
- Are there any knobs you can turn? What happens when you do that?
You could make this easier for students if you make a table of quantities, units and abbreviations for pupils to refer to, here is an example:
| Quantity being measured | Units it is measured in | Abbreviation |
| Current | amps (amperes) | A |
| Mass | kilos (kilograms) | kg |
| Force | newtons | N |
Another way you could make the task easier is to use a small number of practical examples to make the identification process into more of matching exercise.
For example, if you had, an ammeter, a micrometer and a set of scales, you might provide a piece of leather or plastic, a circuit with a battery and a lamp, and a small object made of wood or metal, you might ask:
Which of these could I use to measure
- the thickness of this piece of plastic?
- the mass of this piece of metal?
- the current flowing through this lamp?
Here are some examples of specific pieces of equipment and questions you could ask about them:
- Micrometer – What things change when you turn the knob? (Hint: look at the scale, and look at what else is moving.)
- Ammeter (or voltmeter) next to a circuit with a lamp and a switch connected to a battery pack – What might you use this to measure?
- Force meter – What can you move on this? How do you move it? What do you think it might measure? What units is it marked in/ what letter(s) can you see on the scale? What does it (do they) stand for?
- Voltmeter (connected across a lamp which is connected to a battery pack by a switch) – What changes when you close the switch? What is this measuring?
- Top-pan balance or kitchen scales (with an analogue scale) – How can you get this to change the value next to the pointer? What units is it marked in? What do you think it measures?
- Measuring cylinder or measuring jug – How can you use this as accurately as possible (read it at eye level)? Which would be most suitable for measuring 10 ml and why?
Resource 4: Measurement ‘circus’
![]() Teacher resource for planning or adapting to use with pupils
Teacher resource for planning or adapting to use with pupils
Examples of stations for Activity 2
Note: If you have a camera (or a mobile phone with a camera) it would be useful to take photos of pupils as they carry out some of the activities. Look out for really good technique to praise, such as reading a measuring cylinder at eye level, but also try to catch some of the variations in how different people interpret an activity (e.g. Station 6 extension or dragging the load in Station 7).
Station 1
Equipment and notes
Circuit set up with three bulbs connected in series (with a switch in series) to a low voltage dc supply or battery pack providing about 4 V. The voltmeter should be correctly connected across the three lamps using two leads, but the switch to control the supply to the circuit should be left open for students to close themselves.
Instructions for pupils
Close the switch and record the reading in volts.
Station 2
Equipment and notes
Top pan balance or kitchen scales;
Mystery object such as a 20 g mass, or a pebble, in a box or bag (so that pupils won’t see what it is and guess the answer).
Instructions for pupils
Place the bag (box) on the scales and record the mass.
Stations 3, 4 and 5
Equipment and notes
Stations 3 and 4 need identical small blocks of wood, about 2 cm thickness, but provide a ruler for Station 3 and provide a micrometer for Station 4;
Station 5 needs a small piece of sponge about 1 cm thick, plus either a ruler or a micrometer. All three stations need a small diagram to show which dimension pupils should be measuring.
Instructions for pupils
Measure the thickness of the object.
Station 6
Equipment and notes
Measuring cylinder or measuring jug with some water in it. Check that the water level hasn’t been changed after each group. Provide a cloth for mopping up any spillages.
Extension 1: A second measuring cylinder and a pebble to measure the volume of. Students could either lower the pebble into the measuring container and note the change in volume, or use the measuring equipment to collect and measure the water which runs off from a displacement can.
Extension 2: A third measuring cylinder and a collection of 10 small stones (pebbles/gravel/shingle, all roughly the same size and each less than 1 cm across). For this, students will need to adapt the method used for Extension 1. One stone alone will not displace much water, but, students could find the volume displaced by 10 and then use that value to get an average for 1 stone.
Instructions for pupils
How much water is in the container? Record the volume of water in the container.
Extension1: Find the volume of the pebble. (Hint – the pebble displaces its own volume of water).
Extension 2: You have 10 tiny stones. Find the volume of 1 stone.
Station 7
Equipment and notes
2 x Force meters (spring balance): one of them (A) should be hanging from a stand, ready to attach the load, the other (B) should be left on the bench;
A small heavy object to attach to the spring balances.
Watch out for students ‘dropping‘ the load onto the hook so that it falls off or bounces.
Make sure that both force meters are correctly zeroed at the start of the session. You add another aspect to the discussion by using a third force meter (C), set up like the first one but with the screw adjusted so that the ‘zero reading’ isn’t zero. Check every so often that no-one has corrected it.
Instructions for pupils
Attach the object to the hook on the force meter which is hanging up. What is the weight of the object in newtons? (Take care: support the load as you hook it on, then move your hand away.)
Now take the load off and hook it onto the other force meter so that the load is resting on the bench. How much force does it need to drag the load slowly and steadily along the bench?
Answers and things to discuss with your students
These stations not only provide opportunities to make measurements of a range of quantities, but also to discuss why measurements can vary:
The circuit in Station 1 gives an opportunity to read a voltmeter. As pupils don’t have to do anything to the circuit other than close a switch, any variations in the readings obtained are probably down to parallax error – where pupils have taken the reading from an angle instead of directly in front of it. If a digital meter is used, pupils can have difficulty with rapidly changing final numbers. If the circuit is left connected for a long time, it is possible that the values obtained will get lower.
The Station 2 activity is again a simple measurement using kitchen scales or a top pan balance. The issues here are the precision provided by the scale itself, and the variation in reading position.
Stations 3, 4 and 5 present difficulty because of learning to use a micrometer. The values for the two pieces of wood should show relatively little variation, but the sponge should show wider variation because the material will compress easily, so it is more difficult to judge when the micrometer is at the correct position before trying to read the scale.
Station 6 uses a measuring cylinder or a jug to measure the volume of water in the container. The issues in this case are to do with the precision offered by the scale on the jug or the measuring cylinder and also how pupils read the scale. The single pebble may result in more variation, depending on the equipment and method used. Pupils will get even more variation if they try to measure just one small stone, but if they calculate an average value from using 10 stones together there should be less variation. (If you didn’t tell them to use all 10 stones, you could also ask how many stones they used for the measurement.)
Station 7 uses force measurements. You would expect the same object to give rise to identical readings when hung from identical force meters, but pupils should find one set of results skewed because the equipment was not zeroed. Dragging the object along the bench is likely to give a very odd set of results, because pupils will have different ideas of how fast to drag it and at what angle they should pull from: some photos would be very helpful here. It is also difficult to pull steadily and to read a scale that is moving, even if it isn’t also changing at the same time.
Examples of questions about all the results
- Look at the results for (Station x): did everyone in your group agree on the value? If not, why was that?
- Which station’s results showed the most variation? Why do you think that is?
- Which quantity did you find it hardest to measure? Why/what made it difficult? Could you have improved your measurement still using this equipment? Could you have improved your measurement if you’d used different equipment?
- Did any station’s results show a steady change in the value (getting smaller or larger as you went down the column)? If so, why do you think that happened?
- Were any results different when you might have expected them to be the same? Why?
- Which measurements were most/least precise? Explain why.
- Which measurements were most/least accurate? Explain why.
Summary of precision, accuracy and variation for the teacher
Why do measurements vary?
- Variations caused by the equipment or by the way it is used:
- The scale isn’t fine enough for the quantity you are trying to measure.
- The equipment produces variations in the reading which aren’t due to actual changes in the quantity being measured.
- The scale hasn’t been zeroed before taking measurements
- The measurements are not being taken in controlled conditions (e.g. there are draughts, changing temperatures).
- Incorrect technique ( e.g. not reading a scale from directly in front of the needle or indicator, or level with the scale marker).
- Differences in technique/experimental method.
- The equipment has been damaged.
- Variations in the quantity being measured:
- There is natural variation in the quantity – there is no absolute, ‘true’ value, e.g. length of a leaf, diameter of a seed in the sense that if you chose another leaf or seed the value would be different, no matter how carefully you measured it.
- The value changes with time because of a factor that hasn’t been considered in setting up the experiment (e.g. the length of a wire may change if the load is left on it, a previously desiccated object might show an increase in volume because it has absorbed water from its surroundings, another object might show a decrease in mass because of losing water to its surroundings, water fresh from the tap may be at a different temperature from water which has been standing in a room for an hour or more…).
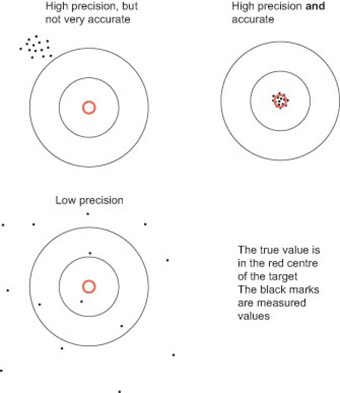
‘Accurate’ or ‘precise?’
Accuracy is about how close a measurement is to an agreed true value for specified conditions. A measurement is said to be accurate if it is close to the true value.
Precision is about how closely a set of measurements agree. A set of measurements that gives tight cluster of values is more precise than one with a wide variation in values.
Resource 5: Interesting facts about the earth
![]() Background information / subject knowledge for teacher
Background information / subject knowledge for teacher
This resource provides you with some information about the Earth and about Africa. Get your students to guess the answers. You can also get them to estimate things like each other’s height and weight, the length of the room etc. Being able to estimate measurements is a useful skill in science as it enables scientists to spot errors.
If some of the students in your class are finding this topic easy, you could ask them to calculate the density of the Earth and the Moon.
Density = mass/volume
Volume = 4/3 π r3 (π = 3. 142) r = radius
The Earth
Diameter = 12,760 km
Radius = 6,380 km
Mass = 5.972 x 1024 kg
Crust = 40 km thick
Distance from the Earth to the Sun = 1. 426 x 109 km
Distance from Earth to the Moon = 384,000 km
The Moon
Diameter = 3,475 km
Radius = 1,738 km
Mass = 7.35 x 10²² kg
Africa
Distance from the most northerly point (Ras ben Sakka in Tunisia) to the most southerly point (Cape Agulhas in South Africa) = 8,000 km
Distance from the most westerly point in Africa (Cape Verde) to the most easterly point in Africa (Ras Hafun in Somalia) = 7,360 km
Resource 6: Problem solving - solutions
![]() Teacher resource for planning or adapting to use with pupils
Teacher resource for planning or adapting to use with pupils
Following are some possible approaches for some example problems from Activity 3:
Height of a tree
- Measure the length of the shadow and compare this with the length of a shadow cast by a metre rule at the same time. Use scaling to work out the height of the tree.
- Measure the length of the shadow and also the angle ϑ from the ground at the tip of the shadow to the top of the tree (Care: avoid looking at the sun!) then use
- opposite = adjacent x tan ϑ
- where opposite is the height of the tree and adjacent is the length of the shadow.
Mass of one sheet of paper
Find the mass M of x sheets of paper, then mass of one sheet = M/x
Area of the palm of your hand
Draw round your hand on a piece of squared paper and count the squares.
Volume of a stone
Displacement methods (see Station 6, Extensions 1 and 2 in Resource 4)
Thickness of a piece of paper
Measure the height (h) of a pile of x pieces of paper. One piece = h/x
Mass of a grain of rice
Measure the mass (M) of a pile of grains. Count the grains (x). The mass of one grain = M/x.
You will need to get several people to count the grains and keep checking until everyone agrees.
Pressure exerted by a student
A student stands on some squared paper and someone draws round their feet. The mass (M) of the same student is found in kg.
The force they exert (F) is the M x 9.8 and is in newtons. The area (A) of their feet on the ground is calculated by counting the squares.
The pressure = F/A.
Section 3 : Pressure and heat transfer
Theme: Science lived – relevant and real
Learning Outcomes
By the end of this section, you will have:
- used brainstorming to help students realise how the principles of pressure apply to everyday life;
- supported learners to use science ideas to explain local technology, household processes or agricultural processes
- supported your students in applying their knowledge of heat transfer in the home.
Introduction
Science is all around us. Activities like baking cakes, growing vegetables and mending a bicycle all involve scientific principles. Making connections between the science they learn in school and the things they do at home can help to reinforce the scientific principles that your students need to learn. It might also help them to understand some of the problems that they and their families face. Resource 1 gives some strategies that you can use in order to help your students make these connections. This unit is not restricted to one topic area – we want to encourage you to develop the habit of relating the science that your students learn about to their everyday lives. You will use brainstorming as a technique for helping them to make connections and you will be encouraged to take them outside the classroom.
Students often see science as something that they do at school and not necessarily related to their lives. An effective way of demonstrating that this is not the case is to start with the everyday context and use it to draw out the scientific principles. Asking students about things outside school that are important can get them engaged and interested – especially if some controversy is involved. Most real-life situations are actually quite complicated and it is easy to find yourself talking about chemistry, biology or physics, or even wider issues. This will help to keep your students interested in science and help them to see how science can help them to understand the world.
1. Everyday examples of ‘pressure’
In this unit we start with aspects of science that are relevant in the home, and move on to consider issues of wider importance to society. Sometimes the everyday applications for the topic you are studying are obvious, but sometimes they are not. If you ask an individual about how ideas about pressure manifest themselves in their lives, they probably would not come up with very much. But once they have the opportunity to talk in a group, you will find that the ideas will flow. Resource 2 provides guidelines for conducting a brainstorming session in a large group; Resource 3 provides lots of examples so that you can keep the discussion going. This approach would work with any physics topic that you have to cover.
Case study 1: Demonstrating pressure
Mrs Joyce walks into her classroom wearing her stiletto heels, carrying a wooden block with sharp nails stuck to it, a bottle of soda and a drinking straw, a blunt and sharp knife and two pieces of cake. She asked one of the students to walk with her outside the class on wet soft ground. She then asked the rest of the class to observe what happened to her shoes and those of the student. The students were keen to observe. She asked the students to support their observations scientifically.
Mrs Joyce had noted that the boys liked soda. She promised them that she would give the soda to any who would stand on the block with nails. The boys were not willing. Why did they decline? She asked them to give a reason. What is the best way to walk on nails? Hari commented that he had seen someone lying on a bed of nails at a circus.
Next Mrs Joyce asked two boys to compete at cutting the two pieces of cake; one using the sharp knife and the other using the blunt one. She wanted them to see which would produce the cleanest cut. She noted that the boys knew the winner before the competition started. How did they know the winner? Using the definition of pressure which the boys had learnt earlier they were able to give an explanation of each of the events.
Activity 1: Demonstrating everyday pressure
Gather your class round the front. Fill a cup up to the brim with water. Make sure the water is almost overflowing. Slide a piece of cardboard across the top. Holding on to the card, turn the cup of water upside down. The water will stay in the cup – make sure you practice before the lesson, or it could be messy! The card stays in place because of the air pressure. The pressure from the air is greater than the weight of the water. Ask questions to try and get your students to come up with an explanation.
Get your students to work in pairs to explain:
- how a straw works
- how a suction pad works
- why elephants and camels have large feet
- why it is possible to lie on a bed of nails.
Choose four pairs to report back.
Finish off with a brainstorm in which you encourage the class to think of other everyday examples of pressure.
2. Relating physics to everyday life
As you begin to make a conscious effort to link science in the classroom with everyday life, you will find numerous examples to support your teaching. It is a good idea to keep a notebook or file in which you record ideas or keep articles from magazines or newspapers. In order to emphasise the relevance of science, it is good to get outside the classroom. Resource 4 gives you some ideas of the sorts of places you could go to. Case study 2 describes how a teacher took his class to a garage.
Case study 2: Visiting a garage
Mr Wekesa, an experienced teacher who had worked in a garage before joining teacher training college, wanted to break the monotony of teaching in the school environment. He decided that the students should visit a garage. Wishing to make science real and relevant, he first explained to the students using diagrams how a hydraulic lift works. The students drew the diagram in their books but he asked them not to name the various parts. After this he took the students to a modern garage opposite the school with a hydraulic lift. The students were first supposed to observe the parts and compare what they saw with the diagram they had drawn. The mechanic helped them to label the parts of the diagram.
Mr Wekesa discovered that most of the students in the class had visited the garage on their way to school but they had not realised how relevant the principles they had learnt in their physics lessons would prove to be. Mr Wekesa did a follow-up by asking the class to make a model of a hydraulic lift and presented it in a science congress competition. He commented that it was wonderful to see the enthusiasm in his class.
Activity 2: Visiting a playground
Choose somewhere near to your school where the principles of physics are apparent, for example a garage, with hydraulic jacks; building sites, with pulleys and levers; a playground with swings, roundabouts and seesaws; a farm with many simple machines.
Go along yourself the week before and make up a list of questions for your students that will make them think about the physics principles. For example, in a playground you could get them to think about what affects the periodic time of a swing, how to make a seesaw balance with a heavier and a lighter person, what forces you experience on a roundabout. On a building site or a farm, ask them to find examples of the ways in which the builders and farmers make use of machines such as pulleys, crow-bars and wheelbarrows to do heavy lifting.
When you get back to the classroom, ask them each to write a short report in which they explain how three physics ideas were being used.
3. How can we keep things cold?
Many of the problems that we face and decisions that we make in everyday life require some basic understanding of scientific principles. In Activity 3 you will support your students in thinking carefully about a problem that they face everyday. There is no right answer to the problem and some groups of students will be more successful than others in providing a solution. Resource 5 gives you some background information on the problem. This is an opportunity to encourage your students to write about their experiment in their own words. It is important for your students to develop their literacy skills in school, and this doesn’t have to be in English or social studies classes. Resource 6 provides a writing frame which will help your students to structure their ideas clearly. You should let your students look at and comment on each other’s solutions. Case study 3 shows how Mrs Ussaman organised the activity as a competition.
Case study 3: Organising an investigation
Mrs Ussaman had been teaching physics for a few years and found that when she related the ideas she was teaching to everyday life, her students were much more interested. When she started teaching about heat, she asked her colleagues at school to give her pieces of cardboard, material and plastic that they didn’t need. By the time she came to the end of the topic she had a large collection.
One morning she gathered her class around the front and showed them a cup of ice cold soda. She challenged them to find a way of keeping it cold for as long as possible. The students worked in groups of five or six and made a plan. Mrs Ussaman gave them 30 minutes to plan and make their design. She gave each group a small piece of card and asked them to write a few sentences to explain how their design worked. She managed to borrow some alcohol thermometers from the local senior high school. Each group was given some water and two ice cubes. They measured the temperature of the water and recorded their reading.
The science lesson was at the start of the day, so the class gathered at lunchtime to measure the temperature of their cup of water and to look at each other’s designs. Mrs Ussaman asked the headteacher to present a small prize to the winning group. They had dug a hole in the ground for their cup and made a lid from a piece of plastic bubble-wrap. The group that came second had wrapped their cup in a wet towel.
Activity 3: Carrying out an investigation
In the weeks before you do this activity, you will need to collect waste materials such as cardboard, plastic, cotton and paper. When you have taught your students about heat transfer, set them the task of designing a way of keeping water cool as long as possible. They should work in groups and plan their design before they start to make it. Encourage them to think about how heat is transferred and to apply their knowledge and understanding to solve the problem.
When they have a plan, provide them with a cup of cold water and the materials that you have collected so they can make and test their design. At the end each group should display their design and explain why it works. Resource 6 provides guidance for your students to help them write a report on the problem and their solution.
Resource 1: Making science relevant to everyday life
![]() Teacher resource to support teaching approaches
Teacher resource to support teaching approaches
Making science relevant to everyday life
Introduction
The TESSA resources are underpinned by a view that science is not just an activity that is carried out by people in white coats in a laboratory. Science helps students to make sense of the world and they need to realise that it is taking place all around them. Many everyday activities involve scientific principles. It is important that pupils get the opportunity to apply their scientific knowledge to an understanding of their own environment and that they understand that the skills they develop in science are relevant to some of the problems they face in everyday life.
Possible strategies
Class discussion
Use local examples where possible, but also encourage pupils to draw on their own experience in the classroom.
Practical work
- Use local examples and materials, e.g. hibiscus indicator; local minibeasts for work on classification or adaptation; wood and kerosene to compare calorific content of fuels.
- Give pupils a challenge using scrap materials, e.g. obtain clean salt.
Research projects
Pupils could find information from local newspapers or magazines or interview adults in the community, such as brewers, mechanics or health workers. This could be the basis of a poster, oral presentation or role play.
Making use of the school grounds
Besides the obvious opportunities for ecological investigations, the school grounds are a source of teaching examples in other topics such as corrosion, structures and forces. Take pupils to see them or ask them to find examples or collect data for analysis.
Day visits
Visit local industries, agricultural sites or museums. The effective teacher will link this to classroom work both before and after the trip.
Homework
Ask pupils to write about examples of science around them (e.g. chemical change in the kitchen or forces on the football field) or to bring materials to the classroom.
Writing tasks
Use local issues as a stimulus for creative written work, e.g. a letter to a newspaper or radio script on local environmental or health issues.
Discussion tasks
- Interviews – one child could be the ‘expert’ and the interviewer can ask questions as if they were producing a news item for the radio.
- Pupils come to a decision about a local issue, e.g. health promotion or energy supply.
You should create a file for yourself and keep any newspaper and magazine articles that you find that contain or are about scientific issues. Every time you start a new topic, ask yourself how it relates to everyday life and help your students to make those connections.
Brainstorming
Brainstorming as a class or in smaller groups can help students to make connections between the science they learn in class and their everyday lives.
Resource 2: Brainstorming
![]() Teacher resource to support teaching approaches
Teacher resource to support teaching approaches
Brainstorming
Brainstorming is a group activity that generates as many ideas as possible on a specific issue or problem then decides which ideas offer the best solution. It involves creative thinking by the group to generate new ideas to address the issue or problem they are faced with. Brainstorming helps pupils to:
- understand a new topic
- generate different ways to solve a problem
- be excited by a new concept or idea
- feel involved in a group activity that reaches agreement.
Brainstorming is particularly useful for helping students to make connections between ideas. In science, for example, it can help them to appreciate the links between the ideas they are learning in class and scientific theories.
As a teacher, a brainstorm at the start of a topic will give you a good idea about the extent and depth of knowledge already held by the class. It will not tell you about individuals’ understanding, but it will provide a wealth of collective ideas that you can refer back to as the topic progresses.
How to set up a brainstorming session
Before starting a session, you need to identify a clear issue or problem. This can range from a simple word like ‘energy’ and what it means to the group, or something like ‘How can we develop our school environment?’ To set up a good brainstorm, it is essential to have a word, question or problem that the group is likely to respond to. The teacher can gather the class round the board and run the session, or, in very large classes, divide the class into groups. The questions can be different for different groups. Groups themselves should be as varied as possible in terms of gender and ability.
There needs to be a large sheet of paper that all can see in a group of between six and eight pupils. The ideas of the group need to be recorded as the session progresses so that everyone knows what has been said and can build on or add to earlier ideas. Every idea must be written down, however unusual.
Before the session begins, the following rules are made clear:
- Everyone in the group must be involved.
- No one dismisses anyone else’s ideas or suggestions.
- Unusual and innovative ideas are welcomed.
- Lots of different ideas are needed.
- Everyone needs to work quickly; brainstorming is a fast and furious activity.
Running the session
The teacher’s role initially is to encourage discussion, involvement and the recording of ideas. When pupils begin to struggle for ideas, or time is up, get the group (or groups) to select their best three ideas and say why they have chosen these.
- summarise for the class what they have done well
- ask them what they found useful about their activity. What did they discover in the brainstorming that they didn’t realise before?
Resource 3: Everyday examples of pressure
![]() Teacher resource for planning or adapting to use with pupils
Teacher resource for planning or adapting to use with pupils
Everyday examples of pressure
Following are some real-life examples of pressure in action:
- If you are carrying a heavy bag, narrow handles or straps cut into your hands and shoulders, but broad handles and straps are more comfortable.
- Narrow heels on shoes sink in further than wide, flat heels.
- Spreading your weight over a larger area stops you sinking in.
- Heavy vehicles that are used on softer ground need to have bigger, wider tyres.
- A sharp knife has a narrower blade edge than a blunt one, and is easier to cut with.
- Nails and tacks have a flat hammering head plus a sharp point to make it easier to hammer into wood, but also puncture tyres.
- Large machines for digging, grabbing or lifting use hydraulic pressure systems.
Below are some everyday items that rely on pressure to work:
- suction pads
- sucking a drink up with a straw
- siphons
- syringes
- bicycle pumps
- water pumps
- hydraulic jacks for lifting cars
- pneumatic controls
- vacuum cleaners.
Resource 4: Examples of Physics in action
![]() Teacher resource for planning or adapting to use with pupils
Teacher resource for planning or adapting to use with pupils
Examples of physics in action
Places to visit and examples you might see
| Place | Examples | Physics principles they use |
| Garage or workshop | Hydraulic jacks | Pressure = force/area and pressure is transmitted through a fluid (oil), so input pressure = output pressure Used as a ‘force multiplier’ |
| Brace, screwdriver | Input force x input distance from axle = output force x output distance A force multiplier | |
| Building site | Pulleys | Input force x distance it moves = output load raised x height it is lifted. A force multiplier |
| Wheelbarrows and levers | Input force x input distance from wheel axle or pivot = output force x output distance from pivot A force multiplier | |
| Kitchen or bakery | Can openers, potato chippers, nut-cracker | Examples of levers as force multipliers, so small force exerted by operator on the handle produces a large force on the object: Input force x input distance from pivot = output force x output distance |
| Knives and skewers | Narrow blade edges and fine points cut into the material more easily because, for the same force, reducing the area increases the pressure | |
| Playground | Seesaw | Another lever example: a lighter person sits further out to balance a heavier person. Clockwise moment = anticlockwise moment |
| Farm/garden | Shears/secateurs/ branch cutters | Force multipliers: Input force x input distance from pivot = output force x output distance |
Some examples of force multipliers
Hydraulic jack:
You use a small force but push further to raise the large load a smaller distance.
Input pressure = output pressure because the pressure is transmitted by oil.
- narrow input piston cylinder with area A1 , small input force F1
- wider output piston cylinder with area A2, larger output force F2
- force on output piston


Levers , e.g. see-saw:
Clockwise turning force x distance from pivot = anticlockwise turning force x distance from pivot

Cutting tools e.g. secateurs, shears:
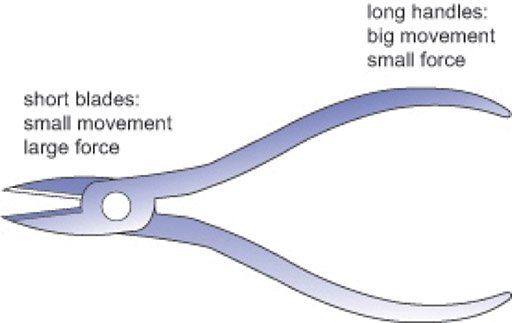
Resource 5: Keeping things cool
![]() Background information / subject knowledge for teacher
Background information / subject knowledge for teacher
Background information on insulation and keeping water cool
- Energy (heat) is transferred from hot objects to colder objects.
- Anything that is warmer than its surroundings becomes cooler by transferring energy to the surroundings (so they get warmer); anything that is cooler than its surroundings becomes warmer (and the surroundings become cooler) as energy is transferred from the surroundings to the object.
- If you leave something long enough, it will reach the same temperature as its surroundings.
- To keep a hot object hot, or a cold object cold, you have to slow or stop the transfer of energy (heat).
- Energy (heat) is transferred by conduction, convection and radiation.
- Metals are good conductors but plastics, or materials with lots of air gaps like foams or bubble wrap, are poor conductors (or good insulators).
- Using thermal insulation or insulating a hot or cold object means wrapping the object in a material which is a poor thermal conductor.
- The thicker the insulation, the better it works. Don’t leave gaps in the insulation.
- Heat (energy) is transferred through a fluid like air or water by convection currents. Convection currents rise above the heat source as the warmed air or liquid expands (because it is less dense than the air/water around it). As the air or liquid cools it becomes more dense again and sinks.
- Building designs can make use of convection currents to keep the building cool: to do this they allow warm air to rise through the building and escape from the top, drawing cool air in at the bottom.
- Shiny or white surfaces reflect most radiation, while black surfaces are the best absorbers and transmitters. To make use of solar heating you would use black surfaces to absorb as much energy as possible; to keep something cool, you use shiny surfaces (wrap them in foil, spray them with shiny paint) or white surfaces to reduce absorption.
- Vacuum flasks reduce heat transfer by all three mechanisms: the silvered layer reduces transfer by radiation, the vacuum means there is no air to allow losses by convection, and the insulating foam beneath the casing reduces losses by conduction.
- Thick coverings also help to keep cool things cool because it takes more energy to heat up the covering material. This is why buildings with thick stone walls stay cooler than buildings with thin wooden walls – there is more ‘stuff’ to heat up.
- Water has a high specific heat capacity, meaning it takes a lot of energy to raise its temperature, so it keeps the temperature steady for longer: rivers and lakes are slower to heat up than the surrounding land; leaving cold bottles in a bucket of water on the table keeps them cool longer than just leaving them on the table.
- When a solid melts, it absorbs energy from its surroundings but it stays at the same temperature until all the solid has turned to liquid. Changing from solid to liquid (or from liquid to gas) is called a ‘phase change’, and materials which need a relatively large amount of energy to melt are used in cooling jackets for transferring foods or medical supplies without refrigeration. (When used like this, or in the plaster of buildings to help keep rooms cool, they are called ‘phase change materials’ or PCMs for short.)
- When a liquid evaporates, it uses energy from the surroundings to do so, so we can use evaporation to help keep things cool: letting the water evaporate from your skin instead of using at towel to dry yourself makes you feel cooler, and wrapping a bottle in a damp towel helps to keep it cool for longer.
Resource 6: Planning resource for students
![]() Teacher resource for planning or adapting to use with pupils
Teacher resource for planning or adapting to use with pupils
How can we keep water cool as long as possible?
A cold drink straight from a fridge or chiller can be very refreshing, but it won’t stay cold for long!
Work with your partner to design a way of keeping water cold in a hot climate. You will need to make and test your design, then present a report explaining how it works. Your report should include technical terms associated with heat transfer.
The writing frame below may help you. Structure your report by answering the questions:
Introduction and plan
| What are you trying to find out? |
|
| What features do you think will be important? Explain how they could help. Include labelled diagrams of the designs you plan to test. |
|
| Describe how you will test your designs to find out which one is best. How will you make this a fair test? What measurements will you take? |
|
Results and evaluation
| Present your results in a table and using appropriate graphs or charts. |
|
| What do the results suggest? Why do you think this design worked the best? |
|
Section 4 : Forces
Theme: Problem solving and creativity
Learning Outcomes
By the end of this section, you will have:
- used a game to help your students become familiar with the key words for this topic;
- planned activities that engaged students’ thinking about forces
- given your students the opportunity to solve a problem.
Introduction
When your students start to look for a job, the qualifications that they have will obviously be very important. However, potential employers will also be looking for people who are creative and who are able to solve problems; they will be looking for people who can think for themselves. The case studies and activities in this unit are designed to show you how you can give your students the opportunity to be creative and to develop their ‘thinking skills’. Some general strategies are given in Resource 1 . You need to think about how you can create an atmosphere of excitement and enquiry in your classroom. If you can do this, students will ask questions and readily contribute their ideas. Students love dramatic demonstrations and amazing and unbelievable facts and will respond to your genuine enthusiasm about the subjects that you are teaching.
Creativity is about the ability to think, not just recall, but to apply, suggest, extend and model and create analogy. You can encourage your students to be creative by setting them open-ended tasks and giving them choices about how they present their work. For example, students who are particularly talented in the humanity subjects and who enjoy writing, might like to write about science in the form of a newspaper article or a poem. That would not suit everyone, so that is why giving students a choice can be very helpful. As a teacher, being creative doesn’t necessarily involve dreaming up new and exciting activities – although it can do! Creative teachers can take ideas from these units or from their colleagues and adapt them for use in different contexts.
1. Developing literacy through Science
In this unit, the three activities would fit into your normal teaching of ‘forces’, but in each one you will be providing the opportunity for your students to talk about and think about the ideas.
Friction and air resistance are all around us and have a profound effect on everything we do. The purpose of Case study 1 and Activity 1 is to get your students to make the links between the forces around them and their everyday lives. Case study 1 describes a teacher who worked jointly with an English teacher – the students discuss the ideas in science and then write a story in their English lesson (Resource 2 provides information on promoting cross-curricular links and literacy skills). The focus of Activity 1 is on helping your students to understand the scientific words.
Case study 1: Creative writing on friction
One of the misconceptions about friction that Mr Sifuna had noted in his many years of teaching was: ‘Friction always hinders motion and therefore you always want to eliminate friction.’ Mr Sifuna and his colleague Mrs Haule (English teacher) agreed to work together. Mr Sifuna divided his class into groups. Each group had a chairperson and a recorder. The students had to imagine and discuss how their daily work would be without friction and then decide whether to eliminate it or not. It was agreed that every idea that each student contributed would be recorded. Mr Sifuna walked around the class as the students discussed. There were heated discussions and the recorder was very busy writing the ideas. Mr Sifuna was surprised by how imaginative his students were and how many ideas they had at the end of 15 minutes.
Later, in English, when they were learning about creative writing, Mrs Haule asked the students to make up a story about a world without friction. When the students wrote their composition, it came out clearly that the misconception had been corrected. Friction must be reduced in some areas for life to be enjoyable but it can also be very helpful. What an exciting way to handle misconceptions! Mr Sifuna was very pleased to see that one of the students who found science difficult wrote one of the best stories.
Activity 1: Using a game to learn key words
One of the difficult things about science is the number of new words your students have to learn. It is a good idea when you start a new topic to spend 15 minutes specifically helping them to learn the key words. This would work for any topic.
Write the key words for the forces topic on pieces of an old cereal box. This could include push, pull, twist, squeeze, moment, air resistance, floating, sinking or upthrust. Ask a student to pick a card and then get them to mime the word. The rest of the students have to guess what the word is and the student with the card picks someone to write the word on the chalkboard and choose another word. If you do this for other topics you will build up a collection of cards that you can use for revision as well. If you work with a colleague, that would save you time.
2. Drawing diagrams to explain science
In science we often illustrate key ideas by drawing diagrams. The temptation is to get the students to copy the diagram off the board so that they learn the ‘right’ version. In Activity 2, you are encouraged to let the students draw their own diagrams to illustrate the forces involved in three demonstrations. Resource 3 provides the necessary background. The case study shows how one teacher managed this in her classroom. During the demonstrations, you should prompt students to ask questions about what is happening. The act of asking questions requires engagement and creative thought, which is what we are trying to promote. You will also find that the students are more interested in the answers to questions that they have generated. Resource 4 provides information on how to promote an atmosphere of enquiry in which students are encouraged to ask questions.
Case study 2: A Bungee jump
Miss Chitsulo was a student teacher on teaching practice. Her tutor was coming to visit in order to watch her teach. Miss Chitsulo knew that her tutor had a laptop computer so she asked her to bring the laptop and a projector from the college to the lesson. The week before, she went to an internet café and downloaded a film of someone doing a bungee jump from the bridge across the river Zambezi and stored it on a memory stick. In the lesson, she gathered the class around the front and showed them the film of the bungee jump. Miss Chitsulo asked lots of questions about what they thought it would feel like at each stage. She sent the class back to their places to draw diagrams to explain what they had seen.
They had to draw three diagrams of the bungee jumper to show the forces acting at various points in the jump – on the way down, at the lowest point and on the way back up. The class teacher suggested that they should copy the diagrams off the board, but Miss Chitsulo wanted to see if they could do it themselves. While they were working, she walked round the room and asked questions to prompt them to remember the discussion they had had. At the end, she asked volunteers to draw their diagrams on the board and gave everyone the chance to correct their own work. She chose people who she knew had got it nearly right. Her tutor also walked round the room and talked to the students. She was impressed by some of the questions that they asked.
Activity 2: Student-led demonstrations
In this activity, you will do three demonstrations: a spring balance (a newton meter) with a mass in water and in the lab; pushing a balloon into the water and a floating needle. See Resource 3 for the details. Give the students the opportunity to volunteer to contribute to the demonstrations. Get the students to generate a set of questions about each demonstration. Write these on the board and discuss the answers as a class. Students should then be asked to draw pictures of each demonstration (or label pictures you have provided) using arrows to illustrate the forces acting. It is important to let your students draw the diagrams for themselves. Don’t worry if they make mistakes – they will learn from the mistakes and are more likely to remember if they have thought about it for themselves. At the end, draw the correct diagrams on the board and ask them to correct their own.
3. Setting open-ended tasks
In order to learn to solve problems, students need to be provided with open-ended activities that have a number of solutions. In order to develop their ability to solve problems you can be selective in the information that you give them. A good problem solver knows which questions to ask. For example, you tell them at the beginning of the topic that you want them to explain why a large ship can float in water. Don’t ask for the answer until the end, but make sure you give them some clues while you are teaching the topic. In Activity 3, you will set your students the task of changing the shape of a piece of Plasticine (or equivalent) to make it float. Once they have solved the problem, they should look at each other’s solutions and should be prompted to explain their own thinking (Resource 5 provides a writing frame that you could use). Resource 6 describes an alternative problem that you could set and suggests how it could be adapted for students of different abilities.
Case study 3: Solving a problem
Miss Chitsulo set up a competition: ‘Which “boat” can hold the most paperclips?’ and gave each group a piece of Plasticine: all the pieces were exactly the same size. Every group tried out their idea and then the class gathered round the winner and worked out why it had won.
Some students commented on how the boats got lower in the water as more paperclips were added. Miss Chitsulo asked the students to predict what would happen if you put the boat into very salty water (or into oil) and to explain why they thought that. She had some salt water and oil ready for them to try their boats out. She knew that this would provide an opportunity to think about what is providing the upthrust and allow students to explore some ideas about forces, and maybe use some things they already knew about the way ships float higher when unloaded and when in salt water rather than in fresh water. After the students had tried the winning boat in different liquids, she showed them some photos of plimsoll lines on ships (lines marked on ships to indicate the depth to which a vessel may be immersed in water) and they talked about how this helps keep ships safely loaded.
Activity 3: Investigating floating and sinking
You will need a bowl of water and some objects of different sizes, shapes and materials. For each of the objects, get the class to predict whether it will sink or float. If possible, it would be good to have a small piece of a hard wood that sinks and a large piece of a soft wood that floats. Encourage the students to explain their predictions before you test them. When they try to explain their thinking, they might get a bit confused, but it will help them to learn. Think back to your own time at college – the things we understand best are often the ones which confuse us for a while! Demonstrate that a lump of Plasticine (modelling clay) sinks when you drop it into a bowl of water. Challenge the class to devise a way to make it float, and if it can do that, to carry a small load. At the end, explain why an object floats, in terms of the forces. Ask students why an ocean liner made of steel can float.
Resource 1: Problem Solving and Creativity
![]() Teacher resource to support teaching approaches
Teacher resource to support teaching approaches
Problem solving and creativity
Through being resourceful and engaging and providing variety, you will be able to motivate your students. If you are willing and able to solve problems and be creative, you will be able to help your students develop these skills. And it is not as difficult as it might seem!
Creativity
Creativity is about the ability to think. It is not just about remembering, but also applying, suggesting, extending, modelling, and offering alternatives. It is something that you can model for your students. Students need to be encouraged to think differently and come up with original ideas. They also need to feel confident in the reception they will get before they make such suggestions.
Some teachers will naturally be very creative, but some will not – and that is fine as long as you are resourceful and willing to try new ideas. A creative teacher, for example, will take the TESSA Secondary Science units and apply the strategies we suggest to different contexts. You could use news items from radio, television or newspapers and relate this to the science you are teaching. You can set open-ended tasks and allow students to make choices about how they present their work. You may take some risks in your teaching. Above all, you will create an atmosphere of excitement and enquiry with dramatic demonstrations, enthusiasm or amazing and unbelievable facts.
Strategies to promote creativity
Get students to:
- write a story to illustrate a scientific principle
- draw a picture to illustrate a scientific principle
- make up a play
- make a model
- take part in a role play (e.g. be the particles in a solid, liquid or gas)
- make up a poem or a rap
- think up alternative explanations for something they see
- write a letter or newspaper article or podcast.
Problem solving
Helping students to develop problem-solving skills is a frequently cited goal of science teachers. As with creativity, you can model these skills in your own classroom. For example, if you can’t answer a student’s question, you can come back next lesson with a solution and explain how you worked it out and why you found it hard. Being able to solve problems involves developing thinking skills. There are various strategies that you can adopt to help children develop these skills (Wellington and Ireson, 2008):
- Encouraging student-generated questions. The act of asking questions requires engagement and creative thought, two core cognitive strategies.
- Being clear about ‘purpose’. Students should be encouraged to ask: what is this all about?’ ‘What does this relate to?’ ‘Why do you want us to do this?’ – rather than embark on activities in an unthinking, recipe-following fashion.
- Setting open-ended activities. Teachers should set activities that can be tackled in a variety of ways so that children have to think about how they will tackle the problem.
- Planning. Teachers need to provide opportunities for children to plan their problem-solving strategy in a systematic way.
- Paraphrasing. It is well known that you really get to know and understand ideas when you try to teach them to someone else. Giving children opportunity to paraphrase an explanation will help them to understand difficult ideas and to be aware of their own learning.
- Learning to learn (metacognition). Teachers can encourage children to become more conscious of their learning by getting them to think about why they don’t understand and what strategies helped them that might be useful in the future.
Reference
Wellington, J. and Ireson, G. (2008) Science learning, Science teaching. Abingdon: Routledge.
Resource 2: Promoting Cross-curricular links and literacy skills
![]() Teacher resource to support teaching approaches
Teacher resource to support teaching approaches
Promoting cross-curricular links and literacy skills
Cross-curricular links
Why promote cross-curricular links?
- It is important that students integrate learning across subjects, rather than seeing knowledge and skills as compartmentalised. Sometimes achievement in one subject can be limited because students don’t realise that skills they learnt in another subject could be helpful.
- When you refer to what students learn in other subject areas, you are demonstrating that you are interested in their broader learning and that you value learning in general, not just science.
- By using a range of approaches, you can draw on strengths which students may not show in the course of a ‘normal’ science lesson. Opportunities to show creative and imaginative ability can motivate students who find science hard and prefer arts subjects.
- This is a two-way process: science provides support for learning in other subjects and beyond the school curriculum; science learning can benefit from skills and knowledge acquired and practised in other subjects.
Some examples of topics which might have a link with other subject areas
- the water cycle, erosion, pollution, mining, energy resources, climate
- growth and development, drugs
- food and nutrition
- famous scientists and inventors, important inventions and discoveries.
Some examples of approaches which may be more commonly used in other subjects:
- role play
- creative writing
- discussion
- producing a poster
- carrying out a survey or using a questionnaire
- practical problem solving
- designing and constructing an artefact
- using an internet search or searching reference books.
Some examples related to teaching forces:
- Bungee jumping – creative writing about sensations at different times in a jump.
- Surface tension – insects that walk on the water surface, creative writing or poster on life from an insect’s point of view (effect of scale – like the raindrops in A bug’s life).
- Floating and sinking – freshness and floating/sinking test for fruit; how do people check whether different foods are fresh? Opportunities for surveys, and for links to work in food technology/cookery.
- Floating and sinking – used as a way of sorting different types of plastic for recycling (pieces of plastic are put into a series of sorting tanks containing liquids of different densities e.g. water, salt water, glycerol), this might link to work in geography on resources, or work in technology on different materials.
Working with colleagues in other subjects
If you want to try a new approach, it is a good idea to work with a colleague who uses this approach in teaching their subject so you can learn how to use the approach effectively. For example, English teachers will be more used to organising a debate than science teachers; maths teachers often use peer marking; and humanities teachers often get students to do their own research, or tell stories in order to convey information. Discuss your plans for your own lesson with a colleague from another subject. For example, you might ask:
- What things do you need to have prepared before the lesson for this kind of activity? (e.g. does it work better if you have some photos, or something to listen to at the start?)
- Does the activity work better with a particular room arrangement (e.g. clear a space for role play, or everyone in a big circle to start a discussion)?
- Are there any routines or rules that you establish before this kind of activity?
- Do you have some standard phrases or instructions that students will recognise (like ‘freeze!’ or ‘statues!’ when you want students to pause in the middle of a role play)?
- What size of group works best for this activity? How do you choose who is in each group? (e.g. Before a group discussion, do you give everyone a role card?)
Promoting literacy skills in science
Why promote literacy skills through science?
- Literacy skills need to be developed through every subject and practised regularly.
- Language is often a problem in African countries because students are learning in English, which is not their first language.
- Improving literacy skills helps students to access materials more effectively, and helps to make them more confident learners.
What kinds of literacy skills are particularly useful in science?
- Students need to understand the key scientific words.
- Locating information from the internet, in newspapers and magazines, or in reference books or non-fiction books.
- Locating information quickly in a piece of text.
- Identifying key words and phrases in a piece of text.
- Producing a summary.
- Following a set of written instructions.
- Knowing the meaning of technical terms.
- Being able to work out what a new technical term might mean (by recognising related terms).
- Being able to spell technical terms correctly.
Below are some examples of how you can promote literacy skills:
1. Identifying key words and phrases in a piece of text
Possible ways of promoting this: Recognition – Search for identified key words (list provided by teacher); identification – write down a list of key words in a text (student identifies key words to make their own list).
2. Locating information in a piece of text
Possible ways of promoting this: DARTs activities – circle/highlight/underline the words (or phrases) that, for example, name a piece of equipment, are the parts that move, are stages in a process, tell you what to do, are units of measurement, tell you how it moves. (Note, if you have see-through plastic pockets you can put a photocopied sheet in, get students to use felts pens for this activity then wipe the plastic clean with a sponge when you’ve discussed the answers).
3. Creating a summary
Possible ways of promoting this: Selecting phrases or sentences that describe key information in the text (e.g. sorting sentence strips into two groups – correct/incorrect, true/false, text says this/text doesn’t say this); sequencing sentences (on strips of paper) to create a summary; provide a writing frame to help students include the key elements in a sensible sequence.
4. Understanding technical terms; recognising families of words/ recognising word roots
Possible ways of promoting this: Make lists of ‘related words’ (words with a common root such as ‘geo-’ or ‘chloro-’) for the wall for each topic; students create their own glossaries for each topic; sorting activities – from a list of words or bag of words on pieces of paper, find all the words that are about…; matching activities – match term to meaning (‘snap’ card game); word searches – will help with spelling.
Resource 3: Force Diagrams
![]() Background information / subject knowledge for teacher
Background information / subject knowledge for teacher
Forces
This resource is for use with Activity 2.
Forces can change the shape of an object, can make it move faster or slower, or change the direction it is moving in.
If an object is not moving, or is moving at a steady speed in a straight line, then the forces on it must be balanced.
The bigger the force on an object, the bigger the acceleration (change in velocity) it produces. If something is accelerating (getting faster while moving in a straight line or moving in a curve) then the forces on it are not balanced.
Forces (and velocity and acceleration) are vector quantities – they have size and direction. (Scalar quantities like speed and mass just have size). We can show them as force arrows, where the arrows are drawn to scale and the length of the arrow represents the size of the force.
Note: In more advanced work, the combined effects of forces can be worked out by using force diagrams with all the force arrows drawn to scale. To find the size and direction of the combined effect (called the resultant force), all the force arrows are moved so they are drawn ‘nose to tail’, then the arrow from the start of the first arrow to the end of the last arrow is the resultant force arrow. The length of the arrow gives the size of the resultant force.
Using force diagrams with students
Asking students to draw diagrams of the forces acting on an object – or adding force arrows to an incomplete diagram – is a good way to explore what they think is happening, and to encourage discussion.
Providing pictures for labelling, rather than asking students to draw the objects, can help to avoid the problem of students worrying about their drawing ability or spending all the time making a pretty drawing instead of thinking about the science. The most important thing is for students to use arrows to identify the forces acting on an object and to show what direction they act in.
For older students, you can introduce some additional guidelines:
- Force arrows are straight arrows (not curved ones).
- The arrow should start from the part it is acting on, and points in the direction the force acts.
- The longer the arrow, the bigger the force.
- If two forces are balanced (so the object is either not moving, or is moving steadily) then the arrows will be the same size and start from the same point, but go in opposite directions.
- If two forces on an object are not balanced (so the object is accelerating), then the bigger force will be in the direction it is accelerating, and the arrow for that force will be bigger.
Identifying the forces acting on objects: some examples
The forcemeter in Diagram 1shows that a smaller force is pulling on it when the mass is in water.
The mass hanging from the forcemeter pulls down the spring less when it is in water.
The mass is unchanged: the pull of gravity on it (red arrow, shown on both diagrams) is the same in air and in water, so its weight is unchanged. It appears to weigh less because there is an upthrust force (blue arrows, only on the right hand image) on the mass.
The balloon in Diagram 2 has only a small mass, so the pull of gravity is fairly small. You have to push down to make the balloon go further under water. The further you push the balloon under water, the harder you have to push to keep it there.
As you push the balloon down, you can see the water level rise: the water that you push out of the way (displace) as the balloon goes further under water.
The amount of upthrust depends on the volume of water that is displaced by the balloon.
 Diagram 2 Pushing a balloon under water |  Diagram 3 A needle floating in water |
A needle does not weigh very much, but it doesn’t displace much water as it seems to lie on the surface; so what is keeping it up? There must be enough force pushing back up on the needle to counter the weight (Diagram 3).
Add a drop of detergent to the water. The needle should sink, because it was being held up by the surface tension of the water.
Identifying the forces during a bungee jump
There are three stages to consider:
- On the way down
- At the lowest point of the jump
- On the way back up
1. On the way down, there is no tension in the bungee rope. The most significant force on the jumper is their own weight, due to the pull of gravity. Some students may also suggest air resistance, but this will be relatively small. Air resistance acts on the surface (think of the jumper pushing through the air as they fall). |  |
2. At the lowest point in the jump, the tension in the bungee rope is at its maximum, and is enough to stop them falling any further. |  |
3. The elastic rope pulls the jumper back up: the rope is no longer so stretched, so the upward pull from the tension is less. |  |
Resource 4: Encouraging student questions
![]() Teacher resource to support teaching approaches
Teacher resource to support teaching approaches
Getting students to generate their own questions
For students to ask questions about something they are studying they need to feel that asking questions is a good thing, and that they won’t be laughed at or thought stupid for asking.
Things you can do
You can encourage students to ask questions by giving replies like ‘That’s a good question! What do you think?’, or ‘Shall we find out?’ or ’Hmmm… let’s find out!’.
This raises two important points:
- It is usually better not to simply give students the answer, but to encourage more thinking.
- You need to have thought about the kind of questions that students might ask, so you have things ready in your room to try out ideas. This might mean a simple additional practical activity that would help students to understand the point more thoroughly, or might be a way of testing out their predictions, or it might mean using the internet or reference books to see if they have any answers. In the latter case, it is important to ask students to think about what are the key words or questions they might use in a search, and help them to rephrase those suggestions into something useful, rather than telling them what to look for.
Another way of promoting a spirit of enquiry is to have something set up and working, or some unusual items as ‘talking points’, so students can ask you ‘What is that for?’ ‘What does this do?’ and engage you in a conversation about it.
When something unexpected happens, it can make people review their understanding, so it is important to include demonstrations that include something which students will find surprising along with demonstrations that illustrate an important point. It is also important to ask students to predict what they think will happen before they see what does happen, and to be prepared to repeat an activity, so they can get the full benefit from this.
You can show that you value enquiry by being a role model. When something ‘odd’ or unexpected happens, let them hear you wonder why that was, and be ready to look for answers.
Resource 5: Structuring thinking
![]() Teacher resource for planning or adapting to use with pupils
Teacher resource for planning or adapting to use with pupils
Solving problems – thinking about thinking
Here is a challenge!
A lump of Plasticine sinks if you drop it into a bowl of water, even if you lower it in carefully. How can you make the Plasticine float? Can you make it float so well it can carry a small load? How much can it carry?
Try out your idea, then compare your solution with other people’s.
| Describe what you did to make the Plasticine float. |
|---|
|
| What did you already know about that made you choose that solution? Did it work well? |
|
| Which design carried the biggest load? What was special or different about it that made it work better than the other designs? |
|
| Why could the best design carry a bigger load? What did you see happening as the boats were loaded that supports this idea? What else have you seen that supports this idea? |
|
| Predict what will happen if you put boat into salt water and load it again. How much load will it carry? What did you already know about that made you suggest this? |
|
Resource 6: Extend and challenge
![]() Background information / subject knowledge for teacher
Background information / subject knowledge for teacher
Extending the work on floating and sinking to provide an opportunity for differentiation in a real life problem-solving context
This resource provides an extension to Activity 3.
The context and problem
Recycling is important for saving precious resources when the item can’t be reused any more. Suppose you are trying to recycle waste plastics, how can you sort the plastics into different types so you can sell some of them to someone who can reuse them? (Plastic items have a recycling code on them which tells you what they are made of, but you can’t always see this code on a piece of waste plastic.)
Background information
One method that recycling companies use to sort mixed plastic waste is flotation: different polymers have different densities, so while some will float in a particular liquid (because the polymer is less dense than the liquid) others will sink (because the polymer is more dense than the liquid). If you use three different liquids – water, saturated salt solution and glycerol (propane-1,2,3-triol) – you can sort most polymers.
The common polymers and liquids (shown in bold) are listed here in order of increasing density:
PP (polypropylene), PE (polyethylene), water, ABS (acrylonitrile butadiene styrene), polystyrene, saturated salt solution, PMMA (polymethyl methacrylate, also called acrylic or perspex), PC (polycarbonate – density varies), glycerol, PC (polycarbonate – density varies), PET (polyethylene terephthalate), PVC (polyvinyl chloride).
How the process works
All the plastic waste is chopped up into small pieces before the batch is added to the first tank (water, the least dense of the three liquids). (This is important because the lid and bottle of many plastic bottles will be made from different materials, and because if you use a whole bottle, it has air in it so you are not looking at the density of the plastic but of the bottle.) All the bits that float are skimmed off, and all the bits that sink go into the next tank, and the process is repeated. (Notice that, depending on what was in the original mix, you might have one type of polymer or you might have two or even three polymers in each of the final, separated groups, and you might have to use other tests to work out what bits were a particular polymer: you can’t tell polyethylene and polypropylene apart by this method because they both float in water.)
Setting a differentiated task
You can control the amount of challenge by:
- the way you word the task
- the materials you provide and how you provide them
- the amount of information or guidance you provide.
Some different ways of setting the task
You will need to provide beakers or bowls for testing samples with each liquid. ‘Samples’ should be small pieces of clean plastic. You will also need to provide something to collect items that sink from the bottom of the container, and some cloths or paper towels to wipe up spills, and so students can wipe samples dry before putting them into the next liquid. It works best if you test samples one at a time, or you could leave students to find that out for themselves…
- Provide some identified samples and some ‘mystery’ samples, and ask students to identify the ‘mystery’ samples. This is a simple comparison or matching task.
- Provide some identified samples and ask students to explore which ones float and which sink in each liquid, then make an identification key. The more polymers, the harder the task.
- Provide unknown samples and the information about relative densities, and ask students to suggest what each sample is. The difficulty depends on what samples you provided and what you tell students about them. Deciding if a sample is x or y is easier than identifying with no possibilities suggested.
- Provide unknown samples and the information about relative densities, and ask students to suggest what each sample is and evaluate the method. This adds a different demand because students have to think about what the strengths and weaknesses are. (Was it easy to make a decision about which samples floated each time? What problems are there if you try to test several samples at once? Could they identify all the samples, or only say a sample ‘might be x or y’?)
Some things you could use as sources for different types of polymer
Note: These are suggestions based on what the polymers are usually used for. Try to find the recycling code on the object to confirm what the polymer is.
PP polypropylene: bottle tops, some cosmetics bottles, yoghurt pots, some food trays
PE polyethylene: bleach or detergent bottles, bottles for still drinks, some cosmetics bottles
PET polyethylene terephthalate: shampoo bottles, fizzy drinks bottles
PVC polyvinyl chloride: plastic pipes and cable sheaths
PS polystyrene: plastic cutlery, ‘foam’ food cartons, drinks cups
PMMApolymethyl methacrylate (acrylic, Perspex): plastic rulers, clear drinks cups.
Section 5 : Electricity and magnetism
Theme: Dealing with challenging ideas
Learning Outcomes
By the end of this section, you will have:
- structured an activity to probe understanding of the topic and to help your students understand the key words;
- supported your students in understanding the topic through active listening and talking;
- organised a role play to model electricity flow and worked as a class to evaluate the model.
Introduction
Being an effective science teacher involves being able to explain difficult ideas very clearly. There are a number of topics in science that are difficult to understand and difficult to explain because the ideas are abstract and based on things that we cannot see. Students often have ideas about science that are ‘wrong’, particularly about the more abstract topics. Just explaining the ‘right’ idea might work in the short term, but often doesn’t last until the student has to take an exam. The ‘wrong’ ideas need to be identified and tackled before progress can be made. Often, simply explaining the ideas is not enough; you need to revisit them and consolidate understanding.
In this unit, the three activities build on each other and will enable you to help your students gradually develop their understanding. The first activity focuses on literacy and making sure that your students understand the key words. The second and third activities use different approaches to developing understanding.
1. Focus on literacy
Electricity is a topic about which there are many misconceptions. These are explained in Resource 1 . Students find it very difficult to visualise how electricity works. If they can be supported in constructing a reasonably accurate model in their heads, then as they move on to more demanding ideas such as ‘potential difference’ and ‘power’, they will have more chance of being successful in this topic. Linked to electricity is magnetism, which can also be problematic for students.
This theme draws heavily on the ideas in ‘Probing students’ understanding’. It is particularly important that for difficult topics with known misconceptions, you find ways of identifying what your students are thinking. Your students will probably have been taught some basic electricity at primary school – but you need to check what they know. A significant barrier to understanding the science can be the scientific words that students need to know, especially if they were taught in their own language. Activity 1 describes how you might support your students in understanding the key words associated with this topic. The teacher in Case study 1 had very little equipment and so had to manage with everyday objects.
Case study 1: Word cards
Mrs Immare is concerned that her Form 1 class is finding learning in English, challenging. It is made more difficult by the fact that she has very little equipment. Before she started the topic on electricity and magnetism, she worked with her colleague and they made a list of all the words that their students needed to understand. (Resource 2 has some suggestions.) Using an old cereal packet, the pair made a set of small cards. They wrote one of the key words on each of the cards and put them in a small box.
Mrs Immare gathered her class around the front of the class. She had arranged on the front desk some objects that use electricity – a torch, a mobile phone, and a radio. She also had some wire, two magnets and electrical components that she had taken from a broken radio. She used the objects to ask questions based on what she thought they should know already and to explain some of the key words. She drew a diagram on the board to show the electric circuit inside the torch.
Then she asked Ernest to pick a card and to read the word. She asked for volunteers to explain what it meant using the objects or diagram on the board. Loli got it right, so she picked the next card. As they got more confident she let the student who had picked the card nominate someone to explain the meaning. Everyone had to concentrate hard in case they were the ones that were picked.
Activity 1: Getting students to explain words
Before the activity, prepare a set of cards with some key words associated with the topic. Collect any equipment that you have on the front desk. Gather the students round the front and ask questions to find out what they already know about electricity and magnetism. Get the students to come and make a circuit and explain how to make the bulb light. Show them the attraction of two magnets and ask someone to make them repel each other.
When you have covered the main ideas, give the cards out, making sure that no one sees them. Each student who has a card has to come to the front and explain the meaning of the word – without using the word. The rest of the students have to guess what word they have. They can use the equipment or actions to help them explain the word.
2. Discussing key ideas in groups
Researchers have established a clear link between language and learning. When students discuss ideas with peers, they have time to draw on their memory of what they have done before, share ideas with their partner and clarify their thoughts by having to explain them to others. It also helps them to get used to scientific words which might not be familiar to them. You get the chance to listen to what they are saying and look at what they are writing, so that you are aware of their misconceptions when you plan your questions at the end. You are far more likely to address their misconceptions in this way. Too often when we use questions in a whole class discussion, we assume that because one student can give us a correct answer, the class as a whole understands the topic well. To show that you can use this technique in different contexts, the teacher in Case study 2 gets her students talking about magnetism. Activity 2, which is based on circuits, will take more time than simply explaining the different types of circuit to your class and asking them to copy labelled diagrams and notes, but it will help the students to consolidate their understanding..
Case study 2: Talking about magnetism
Mr Sifuna knows from past experience that students find it difficult to understand the difference between ‘being magnetic’ and ‘being a magnet’ and that they tend to think that all metals will be magnetic. He started the lesson by talking to them about recycling materials. Some students have seen huge electromagnets lifting cars at a local scrap yard. Mr Sifuna showed the class some materials for sorting and asked them to discuss in groups which ones the magnets would pick out. He included empty drink cans, empty food cans, plastic drink bottles, plastic bottle tops, metal bottle tops and pieces of scrap metal. When everyone had made their predictions, he gave each group a bar magnet and asked them to sort the materials into ’magnetic’ and ‘non-magnetic.’
Some of the students were surprised that some of the metal samples were not magnetic.
He then gave each group two magnets, an iron nail, some paper clips and some pieces of copper. He set the question: what is the difference between a ‘magnet’ and a ‘magnetic material’. He encouraged them to experiment with the materials and went round listening to their discussions.
Finally he showed them how an iron nail can be made into a magnet by stroking it in one direction with the bar magnet. Some of the students wanted to know how to separate plastic from copper and aluminium if they are not magnetic (see Resource 3).
Activity 2: Talking about circuits
In exams, students often have to draw or interpret circuit diagrams. They are more likely to do this successfully if they understand the diagrams; simply getting them to copy them down is not the best way to ensure they understand.
Divide your class into groups of six. Give two students in each group a set of descriptions of circuits (Resource 4). One of them reads a description and the other students work in pairs to draw the circuit as described. When they have done five, the students doing the reading out should check the answers. If the pairs disagree then they discuss it as a group until they all agree on an answer. You can extend the exercise by adding ammeters and voltmeters and asking students to work out the current and voltage in different parts of the circuit – depending on your exam syllabus.
3. Modelling electric circuits
Difficult ideas can often be helpfully illustrated using a physical analogy. This can make something that is very abstract feel concrete and can help the students to understand. The danger, of course, is that an inaccurate physical representation can introduce more misconceptions and difficulties at a later stage. When you are using physical analogies, you should always get your students to discuss the merits of the particular model. By identifying the shortcomings of the model, you will also add to their understanding. In the case of electricity, there are two models that you can use. The teacher in Case study 3 has tried role play before and feels confident about using role plays in her lessons. She uses both models and encourages her students to decide which one is the best. Activity 3 describes a role play that your class should enjoy. Resource 5 provides some example role plays and instructions for carrying them out.
Case study 3: Evaluating models
Miss Chitsulo is a student teacher. She wanted to use a role play exercise to explore models with her students as one of her college assignments. She decided to try out two different role plays with her class, so they could discuss what is good about each model. First she tried out the ‘sweets and cups’ role play with a group of students. She checked that everyone in the class understood how the role play models what is happening in an electric circuit. She asked the students who were watching to explain what each part of the model represents. Then she used a different group of students for the second role play, which uses a rope loop. When they had tried both role plays, Miss Chitsulo asked her class to compare the two.
She asked some questions: ‘Is this a good model? How is it not so good? Why do you think that? Which one did you find easier to understand? Which one would you use if you wanted to explain about circuits to someone of your own age who had not learnt about them?’ Her students enjoyed the role plays and were pleased to be asked their opinions. Miss Chitsulo’s tutor was pleased that she had got her class so involved in thinking about a challenging topic.
Activity 3: Organising a role play
Choose one or both of the role plays described in Resource 5 and prepare your resources before the lesson. For the ‘sweets and cups’ role play, you will need two paper cups, two boxes, and a packet of sweets with wrappers and for the ‘rope’ role play, you will need a rope two or three metres long, with the ends fastened together to make a loop. Explain to the class that they are going to use a role play to model what happens in an electric circuit and that at the end of it you will want them to be able to describe the model and what things it helps to explain. Choose students to take part in the role play, and ask everyone else to watch and listen carefully. Ask questions about the role play as it is going on. Get the students to explain which aspect of the circuit is represented by the different parts of the model. At the end bring everyone together to discuss the strengths and weaknesses of the model. Ask everyone to write a short paragraph to explain the model in their own words.
Resource 1: Common Misconceptions
![]() Background information / subject knowledge for teacher
Background information / subject knowledge for teacher
Misconceptions about magnets and magnetism
Researchers have discovered that there are certain misconceptions about electricity and magnetism that are very common. We have summarised them here, so that when you plan your lessons, you can make sure that you address these misconceptions.
Misconception: all metals are attracted to a magnet
Not all metals are attracted to a magnet. Copper, aluminium, gold and silver are all metals, but they aren’t attracted by a magnet. Iron, steel, nickel and cobalt are. Alloys containing these metals can also be attracted to a magnet – ‘copper coins’ attracted to a magnet are not actually copper but a copper–nickel alloy.
Misconception: if something is attracted by a magnet, it is a magnet
Being attracted to a magnet does not mean that a material is a magnet (but it is a magnetic material and can be made into a magnet). If something is attracted to a magnet, turn the magnet round and try again: if the object is repelled by the magnet this time, then the object is a magnet, too.
Misconception: the Magnetic North Pole, i.e. the pole of the earth in the northern hemisphere, is magnetically a north pole
North poles of magnets are the poles that point to the north. Like poles repel, unlike poles attract, so the Earth’s Magnetic North Pole is actually a magnetic south pole, because it attracts the north pole of a magnet!
Misconceptions about circuits and electricity
Misconception: you only need one wire to make a circuit with a battery and a bulb
If students have seen an electric light hanging by a cord from the ceiling or electrical equipment with a lead to a plug, but have never constructed a circuit with batteries and bulbs, then they may think this. (They may also think that if you use two wires, the wire from one end of the battery is the one that counts and the other one is just there as a ‘return route’.) There must be a connection from each end of the battery to two points on the bulb holder (i.e. the metal, not the glass) for the bulb to light.
Misconception: current is ‘used up’ as it flows round the circuit
Current is not used up: the current is the same all the way round a series circuit. If current is used up, then bulbs near the ‘start’ of the circuit should be brighter than those near the ‘end’. Providing the bulbs are identical, then they will all be the same brightness.
Misconception: current starts from one end of a battery and flows through each component of a circuit in turn, until it gets back to the other end of a battery (e.g. battery to wire, then bulb, then wire, then bulb, then wire back to battery)
Current flows instantly in all parts of a circuit when there is a complete circuit. Even if you had a huge circuit going right round the classroom, all the bulbs in it would light up at the same time, not one after the other.
Resource 2: Focus on Key words
![]() Teacher resource for planning or adapting to use with pupils
Teacher resource for planning or adapting to use with pupils
Some key words for electricity and magnetism
Here are some key words that you could use. You might want to add some more, depending on your syllabus:
Electricity
Current
Charge
Cell
Battery
Circuit
Resistor
Switch
Lamp
Wire
Voltmeter
Ammeter
Magnet
Poles
Attraction
Repulsion
Magnetic field
Resource 3: Background to magnetism
![]() Teacher resource for planning or adapting to use with pupils
Teacher resource for planning or adapting to use with pupils
Magnets, magnetic materials and non-magnetic materials
Questions for students to predict the answers to before they test their predictions
Will a magnet pick up all the materials?
What do all the magnetic materials have in common?
Will the magnet attract or pick up a piece of aluminium?
Will the magnet attract or pick up a piece of iron?
How can you tell the difference between a magnet and a magnetic material?
Additional question and what you need to answer it
How can you find the north pole of a magnet?
In order to find the north pole of a magnet, you must either
- have another magnet with the north pole marked on it (and which you know is correct – see below) or
- know which way is north.
You need a piece of string to suspend your magnet.
What you will need for each group to sort the samples
- At least one bar magnet for testing the samples.
- At least one other magnet to be a sample. This could be another bar magnet, but there are other magnets you could use, too: a ring magnet from an old or broken loudspeaker, a magnet from an old motor, a fridge magnet, a magnet from a magnetic door lock, a small magnet used for earrings or jewellery fasteners or from some handbag closures.
- Small samples of non-metallic materials, e.g. a piece of wood, a piece of cardboard, a piece of plastic.
- Small samples of metallic materials or objects made of metal: try to get a range of metals, e.g. piece of copper sheet or copper pipe, piece of aluminium/aluminium foil/empty aluminium drink can, piece of steel/empty steel food can/steel paper clips, iron nails.
- Two trays.
Before the lesson, put all the samples for a group on a table, spread them out as much as possible and mix them up. (If you have several magnets, make sure they don’t attract other items on the table!)
Sorting the samples
One person in the group should hold one end of the ‘tester’ bar magnet above each sample in turn (but don’t touch the samples with the magnet). They should decide whether the sample is attracted or repelled or neither of these.
Someone else in the group should remove all the items that are not attracted to the magnet or repelled by it and put them on a tray. (This should have all the non-magnetic materials.)
The student who has the magnet should turn the magnet round to use the other end and hold the end of the magnet over each of the samples left on the table.
Someone else should remove any samples that are not repelled by the magnet, and put them on another tray. (This should have all the magnetic materials on it. The only objects left on the table should be the magnets.)
Resource 4: Information on circuits
![]() Teacher resource for planning or adapting to use with pupils
Teacher resource for planning or adapting to use with pupils
Suggested circuits and descriptions
This resource is for use with Activity 2. You can add more of your own that apply to your syllabus.
A circuit with one cell (battery) and a bulb. |  |
A circuit with one cell (battery) and two bulbs connected in series. |  |
A circuit with one cell (battery), and two bulbs connected in parallel. |  |
A circuit with two cells(batteries) and two bulbs connected in series. |  |
A circuit with one cell and a resistor, where one bulb is connected in series with the resistor, and the other bulb is connected in parallel with them. |  |
A circuit with one cell and two bulbs in parallel, with a switch controlling both bulbs. Or A circuit with one cell and two bulbs in parallel, with a switch between the bulbs and the battery. |  |
A circuit with one cell and two bulbs in parallel, with a switch controlling just one of the bulbs. Or A circuit with one cell and two bulbs in parallel, with a switch on one of the branches. |  |
Resource 5: How to model electric circuits
![]() Teacher resource for planning or adapting to use with pupils
Teacher resource for planning or adapting to use with pupils
Teacher instructions for role play
Here are two role plays you could use to model what happens in an electric circuit with a small group (for use with Activity 3).
Note: In the descriptions, the different parts of the role play are explained (‘this person is the battery’, ‘this is charge moving round the circuit’, etc.). When you use these models with students, you might decide not to tell them all of this, but just say that this is a role play to model what happens in an electric circuit. Tell everyone in the role-play what to do, then ask them questions like, ‘Who is the battery?’ ‘What represents the moving charges?’ ‘What represents the resistance?’ or ‘How does this show that energy is transferred?’
Sweets and cups
What you need: a packet of wrapped sweets, two boxes, and some paper cups.
What to do:
- Start with everyone except one in a circle. The one outside the circle is an observer.
- One person (the battery) has a box with some wrapped sweets in it: they pass one sweet every second to the person on their right, who immediately passes each sweet to the person on their right, and so on. (It may help to have someone outside the circle keep time for this by tapping the table once a second.)
- One person in the circle has a cup. They represent a lamp or a resistor. When a sweet arrives, they hold it in the cup for a second before they pass it on. Soon, all the sweets in the box are moving steadily around the circle. The observer stands behind the person on the left of the ‘battery’ and claps every time the person they are standing behind passes a sweet back to the battery. The rate the sweets are moving around is the current. Allow the sweets to go round several times, so that everyone settles into the rhythm before you make any changes.
- Now give a cup to a second person, so there are now two lamps/resistors in the circuit. What happens to the rate that sweets pass round the circuit (how often the observer claps) now?
- Now give someone else in the group a box, and half of the sweets. They also pass one sweet a second, so now there are two people passing sweets to the rest of the circle, so there are two sweets a second being passed). This increases the rate that sweets pass round the circle, and the observer claps twice as fast.
This model is good because you can see that the number of charges moving around stays the same. It is also good because you can see that increasing resistance reduces the current. Adding another battery increases the current as you would expect. There is a risk, however, that students will think that adding batteries adds more charges, although you have not got any more sweets moving round than before: focus attention on the rate at which sweets pass the observer. (Alternatively, just keep one person as the battery, but tell them to pass round sweets at twice the rate, i.e., pass a sweet every half second. This is harder to keep up: if you have someone keeping time, then get them to clap at twice the rate they did before.)
Ideally, the sweets would get a little bit smaller every time they passed the ‘lamp’, representing the transfer of energy to the lamp. Eventually, the sweets would be used up – representing the battery running out of energy. This is one feature of an electric circuit that is not represented very well in this model: the transfer of energy from the circuit to the lamp. The second model is better in this respect as students can ‘feel’ the energy as heat is generated by friction.
Rope
What you need: a (large) loop of rope, ideally with a pattern or marks on it every metre, so you can see how fast it is moving round.
What to do:
- Everyone in the group stands in a circle, so that the rope loop is not pulled too tightly, but does not sag anywhere either.
- One person is the battery: they pull the rope around steadily, i.e. with a steady amount of pull. When they pull, the rope should start to move round, and everyone in the circle should feel it move at the same time. The moving rope represents moving charge: charges around the circuit are all moving at the same time.
- Everyone else is the resistance: they grip the rope very lightly as it moves round, to slow it down. As the rope moves through their hands, their hands will be warmed by friction with the rope; and the more tightly the ‘resistances’ grip the rope as it goes round, the more energy is transferred to their hands (beware of sore hands and friction burns caused by people tugging the rope). More grip is meant to slow the rope down, to model how increased resistance gives a smaller current. (This is not a tug of war game: the ‘battery’ is meant to give a constant amount of pull, and should not start pulling harder and harder against the resistance.)
This model is good because it shows that when the current flows around the circuit, the charges are all moving round the circuit at the same time. It also links resistance with energy transfer, and shows that bigger resistance gives a smaller current. However, if the ‘battery’ starts to pull harder to move the rope round, then students might think that adding more resistance will make the battery work harder to keep the current the same.
For each model you should ask the class:
- What forms the circuit in this model?
- What represents the charge moving round the circuit?
- What represents energy in the circuit?
- Where does the current collect energy?
- Where does it give up energy?
- In what ways is this model similar to your own ideas about electricity? In what ways is it different?
- Which model is better?