Use 'Print preview' to check the number of pages and printer settings.
Print functionality varies between browsers.
Printable page generated Sunday, 14 June 2026, 8:47 AM
Module 3: Looking at the Arts
Section 1 : Exploring the visual arts
Key Focus Question: How do you explore the visual arts with your pupils?
Keywords: art; masks; exhibitions; artefacts; thinking skills; crafts
Learning Outcomes
By the end of this section, you will have:
- developed your skills in carrying out classroom activities and related discussions in the area of visual arts;
- developed pupils’ knowledge of the visual arts that are produced and used in the community;
- undertaken practical artwork with your pupils.
Introduction
Some of the most exciting parts of a society’s heritage are its arts and crafts traditions. The way that objects, both ornamental and everyday, are made and decorated, and the music and dancing that is produced, provide insight into the core values and needs of that society.
This section will show you how to introduce your pupils to visual arts that are around them and ways to use the visual arts to stimulate creative work in your classroom. Your task is to help pupils understand that artwork makes the environment attractive. In addition, you will want to develop the understanding that art is a means of communication and a way to transmit culture.
1. Using brainstorming to think about local art
The study of art and artefacts and how they are produced can provide pupils with a window onto their own culture and community history. It also gives you, the teacher, opportunities to design good activity-based lessons, because there are so many exciting objects and artworks that can be brought into the classroom to stimulate interest and provide ideas for pupils’ own art activities.
The symbols contained in art are most often related to the moral and religious values of a particular society. Therefore, it is important to encourage your pupils to take an interest in the arts – to preserve their own cultural heritage and help them make more meaning of their own contexts. This is why we teach pupils about art.
Case Study 1: Deepening thinking about local artefacts
A day before the first lesson on local traditional art, Mrs Kabalimu, from the Tanga Region in Tanzania, asked her pupils to make a list of artefacts produced in their community, either in the past or in the present. They were to speak to their parents and neighbours in gathering this information. Just to get their thoughts moving, she showed them some examples of artefacts, such as a beautifully woven Makonde basket and a Maasai bead necklace.
The next day, pupils brought back some extensive lists – Mrs Kabalimu would mark each one and return it (see Resource 1: A homework list of local artefacts). She started the lesson by asking pupils to mention names of artefacts they had learned of, which she wrote on the chalkboard. These included the names of carvings, paintings and different drawings, weapons, household objects and accessories. Mrs Kabalimu divided the class into small groups (see Key Resource: Using group work in your classroom) and gave each group the names of two art objects and the following questions:
- Describe the uses of the objects.
- What skills are required to produce the objects?
- Are these skills known to many people?
- How might the objects be stored and preserved for future generations?
After 15 minutes, each group presented its findings to the whole class. Mrs Kabalimu made notes on big sheets of paper and, as she did so, she summarised the pupils’ ideas into different categories. She knew that it was important to group the ideas and to draw attention to the way they were classified.
These sheets were pinned on the classroom noticeboard and left for a week for pupils to study. Not only were the pupils learning about artefacts in their own community, but they were also being given an opportunity to develop their thinking skills.
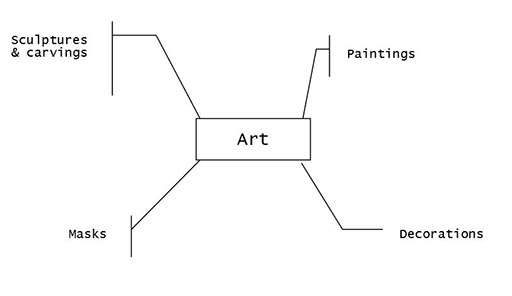
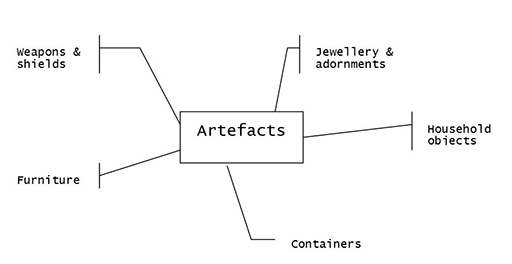
Activity 1: Brainstorming and creating local traditional art and artefacts
You may want to look at the diagram in Resource 2: Categories for organising types of artworks and artefacts to assist you with planning this lesson.
- In a classroom discussion, ask pupils to brainstorm traditional art objects and artefacts they know. Start by giving some examples.
- As pupils come up with ideas, write them on the board in various categories (see Resource 2).
- Examine each object classified as a sculpture or carving and ask the class to discuss the skills required to produce these objects, how and where they are produced and how they are cleaned and preserved.
- Do the same for other categories of objects, covering as many as time allows.
- Finish the lesson by asking pupils to plan for their next art period, in which they are going to draw pictures of or make some of the objects.
- Find a space where these can be displayed according to categories. They could later become part of a school exhibition.
2. Studying and making masks
Traditional African masks were considered to be crucial objects because they played the essential role of the spirits in the African belief system. The original intent in creating an African mask was to create it for a particular ceremony or societal ritual. Unlike the West European concept in which a mask is considered to be the means of ‘representing’ a spirit, traditional masks in Africa were understood to be where a spirit is ‘created’. In other words, when a person wears the mask, along with a costume that conceals them from head to foot, the masked person actually ‘becomes’ the figure the disguise is intended to represent, bringing it to life through their gestures, sounds, activities, and often their possessed state.
In Case Study 2, a teacher uses group work to promote her pupils’ thinking skills and allow them to share their ideas about the purposes of different masks. In Activity 2, your pupils will make their own masks, having thought about questions such as those raised in the case study.
Case Study 2: Exploring symbols and meaning in traditional African masks
Mrs Sungi is an art teacher at IhanjaSchool, Singida. She has decided to explore traditional African masks with three broad outcomes in mind:
- To reflect on shared uses and experiences of artwork across Africa.
- To explore how symbols in a piece of artwork convey particular meanings in a cultural context.
- To help her pupils make their own masks.
She plans to use about two double-period art lessons to achieve these outcomes.
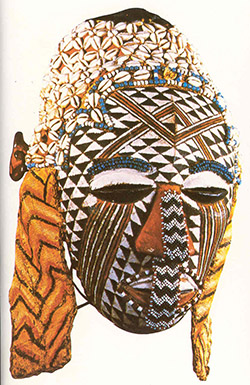
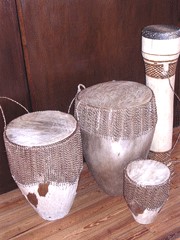
Mrs Sungi starts by presenting her class with picture books and magazines that contain images of traditional masks from all over Sub-Saharan Africa. (See Resource 3: An African maskfor an example.)
She asks the class, in groups, to explore some of the books together and to draw out common uses of masks in social life across different cultural contexts. Each group prepares a list of ritual and cultural functions of African masks.
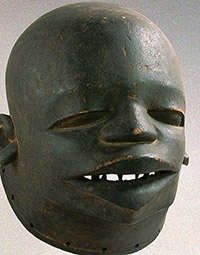
Using Resource 4: Lesson plan on East African masks, Mrs Sungi will go on to introduce specific masks from East Africa, which have many highly stylised features associated with rituals and the symbolism of power. She will draw attention to important symbols in the mask. She will then give her pupils time to design and make their own symbolic masks.
Activity 2: Creating masks to represent emotions and social messages
Before the lesson, gather together a range of picture books and magazines that contain images of traditional African masks from various places and, if possible, some examples of real local masks.
- Tell pupils to look through the resources you have gathered for ideas for their own masks.
- As they plan their masks, pupils need to think what they wish their masks to convey. Remind them that they need to think about:
- facial expressions;
- images or symbols they might use;
- how to capture feelings;
- colour.
- Ask them to design their own masks on a small piece of recycled paper/card first, before making either a larger picture of their mask or making a model out of card.
- You will have to allow several art periods for this work.
- Display the finished masks for all to see and invite other classes to see the masks.
3. Creating an informative exhibition
Producing their own artefacts is important for your pupils and they will want to share their achievements with others. In this part, we suggest creating a school exhibition of community artefacts and objects pupils have created as a means of fostering and preserving your pupils’ pride in their cultural heritage. Artefacts from the local community that cannot be moved or are otherwise unavailable could be represented by cuttings of pictures from newspapers and other sources.
Case Study 3 shows how one class, by working in groups, was involved in all aspects of the exhibition, from planning the layout to talking with visitors. In the Key Activity, your pupils will prepare an exhibition where visitors walk around unaccompanied, so their task of writing informative and interesting labels is crucial.
Case Study 3: Displaying artefacts at a school Open Day
Ilemela Community Primary School’s Open Day normally takes place towards the end of the school year. Mr Koku, who is teaching art to Standard 4 pupils, asks the Open Day planning committee to allocate a space in the exhibition room so that his class can display artefacts they have made during class or collected from different sources in the community. The request is granted.
During the preparation period, Mr Koku led his class to plan for the display. He divided the pupils into four groups. The first group was required to collect and label all drawings, pictures and objects classified as household objects. The second group was assigned the category of musical instruments, the third group was assigned the category of jewellery and the fourth group the category of carvings.
The work of collecting and labelling took up two lessons. In the third lesson, each group nominated one pupil to present its collections to the class the way one would present to visitors. During the Open Day, the class displayed the objects arranged into four categories and four pupils described the collection to parents and other members of the community who visited the class display table.
At the end of the day, the artefacts table was awarded a trophy for the best table in the exhibition room.
Key Activity: Preparing for an exhibition of artefacts
- Ask pupils to bring into class drawings, artefacts, masks, tools, carvings, pottery and baskets either from home or that were made during their art lessons.
- Prepare five cards. On each card, write one of the following words: Picture makers; Weavers; Sculptors; Potters; Carpenters. Divide your class into five groups and assign each group one of the cards.
- Ask each group to categorise the objects that they have brought in and display in a separate space those that belong to the category on their card.
- Once this is done, ask groups to compares categories in order to arrive at uniform sets. The debate that will go on here is very important in building pupils’ categorisation and thinking skills and will help them identify the key things they want to include on their display labels.
- Ask each group to write a name and an information label for each object in their display.
- Ask each group, in turn, to arrange their display for public viewing, while other pupils pretend to be visitors. Ask the ‘visitors’ to feed back to the groups how they could improve their labels.
- Prepare the final draft of the labels and give your class time to set up the displays.
- Devise a rota of pupils to act as custodians of the display while it is open. It may be open only at break times and lunch time.
- After the exhibition, discuss with your pupils what they gained from the experience both in terms of understanding about the artefacts and of being involved in such an event.
Resource 1: A homework list of local artefacts
![]() Example of pupils' work
Example of pupils' work
This was the homework list that Jabali handed in, as marked by Mrs Kabalimu.
| 02. 10.2005 | ||
| Names of Artefacts | ||
| 1. Drum | ✔ | |
| 2. Guitar | Is this the guitar that you made? | |
| 3. Wooden spoon | ✔ | |
| 4. Bottle | Think about this again. Was the bottle really made in your community? | |
| 5. Clay pots | ✔ | Very good |
| 6. Tingatinga painting | What is this? | |
| 7. Car toy | Is it one of the toys made in your village? | |
| 8. Handwoven mat | ✔ | |
| Well done Jabali. You have collected a good list of artefacts here. Make sure you understand which of them are made in your community. | ||
Resource 2: Categories for organising types of artworks and artefacts
![]() Teacher resource for planning or adapting to use with pupils
Teacher resource for planning or adapting to use with pupils
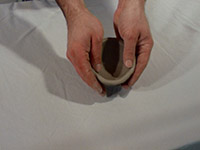
Resource 3: An African mask
![]() Teacher resource for planning or adapting to use with pupils
Teacher resource for planning or adapting to use with pupils
Resource 4: Lesson plan on East African masks
![]() Teacher resource for planning or adapting to use with pupils
Teacher resource for planning or adapting to use with pupils
There are generally three kinds of mask: face masks, helmet masks (which as the name suggests are worn over the head like a helmet), and body masks, which cover a good part of the dancer's torso and are intended to disguise the dancer's identity from people in close proximity. The body mask sometimes only covers the torso and is worn together with a face or helmet mask.
All masks represent spirits or ancestors, and were most powerfully used in initiation ceremonies as expressions of continuity, fear and morality. They were also used in dances for festive occasions, for instance in harvest celebrations.
The helmet masks (mapiko; singular lipiko) are notable for their strong, portrait-like features. Many have real human hair applied in shaved patterns, raised or incised facial scarification, open mouths with bared teeth, large ears or lip-plugs. They are used in the mapiko dance and in other dances. Although both male and female heads can be depicted, female heads are very rare. The dancer breathes and sees though a small opening in the mouth.
Mapiko is not just the name given to a mask (usually helmet mask), but also the name of a dance, the name of the terrifying force that performs in it, and also the name given to one of the stages of male initiation, when the initiate is introduced into the secrets of the Mapiko.
The masks themselves are made in a secret bush location known as the Mpolo, which women are forbidden to approach. When not in use, the masks are kept in the Mpolo, and were traditionally burned when broken or replaced with new masks.
Adapted from original source: http://www.bluegecko.org/ kenya/ tribes/ makonde/ carving-masks.htm (Accessed 1 July 2007)
Outcome
Pupils will develop an appreciation of a mask’s various purposes and will create a mask.
Materials
- drawing paper
- card
- pencils
- modelling clay
- paper in various colours
- markers, crayons or coloured pencils
- poster colour
- beads, shells, etc.
- scissors
- glue
- Collect together some images of masks to share with your pupils.
- Discuss the images of the masks and their symbolism.
- Ask each pupil to create a preliminary drawing of his/her mask.
- Trace the pattern on card and then draw their design for the mask. Tell pupils that they may change the facial features on their masks. The pattern is only a guide for location of eyes and mouth in case they would like to wear their masks.
- Paint the masks and allow them to dry.
- Cut the masks out and prepare the materials that will be attached to masks such as hair and a band to secure it on their head.
- Give pupils time to decorate their masks.
Acknowledgements
Grateful acknowledgement is made to the following sources:
Photographs and images
Resource 3: An African mask: Cable, M. The African Kings. New York: Select Books
Resource 4: An East African mask: http://www.masksoftheworld.com/ images/ African-Makonde-Mask-a.jpg (Accessed 2008)
Text
Resource 4: Lesson plan on East African masks: Adapted from original source: http://www.bluegecko.org/ kenya/ tribes/ makonde/ carving-masks.htm (Accessed 1 July 2007)
Every effort has been made to contact copyright holders. If any have been inadvertently overlooked the publishers will be pleased to make the necessary arrangements at the first opportunity.
Section 2 : Organising practical craft activities
Key Focus Question: How can you help pupils ask questions about and produce local crafts?
Keywords: crafts; research; presentations; practical; culture
Learning Outcomes
By the end of this section, you will have:
- found out what pupils already know about local crafts;
- organised your pupils into small groups to undertake research activities;
- planned practical activities to help pupils produce and evaluate their own craft items.
Introduction
The majority of pupils will already have knowledge about local crafts and some pupils may even be very skilled at doing some of them. The range of crafts in your local area may include such things as beadwork, pottery, sculpture, painting and fabrics.
It is important to find out what pupils already know, and use this as the base for planning activities around local crafts. In this section, you will encourage pupils to share and develop their understanding of the value and uses of these traditional crafts. One important way is to allow pupils to make their own craft items; this provides opportunities for them to plan and evaluate their work.
1. Exploring local crafts in groups
The traditional crafts of the community will have more meaning for your pupils if you involve them doing some of these crafts. This part explores what your pupils know about local crafts and the people who do them in a practical context. It gives you an opportunity to develop your questioning skills and shows a way to help your pupils raise their own questions.
Painting is one way that communities can record events that have happened. It is also a medium that uses the imagination and so is a good way for pupils to express their ideas and feelings.
Case Study 1 describes how one teacher encouraged her pupils to paint and draw. In Activity 1, you use small-group discussions to explore what pupils know about local crafts, their use and how they are made. This can be a starting point to doing more in-depth research into the crafts in the next activity.
Case Study 1: Looking at painting
Mrs Moyosola from southwest Nigeria was teaching painting. She wanted to encourage her class to paint and draw. She decided to begin by asking her pupils to look at some pictures by modern Nigerian painters from their region.
She had one copy of each picture that she put on the board. She asked the pupils to look at these and say what they liked and disliked. She asked if any of them painted or drew and, if so, what and when. Many did not have access to paper and pens but said they did draw pictures in the sand outside their homes. They were sad that these pictures did not last. Mrs Moyosola asked her class to think about what they would like to paint or draw. She gave them paper and pencils and allowed two art lessons for them to draw and paint. Some painted pictures of their own and others did versions of the modern Nigerian paintings.
Mrs Moyosola displayed these for everyone to share.
Activity 1: Asking questions about local crafts
Collect together some examples of local crafts. You could use the same example for all your groups or a different one for each group.
Organise your class into small groups of four/five pupils.
Ask each group to discuss what they know about one craft. Ask them to start by answering the following questions (write these questions on the board).
- What is it?
- What is it used for?
- What was it used for in the past?
- How is it made?
Give pupils 10–15 minutes to discuss these questions and to think of one more question to ask about the craft. You could ask older pupils to draw the craft and record their ideas on the drawing.
Then ask them for some of their answers. You may find that they could not answer all the questions, so explain that they are going to do research to gather more information in Activity 2.
2. Developing research skills
Discussing local crafts or traditional weapons or dress is very motivating for most pupils as they can see the relevance of these to their lives. When pupils are interested, it will also be easier for you to manage their behaviour. In Case Study 2, this interest is stimulated by a visitor. Do you know anyone who has time to visit your class? Have you asked your pupils if they know anyone?
If you also use more interactive ways of working, such as pair and group work, pupils can achieve more by working together to build new knowledge. In Activity 2, pupils work in pairs to research answers to their own questions. Again, this is very motivating for pupils.
Case Study 2: Looking at the history of traditional tools for farming
Ms Dora Edu-Buandoh wanted her pupils to find out more about tools used traditionally in farming. She decided to give them the opportunity of looking at pictures and artefacts, and writing about what they had seen. But first, she had a surprise for her class. She had asked an older member of the community who had a collection of old tools to bring in some of his collection to the class.
The pupils really enjoyed the visit and they were able to gather a lot of information about the tools to add to their research project. The old spade that had belonged to the visitor’s father’s grandfather excited them all most because of its great age.
After the visit, Ms Dora Edu-Buandoh divided her class into small groups and gave each group a picture – some groups had the same picture as she did not have any others she could give. She explained that they needed to discuss the pictures and then write a short story about how the tools in each of the pictures were being used. She explained that they could use the question sheet to start them thinking about what to write about (see Resource 1: Research questions on traditional tools and implements). The pupils used their notes from the visit and also some books that Ms Dora Edu-Buandoh had collected over time. They worked together in their groups to collect the information and write their stories. At the end, each group shared their story with the class.
Activity 2: Researching local crafts
- Ask pupils, in pairs, to choose which craft items they want to research more.
- Each pair can choose between looking for the information in books or interviewing a person in their community as their starting point.
- Next, ask the pupils to think of the kinds of questions they need to ask to guide them to the right information, such as: ‘What is the traditional use of this bowl?’ Discuss some suggestions and decide together if they help focus on the purpose of the research. Each pair selects their questions.
- Each pair conducts their research using their questions, and their chosen research method. You will need to provide information books or extracts from books and magazines for those using books as their source of information, and you will need to give the others time to conduct their interviews.
- If they have trouble finding information with one method, they may need to use the other as well. Allow time for them to do the research and give them guidance as they work if they are struggling.
- Ask each pair to make a poster to present their key findings.
- Assess your pupils’ work using Resource 2: Assessment sheet for research presentations.
3. Making and displaying local crafts
When studying a practical topic like craftwork, it is important that your pupils have an opportunity to work with the materials themselves or at least see someone doing the craft.
Case Study 3 shows how one teacher collected clay from beside the river so that her pupils were able to make clay pots of their own. By handling materials and seeing what can be done with them, pupils gain a better insight into the skills needed. If you have access to materials, plan for your pupils to produce their own crafts. These can be displayed in an exhibition for other pupils or parents. With older pupils, you should encourage them to evaluate their crafts – what did they feel went well? What could they improve on next time?
The Key Activity describes how to set up an exhibition of the crafts. This is another way to motivate pupils and to enable them to understand the power of their local crafts better.
Case Study 3: Making pots
Mrs Khendi was teaching a lesson on traditional pots. She started by asking pupils to talk about their experience of traditional pots and utensils. The pupils had some interesting knowledge about their use in the harvest period and at wedding ceremonies and religious festivals. Pupils also spoke about the different pots they knew, such as one to keep bracelets in. While they were talking, Mrs Khendi made a list of the traditional pots on the chalkboard.
Mrs Khendi had brought in a selection of pots that she had collected from people in the community. She told the pupils to bring in any that they had at home to share to see the shapes etc.
Next, she showed them how to make a small pot out of clay that she had collected by the river. She gave each pair some clay to shape a pot and decorate it in any way they liked. She encouraged them to look at the local designs and, from this, develop their own ideas. The pupils’ pots were left to dry at the side of the classroom where everyone could see them. Mrs Khendi was very pleased with their work.
Resource 3: Making pots gives background information.
Key Activity: Setting up an exhibition
- When your pupils have completed their research on their chosen craft item, invite a local expert in to show them how they make a particular object, e.g. beadwork or carving, so pupils can find out more about why and how they do their craft.
- Next, ask your pupils how they would like to present their research and who they would like to present it to. Organise your class into groups who are interested in the same or similar crafts to discuss their ideas.
- Discuss some of their ideas.
- Agree a date for this and the venue.
- Allow each group time to prepare their book, poster, display, demonstration of how to do the craft or oral presentation.
- Have a rehearsal of the event and ask each group to present their work.
On the day, the next class or the school or parents are invited to come and see their work. Each pair/group stands with their work and explains it to visitors. The oral presentations are held after people have looked at the displays etc.
Resource 1: Research questions on traditional tools and implements
![]() Teacher resource for planning or adapting to use with pupils
Teacher resource for planning or adapting to use with pupils
A.
Look at this picture carefully. Think about all the things that you see in the picture.
- What implements can you see in the picture?
- Who is using these implements?
- What is the person using them for?
B.
Look at this picture carefully. Think about all the things that you see in the picture.
- Which tools can you see in the picture?
- Who is using them?
- What is the person using them for?
Resource 2: Assessment sheet for research presentations
![]() Teacher resource for planning or adapting to use with pupils
Teacher resource for planning or adapting to use with pupils
Name of pupil: _______________ Date: _______________
Class: _____________
| During the presentation the pupil: | Achieved well | Achieved | Needs help | |
| ||||
| ||||
| ||||
| Feedback comments: |
|
|
|
|
|
Teacher: ____________________________________ |
Resource 3: Making pots
![]() Background information / subject knowledge for teacher
Background information / subject knowledge for teacher
An example using a pottery wheel Clay can be made into vessels because of its unique physical properties. The molecular structure of clay means it has a ‘plastic’ quality, allowing it to be shaped into an infinite variety of forms. Subject these forms to sufficient heat and they are altered into a rock-hard material, making them both functional and durable. Clay is composed of the most common elements found in the Earth’s crust and, as a result, is found throughout the world, beneath our feet. Clay was put to use by nearly every culture, often with extraordinary results. Pots can be made with bare hands using clay lubricated with water. | Centering the clay on the kick wheel |
The potter, bearing down on the clay with their hands, then centres the clay. The fingers are used to first form the floor of the pot and then, to pull the walls of the clay up, typically into a cylindrical shape. Then the potter gently shapes the pot into the desired form, using the fingertips, as the wheel continues to spin. | Opening up the clay  |
Once fully formed, the pot is cut off the wheel head with a wire and removed. The process is then repeated with the next ball of clay. | Shaping the clay |
When the work has dried to a leather-hard state, the pot can be trimmed. Handles are attached at this stage. Certain types of decoration can be added. Once pots are bone dry, they can be bisque-fired in a kiln. This produces a hard yet porous vessel. | Pulling a handle for a mug  |
Each pot is dipped directly into a bucket of glaze that has been mixed to the consistency of heavy cream. The stoneware glazes consist of a number of naturally occurring minerals such as feldspar, silica, whiting (limestone) and clay. Iron oxide is added in various amounts for colour. | Detail from stoneware bowl  |
Once the kiln is fully loaded, the door is bricked shut. The firing process takes 18 hours. The pots are gradually heated until they reach 1,250 °C, which is white heat. At several points during the firing, the kiln is starved of oxygen. This reduction atmosphere causes oxygen to be removed from the clay and the glazes. This process of reduction and reoxidation of the pots results in rich, earth-toned glazes. | 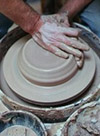 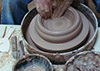 |
An example using pinch pot construction
With pinching gestures, you can mould clay into objects such as animals or make a bowl, a pot, a cup etc. While this form of pottery seems basic, you can get a feel for the clay you are working with and you will get to know the limits of your clay. (Does it bend easily? Does it dry fast? etc.)
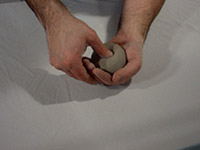
To make a bowl, a pot or a cup, begin with a ball of clay. Push your thumb into the centre. Then pinch up the walls.
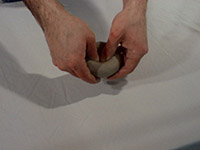
Turn the piece as you pinch. This will help you to keep an even thickness in the walls of the piece.
Gently pat the bottom on a flat surface to create a flat spot on the bottom of the piece.
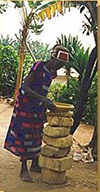
Example of traditional pot – an African bracelet bowl
This bowl is traditionally used for storing bracelets.
Adapted from: http://www.hobokenpottery.com, http://www.jhpottery.com and http://www.jhpottery.com/ tutorial/ pinch.htm (Accessed 2008)
The series of pictures below show pottery being made in Mpraeso, Ghana, three hours northwest of Accra.
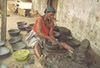 A potter at work. Pottery, like nearly every village activity, takes place outdoors in the communal yard, preferably in a patch of shade. |  Akua Manu makes some adjustments to Ellie’s bowl. |
 With African wheels, the pot stays still while the potter gets her exercise moving, often at a run, around it as she works. The pot rests on a board placed on top of a column of rocks built up to a comfortable height. | 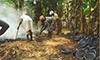 Pit firing under the banana trees at Mpraeso. Pots are placed in a circle with fuel around them. For the typical black reduction effect, potters smother the flames with organic materials producing this cloud of smoke. |
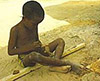 A young Ghanaian sculptor concentrates on getting the details just right. | |
Acknowledgements
Grateful acknowledgement is made to the following sources:
Photographs and images
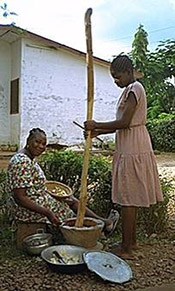
Girl using stick to grind food in a bowl: http://mysite.verizon.net/ vze827ph/ images/ IMG0028.jpg (Accessed 2008)
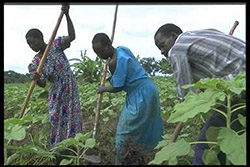
People using hoes in a field: http://www.ifad.org/ photo/ images/ 10190_d3s.jpg (Accessed 2008)
Resource 3: Making pots: Adapted from: http://www.hobokenpottery.com, http://www.jhpottery.com and http://www.jhpottery.com/ tutorial/ pinch.htm (Accessed 2008)
Series of five pictures showing pottery being made in Mpraeso, Ghana: The full article can be found at http://www.infohub.com/ forums/ showthread.php?t=766 (Accessed 2008).
Every effort has been made to contact copyright holders. If any have been inadvertently overlooked the publishers will be pleased to make the necessary arrangements at the first opportunity.
Section 3 : Using dance for learning
Key Focus Question: How can you use dance to enhance learning and physical well-being?
Keywords: dance; choreography; culture; domba; tradition; change
Learning Outcomes
By the end of this section, you will have:
- explored ways to show how African dance traditions can express society’s needs and values;
- helped your pupils understand the changing nature of tradition through practical dance;
- drawn on dance traditions to improve learning and assessment, and develop pupils’ physical well-being.
Introduction
The arts in general are an integral part of the culture of a people and dance is a very strong and vibrant dimension of many cultures. Dance is part of every aspect of African life. Many forms of dance originating in Africa, although rooted in the past, have changed or have been lost, so encouraging an interest in dance will protect those still in use.
This section will help you develop ways of using dance in the classroom. It explores the cultural traditions of dance in Africa, as well as new ways you can use dance across the curriculum.
1. Exploring culture through dance
Helping your pupils appreciate the value of studying traditional African dance is an important part of teaching the arts. Learning about the arts is often rooted in stories from the past.
Also, ‘the arts’ enable people to express meaning in their everyday lives and help them to develop their sense of identity and self-worth.
Case Study 1 and Activity 1 will help you consider with your pupils how traditions change and disappear, and debate whether this is a good or bad thing.
Case Study 1: Investigating the Venda people and the domba
Ms Sylvia Msane teaches at a primary school in Sebokeng, a township south of the Johannesburg city centre in South Africa.
Sylvia is married to a man of Zulu origins and they speak English and Isizulu at home. However, her mother’s ancestors are from Venda. Sylvia is concerned that her pupils, like many other young people in South Africa, know very little about their cultural origins. Sylvia thinks of a saying that has been passed down to her: ‘Umuntu ngu muntu nga bantu’ – ‘A person is a person because of other people’.
She decides to tell her pupils a story that her grandmother told her when she was a child about the Venda people (see Resource 1: Stories of the Venda drum). After telling them how the Venda people came to live in the northern parts of South Africa, she shows them some traditional Venda clothes and pictures of young women dancing the domba. One pupil asks what the women are doing. Sylvia explains that these women have almost completed their initiation and are dancing in the form of a python. She tells them another story to explain the significance of this snake and they discover how the domba dance celebrates the fertility of young women (see Resource 1). Another pupil asks her if she was initiated in this way and she explains that she wasn’t. People’s lives and priorities have changed and many traditions from the past have died out. They debate whether it is a good or bad thing that this has happened.
Resource 2: Local traditions tells you about a different type of drum.
Activity 1: Finding out about an African dance tradition of the past
Find out from your class, colleagues or members of the community if there are any traditional dancers in the area.
Ask the head teacher if you can invite the person in.
Contact the person and ask them to come and talk to your class about local dances and to demonstrate one or two dances. Ask them to bring the clothes they wear.
Prepare your class for the visit (see Key Resource: Using the local community/environment as a resource). Think about questions the pupils may want to ask.
On the day, prepare the classroom so there is a space for the visitor to sit and dance and so all the pupils can see.
Welcome and introduce the visitor. The visitor talks and dances for perhaps half an hour.
Encourage your pupils to ask the visitor questions.
After the visit, discuss with your pupils what they have learned about dance. Who liked it? Who would like to do more? Think what you can do next. Maybe the visitor could return to teach them some dances?
2. Working in groups to devise a dance
Dance in the classroom lends itself to cross-curricular work, as you explore the ideas behind dances, the significance of the costumes and learn how to do the dances.
Dance is a physical activity and can be done as part of the physical education curriculum or it could be used to explore ideas in other subject areas such as literature and science, for example.
In Case Study 2 and Activity 2 dance is used to help pupils show what they know about a topic or tell a story.
Case Study 2: Working in groups to make up a dance sequence
Mrs Agholor has been working with her class on how the brain sends messages around the body. She decides to use this topic in her PE lessons where she is doing a series of lessons on dance.
Mrs Agholor tells her pupils that she is going to divide them into groups of between six and ten. Each group has to think of ways to show how a message goes from the brain to a part of the body to tell it to move and other messages come back to the brain to develop or stop the move. She gives them some time to think about this and goes around supporting them as they talk.
After 15 minutes, she suggests they think about how to do the dance and start practising. She reminds them that they have to convey their ideas through movement with no words.
When they have had time to practise, each group shows what they have done. After each performance, the rest of the class has to guess what is happening and can ask questions.
She decides to give them time to develop their ideas and show them to the class the following week, one group at the end of each day.
Mrs Agholor notes that everyone has had fun and thinks her pupils now also appreciate the importance of dance as a means of expression and as a way to communicate.
Activity 2: Using dance from the past and present to communicate
Ask each pupil to research a dance that a parent or older relative used to perform or still does. It does not have to be a ‘traditional’ dance. They should find out:
- Where the dance comes from.
- Why the dance was performed and what purpose it served.
- Where it was performed.
- How it was performed.
Give them time to do this and write out how to do the dance. (See also Key Resource: Researching in the classroom.)
Next, using one of your local traditional dances as a base, ask your pupils to list what it is meant to show.
Now ask your pupils to make up their own dance using any techniques they like, to show similar ideas. These could be about:
- reaching adulthood;
- the birth of a baby;
- a good harvest.
Give them time to practise and then share their dances.
Remind your pupils that they should show their emotions – such as happiness, anxiety, horror, sadness – with their bodies and faces as they dance.
Discuss these emotions and give them time to practise again. Share their performances again and discuss how they improved.
3. Learning from performance
Dance can be very personal but it also lends itself to group performance and allows your pupils to grow in confidence and self-esteem. This is very important as it can enhance their attitude to learning and their achievements.
As a teacher, it is important in a practical situation to be aware of the individuals in a group and their achievements, as well as the collective achievement of the group.
Case Study 3 and the Key Activity suggest ways of providing feedback to your pupils that will help them prepare to perform in front of an audience. You will also explore how peers can assess and feed back to each other in order to develop their understanding and improve their work.
Case Study 3: Planning and giving a successful dance performance
Mrs Agholor hears from one of her colleagues that the school is going to have an Open Day at the end of the term. Parents and people from the community will be invited to attend.
Mrs Agholor has been impressed by the enthusiasm of her pupils for the dance work they have been doing and decides to help them develop the dances they have created in class into a performance for the Open Day.
She encourages them to practise at lunchtime and allocates some time during physical education lessons. A week before the Open Day, they perform for each other and give feedback on the strengths of the dances and ways they could be improved. She uses a series of questions to help them think about and improve their performances (see Resource 3: Refining our dance). They rehearse and perfect their dances. At the Open Day, everybody is amazed at how Mrs Agholor’s pupils have communicated their ideas about how the brain works through their dances.
Finally, Mrs Agholor asks her pupils to reflect on the experience; this gives her valuable feedback about the learning process and helps her pupils to think about what they have gained (see Resource 4: Thinking back about dance).
Key Activity: Preparing for a performance
Before the first lesson, read Resources 3and 4.
- Explain to your pupils that they are going to perform at the next parents’ evening and that the head teacher is inviting the community to come too.
- Before you begin, make sure that your pupils are aware of the need to work sensibly. Give them details of how you will stop them while working and remind them that they need to be aware of where their classmates are.
- Organise the class into groups. Ask each group to plan a dance based around a topic you have been studying. (You could decide this or allow your pupils to vote for one from a list.)
- Give the groups time to practise.
- Next, allow each group to perform in front of the class. Encourage your pupils to give each other constructive feedback that will help them improve their performances.
- Support groups as they think about how to improve and refine their dances so that they are ready for performance in front of an audience.
- Discuss any props or costumes and prepare these.
- Make a programme.
- Do the performance.
- Discuss how it went together. What they have learned about dance? What have they learned about the topic?
Resource 1: Stories of the Venda drum
![]() Background information / subject knowledge for teacher
Background information / subject knowledge for teacher
The story of the sacred Venda drum
Long, long ago, the ancestor god called Mwari gave the Venda people a sacred drum called the Ngoma Lungundu. In these ancient days, the ancestors of the Venda lived in Zimbabwe. One day, they received a divine message that they should pick up their sacred drum, the Ngoma Lungundu, and move south.
This magic drum was large and heavy and had to be carried by many men. In order to preserve the power of the drum, it could never touch the ground. When struck by the chief it could cause fog, hail, rain, thunder or lightening. At times, the great god Mwari would play the drum himself. At these times the drum would appear to be playing itself. Enemies fled in terror, fainted or died when they heard its powerful rhythms.
These powers helped to protect the ancestors of the Venda people during this journey and eventually they arrived where they live today in the northern parts of South Africa. Here, there is a lake called Fundudzi that is sacred to the Venda people. Many years ago, a great hero of the Venda people, called Thoyo ya Ndou, disappeared into this lake, taking with him the magical drum. Most people think that it has never been seen since, but some believe it lies guarded and hidden in a cave. Thoyo ya Ndou, or Head of the Elephant, was greatly admired because he united the Venda people and there was peace and prosperity. Ever since he disappeared, many say there has been disagreement and strife between the royal Venda families.
The python
In the Limpopo Province there is a beautiful lake called Fundudzi. The Venda people regard this as a very important, sacred place as they believe there is a great, white python that lives at the bottom of Fundudzi. This python is the god of fertility. In other words, he ensures that there is enough rain and plentiful food. He also makes sure that people are healthy and have many children.
Long ago, this god lived on the land. He had a beautiful patterned skin and married two human wives, one old and one young. It happened that he visited these wives each day, late at night. He also visited their huts when they were busy working in the fields. So they never saw their husband or knew what he really looked like.
One day, the younger wife grew curious and decided to come back from the fields early and peep through the window. She was horrified to see that her husband was a fat python and screamed in horror. The snake god took fright and slithered away into the lake. From then on there was drought and famine in the land. The animals died and there was not enough water for the crops to grow.
Nobody knew what had caused this disaster and the elders met to have discussions about the problem. Eventually the young wife confessed what had happened. They begged her to help them restore fertility to the land. Early one morning, she took a pot of the finest beer and waded into the water. The men played their reed flutes in honour of her courage. She walked deeper and deeper into the lake until the water covered her head, and was never seen again.
After this, the rains returned and the famine stopped. To this day, Venda kings and traditional healers go down to Lake Fundudzi and pour beer into the water. They believe if the beer sinks, it is a sign of the python god’s pleasure and acceptance of their gift. In Venda culture, young people attend a special school of initiation. This prepares them for their role as a married woman or man in society. Young people learn the domba dance when they attend the dombani or traditional school. Before the domba dance begins, the master of the dance calls out: ‘Tharu ya mahbidighami!’ (‘The python is uncoiling!’) When performing the dance they form a long line and ‘snake’ around a sacred fire.
Resource 2: Local traditions
![]() Background information / subject knowledge for teacher
Background information / subject knowledge for teacher
The sacred Batá drums
Batá drums are a family of three double-headed tapered cylinders, with a slight hourglass shape. With varying sizes that produce differences in pitch, they are named according to size: iyá, the larger drum, considered the mother; itótele, the medium-sized drum, and okónkolo, the smaller or baby drum. They are carved out of solid wood. The skins are of male goat or deer. The small head is called the chacha and the large is the enu, or mouth. A wax-like substance called ida, or fardela, is used on the larger heads of the iyá and itótele, changing the tonality to produce a duller sound. There are usually two belts around the iyá, near the heads, with bells attached to them. These are called chaguoro. The drums have embroidered skirts or aprons and decorated strips of cloth as well.
Used almost entirely for religious or semi-religious events in Yorùbáland, in Nigeria, the batá are used for worship of Shangó, the leader of Oyó and God of Thunder and Lightning, to produce what believers consider is celestial music. They are also used for ancestor (egungun) worship with masked dancers called agbegijo, who portray humorous and serious as well as ancient and modern characters.
The batá drums can speak. They can be used to speak the Yorùbá language, and have been used traditionally to recite prayers, religious poetry, greetings, announcements, praises for leaders, and even jokes or teasing. The Yorùbá language, the mother tongue of over 10 million people, is a tonal language, like many African languages. Yorùbá speakers use three basic tones, or pitches, and glide between them, as an essential part of how words are pronounced. This is how the hourglass-shaped ‘talking drums’ (called dundun in Yorùbá) are able to speak Yorùbá praises and sayings. This is also how batá and other drums can talk. | 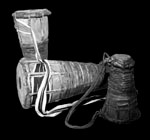 | |
Sacred batá drums in Yorùbá culture have religious rituals surrounding their construction: who can touch them, how to prepare to play them, and how to care for them. These sacred batá are treated as living creatures with names, care and feelings, with various rules for their use. An uninitiated person may not touch them and they may not touch the ground.
The spiritual force and mystery placed within the drum when it is made sacred, or consecrated, is called añá or ayán. Añá is also referred to as an orisha, or deity. A drummer may be initiated into añá through certain religious rituals practised mostly in Nigeria, and receives the spiritual force needed to play the drums correctly to bring the orishas down to a ceremony to possess the devotees.
 | |
 | Omele batá drums from Nigeria 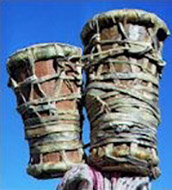 |
 | |
Adapted from: http://www.batadrums.com | |
Resource 3: Refining our dance
![]() Teacher resource for planning or adapting to use with pupils
Teacher resource for planning or adapting to use with pupils
Use the following questions to guide a discussion about each group’s dance. Note that you do not have to follow these questions in any particular order.
Creativity
- Could you create more variation in your dance to communicate your ideas?
- Could you, for example, swap partners, change directions, use different parts of the space, use different parts of the body or vary the space between the dancers?
Working with each other
There are lots of different ways of working together in a group dance. Consider some of the following variations:
- working in groups within the large group, e.g. in twos;
- swapping partners;
- facing each other, dancing alongside, back-to-back or leaning against each other;
- varying the distance between dancers;
- creating a focus on one or more dancers at a particular time;
- allowing one dancer to take the lead and the rest following.
Performance space
- Do you need to adjust your dance to suit the performance space?
- How will you position yourselves in the space to start?
- How will you be positioned in the space when you finish?
- How will you move around the space during your performance?
Awareness of the audience
- Is it easy for the audience to see all the dancers in your group?
- Could you adjust your dance so that the audience can see it better?
Other things to think about…
- Does anybody in your group need extra support or help?
- Could you enhance your presentation by wearing similar hats, scarves, particular colours etc.?
Resource 4: Thinking back about dance
![]() Teacher resource for planning or adapting to use with pupils
Teacher resource for planning or adapting to use with pupils
You can use the questions here to help your pupils reflect back on their experiences. Ask them to read and think about these questions carefully and to answer them in an honest and detailed way.
- Write down three or more words to describe how you felt during each of the following stages:
- a.presenting your dance to the class;
- b.watching the other dances;
- c.performing your dance in front of the audience.
- What did you enjoy most about these lessons? Why?
- What did you find most challenging about these lessons? Why?
- What do you think is the most successful thing about your dance? Why?
- Do you think there are any ways you could improve your dance? If so, how?
- Which other performances did you like? Why?
- Have you learned anything new about yourself?
- What have you learned from the other performances?
Acknowledgements
Grateful acknowledgement is made to the following sources:
Photographs and images
Resource 1: Stories of the Venda drum: Catalogue: Ten Years of Collecting (1979–89), Standard Bank Foundation Collection of African Art, Editors: Hammond-Tooke & Nettleton, 1989
Resource 2: Local Traditions - The sacred Batá drums: Adapted from: http://www.batadrums.com
Every effort has been made to contact copyright holders. If any have been inadvertently overlooked the publishers will be pleased to make the necessary arrangements at the first opportunity.
Section 4 : Using music in the classroom
Key Focus Question: What different approaches are there to making music in the classroom?
Keywords: music; sound walk; praise song; group work; community; instruments; culture
Learning Outcomes
By the end of this section, you will have:
- used the environment and community as resources for learning;
- planned practical music activities;
- involved pupils in making their own music, using different musical cultures and forms.
Introduction
Music is an important part of most people’s lives and cultures. Understanding the place of music and how making music can help pupils’ self-esteem and confidence is important.
The emphasis in this section is on exploring different sounds and working together. Throughout these activities you encourage your pupils to listen carefully, ask questions and experiment.
1. Using mind maps to organise thinking about sound
The environment is a valuable resource for exploring sounds and how different natural materials can produce sound.
The aim of this part is to broaden your pupils’ understanding and experience of different types of sound, and to see themselves and their immediate environment as music resources. Case Study 1 and Activity 1 show how sounds in everyday life are a good starting point for this topic. These activities could be extended to ask pupils to make their own instruments from everyday materials (tin cans, bottles and so on) or you may be fortunate enough to have pupils who can play an instrument or sing. Organise for them to demonstrate their skills to the class.
See Resource 1: Exploring sound for background information and SCIENCE Module 3, Section 2 for more information on sound and musical instruments.
Case Study 1: Making a mind map to link materials and sound
In her primary class in Soweto, South Africa, Ms Simelane notices two boys tapping the desk. She listens carefully as they create a rhythmic conversation using the desk as a drum. Then they tap their pencil cases. Ms Simelane draws attention to their music, asking the class to close their eyes and listen. ‘Are they making music? How?’ ‘What different sounds can you hear?’ The pupils become interested in using their desks, pens and pencil cases to make sound. She lets them explore the different sounds they can make at their desks, using the objects around them. They listen to each other’s sounds and comment on the ways they are made.
Ms Simelane asks her pupils to suggest materials that make sounds and records these on a mind map on the board. She encourages them to think about the relationship between materials and sound. ‘What kind of sound do we hear when we hit a bottle with a spoon? Or blow across a bottle opening?’ ‘What sounds do different sized drums make?’ ‘How do we describe sound?’ She adds their ideas to the mind map.
She is pleased with their responses and sees this as a starting point for the pupils to make their own instruments using materials from the local environment (see Resource 2: Making instruments).
At the end of the lesson, she asks them to go home and collect as many different materials as they can and bring these into school to add to those she has been collecting. Next week they will make and demonstrate these instruments.
Activity 1: A sound walk
- Before the lesson, read Resource 3: Listening to sounds in everyday life.
- Ask your pupils to be very quiet and listen to the sounds they can hear in the classroom.
- In groups, or with the whole class grouped around you, brainstorm all the sounds they could hear on a large piece of paper or the chalkboard. (See Key Resource: Using mind maps and brainstorming to explore ideas.)
- Next, organise small groups of pupils (four/five) to go out at intervals and walk around the school grounds. They should stop in four places and listen very carefully to what they can hear. They should take pens or pencils and their books or paper or a clipboard for this.
- Each group should note down every new sound they hear and where they hear it, and try to identify what is making the sound and how it is made.
- On their return to class, ask each group to draw their own mind map of their ‘sound walk’.
- When these are finished, display them for all to see and discuss their ideas about how sounds are made.
2. Working in groups to write a praise poem
Praise poetry and singing is an important African practice, past and present. African names carry stories of who you are and where you come from. They tell people about your experiences, your joys and struggles, and what you are like, so that others can know you. People create their own praise songs. Praise poets perform at ceremonies, rituals and festivities to praise a person or group. Praise singing and poetry has become a sophisticated art form, practised in many cultures through music, dance and chanting.
You will help pupils research and create their own praise poems or songs, focusing on the communication of identity and family heritage. This will enable your pupils to make connections between themselves and musical practices.
Case Study 2: Using praise poems to develop musical understanding
Mr Ekadu is a musician and arts and culture teacher who grew up in Soroti district in eastern Uganda. He teaches in an urban primary school, where his pupils represent many cultures, religions and languages.
He is playing an old Iteso song on his guitar as he thinks about his music lessons for the coming month. How will he develop the theme of identity using music? As he sings, the music takes him back to his childhood, his home, parents and grandparents. He remembers hearing naming songs and praises as a child. He remembers his own naming song that tells of his birth and ancestry. His memories form the beginning of an idea for his class.
Mr Ekadu collects some praise poems and songs and devises questions about them. He listens to the songs’ call-and-response structure and links this to a familiar naming game his pupils play in the playground. He plans to do a lesson on praise poems beginning with a familiar song. Next he encourages his class to produce and perform their own praise poems and songs about their friends.
See Resource 4: Praise singing for more background information.
Activity 2: Praise songs and poems
Before this activity, look at Resource 5: Pupil praise songs.
- Sing a praise song you know to your class or ask a pupil to sing to the class. Explain to them how the structure of the song works and get them to join in the responses.
- Sing the song again while pupils keep the beat by clapping, tapping or using their instruments.
- Talk with them about the idea of a praise song, who sings them and why.
- Say a praise poem together, paying attention to the rhythm of the words and communicating the feeling of the poem with your voice. Add instrumental sounds that enhance the poem’s mood if possible.
- Next, divide the class into groups of six. Ask each group to work in threes and write their own praise poem. Each three should perform their poem to the other three and then explain the meaning of and feelings in the poem. Together, the whole group chooses a response line to chant in between the individual lines and they practise their two poems. They can add other sounds if they like.
- Over the next few days, ask each group to perform their praise poem to the rest of the class.
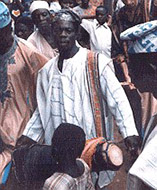
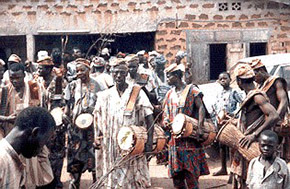
3. Organising a musical performance
Making music is a form of communication: instruments and voices ‘talk’, communicating feelings, thoughts and ideas. Music reflects and creates culture, and it is always dynamic – changing and developing. In Africa, music is important in creating social cohesion (unity) and can be important in the classroom.
In this part, you will build on the previous activities to organise a whole-class performance. The way you set up the activity can contribute to pupils’ cooperative and listening skills.
Case Study 3: The value of group music making
Sam’s passion is making music in a group. The feeling he gets playing the ngoma, or singing in the choir is a special one of togetherness. He wants to share this feeling with his pupils; to experience what it’s like to make music together when everyone is listening sensitively to each other.
Sam travels from Kampala to Mbale and visits a small primary school away from the city to visit the arts and culture teacher. As he arrives, he comes across a festival. Groups of young boys try out their flutes and drums in preparation. In the dusty playground, Sam listens and watches as a group of 50 children move and make music together – each one contributing, each one watching and listening as they tell the story of the dance.
Inspired by the flautists and the dance, he decides that his own pupils back in Kampala need to experience what it’s like to ‘become one’ through music. After talking to the teachers and learning more about the cultural significance of the music and dance, he returns home to plan a lesson where his pupils make music together.
Resource 6: Musical pipes shows how musical instruments can be made for your pupils to play.
Key Activity: Music making
- Ask your pupils if any of them play an instrument. If they do, ask them to bring them to school.
- The next day, ask the pupils who have brought instruments to show them and play them to the class.
- Ask your pupils if they know any songs or praise poems. If they do, ask them tell you the words. You write these on the board.
- Ask the pupil to sing the poem/song and then ask the class to join in as you sing it again.
- Repeat until the class are comfortable singing.
- Now, ask those who play instruments to join in as well.
- Practise the whole song until everyone is happy and then perform it to another class or at an Open Day.
Resource 1: Exploring sound
![]() Teacher resource for planning or adapting to use with pupils
Teacher resource for planning or adapting to use with pupils
Activity A: Musical questions about sound
Begin with investigating the science of sound with pupils. Explore these questions with your pupils by making different sounds, in different ways, using the objects around you as sound makers: a desk, the floor, a pen, a bottle, chalkboard or window. Remember, talking about sound must always relate to our aural and physical experiences of sound.
- What is sound?
- What has to happen for us to hear a sound?
- How does sound travel to us?
- What makes something a musical instrument?
- Can we use our own body as a musical instrument?
- Why do you think people use instruments to make music? What purpose does it serve?
- Which musical instruments do you know about? Can you classify them into groups?
- What criteria did you use to classify your instruments?
Activity B: The science connection – how sound travels
Have you ever seen a ‘Mexican wave’ at a big sports event? Sound travels in a similar way to the movement of a Mexican wave: the air molecules, like people in the crowd, move backwards and forwards, combining to make a wave. The individual molecules do not actually travel from one place to another: molecules vibrate, each about its own position, when something makes the molecules next to them move. These vibrating molecules then attract other molecules, so that they move out of their positions.
Sound can travel through the air or through anything made up of molecules, like water, steel or wood. Sound travels at different speeds depending on the substance it is moving through.
Activity C: Making a sound wave
Make a line of ten pupils next to each other, standing shoulder to shoulder. At one end, ask one pupil to play a loud instrument like a gong or cymbal and another to hold up a big sign saying SOUND. At the other end, ask a pupil to hold up a big picture of an EAR and a sign saying HEAR. The other pupils in the line have signs saying AIR.
The pupil with the gong or cymbal strikes it. The first pupil wiggles back and forth using their body (with the feet planted on the ground); then the next pupil wiggles when they feel the first pupil (not before!), and so on down the line. The last pupil holds up the HEAR sign as they feel the wiggle of the pupil next to them.
Adapted from original source: http://www.stomponline.com/ lessons.html (Accessed 2008)
Resource 2: Making instruments
![]() Teacher resource for planning or adapting to use with pupils
Teacher resource for planning or adapting to use with pupils
‘Long ago, before man-made materials were available, people in indigenous societies in Africa constructed musical instruments from materials they found around them … in rural societies they made bows from sinew and wood, leg-rattles from fruit or cocoon shells filled with seeds or stones, and drums from animal skins and wood’
Instrument-making materials list
Make a collection of sound-makers, using the following categories as a guide.
- Wooden objects.
- Metal objects.
- Hollow objects.
- Surfaces that can be scraped.
- Surfaces that can be hit.
- Objects that can be suspended.
- Objects that can be shaken.
- Material that can be plucked.
- Containers for drums and shakers:
- small glass or plastic bottles; yoghurt cups; matchboxes; washing powder boxes; cardboard or plastic tubes; coffee tins; tin cold drink cans; plastic drink bottles.
- Flat cardboard boxes to make a sound tray.
- Glass bottles of different sizes and shapes (fill them with water and tap with a metal beater).
- Fillings for shakers and tambourines:
- stones; seeds; rice; beans; nails; sand; lentils; bead; corks; buttons; paperclips; bottle tops.
- Materials for guitars:
- shoe boxes; old oil tins; elastic bands; flat pieces of wood; thin pieces of wire or fishing line.
- Materials for multitones (instruments that can make two or more sounds):
- cutlery, car hubcap, kitchen utensils, saucepan lids, grater, colander, whisk, old teapot.
- Metal objects to suspend from a gong stand, metal coat hanger or wooden dowelling rod:
- metal nails tied together, old horseshoe, large metal bolt, old bits of iron, copper tubing.
- Beaters:
- old cutlery, long nail, strong wooden stick, toothbrush, ruler, chopstick.
- More materials:
- seed pods or dry calabashes; newspaper; wire coat hangers; rubber foam; string and metal wire of all sizes and strengths; wooden sticks or blocks; plastic bags.
Resource 3: Listening to sounds in everyday life
![]() Teacher resource for planning or adapting to use with pupils
Teacher resource for planning or adapting to use with pupils
This activity encourages pupils to pay attention to the sounds around them. You can use it as a classroom project or a ‘sound search’ project at home.
Sound scavenger hunt
Ask pupils to work in pairs to identify and record the following sounds using words, symbols or drawings. The hunt can be done at home, in the street or at school.
The aim is to use their ears, not their eyes!
Ask them to identify:
- a musical sound;
- a chaotic sound;
- the loudest sound they can;
- a short, sharp sound;
- a sound that makes them feel calm and relaxed;
- a continuous sound (one that goes on and on);
- a sound with a definite pattern;
- a sound which makes them want to move or dance;
- a scary sound;
- a tiny sound;
- a sound that is very far away;
- a sound that is close by;
- a rhythmic sound;
- a tinkly sound;
- a rough sound;
- a long sound;
- a deep sound.
Use just a few of these with your pupils to start with, selecting the easier ones (like a deep or long sound) and then extend the list as they understand the task. Let them make up their own descriptions for sounds and try to make the sound that matches their description.
Resource 4: Praise singing
![]() Background information / subject knowledge for teacher
Background information / subject knowledge for teacher
The tradition of praise songs varies between different groups of people in Uganda. If it is a tradition locally, you may be able to use the expertise of a singer and find examples of praise songs in your local community.
The information that follows is about praise singing in Nigeria, where there is a strong tradition.
Praise singing topics can range from the formal to the informal. As long as they serve to entice, excite, tease and flatter the subject being praised, anything is fair game. The simplest and most common praising techniques call attention to the obvious positive aspects of the person in question. The singer might comment on their elegant or outrageous outfit, their stature (tall, short, narrow or wide), or the sheen of their skin, from dark to light.
Here are some examples of these simple forms of praise:
See the owner of this wild head gear.
Come and see (this would be followed someone’s names and praise of their physical attributes).
At a deeper level, the praise singer may draw upon the achievements of the person or their immediate family. Whether business, political or traditional achievements, they can be praised directly.
You can never buy being born into greatness (the right circumstance).
Being born to greatness is nothing compared to what you have done with the opportunity … (insert the person’s name here)
Or they can be praised by commenting on the general character of their family name or town.
At their deepest level, Nigerian praise singers draw upon folklore, oral history, and poetry to raise the profile of the person who is showering them with money. This is done through elaborate knowledge of family names, town and regions, and tribal history. For instance, among the Yoruba, each person, family and town has what is known as ‘Oriki’ or praise poems. These praise poems say simple yet deeply meaningful things about people and the things they are socially bound to (families, towns and ethnicities for example). You could compare this to the praise names found among some Ugandan people, which may help to give some ideas.
The master praise singer has the knowledge and the good social sense to draw on each of these to provide a constantly changing and entertaining mix of narrative, praise and humour, which keeps the audience engaged, watching the show and waiting for their chance to shower someone with money and be praised in the public eye. The praise singer has to constantly assess the audience and lead the ensemble in whatever direction is going to keep the party bubbling, the audience engaged and the money flowing.
Adapted from: http://www.rockpaperscissors.biz/ (Accessed 2008)
Resource 5: Pupil praise songs
![]() Background information / subject knowledge for teacher
Background information / subject knowledge for teacher
Gracie – A praise song
Say this poem and ask your pupils to devise a response that supports the call. Choose instrumental or voice sounds that match the words: high, rooted, calls, soars, guides and moon.
Call:
Gracie
High desert dweller
Rooted in peace
Calls upon the monkey and the lion spirit
Soars with the dragonfly
Guides the pen
Moon drawn
Line 1. Gracie (My name).
Line 2. High desert dweller (I was born and raised here in Bend, which is a high desert).
Line 3. Rooted in peace (My ancestor Chief Joseph of the Nez Perce Tribe was known for his peaceful nature).
Line 4. Calls upon the monkey and the lion spirit (My totem animals are a monkey and a lion. The monkey shows my playful/childlike nature and the lion shows strength, loyalty and ferocity).
Line 5. Soars with the dragonfly (The dragonfly symbolises my imagination, love for fantasy, and also dreamland).
Line 6. Guides the pen (I love to draw and that is my passion).
Line 7. Moon drawn (At night is when I find comfort, the stars give me hope and the moon is who I can trust with my problems).
Creating a praise poem or song (pupil instructions)
- Start with your name.
- Refer to something about where or how you were born.
- Say something about your family heritage: where your family is from originally.
- Mention an object, animal, something in nature that is meaningful or special to you.
- Say something about yourself: what you are like, what you want, your dreams.
Create a poem of between five and eight lines. The poem is short, so each word is symbolic, i.e. each word has a lot of meaning, telling us many things.
Choose your words carefully. Use your instrument to enhance the feeling and meaning of your poem. Choose when and how you are going to make a sound. Think carefully about how you are going to use your voice expressively.
You can see more pupil praise songs on the following website: http://web.cocc.edu/catagucci/ from which the above has been adapted. (Accessed 2008)
Resource 6: Musical pipes
![]() Background information / subject knowledge for teacher
Background information / subject knowledge for teacher
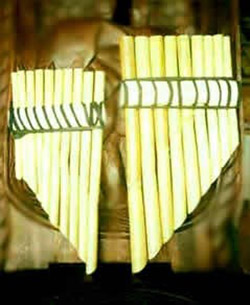
The panpipe is called enkwanzi or oburere, which means little flutes. They are made from elephant grass or bamboo.
They are called stopped flutes because the nodes of the grass block the passage of air through the flute and determine pitch. The Ambu flutes are called stopped flutes for the same reason.
The flutes are arranged from lowest to the highest notes and then laced with a string. The open rim at the top is cut at right angles to the tube and the musician blows across the hole, as one is able to do with a bottle.
The melodic possibilities produced by the panpipe and by sets of flutes perhaps influenced the development of flutes with finger holes such as the Teso tribe flute and notched flutes.
Making and playing your own pipes
Pipe ensembles are special music groups because each person plays only one note. However, put together, often in very complicated ways, this creates wonderful music.
Pipes can be made from reeds (in rural areas) or metal (in urban areas). Pipe length can vary from 20 cm to over 1 m, producing a range of high and low notes.
You can make your own pipes by using plastic piping such as electrical conduit, cutting plastic fax-paper pipes, or irrigation piping (12–15 mm diameter). Make pipes of different lengths so that you have different notes.
To play the pipes:
- Place the open side of the instrument level, against the lower lip.
- Hold the pipe between your fingers, the index and thumb.
- Relax your other fingers around the middle of the instrument.
- Begin to blow softly across the hole until a note is produced.
- Experiment with closing the bottom of the pipe with your hand.
You could also use different sized bottles and blow across the tops to produce sounds.
Acknowledgements
Grateful acknowledgement is made to the following sources:
Photographs and images
Panpipes: http://www.musicuganda.com/ images/ flute.jpg (Accessed 2008)
Text
Resource 1: Exploring sound: Adapted from original source http://www.stomponline.com/ lessons.html (Accessed 2008)
Resource 2: Making instruments: Traditional Music of South Africa by Laurie Levine, 2005
Resource 4: Praise singing: Adapted from http://www.rockpaperscissors.biz/ (Accessed 2008)
Resource 5: Pupil praise songs: Adapted from http://web.cocc.edu/ catagucci/ (Accessed 2008)
Every effort has been made to contact copyright holders. If any have been inadvertently overlooked the publishers will be pleased to make the necessary arrangements at the first opportunity.
Section 5 : The art of storytelling
Key Focus Question: How can you help pupils appreciate stories and develop their storytelling skills?
Keywords: stories; community; storytelling; writing; culture; group work
Learning Outcomes
By the end of this section, you will have:
- planned and managed classroom activities to develop an appreciation of stories and storytelling;
- used local contacts and resources to develop your knowledge about the culture of storytelling;
- devised and used strategies to help pupils write their own stories.
Introduction
Stories have been part of human history for centuries. In the past, stories often delivered important messages. The listeners would laugh, cry and sometimes sing along with the storyteller.
It is the ability to carry messages that makes stories so valuable for you, as a teacher. The activities, case studies and resources in this section are intended to help you use this rich heritage to develop your pupils’ skills in the art of writing, telling and reciting stories. This will develop their sense of belonging and give them insight into their cultural heritage.
1. Listening to and telling stories
A story may be told, written, read or recited. It may be a true story or fiction. Often stories have messages in them about the values of the community, how to live our lives and how to care for others.
You and your pupils will probably have told and listened to stories before. You may even have written some. This part will help you develop your pupils’ understanding of the art of storytelling and also that storytelling is embedded in the culture of your society.
You may be fortunate and know someone in your community who is skilled at telling stories and could come and tell a story to your class. (See Key Resource: Using the local community/environment as a resource.) Or, as in Case Study 1, you may be able to visit the storyteller and record them on a tape and use this in your class. Activity 1 suggests ways to organise pupils to share their own favourite stories.
Case Study 1: Using a local person to learn the cultural significance of stories
Mrs Biyela teaches at Furaha Primary School, Tanzania. She is preparing for her next teaching topic, which is ‘Story’. She consults books and website resources on storytelling, writing and reciting. She learns that storytelling has deep cultural significance, and wants to find some way of conveying this to her pupils.
She has heard of an old lady, Bibi Koku, who lives nearby and is famous as a storyteller. One afternoon, she visits Ma’Koku and asks if she would be willing to tell a story to Mrs Biyela’s Standard 4 pupils. The old lady agrees, but, she says, ‘Only during the evening.’ She insists that people who tell stories during daytime invite famine into their community and she is not willing to do that.
Immediately, this becomes an interesting issue for Mrs Biyela – she is sure it would grab her pupils’ attention and give them insights into a cultural aspect of storytelling. Therefore, she arranges to bring a tape-recorder and record Ma’Koku telling a story, as well as talking about the taboo on daytime storytelling. She is concerned to try to make sure that the old lady talks about this in a way her pupils can understand. As it turns out, Ma’Koku solves the problem for her by telling the story about what happens to people who tell stories during the day!
On the day of the lesson, Mrs Biyela checks the tape-recorder to make sure everything is fine. She introduces the lesson, asking pupils if they have ever listened to any stories told by old people. The pupils are curious – they listen to Ma’Koku telling her story.
Next, Mrs Biyela conducts an animated discussion about why Ma’Koku could not come to tell the story at school that morning. She is excited by the fact that so many of the pupils are aware of the custom of not telling stories during the day. By the end of the lesson, they have built up a rich understanding of the tradition and the taboos associated with it.
Activity 1: Choosing a favourite story
Prior to the lesson, ask each pupil to decide on a favourite short story to share in class.
- Organise the class into small groups of between four and six pupils. Ask each pupil to tell their story to the members of their group. Before they start, emphasise that everyone is to have a turn and they must each listen to each other’s stories.
- Next, ask each group to choose between them one story from their group. They will present these to the class. If you become aware that any group is finding it hard to agree, step in to help the group decide on a story.
- Give the groups time to prepare. If possible, provide a range of props – clothing, tools, toys, musical instruments, etc. – or ask pupils to bring these in, to enhance their stories and help convey the meanings.
- Each group in turn tells their story to the whole class and explains why they like it.
- Finally, discuss with your class the important parts of a story; the beginning, the body, episodes, setting, characters and the ending.
Were you surprised at the stories your pupils chose?
How well did your pupils work together in the small groups? Do you need to plan different groupings for the next activity?
2. Exploring traditional Stories
Many traditions and beliefs are passed on through story. In this part, we suggest how to develop pupils’ understanding of the importance of story in passing on such traditions and providing messages about how people should live.
It is very exciting for pupils to hear expert storytellers telling their stories. In Case Study 2, a teacher organises a visit to a storyteller. In Activity 2, you use brainstorming to investigate your pupils’ knowledge of traditional tales and explore ways to gather these stories together (see Key Resource: Using mind maps and brainstorming to explore ideas).
Case Study 2: Taking pupils to visit a local storyteller
Mr Mncube is an arts and culture teacher at a school in KwaZulu-Natal. Mr Mncube visited his village leader, Inkosi uShandu, and asked him if he could bring the Grade 6 pupils to his kraal. He also asked the village leader if he would tell a traditional tale to the pupils. This was agreed.
A day before the appointment, Mr Mncube told the class that he would be taking them out on a visit to the village leader’s home to listen to the traditional tales of the amaZulu. In order to prepare his pupils, he conducted a brief discussion about their experiences of story and what they thought they might encounter the next day and made a mind map of their ideas on the chalkboard.
The tale that the village leader narrated is set out in Resource 1: The snake chief. It had an important message and lessons to be learned. Mr Mncube, as he listened to the story, was already preparing questions that he would ask the class about the story in order to bring out these lessons. Because the village leader was an old, respected man, he was also able to impress on the children the rich sense of ancestry attached to the story in Nguni tradition – it had been handed down over time, with its meanings reinforced from generation to generation. Mr Mncube realised that he had made a wise choice in actually bringing his pupils to the storyteller’s home, rather than simply telling them the story himself.
Activity 2: Reconstructing traditional tales
Before the lesson, gather as many written or oral versions of local traditional stories as you can find. (See Resource 2: Stories and fables from across Africa for a useful website and read Key Resource: Using new technologies.)
Ask pupils to brainstorm as many traditional tales as they can remember hearing.
Next, divide the class into groups of four. Ask each group to identify a story that was identified in the brainstorm and to write up and illustrate a fuller version of the story.
Provide guidelines, such as:
- What is the name of the traditional tale?
- To which society/community/clan does the tale belong?
- What message(s) does the tale provide?
- What lesson(s) can be learned from the tale?
- Who normally tells the story?
- Who is the intended audience and why is this audience targeted?
- What time of the year is the tale normally told? Why?
- What time of the day is the tale normally told? Why?
The stories that are produced can be bound together as readers for use in the school. It may even be possible to publish them in the community or beyond.
3. Supporting pupils in writing a story
Having a good understanding of local traditional tales is a good base for your pupils to devise their own stories. Listening to stories told with animation and which use words to gain effect will give them confidence to take risks in their writing and produce more creative tales.
The purpose of this part is to use local resources to develop your pupils’ skills in writing their own stories and poems. You will also develop your skills in planning learning activities that allow pupils to participate fully. In Case Study 3, a teacher uses a radio programme to stimulate interest about writing stories and the Key Activity uses pictures as the stimulus. With younger pupils, you might want to encourage them to draw pictures for their story; it is important that all pupils feel able to tell a story, rather than struggle with spellings and handwriting.
Case Study 3: Learning from an expert storyteller
While listening to the radio, Miss Sala, a social studies teacher, heard that on the coming Friday there would be a programme in which a renowned local storyteller and writer would be interviewed.
Fortunately, the programme was at a convenient time during the school day, so Miss Sala came to school with her radio. She also prepared to tape-record the radio programme.
Before the programme started, she discussed with her pupils what they knew of the writer, and what they expected she would be talking about when she was interviewed.
During the programme, the writer explained about the structure of a story, the theme/main idea, the characters and setting. She gave some advice on the process of writing. She also spoke about what inspired her and where she got her ideas from.
When the programme was over, Miss Sala asked the following kinds of questions to promote discussion among her pupils:
- What can you learn from this writer that could help you become a better writer yourself?
- What inspires her? Are there things in your life or community that you want to write about?
- What is the structure and content of a good piece of writing?
She asked the last question at the end because she wanted it to be inspired by the bigger issues.
At the end of the lesson, she said that with their next piece of creative writing, she would like pupils to try some of the techniques suggested by the storyteller. She would then mark it by looking for evidence they had considered these issues and give careful feedback.
Key Activity: Writing and telling stories
- Present pupils with a stimulus to draw out ideas about life, community or broader society. See Resource 3: Pictures for stories for two images that work well, but you might choose anything similar.
- Using Resource 4: Using pictures as a stimulus for story writing to guide you, discuss the picture your class has chosen.
- Ask each pupil to write their own version of the story. Encourage them to add in their own ideas and scenarios as they write. For example: What happened before that led to the picture and what happens next?
- The next day, pupils read their stories to each other in small groups and each group chooses one to read to the whole class. Remind them of how important it is to use their voices and props if possible to help them.
- You might want to put all the stories into a class book.
Resource 1: The snake chief
![]() Teacher resource for planning or adapting to use with pupils
Teacher resource for planning or adapting to use with pupils
This is a Zulu folk tale.
Nandi was very poor. Her husband was dead and she had no sons to herd cattle and only one daughter to help in the fields.
In summer, when the umdoni trees were full of creamy flowers, she and her daughter dug for amadumbe to eat with their maize porridge. But in autumn, she collected the umdoni berries, purple and sweet, and gave them to her neighbours in return for strips of dried goat meat or calabashes of thick creamy sour milk.
One hot day, Nandi went to the river as usual to gather the purple berries, but she found nothing.
Just then she heard a loud hissing. Looking up, she saw a great green-grey snake wound around the dark red trunk of the tree, his head swaying among the branches. He was eating all the berries.
‘You are stealing my berries,’ she called. ‘Oh snake, you are stealing all my berries. What will I have to exchange for meat if you take all the fruit?’
‘What will you give me in exchange for the umdoni berries?’ he hissed. ‘If I fill your basket, will you give me your daughter?’
‘Yes,’ cried Nandi, ‘I’ll give you my daughter this very night. Only let me fill my basket with the purple fruit.’
But once her basket was full, she began to tremble at what she had promised. How could she give her daughter to such an ugly creature? She must make sure that snake did not find out where she lived. She must not go straight home lest he were watching.
At last she reached her hut and cried out to her daughter, ‘My child, I have promised you to snake in return for this basket of purple fruit.’ And she burst into tears.
Meanwhile, snake had followed Nandi to her hut. Just as she burst into tears, snake hissed at the entrance to her hut.
‘No! No!’ cried Nandi. ‘I did not mean my promise.’ The young girl looked up fearlessly and said, ‘A promise is a promise, Mother.’ She put out her hand and stroked his grey-green head. She gave snake food and made a bed for her snake master. During the night, Nandi heard voices, one deep and strong. She silently crept from her skin blankets and she saw a handsome young man, tall, brown and strong sitting with her daughter. Surely he was a chief’s son or a chief himself. Her daughter was making a bead necklace, weaving a wedding pattern with the multicoloured beads. The young man was talking gently and lovingly to her as she worked.
Nandi looked at the folded blanket where snake had slept and on it lay a long coiled green-grey skin. She snatched the skin and threw it into the fire that still burned low in the middle of the hut.
‘Now the spell is broken,’ spoke the snake chief. ‘For a virtuous girl took pity on me and a foolish old woman has burned my skin.’ But in spite of his harsh words he smiled gently at Nandi.
Adapted from: Pitcher D. in Gordon M Ed, Madiba Magic: Nelson Mandela’s Favourite Stories for Children, Tafelberg2002, page 26
Resource 2: Stories and fables from across Africa
![]() Teacher resource for planning or adapting to use with pupils
Teacher resource for planning or adapting to use with pupils
The website below gives you over 50 stories and fables from across Africa
http://www.gateway-africa.com/ stories/
such as the one below.
Thunder and Lightning
A long time ago, both thunder and lightning lived on this Earth, among the people. Thunder was a mother sheep and Lightning was her son, a ram. Neither animal was very popular with the people, for when somebody offended Lightning, he would fly into a furious rage and begin burning whatever he came across. This often included huts and corn bins, and even large trees. Sometimes he damaged crops on the farms with his fire and occasionally he killed people who got in his way. As soon as Thunder knew he was behaving this way, she would raise her voice and shout at him as loudly as she could, and that was very loud indeed. Naturally the neighbours were very upset, first at the damage caused by Lightning and then by the unbearable noise from his mother that always followed his outbursts. The villagers complained to the king on many occasions, until at last he sent the two of them to live at the very edge of the village, and said that they must not come and mix with the people any more. However, this did no good, since Lightning could still see people as they walked about the village streets and so found it only too easy to continue picking quarrels with them.
At last the king sent for them again. ‘I have given you many chances to live a better life,’ he said, ‘but I can see that it is useless. From now on, you must go away from our village and live in the wild bush. We do not want to see your faces here again.’ Thunder and Lightning had to obey the king and agree to abide by his ruling; so they left the village, angry at its inhabitants. But still there was plenty of trouble in store for the villagers, since Lightning was so angry at being banished that he now set fire to the whole bush, and since it was the dry season this was extremely unfortunate. The flames spread to the little farms of the people, and sometimes to their houses as well, so that they were in despair again. They often heard the mother ram’s mighty voice calling her son to order, but, since it was always after the fact, it made very little difference. The king called all his counsellors together and asked them to advise him and, after much debate, they hit on a plan. Why not banish Thunder and Lightning completely away from the Earth, and send them to live in the sky?
And so the king proclaimed. Thunder and Lightning were sent away into the sky, where the people hoped they would not be able to do any more damage. Things did not work out quite as well as they had hoped, however, for Lightning still loses his temper from time to time and cannot resist sending fire down to the Earth when he is angry. Then you can hear his mother rebuking him in her loud rumbling voice.
Adapted from original source: http://www.gateway-africa.com (Accessed 2008)
Resource 3: Pictures for stories
![]() Teacher resource for planning or adapting to use with pupils
Teacher resource for planning or adapting to use with pupils
Resource 4: Using pictures as a stimulus for story writing
![]() Teacher resource for planning or adapting to use with pupils
Teacher resource for planning or adapting to use with pupils
Pictures or photographs can be a very good stimulus for creative writing for your pupils. Discussion focused around a picture can stimulate ideas before pupils write their own stories or poetry.
You can discuss a chosen picture or photograph with the whole class or have more copies of the same or different images so that they can discuss them in groups. If you have a large class, you may need to have many more images or work with half the class at a time while the other half of the class is working on another task.
The following questions can be used with any picture to stimulate ideas and imagination. You can write the questions on the chalkboard and discuss them as a class or give each group a set of the questions and ask them to report back after a few minutes. Some of these questions will not be useful with every picture. You will have to select those that fit your purpose best and maybe add your own questions to the list or ask your pupils to raise questions about the picture.
- What do you think is happening in this picture?
- What do you think it is called?
- What catches your interest in this picture? Why?
- What do you like in this picture?
- What do you not like in this picture?
- What is the story around this picture?
- What led up to this picture being painted / photograph being taken?
- What do you think will happen next?
Record pupils’ answers on the chalkboard so that they can look at these as you set them the task of writing a story, but encourage them to be creative and use their own ideas.
Encourage them to think what happened before the picture and maybe start their story there.
Acknowledgements
Grateful acknowledgement is made to the following sources:
Photographs and images
Resource 3: Pictures for stories: Arthus-Bertrand, Y. 2004. 365 Jours. Editions de la Martiniēre: Paris
Text
Resource 1: The snake chief: Adapted from Pitcher D. in Gordon M Ed, Madiba Magic: Nelson Mandela’s Favourite Stories for Children, Tafelberg2002, page 26
Resource 2: Stories and fables from across Africa: Adapted from original source: http://www.gateway-africa.com (Accessed 2008)
Other
Every effort has been made to contact copyright holders. If any have been inadvertently overlooked the publishers will be pleased to make the necessary arrangements at the first opportunity.