Use 'Print preview' to check the number of pages and printer settings.
Print functionality varies between browsers.
Printable page generated Friday, 19 June 2026, 4:07 PM
Module 1: Science - Looking at Life
Section 1 : Classifying living things
Key Focus Question: How can you help pupils organise their observations of living things?
Keywords: classify; model; life cycle; animals; plants; research; group work
Learning outcomes
By the end of this section, you will have:
- collected and displayed real items in a logical way in your classroom to support your pupils’ learning about grouping living things;
- used model building as a way of recording what your pupils know about different plants and animals;
- organised your pupils into pairs or small groups to undertake independent research projects on different life cycles.
Introduction
Pupils need to grow up respecting and caring for our natural world; ideally, we all need to be naturalists. A naturalist is interested, observant, curious and values nature – someone who is learning about and caring for their world all the time. They have a clear, ‘big’ picture in their mind of how things work in nature. New observations will find a place in their big picture.
How do teachers help pupils achieve this big picture of how nature works? This section explores how you can help pupils organise and extend their knowledge about living things. You will bring real items into your classroom, organise displays, make models and undertake research with your pupils.
1. Classifying living things
When we find out something new, we fit it in amongst all the things we already know. We build up our own big picture (organising system) in our heads. That’s how the human mind works.
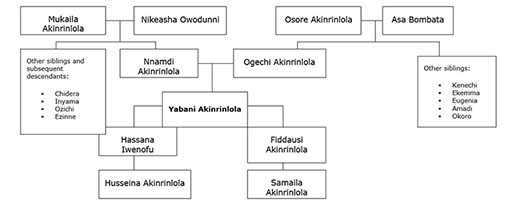
Think about how we organise our ideas of a family. We can represent this in a diagram called a family tree, where you place people where they belong in the big picture. Resource 1: An African family tree shows a typical family tree. You might like to create your own family tree to share with your pupils, or that of a famous person.
This is how it is with biology. As a teacher, you need to help your pupils to build up a useful big picture of living things and how they are related. There is an agreed organising system that scientists have developed over years. Resource 2: The current agreed classification of living things shows how biologists organise living things into kingdoms and some of their subdivisions.
A good way to start helping pupils organise their ideas about living things is to begin with items in your own environment – objects that pupils are familiar with and can easily investigate. Case Study 1 shows how one teacher did this with her class and Activity 1 shows how to make a display in your own classroom. If your pupils can start to classify (sort) these items into groups, they will be behaving as scientists.
Case Study 1: The big picture of living things
Amaka Ukwu’s pupils in Nguru, Nigeria, were surprised to find two new tables in the class. Without saying anything, Ms Ukwu carefully laid out four self-standing cards in specific positions on the tables. ‘Non-living’ on the table to the left and ‘Living’, ‘Plants’ and ‘Animals’ on the table to the right.

Ms Ukwu gave the class five minutes to go outside and find different examples of non-living things. She talked about what they brought back and helped them to group similar things together on the non-living table. Ms Ukwu deliberately checked that things like bone, wood, cardboard and paper were on the side nearer to the living tables. Why did she do that?
Next, each pupil was given a small self-standing card and asked to draw any plant or animal on one side and write its name on the back. It must be different from anyone else’s. The cards were brought to the front and sorted, displayed and discussed. Ms Ukwu ensured that like was sorted with like. (She had in mind the organising diagram from Resource 2 but chose not to confuse her pupils by telling too much too soon.)
Ms Ukwu completed the lesson by asking the pupils to look at all the non-living things and divide them into those that were once living and those that were never alive. The pupils worked in groups and had lively discussions about many of the exhibits.
Activity 1: Collecting evidence of life around us
Tell your pupils that they will be developing a display to show non-living and living things around them. Explain that it would not be right to display real animals and plants. They should not damage or kill anything living. Instead, rather like detectives, they should hunt for clues and evidence of any living thing – for example, feathers, droppings, leaves and seeds. Give pupils several days to bring in things for the display. Now talk about the groupings you will have (animals, plants and so on), what defines each group and where each item sits in the display. Pupils could then make labels for the display.
In the next science lesson, choose six things from the display – three living and three non-living – and display them on another table.
Gather your pupils round the table and ask them which of the six things are living and how they know this. By careful questioning and discussion you should be able to draw up a list of the seven characteristics of living things. Resource 3: The seven common characteristics of all living things gives you ideas for this work on the characteristics of plants and animals.
2. Making models in groups
Mathematics deals with patterns, so does art, and even in language there are patterns and structures. Thinking scientifically also involves looking for basic patterns. Think of your hands and feet. They have the same basic plan. They are joined to a limb by a joint (wrist/ankle), there is a flat part (palm/sole) and there are five jointed digits (fingers/toes) with hard nails on the upper tip.
Scientists group things by similarities and differences in the basic patterns of their structure or form.
Pupils will enjoy looking for basic patterns in the plants and animals they know and find. One way to find out what your pupils observe about patterns in plants and animals is by asking them to make models. Talking about their models will help them make more detailed observations of the living things.
In Case Study 2 pupils showed their teacher what they knew about plants by building models. This gave a starting point for developing their skills of observing and understanding plants. Activity 2 guides you through a similar exercise that is appropriate for your curriculum.
Case Study 2: Models of plants
At a teacher education session, teachers worked to plan more practical, hands-on science lessons that would help them see what children already knew and could do.
They explored the use of model making as a way to assess what children knew about something like the structure of plants. Then, after comparing each other’s models and observing real plants more carefully, the pupils could choose to improve their old models, or make new ones to show new learning.
One of the teachers, Okoro Mohammed, demonstrated how she had used a cardboard box of scrap material (cloth, cardboard, paper, plastic, old tights, elastic bands, used containers etc.) as a resource for children to build models to show what they already knew about plants. She explained how much more detail the children had taught themselves after comparing each other's work and going out to observe plants more carefully. They included bark and buds, and finer details like leaf veins, or specific patterns of branch formation. Improving their models seemed to give the pupils a real reason to sharpen their observation and extend their understanding of plant structure.
See Resource 4: Plant models for more detail on how to carry out this activity.
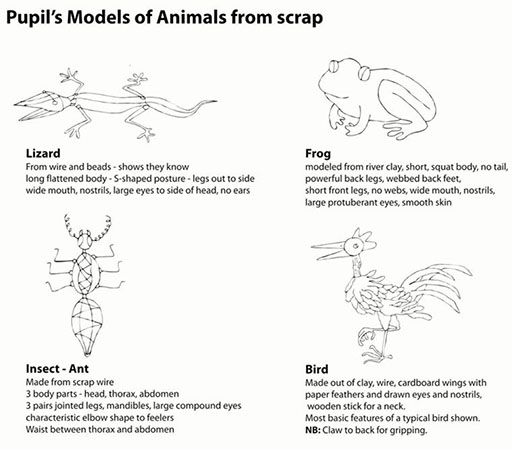
Activity 2: Making models of animals
In many parts of Nigeria, entrepreneurs make a living by selling lifelike models of animals. We feel that all pupils are entitled to the chance to extend this natural desire to make models to extend their study of different animals. By asking children to make models, you will also be integrating science with technology and art.
You can add to the classroom displays set up in Activity 1 by getting children to work at making models of different types of local animals like chickens, dogs or cows using appropriate materials. (See Resource 5: Pupils’ models of animals for examples and suggestions.)
We suggest you organise the pupils to work in groups, three or four pupils in each group usually works well. (See Key Resource: Using group work in your classroom to help you decide how you will organise the groups.) You could organise your groups by mixing lower and higher achievers.
Encourage pupils to bring in materials for their models. As they are building the models, move around the classroom, talking to the groups; with younger pupils ask them to name the parts of the animal they are modelling – paws, tails, ears and so on. With older pupils, ask questions about the shapes and functions of the different parts of the animals – how do they help the animal move? eat? keep warm? cool down? sense that predators are near?
Think about how you could encourage your pupils to reflect on their work. Could you ask different groups to comment on the other groups’ models? Make sure you allow time for pupils to talk about their work and to improve it.
Did this activity work well?
Were you surprised by the detail of the pupils’ models?
Is the detail of the pupils’ models accurate?
What could be improved?
Did it help pupils to see similarities and differences between animals?
3. Organising project work
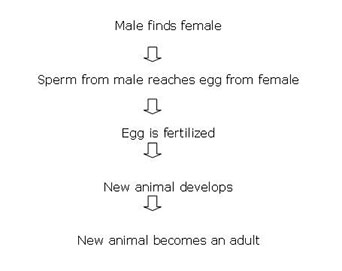
In this section we have been exploring patterns in living things. There is a basic pattern to the life cycle of all living things. There is fertilisation and development of an embryo in a seed/egg/womb. Then there is a process of birth/hatching/germination. Next comes feeding and growth through a number of stages. At maturity, the final stage of reproduction can take place and the cycle begins again.
In Case Study 3 teachers use story wheels to help pupils understand this pattern in life cycles.
Story wheels are useful tools to use because they:
- show the stages in the life cycle of the plant or animal;
- help pupils to organise their ideas about life cycles;
- help pupils to move from the known to the unknown – from the pictures to the labels with the scientific terms.
Read the case study for more detail about how story wheels can be used with pupils.
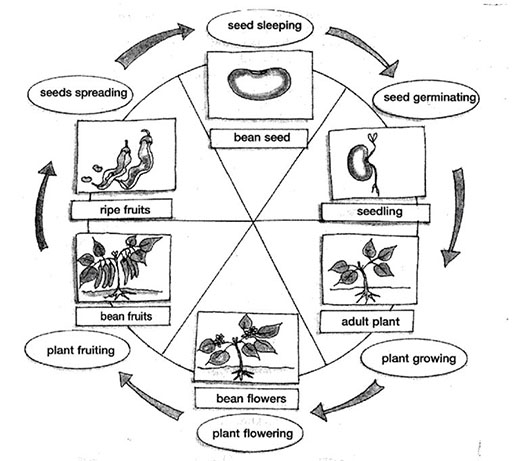
You might like to try story wheels with your classes; there are some labels and pictures to help you in Resource 6: Story wheel of the life cycle of the bean.
All types of living things have their own distinctly different life cycle pattern. It is interesting for pupils to find out how different living things have adapted their own life cycles. Having discussed the basic life cycle pattern in class, and perhaps done some plant story wheels, your pupils will be ready to do some research projects of their own on life cycles in the Key Activity. This activity builds on pupils’ observations of living things in their environment. Pupils take responsibility for planning, doing, reporting and assessing their own learning on their chosen animal. At the end of the activity, it is important to look at all the life cycles and discuss how they all have the same basic pattern.
You might like to look at the Key Resource: Researching in the classroom to help you plan this activity.
Case Study 3: Plant life cycle patterns
Mrs Aderinto gathered her class round her, held up a green bean pod and told the story of the life cycle of the bean. She used the words seedling, germination, growing and adult plant so that her pupils learned the correct words.
Then she divided her class into four groups: Groups 1 and 2 each had three pictures showing one of the stages in the bean’s life cycle, Group 3 had the rectangular labels (describing the pictures) and Group 4 had the round labels (describing the steps in the life cycle story). Resource 6 shows these labels and pictures.
Mrs Aderinto then drew a large circle on the board and divided it into six equal parts. She asked the group with the first picture to come and put it in the story wheel. She then asked what came next and asked the pupils to put in the next picture. When each part of the wheel contained a picture, she asked Group 3 to add their labels. Finally, Group 4 placed their labels in sequence on the story wheel and explained the steps to the class. She finished by asking pupils to copy the story wheel and explain in their own words the story of the bean’s life cycle – they could start anywhere on the cycle.
Mrs Aderinto found this lesson worked really well with her pupils and they wanted to do story wheels for other plants and animals.
Key Activity: Animal life cycle projects
- Organise your class into groups of three or four.
- With your pupils, make a long list of animals that can be found in your local environment. Write this list on the board or on a large piece of paper stuck to the wall.
- Ask each group to choose an animal from the list; try to ensure that no two groups choose the same animal. Suggestions include: grasshopper, butterfly, frog, turtle, mosquito, beetle, elephant, bird and fish.
- Give the class some basic guidelines for the work on life cycles; how long they have, what you expect from them and how they should display their work. For younger pupils, you would expect them to give you three/four pictures in the story wheel shape and to put some basic labels on the pictures such as egg, chick, adult, baby and to have the pictures in the correct order. Older pupils should be able to discover something about each of these five stages:
They should draw detailed diagrams with clear labels and notes. They should include the number of babies born together, the time for each stage and how the animal gets its food at each stage. You will need to guide them so that they can work fairly independently with confidence. One way to help the pupils is to have a list of useful words on the classroom wall; they can then feel confident about spelling these words.
- Encourage each group to start by recording what they already know about their animal. Then they should find out more by investigation, research and observation. Pupils might want to ask people in the community or to use books or the Internet (see Key Resource: Using new technologies) if you have access to these.
Working in this way, your pupils will really be thinking and acting scientifically. Did your pupils seem interested in this activity? What do you think they learned?
Resource 1 : An African family tree
![]() Teacher resource for planning or adapting to use with pupils
Teacher resource for planning or adapting to use with pupils
This resource shows the family tree of the Yabani Akinrinlola family.
Resource 2 : The current agreed classification of living things
![]() Teacher resource for planning or adapting to use with pupils
Teacher resource for planning or adapting to use with pupils
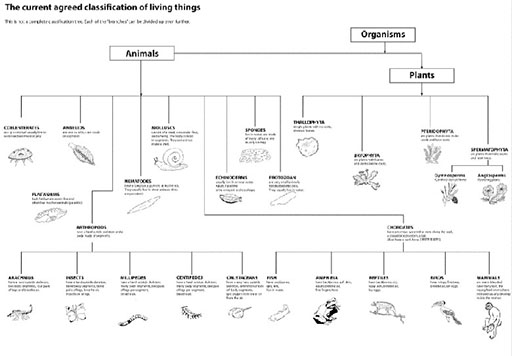
Original source: Active Science 1, Coles, Gott and Thornley, Collins Educational
Resource 3: The seven common characteristics of all living things
![]() Background information / subject knowledge for teacher
Background information / subject knowledge for teacher
When asked to think of the characteristics of all living things, most young children relate it to themselves and include things like needing to sleep, needing to keep clean, all die, need air, need to eat, all grow, all can be hurt or damaged, need friends, etc.
Accept and praise all their answers before you explain to them that scientists have come to agreement that the seven things that all living things have in common are the following:
- Nutrition
- Reproduction
- Growth
- Respiration
- Sensitivity
- Movement
- Excretion
We suggest you discuss each characteristic in turn with pupils. It is useful to clarify that the same basic things happen in plants and in animals but slightly differently. For example, with nutrition, plants manufacture their own food, whereas animals are dependent on eating plants or other animals. A further example is that more plants than animals can reproduce both asexually (without mating) as well as sexually (requiring pollination). It is only some of the more simple animals that can split into two or bud off new offspring; otherwise sperm and eggs are involved. But with both eggs and seeds there is an embryo that develops and germinates/hatches or is born. Let the children’s interest and questions guide the discussion about each characteristic.
A good activity is to try to find evidence of these characteristics. For example, a leaf that shows evidence of having been eaten by some insect, or the owl pellets of skin, fur and bone found under a tree where an owl roosts (nutrition). Tracks, trails and ripples in water are evidence of animals moving (movement). Flowers that follow the sun, like sunflowers, or others that close/open at night, is evidence of plant movement. Then, clothes that no longer fit, shed skins of insect larvae and tree roots that crack paving are evidence of growth. Write each characteristic on the chalkboard and let pupils add notes or drawings to explain evidence they have found.
Resource 4: Plant models
![]() Teacher resource for planning or adapting to use with pupils
Teacher resource for planning or adapting to use with pupils
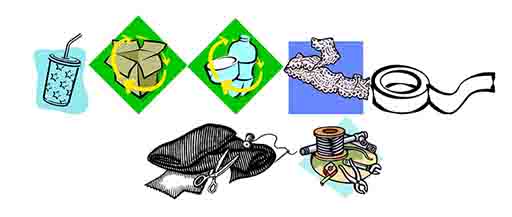
Before this activity, ask your pupils to bring in scrap materials. Collect some yourself. Scrap materials might include: tin; cardboard; string; tape; straws; plastic bottles; fabric; paper; netting; wire.
Step 1: Divide your class into small groups of three or four pupils. Write the following instructions on the chalkboard or give each group an instruction card:
| Talk about what a plant looks like. Then make models of the plants from the scrap materials. |
Step 2: Organise the scrap materials so that each group has a selection to use.
Step 3: Give your pupils time to plan and build their models.
Step 4: Ask each group to come to the front in turn and explain their model to the class.
How the lesson went for Okoro
The plant models that the pupils made showed that they knew the basic structure of a plant, but they were not too sure of the details, like bark, side branches and where the leaves are on branches.
She decided to let them look at plants outside and then return to their models and change or add to them. Her pupils had some knowledge of the terminology but not enough in English or their mother tongue, so they used a mixture of both. There were some plant parts they did not know the names of in either language.
To help pupils, she developed a lexicon (a small dictionary) to show which words the pupils knew to describe the parts of plants that they were familiar with:
(You might find it helpful to put up these words round your classroom and encourage the pupils to use them when talking about their models).
| Lexicon of plant terms | |
| Simple terms | More advanced terms for older pupils |
| * root | tap root, side root |
| * stem | bark |
| * leaf | vein |
| * bud | |
| * flower | petal, anther, pollen, ovule |
| * fruit | fleshy, dry, case |
| seed | radicle (baby root) plumule (baby shoot) cotyledon (food store) |
Adapted from: Primary Science Programme – Teaching the Topic Plants
Resource 5: Pupils’ models of animals from scrap
![]() Example of pupils' work
Example of pupils' work
Resource 6: Story wheel of the life cycle of the bean
![]() Teacher resource for planning or adapting to use with pupils
Teacher resource for planning or adapting to use with pupils
The story wheel is a useful tool because it:
It also shows the pupils that they can start the story at any place in the wheel and follow it through all the stages. |
The various stages of the story wheel have been mixed up on the worksheet below. Ask the pupils to cut them out and arrange them in the correct places to test their understanding.

Adapted from: Primary Science Programme – Teaching the Topic Plants
Acknowledgements
Grateful acknowledgement is made to the following sources:
Photographs and images
Classification of living things diagram: Active Science 1, Coles, Gott and Thornley, Collins Educational
Story wheel of the life cycle of the bean diagram: Adapted from Primary Science Programme – Teaching the Topic Plants
Text
Lexicon of plant terms: Adapted from Primary Science Programme – Teaching the Topic Plants
Every effort has been made to contact copyright holders. If any have been inadvertently overlooked the publishers will be pleased to make the necessary arrangements at the first opportunity.
Section 2 : A closer look at plants
Key Focus Question: How can you help pupils ask investigate plants in the local environment?
Keywords: plants; reproduction; flowers; project; nature trail; values
Learning outcomes
By the end of this section, you will have:
- explored how to help pupils ask questions, observe and make deductions to develop their knowledge of local plants;
- worked with pupils to develop positive attitudes to how the local habitat is valued and cared for;
- planned and carried out a class project to develop a local nature trail.
Introduction
How many species of plant grow in your local environment? How many can you and your pupils recognise?
In this section, you work with your pupils to establish and consolidate what they know about plants. This is your starting point for introducing new knowledge. The new knowledge will then be more likely to make sense to them and be more meaningful. The emphasis throughout this section is on practical activities, encouraging pupils to explore, observe carefully and investigate their own environment. This includes planning a nature trail with your pupils. This work will help them develop a positive attitude to their local environment, valuing and caring for the different species.
1. Encouraging pupil questions
What makes plants so special? Two things. Almost all plants make their own food from water and a common gas in the air – carbon dioxide. The special green pigment, chlorophyll, traps the energy of sunlight, forming energy-rich carbohydrate. At the same time, plants release oxygen. People and animals would not exist if it were not for plants. This is why we should take plants more seriously!
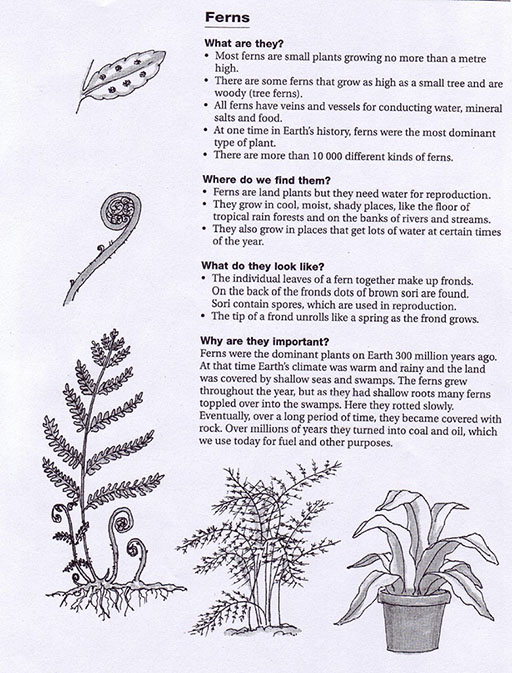
A good starting point for exploring plants is to look at some of the simpler non-flowering plants. Simple plants do not have flowers, pollen or seeds; they reproduce in different ways. This group of plants includes mosses, ferns and lichen. Resource 1: Looking at plants has more information about these simple plants.
Do you have examples of these in your local environment?
On your usual walks, try to find examples of these different plants; this will give you ideas for questions to raise with your pupils. You could collect some to bring into your class.
Case Study 1 shows how one teacher encouraged his pupils to observe these simple plants and Activity 1 shows how you can support your pupils to ask their own questions about them.
Case Study 1: Local simple plants
Mr Karume and his class in Tanzania walked round the area near their school, hunting for examples of simple plants. They found tiny mosses, green tufts growing on the bark of the shady side of tree trunks and rocks. They looked at lichen, which grew on the bark of the sunny side of tree trunks and rocks and even roofing. They found small ferns growing in cracks in the wall near the rainwater tank. They drew each plant and noted where it was growing.
When they were back in the classroom, Mr Karume asked his pupils to think about how these plants were able to reproduce. He displayed all their ideas on newsprint round the classroom.
To find out more, the pupils collected some moss and grew it under the bottom half of a clear plastic bottle. After a time, they noticed that the moss produced green, club-shaped capsules that turned brown and split, releasing tiny spores. They discussed whether these would grow into new moss.
The pupils then went back to observe the ferns and the lichen. They discovered that all the ferns had patches of scaly brownish spore capsules on the undersides. They kept observing the lichens, but saw no spore production. Mr Karume asked a local high school biology teacher to tell them more about lichen and how it reproduces. He was very pleased with how these activities had increased his pupils’ awareness of these plants.
Activity 1: Asking questions
Freshwater algae are plants that make food and give off oxygen. Grow some algae in the classroom by letting some water turn green in a clear open glass (or collect some algae locally).
- Encourage pupils, working in small groups, to think of questions to ask about the algae. What would they like to know about it? Remind your pupils of the seven characteristics of living things. Does it need light to grow? Where does it come from? Why is it important? Each group of pupils should record each question on a piece of paper or newsprint.
- Ask each group in turn to share their questions. Display the questions in suitable clusters on the classroom wall and discuss them. Which questions could you investigate? Which do you need to look up in a book or ask an expert or use the Internet? Which might be very difficult to answer?
If you have time, ask the groups to carry out investigations (see Key Resource: Using investigations in the classroom) and do research to answer some of the questions.
2. Observing plants
An important part of thinking scientifically is looking for patterns and organising observations. You and your pupils have been looking at simple plants, which reproduce without flowers, pollen or seeds. But most plants today, from the tiniest grass plants (grass has very inconspicuous flowers) to the tallest of woody trees, have flowers that make pollen and produce seeds carried in a closed ovary. (See Resource 2: Reproduction in flowering plants for more information.)
In Activity 2 you work with pupils to find out the common features of flowering plants and try to solve a problem – how does each plant pollinate? In this type of activity your pupils will be involved in speculating, sharing and reforming their ideas. It is important that you and other pupils listen carefully to everyone’s ideas and do not dismiss what anyone says. The discussion should challenge the ideas, not the person – otherwise pupils will not be happy to do this kind of activity.
Following the activity, you might want to start a checklist of local flowering plants. You could use scrapbooks to keep the information for future reference, as well as drawings and pressed dried specimens. Other pupils in the school and parents may enjoy looking at these scrapbooks and adding their own comments.
Case Study 2 shows how one teacher encouraged her pupils to think about our dependence on plants and to find out about the different plants being used in the local area.
Case Study 2: Plants used as barriers
Mrs Ollenu set her class an activity for the holidays. She asked them to report back on the number of examples they could find of plants (alive or dead) being used to form a protective barrier in some way. A barrier keeps things in or out of a place. She told them they could also interview older people to discover what happened in the past, or find photographs in old magazines or newspapers.
The next term, pupils reported back on what they had found out. Mrs Ollenu was delighted with their findings and the class were very surprised at the number of different examples. They didn’t just have examples of hedges and wooden fences; they also had windbreaks, creepers grown over structures to provide shade, cane screens and cotton cloth curtains. Mrs Ollenu gathered their ideas on a large poster on the classroom wall. Some pupils had brought in drawings, so this was a very colourful and informative display.
She used this display as the starting point for a class debate on the advantages and disadvantages of plants as barriers.
Activity 2: Structure of flowers
- Organise your class into pairs, or into groups of four if you have a large class. Ask each pair or group to find a flower that grows in your local area.
- Now ask each pair to find out everything they can about the structure and function of their chosen flower. (See Resource 2 for more information on flower reproduction.)
- Use the following instructions and questions as a guide with your pupils:
- Draw the structure of the flower.
- Label the parts of the flower. (To help them do this, you could put up a large drawing of a flower with the labels you want them to use on the chalkboard.)
- Describe the function of each part.
- How is the plant pollinated: Do insects visit the plant? Does the pollen hang on stamens outside the flower? Is it in a windy place?
When each pair or group is ready, they could give an oral presentation to the class covering the points above.
3. Focus on local plants
How well do your pupils know the plants of the local area? Do you or your pupils know what plants of interest grow in the vicinity of the school? Perhaps the school should develop a list of local plants and collect information about them. This could be an interesting and valuable ongoing project to do with your class or school. Case Study 3 shows how one teacher did this.
Once your pupils have increased their knowledge of local plants, you could use this knowledge to plan and design a nature trail (see Key Activity), which will make it easier for next year’s pupils to learn about local plants. Projects such as this allow pupils to transfer learning from one context to another, to make decisions and to work closely with others. This enables pupils to develop skills that help them to become cooperative members of the community.
Undertaking a project like this can be daunting if you have not done it before. You will need to plan carefully and not worry if it does not go exactly as you planned. The important thing is to think about the experience: What went well? What would you change next time? What did you enjoy? Most importantly, did this activity allow your pupils to be active learners?
Case Study 3: Knowing your local plants
At Akaa-Buem Roman Catholic Primary the teacher came into the class with samples of local plants collected from around the school. Pupils struggled to identify most of the plants. Yet the week before, they had brainstormed a list of 52 local plants in 15 minutes. They knew the names, but could not always associate the correct name with a specific plant. There was a problem here.
The teacher suggested that her class could increase their knowledge of local plants and also produce a resource for other pupils in the school. She explained that the pupils would be responsible for developing an accurate checklist of all the plants they could name and identify in the local area. Then she helped them draw up a plan of how they would approach this, by giving them these questions:
- Which plants are you going to include?
- What information are you going to give about each plant? (e.g. shape of leaves, where it grows, does it have flowers? how big is it? is it useful? do any animals eat it? are there any stories about it?)
- What do you already know about each plant?
- How will you find out more about each plant?
- How will you present this information?
- How will you organise yourselves to do this task as efficiently as possible?
Her pupils organised themselves into groups, each with responsibility for one area. They set themselves a timetable.
The pupils responded well to the challenge of increasing their knowledge of local plants. They presented their work to the school in an assembly and also invited parents to come and see what they had learned. Everyone praised their work and the way they had worked together.
The teacher explained that this is the kind of work done by trained botanists. She told her pupils that they were thinking and behaving like scientists.
Resource 3: The gosenga has an example of a common local plant.
Key Activity: Mapping a local nature trail
A nature trail is a path that can be walked and which includes places where interesting trees and other plants can be seen. As well as a map that shows sites of interest, a trail often has an information brochure or pamphlet that gives additional interesting information.
Work with your pupils to plan a nature trail near your school. Resource 4: Developing a nature trail gives more detailed advice for organising this activity, as well as some of the safety precautions you might need to take account of.
Groups of pupils could each plan, design and prepare a page for part of the nature trail. (If you have access to a computer and printer, your pupils could use these to help them produce a final version. You might also be able to include photos from a cellphone or camera.)
Later, you and your pupils might want to assess the trail and even think of ways you could improve on your first attempt (perhaps you could survey the opinions of other pupils who use the nature trail).
Resource 1: Looking at plants
![]() Background information / subject knowledge for teacher
Background information / subject knowledge for teacher


Original source: Teaching the topic Plants, Primary Science Programme
Resource 2: Reproduction in flowering plants
![]() Teacher resource for planning or adapting to use with pupils
Teacher resource for planning or adapting to use with pupils
Flowers contain the reproductive parts of a plant – they produce the seeds from which a new plant will grow. Flowering plants reproduce by two special sex cells joining together. The male sex cell (pollen) joins with the female sex cell (ovum) to become the first cell of a new organism. This cell then divides to become two, then four, then eight … and so on until there are millions of cells in the seed. The seed then germinates and grows into a new plant.
The diagram shows the parts of a flower:
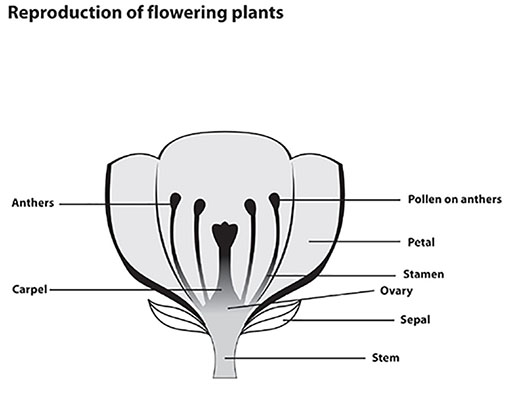
- The stamen is the male parts of the flower.
- The anthers, at the top of the stamen, contain thousands of grains of pollen.
- Each pollen grain contains a male sex cell.
- The carpel is the female part of the flower. At the bottom of the carpel is the swollen part – this is the ovary.
- The ovary contains several ovules.
- Each ovule is a female sex cell called an egg cell.
- Ovules are bigger than pollen grains – sometimes you can see them with a hand lens.
- Plants need help to get the pollen grains from the stamens to the top of the carpel of another flower of the same kind: this is cross-pollination. (Self-pollination is when this happens in the same flower.)
- In cross-pollinating plants, the stamens usually ripen to produce pollen before the carpels have fully developed so that self-pollination does not occur.
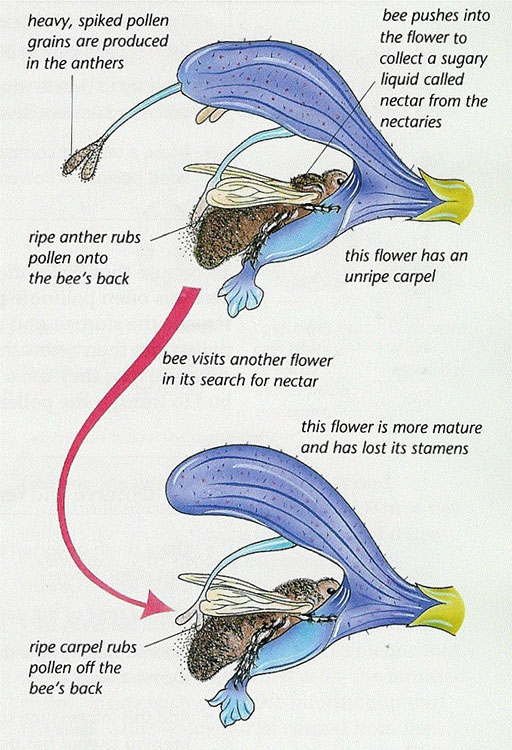
- Some plants use insects to help them pollinate. The insect, in search of food, is attracted to the flower. The pollen brushes onto the insect’s body and sticks. The insect then visits another flower and some of the pollen will rub off onto the carpel of the next flower.
- Flowers that use insects to help them pollinate usually have brightly coloured petals, scents and large sticky pollen grains.
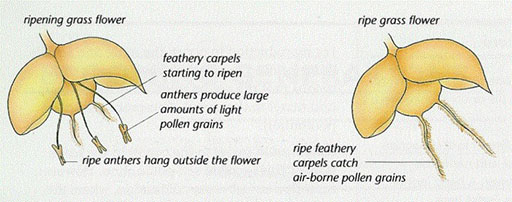
- Some plants use the wind to help them pollinate. These plants usually have male and female parts that hang outside the flower. They are not usually brightly coloured and their pollen grains are small and light. Grasses are pollinated in this way.
- After pollination, a tube grows out of the pollen grain and down to the ovary.
- In the ovary, the nucleus of the male sex cell joins with the nucleus of the female sex cell – this is fertilisation.
- Fertilised ovules develop into seeds and the ovary changes to become a fruit.
Examples of pollination
Insect pollination
Wind pollinated plants
Resource 3: The gosenga
![]() Teacher resource for planning or adapting to use with pupils
Teacher resource for planning or adapting to use with pupils
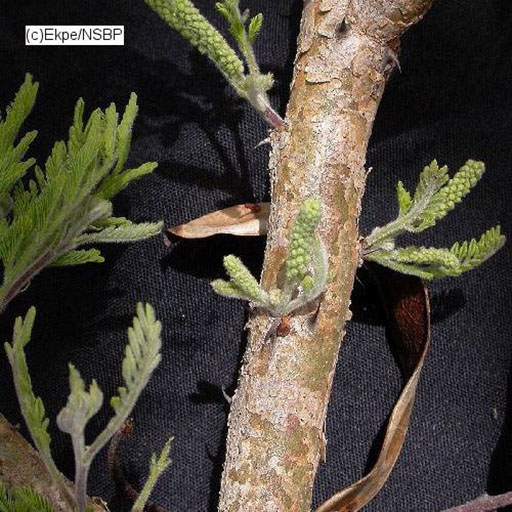
Here is an example of a shrub or small tree commonly known as the Gosenga, which is widespread in West Africa.
- Name: Gosenga or Acaciadudgeoni.
- Where found: sandy soils in open savanna (location Yendi).
- Appearance of plant, leaves, flower and fruit, or seeds: flaky, reddish coloured bark with curved spines at nodes. Light green leaves. Small flowers and dried pods.
- Uses: a gum, firewood, wood for tools.
- Animals that can be associated with the plant: goats, antelopes and horses eat the leaves and young pods; bees get pollen from the flowers.
- Interesting beliefs: bark extract sometimes used for treating diarrhorea and dysentery in children.
Source: http://herbaria.plants.ox.ac.uk (Accessed 2008)
Resource 4: Developing a nature trail
![]() Teacher resource for planning or adapting to use with pupils
Teacher resource for planning or adapting to use with pupils
Developing a nature trail is not a difficult thing to do. You and your pupils learn a lot and it helps you all appreciate what the environment has to offer.
What is a nature trail?
A trail is a planned walk along a mapped-out path. There are sites, or stations, along the trail where people can stop to observe things of interest. There is usually a pamphlet or guide that explains what is to be seen and gives extra details and background information to support people’s observations.
The first step – discussion
You need to start off by discussing what you mean by a nature trail. The pupils need to feel it is something worth doing. You should talk a little about what plants you plan to look out for, and what you want to focus on. It could be something simple like how many different types of tree can we find, and what plants do we find associated with the different kinds of trees. Or perhaps you could focus on looking for signs of resilience in plants. Make sure you make a few notes in this discussion.
First exploratory walk
You need at least two clipboards so that people can write easily on the walk. If you don’t have clipboards, they can be easily improvised using stiff card and clothes pegs. The first clipboard is for a pair of pupils who volunteer to map the route you take and note down the points of interest. The second clipboard will be for a pair of pupils who list the plants as they are found. If you have lots of clipboards, pupils could work in groups of four with two clipboards for each group.
Before you start the walk, speak to your pupils about appropriate behaviour and think about any possible dangers. The biggest fear might be of snakes, but when a large crowd walks in the bush, any sensible snake makes sure that it is well out of the way. If a snake is seen, it is best left alone. No one should panic. Give the snake time to move away. Then just walk past calmly, avoiding the place where the creature was last seen. Eating unknown plant parts or berries could be dangerous, and pupils should watch out for thorns and stinging nettles as well as stinging insects like hornets. Another thing to be avoided is somebody letting a branch swing back into the face of the following person, especially if it has thorns.
As you go round the walk, stop when you see anything interesting. Spend a little time observing. Encourage pupils to ask questions and to try to find answers to the questions raised. When you come across plants that are not known, ask one pupil to be responsible for finding out its name and any interesting information about it. They might need to break off a small part of a twig with some leaves, flowers or fruit without harming the plant. If you have a camera/cellphone you could take photos of each plant and tree.
A circular path is best, but the way will also depend on the paths available to you.
After the walk – discussion
When you get back to the classroom, discuss what went well. What didn’t you see that you were hoping to see? Did you notice any differences between north- and south-facing slopes? Or any differences near streams, lakes or roads?
Research
Give your pupils a few days to find out about the plants that were not well known. Let them report back and write up what they have found.
Second exploratory walk
Now you want to improve on what happened the first time. You might also want to think of a way of numbering or marking the larger plants that doesn’t harm them, but makes identification easier. This is a problem to solve. You need something durable (that lasts) which can be fastened to a plant and can be seen. A few more outings with some of your pupils may still be needed before a final route is settled and the stations are properly marked on the map.
Finalising the nature trail
Then a pamphlet or booklet can be designed and made. Make sure that your pupils give tasks to different members of the class and that everyone has a chance to contribute to the pamphlet. (If you have access to a computer or laptop, your pupils could use this to lay out their pamphlet. You might include images from a camera/cellphone or from the Internet).
Your class could now invite other classes or teachers to experience the nature trail that they have designed. It might be interesting to invite some pupils from a neighbouring school. Another task is to ask some volunteers to design a questionnaire to find out what people think of the trail.
Repeating the trail
It would really be worthwhile to repeat the trail with pupils at different times of the year so that they could compare seasonal changes. Then they could include that information in an improved version of the nature trail pamphlet.
Below is an example of a nature trail in a Ghanaian butterfly sanctuary.
Bobiri Butterfly Sanctuary
Located 20 km on the Kumasi–Accra highway is a quiet reserve showcasing an arboretum, forest hiking trails and a butterfly sanctuary; lodging, guiding and interpretative materials are available. The forest is an undisturbed rainforest. In front of the guesthouse is the butterfly sanctuary, where different butterfly species can be observed. The butterflies are at their best around midday since they do not like moisture. The reserve is ideal for a rainforest walk along the carefully laid paths. Visitors also have the opportunity of identifying different tree species. The forest canopy creates a cool and conducive environment that visitors love.
Adapted from: Umthamo 43, University of Fort Hare Distance Education Project and http://www.ghanatour.org (Accessed 2008)
Acknowledgement
Grateful acknowledgement is made to the following sources:
Photographs and images
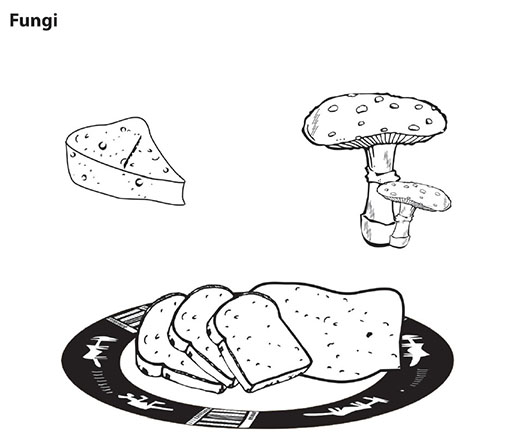
Fungi: Teaching the topic Plants, Primary Science Programme
Gosenga branch: http://herbaria.plants.ox.ac.uk (Accessed 2008)
People walking in forest: Adapted from Umthamo 43, University of Fort Hare Distance Education Project and http://www.ghanatour.org (Accessed 2008)
Every effort has been made to contact copyright holders. If any have been inadvertently overlooked the publishers will be pleased to make the necessary arrangements at the first opportunity.
Section 3 : Investigating animals: hunters and the hunted
Key Focus Question: How can you help pupils investigate how different living things feed?
Keywords: predators; prey; adaptations; observations; project; animals
Learning outcomes
By the end of this section, you will have:
- used pupil observations of ecosystems and species to explore animal adaptations and behaviours
- provided opportunities for pupils to share their knowledge
- undertaken project work with your pupils.
Introduction
Unlike green plants, which can manufacture their own food, all animals have to find and eat plants or other animals to survive. Hunting animals (predators) are adapted for finding and catching food in many ways. Animals that are hunted (prey) are also adapted to avoid being found, caught and eaten.
Pupils are often fascinated by studying feeding relationships and adaptations. In this section, we look at ways of encouraging pupils to ask ‘Why?’ questions using animals in your local environment. We also look at how to structure and record pupils’ observations of ecosystems and species.
1. Observing local ecosystems
An ecosystem is the pattern of life and interaction between the living things in a specific type of place. This could be a pond, a stream, a hedge, a tree, a forest, a cliff-face or even a field. It could be as small as life under a rotting log or as vast as life in an inland lake.
Thinking about ecosystems doesn’t have to be complicated for you and your pupils. It is sufficient if pupils spend time observing and investigating different ecosystems. They should get a general idea of ‘what eats what’, relative numbers of different species and raise some questions about how different animals interact with each other. It is important to give pupils time to think of the questions they want to ask; often short discussion in small groups will lead to more focused questions.
Case Study 1 shows how one teacher introduced her pupils to a local ecosystem – a pond. Activity 1 shows how to start long-term observations of your local ecosystems.
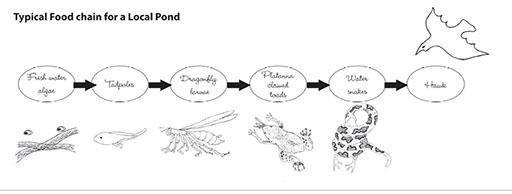
Case Study 1: Investigating food chains by observing an ecosystem
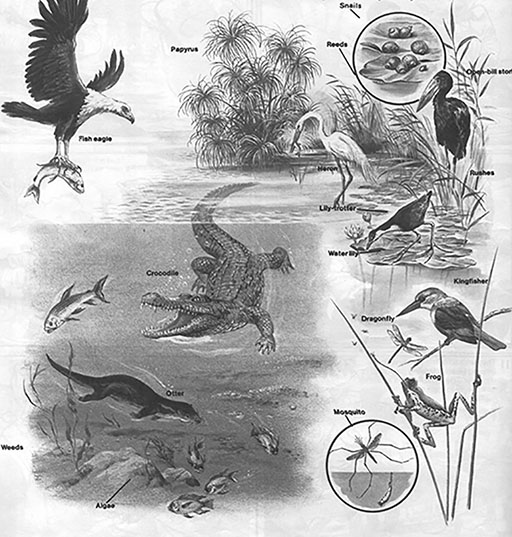
A primary school in a squatter camp on the outskirts of Nairobi, Kenya, is next to a small natural pond. One of the teachers took her class for a ‘look, see, think’ slow walk around the pond.
They realised from the greenish colour of the water that there must be millions of minute algae plants and thousands of threads of spirogyra making food in the sunlight. They saw hundreds of tiny tadpoles, which feed on algae. What might eat the tadpoles? Sifiso had noticed about 15 shiny, brittle, larvae skins (exoskeletons) clinging to the stalks of reeds left behind by new adult dragonflies. Perhaps about ten platanna frogs lived in the pond, eating dragonfly larvae and other swimming insects. A few brown water snakes had been seen and these probably ate frogs. Ncediswa had seen a single hawk swoop down and catch a small snake. The teacher recorded their observations as they walked.
Afterwards, back in class, they shared ideas and the teacher wrote these observations on the board. Everyone discussed how the animals and plants were linked in a food chain. The pupils copied the final agreed food chain diagram from the board as well as a pyramid of numbers for this ecosystem (see Resource 1: Food chain).
Activity 1: Observing local ecosystems
- Talk to your class about the idea of an ecosystem. Brainstorm a list of probable ecosystems near the school (see Resource 2: Likely local ecosystems).
- Divide your class into groups and let each one select an ecosystem to adopt and study for the rest of the year. If there is only one suitable ecosystem near your classroom, everyone can study it. Organise pupils to take turns to record the observations. Encourage them to ask questions about the animals that live there and how they might interact with each other. What types of living things (populations) would they expect to find and in what numbers? What eats what? How might numbers change during the year? Record these questions and predictions for future reference.
- Later, make time to visit the sites with pupils, to check their predictions. This becomes an ongoing group project. Make time every few weeks for visits and reports of new information. In this way, the pupils’ knowledge and understanding will grow over time in a relaxed and informal way.
- Groups could keep a scrapbook or journal to record their growing understanding of the way things happen in their ecosystem.
As the project progresses, think about your pupils’ involvement – are they motivated by this activity? Do they enjoy this way of learning?
2. Discussing animals in groups
Biologists are fascinated by the way the survival of animals depends on adaptation for successful hunting and the avoidance of being eaten. Think of how claws and pincers have been developed to seize and grasp prey or frighten off predators (scorpions, crabs, cats, the preying mantis etc.). Other animals construct traps. Think of trapdoor spiders, spiders’ webs and ant lion pits in soft sand. Topics to discuss with pupils or ask them to find out about could include mimicry, camouflage, feigning death, prickles and spines, hard shells, speed, bad tastes and even poison.
In this type of work, it is a good idea to start with animals that pupils can make accurate detailed observations of. Pupils can then discuss how their observations of behaviour and structure help these species to survive as predators, prey or both. Case Study 2 and Activity 2 explore how you can make such observations in your classroom. Pupils could then find out about other animals if they have access to any reference books, the Internet or local experts.
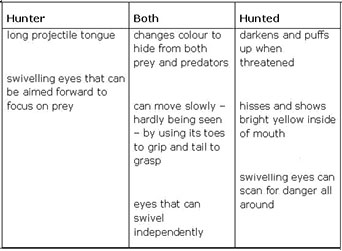
Case Study 2: A table of adaptations
Mr Mulele’s class kept (and later released) an injured chameleon that the pupils had rescued from a dog in the school grounds. It recovered from its injury at the back of the classroom on a branch in a vase by the window. The pupils enjoyed watching the chameleon shooting out its tongue to catch flies.
Mr Mulele asked his class these questions:
- How is the chameleon adapted to be a hunter?
- How is the chameleon adapted to avoid being eaten by other animals (hunted)?
He gave them two days to think about these questions and to watch the chameleon to help them answer the questions. He suggested that they look at how it moved, its eyes and its behaviour when it was threatened. Some of his older pupils made some notes on their observations.
After two days, he divided his class into groups of five/six pupils and asked each group to choose a leader. He asked the groups to discuss the questions and to draw up a list of at least two features that help the chameleon hunt other animals and two features that help it avoid being eaten by other animals.
He gave them 30 minutes for this discussion and during this time he went round all the groups encouraging them to use their observations about the chameleon. He also emphasised that the group leader should make sure that each pupil in the group had a chance to speak.
After half an hour, each group gave one observation to the class. Mr Mulele recorded all their observations on the board as a table.
The following month Mr Mulele brought a praying mantis to the classroom. Again, pupils observed its behaviour and the different ways in which the insect is adapted for survival. This time the pupils needed less prompting from the teacher to notice significant features.
Activity 2: The praying mantis – a successful insect predator
Praying mantises are very common in Africa. They can easily be kept safely in the classroom for a short while (see Resource 3: Keeping a praying mantis in the classroom). If fed live insects, their hunting adaptations and feeding behaviour can be clearly observed.
Keep an exercise book or large piece of paper near to the container as a journal for everyone to write in. Pupils can record any interesting observations, descriptions of behaviour, and drawings of adaptations that help the mantis hunt its prey. Over a few days, allow different pupils in the class to spend time recording their observations. Questions you might give to start the pupils observing could be: How often does it feed? What does it eat? How does it disguise itself to catch prey? How quickly or slowly does it move? Also, ask pupils if they can discover whether they have caught a male or a female praying mantis. How can they tell? How are these features helpful to the male and female?
Encourage pupils to write questions as well as observations. Other pupils may be able to answer the questions. In this way, pupils can build up collective knowledge about the praying mantis.
You can extend this work by catching a male and female praying mantis and keeping them in the same container.
Some of your pupils might want to catch their own praying mantis to learn more about it. They should be able to look after it and make further observations. These pupils could give a presentation to the class about what they have learned.
3. Valuing experience and local knowledge
Sadly, much of the local knowledge of the natural world is in danger of being lost in modern times. It is seen to have little or no value. Perhaps local primary schools could take responsibility for reviving interest by researching and recording such knowledge and understanding.
Students at a teachers’ college discovered that George, the man who worked as the gatekeeper, was a wonderful resource due to his extensive knowledge of the local natural world. But all his knowledge and understanding was in his head and would probably die with him. See Resource 4: Local knowledge for examples of some of the things we learned from him. Do you know anyone like this? Could they come and talk to your pupils?
We need to encourage our own pupils to become naturalists. We have already explored the value of giving pupils time to undertake detailed observations of ecosystems and different species. Case Study 3 shows how exciting lessons can be if we value our pupils’ knowledge and allow them to make decisions about their own learning. Here, the pupils were able to show their learning to others and decide what they wanted to research further. Think about lessons where you could try this.
The Key Activity uses this way of working to compile a display or book about animals in your local area. The emphasis is on organising observations of adaptation and feeding patterns.
Case Study 3: Learning from experience
A science education lecturer was disappointed to observe a Grade 5 lesson on birds that really didn’t work well. The student teacher followed the curriculum and textbook of the time, but the pupils seemed bored. Reflecting on the failure of the lesson to catch the pupils’ imaginations, the teacher and lecturer realised that any three-year-old preschooler would already know that birds had wings, feathers and beaks and that they usually made nests and laid eggs.
Later, the lecturer and the student teacher, Mumba, planned a very different lesson where they took in artefacts (such as bits of a broken swallow nest, assorted feathers, the discarded shell of a hatched chick, a dead vulture that had been hit by a car that morning near the school) and pictures of local birds. They put the items on the front bench and left groups of pupils to choose something and tell their classmates what they knew about that thing. What could they tell us about birds?
What a different lesson! We couldn’t stop them talking. They had so much to tell. They told us things we didn’t know, like: swallows mate for life, raise a few broods each season, and sometimes, on dead chicks (baby swallows) thrown out of the nest, you find strange bloodsucking tick-like things that can run very fast. Pupils went on right through lunchtime telling us all the interesting things they knew about local birds and discussing their own unanswered questions. These were recorded for answering later.
Key Activity: Researching and recording local knowledge
Here, you and your pupils plan and draw up a large table on a poster to record information that pupils find out about all kinds of local animals. It could have column headings such as:
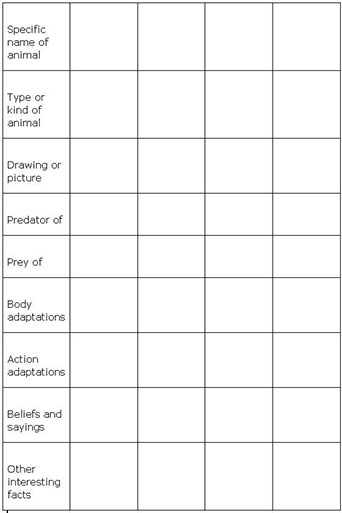
The table is built up and added to over time. Encourage your pupils to add questions to the table. If possible, use different colours for questions and answers. Blank spaces will indicate where further research is needed. You might ask different pupils to take responsibility for finding out about particular animals, but encourage teamwork. If you have a multigrade class, older pupils could assist younger pupils with the recording. You will need to plan regular times to allow pupils to add their findings to the table.
At the end of the term or year, the information can be transferred to a large book to be kept as a record for future reference.
(You may find the Key Resource: Using new technologiesuseful to research information or to display the information).

Resource 2: Likely local ecosystems
![]() Teacher resource for planning or adapting to use with pupils
Teacher resource for planning or adapting to use with pupils
Probable ecosystems you and your pupils might like to consider include the following:
- life under a small rock or fallen tree trunk;
- a nearby tree;
- a hedge;
- the classroom itself (corner, cupboard, etc.);
- the local river, dam or lake;
- a nearby forest;
- a marsh or boggy area;
- a dry barren hillside;
- the household woodpile (watch out for snakes);
- a clump of bushes;
- a compost heap.
Record what pupils expect to find in their ecosystem in a table, example below:
| Species | Approximate number | Feed on | Eaten by | Eggs or ? | Activity | Value |
| Ants | whole colony | ant lion | many eggs and larvae and pupae | different workers soldiers queen | nuisance clear dead things | |
| Scorpion | only one | millipedes crickets beetles | baboon | live young | sting is poisonous | |
| ||||||
| ||||||
|
Write pupils’ suggestions lightly in pencil to be rubbed out when the answers are filled in. Below you will see some examples of different ecosystems that are likely to be found in Zambia.
Lakes and ponds e.g. Bangweulu, Mweru, Kariba
Flood plains e.g. Kafue Flats, Zambezi Region
Bush e.g. Mansa District, Chipata District, Mwinilunga District
Resource 3: Keeping a praying mantis in the classroom
![]() Background information / subject knowledge for teacher
Background information / subject knowledge for teacher
Keeping a praying mantis as a temporary guest in the classroom is very easy. The larger ones with bigger abdomens (full of eggs) and shorter feelers are the females. The thinner more delicate ones with longer feelers are the males. They are better adapted to flying in search of females. The females tend to stay on the same plant and wait for males to approach them.
It shouldn’t be difficult for pupils to catch one in a plastic bag. A good cage can be made using wire gauze over a wooden or stiff wire frame. What also works well is to cut off the bottom of a clear plastic 2-litre cool drink bottle. Make a series of holes near the top using a sharp nail to let in air. Put some sand into the lid of a box and stand a leafy twig in a small jar of water (see diagram below). Trap the praying mantis under the bottle and use the screw-on cap to put in a regular supply of small, live insects such as flies, moths and grasshoppers. The pupils will enjoy watching the mantis trap and eat its prey.
If you have a male and a female in the same container they may well mate, but be prepared for a bit of drama. The female will usually lean back and start to cannibalise the male once mating has taken place.
After mating, you might see the female laying her eggs in two neat rows in a frothy substance that soon dries and hardens and is paper-like. Release the female after a while. Keep the egg case under observation and your pupils might be lucky enough to witness the hatching of the tiny, blackish praying mantis nymphs. They need to be released, as it isn’t easy to feed them in captivity, but notice how the abdomen is curled up over the back in a characteristic way.
Resource 4: Local knowledge
![]() Teacher resource for planning or adapting to use with pupils
Teacher resource for planning or adapting to use with pupils
At Kabwe College of Education, teacher training students discovered that George, the man who worked as the gatekeeper, was a wonderful resource about the local natural world – a true naturalist.
If George was shown a pouched squirrel, he would know that it harvested and stored seeds and grain (much like a hamster), and had a specific berom name for it that no student knew. He could tell all sorts of fascinating facts and folklore about the animal. For example, he told how seven years of drought can be predicted when the pouched squirrel is taking the trouble to chew the palm nuts so as to carry them in its cheek pouches to be stored safely.
He also knew that the antelope could see directly up through the spirals of its horns to the exact tip. You can check this if you look down from the top of a mounted set of horns. There is a direct line to the eye socket. We didn’t really believe him when he told us that trees communicated directly with the buck, sending them on by saying ‘you have taken enough here, now move on’. Years later, telling some nature conservation experts about this odd notion, they laughed, saying that it had recently been discovered that certain local trees do in fact produce bitter-tasting chemicals in response to grazing and that these are even passed on to neighbouring plants, causing the buck to move on to a different clump of plants.
Another example of local knowledge:
The story of the old woman who knew her ants
A very famous African entomologist, S H Skaife, tells an interesting story of how, during World War 2, there was a shortage of tea. People decided to try to cultivate the wild rooibos tea plant from the Western Cape Fynbos.
They offered a reward of one pound (a lot of money in those days) for every matchbox full of rooibos seeds. The seeds were very small and the local children soon gave up trying. Only an old woman was successful. Every week she brought in a matchbox full of seeds and collected her pound. She would tell no one how it was that she managed to do what no one else could.
She only divulged the secret of her success when the organisation had enough seeds and stopped paying. What was her secret? She knew that a certain type of ant harvested the seeds of that specific plant. All she had to do was to find the ants and follow their trail back to their nest and rob them of the harvest of rooibos seeds. The moral of the story – sometimes it pays to carefully observe what is going on in nature.
Acknowledgements
Every effort has been made to contact copyright holders. If any have been inadvertently overlooked the publishers will be pleased to make the necessary arrangements at the first opportunity.
Section 4 : Plants and animals adapting to survive
Key Focus Question: How can you encourage pupils to make deductions from their detailed observations?
Keywords: plants; animals; observations; adaptation; mind maps; brainstorming; project
Learning outcomes
By the end of this section, you will have:
- encouraged pupils to make deductions from their observations of living things (thinking and behaving scientifically);
- used mind maps to record observations;
- undertaken collaborative open-ended activities.
Introduction
One important way in which scientists work is to make logical deductions based on careful observations and data.
Too often, teachers prevent this by giving pupils ready-made facts to memorise (and which pupils often forget). So we need to support pupils as they work things out for themselves. This section looks at encouraging pupils to interrogate (ask questions about) their observations in order to make reasonable deductions for themselves.
To tackle this, we focus on how animals adapt for survival and movement.
1. Using mind maps to record observations
Ponds and pools of water support a complex balanced system of life. Observations of such an ecosystem can be organised on a mind map (see Key Resource: Using mind maps and brainstorming to explore ideas). Pupils can then add their ideas in a different colour.
In Activity 1 we encourage you to start an open-ended project – making a temporary pond at school. This can be populated by plants and animals borrowed from a local source. It is best if you involve your class in discussions about how you will collect pond life and safely keep it in the temporary ‘pond’. Pupils make accurate observations of life in the pond over a few weeks. By temporarily bringing nature close to the classroom, you have a resource for extending initial observations into deeper science thinking.
Teachers often feel insecure when doing more open-ended work like this. But it is more ‘learner centred’; it builds on pupils’ ideas and interests. You will probably be surprised by your pupils’ enthusiasm and the high quality of work produced. Remember that there are no ‘right answers’ to open-ended work like this. There is accurate observation and there is good, clear thinking that builds deductions that make sense.
Case Study 1 describes how a specific local environmental problem can be the basis for similar work. Do you have any similar problems in your area? This is a good opportunity to ask a local expert to visit your classroom to talk about the problem; remember to spend time preparing questions with your pupils before the visit (see Key Resource: Using the local community/environment as a resource).
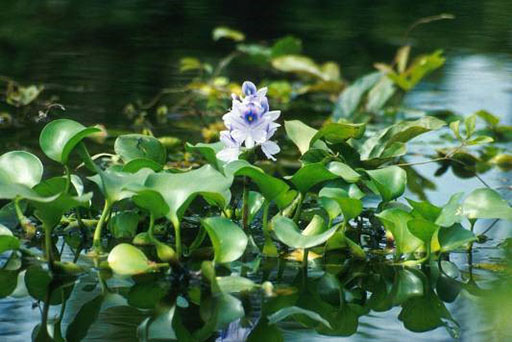
Case Study 1: Observing an invasive plant
Bongile Mpuntsha teaches in the rural Nxarhuni valley (South Africa) where there are weirs (barriers) to retain river water for farming. But there is a huge problem on the water. An alien plant – water hyacinth – is growing rampantly out of control and clogging the water.
Bongile uses the problem as a basis for science work. He starts with the observation of actual samples (specimens) of the plant. These initial observations are recorded on a collective class mind map (see Key Resource: Using mind maps and brainstorming to explore ideas). The pupils discuss the mind map, which leads to further observations. Then, from what they have observed, pupils work to answer the core question: What factors and adaptations make this plant such a successful invader?
It is clear that the pupils are able to think scientifically, given the opportunity. Bongile is surprised and pleased with their deductions. These are discussed and written up on the mind map in a second colour (see Resource 1: Mind mapping).
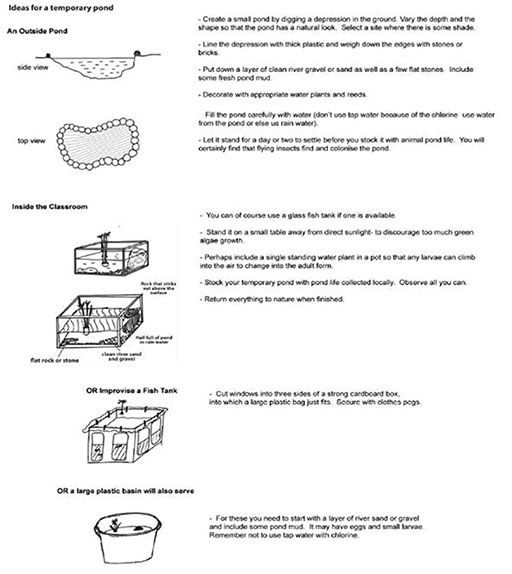
Activity 1: A temporary class pond project
Build and establish the pond using Resource 2: Ideas for a temporary pond to help you. It is really best if the ideas come from the pupils themselves. Remember that we all learn a great deal from our mistakes – especially scientists, who often have to change their ideas as projects progress.
With your pupils, think of ways to record information about animals and plants in your pond. Perhaps you need a checklist or table for noting the names of all the plants and animals found? How will the work of observing be divided and shared among pupils? How will recording happen? Will you keep a scrapbook near the pond?
When you have a good range of observations, try to make a mind map of them. How will it be organised? You could use a large piece of newsprint/paper, the wall or the chalkboard.
Next, ask your pupils, in pairs or small groups, to think of deductions that can then be added to the mind map in a separate colour. You could write pupils’ initials next to their deductions to acknowledge their work.
2. Thinking about adaptions
Plants and animals adapt to a wide range of conditions on land. This makes a fascinating topic to study.
You can work out much from pictures or specimens of plants or animals about how or where they live. Clues are:
- the overall body shape;
- the type of outer covering;
- the proportions of the body parts;
- any unusual structures or arrangements of parts.
We do this by processes of deduction. Activity 2 suggests how you can encourage the development of this skill by observing small animals that are found around the school. If you have suitable books, you might extend this work using pictures of other animals or by thinking about humans.
In Case Study 2, a teacher helps his pupils to extend their science thinking based on one pupil’s observation. Read this before doing the activity with your class.
You might ask your class to think about how plants adapt to your own environment.
Case Study 2: Plants in dry places
Alias Morindat grew up and teaches in the dry Dodoma region. Every few years, he asks his multigrade, farm-school class to list different ways local plants are suited to survival in dry conditions. He is always impressed with just how much knowledge they produce, recording observations and conclusions in a collective mind map. To assess their work, they enjoy comparing it with work from a few years back (including that of their older brothers and sisters).
Here is one example of how this work can encourage pupils to make deductions from their observations.
One year, a pupil made this observation: ‘Here in Dodoma region, more plants have thorns or spines than those near Tanga (at the coast).’ What could be deduced from this observation? Are thorns and spines an important adaptation for dry area plants – and why?
Alias asked groups to consider this. Most agreed that it is an advantage to have thorns because plants in dry places cannot easily replace green parts eaten by animals. One child observed how people in wetter areas encourage fresh growth by cutting off branches. Others noted that some plants also combined thorns with bitter tasting or irritating juices. This stops them being eaten.
They deduced that it must be very important for the survival of xerophytes (organisms which live, or even thrive, in areas with very little moisture) not to have to replace lost parts.
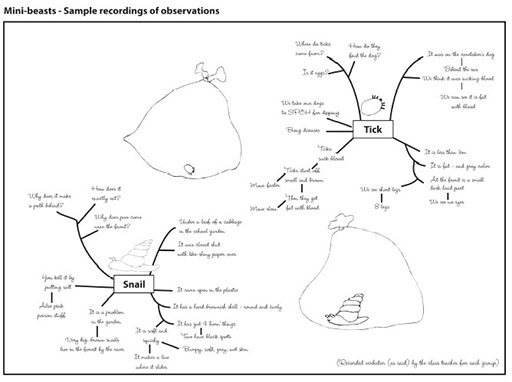
Activity 2: Mini-beasts – life just outside the classroom
This activity requires small clear polythene bags. Give one bag to each group (three/four pupils). Then ask each group to go outside (with your supervision) and catch one single different small animal – not something with a poisonous bite or sting – a grasshopper, for example. Back in class, groups study their mini-beast, which is easily visible and safely contained with enough air to survive until released.
They record all their observations in the form of a mind map. ‘Where it was found’ and ‘What it was doing there’ is recorded top right. Its features are carefully recorded bottom right. Bottom left they list what they already know about the creature and the top left is used for questions they raise.
In a multigrade class, you might ask older pupils to work with younger pupils to help them record their observations and questions.
Groups share their observations and questions, and add information from other pupils to their mind maps. Then they think carefully of something more they can add in another colour for each observation or question they have written. This helps them deepen their thinking.
(See Resource 3: Mini-beasts for examples.)
3. Organising open-ended project work
All land-living things need air for life processes such as respiration and photosynthesis. But many living things have adapted to moving in air (flight), or to using air in some effective way for survival.
Case Study 3 describes a teacher guiding the further investigation of a single group of pupils in a focused, but still open-ended, project. The Key Activity is much broader and involves pupils taking more responsibility for their own learning as they work together to meet a challenge. It builds on the skills of observation and deduction from the previous activities.
If there is access to the Internet in your community, your pupils could use it to find out more for their projects. See Key Resource: Using new technologies for where to start in finding useful information on the Internet.
Case Study 3: Encouraging further investigation in a focused project
Justin Chidawale’s class had spent a term on a ‘moving through air’ project (see Key Activity), finding out about natural things flying, gliding, parachuting, floating and spiralling through air. They had also discovered that the importance of air carrying smells and odours.
Two boys and a girl came back from the holidays with a question: ‘How does a kingfisher bird stay in one place in the air before diving? It doesn’t have rotors like a helicopter!’
Justin did two things. First, he gave them time and encouraged them to find out what other living things hovered (dragonflies, hawks, bees, hoverflies and certain moths). Then he encouraged them to spend time observing these creatures in action. Sharifa’s deduction was that they could move their wings round and round in a figure of eight pattern. She thought this might be true because that is how she used her arms to stay up in one place when swimming.
Then, Justin arranged for them to use the science textbooks in the nearby high school; one of the teachers helped them.
The wonderful thing is that they submitted their project to the Young Scientists competition and won a flight to the national finals in Dodoma.
Key Activity: Moving through air – a project
Take pupils into the open air to breathe and appreciate our ‘ocean of air’. Notice clouds, quality of light, dusty haze in the distance and evidence of pollution. Ask: What living things and parts of living things move in the air? Challenge pupils to find out all they can – this is a project to do over several weeks.
Back in the classroom start by brainstorming the question with pupils – perhaps display this as a list on the classroom wall (see Key Resource: Using mind maps and brainstorming to explore ideas). Resource 4: Questions on moving in the air gives some ideas.
Organise your pupils into groups of between four and eight. Each group should observe and anticipate one area – you could use the questions in Resource 4, giving one question to each group. You need to plan regular report-back sessions through the project. Keep pupils motivated with interested support, ask questions and give feedback.
Groups looking at animals could do drawings of different flight patterns (for example gliding, parachuting) and this could lead to drawings of comparative wing shapes. See Resource 5: Examples of flight patterns and wing shapes.
At the end of the project, each group gives a presentation to the class – think about what criteria you will use to assess their work. Could they assess their own work?
Did you and your pupils enjoy this activity? Could you use this approach for other topics and other subjects?
Resource 1: Mind mapping
![]()
![]() Example of pupils’ work / Background information / subject knowledge for teacher
Example of pupils’ work / Background information / subject knowledge for teacher
Observations on the water hyacinth – an example from the class
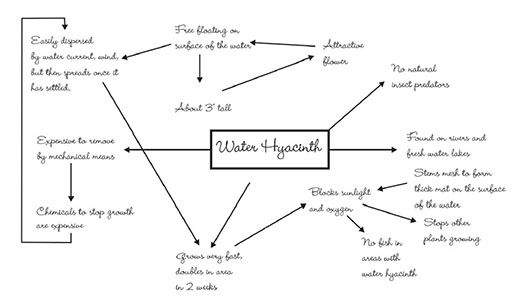
Background information on the water hyacinth
Water hyacinth, Eichhornia crassipes, is a free-floating perennial herb. The plants grow about 3 feet tall as they float on the water’s surface, with stems intertwining to form dense mats.
Out of its enemies’ reach (mechanical/chemical removal or strong water flow/wind), the water hyacinth has become one of the most troublesome floating aquatic weeds in many tropical and subtropical parts of the Americas, Asia, Australia, and Africa. In Africa, it infests every major river and nearly every major freshwater lake.
Water hyacinth damages water quality by blocking sunlight and oxygen and slowing the water’s flow. Capable of doubling within a couple of weeks, it can grow faster than any other plant. By choking out other vegetation, it makes an area unusable by plants and animals that live in or depend on the water. Fish spawning areas may vanish.
Uncontrolled, water hyacinth robs water from potential drinking and irrigation supplies. The mats can block boat travel. Chunks of mat can break free to clog downstream pump stations supplying water for drinking, irrigation and hydropower.
Chemicals and mechanical removal, the primary weapons against the weed, are costly and often ineffective.
Lake Victoria’s water hyacinth problem
No one’s sure how the South America water hyacinth invaded Africa’s Lake Victoria but there’s little doubt as to the damage it has caused. In 1989, the weed was spotted in the lake and seven years later, it had clogged 80% of Uganda’s shoreline. Freed from its natural insect enemies, it continued to spread. Getting to fishing grounds became a terrible struggle. A reduced catch and lowered income threatened to trigger widespread famine. Rotting vegetation, under the suffocating blanket of weeds, began to foul drinking water – which comes straight from the lake. Meanwhile, along the edges of the floating weeds, water snails harbouring the deadly schistosomiasis parasite found a new place to breed.
James Ogwang – decided to spoil the party
Ogwang, a scientist from Uganda, imported another invasive species – a voracious South American weevil and natural enemy of the water hyacinth. Ogwang tested to see if his new tiny imports would solely attack the water hyacinth and not any local crops. Satisfied with their specificity, he released his tiny army and they got to work.
Adapted from: Watch out Water Hyacinths New Jungle Enemies are Coming’
Resource 2: Ideas for a temporary pond
![]() Teacher resource for planning or adapting to use with pupils
Teacher resource for planning or adapting to use with pupils
Resource 4: Questions on moving in the air
![]() Background information / subject knowledge for teacher
Background information / subject knowledge for teacher
Some animals can’t fly, but they can jump through the air. A monkey (rainforest animal) jumps from tree to tree. It has flaps of skin between its legs that help it move.
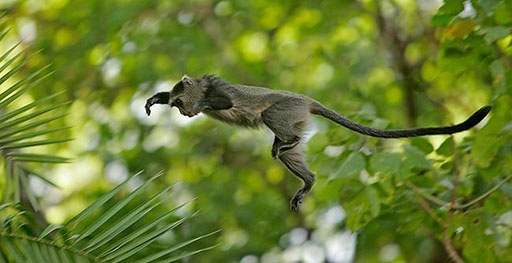
Blue monkey, Lake Manyara, Tanzania
Original source: http://www.birdsasart.com/ Blue-Monkey-leap-of-faith-_H2D7594-Lake-Manyara-N.jpg (Accessed 2008)
- Feathers: What are they made for? How do they grow? How many feathers does a bird have? What is the structure of a feather?
- Structure of a bird: How do a bird’s body shape and other features help it to fly?
- What kind of animals can parachute, glide or fly?
- What parts of flowers and plants can move through air?
Resource 5: Examples of flight patterns and wing shapes
![]() Teacher resource for planning or adapting to use with pupils
Teacher resource for planning or adapting to use with pupils
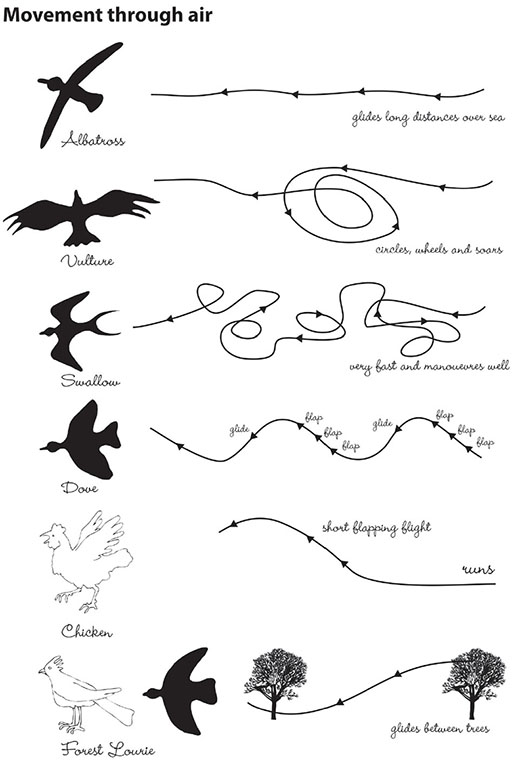
Acknowledgements
Grateful acknowledgement is made to the following sources:
Photographs and images
Blue monkey, Lake Manyara, Tanzania:http://www.birdsasart.com/ Blue-Monkey-leap-of-faith-_H2D7594-Lake-Manyara-N.jpg (Accessed 2008)
Text
Resource 1: Mind Mapping - Background information on the water hyacinth/Lake Victoria’s water hyacinth problem/ James Ogwang – decided to spoil the party: Adapted from Watch out Water Hyacinths New Jungle Enemies are Coming
Every effort has been made to contact copyright holders. If any have been inadvertently overlooked the publishers will be pleased to make the necessary arrangements at the first opportunity.
Section 5 : Developing attitudes about our environmental impact
Key Focus Question: How can you help pupils develop values of caring and concern for the environment?
Keywords: human footprint; endangered; environment; discussion; research; projects
Learning outcomes
By the end of this section, you will have:
- used discussion to help pupils become more aware of their values and attitudes towards the environment;
- used different resources (articles, information books, web sites, photographs, drawings etc.) with your pupils;
- helped your pupils plan, participate in and assess environmental action projects.
Introduction
We can feel very proud of Africa and being African. From research, scientists now believe that Africa is the ancient home of all people here on Earth. Southern Africa is seen as the ‘cradle of humanity’. Isn’t that wonderful?
Although human history is very short compared to the Earth’s history, humans have developed the capacity to damage and even destroy vital elements of our natural world.
How can you help pupils participate in serious discussion about their environment? How can we encourage pupils to develop values of caring for their world?
1. Discussing and imaging the past
Earlier sections in this module considered how living things are adapted to survive in their environment. The great human adaptive advantage, developed here in Africa, is the ability to think of and make tools to cope with changing environments and to learn new things. For example, the earliest evidence of learning how to make and use fire is found in South Africa. (See Resource 1: The ‘Out of Africa’ theory of human origins for further information about early humans.)
In Case Study 1, a teacher uses artefacts of human life from thousands of years ago, found on a local sand dune, to develop attitudes of respect for what early humans could do. This is one way of starting this topic with your pupils; you could also use some of the background materials in Resource 1. Make sure you give a purpose to this activity; ask pupils to find one idea that is new to them or to summarise the main ideas in a way suitable for younger pupils, perhaps with some pictures.
In Activity 1, you lead your pupils through thoughtful discussion that will encourage them to seek more evidence from a range of different sources.
Case Study 1: Inspiring pupils with shards, stones and bones
Alan is a teacher who grew up spending holidays on the coast of South Africa. Here, when the wind blows away sand in the dunes, it uncovers places long hidden. You can find broken parts of very ancient pottery and marvel at how it was made and decorated. You can find parts of stone that have been chipped and shaped to make tools for cutting, hammering and even grinding. There are also bits of bone that show evidence of having been shaped into awls (pointed tools) for piercing leather, or cut into tubes as beads.
Sometimes Alan takes his pupils there. When pupils hold these things and imagine people thousands of years ago, and the time and trouble they took to make these tools, he can see the sense of wonder in their faces.
For more details on looking at artefacts see Resource 2: Interrogating artefacts.
Activity 1: Imagining the deep human past
First read Resource 3: History of technology to yourself to give you some ideas about early technologies.
Now, sit your pupils around you. Ask them to close their eyes and imagine themselves back in the very distant past. They are a family of hunter-gatherers, living off the land, making their own tools and seeing to their own needs for survival. Tell them to keep their eyes shut and to hold the answers in their heads to the questions you ask (later you will talk about the answers).
Ask them to imagine themselves waking. Where did they wake up? What kept them warm and safe in the night? What are they wearing? Who made it for them and how? What do they eat and drink? How is it prepared and stored? Take them briefly through the probable activities of the day. Focus on the tools, implements and other objects used.
Record your subsequent discussion in the form of a mind map titled ‘The earliest technologies for a good life’. (See Key Resource: Using mind maps and brainstorming to explore ideas.)
2. Discussing environmental issues in groups
There is strong evidence that all modern humans descended from a single population living in Africa about 150,000 years ago. Until only recently, humans lived in close harmony with nature, advancing the technologies that made their lives easier or better. Today, more modern technologies give us the power to harm or damage our world – and even its climate – in very dramatic ways.
This section looks at how you can explore with your pupils the impact we make on the world. What harms it, and what heals it? There are many plants and animals that have become extinct over time as part of natural processes, but human activity can also result in a species becoming extinct. Therefore, it is important to help pupils understand that their behaviour can have long-term effects on the Earth and our environment.
Case Study 2 tells how one teacher worked with his class to raise awareness of the effect of people on one species. In this type of activity, it is important to choose topics that are relevant to your pupils; Activity 2 helps you build up a list of these topics. This can act as a starting point for further discussion, research and action. Older pupils might extend this work to look at how the issues are reported in the media.
Try to do some background research yourself before starting this work with your pupils. What are the endangered species in your country or local area? If you have access to the Internet, it can be a great resource (see Key Resource: Using new technologies), but you can also ask local experts, teachers in the local high school and other community members for help or to come in and talk to pupils.
Case Study 2: Raising awareness of endangered animals
Kioko Mutiso talks to his class about the flightless dodo of Madagascar. This was a large bird (about the size of a turkey) that ate ripe fruit that had fallen to the ground. It built its nests on the ground because there were no natural predators on the island of Madagascar. Then, more sailors started visiting the island, bringing mammals including pigs, monkeys and rats. Over the years, the number of dodos decreased and by around 1680 the last dodo died.
Mr Mutiso then organised his class into groups of four and gave each group six small cards, each with one of these phases on them:
- Fruit trees cut down to grow other crops
- Climate changed and became too cold for the dodo
- More people hunting the dodo for food
- More people picking the fruit from the trees before it ripens and falls
- More people hunting the dodo for their feathers
- Small mammals ate the dodos’ eggs
Mr Mutiso asked each group to read out the cards to each other and then to put them in order to explain why the dodo became extinct. He gave them 20 minutes for this task and during this time he went round each group asking them questions about their reasoning. At the end, each group shared their ideas on a class table. The most popular idea was eating the eggs and Mr Mutiso confirmed that this was indeed the most important reason for the dodo becoming extinct.
He then asked his class if they have heard of any other endangered animals. The pupils mentioned elephants, tigers, dinosaurs and local endangered animals including the black rhino, the African elephant and certain plants.
They decided to research several of these animals to find out the reason why their numbers are going down. They wrote letters to conservation organisations to find out more information about the local animals and make posters of their findings for the classroom walls (see Resource 4: Black rhino).
Activity 2: Keeping a score sheet – ‘Harm’ versus ‘Help’
‘What are we doing to the world?’ In this activity, you use this question to increase awareness of both global and local issues regarding the environment.
Use the wall at the back of the classroom to make a large score sheet – draw a table with two columns. Head one column ‘Harm’ and the other column ‘Help’ or ‘Heal’.
Every week, a different group of pupils collects last week’s old newspapers, listens to the radio news or television and finds one story or picture which shows how people are affecting the environment. You might have stories about leaking oil pipelines, burning of forests, dumping rubbish, planting young trees, opening a new road or recycling aluminum cans.
Pupils should summarise their story using these headings:
- What is the title of the story?
- Which part of the environment is affected? (Air, soil, water)
- How is it affected? Is this a long-term or short-term effect? Who is responsible?
The group presents its story to the class and then adds to the score sheet in the appropriate column.
When the sections are full, the class votes for the most significant choice in each column and these get pasted into a ‘What worries us – What we like to see’ book for future reference.
Think about how the group oral presentations could contribute to language assessment (see Key Resource: Assessing learning).
3. Raising environmental awareness
It is important that pupils are encouraged to value their own culture and traditions. Scientists are discovering that indigenous knowledge carries important understanding, but there is a danger that this local knowledge will be lost.
Case Study 3 shows how a teacher uses local news to link local and global issues around pollution, threats to animal populations and increased employment and facilities.
In the Key Activity,you build on the earlier discussion and research and take action with your pupils to improve the local environment. In this type of work, you need to think carefully about how you divide up the work and ensure that everyone has a chance to participate. Encourage pupils to reflect on what they have contributed to the group (see Resource 5: Ideas pupils may have about working in a group).
Case Study 3: Using local news
There is a story in a local newspaper about how a large company plans to build a hotel near to the town on the beach, where many animals live and local people fish. Some local people are very upset about this and think it will bring pollution, and scare away animals and fish. Other local people are excited at the idea that there will be jobs in the hotel, and tourists to guide and buy local crafts. A local teacher, Mrs Rutebuka, sees this as a good opportunity to link language and science.
She asks her pupils to find as many copies as possible of this edition of the newspaper. She then cuts out the article so that each group (eight pupils) has a copy of the article. In their groups, the pupils then read the article and analyse the article under these headings (which Mrs Rutebuka has written on the board);

After half an hour, Mrs Rutebuka stops their discussion and asks different groups to send a representative to help complete the table on the board.
She finishes the lesson by working with the pupils to write a summary of the story from the completed table.
Key Activity: Taking action
- Explain to your class that you want them to decide on a project where they take action to do something positive for the natural world.
- Brainstorm the aspects of local life that could be improved. Discuss and rank the ideas in order of importance.
- Next, divide your class into groups. Ask each group to draft a provisional action plan to present to the class. How will you decide which plan is sensible and realistic? Discuss this with the class and decide on 3-4 criteria for judging each plan.
- Ask the class to choose one plan and work out how you will measure how effective of the project.
- Finally, try to put your plan into action. Use an action research pattern of:
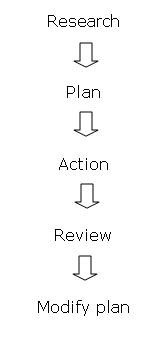
Resource 6: Thinking globally – acting locally gives more detailed advice on organising this activity.
Resource 1: The ‘Out of Africa’ theory of human origins
![]()
![]() Background information / subject knowledge for teacher / Teacher resource for planning or adapting to use with pupils
Background information / subject knowledge for teacher / Teacher resource for planning or adapting to use with pupils
Most experts believe that the species to which we belong, Homo sapiens, evolved in Africa, sometime between 200,000 and 100,000 years ago. By 30,000 years ago, Homo sapiens had spread to all parts of the world apart from the Americas; by at least 11,000 years ago, every continent apart from Antarctica was populated.
Homo sapiens had more tools than their predecessors, including a wide variety of stone blades and tools made of bone, wood and ivory. They lived in larger settlements and there was more contact between villages and tribes. Communication through the spoken word and through art, engravings, sculpture and music became a vital part of human life. Later human developments – farming, civilisation, huge population growth, industry and control over nature – have occurred in the relatively short period of 10,000 years.
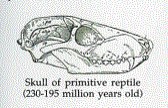 | 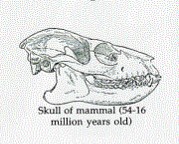 |
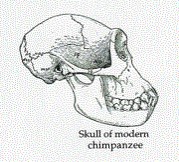 | 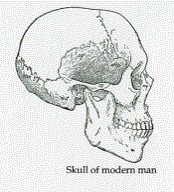 |
Adapted from: http://www.harperchildrens.com (Accessed 2008) and Dorling Kindersley Eyewitness, Early People
Resource 2: Interrogating artefacts
![]()
![]() Background information / subject knowledge for teacher / Teacher resource for planning or adapting to use with pupils
Background information / subject knowledge for teacher / Teacher resource for planning or adapting to use with pupils
An artefact is evidence of the life of early people. When pupils handle or see a picture of an artefact, you first want them to think about:
- How was this made?
- What was it used for?
This works best if there is a local site where such artefacts can be found. On a visit to such sites, pupils need to respect the place and not damage or remove items they see or find. It is useful if an expert or local enthusiast can guide the visit.
The next best thing is for a local museum or regional expert/archaeologist to loan a ‘handling set’ of artefacts for pupils to interrogate in the classroom. But photographs also work well. An enthusiastic teacher could compile a set from old magazines such as Natural Geographic, and magazines like Time and Newsweek often carry photographs of recent discoveries. A serious science teacher needs to be on the constant lookout for such visual resources.
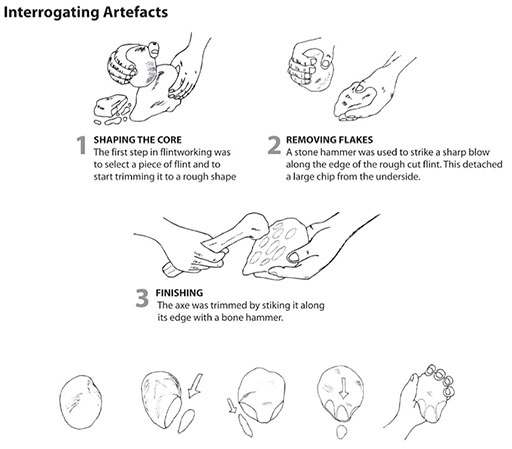
Archaeologists use careful line drawings to illustrate the artefacts they find and such drawings can also be used effectively.
Finally, human thought and imagination are powerful tools we can make use of. Pupils can be led to discuss and picture how prehistoric people probably made certain artefacts. For example, consider how a round river stone that fits comfortably in a human hand could be chipped and shaped to form a large hand-axe or hammerstone that could be used to break open large bones to extract the nutritious marrow.
It doesn’t really matter whether you have access to the real thing, use photographs or drawn illustrations or have to rely on the power of the imagination. The important thing is that your pupils develop a sense of awe and respect for the resourcefulness of early humans in Africa.
Resource 3: History of technology
![]() Background information / subject knowledge for teacher
Background information / subject knowledge for teacher
Before you read about the history of technology, spend a few minutes thinking how technology first began. When do you think it all started? What sorts of things did the first people need to make? What do you think might have been the very first thing that they made? Why?
Technology is something that has built up over the ages; it is as old as the human species. And it is at the very centre of most human experience. It always has been and it always will be. All the latest research shows clearly that human life had its origins in our part of Africa; Southern Africa is now known to be the ancient home of all people – the ‘cradle of humanity’. As people developed here in Africa and advanced their culture, they found ways to use, adapt and change natural things to make their lives easier. They developed cultural and kinship systems. (Systems themselves are a kind of technology – a way to regulate human life and behaviour.) Perhaps the first great inventions were bags, or baskets, and knots to tie things. Skins, parts of plants, and fibres were probably used, and knots, weaving and plaiting were invented. (Of course, dried gourds, or calabashes, could also be used as carrying containers.) Bags and baskets were probably invented by women to carry the food that they had gathered, so that they could carry more than a handful back to their homes. Also, they needed to be able to carry their babies safely, while they gathered roots, fruit and plants. Once human hands were freed by the invention of bags and baskets, people could use their hands for other things. Hunting and other tools were also developed, using hard substances such as bone or stone. Long bones could be twisted or broken and shaped by rubbing them to form bone daggers for cutting or stabbing. Rocks could be knocked and chipped to make stone hand-axes. The sharp flakes that were chipped off could be used for scraping skins to get leather. These tools could be used to make other tools. And so people evolved more and more complex technology to make human life easier in one way – and perhaps more complicated in others. From early on, people probably decorated themselves. They made ornaments like beads, bracelets and necklaces to wear. This required skilful technology. Before long, people probably discovered that they could get certain colours from plants. They also found, crushed and mixed coloured minerals to make pigments to paint and decorate designs on their bodies. By cutting the skin and rubbing ash into the wounds, beautiful, permanent patterns of scars could be made. At some stage, tattooing was invented. Of course, they also decorated the objects and tools that they made. We’re sure that early people appreciated beautiful, carefully made things. At some point, the control and use of fire became an important part of human life. This gave people some control over darkness, and a way to process certain foods by cooking or smoking. Control over fire meant that people could now move to live and settle in colder places. Fire could also be used to bake pots made of clay. This process turned the pots into stronger containers that could be used for cooking as well as storing. Discovering how to find, mine, melt and shape metal was another important series of technological discoveries and inventions. The taming and domesticating of animals was also a technological advance. This led to a nomadic herding lifestyle. In drier places, people learned to dig wells to provide their animals with water. Domestic animals could be a source and sign of wealth. Complex trading and bartering systems probably developed. Learning how to grow crops led to the development of agriculture and settled farming. Control of water by irrigation was another technology that was developed. Settlements turned into villages. Villages, in turn, developed into towns and cities. These towns and cities were complex systems that required many different jobs, which required specialised skills and technologies. As human life got more complex, many other tools and systems had to be developed. Tools were used to make marks or records on stone or clay that carried messages or information of importance. Writing systems were developed. Eventually, more complex tools and sets of tools turned into machines that could do the work of many people or animals. They could even do things that people had not been able to do before. When people worked out how to use the wind and water as sources of energy to work the machines, production systems improved. Using steam and coal was another major breakthrough, which led to the industrial revolution. You can see that technological development leads to all sorts of other changes. Sometimes the changes are good and sometimes the changes can cause problems. Today we live in a modern world that is dominated by rapid technological change. Do we control technology, or does technology control us? Understanding the uses of technology and being able to live and work as human beings in this modern world is a very important life skill for everyone to learn. Original source: University of Fort Hare |
Resource 4: Black rhino
![]() Example of pupils' work
Example of pupils' work
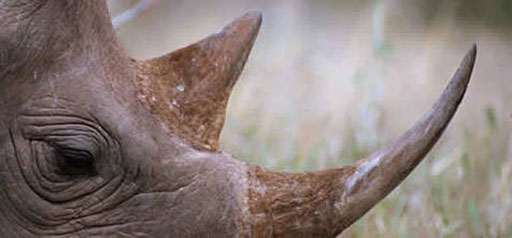
Common name – Black rhino
Scientific name – Diceros bicornis
Location – Eastern, central, western and Southern Africa
Population – approximately 3,725
Size – The black rhino's weight ranges from 800 to 1,400 kg
Colour – Dark yellow brown colour to dark brown or dark grey
Habitat – Tropical and subtropical grasslands, savannas, and shrublands; deserts and xeric shrublands
The black rhino can be found in mud or water wallows, where it cools itself. Sleeping usually occurs at midday, and it feeds mostly during the early morning and in the evening.
The East African black rhino, which had a historic distribution from south Sudan, Ethiopia, Somalia down through Kenya into north-central Tanzania, maintains its current stronghold in Kenya.
Rhinos are easy targets for poachers and their horn is easily concealed and smuggled across borders. Protecting rhinos effectively is very expensive.
Interesting facts
All animals of this species use communal dung heaps, sometimes scraping their feet in them and leaving a scent as they travel about.
Adapted from original source: http://www.panda.org/ about_wwf/ what_we_do/ species/ about_species/ species_factsheets/ rhinoceros/ black_rhinoceros/ index.cfm (Accessed 2008)
Resource 5: Ideas pupils may have about working in a group
![]() Teacher resource for planning or adapting to use with pupils
Teacher resource for planning or adapting to use with pupils
Choose one of these methods to help your pupils to talk about how they worked together in a group.
1. Write each of the following words on to a card or on the board. Give each group a set of cards to help them develop three sentences to describe how they worked. They should try to use some of these words in their sentences:
decide, persuade, tell, ask,
argue, describe, agree, opinion,
listen, share, organise, lead,
2. Write these statements onto a set of large cards (keep these for different group work activities). Display the statements around the room and ask each group to choose the statements that describe the way they worked.
Encourage your pupils to add further statements.
- Everyone in the group had a chance to speak.
- Everyone in the group was encouraged to speak.
- Not everyone spoke during the activity.
- We reached agreement in our group.
- We listened carefully to each other.
- Sometimes we found it hard to listen to others without interrupting.
- Not everyone in the group agreed with our way of drawing the poster.
- Not everyone in the group contributed to the poster.
- Everyone in the group was able to add to the poster.
3. Choose one or more of these questions. Read it/them out to your class and ask each group to discuss the question(s) in their group for five minutes. Ask for feedback from some of the groups.
- How did sharing your ideas help you?
- Did everyone have a chance to speak?
- Did we encourage each other to share our ideas?
- Did we listen carefully to each other?
Resource 6: Thinking globally – acting locally
![]() Teacher resource for planning or adapting to use with pupils
Teacher resource for planning or adapting to use with pupils
Learning through action: a step-by-step approach
1. Encounter
Take your class out on four short survey walks. Explain that you want them to use all their senses. What do they feel, see, smell?
Using the school as a base, walk out from the school in an easterly direction. Walk about 500 metres to a convenient safe place to stand. Get everybody to stand quietly facing east for a few minutes with their eyes shut, and to be very sensitive to what they feel, hear and smell.
Then, with their eyes open, ask them to observe carefully all that the environment to the east of the school has to offer. What has nature to offer? What does the built environment (area covered with houses or other buildings) provide? Then ask them to think of the resources beyond, resources that are out of sight, but in that direction.
Tell them that as they walk slowly back to the school, you want them to think about what they have become aware of. When they get back to the classroom, give them some time to jot down thoughts in their books or on a poster.
Repeat this stage, walking in northerly, southerly and westerly directions.
2. The first draft
You need to decide or discuss with your class how you can capture the results of their sensory ‘encounter’ with the environment.
You could clear your desk, place a matchbox in the centre to represent the school, and then write the names of different local resources on small cards. The cards could be placed in a position that represents the direction and distance of each place or feature. You could even colour-code so that one colour card represents a natural feature, and another colour represents a built item. Perhaps if there is a road, river or stream, you could use ribbon, or a strip of cloth, rope, string, or wool to show shape and direction.
You could build up a diagram on the chalkboard, or you could use sheets of newsprint so that you have a record of this work. You could go outside and mark out the features on a clear patch of sand. You could use stones to hold any names written on scrap paper in place. There are many possibilities.
The end result should be that you and your pupils have a rough plan/model/map of the local environment that you are happy with.
You and your pupils are now ready for the next stage. This will be to list and discuss any problems or dangers they are aware of for people or the environment itself.
3. Representing what has been researched
If the work has gone well, your pupils may want to develop a special project. This could be to make a permanent mural on a school wall of what the environment of the school has to offer.
4. Agreeing a plan
You have started the process of raising awareness about the environment and pupils have been doing some research. This will have lead to an awareness of problems or potential problems in the local environment.
Spend some time with your class discussing problems or potential problems and possible courses of action. Share ideas of alternatives. Then spend a few minutes sharing personal views and feelings as you work with your pupils towards an agreement of what needs to be done, and possible ways it could be done. Set a time for the next lesson and ask your pupils to go on thinking in their own time, and even to share what they are thinking with others at home.
5. Designing a plan of action
At the next lesson, you and your pupils will be turning ideas into proposals and commenting constructively on the ideas being shared. This stage of deliberation is very important. Pay careful attention to the way ideas are developed and challenged. Make sure that quieter pupils are taken seriously.
The outcome of this lesson should be an agreed plan of action in a written form. Tell your pupils that the plan will get turned into action.
Just before you finish, spend a short while with your pupils assessing the process of developing the action plan. What went well? What could have helped things go better? What aspects of the plan might need review?
6. Taking action
This stage will depend on your pupils and the nature of their project. Your role will be to encourage, praise and support their action. You will do this by smoothing the way, making sure that they are ‘safe’ in whatever they do, and by giving them positive feedback and good advice.
Remember that the action stage of some projects may take weeks or even months. But you need to make sure that you keep good records of progress (what is happening) so that you can report on ‘work in progress’ at any stage.
7. Assessing outcomes and reporting
Although this can be seen as a final activity, it need not be. An ongoing process of assessing progress should be put in place. Regular time should be scheduled to report on how things are going and all the ‘ups’ and ‘downs’ on the project.
Adapted from: Umthamo 39, University of Fort Hare Distance Education Project
Acknowledgements
Grateful acknowledgement is made to the following sources:
Photographs and images
Four skull diagrams: Adapted from http://www.harperchildrens.com (Accessed 2008) and Dorling Kindersley Eyewitness, Early People
Resource 6 : Thinking globally – acting locally: Adapted from Umthamo 39, University of Fort Hare Distance Education Project
Text
Resource 3: History of technology: University of Fort Hare
Resource 4: Black rhino: Adapted from http://www.panda.org/ about_wwf/ what_we_do/ species/ about_species/ species_factsheets/ rhinoceros/ black_rhinoceros/ index.cfm (Accessed 2008)
Every effort has been made to contact copyright holders. If any have been inadvertently overlooked the publishers will be pleased to make the necessary arrangements at the first opportunity.