Use 'Print preview' to check the number of pages and printer settings.
Print functionality varies between browsers.
Printable page generated Friday, 19 June 2026, 1:57 PM
Module 3: Science – energy and movement
Section 1 : Everyday forces - investigating movement
Key Focus Question: How can we find out and build on pupils’ ideas about forces?
Keywords: force; investigation; brainstorming; floating; games; friction
Learning outcomes
By the end of this section, you will have:
- used different methods to find out pupils’ ideas about forces around them;
- considered how to record your own and pupils’ learning in this topic;
- supported your pupils to do investigations in small groups.
Introduction
The most obvious thing about our world is the amount of movement that is happening almost all the time. What powerful natural forces drive this movement? What is force, and how do we explain its effects? How do we make use of forces to make life easier or better?
Here we look at different ways to find out how pupils make sense of everyday forces. As their teacher, your challenge is to help them explore and assess possible explanations for how forces cause changes.
1. Discussing Forces in everyday life
How do you, the teacher, find out what your pupils already know about forces and motion? And how can you extend these ideas and link them to current scientific understanding?
In Case Study 1, a teacher raises her pupils’ awareness of all the force events around them. From the start, she challenges their understanding by asking them to see themselves as thinkers with scientific minds.
In Activity 1, you ask pupils to identify and describe forces at work captured in photographs. By trying to make sense of what they have identified, they will be increasing their science awareness with your help.
Case Study 1: Challenging pupils to see forces everywhere
Eugenia in Abuja, Nigeria, is an experienced teacher who has learned to trust her pupils. When she did an upgrading course some years back, she realised how following traditional ‘jug and mug’ (where the teacher has the ‘jug’ of knowledge and pours it into the ‘mug’ of the waiting student) teaching had led her to underestimate her pupils. Now she tells less and challenges them more.
She began the topic of ‘force’ by suggesting to her class that they have a ‘Force Week’, where nearly everything that happens will need to be explained in relation to ideas about force and movement (motion).
First thing on Monday, as they wrote the date in their books, she told them to stop and think if any force was involved in making marks on paper. A lively discussion followed. She encouraged them to investigate by making different marks on scraps of old paper. They came up with ideas that surprised and even challenged Eugenia.
- ‘We pull the pencil across the paper.’
- ‘But I push the pencil!’ exclaimed Danladi, who is left-handed.
- ‘The ballpoint pen slides easier than a pencil.’ – ‘Maybe the ink is like oil for a bicycle.’
- ‘Rough paper scratches more colour off the point of the crayon than shiny paper.’
- ‘Look Ma’am, you push and you pull when you rub out. Rubbing is a different kind of force.’
How do you turn a page when you read a book? This question led to more discussion about gentle pulls, pushes and lifts, and holding up books against gravity.
Identifying forces in everyday happenings really excited the class. Soon, pupils were discussing and trying to explain all sorts of event.
Activity 1: Identifying forces in action pictures
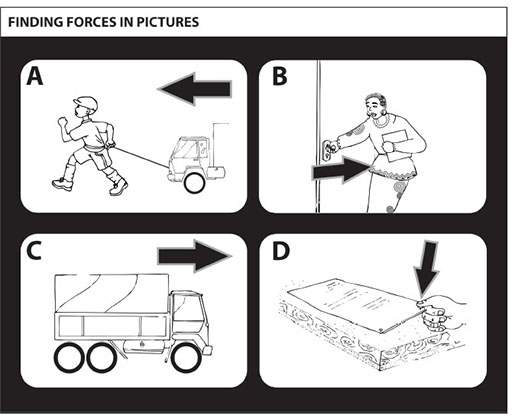
You will need to collect good pictures from newspapers or magazines depicting force in action and effects of forces. Ask some pupils to help you cut out paper arrows of two colours (colour-coded for pulls and pushes) and three sizes. (See Resource 1: Finding forces in pictures.)
Pupils work in threes to look carefully at a picture for evidence of forces in action.
Mark all the pushes and pulls with arrows that show the direction of force and prepare to discuss and share what they believe. See if they realise that different-sized arrows can be used to compare the size of the different forces they find. Do they notice that you get changes in movement when forces are not balanced?
Ask the groups to join into sixes to explain, check and challenge each other’s ideas.
Was asking the groups to assess each other’s work successful? Did it lead each group to understand the size, direction and effects of forces better?
2. Using games and brainstorming to learn about forces
Forces and motion are part of the games and sports children play.
You can use this to determine what your pupils already know and to encourage them to challenge their own thinking. By doing this, they will be extending their understanding.
Case Study 2 shows how pupils can learn things about force and motion through games and competitions.
Activity 2 builds on pupils’ identification of forces from Activity 1. We integrate science and language work to help us describe forces and their effects more accurately in a brainstorm activity. (See Key Resource: Using mind maps and brainstorming to explore ideas.) There are no ‘right’ or ‘wrong’ answers in a brainstorm, but you are challenging pupils’ thinking by encouraging them to speak their thoughts. An important part of learning in science is communicating ideas and practising using scientific vocabulary.
Case Study 2: The class force Olympics
Mr Peter Osumba set up a series of games and competitions one Friday. He thought carefully about how these games would show aspects of force. He realised that wrist wrestling would show how forces work in pairs and that, if opposing pushes are balanced, there is no movement. He thought how he could use blow football to illustrate forces acting on a moving object – air blown through the straws would cause movement, change of direction and slow or even stop the table-tennis ball. Tug-of-war would get the pupils thinking about balance, and being pulled off balance.
Before each game, Mr Peter asked his pupils to predict what the game would teach them about force. Then, as the game took place, he took the role of commentator, describing what was happening and providing extra information about the effects of forces. In this way, they were thinking about the forces involved as they experienced the effects directly.
The next week, Mr Peter and the pupils reflected on the ‘force Olympics’ and made notes and drawings to show what had been learned. (See Resource 2: Force games.)
Activity 2: Force action words
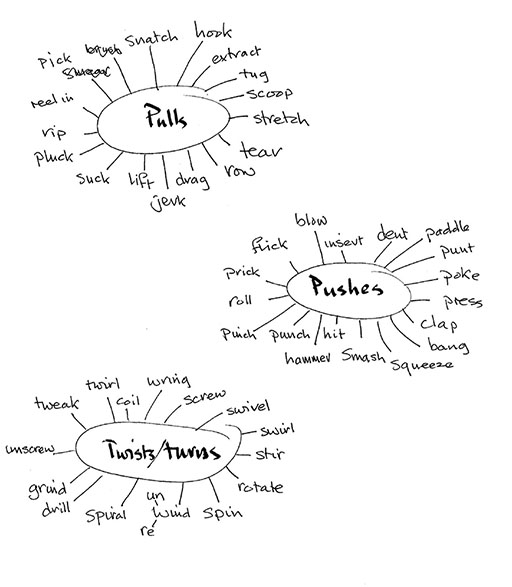
Space out the words ‘Pulls’, ‘Pushes’ and ‘Twists/Turns’ on the chalkboard (or on separate sheets of newsprint).
Brainstorm all the force action words the pupils can think of and form word spiders (word burrs) for each term. (See Resource 3: Force word spiders or burrsfor examples of pupil’s work.) Encourage your pupils to use all languages they understand and use. Do any words sound like their action? Think of words like ‘prod’ or ‘thump’ and even ‘stretch’ or ‘smear’.
Discuss the words and actions with pupils, using mime to demonstrate (e.g. what are you doing when you ‘wring’ out a damp cloth to squeeze out the water?). Check if the words represent pushes, pulls or circular movements. Expect some healthy disagreement. Give your pupils time to discuss conflicting ideas and praise their logical contributions.
Finally, organise your pupils to display the selected words alongside pictures or objects that illustrate the force action (e.g. ‘screw’ could show a screw or screwdriver, ‘tear’ could show torn fabric, ‘crumple’ could show a crumpled drinks can).
3. Organising investigations into friction
Resource 4: Summary of forces summarises what a teacher could be expected to understand on forces and motion.
Primary pupils need to experience a range of practical experiences and have chances to talk and think about what they have been finding out. There are many activities that would extend your pupils’ ideas about forces, for example looking at balls rolling down slopes at different angles and pushing or pulling shoes along different types of surface.
Case Study 3 shows how Mr Peter reflects on what he has achieved with his class. How do you reflect on your learning and that of your pupils? What would you record about your learning in this topic?
In the Key Activity, you guide the pupils through thoughtful investigations around a force that slows objects down – friction. This extends the work of Activities 1 and 2, where you encouraged pupils to speak their ideas. At the same time, you can assess their developing understanding by listening carefully to what they say.
Case Study 3: Reflections of a teacher
Here are Mr Peter’s notes on what he feels his pupils have gained from doing half a term’s work on force. (This involved a number of different experiments and discussions, those in this section and some based on the ideas in Resource 6.)
- Confident they know forces are pushes or pulls or combinations of both
- All pupils know that forces are involved when things start and stop moving and make turns.
- Some pupils know that the forces on a stationary object are equal and opposite but many find this difficult, as they can’t see any forces acting.
- They have good experience of most forces that require actual contact – but many are not sure about forces exerted over a distance (for example repulsion and attraction of magnets and static electricity).
- The class is pretty clear about effects of gravity and most pupils have some idea that ‘weight’ is the force they exert on our planet and that this would change if they were on a different planet.
- Need more work on friction. Some pupils still puzzled that friction can be both useful and a problem.
Need to improve our models of force meters, which show how to measure forces accurately.
Key Activity: Reducing friction
Give your pupils opportunities to work in groups (see Key Resource: Using group work in your classroom) to set up their own investigations.
This investigation looks at reducing friction. Write this question on the board: Which substances are better at reducing friction? Some ideas of substances to use are chalk, cooking oil, margarine and soap, but let your pupils try their own ideas. (See Key Resource: Using investigations in the classroom.)
Depending on the equipment you have:
Pupils could use a shoe with weights (heavy stones would be ideal) on a piece of wood. If they tilt the wood the shoe will slide. The more they need to tilt the wood the greater the friction. How does the angle change when they rub different substances on the wood?
Or pupils could use an elastic band to propel a coin across different surfaces. If the elastic band is pulled back the same amount each time, the coin will get the same pushing force each time. Pupils can then measure how far the coin travels on different surfaces.
Support their planning of investigations including their predictions – what they think will happen and why. How will they clean the wood in between experiments? How many times will they try each substance? Resource 5: Investigating frictionprovides a planning sheet to help pupils with their investigations.
Give them plenty of time to carry out the experiment. Encourage them to record their results in a table.
At the end of the investigation, ask them to explain what their results mean. What advice would they give to people who wanted to know how friction could be reduced? They will be behaving, talking and thinking scientifically – which is great.
Think about how your pupils could present their work: will you ask each group to present to the class? Or make a poster to show their results?
(Look at Resource 6: More ideas for experiments around forces for how to support and encourage more investigations.)
Resource 1: Finding forces in pictures
![]() Teacher resource for planning or adapting to use with pupils
Teacher resource for planning or adapting to use with pupils
Original source: Science Now Book 1 – Heinemann
Resource 2: Force games
![]() Teacher resource for planning or adapting to use with pupils
Teacher resource for planning or adapting to use with pupils
The standing one-hand boot throw
A competitor stands outside in the open with both feet on an agreed line with a large size boot, which they proceed to throw as far as possible, without moving their feet.
- What is the best way to measure/compare distances?
- Is this a push or a pull?
- Discuss other examples, like throwing a 1. 5 m stick or heavy stone. Explain that these are like sports activities such as javelin throwing and shot put.
Wrist wrestling rules
Opponents face each other on opposite sides of a desk with left hands on laps. Their right elbows are on the table in front of them in line with the opponent’s elbow (elbows should not move). They grasp hands and at the instruction ‘PUSH!’ each tries to push the back of their opponent’s hand onto the table to score a point. First to three is the winner who then accepts further challenges. (A variation is to alternate hands.)
This is a good example of balanced forces, but as one weakens, the more powerful force results in a movement.
Blow football
Blow football is played on a large empty table with a ping-pong (table-tennis) ball and two or three players per team. The ball can only be moved by air blown through straws.
A goal is scored when the ball is blown over the far end of the table. A game lasts five minutes each way. If the ball goes off at the side, the opposite team has a free blow-in from the place where the ball left the table. If the ball is touched by a player or a straw, the opponents get a penalty blow and all other straws must be at least two straw lengths away.
This is an example of pushes on the ball from the air.
Tug-of-war
Two opponents stand sideways, foot to foot. They hook little fingers together. At the command pull, they both try to pull the other off balance. The first person to move or lift a foot is the loser.
All these games show the effects of forces clearly and give pupils a good chance to experience and think more carefully about how forces operate. Many other possible push and pull games exist and new ones are waiting to be invented.
Resource 3: Force word spiders or burrs
![]() Example of pupils' work
Example of pupils' work
Here are some examples of pupils’ work.
Resource 4: Summary of forces for the teacher
![]() Background information / subject knowledge for teacher
Background information / subject knowledge for teacher
|
Adapted from: Developing Subject Knowledge – Jane Devereux
Resource 5: How can we reduce friction?
![]() Pupil use
Pupil use
Friction is the force that stops your shoes from sliding across the floor. This helps you not to slip over. But sometimes we want to reduce the amount of friction – how can we do this?
Work with your partners to complete this planning sheet for your investigation.
| We are trying to find out: |
|
| We think that these substances will reduce friction: (give 3–5 ideas) |
|
| We predict that the substance that will be best at reducing friction is: |
|
| We think this because: |
|
Our investigation:
| We will need: (list your equipment) |
|
| What we will do: |
|
| What we will measure: |
|
| What we will change in each experiment: |
|
| What we will keep the same: |
|
Our results:
Try to draw a table to record your results.
| We found out that the best substance to reduce friction was: |
|
| Was your prediction correct? |
|
| Did you experience any problems in your investigation? What were they? |
|
Resource 6: More ideas for experiments around forces
![]() Teacher resource for planning or adapting to use with pupils
Teacher resource for planning or adapting to use with pupils
1. Using springs to measure forces:
- a.Make a class list of everything the pupils have seen that includes a spring.
- b.Show how a spring stretches with a pulling force and measure how much it stretches.
- c.Use a spring to measure forces around the classroom – measure how much the spring changes in length. (You can make a spring from a 50 cm length of copper wire or you can use a strong elastic band instead of a spring.) Some forces to measure include door opening, pulling a chair along the floor, pulling a pen or pencil, opening a clothes peg.
2. Cutting down friction in water – making streamlined shapes:
Ask pupils to draw the shapes of fish, boats and diving birds. Which sort of shape is best for going fast through air or water?
Pupils make different shapes with lumps of clay or plasticine. Drop these shapes through a tall tank of water and time how long it takes each to get to the bottom.
3. Forces at a distance:
- a.Use a magnet to pick up steel pins. Ask pupils to slowly move the magnet towards the pins. What is the distance between them when the pins first start to move?
- b.Rub a plastic pen or ruler on a cloth (e.g. a duster). This gives the pen or ruler an electric charge. Now try to use the pen or ruler to pick up small pieces of scrap paper. How many will it pick up?
Ask pupils to explain what they think is happening in each of these experiments.
4. Forces and weight:
Weight is a special sort of force caused by the Earth attracting everything on it or near it.
Ask pupils to use a spring or elastic band to make a weighing machine that measures the pull of the Earth on objects. They will need to make a scale for it.
Then talk to pupils about how the weight of these objects would be different on other planets in the solar system or on the moon. Larger planets exert a larger force on another object and smaller planets or bodies exert a smaller force.
Acknowledgements
Grateful acknowledgement is made to the following sources:
Photographs and images
Resource 1: Finding forces in pictures: Science Now Book 1 – Heinemann
Text
Resource 4: Summary of forces for the teacher: Adapted from Developing Subject Knowledge – Jane Devereux
Every effort has been made to contact copyright holders. If any have been inadvertently overlooked the publishers will be pleased to make the necessary arrangements at the first opportunity.
Section 2 : Exploring sounds and music
Key Focus Question: How can you involve your pupils in assessment?
Keywords:sound; musical instruments; assessment; local resources; game; project
Learning outcomes
By the end of this section, you will have:
- used peer assessment with your pupils;
- used resources from the local community to produce musical instruments with your pupils;
- used practical activities to develop your pupils’ understanding of how to produce different sounds;
Introduction
From a very early age, we respond to familiar sounds –a baby will respond to its mother’s or carer’s voice for example –and we learn new sounds very quickly. Your pupils will have learnt to recognise a large number of different sounds. In this section, you support your pupils’ developing ideas about sounds and how they are produced. The emphasis is on practical activities and active learning. Do you play an instrument yourself? Or know someone who could visit your classroom to play to your pupils?
This section also explores ways for helping pupils to assess their own work. (See Key Resource: Assessing learning.) Being involved in assessment helps pupils understand their learning and set goals for future progress. It also builds self-confidence and enthusiasm for learning.
1. Using stories and games to introduce sound
It is always wise to start by finding out what pupils already know. Pupils will recognise many different sounds, but they probably haven’t considered different qualities of these sounds like pitch (low notes or high notes) and volume (loud or soft).
In Activity 1, you play a guessing game with your pupils, where they try to identify sounds and explain how they think the sounds were made. This involves pupils scoring their own answers, one way of involving them in assessment.
Don’t dismiss answers that seem incorrect –encourage pupils to explain their responses. You can learn much about their understanding from what they say. Afterwards, think about what they said –was there anything that surprised you?
Case Study 1 shows how one teacher used a local story as a starting point for pupils’ questions about sound. Do you know any stories from your own culture that you could use? Or could you ask a member of the local community to visit your school to tell a story? Could one of your pupils tell a story?
Case Study 1: Using a folktale to start the topic ‘Sound’
Ms Sarpong, who teaches in South Africa, but comes from Nigeria, used a Nigerian folktale about a swallowing drum to introduce the topic ‘sound’ (see Resource 1: Sound story).
When she told the story to her pupils, she beat three different-sized drums to demonstrate the ‘bim’, ‘bam’, ‘bom’ sounds of the drums in the story.
After the storytelling, they discussed the sounds in the story and how they were made.
Some groups investigated how drums make sound, by using grains of dry rice on the surface of the drums to see the vibrations. They also tried to get different sounds from the same drum.
Other groups investigated what happened when they blew air over the tops of different sizes of empty plastic bottles. They made notes of what they found out, and later they shared what they had thought about and learned.
Finally, they made a list of all the questions they had about sound and displayed it on the classroom wall. Ms Sarpong encouraged them to think of ways they could find out the answers for themselves.
Activity 1: A sound guessing game
Gather 10–12 different objects that make interesting noises – include both familiar and unusual sounds. You might include sounds recorded on a cellphone. Before pupils come to class, you will need to set up a screen to hide from view both the objects and the action that makes the sound.
Settle the pupils and explain what you have planned. Tell them that they will be expected to assess their responses honestly.
From behind the screen, make each sound in turn. Pupils need to write down how they think the sound is made.
At the end, show how each sound was made and pupils score the sounds they identified.
Finally, ask the pupils if all the sounds were equally easy to identify? How did they identify the more unfamiliar sounds? What clues helped them to identify the sounds?
2. Working in groups to investigate sound
Sounds are made by vibrating objects. The vibrating object causes the air particles to move closer together (compress) and then apart in a regular pattern –this is called a sound wave (see Resource 2: Sound waves ). Thus the air carries the sound to our ear.
In Activity 2, you ask your pupils to use everyday objects to make sounds and see how they can change these sounds in different ways. The pupils should carry out this investigation in small groups. (See Key Resource: Using group work in your classroom.) Spend some time at the end of the investigation talking to your pupils about how the groups worked; do they have ideas about how they could work together more effectively in the future?
In Case Study 2, a teacher uses an interesting set of questions to encourage pupils to think about their work –another way of involving them in assessment.
Case Study 2: Measuring how far sounds travel
Mrs Antwi organised her multigrade class into groups of six pupils of different ages. Each group was given some wooden blocks.
She asked them to find out how far the sound of blocks clapped together travelled. Each group organised their own investigation. (See Key Resource: Using investigations in the classroom.) When they had planned their investigation and decided who would carry out each task, she let them work outside. Groups recorded results on a poster.
After they had completed their investigations, Mrs Antwi gave them the following questions to discuss in their groups:
Did they get an accurate answer to the question (results)?
Were they happy with their data?
What would they do differently next time?
Mrs Antwi knew this was a good way of helping her pupils to reflect on their learning. The pupils came up with some excellent ideas, including that the wind varied and affected the results, not everyone’s hearing is the same and that other noises were distracting.
Activity 2: Exploring changing sounds
Organise your class into small groups to investigate ways to change the sounds made by a range of objects. Give each group one set of equipment –here are some ideas:
Use different-sized upturned tin cans as drums. Fill five identical glass containers with different levels of water and tap them with a pencil.
Blow air over bottles of four different sizes.
Use four identical plastic bottles filled with different amounts of sand as shakers.
Pupils could also choose something for themselves.
Ask your pupils to think about and then carry out investigations to find out:
- How are you making the sounds?
How can you make the sound higher? lower? louder?
Each group records their results on a poster, including any patterns that they found. They also discuss:
- how well they have worked together;
- how they might organise themselves next time;
- how happy they are with the group ideas on changing sounds.
Groups could swap equipment if they want to do more experiments, but make sure that they have first recorded their results on the poster or in their book.
You may like to use Resource 3: Ideas pupils may have about working in a group to help your pupils with their discussions at the end of the experiment.
3. Exploring musical instruments
For centuries, people have developed musical instruments using local materials. These all involve plucking, hitting, blowing or rubbing to create vibrations of different pitch and volume. Many instruments also have a box of vibrating air to amplify the sound (make the sound louder). Try to find out about traditional instruments in your community –is there anyone who could come into your classroom and show their instrument? Read about one female singer from West Africa using traditional musical instruments in Resource 4: Ami Koita.
The Key Activity and Case Study 3 involve pupils exploring musical instruments –either from the community or those pupils have made themselves. In both cases, pupils develop criteria to judge the instruments. In the activity, you could also ask your pupils to develop criteria to judge their presentations.
Inviting local musicians into the school to demonstrate their instruments and to hear the pupils’ instruments would be a wonderful way to end the activity. (SeeKey Resource: Using the local community/environment as a resource)
Case Study 3: Involving pupils –what is best to buy?
Mrs Osei involved her class in the choice of a musical instrument for the school choir. She planned a research project where pupils researched locally available musical instruments, such as the balafon (xylophone), musical bow, drums and trumpets. The class suggested the kinds of questions that would have to be asked, the points to be awarded for each answer and how they would report back. These questions were put together to form a questionnaire. (See Resource 5: Ideas for judging each instrument ) Pupils worked in small friendship groups for homework to get answers to their questions.
To analyse the scores, Mrs Osei made a table on a large manila sheet (also in Resource 5 for hints). As the different groups brought in their reports, the scores were entered into the table. These points were all totalled up and, based on the instrument with the highest total score, the class decided to buy the small locally made wooden balafon (See Resource 6: Traditional musical instruments .)
Key Activity: Making musical instruments
Organise your class into groups of three (or more if you have a very large class).
Tell them that each group will make their own musical instrument, using what they know about changing sounds.
Ask each group to draw a rough diagram, showing their instrument and a list of what they will need to make it.
Ask each group to organise themselves to bring in materials from home.
The next day, give time for each group to make their instrument and prepare a three-minute presentation to:
- show the different sounds the instrument makes (louder/softer, higher/lower);
- try to explain how the instrument makes the different sounds.
Depending on the size of your class, bring groups together or into four larger groups.
With the class (or large group), develop a set of criteria to judge the instruments. Make a list of these criteria on the board. Discuss whether they are all of equal importance. (See Resource 5 for hints.)
Resource 1: Sound story
![]() Teacher resource for planning or adapting to use with pupils
Teacher resource for planning or adapting to use with pupils
The swallowing drum
A small girl, an only child, lives with her parents in a certain village. Because of a terrible unspoken local danger, she is never let out of her parent’s sight nor allowed to go and play with other children. She feels like a prisoner in her own home and longs to be independent like the other children.
One day, she gets a chance to slip away when her father falls asleep after lunch. The mother has gone to work in the fields and the girl hopes to surprise her there. She is not certain of the way and when the path splits into two, she chooses the cool path by the river rather than the hot path over the hill.
After a while she comes across a small little drum, beating itself …
‘Bim! Bim! Bim! Little Girl! Little Girl, go back home.’
But the little girl is curious and she carries on regardless. Around another corner she comes across a middle-sized drum beating itself …
‘Bam! Bam! Bam! Little Girl! Little Girl, go back home.’
But the little girl is curious and she slips past the drum and carries on. Further on, what do you think she finds? Yes, A big drum beating itself …
‘Bom! Bom! Bom! Little Girl! Little Girl, go back home.’
Really curious, the little girl ignores this warning too. The path comes to the edge of the forest and as she enters the dark forest the trees close behind her.
She can only go on now – but there is a terrible drumming noise in the forest. She comes to a clearing and faces a truly enormous drum. It is the swallowing drum – the terrible danger that her parents were so terrified might get her. She gets swallowed by the drum and, as she falls to the bottom, other people and animals rush up asking her if she has anything sharp with her. But she hasn’t. All she can see as she looks up from her new prison is the slit of the mouth of the drum and a huge wooden heart beating …
Ba-boom! Ba-Boom! BA-BOOM!
Back home her parents are devastated when they discover her missing and see where her footprints lead. The father weeps and cries and covers himself with ashes from the fire. But her mother doesn’t rest – she goes around the village borrowing sharp things and she stays up the whole night stitching them carefully into the inner lining of her cloak.
The next day she sets out for the forest. She sees no drums but as she enters the forest, the trees close behind her.
She comes to the clearing and faces the terrifying swallowing drum, who asks, ‘Yes fat woman! What do you want!’ Before she can answer, she too is swallowed and the people rush to her asking if she has sharp things. But she first asks to see her daughter and then she shows them the sharp things. The men in the drum stand against the wall of the drum and the women stand on their shoulders. The young boys climb up with the sharp things and begin to chop away at the wooden heart…
BA-BOOM! Ba- boom! Ba-boom, b-bm
When the heart stopped beating, they chopped their way out of the drum, ran back to the village to fetch help and the dangerous swallowing drum was chopped into pieces. The people in that village had good firewood for more than a year.
Resource 2: Sound waves – teacher notes
![]() Background information / subject knowledge for teacher
Background information / subject knowledge for teacher
What is sound?
Sound is produced whenever an object vibrates. The object could be a string on a guitar, a flat surface such as a drum skin, the diaphragm in a loudspeaker or even the vocal cords.
Sound transfers energy away from the vibrating object, and it needs something to travel through. Sound cannot travel through a vacuum – in space, no one can hear you scream!
Speed of sound
Sound travels at different speeds through different substances. In general, the denser the substance, the faster sound travels through it. Sound travels at 5,100 m/s through steel, 1,480 m/s through water and 330 m/s through air. This is much slower than the speed of light.
Light travels nearly a million times faster through the air than sound does. This is why you hear the thunder clap after you see lightning in a thunderstorm, and why the sound of someone hammering some distance away does not match the hammer blows.
Echoes
Sound can reflect from the surface of an object. This is called an echo. Hard surfaces reflect sound better than soft surfaces.
Loudness
The loudness of a sound depends upon the size of the vibrations. Big vibrations transfer more energy than small vibrations, so they are louder.
Pitch
A sound can range from a high to a low pitch (high to low note). The pitch of a sound depends on how fast the original object is vibrating. If there are lots of vibrations per second, the frequency is high and the sound has a high pitch. If there are few vibrations per second, the frequency is low and the sound has a low pitch.
Checkpoint
The table summarises some features of sound waves and vibrations.
| Size of the vibrations | Number of vibrationsin each second | |||
| Small | Big | Low | High | |
| Sounds like | Quiet | Loud | Low pitched | High pitched |
| Example | Whispering | Shouting | Man talking | Child talking |
Hearing
We hear because sound waves enter the ear and cause the eardrum to vibrate. Three small bones in the inner ear carry these vibrations to the cochlea (pronounced ‘kok-lee-a’). The cochlea contains tiny hairs, which send messages to the brain when they vibrate.
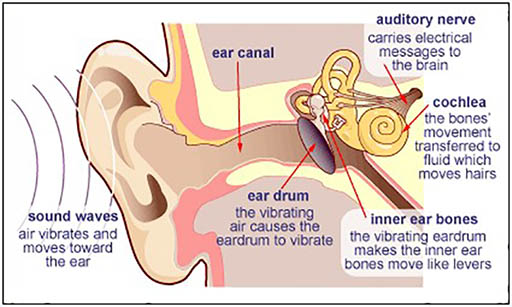
A diagram of the ear
Hearing damage
Our hearing is easily damaged and as we get older we find it more difficult to hear very low or very high sounds. The three small bones may join together as we age, so they are not so good at passing along the vibrations from the eardrum to the cochlea.
Loud sounds can eventually damage our hearing. If the eardrum is damaged, it may repair itself again, but if the cochlea is damaged, the damage is permanent. People with damaged hearing may find it difficult to follow conversations and may need a hearing aid.
Resource 3: Ideas pupils may have about working in a group
![]() Teacher resource for planning or adapting to use with pupils
Teacher resource for planning or adapting to use with pupils
Choose one of these methods to help your pupils talk about how they worked together in a group.
1. Write each of the following words on to a card, or on the board. Give each group of pupils a set of cards to help them develop three sentences to describe how they worked. They should try to use some of these words in their sentences:
decide, persuade, tell, ask, argue, describe, agree, opinion, listen, share, organise, lead,
2. Write these statements onto a set of large cards (keep these for different group work activities). Display the statements around the room and ask each group to choose the statements that describe the way they worked.
Encourage your pupils to add further statements.
- Everyone in the group had a chance to speak.
- Everyone in the group was encouraged to speak.
- Not everyone spoke during the activity.
- We reached agreement in our group.
- We listened carefully to each other.
- Sometimes we found it hard to listen to others without interrupting.
- Not everyone in the group agreed with our way of drawing the poster.
- Not everyone in the group contributed to the poster.
- Everyone in the group was able to add to the poster.
3. Choose one or more of these questions. Read it/them out to your class and ask each group to discuss the question(s) in their group for five minutes. Ask for feedback from some of the groups.
- How did sharing your ideas help you?
- Did everyone have a chance to speak?
- Did you encourage each other to share your ideas?
- Did you listen carefully to each other?
Resource 4: Ami Koita
![]() Teacher resource for planning or adapting to use with pupils
Teacher resource for planning or adapting to use with pupils
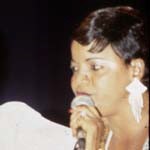
Ami Koita
Since ancient times, Manding griots have sung histories, lineages and praise songs with grand style and devastating conviction. Of Mali's many jalimusolu-female griot singers, none has earned more adulation than Ami Koita, a role model for all Mali's contemporary women singers. Koita's big, vibratoless voice and her dazzling lineup of nimble-fingered instrumentalists make her songs of pride, love, tragedy and joy accessible even without translation from her native Bambara. Her traditional acoustic work surrounds her voice with an irresistible chattering of melodies from balafon (wooden xylophone, see Resource 6), kora (21- string harp), ngoni (small, banjo-like lute) and guitar, which plays in the lightning-quick manner of the other instruments. Recently, Koita has also branched out to record with electric instruments, even collaborating with Tabu Ley and Afrisa, one of the great old bands of Zaire. ‘I am proud to be a griot,’ sings Koita over the chiming of Zairean guitars. ‘I become a bird and fly above the people.’ Brightly coloured traditional gowns spreading wing-like below her gesturing arms reinforce the image.
Adapted from: http://www.afropop.org/ explore/ artist_info/ ID/ 5/ Ami%20Koita/ (Accessed 2008)
Resource 5: Ideas for judging each instrument
![]() Teacher resource for planning or adapting to use with pupils
Teacher resource for planning or adapting to use with pupils
1. These are some questions pupils could ask about each instrument. Brainstorm a list of questions with your class.
What is it made of?
How old is it?
How robust (not easily broken) is it?
Does it need to be kept in a special place?
How easy is it to carry around?
How do you make a sound?
How do you make the note higher? lower?
How do you make a quiet sound? loud sound? Is this easy to do? Can you hear the quiet sound?
What is vibrating?
How easy is it to learn to play?
How much does it cost?
2. Decide which of these questions are important when judging the instrument. We suggest that pupils in your class choose a maximum of five criteria/questions to judge each instrument.
3. For each of the five criteria or questions your class has chosen, develop a scoring scale out of 5. The maximum for each instrument would then be 25.
4. As each group presents their instrument, the class gives them scores for each criterion.
5. These scores could be recorded on the chalkboard or a large sheet of newsprint on the wall.
Each group should summarise their work by saying:
The final score for our instrument is:
Our instrument is a good choice because … (strengths)
Our instrument might not be a good choice because … (difficulties and problems with the instrument)
Resource 6: Traditional musical instruments
![]() Background information / subject knowledge for teacher
Background information / subject knowledge for teacher
The balafon (or ‘bala’) is a resonated frame xylophone of West Africa. It is a lamellophone with wooden keys. There are many different balafons in Africa. They fall into two main categories: the free-key type, in which the keys are independent of one another and of their supports, and those with fixed keys, in which the keys are permanently strung together and attached to their support. In the free-key balafons, the loose keys are assembled on temporary supports; for example, the player’s legs, banana-tree trunks, straw bundles or logs padded with grass. The fixed- key balafons are generally mounted on or suspended from a frame, with or without calabash resonators.

http://www.africaclub.com/ balafogr.jpg (Accessed 2008)
The keys themselves are suspended over the resonators by means of two lines of twisted leather cord, which pass through two ‘vibration knots’. Each key has its own particular length, width and thickness. The keys are struck with two beaters with rounded ends, formed by winding the tips with rubber strips.
Playing techniques
The balafon reproduces the timbres and tonalities of the spoken language. A tonal language is one expressing difference of meaning by variation of tone. Thus, the same word pronounced at different pitches will have a different meaning.
If the musician plays and sings:
- the balafon repeats a phrase that has been sung; or
- the singing repeats a phrase that has been played; or
- the same phrase is played and sung simultaneously. In this case, as the balafon playing is faster than speech, the musician performs melodic phrases to fill in. For this, each interpreter develops his own particular formulas. These formulas may sometimes be as simple as the repetition of a single note.
If the musician plays without singing, he expresses himself in a coded manner by transferring his speech to the balafon.
Balafons are played alone or in pairs, with or without accompaniment from other instruments. Some pieces may be played by two, or even three or four players on the same instrument. One or two of the keys of the balafon are sometimes struck rhythmically with the handle of the beater or with wooden sticks.
Adapted from: http://www.masabo.com/ balafon.html (Accessed 2008)
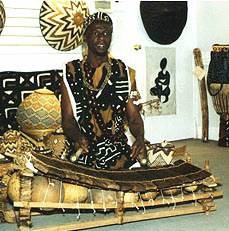
Yusuf Ahmed, Balafon Musician from N. Ghana with Balafon
http://portalmarket.com/balafon.html(accessed 22/06/07)
Acknowledgements
Grateful acknowledgement is made to the following sources:
Photographs and images
Resource 2: Sound waves – teacher notes: Adapted from http://www.bbc.co.uk (Accessed 2008)
Ami Koita: Adapted from http://www.afropop.org/ explore/ artist_info/ ID/ 5/ Ami%20Koita/ (Accessed 2008)
Balafon: http://www.africaclub.com/ balafogr.jpg (Accessed 2008)
Yusuf Ahmed, Balafon Musician from N. Ghana with Balafon: http://portalmarket.com/ balafon.html (accessed 22/06/07)
Text
Resource 6: Traditional musical instruments: Adapted from http://www.masabo.com/ balafon.html (Accessed 2008)
Every effort has been made to contact copyright holders. If any have been inadvertently overlooked the publishers will be pleased to make the necessary arrangements at the first opportunity.
Section 3 : Investigating electricity
Key Focus Question: What sorts of practical activities with electricity can you do in your classroom?
Keywords: electricity; circuit; electromagnets; models; investigation; group work
Learning outcomes
By the end of this section, you will have:
- gained confidence to do practical activities in your classroom involving electricity and improved your understanding of the dangers associated with electricity;
- used rotating group work;
- supported your pupils in undertaking investigations in small groups.
Introduction
This section deals with electricity. This topic often frightens teachers –you may think it is complicated, difficult or even dangerous. But there are straightforward, practical activities that help pupils make sense of an important aspect of modern life.
We suggest you use small group demonstrations and investigations to help pupils understand two key ideas:
- Energy cannot be created or destroyed, only changed from one form to another. What can we change electrical energy into?
- An electric device will only work when there is a complete circular path for the electric current.
1. Working in groups
It is very important that pupils are given opportunities to think and behave scientifically. This can only happen with practical, hands-on activities. Pupils will be challenged and enjoy working in groups to discuss and discover things for themselves. It often helps their thinking if they use models as well as real items.
Activity 1 uses cut-out shapes to help pupils understand the need for a complete circuit in an electrical device. Case Study 1 shows how one teacher extended this activity and supported her pupils in their own investigations about electric circuits. This type of encouragement and recognition is very important to pupils.
Resource 1: A careful look at the torch bulb shows you how you can extend this work and lead pupils to a clearer understanding that electricity travels in a complete circuit inside a torch bulb.
You may also find it helpful to read Resource 2: Safe ways to investigate electricity , which explains the dangers of electricity but encourages you not to be frightened by the topic.
Case Study 1: Pupil-led investigations
When teacher Florence in Uganda tried Activity 1 with her class, she found that some pupils took the investigation further. They noticed that the metal tip of a ballpoint pen will also allow the bulb to light when it is placed between the top of the battery and the bottom of the bulb. She watched as they investigated other materials; a wooden pencil did not light the bulb, nor did a piece of cardboard, but the end of a metal spoon worked.
Florence gave them the chance to report on their own investigations and encouraged them to repeat and do further investigations. Later, she took the activity further to explore circuits and switches.
She asked her pupils to use their bulbs and cells (and other bits of scrap materials) to design a circuit so that when a visitor presses a switch a light comes on. Her pupils used paperclips, small pieces of wood, card and metal from cans to make really imaginative switches.
Then, some of the older pupils made model rooms from cardboard boxes and scraps of material and put two or even three lights in the room with a switch. One group even managed to add a warning light, which came on when a thief opened the door of the model room. Florence displayed all these models in her classroom and encouraged other teachers to come and look at them while her pupils explained how they worked. Her colleagues were very impressed at what the pupils had achieved and everyone enjoyed the afternoon.
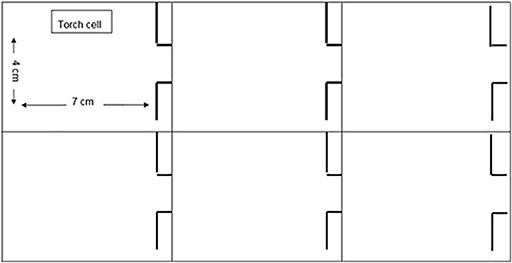
Activity 1: Lighting a torch bulb
Each group of pupils needs one live torch cell, one working torch bulb, two 15-cm lengths of plastic-coated thin copper wire, at least five life-size cut-out shapes of a torch cell and five cut-out shapes of a live bulb. (See Resource 3: Lighting a bulb – templates and discussion –it is quite time consuming to cut out the shapes; you could ask older pupils to do this for you before the lesson.) They also need a blank sheet of card or paper and a small amount of glue. (Make sure all cells and bulbs are working before the lesson.)
Hand out a bulb and a cell to each group. Ask: ‘What do we get from these?’ Can they show this? What else do they need?
Hand out the cut-out shapes and the wire. Ask pupils to investigate different arrangements to see if they can light the bulb. Successful arrangements are recorded by gluing the shapes down and drawing in the position of the wire.
Tell them: ‘There is more than one arrangement that will light the bulb.’ Encourage them to find five possible different arrangements.
The groups report back at the end. ( Resource 3 discusses this activity in more detail and shows you the five possible arrangements).
2. Rotating group work
Electricity provides more than light. Think of the modern electrical appliances we use. We get heat from electricity (stoves, irons, etc.). We get movement (mower, fan etc.). Radios and TVs give us sound. Some pupils may even know that magnetism is also involved in some way with electricity.
You need to think about how you can show these electrical effects to pupils. One way would be to get pupils to be investigators in their local community; they draw up lists of all the effects and uses of electricity that they see around them. Or they could cut out pictures of appliances from adverts in old magazines and newspapers to make a display. Can you think of other ways to make pupils aware of different uses for electricity?
In Activity 2, your pupils move round a number of workstations in your classroom to find out about the effects of electricity; this is an example of rotating group work. You will need to think about how you ask the pupils to record what they have learned in this activity –will they create a poster in each group? Will you ask each group to present their ideas about one workstation? Read Case Study 2 to see how one teacher carried out this activity.
After the activity, ask yourself if your pupils enjoyed this way of working. How could you improve it next time?
Case Study 2: Reflecting on rotating group work
Mrs Yargawa, an experienced primary science teacher, decided to try rotating group work using a double period and ten groups of five pupils. She planned ten workstations to show the effects of electricity: two for the ‘heat’ activity, two for ‘movement’, two for ‘sound’, two for ‘magnetism’ and two for ‘light’.
The day before the lesson, she made ten workcards (see Resource 4: Workcards) and packed the apparatus for each workstation in a shoebox. She appointed a group leader for each group and arranged a meeting with the leaders before the lesson so they were well prepared.
Reflecting on the lesson, Mrs Yargawa was very pleased with the way it went. The groups moved from station to station every ten minutes, and the leaders ensured that everyone took part. She had asked the pupils to write their own notes on what they had learned from the lesson and to comment on their experience of rotating group work. She was impressed with how much the pupils gained, but she was even more impressed with the mature way they talked about the approach she had used.
Activity 2: Rotating group work
Read the workcards ( Resource 4), which give details of workstations, each to demonstrate one effect of electricity. Look at the equipment needed, and decide how many workstations you will have for each card. Prepare the equipment and label it clearly.
- Divide your class into groups to match the total number of workstations. (If you have a large class and only one workstation for each effect, you may need to do the activity with half your class and then repeat it with the other half).
- Explain to your class how to set up each workstation and read through the workcard for each workstation with the pupils.
- In each group choose a leader. Gather the leaders round you and tell them they are responsible for making sure that their group works in an orderly way at each workstation and that everyone in the group joins in. When you call ‘stop’ the leaders will move their group to the next workstation until they have completed all five.
- Tell the leaders to return to their groups and to start working.
- After ten minutes call ‘stop’. Each group puts the equipment back neatly and moves to another workstation. Do this again after another ten minutes, and so on, until everyone has looked at all five workstations.
- Make sure that each group records their observations at each workstation.
- At the end, ask each group to present their observations and ideas from one of the workstations.
3. Planning investigations
The Key Activity builds on the ideas of energy change and the need for complete circuits. In it, pupils work in small groups to explore one effect of electricity –electromagnetism. This type of activity encourages pupils to think about different scientific processes –planning, observing and recording. After the activity, pupils could think of uses for their electromagnets (see Resource 5: Electromagnets for ideas).
Case Study 3 shows how a teacher with very limited resources encouraged her pupils to think through the processes involved in an investigation like this.
Case Study 3: Investigating electromagnetism with limited resources
Mrs Popoola works in a rural school with little equipment. She likes doing practical demonstrations with her pupils and is always searching through broken devices in the village to find equipment to use with them.
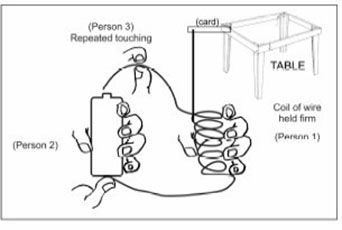
One day, she took apart an old buzzer to use as an example of an electromagnet. She set it up on her table and gathered her pupils around her. She showed them that she was using electricity to make a magnet. She then asked them each to discuss with their partner ideas for how she could make the magnet stronger –what could she change? How could they measure the strength of the magnet?
After a few minutes, Mrs Popoola asked pupils to share their ideas and she recorded the different suggestions on the chalkboard. Some pupils thought that if she used more torch cell batteries the magnet would get stronger. Others suggested using a different material in the core. Other ideas included longer wire, more coils round the core and using two strands of wire. Mrs Popoola then asked pairs of pupils to come out and try one of the ideas. They recorded the results in a table on the board. The next pair tried a different idea, and so on, until they had tried all the ideas. Her pupils copied down the table with the results and then, working with their partner, tried to write a sentence to summarise what they had found out.
Mrs Popoola was very pleased with the way her class listened to each other but she realised that next time she needed to make sure that equal numbers of boys and girls came out to do the experimenting.
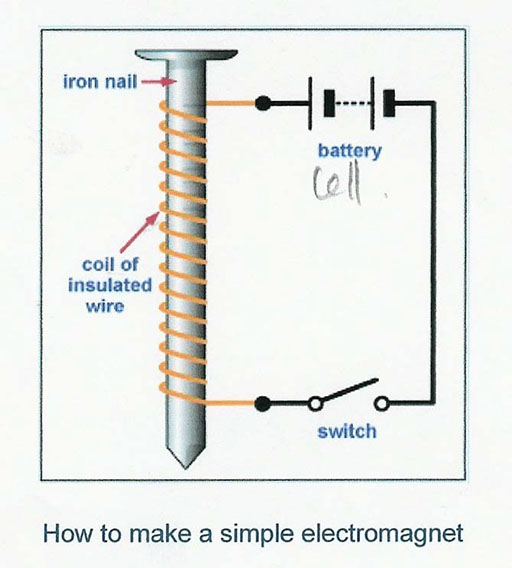
Key Activity: Investigating electromagnets
Gather your class around you and brainstorm the concept of ‘magnetism’. (See Key Resource: Using mind maps and brainstorming to explore ideas .) Where have they seen magnets being used? What sorts of substances are magnetic? Can we make magnets from electricity? This is called an ‘electromagnet’. Record their thoughts on the chalkboard or on large newsprint on the wall.
- Organise your class into small groups of between four and six pupils. Give each group: a steel pin; a working 1. 5V torch cell; some small pins or paperclips; and 50 cm of thin insulated copper wire.
- Tell the groups you are setting them a problem. They have to use the equipment to make an electromagnet that will pick up as many pins as possible. (See Key Resource: Using investigations in the classroom.)
- Encourage pupils to investigate how to make an electromagnet with the equipment.
- When they have solved the problem, ask pupils to draw a diagram to show their solution.
Resource 1: A careful look at the torch bulb
![]() Teacher resource for planning or adapting to use with pupils
Teacher resource for planning or adapting to use with pupils
First make your teaching aid – a model torch bulb, and read this information about a torch bulb.
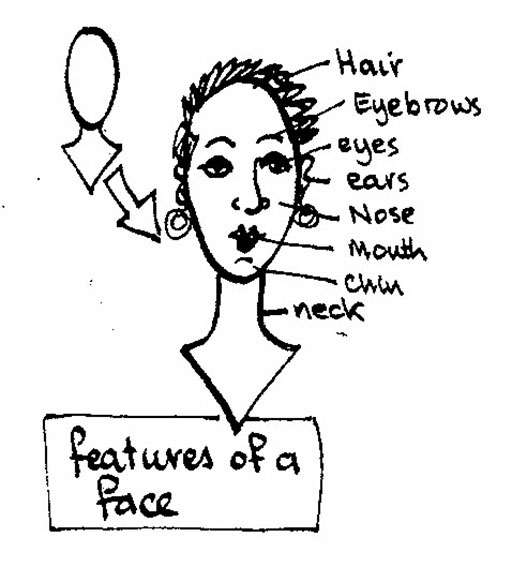
With younger pupils, we suggest that you draw in the features of a face to explain what we mean by features.
Now tell them that the class will do the same thing with the torch bulb.
Organise your class into groups of three/four:
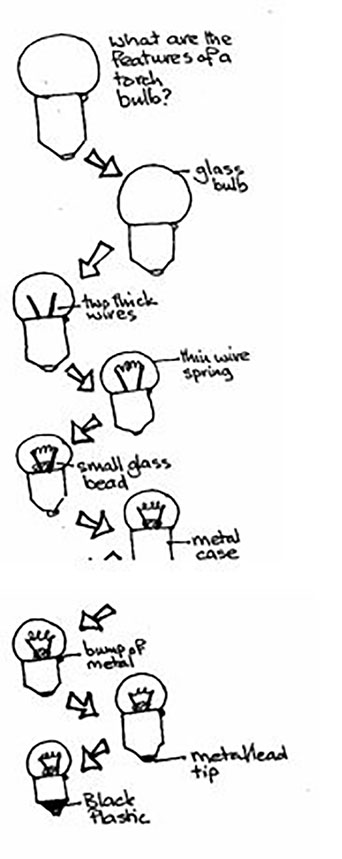
Give each group of pupils a torch bulb and ask them to look at it carefully.
- What are the ‘features’ or parts of a bulb?
- Give them a few minutes to observe carefully.
- While they do this, draw the outline of a torch bulb on the board. (Or you can have a ready prepared drawing, which you put up at this point. You can also have labels, written on cards, ready for when they tell you what they observe.)
- When they seem ready, ask them to tell you what they see. You can be open to any suggestions and fill in the picture in a random way. Or you can decide to be systematic and guide their reporting by pointing to a place on the drawing and asking a specific question. As they answer, draw in and label the part – the notes below show you how to do this.
Recording observations in an ordered way
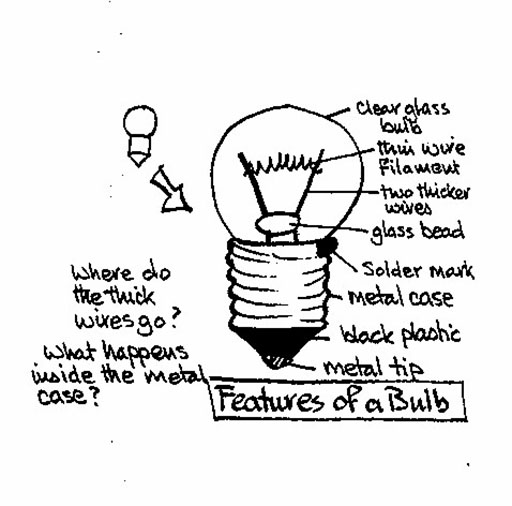
- Point to the round glass part. What do we see here? Answer: Glass ball
- What do we see inside the glass ball? Answer: Two thick wires
- What do we see between the two thick wires? Answer: a thin wire, like a curly hair, called a filament.
- What do we see between the two thick wires near the base/at the bottom? Answer: A small glass bead
- What is below the glass bulb? Answer: A metal drum/case/cylinder
- What can we observe on one side of the metal case, near the top? Answer: A little lump of metal
- What do we observe right at the bottom of the torch bulb? Answer: A metal/lead tip
- What do we observe between the metal case and the metal tip? Answer: Black plastic
- Is there anything else you have observed? Answer: Some may notice writing on the metal case.
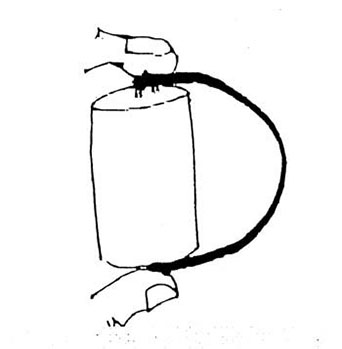
You also need to make a large 2-D (flat) model of a torch bulb for the part of the Activity where pupils observe a bulb carefully. You will also use this model when you conclude the Activity. 1. Cut out the large bulb shape. 2. Cut out the shape for the metal case of the bulb. 3. Glue the bottom of the bulb to the right side rectangle so that it fits over the shaded triangle. 4.Use a large black crayon or koki-pen to draw the thick wires, as shown. 5.Cut out a small oval bead shape from a coloured picture in a magazine and paste it over the black lines you have drawn (this represents the glass bead that prevents the two thick wires from touching). 6.Make the filament from a coil of thin wire, and fasten it across the ends of the thick black lines. One way is to stick the ends of the coil of wire through the cardboard and to use sticky tape on the wrong side (back) to fasten them down. 7.Fold the left-hand side of the base of the bulb over the right-hand side. Now your model of a torch bulb is nearly complete. 8.Use blobs of Prestic to represent the metal solder mark on the side of the case, and the bottom metal tip of the torch bulb. 9. Finally, shade the trapezium shape between the metal case and the metal tip of the torch cell. This shows the layer of black plastic that separates the metal cylinder from the metal tip. |  |
This model is specially designed so that you can demonstrate the arrangement of the inner parts of the bulb. What happens inside a light bulb will always be a strange mystery to pupils unless they have thought about what might be the case, and then had the chance to find out. It is possible to use a hack-saw blade to carefully cut open the metal case of an old screw-in bulb. Then the arrangement and direction of the wires is clear.
A model light bulb
Now show them the model you have made of the torch bulb. Ask: What do they think they would find, if they could open up the metal case? What would be inside? Where do the two wires go? Give them some time to think.
What do they predict will be the arrangement of wires that are hidden by the metal case?
After a while, you can open up your model and show them how one wire is joined by solder to the metal case, and how the other goes to the metal tip at the bottom of the torch bulb.
Now use your model to demonstrate that there is a complete pathway, or circuit, for the electricity when the bulb lights. The electricity is free to travel in a complete pathway. It travels from the cell, through the wire to the metal case, and then to the one thick wire. From there, it goes through the thin wire filament. It causes the filament to light up, and goes back down the other thick wire to the torch cell again.
Adapted from: Umthamo 3, University of Fort HareDistance Education Projectpagination layout-hint="pagebreak"
Resource 2: Safe ways to investigate electricity
![]() Background information / subject knowledge for teacher
Background information / subject knowledge for teacher
Two teachers discuss the dangers and safety of electricity with a science advisor and they explain why they are nervous about dealing with electricity in the classroom.
She assures them that the 1. 5V batteries and light bulbs that we find in a simple torch are quite safe.
One teacher asks: ‘When is electricity dangerous?’ The specialist explains that the electricity supplied to homes is 220 volts, so it is hundreds of times more powerful than a battery. The high-tension wires that carry electricity across the country are thousands of times more powerful.
So the teachers realised that they could safely conduct electricity experiments in the classroom.
The specialist advised them to make sure that they warned the children of the true dangers of electricity, and she left them some examples of safety pamphlets that are available locally.
The two teachers decided they would also look in the local newspapers for articles about electricity-related accidents and get their pupils to discuss both the causes and the consequences of these tragedies.
Here is one example they found:
Eight feared electrocuted in Imo
from Charles Ogugbuaja, Owerri
About eight persons are feared dead in a massive electrocution that occurred yesterday in Orji, near Owerri, the Imo State capital.
According to an eyewitness, the accident happened when a small truck carrying a metal kiosk suddenly ran into a high-tension wire. When the kiosk touched the high-tension wire, the many men in the vehicle were electrocuted.
One of them, who was thrown out of the vehicle by the electrocution, died instantly. It is believed that the other men died while receiving treatment.
The public affairs manager of the Power Holding Company Nigeria (PHCN), Owerri district, Mr Osita Ugwuafor, confirmed to The Guardian yesterday that though he was unable to visit the hospital to check the story, he had heard about the deaths of two victims.
‘We are yet to get full details, but [an] unconfirmed source told us that two died earlier. I don't know the state of others because the authorities were yet to allow people to see them,’ he said.
Adapted from: The Guardian, http://www.guardiannewsngr.com/news/article17/230107 (Accessed 19/06/07)
Resource 3: Lighting a bulb – templates and discussion
![]()
![]() Pupil use / Teacher resource for planning or adapting to use with pupils
Pupil use / Teacher resource for planning or adapting to use with pupils
Templates of bulb – for cutting out
Templates of batteries for cutting out
Discussion notes for Activity 1
Be patient. Let your pupils struggle. Remember that ‘easy come’ knowledge, becomes ‘easy go’ knowledge. Don’t interfere. They will be determined and persist. They may eventually work it out by trial and error. Then they will try to make sense of this and ask: ‘What’s going on here?’
You will see that most young children first think it will light if they just touch the bottom of the torch bulb to the top of the torch cell, metal to metal. They look quite puzzled when it doesn’t work.
They think, ‘No! But it needs some wires! Or a wire!’ Then they link a piece of connecting wire from the base of the cell to the top of the cell. It still doesn’t work.
Watch to see what strategies your pupils adopt.
The bottom of the torch bulb must contact the top of the torch cell, and the wire connects the bottom of the cell to the metal side of the bulb.
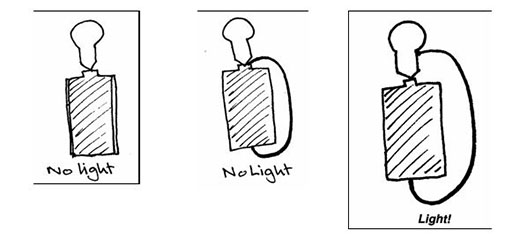
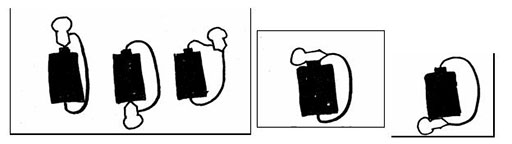
The five arrangements
They will probably get these on their own, by trial and error. Give them time and keep encouraging them.
One or two groups may realise that it will still work if the bulb is laid on its side.
Adapted from: Umthamo 3, University of Fort Hare Distance Education Project
Resource 4: Workcards
![]() Teacher resource for planning or adapting to use with pupils
Teacher resource for planning or adapting to use with pupils
WORKCARD 1: HEAT What you have:
What you do: | |
 |
|
WORKCARD 2: MAGNETISM What you have:
What you do: | |
 |
|
| WORKCARD 3: MOVEMENT What you have:
What you do: | |
 |
|
WORKCARD 4: SOUND What you have:
What you do: | |
|
WORKCARD 5: LIGHT What you have:
You have already seen how we get a bulb to light and you have already investigated the structure of a light bulb. What you do: | |
|
Resource 5: Electromagnets: Teacher notes
![]() Background information / subject knowledge for teacher
Background information / subject knowledge for teacher
A magnetic field is produced when an electric current flows through a coil of wire. This is the basis of the electromagnet. We can make an electromagnet stronger by:
- wrapping the coil around an iron core;
- adding more turns to the coil;
- increasing the current flowing through the coil.
The magnetic field around an electromagnet is just the same as the one around a bar magnet. It can, however, be reversed by turning the battery around. Unlike bar magnets, which are permanent, the magnetism of electromagnets can be turned on and off just by closing or opening the switch.
Using electromagnets
Many objects around you contain electromagnets. They are found in electric motors and loudspeakers. Very large and powerful electromagnets are used as lifting magnets in scrapyards to pick up, then drop, old cars and other scrap iron and steel.
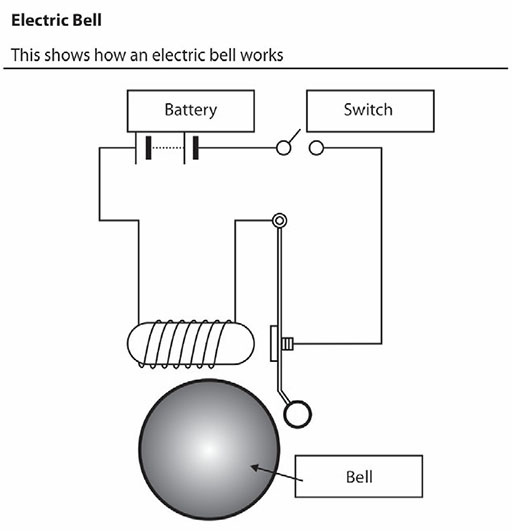
Electric bell
Electric bells also contain an electromagnet.
- When the current flows through the circuit, the electromagnet makes a magnetic field.
- The electromagnet attracts the springy metal arm.
- The arm hits the gong, which makes a sound and the circuit is broken.
- The electromagnet is turned off and the springy metal arm moves back.
- The circuit is complete again.
- The cycle repeats as long as the switch is closed.
Original source: http://www.bbc.co.uk/ science/ (Accessed 2008)
Acknowledgements
Grateful acknowledgement is made to the following sources:
Photographs and images
Resource 1 : A careful look at the torch bulb: Adapted from Umthamo 3, University of Fort Hare Distance Education Project
Resource 3 : Lighting a bulb – templates and discussion: Adapted from Umthamo 3, University of Fort Hare Distance Education Project
Electric bell: http://www.bbc.co.uk/ science/ (Accessed 2008)
Text
Eight feared electrocuted in Imo,from Charles Ogugbuaja, Owerri: Adapted from The Guardian, http://www.guardiannewsngr.com/ news/ article17/ 230107 (Accessed 19/06/07)
Every effort has been made to contact copyright holders. If any have been inadvertently overlooked the publishers will be pleased to make the necessary arrangements at the first opportunity.
Section 4 : Looking at light and shade
Key Focus Question: How can we integrate science with other areas of the curriculum?
Keywords: light; shadow; reflections; patterns; evaluate; prediction; investigation
Learning outcomes
By the end of this section, you will have:
- supported pupils in carrying out their own investigations;
- encouraged your pupils to develop the science skill of prediction;
- developed your own skills and confidence in integrating different areas of the curriculum.
Introduction
As a teacher of science, you need to help your pupils look carefully at things often taken for granted. Light, dark, shade, shadow, colour and reflection are very much part of our daily lives, but we often pay little attention to the science involved.
This section looks at how light behaves on different surfaces and objects. It suggests using active learning to help pupils understand how light is used for different purposes and develop their skills at prediction. It also builds on the links between science and the arts and technology. This should help pupils develop an understanding of applications of science.
Note: Resource 1: Safety advice for teachers has important safety advice relating to this topic.
1. Exploring Shadows
Start by investigating light and shade for yourself, using pictures from magazines or photographs. Which parts of the picture stand out because they are directly in the light? Where do you see shade or shadows? Can you work out where the light source is coming from? When do we see a silhouette (the dark outline of an object or person)? Try this out for yourself, perhaps with a colleague.
You are now investigating ‘cause’ and ‘effect’ with regard to light by considering the evidence you have observed and you are thinking scientifically. You might want to try this investigation with some of your pupils.
Case Study 1 shows how it is important for pupils to experience the science they are talking about. In Activity 1, you encourage your pupils to think about effects they observe and to recognise patterns when doing experiments with light.
Case Study 1: Categories of possibility
Busiku was going to read her class a story about a child losing their shadow. First, she planned for them to notice their own shadows more consciously. Outside in the morning sun they traced their shadows on large sheets of paper. The shadows were shaded in, carefully cut and proudly displayed and talked about in the class and at a school assembly.
The popular story of the lost shadow was reread many times. In this story, a child loses their shadow, but finds a way to get it back again. By now, the original shadows were getting a little damaged. ‘Yes! Yes!’ they clamoured when Busiku suggested they repeat the activity. This time she specifically took them out at noon. They, too, were losing their shadows! The pupils were confused and worried. Wisely, Busiku chose deliberately to leave them like that.
Over the next few weeks, the class talked about this experience, relating it to other observations. They slowly built up their understanding of what had happened to their shadows.
Activity 1: Exploring what can be done with light and shadow
With your class, discuss the creative game played at night using hands to make shadow images on a wall (see Resource 2: Wall shadows ). Set them a homework task of inventing images that can be made.
They should find out what they must do to make (cause) the shadow picture to be bigger or smaller (effect).
Pupils must come back tomorrow ready to demonstrate what they have found out.
Set up a way for pupils to demonstrate their wall shadows in the classroom.
Help them record what they have found out by:
- listing the different images they demonstrate (pupils do drawings to show the shape of their hands);
- writing down the ‘cause and effect’ findings.
If nobody mentions it, ask them to investigate what causes the effect that some images are blurred while others are clear?
Finally, use everyday objects (a cup, a comb, scissors, a hammer etc.) to pose problems. The pupils should only see the image and not the object or how it is held. Hold different objects in a range of positions to cast interesting shadows. Ask your pupils to work out what the object is and explain why they think this.
2. Using games and pictures to explore reflection
Reflection plays a large role in how we see or perceive light and colour. In fact, without reflection, we would see nothing. (See Resource 3: Information on light for more about the properties and behaviour of light).
In this part, we look at ways you can help your pupils explore what happens when light is reflected off different surfaces. Your aim should not be to provide them with the ‘right’ answers, but to give them a range of experiences that make them thoughtful and interested in this topic. In Activity 2, you encourage your pupils to observe carefully examples of reflection around them. Case Study 2 shows how one teacher’s work on reflection encouraged some pupils to become better artists.
Case Study 2: Thinking about the reflection of light
Mrs Moonga teaches a combined primary class. She had carefully collected and mounted on card good pictures from old magazines for language, literacy and communication work.
When she read the introduction to part one of this section, she realised she could use her pictures again for science. She could see so many different sorts of reflections in the photographs (not only shadows and shade). There was light glistening on the water, reflections in glass windows, the sparkle of shiny objects, as well as the glow on the skin of an apple. She realised that even the glint in someone’s eye is in fact a reflection.
First, Mrs Moonga explained to her class some of the facts she knew about light and reflection (see Resource 3).
Next, she gave them the pictures to look at and she was surprised at just how much detail they were able to notice. They were much more aware about the effects of light on different surfaces. She was totally amazed when some of the children, more interested than others in drawing, began to experiment with shading and drawing in the reflections on round objects so that their drawings became more realistic.
Activity 2: Investigating mirrors –reflections and reversals
Start with this game. In pairs, children take turns to act as the mirror image of the other. One pupil carefully leads, and the other copies (mirrors) the slow deliberate movements. Let pupils do this for a few minutes.
Discuss the experience. Do they realise that if the leader winks with the left eye, then the follower (‘mirror image’) winks with the right?
Reversals in reflections
Now use lipstick or eyeliner to mark the cheeks and hands of some pupils. Write ‘L’ or ‘R’ in the palm of each hand and the letters ‘AB’ on the right cheek and ‘OB’ on the left. Let them observe what they find when they look at themselves in real mirrors. Discuss their observations.
(More activities to stimulate speculation and investigation are outlined in Resource 4: Additional reflection activities ).
3. Using Science to solve a problem
We try to make sense of our world and then we use what we have found out to help us do things. It is the same with science. Results from investigations can sometimes be used to solve problems we face in life. This is linking science and technology and helps pupils to understand why it is important to study science.
The Key Activity (read this now) builds on knowledge gained from Activity 2 to solve a technological problem. How will you assess your pupils in this activity? After the activity, think about how your pupils reacted to this way of working –did they work well in groups? Would you do anything differently next time you do this?
In Case Study 3, a teacher encourages his pupils to use what they have found out from Activity 1 to plan and present shadow-puppet plays.
Case Study 3: A shadow-puppet play
Mr Mapushi projected shadows of mystery objects on a screen when doing Activity 1. Three pupils stayed behind to investigate and play with the items used. He watched them as he tidied the classroom.
They realised that the scissors or the pliers seemed to ‘speak’ if you moved the parts.
‘Hello, I am Mr Scissor-mouth. I am a very sharp guy!’
‘And I am Mr Heavy Hammer and I am going to beat you to death!’
They soon improvised a plot for a short play where Mr Hammer threatens Mr Scissor-mouth. But Mr Scissor-mouth is rescued by Mr Long-handle Pliers! Mr Mapushi gave them a chance to present their shadow-puppet play to the class.
The class became very interested in shadow puppets. Some pupils made cut-out puppet characters and discovered how to join parts that could move, using thin wire or dry grass-stalks for rods and supports. The way they used what they had learned in science amazed Mr Mapushi. They made the puppets appear larger and smaller, clearer and more blurred, and they were able to create different shapes with the same puppet by holding it at different angles to the screen. (See Resource 5: Ideas for creating shadow puppets).
Key Activity: Problem solving – applications-led science
Write this question on the board:
‘What is the problem if you are a short person standing near the back of a crowd at a soccer match?’
You can’t see! Ask your pupils how might you solve your problem? What about mirrors? Design something to solve the problem of seeing over something higher than you.
In groups of three/four, pupils design, make, compare and assess their own device to see around corners or over the top of a high obstacle.
Before they start, pupils need to discuss the following points in their groups:
How many mirrors will you need?
What angles will the mirrors need to be placed at?
How will you hold, fix or support the mirrors safely and securely?
Draw a plan for the device.
Then, before pupils start building their devices, discuss with them the criteria you will use to evaluate their devices. Draw up a list and display it during the activity.
Resource 6: Periscopes –ideas to get you started has design ideas for periscopes and some suggestions for evaluating the finished periscopes.
Resource 1: Safety advice for teachers
![]() Background information / subject knowledge for teacher
Background information / subject knowledge for teacher
Not looking at the sun
It is really important that you warn children to NEVER look at the sun directly. Tell them our eyes have built-in lenses that act like magnifying glasses and will focus the HEAT as well as the light energy from the sun onto the tender back of the eyeball, the retina, which helps us see. This heat can burn and destroy forever the cells of the retina, just like a magnifying glass can burn and destroy paper. (Using things like binoculars would be even more dangerous.) Tell them that nobody should ever take chances with something as precious as their sight.
Don’t get burnt
Most other direct light sources also involve quite intense heat. Only insects like fireflies and glowworms seem able to produce light without heat. Supervise children carefully when flames are involved. Also, make sure that matches are kept safe and used properly.
Electric shocks
All the usual necessary precautions need to be taken when electrical appliances are being used in the classroom as sources of light. (No damaged cables, no faulty connections, plugs properly wired, and no water near electricity).
Finally, it is not nice to think of any pupil getting hurt, burnt or injured, but make sure that you have thought about the possibility that it might happen to you or a colleague, and be prepared to take the proper first aid action.
Resource 2: Wall Shadows
![]() Teacher resource for planning or adapting to use with pupils
Teacher resource for planning or adapting to use with pupils
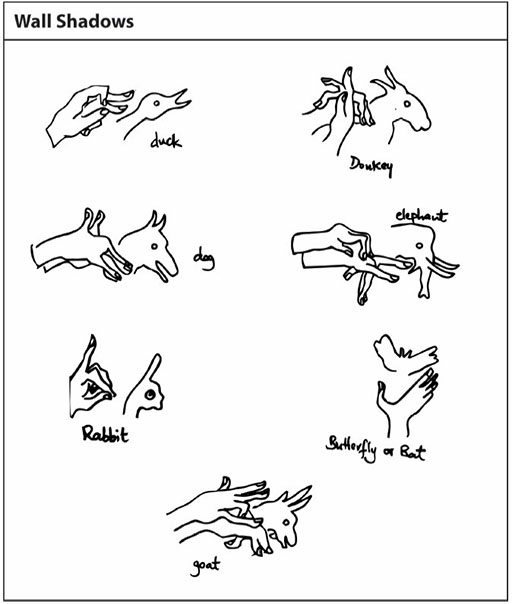
Resource 3: Information on light
![]() Background information / subject knowledge for teacher
Background information / subject knowledge for teacher
Sources of light
- The sun – major source of light and heat here on Earth.
- Stars – distant suns. We can just see the light of these but don’t feel the heat.
- The moon and planets – reflect the light of the sun.
- Lightening flashes during thunderstorms.
- Fire, flames, sparks, heated metals and glowing embers.
- Electric lights.
Colour
- When white light is refracted (bent) by certain transparent surfaces, even raindrops, it is split and reveals the seven colours of the rainbow.
- Coloured things absorb all the other colours but reflect their own colour. So a red car reflects only red light, red glass in a car’s brake light transmits only red light.
Light travels
- Nothing travels faster than light.
- Like sound, light travels as waves of energy. We talk of sound waves, but light ‘rays’ or ‘beams’ of light.
- Light rays generally travel in straight lines that radiate out from a source.
- We see things because light rays bounce off them (get reflected).
- Darkness is because of an absence of light. If there is no source of light to reflect off things we get blackness and cannot see anything.
What happens to travelling light?
- It passes straight through transparent things (glass, water, clear plastic, etc.).
- It partly passes through translucent things (wax paper, tissue, tinted or frosted glass, mist and clouds, etc.).
- Light is blocked by opaque things – this causes shade and shadows.
- Light is also reflected by opaque things.
- Very shiny surfaces (mirrors, polished metal etc.) reflect a clear image/picture.
- Dull surfaces scatter the light that they reflect.
- When light is neither transmitted or reflected, it is absorbed.
- When all the light is absorbed by anything we see it as black.
Mirror Images
- When we look into a mirror, the image we see seems to come from behind the mirror.
- A mirror image turns things otherwise (lateral inversion). That is why we can’t easily read a page held up to a mirror.
- Try to shake hands with your own image in a mirror – you will see that as you hold out your right hand, the mirror image ‘holds out’ its apparent left hand.
Resource 4: Additional reflection activities
![]() Teacher resource for planning or adapting to use with pupils
Teacher resource for planning or adapting to use with pupils
Are we really two-faced?
Are the two halves of our face exactly the same? Pupils might enjoy an activity where you look at full-face passport photographs that they or you bring.
Stand a small hand mirror down the midline of the face in the photograph so that the reflected half makes one face with the uncovered half. Now do the same to the opposite side. Isn’t it amazing how different the two faces are? That is because our faces are not exactly symmetrical.
Shaking the wrong hand
Try to shake hands with your own image in a large mirror – when you hold out your right hand, it offers you its apparent left hand.
Repeat this, but this time, arrange two mirrors at right angles. Look into the corner and you will see one image of yourself. Offer to shake hands.
What hand does the image in the two mirrors offer this time?
Can you work out why this happens?
Using reflection
Brainstorm uses of mirrors:
- Which devices contain mirrors?
- Where are they useful?
- How could mirrors be useful in a shop to help security?
Scary reflections
Experiment with looking at reflections in curved pieces of metal like spoons and kettles.
- What happens to the reflection?
- What patterns can you notice?
Light and dark
Gather together a collection of different shiny materials and objects. Experiment with looking at them:
- in normal classroom light;
- in a ‘black box’ where there is very little light;
- when a torch is shone on them.
Which objects are the shiniest? Can you put them in order of shininess? What happens when you put them in the box? What happens when you shine a torch on them? Can you see any patterns in your observations?
Resource 5: Ideas for creating shadow puppets
![]() Teacher resource for planning or adapting to use with pupils
Teacher resource for planning or adapting to use with pupils


Resource 6: Periscopes – ideas to get you started
![]() Teacher resource for planning or adapting to use with pupils
Teacher resource for planning or adapting to use with pupils
Start by finding two mirrors.
Hold one in each hand and see if you can use them to peer over a wall or see round a corner.
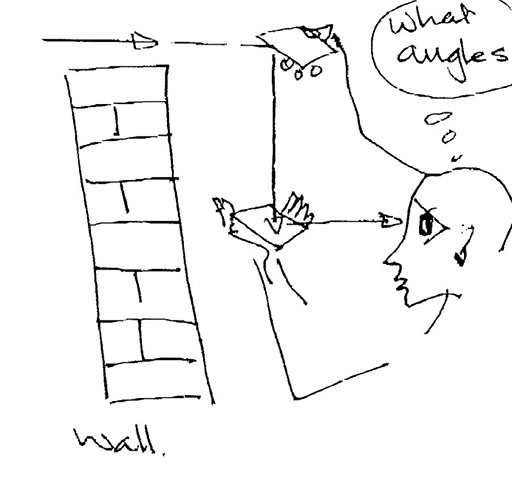
When you have a good image over the wall or round the corner, stop. Look at how the mirrors are arranged – what do you notice about the angles?
Now you can use your observations to build a periscope. The images below give you some ideas of how to do this.
How will you evaluate your periscope? Are any of these criteria useful? Can you think of any more?

Draw up a table of the criteria you choose and use it to record judgements on everyone’s periscope.
Acknowledgements
Every effort has been made to contact copyright holders. If any have been inadvertently overlooked the publishers will be pleased to make the necessary arrangements at the first opportunity.
Section 5 : From Earth to the stars - using models
Key Focus Question: How can you use models to help pupils develop their understanding of the universe?
Keywords: models; storytelling; stimulation; sun; moon; solar system
Learning outcomes
By the end of this section, you will have:
- used different models to help pupils develop their understanding of the Earth in space;
- used brainstorming, observation and model building to explore pupils’ own ideas about the universe;
- explored storytelling as a way of encouraging pupils in the study of space.
Introduction
What is meant by a year? What shape is the Earth? What do we mean by ‘the sun rising’?
Helping pupils understand how their home, the Earth, fits into the wider environment of our solar system is not easy because hands-on experiences and visits are not possible. But we can use models to help our pupils understand the key scientific ideas.
This section aims to develop your skills in using models to explore night and day, the phases of the moon and our solar system. These teaching models include physical models (built out of everyday materials), diagrams and computer simulations to help your pupils understand the relative sizes, positions and movements of bodies in our solar system.
1. Using models to explore night and day
Pupils have their own ideas about the difference between night and day based on their experiences. These ideas do not always agree with the scientific understanding. For example, in everyday life, we talk about the sun rising or setting, which implies that it is the sun that moves and not the Earth. However, by using a simple model, it is possible to challenge and extend pupils’ ideas and help them answer the question: ‘Why do we have night and day?’
Activity 1 provides a simple way of modelling night and day and Case Study 1 explores further ideas. You might like to try the activity with your colleagues first, before trying it with pupils. This will test your understanding and help you decide the best way to use the model in your classroom.
Case Study 1: Modelling night and day
Mrs Abdul, who works with Grade 6 pupils in a small rural school in North Sudan, was exploring her pupils’ ideas about night and day. For homework, she asked them to note down the answers they got when they asked friends, carers and other community members the following questions:
- Why does it get dark?
- How does night and day happen?
- How could you show this to others?
The next day, pupils reported back what they had found out.
Mrs Abdul showed them her way of modelling day and night. She used a candle as the sun and asked several pupils, in turn, to come up and be the Earth and turn round slowly. As they turned, she asked them when they could see the candle. Next, as they turned a second time, she asked them which was day and night and when was it dawn and sunset.
They talked about their ways of showing night and day and compared these with Mrs Abdul’s day and night model and discussed how much their ideas matched.
Mrs Abdul was surprised at the number of questions the pupils asked about night and day, but also how the model helped them to understand what was happening.
Activity 1: Night and day
Working with the whole class, ask them to tell you what they know about how night and day happens. Accept and record each different idea and alongside each suggestion put the name of the person who suggested it. Once all the ideas are listed, ask the rest of the class to show, by raising their hands, which idea they support and put the number by the side.
Using Resource 1: Modelling night and day to help you, model day and night for the class.
Ask pupils to talk with their neighbour about how they would now explain night and day, and record their ideas.
To assess their understanding, use Resource 2: Day and night questionnaire. You might read out the questions or ask one pupil in each group to read out the questions to their group. Ask pupils to record their answers and then share the answers with them at the end.
2 : Using stories and observation to think about the moon
People sometimes refer to the moon when writing or speaking: they use expressions like ‘once in a blue moon’, ‘moonstruck’ and ‘harvest moon’. What expressions do you know that use the word ‘moon’? What expressions do your pupils know? You might make links with literacy work here.
In Activity 2, your pupils observe in detail the shape of the moon over several weeks. You then build on these observations by using everyday objects to model the changes in the moon shape. This will help pupils to understand the pattern in the phases of the moon. Try the model part of the activity yourself before using it with the class.
Using traditional tales about the sun and moon is another way to stimulate pupils’ interest. You could use your own traditional tale instead of the one used in Case Study 2.
Case Study 2: Science, the moon and storytelling
Mr Lowassa decided to read a story to his Standard 2 class about the sun and moon to stimulate their interest before studying the moon as a science topic. He used the story in Resource 3: Sun, Moon and Water , which talks about the sun and moon as being man and wife and living on Earth. His class enjoyed the story, especially as Mr Lowassa read it in a lively way, using different voices for the characters.
After discussing the story, Mr Lowassa asked his class to tell him what the moon looks like in the sky. (He reminded the pupils never to look straight at the sun as it could damage their eyes).
He drew their ideas and then showed them a model he had made of the phases of the moon to help them understand why the moon has different phases.
Activity 2: Phases of the moon
Ask your class, if they can, to look at the moon in the evening when they go home and pay particular attention to its shape. The next day, pupils draw the shape of the moon. Ask them if the moon is always this shape? If not, why not? If not, what other shapes does it take? Are they always the same? Is there a pattern to the shapes?
Set up a roster of pupils to look at the moon each night over several weeks and record its shape on the chart you have prepared for this task (see the template towards the end of Resource 4: The moon and its relationship to the Earth and the sun).
After a month, ask pupils to discuss and answer the following questions:
- How does the moon’s shape change in a week?
- How would you describe the shape(s) of the moon?
- Why does the shape change?
Next, help the pupils develop their understanding by modelling the phases of the moon using the approach in Resource 1 using balls or mud to see how the moon appears to change shape. Resource 4 gives you further information on the moon.
3. Representing the solar system
People have always been fascinated by space. Most pupils are interested in space, and the night sky is their first realisation that there is more beyond our world.
Exploring the solar system cannot be done through school visits. But by using books, telescopes, computers, the Internet and models, you can show the vastness and detail of the solar system to your pupils. The size is something pupils find hard to grasp, but making a scale model of the solar system will help.
In Case Study 3, a teacher uses a simulation on the computer, one kind of model, to help develop pupils’ understanding. If you have access to a computer to do this, try the web link listed at the end of Resource 4. The case study shows how the teacher allowed each group of pupils a turn on the computer and the rest of the class worked on a different but related activity.
In the Key Activity, your pupils use models to show the arrangement of the planets. You could extend the model of the solar system by asking pupils to find out how long it takes for each planet to orbit the sun and to turn on its axis (day and night).
Afterwards, reflect on the activity. How did your pupils react to building models? Do you think the models helped them to understand more about the solar system? Could you use models in another topic –what about building models to show particles?
Case Study 3: Using a simulation of the solar system
Mrs Mucaba was working with her Standard 5 class of 46 pupils in Usangi Primary School exploring the solar system. She had downloaded from the Internet onto the school computer a simulation model of the orbits of the sun, Earth and moon (see Resource 4 for an example). She wanted her pupils to find answers for some of the questions that they had asked about the sun, Earth, moon and other planets. The questions were listed on a sheet by the side of the computer and the groups of four/five pupils had to try and answer these as they looked at the simulation.
The rest of the class were writing poems about their feelings about being part of the solar system, which they had discussed as a whole class at the beginning of the lesson.
Key Activity: Modelling the solar system
Start with a class brainstorm on the solar system. (See Key Resource: Using mind maps and brainstorming to explore ideas). Record all their ideas and questions about the planets, sun, moons and so on.
Share with your pupils the detailed information on the planets in Resource 5: Solar system –facts and figures. Ask the pupils to work in pairs to draw a diagram showing each planet in order, giving some indication of the size of each planet. Each pair then shares their diagram with another pair to check their answers.
Ask each group of four pupils to make a model, using clay and mud, of one planet. If you have access to books and/or the Internet use these to give more information. Try to make sure the models are all to the same scale.
Then, use these model planets to build a model of the solar system. You will need to go outside to place their models in order. (See Resource 6: A scale model of the solar system for hints on the sizes and positions of the planets in the model).
Finally, plan an assembly with your class. They should show their model and tell the rest of the school what they have found out about the solar system.
Resource 1: Modelling night and day
![]() Teacher resource for planning or adapting to use with pupils
Teacher resource for planning or adapting to use with pupils
Why do we get night and day?
You can use a simple model to help you find out the answer to this question.
You will need:
- a large ball to show the Earth
- a torch to show the sun
Investigate
- Use the ball and torch to investigate why we get night and day – see below
- Explain how your model shows the difference between night and day.
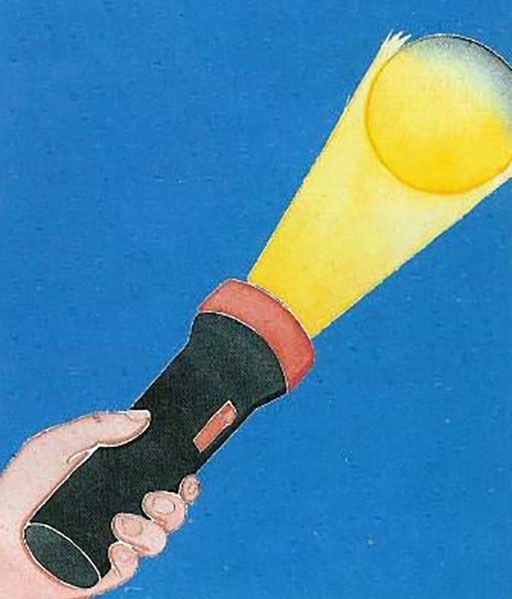
Original source: Oxford Science Programme 2 – 1991 Oxford University Press
Resource 2: Day and night questionnaire
![]() Teacher resource for planning or adapting to use with pupils
Teacher resource for planning or adapting to use with pupils
What do you think about the statements below?
Score each one according to the following scale. Then discuss your scoring with others.
| I know it is true | 1 |
| I think it is true | 2 |
| I am not sure | 3 |
| I think it is wrong | 4 |
| I know it is wrong | 5 |
- At night, the moon blocks out the sun.
- The sun revolves around the Earth every 24 hours to give day and night.
- The atmosphere blocks the sun at night.
- At night, the planets get in the way of the sun.
- One half of the Earth has day, while the other half has night.
- The day and night cycle has something to do with the movement of the Earth.
- The Earth moves around the sun every 24 hours to give day and night.
- When we are facing the sun it is day and when we are facing away from the sun it is night.
- It is dark at night because clouds cover the sun.
- The Earth spins round once every 24 hours to give day and night.
- The moon is in a part of the sky where it is always night.
- The Earth turns around an imaginary line from the North to the South Pole once every day.
- The Earth spins on a line through the equator once every day.
- At night, the Earth turns to face the moon.
ANSWERS to Day and night questionnaire
- False
- False
- False
- False
- True
- True
- False
- True
- False
- True
- False
- True
- False
- False
Resource 3: Sun, Moon and Water
![]() Teacher resource for planning or adapting to use with pupils
Teacher resource for planning or adapting to use with pupils
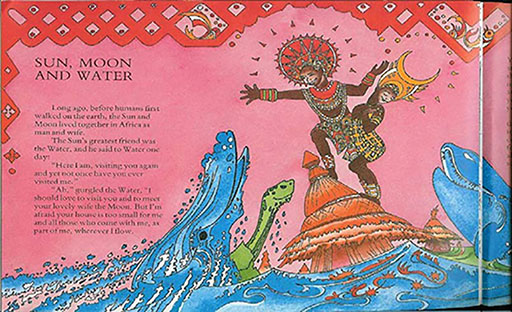
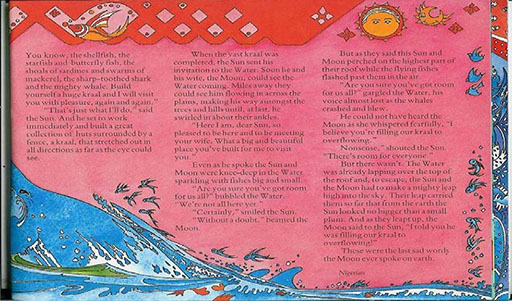
Original source: Nevin T (1995), Fire’s Wild Dance
Resource 4: The moon and its relationship to the Earth and the sun – background for the teacher
![]() Background information / subject knowledge for teacher
Background information / subject knowledge for teacher
The moon is a spherical body that is illuminated by the sun and reflects some of its light. But how is the moon placed in relation to the sun and the Earth, and how does it move?
We know that:
- the moon is visible at different times during the day and/or night;
- the time at which the moon is visible is closely related to the shape and size of its bright part (phases);
- the moon is much less bright than the sun and emits a negligible amount of heat;
- the complete cycle of lunar phases has a period of about 29.5 solar days;
- the moon is visible, albeit at different times, for some part of each solar day (provided that it is not hidden by clouds);
- the moon shows the same face to the Earth at all times;
- the moon is always of the same apparent size;
- the apparent size of the moon is about the same as that of the sun;
- eclipses of the moon occur relatively rarely (no more than twice a year).
Commentary
The diagram on the next page will help you to make sense of how the moon moves around the Earth. It shows how we only see different-sized bits of the moon at different stages in its orbit. It shows how the phases of the moon arise from its orbit around the Earth. The time between occurrences of the same phase (e.g. full) is, on average, 29.5 days.
You will see that the moon always presents the same face to the Earth: the moon rotates on its axis in the same time that it orbits the Earth, and in the same direction. Moreover, whenever you see a full moon, everyone else on the same side of the Earth will also see a full moon. This applies to a new moon and to every other phase of the moon as well.
Please note: You will need to reverse the sequence in the diagram for the southern hemisphere.
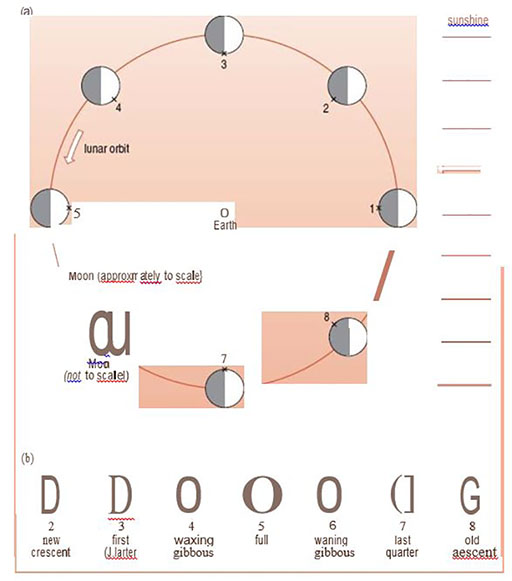
Person on earth sees everything inside the circle Moon number 1 = New Moon
Part of the moon illuminated by the sun
Part of the moon in darkness
Template for pupils to record the shape of the moon
| Monday | Tuesday | Wednesday | Thursday | Friday | Saturday | Sunday | |
| Week 1 | |||||||
| Week 2 | |||||||
| Week 3 | |||||||
| Week 4 | |||||||
| Week 5 |
Useful web link
If you are able to access the Internet, the link below gives your pupils a chance to take part in an interactive tour of the southern hemisphere and has a wonderful animation of moon rotation.
http://www.learningmedia.co.nz/ staticactivities/ dayandnight/ dswmedia/ index.html
Original source: Primary Science, Developing Subject Knowledge, Jane Devereux
Resource 5: Solar system – facts and figures
![]() Teacher resource for planning or adapting to use with pupils
Teacher resource for planning or adapting to use with pupils
| Axial rotation | Time in orbit | Diameter in km | Km from sun (in millions) | Miles from sun (in millions) | Gravity (Earth =1) | Mass (Earth =1) | Density (Water =1) | |
| Mercury | 56 days | 88 days | 4,878 | 57.9 | 36 | 0.38 | 0.555 | 5.4 |
| Many craters on the surface make Mercury look like our moon. Because there is no atmosphere to keep temperatures steady, they fall from 425 °C at midday to 180 °C before dawn. It is made of rock with no water. | ||||||||
| Venus | 243 days | 225 days | 12,103 | 108.2 | 67.2 | 0.9 | 0.81 | 5.2 |
| The white clouds prevent us seeing the surface but make it the brightest planet in our sky. It is sometimes called the morning star or evening star. It is made of rock and very hot with an atmosphere of carbon dioxide (CO2). | ||||||||
| Earth | 23h 56m | 365.25 days | 12,756 | 149.6 | 93 | 1 | 1 | 5.5 |
| Two-thirds of the Earth’s surface is covered by water, which gives it its blue colour. It is the only planet known to support life. It has an atmosphere containing oxygen. | ||||||||
| Mars | 23h 37m | 687 days | 6,786 | 227.9 | 141. 6 | 0.38 | 0.11 | 3. 9 |
| It is the fourth planet from the sun and is commonly referred to as the red planet. The rocks, soil and sky have a red or pink hue. | ||||||||
| Jupiter | 9h 50m | 11. 86 yrs | 142,984 | 778 | 483. 6 | 2. 6 | 318 | 1. 3 |
| The atmosphere has a stripy appearance with a giant red spot. It is a huge ball of the gases | ||||||||
| Axial rotation | Time in orbit | Diameter in km | Km from sun (in millions) | Miles from sun (in millions) | Gravity (Earth =1) | Mass (Earth =1) | Density (Water =1) | |
| hydrogen and helium. | ||||||||
| Saturn | 10h 14m | 29.45 yrs | 120,536 | 1,426 | 886.7 | 0.9 | 95 | 0.7 |
| A set of rings can be seen round Saturn, caused by millions of circling ice, dust and rock particles. Another gas giant made of hydrogen and helium. | ||||||||
| Uranus | 10h 49m | 84.01 yrs | 51,118 | 2,871 | 1,783 | 0.8 | 15 | 1. 3 |
| It appears bluish-green because of the methane gas reflecting sunlight. It has a small ring system and has an axis of rotation at right angles to other planets. Another gas giant. | ||||||||
| Neptune | 15h 40m | 165.79 yrs | 49,528 | 4,497 | 2,794 | 1. 1 | 17 | 1. 6 |
| It appears bluish and has a small ring system. It is sometimes called the twin of Uranus. The last gas giant. | ||||||||
| Pluto | 16h | 248.43 yrs | 2,284 | 5,913 | 3,666 | 0.04 | 0.002 | 2 |
| Pluto is primarily composed of rock and ice. It has three moons – Charon, Nix and Hydra. On 24 August 2006, the International Astronomical Union defined the term ‘planet’ for the first time. This definition excluded Pluto, and so Pluto was added to the list of minor planets. | ||||||||
Original source: Primary Science, Developing Subject Knowledge, Jane Devereux
Resource 6: A scale model of the solar system
![]() Teacher resource for planning or adapting to use with pupils
Teacher resource for planning or adapting to use with pupils
| PLANET | REPRESENTED BY | DISTANCE FROM 'SUN' | FOR YOUR MODEL* |
| MERCURY | 1 mm poppy seed | 12 metres | 12 centimetres |
| VENUS | 3 mm pin head | 23 metres | 23 centimetres |
| EARTH | 3 mm pin head | 30 metres | 30 centimetres |
| MARS | 1. 5 mm mustard seed | 50 metres | 50 centimetres |
| JUPITER | 30 mm ball | 167 metres | 1. 67 metres |
| SATURN | 30 mm ball | 300 metres | 3 metres |
| URANUS | 10 mm marble | 600 metres | 6 metres |
| NEPTUNE | 10 mm marble | 900 metres | 9 metres |
| PLUTO | 1 mm poppy seed | 1. 25 kilometres | 12. 5 metres |
N.B: On this scale, our moon would be slightly smaller than a poppy seed and would be 8 cm from the Earth.
All the sizes and distances are approximations.
For practical reasons, you may wish to use this ‘shortened’ distance scale for your pupils’ model, but you will need to point out that the size of the planets is now disproportionately large.