Use 'Print preview' to check the number of pages and printer settings.
Print functionality varies between browsers.
Printable page generated Tuesday, 14 July 2026, 3:02 AM
Module 2: Using community voices in your classroom
Section 1: Investigating stories
Key Focus Question: How can you use investigations to develop ideas about story?
Keywords: research; stories; purpose; questions; investigating; community
Learning Outcomes
By the end of this section, you will have:
- used investigation and research methods to develop your classroom practice;
- investigated pupils’ understanding of stories;
- explored ways to create original stories.
Introduction
Storytelling is an important part of most communities’ life and culture. This module explores how to strengthen links between school and community by using the community and its stories as a resource for learning.
This section introduces you to the value of research in teaching and learning. By setting up research activities, you will find answers to questions, try out new ideas and then use them to create an original piece of work.
1. Developing pupils’ research skills
We all tell stories, about our daily lives or about the past. There are many traditions around storytelling and many lessons to be learned from stories. Activity 1 explores what researching is, how it is done, and how results can be analysed. As you work alongside the class on the task, you will learn what your pupils are capable of.
We suggest that you read Key Resource: Researching in the classroom before starting. If you would like to read about other people’s research, Resource 1: Traditional fables is also interesting. It reports on a workshop, held in Qunu in the Eastern Cape of South Africa, where parents, teachers and pupils discussed the questions you are researching.
Case Study 1: Researching why people tell stories
Mrs Rashe and her Grade 3 pupils in Nqamakwe, in the Eastern Cape of South Africa, tell stories every day.
One day she wrote the question ‘Why do people tell stories?’ on the chalkboard and then listed pupils’ answers:
- To enjoy
- To make people frightened
- To teach me not to do something
She asked each pupil to go home and ask an older person the same question and to bring the answers back. She made sure that she reminded pupils that they needed to approach people very respectfully when asking the question. She also reminded them to explain what the information would be used for.
The next day she added their answers to the list. Where more than one person gave the same answer, she added a tick (see Resource 2: Why people tell stories).
She asked the pupils to add up the ticks for each reason. They discussed the following questions:
- Which reasons are the most popular? How do you know?
- Do you agree with the elders’ ideas? Why, or why not?
After the discussion, Mrs Rashe asked her pupils to write what they had found out through their research.
The next day, she asked a few pupils with different views to read their reports. She was very surprised and pleased with the different ideas that the pupils came up with.
Activity 1: Investigating storytelling
- Explain to pupils about research, using Key Resource: Researching in the classroom beforehand, to help you plan what you want to say. Explain that they are going to help you investigate storytelling. (See Key Resource: Using explaining and demonstrating to assist learning.)
- Write the questions from Resource 3: Questions about stories on the chalkboard.
- Explain that each pupil is going to ask these questions of one older person in the community. Remind the pupils to approach the elder respectfully and to record the answers they are given.
- Some days later, divide pupils into groups of six to eight and let them list (for each question), the answers they got, adding a tick where more than one person gave the same answer.
- Now each group reports and you complete a set of data (the information collected by the class) on the chalkboard.
- Discuss the most common ideas. Do the pupils agree with them?
- Help pupils to write a simple report on their findings (see Resource 2 for a plan for a research report).
2. Thinking about the purpose of a story
Once you have your research results, they need interpreting so that you can use the information. In this case, this means helping your pupils use this information to understand stories more. Activity 2 helps you to explore meanings in stories as a follow-up to the investigation.
Case Study 2 introduces the important idea of getting pupils to raise their own questions and to try to find answers to them. Being able to raise their own questions in small groups builds independent thought and develops pupils’ ability to think creatively and critically.
Case Study 2: Finishing a story
Mrs Masiko from Ibanda did careful research into the details of a good, but not well-known, story (see Resource 4: How Mrs Masiko found her story).
One day, she gathered her Primary 5 pupils around her, and told them the first part of the story (the first three paragraphs of Resource 5: The river that swept away liars and other stories). Next, she asked them to each think of a question about what would happen in the rest of the story. After two minutes, they gave her their questions, and she wrote them on the chalkboard.
She asked the class to think of answers to the questions, taking each question in turn. The pupils gave reasons for their answers.
After they had gone back over all the questions and answers, she asked them to help her write an ending for the story. They suggested what might happen next and she wrote their ideas on the board. She did not rush the process, or push her ideas on to the pupils.
Once the story was complete, they read it together.
The pupils liked working together on the story. The next day, in pairs, they drew pictures for different parts of the story. These were put together in a book.
Finally, Mrs Masiko read them the original story. The pupils were pleased at their ending compared to the original and talked a lot about the problems of telling lies.
Activity 2: Discussing why specific stories were told
Choose a good story from those that you know. Make sure that you have a complete version of the story.
- Make one copy of the story for each group in your class, or write the story on the chalkboard, where they can all see it.
- Also write up the reasons for storytelling that came out of the class research.
- Ask your pupils to discuss in groups why they think people would have told this story (i.e. its purpose).
- As groups report back, ask them to explain their reasons.
- Next, discuss the characters in the story and their behaviour.
- Ask the pupils how they could apply this story to their own lives.
- Ask them, in groups, to discuss the purpose of another story, perhaps one from home and then to draft a paragraph about the story’s purpose.
Did they all understand the purpose of their stories? How do you know this?
This activity need not be completed in one 30-minute lesson period. It can be spread to other lesson periods if your pupils have lots of ideas to discuss.
3. Writing stories
Research suggests that people learn best when what is being taught is relevant to them. As a teacher, you constantly need to make sure that your pupils are gaining knowledge that will help them make sense of their world.
You and your class have researched why people tell stories, and looked at the meanings of particular stories. Now we look at how you can help your pupils apply storytelling to real-life situations and difficulties.
Case Study 3: Writing a story
Mrs Alitwala wanted to help her pupils in her Primary 5 class in Kampala to write their own stories in pairs. She wrote a list of possible story features (see below) on the chalkboard and discussed with her pupils how these can determine what kind of story is written.
- Animals representing humans
- Marvellous events, unusual creatures
- Someone getting into difficulties and finding a way out
- Good and evil
- Explanations for the way things are
She also gave them a list of events, good and bad, that had happened in the city recently and suggested they use one of these as the context of their story. Next, she asked them to choose whether the characters in their story would be animals or people. Finally, she asked what theme they might choose, such as the battle between good and evil. Once they had decided, she encouraged each pair to start writing.
Over the next week or two, Mrs Alitwala asked each pair to share their story with the rest of the class who then discussed what the story’s purpose was. She was very pleased with the variety of the stories.
Key Activity: Creating an original story
Ask pupils to think of problems in their families, school and community that come out of the way people behave towards one another. The problems might range from everyday ones, like laziness, to serious issues, such as HIV/AIDS, step-families, poverty, parents neglecting their roles, drunkenness. You might prompt them by describing familiar situations involving certain kinds of behaviour, but be sensitive to the situations of individual pupils in your class. You could use old newspapers and magazines to help with ideas for stories.
- Each group should choose one problem to create a story that shows the effects of this kind of behaviour and offers some wisdom about it.
- Discuss some of the features of stories before they write their story or plan how they will tell it (see Case Study 3).
- Ask each group to tell their story to the class. Discuss the purpose of each story, list these, and compare them with their research findings from Activity 1.
- Let group members decide for themselves whether their story was successful, and why. (See questions in Resource 6: Assessing your story.)
How well did they assess themselves?
Do you agree with their assessment?
If you have younger pupils, you may want to do this as a whole-class activity where you write their ideas on the board or on paper.
Resource 1: Traditional fables
![]() Background information / subject knowledge for teacher
Background information / subject knowledge for teacher
Background
A workshop was held as part of the work of the Nelson Mandela Foundation’s Unit for Rural Schooling and Development, with five schools from the Qunu area of the Eastern Cape participating. From each school, there were two teachers, one pupil, one parent, and one member of the school governing body.
The aim of the workshop was to reflect together on the value of traditional fables in the education of young people, and the community, and to plan a way forward for making use of these stories in and out of school.
What follows is a report on a discussion that was held in groups on the first day of the workshop. Participants reported back on their ideas.
Do you agree with their ideas and comments?
What is a fable?
A fable is a short story with a specific aim. It has some teachings, humour, warnings. It applauds, criticises and corrects. It sharpens the mind to think critically and creates a deep thinker. Some were real events, which, over time, turned into fables; some have been specially coined for conscience pricking, in order to relive the past event and to teach modesty.
Who are the people who tell, or told, fables/engero?
Unanimously they said it was the elderly – grandmothers and grandfathers, also children among themselves, during initiation schooling of both girls and boys. Also teachers, radios and television told stories.
To whom did/do they tell them?
They were told to children, youth and the elderly.
When and where are/were fables/engero told?
The common room was mostly used, sometimes the bedroom, and sometimes stories were told while basking in the sun near the cattle enclosures. Other places were the riverbank, the grazing lands, field watch-house and initiation places.
Why were/are they told?
They were for enjoyment, for sharpening the mind, as reminders, as a deterrent or warning, to encourage patriotism through certain behaviours, to pass on vocabulary and its intricacies (like figures of speech, idioms and proverbs and new words which enter the dictionary).
How are/were they told? (Style of delivery)
There was competition in storytelling. It was an art, involving music, humour and changing the voice. A traditional fable has a unique beginning and ending.
Are new as well as old fables/engero told? For what reasons are new ones created?
Old and new fables are being used, and they do the same work. The new ones encompass new angles of life.
Do you have any written versions of fables/engero? Name them.
There are very few old fables out there in written form. (Some were named.)
What was observed is that very few fables were remembered by the group and it was not easy to do so. Only one person remembered three; some couldn’t remember any. From 23 participants, only 19 fables came forward. What does this mean?
Where and how are written fables/engero used?
Fables are read from books over and over again. The same happens at home where the same fables are repeatedly told for enjoyment. At school they are read to children. They are of great help to children’s vocabulary. They are few. There are some in libraries and sometimes they are acted on stage.
The language used
The commonly used language is the regional dialect. Baby-language is also used, as well as words coined to show respect.
Extract adapted from report of workshop on traditional fables, held at Qunu, Eastern Cape
Resource 2: Why people tell stories
![]() Example of pupils' work
Example of pupils' work
Mrs Rashe’s chalkboard
Why do people tell stories?
- To enjoy ✔✔✔✔✔ ✔✔✔✔✔ ✔✔✔✔✔ ✔✔✔✔✔ ✔✔✔✔✔ ✔✔✔✔✔ ✔✔✔✔✔ 35
- To make people frightened ✔✔✔✔✔ ✔✔ 7
- To teach me not to do something ✔✔✔✔✔ ✔✔✔✔✔ 10
- To teach wisom about life ✔✔✔✔✔ ✔✔✔✔✔ ✔✔✔✔14
- To show correct behaviour ✔✔✔✔✔ ✔✔✔✔✔ ✔✔✔✔✔ ✔✔✔✔✔ ✔✔✔✔✔ ✔✔✔✔✔ ✔✔ 32
- The make our language grow ✔✔✔✔✔ ✔✔ 7
Plan for research report
- Research question
- What we did
- How we analysed data
- What we found out
Report on story research
The Grade 3 pupils asked elders a question: ‘Why do people tell stories?’
35 elders answered the question.
The pupils made a list of all the answers, and counted how many people gave each answer.
Example report
- 34 people thought that stories are told for the listeners to enjoy them.
- 32 people thought that stories are told to show correct behaviour.
- 14 people thought that stories are told to teach wisdom about life.
- 10 people thought that stories are told to teach people not to do something.
- 7 people thought that stories are told to make language grow.
- 7 people thought that stories are told to frighten people.
Resource 3: Questions about stories
![]() Pupil use
Pupil use
- Who are the people who usually tell stories?
- To whom do they tell them?
- When and where are stories told?
- Why do people tell stories?
- How do they tell them? (Style of delivery)
- Are new as well as old stories told? For what reasons are new ones created?
This resource is suitable for use with older pupils. For younger pupils, you may want to choose one or two of these questions for your pupils to investigate.
Resource 4: How Mrs Masiko found her story
![]() Background information / subject knowledge for teacher
Background information / subject knowledge for teacher
Beatrice Masiko tried to think of a story that was not well known. She remembered an idiom that was based on a story. The idiom said: ‘There is no jackal bigger than another, all jackals are equal in size.’ She remembered that the story was about a master and his servant travelling on horseback, and that the servant told his master about a jackal that was the size of a calf or an ox. She also remembered that there were rivers to cross, and one of them was called ‘the river that drowns all liars’.
Since she was not sure of what actually happened, she asked her sister-in-law Ruth about the story. Ruth said that the servant in the story was a habitual liar. Once, he even told a story of a bug, likening it to something so big, the story could not possibly be true. They were still short of details, so they went to Mr Kagwa, who had been a teacher of Luganda, now an inspector of schools. He could not remember the story, but remembered that a version of it was in a particular reader.
One day, Beatrice was speaking to Mrs Cissy Mirembe, a maths teacher, and found that she knew the message behind the story. She said that the master used a certain technique to stop the servant from lying. He didn’t want to accuse him directly of lying. Mrs Mirembe said that the technique worked, as the servant repented and told the truth before they reached the river. But she also couldn’t remember the details of the story.
Beatrice then went to Mr Henry Kibedi, an attorney. He also knew the idiom and the message behind the story. He thought it had arisen because a community was sick and tired of the lying of a particular man. They decided to put him to a vigorous test, and teach him a lesson. Mr Kibedi’s version of the story is at Resource 5: The river that swept away liars.
Resource 5 also contains two traditional Ugandan stories – The lazy hare and the 20-eyed monster and The singing bird, which have morals to teach.
Adapted from: Umthamo 2, University of Fort Hare Distance Education Project
Resource 5: The river that swept away liars and other stories
![]() Teacher resource for planning or adapting to use with pupils
Teacher resource for planning or adapting to use with pupils
The river that swept away liars
A certain master was on a journey with his servant. It was a long journey on horseback. As they were travelling across the country, the master saw a jackal crossing their path.
The master remarked, ‘That jackal is quite big.’ The servant replied, ‘Oh, Master, this is nothing compared to the one I saw yesterday.’ ‘Is that so?’ responded the master. ‘Oh yes. It was very, very big. In fact, it was as big as an ox!’ ‘As big as an ox?’ questioned the master. ‘Yes, as big as an ox,’ answered the servant. The master answered again, ‘You say “as big as an ox”?’ ‘Yes, really, as big as an ox,’ said the servant. The master did not utter a word and they continued on their way, without talking to each other, for about an hour.
The servant noticed that his master was not happy and he didn’t know what was worrying him. So he asked the master what the matter was. The master told him that they would have to cross four rivers before they reached their destination. The last river was the biggest and the most dangerous of all the rivers. This river was allergic to liars, and no liar could escape its anger. It swept liars there and then down to the deep blue sea. It never missed a liar, even if they were to invoke ‘Ifa’ to bring them luck (people invoked Ifa to bring them luck, and to give them power to conquer evil spirits).
When the servant heard this, he was quite shocked because he knew how powerful Ifa was. If this river would not yield to Ifa, then he knew it must be a VERY powerful river. As they travelled, he became more and more uneasy. The master also became sadder and sadder the further they rode. And as his master grew sadder, the servant grew more and more panic-stricken.
As they neared each river, the size of the jackal changed. When they reached the first river, the servant said, ‘My Lord, the jackal was not exactly as big as an ox. It was a little bit smaller than an ox.’ The master said nothing.
When they reached the second river, the servant said, ‘The jackal was not even nearly the size of an ox. It was as big as a calf.’ But again, the master said nothing. When they had crossed this second river, the master just explained his concerns about the last dangerous river, and said no more.
As they approached the third river, the servant said to his master, ‘The jackal was not even as big as a calf. It was as big as a goat.’
Just before they reached the last river, the jackal was the same size as other jackals, which are common everywhere.
Adapted from: Umthamo 2, University of Fort Hare Distance Education Project
The lazy hare and the 20-eyed monster
Once upon a time in Uganda there lived a group of animals: the giraffe, the buffalo, the hippopotamus, the elephant, the zebra and, of course, the king of all the animals – the lion.
All of these animals worked together in the fields to grow food. They helped one another and shared the work and the harvest was plentiful because they had all worked in cooperation with each other.
All of them, that is, except for one.
The hare would not work. He was too lazy and too proud to work and he was cunning. There lived near the animals a 20-eyed monster that was very fierce and terrible to look at. The 20-eyed monster grew beans in his garden, which he harvested and ate to keep him strong.
The cunning hare crept into the 20-eyed monster’s garden at night and stole his beans.
The hare ate the beans and the next day when the animals said, ‘Come and help us in the field, Hare, or you will have nothing to eat for the winter,’ he laughed at them and smiled a cunning smile. ‘I have already grown my crops somewhere else,’ he lied, ‘I don’t need to work with you.’
This continued for some time. The 20-eyed monster would grow his beans, the hare would creep into the garden at night and steal the beans, and the hare would refuse to help the other animals in the field.
One day the 20-eyed monster was so angry that someone kept stealing his beans that he decided to set a trap to catch the thief. The 20-eyed monster made a scarecrow woman, a beautiful scarecrow woman, and he made the beautiful scarecrow woman out of glue.
The 20-eyed monster put the beautiful scarecrow woman into his garden that evening and then he went off to bed. That night, the lazy and cunning hare was hungry and decided to steal some more beans from the 20-eyed monster’s garden. The hare jumped over the wall and made his way towards the beans. Then he saw the beautiful scarecrow woman. The hare was mesmerised by her beauty and walked over to talk to her. ‘Hello,’ said the hare, blushing slightly, ‘you are a very beautiful woman, will you shake me by the hand?’
The hare put out his hand and grasped the beautiful scarecrow woman’s hand in his… but of course the beautiful scarecrow woman’s hand was made from glue!
The hare’s hand was stuck fast. ‘Let me go!’ he cried, trying to pull away from the scarecrow woman. ‘Let me go or I’ll hit you!’ he shouted and tried to slap the scarecrow woman with his other hand, but of course the other hand got stuck as well!
The hare tried to kick the scarecrow woman and his foot got stuck and then he tried to stamp on her foot and his other foot got stuck as well.
So the lazy hare was stuck fast to the beautiful scarecrow woman, and there was nothing he could do but wait.
The next morning, the 20-eyed monster came down to his garden and saw the hare stuck to the scarecrow woman. ‘So it was you who stole my beans!’ he roared, and picked up the hare and tucked him under his arm. ‘I’ll teach you to steal from me,’ the 20-eyed monster growled, ‘I’ll cook you in my pot and eat you all up.’
The 20-eyed monster put the hare into his cooking pot, but the hare was cunning and leapt out of the pot and out of the window while the 20-eyed monster’s back was turned, and ran away as fast as his legs could carry him.
The hare never went back to the 20-eyed monster’s garden and was very hungry for the whole of the winter!
[The moral of this story is that you should not be lazy – you should help each other and when you have helped each other you can all share in the rewards.]
The singing bird
Once upon a time in a village called Laeni there was a chief called Ojubi. In his palace there were women and men working for the chief.
One day, six women were told to go and fetch firewood. When these women were about to collect firewood a beautiful bird flew over them and stood on the tree near to them.
This bird began to sing beautiful songs in a rhythm that encouraged the women to dance.
The bird sang for nearly four hours. When the women returned to the palace the chief asked them why they took so long to get back. The women told the chief about this beautiful bird.
The following day the chief sent a different group of women to the forest. They, too, encountered the singing bird and danced for hours.
The chief decided to go with some men to guard him to find the bird. When they arrived at the place where the bird was, the beautiful bird sang wonderful songs. The chief was amazed and asked the bird to come and live in his palace. The bird agreed.
Once inside the palace the chief instructed one of his guards to look after the bird carefully.
Some time later, the daughter of the guard who was looking after the bird took the bird from the cage where it was kept. She asked the bird to sing for her. As she turned to sit down the bird flew straight back to the forest.
When the girl realised what had happened she started crying and went and told her father. He was very upset with his daughter.
When the chief learned that his bird had flown away he ordered the guard to go and find it and return it to the palace. If not, then he would lose his job. The guard and his daughter searched the forest for days and days but they couldn’t find the bird. They returned to the palace and told the chief, who said that the guard would have to leave his job. The guard turned to his daughter and asked ‘why did you have to meddle with something that was not yours?’.
[This story teaches us not to play with things that do not belong to us.]
For more materials see: Tales From The Past by Harriet Masembe pub. Fountain ISBN9970020919
Resource 6: Assessing your story
![]() Background information / subject knowledge for teacher
Background information / subject knowledge for teacher
Questions
- Did the class enjoy your story?
- How do you know?
- Did the class learn something from your story?
- How do you know?
- Did your story give its message clearly?
- How do you know?
Acknowledgements
Grateful acknowledgement is made to the following sources:
Other
Resource 1: Traditionnel fables: Extract adapted from report of workshop on traditional fables, held at Qunu, Eastern Cape
Resource 4: How Mrs Masiko found her story: Adapted from: Umthamo 2, University of Fort Hare Distance Education Project
Resource 5: The river that swept away liars and other stories: Adapted from: Umthamo 2, University of Fort Hare Distance Education Project
Every effort has been made to contact copyright holders. If any have been inadvertently overlooked the publishers will be pleased to make the necessary
Section 2: Ways to collect and perform stories
Key Focus Question: How can you use performance to develop your pupils’ language skills?
Keywords: stories; collect; perform; confidence; competence; pride; cultural heritage
Learning Outcomes
By the end of this section, you will have:
- worked with your local community to promote language skills and pride in cultural heritage;
- planned and organised opportunities for performance before an audience.
Introduction
Using different kinds of oral activities can develop your pupils’ confidence in speaking and listening and promote pride in their home languages. This will have a positive impact on their self-esteem. Pupils who feel more confident about who they are will learn more easily.
The activities in this section provide opportunities for your pupils to collect, rehearse and perform stories in front of an audience. It is suggested that you work with older community members by asking for their help in providing stories and in sharing their storytelling skills. These activities will build competence in the home language, on to which you can later build additional language skills.
1. Sharing stories from the community
Community knowledge of stories is a valuable resource for listening and speaking activities outside and inside the classroom. It is important that your pupils learn to respect and love the wisdom and heritage of their home language and culture. By strengthening their speaking and listening skills in the home language in an enjoyable way, the pupils will grow in confidence too.
Because the art of storytelling is no longer so deeply valued in some communities, people may have forgotten some of the richness and detail of stories. A way of building language resources for your class is to uncover older and more authentic versions of stories. You can do this by talking to other people in the community.
Case Study 1: Using the multilingualism of your class
Mr Kimaryo teaches Standard 4 at Makanya Primary School in Tanzania. The school is near a sisal estate, where workers speak many different languages. In his class of 70 pupils, 10 speak Chaga, 6 speak Chirundi, 3 speak Chinamwanga, and the rest speak Pare. He usually speaks Swahili when he teaches them.
Mr Kimaryo wanted his pupils to collect stories from their homes and to build their confidence in speaking by telling stories in their home languages. He began his lesson by showing pupils a picture of an old man and some members of the family seated around the fireplace. He then asked the pupils in pairs to discuss what the people were doing. The pairs reported their answers to the class. He then asked the pupils if they also sat around the fireplace to listen to stories, and many said they didn’t. He told the pupils to go home and ask one of the older members of the community to tell them a story.
In the next lesson, he divided the pupils into groups. He made two groups of Chaga speakers, one group of Chirundi speakers and one of Chinamwanga. He divided the Pare speakers into ten groups. He asked each pupil to tell their story to the rest of the group members, using the home language.
Mr Kimaryo went round and listened as they told their stories. He was pleased at how well they told the stories, especially the ways they used their voices to add interest.
Activity 1: Sharing stories in the home language
Your pupils have found out what older people know about storytelling in Section 1. Now is the time for them to collect stories from them.
- Talk to your pupils about their experiences of listening to stories, and find out what kinds of stories they enjoy. Ask them whether they listen to stories at home, and who are the storytellers in their community.
- Ask them to find someone from the home community to tell them a story. They will need to remember the story because they will have to tell it to their classmates. A good way of learning the story is for them to tell it to a number of people at home. As they do this, they should check that they have all the details of the story right.
- In the next lesson, group together pupils with the same home language (see Key Resource: Using group work in your classroom). Ask them to tell each other the stories they collected, using their home languages.
How did your pupils react to this activity?
How could you build up a resource of these stories?
2. Inviting visitors into school
Inviting community members into the classroom will help to motivate pupils and build their storytelling expertise in the home language. You can also ask your visitors to offer their knowledge of stories, to make sure that the stories the pupils tell are as complete and authentic as possible. This will mean that these stories become a rich resource for learning.
If you have a large class, this kind of community support is particularly helpful. Asking for support from your head teacher and colleagues may make it easier to get some members of the community involved on a regular basis.
Case Study 2: Inviting community participation in an Open Day
Four teachers at St Mary’s Junior Primary School in Dar Es Salaam were all enrolled in the same NTI distance-learning teacher upgrading programme. One of the modules asked them to explore how resources around them could be used in the classroom. They did some work on collecting boxes, bottles, plants and other resources and using them in science, mathematics and language activities. But the module reminded them that people are the most valuable resource for learning. It suggested that they arrange an Open Day for pupils and older community members to share their knowledge and skills.
The day the four teachers organised was a great success. Mrs Rwakatare, the School Governing Body chairperson, told the history of the school. Some older community members demonstrated crafts, such as basket weaving, tobacco curing, and beadwork, and women renowned for their cooking gave recipes for traditional dishes. Various grandfathers and grandmothers told itan (traditional tales).
Then it was the turn of the pupils to demonstrate what they had learned at school. The day ended with the performance of songs and dances by different groups.
As a result of the activities of the day, several community members became regular visitors to the school. They passed on their skills in various crafts and told stories, which were later used in class.
Activity 2: Coaching from community ‘experts’
You will need to plan this activity well in advance and allow a whole morning or afternoon for it.
- Arrange your pupils into groups of the same home language. Ask each home language group to invite someone from their community to class to help pupils with their storytelling skills. Give each group a written invitation to take home (see Resource 1: Sample invitation letter).
- On the day, ask the community members to join the group and listen to the pupils telling stories. Ask the ‘experts’ to give the pupils guidance and advice on how to improve the stories and their storytelling.
- Once the ‘training’ part is over, groups can come together and listen to stories from the experts. Songs, poems and riddles could also be shared.
What did the community participation add to the learning in your classroom?
Were you pleased with the way you organised your activity?
What would you do differently next time?
3. Performing for an audience
It is important that every pupil is able to communicate effectively and is given the opportunity to be imaginative. Group story performances can give even quiet pupils the chance to speak, sing, act, dance, etc. without too much pressure. Each pupil in a story-performing group can play a role: a character in the story, a narrator or part of a chorus. Pupils with specific talents can create ‘props’ and ‘costumes’ with objects such as pieces of cloth or paper or a few twigs from a tree.
In classes where pupils do not all speak the same home language, working with fellow speakers of the same language in order to prepare a performance in this language can be very positive.
This next part provides you with ways to develop pupils’ confidence and skills in speaking their home language. These ways can also be used to improve skills in a lingua franca or an additional language.
Case Study 3: A story performance day with a large class
Mrs Rebecca Kassam teaches a class of 100 Standard 5 pupils in a village near Tanga in Eastern Tanzania. She decides to hold an end-of-term story performance day. She organises her pupils into groups of five and then encourages them not just to tell stories but also to perform them so that both performers and audience will enjoy them. She tells pupils that if they wish to perform in a language that not everyone knows, they must decide how to help the audience understand the meaning by using actions, facial expressions and different objects (‘props’).
Mrs Kassam gives her pupils time to plan and rehearse their chosen stories. As they work, she monitors their progress and sometimes shortens or lengthens the preparation time. She has found that pupils prefer to prepare and perform their work outdoors.
With 80 pupils, it would take up too much time if all groups performed for everyone in the class. On the story performance day, Mrs Kassam asks pupils to form four circles, with four groups in each circle. She numbers the groups in each circle from 1 to 4. Group 1 performs in the circle centre for groups 2, 3 and 4. Then group 2 performs for groups 1, 3 and 4 and so on until all groups have had a turn.
After the performances, Mrs Kassam asks each group to discuss what they have learned. She thinks about what some of the quieter pupils in her class have shown about their understanding and how she can use this information to plan the next stage of learning.
Key Resource: Working with large classes and Key Resource: Working with multigrade classes gives further ideas for teaching large classes.
Key Activity: Performing stories for an audience
Ask pupils to form themselves into groups of six. Ask them to:
- think about the stories they have told and listened to;
- decide which story they think would be the best one to perform for the rest of the class, so that everyone can understand and enjoy it – more than one group can choose the same story;
- identify all the characters and decide who will play each part. They may also need a narrator;
- decide on the language(s) to use, sound effects, gestures, clothes and objects that will help bring the story to life and who brings which resources.
Allow time to rehearse and set a time limit for the performance. Monitor each group and help them as necessary by providing ideas or suggesting ways to do things.
Ask the audience to give feedback to each group (see Resource 2: Assessing group story performances).
If you can, tape-record the stories that are performed. Otherwise, take notes for later use.
The stories could be perfected and performed to parents and community leaders in your area to raise funds for buying resources for your class.
Resource 1: Sample invitation letter
![]() Teacher resource for planning or adapting to use with pupils
Teacher resource for planning or adapting to use with pupils
Dear …………………,
Our class, Standard…… is learning about local stories and the art of storytelling. We have heard about your expertise and we would like to invite you to come and help us work on how to develop our storytelling skills and to help us learn the stories well.
We would like you to come on …………………………………. Please let us know if this is convenient. ………………………………… from our class will meet you at the school gate at 10.00 am.
- With many thanks,
- Standard 5
- St Mary’s Junior Primary School
Resource 2: Assessing group story performances
![]() Pupil use
Pupil use
| Performance feature | Excellent | Good | Average | Weak |
|---|---|---|---|---|
| Easy to follow and enjoyable story | ||||
| Use of different voices | ||||
| Use of sound effects | ||||
| Use of movement | ||||
| Use of costumes and/or props |
Section 3: Using local games for learning
Key Focus Question: How can you use local games to help language learning?
Keywords: research; local games; traditional; rhymes; songs; investigating
Learning Outcomes
By the end of this section, you will have:
- used traditional and local games to support learning activities;
- motivated pupils and built their confidence in using language through games, songs and rhymes;
- extended your own skills in thinking about your role and effectiveness by investigating the value of games for learning.
Introduction
Some teachers who have taught for 20 years have only one year’s experience, repeated many times. This is because they do not learn much or do not develop into better teachers.
Good teachers plan what they do and, once they have done it, record what happened, ask themselves what was successful and what needs improvement. They reflect on (think about) whether the pupils learned anything and, if they did, what they learned. On the basis of this ‘reflection’, they plan again for their next activity. Resource 1: Action-reflection cycle shows this process in the form of a diagram.
1. Informal learning
Children do not only learn in the classroom; they also learn while they are playing. They learn from one another, by watching what others do. They learn by talking, singing, chanting and interacting. By can use play to make your classroom learning more effective and close the gap between what happens in the classroom and outside.
In Activity 1, your pupils act as researchers, going out into the playground (or beyond) to record what they think children are learning there. When they come back into the classroom, they will talk about what they found out: you will be able to listen to their talk and see what you think they have learned.
Case Study 1: A six-year-old learns and teaches English
Six-year-old Maria is at a school where English is the language of the classroom, although it is not her home language.
Every day for a week, Maria could be seen at break time watching other children play with a skipping rope. She did not join in, but stood close enough to watch and to ‘listen in’ to the rhyme the children were chanting. On the first day of the second week, Maria took her usual position a few feet away from the game, but now she could be seen ‘sounding out’ the words of the rhyme.
She repeated these words over and over, taking delight in saying them louder, softer, and with different stress on parts of a word. She repeated the rhyme several times and then listened again to the other children. She smiled, and said the rhyme again. Finally she looked for a rope and went to her friend, Miguel. She sang the song, line for line to her friend, teaching him the song. She translated the English words so that he could understand what he was learning. Soon Miguel was able to sing the rhyme with Maria.
Activity 1: Investigating natural learning
Before you start this activity, read Resource 2: Research on local games in the curriculum. This explains one researcher’s work and two games that the teachers developed as a result of that research. It would also be helpful to read Key Resource: Researching in the classroom.
- Talk to your pupils about learning. Do they know that they are always learning: at home, at school, when they are playing?
- Ask the class to do an investigation into ‘natural’ learning. Their question is: What learning happens when children play? The pupils should make notes and drawings about the learning they see in the playground and after school, when other children are playing, and when they play themselves.
- In class, ask pupils to share their findings, in groups. Ask each group to demonstrate how to play one game. Record songs or chants they sing during the game, on tape, or in writing.
- Ask each group to discuss what can be learned from these games. Note down their ideas.
What did you learn from this activity about how games can help learning?
2. Learning from games
All sorts of games can be used for learning and you need to think creatively about how to use them in the classroom (see Activity 2). It helps if you can work together with colleagues and friends, and also with your pupils, creating new ideas that can make the learning in your classroom more fun and effective.
In this part, you and your class extend your research investigations by asking older members of the community about games that they played when they were young.
Case Study 2: Games and chants on reading cards
The Project for Alternative Education in South Africa (PRAESA) promotes additive multilingualism, i.e. basic learning in the home language, with other languages added (without replacing the home language). PRAESA believes that all languages that children know should become part of the learning environment.
Mr Jacobs helped his Grade 3 pupils in Cape Town to make ‘reading’ cards, one for each pupil in the class. They drew a picture of themselves on one side of a piece of card. On the other side, they wrote songs, games, chants or rhymes, which they brought from home. Resource 3: Reading cards has some examples.
Each day, they have a reading period when the children read (and sing!) the cards. Sometimes, a better reader reads a card with a slower reader. Sometimes, a speaker of one language helps another pupil to read their language and make the sounds. Sometimes, they act out the rhymes or play the games. Mr Jacobs has noticed how much happier his class is and how they mix much better since doing this.
Activity 2: Games and songs from older community members
- Ask your pupils to ask an older person (parent, grandparent, neighbour, etc.) to teach them a game, song or chant they used to enjoy. They need to know the rules or words and any resources it might need.
- Next day, list the games and songs that pupils brought from home.
- Group together pupils who learned the same game or song. Ask them to prepare to teach this game or song to the class.
- Ask them to write out the song or chant or how to play the game on a card.
- When the class has learned the game or song, discuss what can be learned from it. Make notes as you did before.
- In future lessons, encourage pupils to read newspapers and magazines to find songs, games, riddles and jokes as a basis for writing their own.
3. Using reflection to improve teaching
‘Reflection’ is thinking over what happened and seeing how you could do it better next time. After you have tried new activities, it is really helpful to reflect on what was successful and what needs improvement. Make the process of ‘Plan-Act-Record-Reflect’ a part of your daily practice (see Resource 1).
Now that you have a good collection of games, you can use them as the basis for learning activities, and as a basis for reflection and growth. (This can, of course, be done with stories as well.)
Resource 4: Word games has some word games you can try with your pupils.
Case Study 3: English verbs in a skipping song
Ms Mofokeng sang a skipping song when she was a child in Soweto. She decided to use it for teaching her Grade 2 pupils some words and present-tense phrases in English.
The pupils first sang it in Sesotho and then she helped them to sing it in English.
She gave each pupil a piece of paper with a verb (e.g. eat, drink, laugh, cough, jump, run, hop) written on it. She made sure that each child knew what the word meant and how to do the action associated with it.
She allowed each pupil in turn to mime their action, and the class sang a new verse: ‘Antoni, what is she doing? Antoni, she is laughing,’ etc.
After the lesson, she thought about:
- what went well;
- what didn’t go so well;
- what surprised her;
- what she would change if she repeated the lesson.
What surprised her was how much time it took for the pupils to learn the English version but also how much the children enjoyed it. She decided that she needed to give more time to the activity, and introduce fewer new words at a time.
The following week, she used the English version of another skipping song in a similar way, making verses with different kinds of foods.
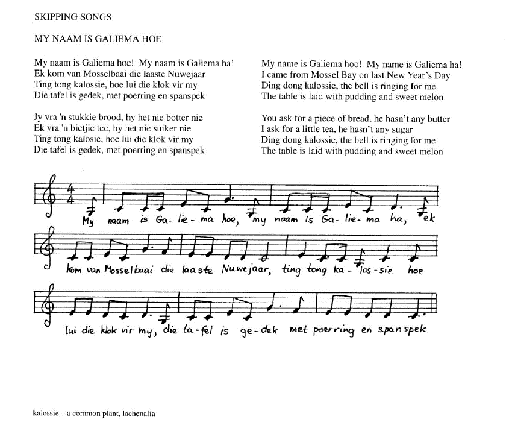
(See Resource 5: Skipping song for a Sesotho skipping song.)
Key Activity: Learning from a chant
- Is there a chant in your class collection that could be changed into the additional language and used to support language learning?
- Identify a sentence in the chant where a word (or words) could be replaced by a number of other words in turn. For example, ‘She is laughing’ could be replaced with ‘She is jumping, hopping, running’ etc. Each pupil, or group, can then sing a new verse, with a new word in the sentence.
- It will be even more fun if the words or sentences can be linked to actions.
- Plan how you will organise your class to sing/chant and act out this ‘substitution drill’. (This is a series of sentences, which are the same except for one word/phrase; they are used to practise language patterns.)
- If it is not successful, you will need to try a different song, or a different way of organising the activity.
Resource 1: Action-reflection cycle
![]() Background information / subject knowledge for teacher
Background information / subject knowledge for teacher
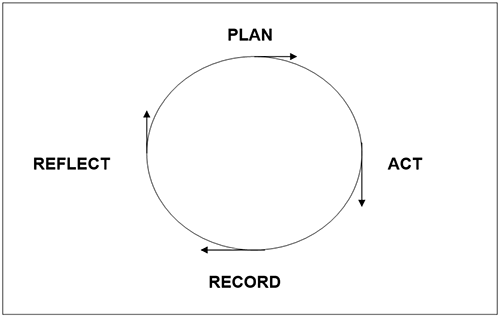
The diagram shows the following steps in the action-reflection cycle:
- Plan an activity.
- Act by putting the plan into practice, and observe how it goes.
- Record what you observe.
- Reflect on what happened.
- Revise your plan, or make a new plan.
- Put the revised or new plan into action, and observe again.
- Record and reflect again.
- And so on, and so on...
Everything you do as a teacher can become part of an action-reflection cycle.
Resource 2: Research on local games in the curriculum
![]() Background information / subject knowledge for teacher
Background information / subject knowledge for teacher
Nonhlanhla Shange is involved in research towards her master’s degree at the Nelson Mandela Unit for Rural Schooling at the University of Fort Hare in South Africa. She is researching the use of local games in the classroom, working at four rural schools.
The pupils and their teachers are carrying out action research into local games.
Teachers listen attentively and make notes of the games that are brought by pupils to class. They try to develop lessons based on the games. They keep journals, in which they reflect on how successful these lessons are, and try to improve on them with future attempts.
Descriptions of two games that were played as part of the research are below.
1. Circle game
Preparations for the game involve drawing a diagram like the one below on the ground.

How is the game played?
This game is played by small groups of five or six pupils. One pupil jumps inside the spaces, turning from side to side, while the other pupils sing a short song or rhyme, first in the local language, and then in English.
What learning activities were based on this game?
This game was developed to show how using repetition, in the children’s own language and in English, can aid learning. By using a different short song or rhyme, the game was also used to teach and practise pupils’ counting.
2. Stone game
Preparations for the game involve drawing a circle on the ground and putting a number of stones in the circle. (The circle should be no more than a metre in diameter.)

How is the game played?
Pupils are put into small groups of five or six. Each group has its own circle on the ground with stones inside it.
A player throws one stone up; before it falls to the ground, they must try to pick up other stones from within the circle.
- Every pupil in each group should assign themselves a number (below 10). This number is the number of stones that the player has to try and pick up.
- One player goes first. If the player picks up the required number of stones from the circle, they say the multiplication table of this number (for example, the 3 times table, stopping at 30 – this could be lower for younger pupils).
- If a player fails to pick up the required number of stones from the circle, they have to multiply the number of stones they have picked up by the number of stones they were supposed to pick up, and come up with a correct answer. For example, if they were supposed to pick up 5 stones, but only picked up 3, they would have to give the correct answer to the sum 5 x 3.
- The other players will judge whether they are giving the right or wrong answer.
What learning activities were based on this game?
This game was used to practise pupils’ skills at multiplication.
Original source: Shange, N., Nelson Mandela Foundation’s Unit for Rural Schooling and Development [unpublished research]
Resource 3: Reading cards
![]() Teacher resource for planning or adapting to use with pupils
Teacher resource for planning or adapting to use with pupils

Resource 4: Word games
![]() Teacher resource for planning or adapting to use with pupils
Teacher resource for planning or adapting to use with pupils
These games can be played in any language and with any age, provided pupils are moderately competent in literacy skills.
Game 1: Bingo
Read the pupils a story they enjoy and ask them to choose two words they like.
Ask each pupil for their words and write the key words on the chalkboard where everyone can see.
Divide the class into groups of six and ask each group to choose 12 words for their group. These can be different for each group.
Each pupil makes a bingo sheet by drawing a big square divided into nine small squares (see example below).
Tell each pupil to choose any nine words from their list of 12 and copy these into the bingo sheet, one word in each square. Pupils’ sheets will be different, because they can only choose nine out of the 12 words.
One pupil has the master sheet with the 12 words. They call the words out in random order. As a word is called out each pupil who has the word must cross it out from the bingo sheet. The first to cross out all their words shouts ‘bingo’ and has won.
Let each group play again with each pupil taking a turn at calling out the words.
If you want to use the bingo sheets more than once, ask the pupils to cover the words with stones or counters as the words are called out.
Did the pupils learn new words? How do you know this?
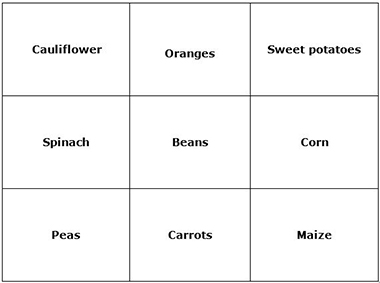
Sample list of words for bingo:
- Beans
- Cabbage
- Carrots
- Cauliflower
- Corn
- Mangoes
- Maize
- Oranges
- Paw paws
- Peas
- Spinach
- Sweet potatoes
Two examples of bingo cards:
Game 2: Word soup
Make a list of nine words, e.g. parts of the body, rooms in a house, or vegetables. Put this list on the board (next to pictures illustrating the words if you can).
Give each pupil a sheet of squared paper. Tell them to enter the key words into the squared paper, one letter per square. Tell them that words can go from left to right, or top to bottom. Tell pupils to fill the extra squares with any letters of the alphabet. (See example below.)
When every pupil has done this, collect the sheets and mix them up. Now distribute them randomly, and ask pupils to circle all the key words they can find. Each pupil knows there must be nine. The first to finish is the winner.
The pupils can then choose their own subject or area and a word soup from this to give to a friend to play.
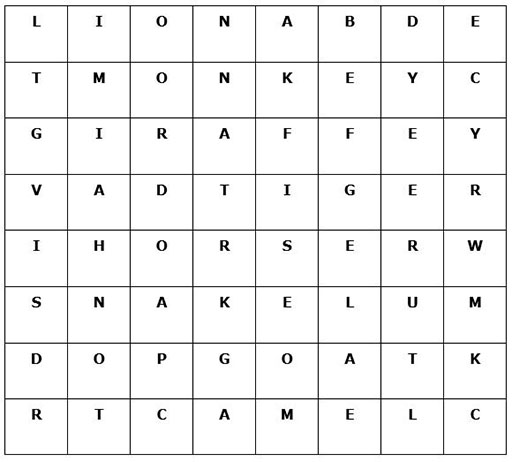
Words to find in this word soup:
- Goat
- Lion
- Snake
- Tiger
- Camel
- Giraffe
- Monkey
- Horse
Create your own
You can make this more interesting by giving ten words and asking them ‘Which word is NOT included in the soup?’ You can use this game for lots of different words and in different subjects.
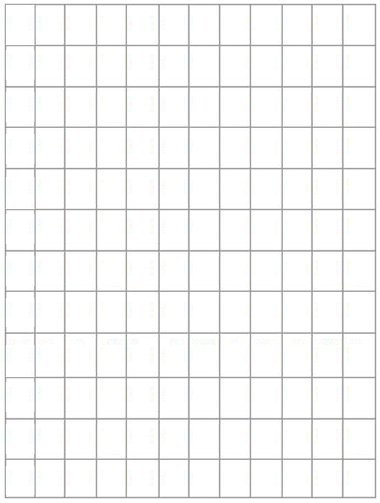
A blank template for word soup is below. You can add more squares or make it smaller to make the game harder or easier depending on the age and ability of your pupils.
Resource 5: Skipping song
![]() Teacher resource for planning or adapting to use with pupils
Teacher resource for planning or adapting to use with pupils
Acknowledgements
Grateful acknowledgement is made to the following sources:
Other
Resource 2: Research on local games: Original source: Shange, N., Nelson Mandela Foundation’s Unit for Rural Schooling and Development [unpublished research]
Every effort has been made to contact copyright holders. If any have been inadvertently overlooked the publishers will be pleased to make the necessary arrangements at the first opportunity.
Section 4: Using story and poetry
Key Focus Question: How can you use poetry and story to stimulate pupils to write?
Keywords: name; praise; poems; stories; biographies, writing
Learning Outcomes
By the end of this section, you will have:
- used name or praise poems or stories to stimulate pupils’ ideas for writing;
- used resources such as magazine or newspaper articles to stimulate ideas for writing life stories (biographies);
- explored ‘drafting’ and ‘crafting’ when writing.
Introduction
Throughout Africa, we have a rich oral and written literature about people who are, or who were in the past, important to their families, their communities and their countries. They are celebrated in praise songs and poems and in life stories (biographies). Using this rich cultural history in your teaching can provide reading materials for the language classroom and stimulate pupils’ interest in writing.
1. Using poems to stimulate writing activities
If pupils listen to and read poems or stories that they enjoy, they are more likely to be interested in developing their own reading and writing skills in their home language or in the language of the classroom.
In order to become successful writers, pupils need several ‘tools’. Firstly, they need something to write about. In Activity 1, you will use examples of name or praise poems or stories to give pupils ideas. Then you will guide them in writing the first draft of a name or praise poem or story. It is important for pupils to understand that writers ‘craft’ their poems and stories. This means writing several draft versions, to which they make improvements, until they are satisfied that their poem or story is the best they can make it.
Case Study 1: Reading and writing name poems and stories at a teacher workshop
At a four-day workshop in Johannesburg in South Africa, some teachers of English read poems and stories about names. In these, the writers described how they came to have their names, what they liked or did not like about them and what words or images they associated with them. The teachers really enjoyed what they read and asked if they could write their own name poems or stories during the workshop.
On the second day, each teacher read his or her first draft to a partner. They gave each other feedback on what they liked and what they thought could be improved, for example by adding details and choosing different vocabulary or punctuation.
On the fourth day, having worked on their drafts the day before, they each read their completed poem or story to the whole group. There was laughter, there were some tears and there was much applause.
When they were asked to reflect on their experience, they said:
- no one had been ‘stuck’ for something to write about;
- while most wrote in English, they enjoyed using occasional words or phrases in an African language to express a particular idea;
- they benefited from the feedback on their first draft;
- they felt proud of the final version;
- they enjoyed listening to the other stories/poems;
- many of the poems were similar to traditional praise poems and songs.
The teachers decided they would read their own and other name poems or stories to their pupils and help them to write about their names.
Activity 1: Drafting name or praise poems or stories
Use Resource 1: Preparing lessons on name or praise poems to prepare for this activity and Resource 2: Name poems and stories or Resource 3: Praise poems and stories for ideas. Choose either name poems/stories or praise poems/stories.
- Ask pupils to suggest what a name poem/story or a praise poem/story would be about.
- Ask them to listen while you read aloud the poem(s)/story(ies) you prepared.
- Ask them questions about what you have read to them.
- Ask pupils to discuss with a partner either what they know about their name or that of a family member and how they feel about this name, or what they know about the person, animal or object they wish to praise.
- Next, ask some pupils to report to the class on their discussion.
- Ask pupils to write the first draft of a poem or story about their own or family member’s name or in praise of their chosen person, animal or object.
- Collect the drafts in preparation for the Key Activity.
Did writing name or praise poems/stories give your pupils ideas for writing?
Were you pleased with the way you organised the lesson? What changes would you make next time?
With younger children, you might write a name poem together, sharing ideas and using familiar words in the classroom language.
2. Working in groups to write life stories
Some of the first stories children hear are likely to be stories about the life experiences of family or community members. The life stories (biographies) of famous people are frequently published in magazines and newspapers and even in comic form, so, whether from listening or from reading, many pupils are likely to be familiar with life stories. This is a good starting point to stimulate interest in reading and writing.
In the classroom, pupils need support from their teacher and from one another when they are learning to speak, read and write – particularly if this is in an additional language. Case Study 2 and Activity 2 show how you can give pupils opportunities to read, talk, work together in small groups and write the first drafts of the life stories of people they are interested in. Pupils need examples to guide their development as writers. The articles they read can help them organise their writing and help with sentence structure and vocabulary.
Younger pupils will need you to work with them, guiding their writing and gradually extending their vocabulary.
Case Study 2: Using pupils’ interests to develop reading and writing skills
Mr Simon Ramphele noticed that, in the playground, some Grade 6 boys – who showed no interest in reading and writing during English lessons – often sat together to read the soccer newspaper, Laduma. They told him they enjoyed finding out about the lives of their favourite players.
This gave Simon an idea. He asked the whole class whether they ever read newspapers or magazines and, if they did, what they enjoyed reading. Many said they tried to read stories about people who interested them, even though they couldn’t understand all the words. Simon organised a collection of newspapers and magazines for the classroom. Then he asked pupils who they were most interested in reading about. The favourites were sports stars (mainly soccer, but some basketball, athletics and boxing), musicians, film and TV stars, followed by fashion models, politicians, community leaders and successful business people.
Simon grouped pupils according to their interests. There were several groups for sports stars and musicians! He gave magazines and newspapers to each group and asked them to find articles/pictures about one person who interested them. Then, as a group, they helped each other to write one or two short sentences about the person’s life. They used their own words as well as vocabulary from the articles. They wrote their own title.
Simon was pleased to find that most pupils were involved in reading and, while some did more of the writing than others, everyone participated. Each group enjoyed reading their biography to another group.
Activity 2: Reading and writing life stories
Use Resource 4: Preparing lessons on life stories to prepare for this activity.
- Ask pupils to read together the story you have copied on to the chalkboard or paper. Or read it to them and explain what it is.
- Discuss the features of life stories (biographies). Ask pupils to tell you what categories of people (e.g. national footballers, local musicians) they are interested in, and why.
- Give each same-interest group several newspapers and magazines that contain articles about the category that interests them.
- Ask them to find articles about a person from their chosen category and use the information to write two important facts about the person (see Resource 4 for guidance on helping your pupils to do this).
- Collect the drafts for use in the Key Activity.
If your class is very large, you could do this activity with half the class or smaller groups in turn. You could also group pupils according to their ability – mixing more able and less able to help each other. With younger pupils, you might do this as a whole-class exercise where you help by writing their ideas down and sharing their words.
3. Focus on the writing process
When we write something, it is important to make it clear what we are trying to say. We need to plan. Next, we start writing and then stop and read what we’ve written. We may decide to change the order of some words, to add or take away some information or change it around. Finally, we check for incorrect spelling, punctuation or grammar. The final piece of writing may look quite different from our first draft. We have ‘crafted’ our writing.
In the classroom, one piece of writing would be completed (i.e. crafted) before another one is begun. Case Study 3 and the Key Activity show you how to prepare for lessons in which pupils are to craft their writing.
Case Study 3: Working with a colleague to help pupils’ writing
Mrs Dorcas Mazibuko and Mrs Beauty Mntambo teach English to Grade 6 classes in Daveyton. They give pupils detailed feedback on their writing, so sometimes stay after school and work together on their marking.
One afternoon, while drinking tea before they began marking, they agreed that they were feeling frustrated. Most pupils seemed to ignore the comments and corrections in their books. The friends thought this was strange, because they found the comments they gave each other on first drafts helped them to improve the final versions of the assignments for their professional development courses. Then Dorcas realised something important! Her pupils didn’t get a chance to do more work on the same piece of writing. Instead, there was a new topic in each writing lesson. When she said this to Beauty, her friend agreed that the same happened in her class. That’s how they’d been taught when they were at school!
They decided to try a new approach. They would use several lessons to work on drafting and crafting the same piece of writing. They would give pupils ideas to guide their writing and rewriting. At first, pupils didn’t like rewriting, but when they saw how their work improved, they started to take much more pride in it.
Key Activity: From first draft writing to crafted poems/stories
- Before the lesson, read pupils’ first drafts and decide on some general questions to ask them all to improve their work (see Resource 5: Questions for pupils). Write these on the chalkboard.
- Return the drafts, with some general comments on what you like about pupils’ writing. Explain that they are now going to craft their writing.
- Ask them to reread their first draft and to use the questions on the board to write an improved second draft.
- Ask them to exchange their second draft with a partner and give each other suggestions for improvements.
- Ask them to use these suggestions to write the final version. Go round the class and help where necessary. Encourage them to include drawings with their writing.
- If there isn’t time to complete this activity within the class period, ask pupils to complete the activity at home and report back the next day.
- Ask them how the process of drafting helped.
Were there any improvements in pupils’ writing as a result of the drafting and crafting process? How can you build on these?
With younger pupils or those less competent in the classroom language, you could work with them to draft and redraft a simple piece over two lessons – giving them space between lessons to think about what they really wanted to say.
Resource 1: Preparing lessons on name or praise poems
![]() Background information / subject knowledge for teacher
Background information / subject knowledge for teacher
Decide whether you wish to choose name or praise poems/stories to work on with your pupils.
- Choose one or more examples from Resources 2 or 3 OR from other resources that you have OR write your own poem or story.
- Write the poem(s)/story(ies) on large sheets of paper or cardboard so that when you use them in class pupils will be able to read the large print with you and then refer to the poems and stories when they are writing their own. If you don’t have large sheets of paper, write on your chalkboard.
-
Prepare some questions to ask pupils about the poem(s)/story(ies). Obviously, the kind of question will depend on what you have chosen.
For example, if you chose Tade’s or Thabo’s poem, you could begin with: ‘What do you notice about the way this poem is written?’ (Answer: Each line begins with one letter in Tade’s or Thabo’s name).
If you chose Hugh Lewin’s praise story about Jafta’s mother, you could ask: ‘Would you like to have a mother like Jafta’s? Give me a reason for your answer.’
When you have completed this preparation, you are ready to teach lessons about name and praise poems and stories. When pupils begin writing, move around the class to help anyone who finds it difficult to get started. Some may need help with ideas, others with vocabulary.
Resources 2 and 3 are all name or praise poems, songs or stories but the language is much more difficult in some than in others.
Resource 2: Name poems and stories
![]() Teacher resource for planning or adapting to use with pupils
Teacher resource for planning or adapting to use with pupils
A name poem written by a teacher in South Africa
Marumo – My Praise Name by Marumo Magdalene Mafokoane
A name poem written by a teacher in South Africa
Thoughts about the letters of my name by Thabo X
A name story written by a teacher in South Africa
A naming story that was told to me by Mbhevula Ntuli
Resource 3: Praise poems and stories
![]() Teacher resource for planning or adapting to use with pupils
Teacher resource for planning or adapting to use with pupils
A traditional Zulu praise poem – in isiZulu and in English translation, with some explanatory notes
| isiZulu | English |
|---|---|
| Ujama kaNdaba! | Jama son of Ndaba! |
| UJama kaluthwana kangakanani, | Jama is not deceived to the slightest extent, |
| Nasenhlamvini yomkhont’angenela, | Even on the point of a spear he can be at ease, |
| Nasemagatshen’ angaphathetela. | Even on branches he can hold tight. |
| Obengumqingo wang’itshe laseZihlalo, | He who was solid like a rock of Zihlalo, |
| Ebilingalayezwa ngabaphath’ izinhlendla, | Which could be commanded by those who carry barbed spears, |
| Thina bamaklwa singathath’ichoba sophule, | While we of the broad-bladed spears could save ourselves by using a sandstone, |
| UMabopha wakithi kwaZwangendaba, | Inspirer of our place at Zwangendaba, |
| Ongibophe zaluk’ inhlazane nemfuduluko, | Who inspired me as the cattle went out to graze at midday, |
| Obabis’ ihlaba elikuMahogo, | Who made bitter the aloe of Mahogo, |
| Othabis’ idukumbane elikuNgcingci | Who made glad the trifle of Ngcingci. |
This is a poem in praise of Jama who was an early Zulu chief. Hlaba (aloe) and Dukumbane (trifle) were the names of regiments of young soldiers who were made ‘sharp’ (bitter) or pleased (glad) by Jama.
A praise poem written by a South African pupil
Praise poem for Sekhukunene by Nathaniel Seleka
A praise song sung by children in Soweto
An explanation of some of the words and ideas follows the poem.
Ma Sisulu
Notes
- Mrs Albertina Sisulu is one of the heroes of the struggle against apartheid in South Africa. Her husband Walter was one of the leaders of the African National Congress and was imprisoned with Nelson Mandela on Robben Island. While Walter was in prison, Albertina was not allowed to leave Orlando township in Soweto and for much of the time she was a banned person. This meant, among other things, that she could not be quoted in the media (i.e. she was silenced – line 12). She worked in Soweto as a midwife, helping to deliver babies.
- Sawubona (line 7) is a Zulu greeting, roughly translated as ‘Hello!’
- laaitjie (line 8) is an Afrikaans word meaning ‘little child’ or ‘young one’.
- SB (line 10) refers to the Security Branch – the branch of the police who checked to see if Mrs Sisulu had defied her banning order.
A Yoruba poem in praise of the python
Some praise poetry praises animals or objects rather than people. Here is a poem from the Yoruba people. Explanation of some of the language is provided after the poem.
Python
Notes
- To walk with a swagger is to walk proudly – thinking you are the best, showing off. In Line 1, the poem describes the python as a swaggering prince.
- The questions in Lines 6 to 9 suggest that the python has many houses – both on the ground and in water.
- In verse two, the poem suggests that other animals and people would be too frightened to walk next to the snakes – that is why snakes ‘walk’ singly (by themselves).
Resource 4: Preparing lessons on life stories
![]() Background information / subject knowledge for teacher
Background information / subject knowledge for teacher
- Collect the resources that you will need. This may take some time, but the newspapers, magazines and comics that you collect could be used for many different kinds of language lessons in addition to those on reading and writing life stories. Some pupils may be able to bring newspapers and magazines from home, so ask them to ask their families for permission to do so. Ask your colleagues and friends to contribute newspapers and magazines that they have finished with. In some countries, newspaper and magazine publishers may be prepared to donate copies to your school. Some NGOs also have excellent publications. For example, in South Africa, comics about Nelson Mandela’s life are available from the Nelson Mandela Foundation and the NGOs ‘Soul City’ and ‘Love Life’ also have useful magazine materials.
- Before you begin these lessons you must have enough reading material about a range of well-known people for each group of pupils to work with.
- Copy on to large sheets of paper or cardboard or on to your chalkboard the life story of Hugh Masekela (biography below) OR another life story of your choice that is written in fairly simple language.
- Make a list of common features of life stories to discuss with your pupils. These include:
-
- usually telling the story in a time sequence from early years to later years in the person’s life;
- highlighting the special achievements of the person’s life;
- details of something particularly interesting or amusing about the person’s life.
Now you are ready to begin the lesson!
Guiding pupils while they write life stories
While pupils are working in their groups, move round the room to check that they understand the task and are able to find articles to use. You could write a ‘checklist’ on the chalkboard to guide pupils in their writing. For example:
- name(s) of the person;
- place of birth;
- family details;
- ‘history’ – school days, first achievements, later achievements;
- interesting/sad/amusing things that have happened in the person’s life.
Encourage pupils to think about the order in which to write the information about the person and to use some of their own words. They should not just copy from the articles.
Hugh Masekela’s life story (biography)
‘The magic blower – Hugh Masekela’
Adapted from New Successful English, Learner’s Book, Grade 5 (2001), p.19 (Cape Town: Oxford University Press). ISBN: 0 19 57433 4
Resource 5: Questions for pupils – to think about how to improve (craft) what they have written in their first draft
![]() Pupil use
Pupil use
- Does your poem/story have a title? If no, what would be a good title? If yes, is the title likely to interest readers? Is the title a ‘good match’ with what you’ve written about?
- Will a reader be able to follow your ideas or the sequence of events in your poem or story?
- If you have written a description, have you included plenty of details?
- Now that you’ve read your poem or story again, what would you like to add or to take out?
Acknowledgements
Grateful acknowledgement is made to the following sources:
Other
Resource 3: Praise poems and stories: Original source(s):
A praise poem written by a South African pupil. Praise poem for Sekhukunene by Nathaniel Selka, taken from:English Matters, Grad 7 Anthology, compiled by Lloyd, G. & Montgomery, K. (1999), p.67. Cape Town: Cambridge University Press) ISBN: 0 521 66747X
A praise song sung by children in Soweto, taken from:
New Successful English, Reading Book, Grade 6 (2001), p.115. (Cape Town: Oxford University Press). ISBN: 0 19 571433 4.
Python taken from English Matters, Grade 7 Anthology, compiled by Lloyd, G. & Montgomery, K.
Resource 4: Preparing lessons on life stories: Original source:
Hugh Masekela’s life story (biography) The magic blower – Hugh Masekela.
Adapted from New Successful English, Learner’s Book, Grade 5 (2001), p.19 (Cape Town: Oxford University Press). ISBN: 0 19 57433 4
Every effort has been made to contact copyright holders. If any have been inadvertently overlooked the publishers will be pleased to make the necessary arrangements at the first opportunity.
Section 5: Turning oral stories, poems and games into books
Key Focus Question: How can you support language learning by making and designing books?
Keywords: writing; illustrating; designing; book; cover
Learning Outcomes
By the end of this section, you will have:
- used discussion to help pupils understand the similarities and differences between oral and written texts;
- developed ways pupils can turn oral stories, poems, songs or games into written and illustrated forms;
- explored how to produce books of stories, poems, games and songs for a class library.
Introduction
One important aspect of teaching is that your pupils see a real purpose to the tasks you set them. By helping pupils to make books for the class library, you will be giving them a reason for taking care with their writing and drawing. This will also encourage them to value their home languages and the classroom lingua franca or additional language. The books can be written in the pupils’ home language(s), a classroom lingua franca or an additional language. More than one language can be used in the same book. The books pupils make, with your help, will also give you extra materials for reading activities.
1. Showing that you value home languages
Pupils who speak a language at home that is different from the language of the classroom need to know that you value their home language. This is important because a home language is part of who a person is. One way of demonstrating this is to encourage your pupils to tell stories and riddles, recite poems, sing songs and explain games in their home languages and then to write these down, either in their home languages or in another language.
In Activity 1, you help pupils explore the similarities and differences between oral and written texts. You will encourage them to think about what is valuable about the oral tradition, why people write things down and which languages are used in speech and writing.
Case Study 1: Telling stories in home languages; writing them in a lingua franca
Mr Okitikpi, a Yoruba-speaking teacher, has recently been transferred to a community in Northern Nigeria that has Hausa as a common language, but a number of pupils speak three Nigerian languages. A few parents and young adults have agreed to act as teaching ‘aides’. They know Hausa and some English and are helping Mr Okitikpi to learn Hausa so he can communicate with his pupils better. As some of his pupils can speak three Nigerian languages, Mr Okitikpi has involved these aides in storytelling activities to build pupils’ confidence in speaking and to show that their home languages are valued.
He wants pupils to write some stories down, ideally in their home languages. However, a number of the languages do not have a written form, so he decides they should write the stories in Hausa.
One of his aides discusses with pupils why people write stories down. Next, they write down their favourite story, in Hausa, so that they can put it into a book for the class library. Mr Okitikpi puts the pupils into groups for this writing activity, making sure that at least one group member is fairly fluent in Hausa and can support the others. He also asks his aide to help him monitor the writing process.
Activity 1: Writing down oral literature and games
First, read Resource 1: How stories are made into books, and think about the answers to the five questions for pupils.
Ask pupils for the titles of home language stories, poems, songs and games they know. Write these on the chalkboard.
Discuss these questions with pupils:
- are these home language texts written in books?
- why do people write down stories, poems, songs and games in books?
- would you like your home language stories, poems, songs and games to be written in books? Why, or why not?
- in which language or languages would you write poems, stories and games for a book? Why?
- how do books get written and produced? Tell pupils they will be making books for a class library.
Ask pupils to each choose a favourite story and to write the first draft in the language of their choice.
Were you pleased with the discussion?
How did pupils respond to this activity?
2. Turning stories into books
Some kinds of learning, such as learning to play a musical instrument, use a computer or drive a car, require a great deal of practice. As a teacher, you need to give pupils opportunities to repeat and practise what they have tried before so that they can improve on their first efforts. While Activity 2 in this section is similar to the Key Activity in Section 4, the repetition is important. Pupils will learn that writing is a process and that their written stories, poems and instructions for games will give more pleasure to others if they craft them carefully.
Writing, illustrating and reading these books may take several lessons, but as these activities provide many opportunities for language work, the time will be well spent. You can use Resource 2: A checklist for pupils to help pupils assess their work. Case Study 2 suggests how teachers can make books with pupils who are not yet very skilled as writers.
Case Study 2: Helping beginner readers and writers to make a storybook
Regina Banda teaches 60 Grade 1 and 2 pupils, in a combined class, at a farm school near Lilayi in Lusaka. Regina regularly invites parents into school to tell stories in Chinyanja to their pupils.
Regina asked her pupils to help her turn a favourite story, which they had helped create, into a book. First she made a big blank book (see Resource 3: Turning pupils’ stories into a ‘Big Book’).
She wrote out the story, using short phrases and sentences. Then she decided where each phrase or sentence should go in the blank book. She used a black wax crayon to write the story in large neat letters, leaving space for drawings.
In class, Regina held the book up for pupils to see, and read the story with them. She discussed what kind of picture was needed on each page. She gave pieces of paper to each pair of pupils, and two pairs of pupils illustrated each of the 15 pages.
She asked pupils to find the right page for each picture, and helped them paste the pictures in.
Activity 2: Crafting first drafts and planning the books
Ask pupils in groups of four to read the first drafts of their stories (from Activity 1) to each other.
Ask them to choose two drafts (from the four) to work on in pairs to improve them. They should use the checklist in Resource 2 to guide their work. Remind them ‘real’ authors revise their work many times.
Next, ask them to show it to the other pair in their group for further improvements.
Now collect their work and write on it corrections to spelling, grammar and punctuation.
Next lesson, give the groups their blank book (see Resource 3) and ask them to do the following:
- plan which sentences go on each page and where illustrations will be;
- decide how to divide the writing and drawing tasks, so that each group member participates.
Ask them to show you their plan; discuss this and then ask them to carry out their plan.
With younger pupils, you could write a story together in a big book and then the pupils can do drawings for each page.
3. Working in groups on book design
Communication is not just about words. Today’s newspapers carry far more photographs than in the past and modern textbooks include many more illustrations than older ones. Advertisers use images on billboards, in magazines and on television to sell products. Computer screens combine words and images in exciting ways. Pupils need to be able to create and read texts that combine the verbal (words) and the visual (pictures). As the teacher, your responsibilities include:
- keeping up to date with what interests pupils;
- including design activities (for example, designing grocery packages, posters, advertisements) in language and literacy lessons.
This part focuses on designing a cover for the pupils’ books of stories, poems, songs and games.
Case Study 3: Discussing and designing book covers
Mr Eddie Mubanga encourages his Grade 6 English pupils to ask questions in their reading lessons about words and expressions that they hear or read but don’t understand. One morning, a pupil told the class he had heard one character in a TV drama say to another, ‘Don’t judge a book by its cover.’ Mr Mubanga asked his pupils for ideas about what this expression means and why it might have been used in the drama. After a few minutes of discussion, pupils understood that the design of a book cover may or may not give a good idea of what a book will be about. In a similar way, how a person looks or what he or she says may not be a reliable guide to what that person is like ‘on the inside’.
Mr Mubanga decided to take the discussion further. He asked the class to think about the purpose of book covers and then to look at the cover of a storybook he had brought in. Can they tell from the cover what the story is about? What did they like or not like about the cover? Could it be improved and if so, how? After a lively discussion and reading the story to the pupils, he asked them to work in groups of four to make a new cover design for this book and gave them loose sheets of paper to work on. When they had finished, one pupil from each group explained to the class why they had chosen their design. Mr Mubanga displayed the covers on the classroom wall.
Key Activity: Writing books, designing covers
Having finished the writing and drawings for their storybooks, your pupils are now ready to design their book covers. You could use the backs of posters, cardboard boxes and other ‘throwaway’ materials, especially if resources are limited in your school. See Key Resource: Being a resourceful teacher in challenging conditions for further ideas.
- Show pupils some book covers and ask them what they think are good features (see Resource 4: Features of good cover design).
- Ask each group to design a cover for their book. They need to agree on the words, drawings and the position of each and decide who will write or draw each part of the cover.
- Move around the groups to discuss their designs with them and provide support and guidance as they make their book cover.
- Allow time for the groups to assemble their books.
- Ask one pupil from each group to display the book and encourage other groups to read it.
- Put the books into the class library.
What do you think your pupils learned from this activity?
Were the books read by other pupils once they were in the library?
With young children, you could read the story or poems and ask them to draw a picture for the cover or inside.
Resource 1: How stories are made into books
![]() Background information / subject knowledge for teacher
Background information / subject knowledge for teacher
Making a book for your class alongside their normal reading and writing activities gives pupils an understanding of the importance of being able to read to access information and new stories. This process might encourage your pupils to want to read more by making a book for the class using their pictures and their own words as they become more competent writers.
Stage 1: Books begin with a great idea.
The author writes down a story. Probably, the author will write a few drafts of the story, trying to improve it each time. Authors often do research for their stories to make sure that they spell words right and get their facts straight. Sometimes it takes many weeks for the author to find the right way to tell the story. When the author is satisfied, she’ll type up or write her words into a manuscript, which she will send to her editor at the publishing house.
Stage 2: Editors are very busy people, and they have to read a LOT!
Manuscripts come in every day from authors all over the world. Editors have to sort through all of the manuscripts and decide which stories they think should be published. Editors love being able to tell authors that they want to publish the author’s story. And, of course, the author is thrilled! The editor also decides who should illustrate the manuscript. It’s very odd to think that for some books the author and illustrator never meet each other! Sometimes, the editor helps them communicate back and forth.
Stage 3: The artist's work begins.
Before an artist sits down to illustrate a story, she finds out the size the book is to be, and then she plans out the pages. She makes a ‘dummy’ book, with rough sketches, to show to her editor and the book designer. At this point, the editor might make some changes in the text of the story. Editors are good at helping writers find clearer ways of saying things.
Stage 4: The book designer gets involved.
The designer takes a look at the artist’s dummy book, and he makes suggestions for the art. He also finds the right typeface to use in the book. The style and size of the letters can make a big difference in how the book looks in the end. The designer can also help the artist decide how the words of the story will fit in with the art. Next, the story is sent to a copyeditor so that spelling, grammar, and punctuation can be checked. Then the author has another chance to change any part of the story.
Meanwhile...
Stage 5: The artist gets busy creating the finished artwork!
She uses her dummy book as a guide. The pages must be measured exactly so that she draws the art in the right place. She makes marks in the gutter where the pages will be sewn into the binding, and she marks the trim lines where the pages will be cut.
It’s not easy! She needs to create the art the way it will look in the printed book. It needs to be wonderful. Lines need to be straight, and there needs to be space for the words of the story.
When this is finished, she delivers the art to her editor at the publishing house.
There, the art is checked for mistakes, and the production director estimates how much it will cost to make the book. He determines the printing schedule for the book and orders paper.
Stage 6: The book goes into production!
The designer shows how the words and art will be placed. Then colour proofs are made, and everyone checks to make sure the printed colours match the colours of the artist’s illustrations. That is what everyone is looking at in this picture.
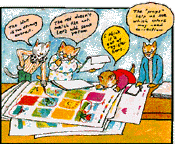
Once everyone is satisfied with how the art looks on the pages, final printing plates are made. The plates will be used on the printing press to print the pages.
Stage 7: Finally! It’s time to print the book!
After months of preparation, the printing takes only a day.
The thin plates (with impressions of the book on them) are wrapped around large cylinders that go in the printing press. Each cylinder prints one of the four colours of the book – first yellow, then blue, then red, then black. The other colours are made from combinations of these four colours.
Special grippers and conveyer belts help move the sheets of paper through the press. It’s VERY noisy in a printing plant!
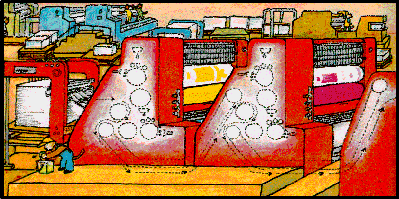
Stage 8: Hooray! The moment everyone has been waiting for is here!
The book is printed, and it looks wonderful!
Did you know that all of the pages of a book are printed on one BIG sheet of paper? Half of the pages are printed on one side of the press sheet and the other half are printed on the opposite side. After these sheets are printed, they are folded, cut and then bound into a book.
Stage 9: The new books are distributed!
Bound books are taken to the book warehouse, where they stay until they are sold to libraries and bookshops.
How do librarians and booksellers know that a great new book has been published? Other people at the publishing house sell and publicise the book. Sometimes posters and special displays are made. Publicists send out review copies of the book to people in the media. Authors often are interviewed by reporters in the newspaper and on TV.
Lots of people work hard to make sure that one day...
Stage 10: ...you read the book!
All of the people you’ve met are thinking about you and whether or not you will like the book. The author and artist think about you when they create the story and illustrations. The editor and designer think about you, too, when they put the book together. And YOU are the reason the big noisy printing press prints the books for you to read.
Happy reading!
Adapted from: How a book is made – http://www.harperchildrens.com (Accessed 2008)
Other websites on this topic include http://library.thinkquest.org and http://www.factmonster.com (Accessed 2008)
Resource 2: A checklist for pupils – to use when editing their work for a book
![]() Pupil use
Pupil use
| Checklist for stories | ✔ |
|---|---|
| Does the story have a title? | |
| Will this title make readers interested in the story? | |
| Will readers be able to follow the sequence of events in the story (what happens first, what happens next...)? | |
| Have characters and places in the story been carefully described so that readers can picture them? | |
| Does the story come to a climax/conclusion? | |
| Checklist for poems or songs | ✔ |
| Does the poem or song have a title? | |
| Will this title make readers interested in the poem or song? | |
| Does the poem or song have a rhythm or rhyme (or both) that readers are likely to enjoy? | |
| Have the words been carefully chosen to describe people, animals, objects, actions or feelings? | |
| Checklist for games | ✔ |
| Does the game have a name? | |
| Are the instructions in the correct sequence? (first do this…) | |
| Are the instructions clear? |
Resource 3: Turning pupils’ stories into a ‘Big Book’
![]() Teacher resource for planning or adapting to use with pupils
Teacher resource for planning or adapting to use with pupils
What you will need
- Some large sheets of ‘newsprint’ (approx 60 cm x 85 cm)
- Some fat wax crayons
- A pencil
- Thick felt tip pens
- A fat sewing (or embroidery) needle
- Some thin string
- A glue stick
- Some smaller pieces of plain white paper
- A large sheet of card, or poster paper, or a ‘chart’
- The beginning of the story that you told your pupils
- The rest of the story, which your pupils have dictated to you
How to make a Big Book
Making books can really motivate children to want to read and write more for themselves. With younger pupils, you may want to do more preparation beforehand, limiting the tasks they are involved with to specific aspects (see below). Older pupils, depending on their experience, will be able to undertake many more of the tasks themselves (as in Activity 2).
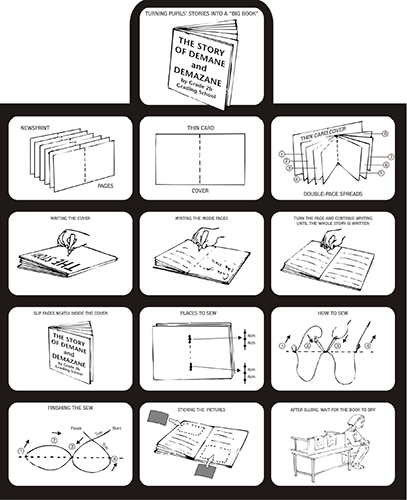
- First of all, read through the whole story carefully and make sure it is complete and properly punctuated.
- Decide how much text (writing) you want to put on each double-page spread. If you have Primary 1s and it is the beginning of the school year, you may want to make sure that there are no more than two or three sentences on a double-page spread. In some parts of the story you may only want to write a phrase. If you are working with older pupils, you can write more.
- Think about what illustrations or drawings you need to accompany the text. This will help you to decide how long you think the book will be, and how many pages it will have.
- Take your sheet of thin card, and fold it in half. This will be the cover of your book. If a book made of newsprint pages has a card cover, it lasts much longer.
- Write out the whole story on an A4 sheet of lined paper and put the text for each double-page spread on a new line. This will be really helpful when you write out the text on the actual pages.
- Fold each sheet of newsprint in half. Slip the sheets together and make sure that they are neat, and fit nicely. Don’t fasten the sheets together yet.
- Now decide where you are going to put the text. Will you put it on the left-hand page of each double-page spread? Or will you write on the right-hand pages? Will you write at the top of the pages? Or will you write at the bottom? Will each double-page spread look a little different? Perhaps you will choose to write right across the double-page spread sometimes? You will have to make decisions about this.
- Now take the folded newsprint pages. Work at a large table. Use the fat black wax crayon and write neatly the title of the story on the outside of the first sheet. Write the title just as it would look on the very first page in a book that you would buy in a shop. You want your book to look professional.
- Underneath, in smaller letters, write the names of all the pupils who created the story, or your class. (If this is the whole class, it will be very difficult to fit in 50+ names, so just name the class if you can’t fit in all of the names!)
- Next, open the first sheet of newsprint. This will be your first double-page spread. Write the first sentence(s) or phrase(s) on this double-page spread, using the fat black wax crayon. You must leave enough space for the illustrations or drawings.
- When you have written the text for this double-page spread, turn over to the next double-page spread, and write the next sentence(s), or phrase(s), with the black wax crayon. Carry on in this way, until you have written out the whole story.
- Take the ‘cover’ of your book. You need to decide where you want the title. It’s a good idea to leave space for an illustration. Will you write the title at the top, or at the bottom? When you have decided, write the title lightly in pencil. When you are happy with the way it looks, write over the pencilled words with a felt tip pen.
- Slip the newsprint pages neatly inside the ‘cover’.
- Now sew the pages and cover together. There are several ways that you can do this, but the following way works very well:
- Open out your book so that the cover is at the bottom, and the middle double-page spread is on top. With a big book, it is a good idea to mark two places on the crease in the middle, where you can sew. Mark one place in the top half of the crease, and mark another one in the bottom half. In each place, make three spots. These spots should be about 4 cm apart.
- Thread your needle with a piece of thin string about 50 cm long. Push the point of the needle through the middle of one of the sets of three spots, right through all the newsprint pages and the cover. Pull the string through firmly, but leave a piece of string about 7 cm hanging and follow the chart.
- Cut the string attached to the needle, about 7 cm from where it has come through the pages. Now tie the two 7-cm ends together firmly.
- Repeat the process at the opposite end of the crease.
- Make a list of the illustrations that you need. Decide if you are going to ask specific children to make the illustrations, or whether you want your whole class to be involved. Pupils can work well in pairs to create the pictures. Plan how to organise the drawings.
- Choosing the pictures. Read through the whole text with your pupils. Hold the pages open, and read the story aloud. Read the story so that it sounds interesting.
- Tell your pupils that you want them to make the pictures. As you read through the text a second time, pause on each double-page spread and discuss the picture that it needs. As you and your class decide what is needed on each page, assign each illustration to a specific pupil, or pair of pupils.
- Give them time to make the pictures carefully. Involve the pupils in sticking them in the book.
- Even beginner readers can memorise the story, and have a sense of where each picture goes. Underneath each picture, write the name(s) of the pupils who made the picture. Continue in this way until all the pictures have been glued in and labelled.
- When all the illustrations have been glued in, read the book with your pupils. We are sure that both you and your pupils will feel very proud of their efforts.
Adapted from: Umthamo 2, University of Fort Hare Distance Education Project
Resource 4: Features of good cover design
![]() Background information / subject knowledge for teacher
Background information / subject knowledge for teacher
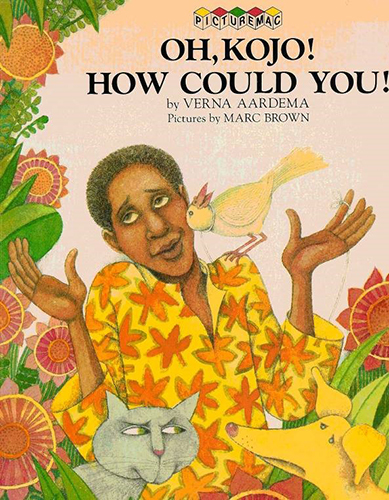
- Eye-catching – a potential reader is attracted to the ‘look’ of the cover.
- The title is carefully positioned on the page and stands out clearly.
- The title encourages readers to open the book.
- The words of the title and the name(s) of the author(s) are easy to read.
- The use of colours attracts the reader.
- The use and position of images (drawings or photographs) on the page attracts the reader and these images are ‘connected’ with the book.
- There is some ‘open space’ on the cover so that the design is not too ‘crowded’.
Acknowledgements
Grateful acknowledgement is made to the following sources:
Other
Resource 1: How stories are made into books: Original source(s):
Adapted from: How a book is made – http://www.harperchildrens.com (Accessed 2008)
Other websites on this topic include http://library.thinkquest.org and http://www.factmonster.com (Accessed 2008)
Resource 3: Turning pupils’ stories into a ‘Big Book’:
Adapted from: Umthamo 2, University of Fort Hare Distance Education Project
Resource 4: Taken from: http://www.twbookmark.com/, Oh, Kojo! How Could You! published by Macmillian Children’s Books 1988 (Accessed 2008)
Every effort has been made to contact copyright holders. If any have been inadvertently overlooked the publishers will be pleased to make the necessary arrangements at the first opportunity.