Use 'Print preview' to check the number of pages and printer settings.
Print functionality varies between browsers.
Printable page generated Tuesday, 28 July 2026, 5:41 AM
Module 2: Exploring shape and space
Section 1: Exploring shapes
Key Focus Question: How can you help pupils develop and use a mathematical vocabulary for shape?
Keywords: object; shape; geometry; language; classification; open-ended activities
Learning Outcomes
By the end of this section, you will have:
- used open-ended sorting activities to explore knowledge of shapes;
- explored practical ways to introduce pupils to the language or ‘register’ of mathematical terms;
- used practical activities to develop pupils’ understanding and use of mathematical descriptions of basic geometric shapes.
Introduction
Investigating shapes or exploring geometry with your pupils can be very rewarding. Using a practical approach and objects from the pupils’ environment can help to raise pupils’ motivation and interest.
In this section, you use objects from everyday life to help pupils develop important geometrical skills, such as recognising, visualising, describing, sorting, naming, classifying and comparing.
1. Exploring and classifying shapes
To begin with, you will need to collect a range of resources that you could use for the activities in this section (see Resource 1: Using feely bags). It may be helpful to gather and keep a box of such objects as a permanent resource. Your pupils may enjoy helping you collect the resources, and ‘looking out for shapes’ in everyday life. (Remember to praise the pupils who contribute, and to take the opportunity to discuss the shape of any objects they bring.)
Case Study 1: Planning to study shape
Some primary mathematics teachers in Umtata, South Africa, were planning a geometry scheme of work for the term. As part of their in-service development, they wanted to prepare good, hands-on geometry activities for their pupils.
They decided to invite a mathematics education expert from their nearby higher education institution to help them write their scheme. She agreed, and suggested they start with a sorting activity. They needed to collect as many different objects as possible, such as empty cans, cotton reels, toilet roll tubes and pictures of different shapes in the environment e.g. buildings, fabric patterns and so on. In pairs, they planned an activity using these shapes and tried it themselves.
Back in their classes, the teachers asked their pupils to help them collect similar objects. When they had enough for the pupils to work in groups of five or six, with each group having ten or more different objects to sort, they tried out the activities.
The tasks were all about putting objects into groups that had similar properties, to record what property they shared, and which items had that property. The teachers were surprised and encouraged by the interest and thinking that the activity produced in their pupils.
At the next in-service meeting, each teacher reported back on what happened.
Activity 1: Helping pupils sort real objects
Collect together as many objects of different shapes as you can. You will need at least two objects for every pupil. You could use pictures of shapes from the environment as well.
- Divide the class into groups of five or six and give each group a selection of objects (see Resource 1).
- Explain what a ‘set’ is – a collection of items with some common features, for example, the class is a ‘set’ of children, who are all taught by you. This ‘large set’ can be grouped into smaller sets – one example would be a set of boys, and a set of girls. (You may like to physically separate the pupils into these two sets to illustrate this point.)
- Explain to the groups that they have a set of different objects. You want them to sort these objects into smaller sets. Ask them the following question: How many different ways can you sort these objects into sets? This makes the task an open task, so do not specify how many sets or any criteria.
- Ask them to explain their reasons for their sorting each set.
- As they work, observe them and listen to the discussions they have in their groups, noting carefully what they say. This will help you find out who has clear ideas and who is still exploring the ideas.
- Ask each group to share the different ways they sorted their objects and note the main features on the board.
You may wish to use a double lesson for this activity.
2. Introducing mathematical language
Having introduced the concept of sorting objects, and asking pupils to describe the characteristics in ‘everyday’ language, it is now time to develop a more mathematical way of describing some of the objects’ features.
In every area of activity, people develop special words and terms to describe what they are doing. The special language of mathematics is sometimes referred to as the mathematical register. Introducing pupils to the language of shape will take time and needs to be built into your lessons over time. As your pupils understand the concepts behind the names, this is the time to introduce the mathematical words. As well as using these words in practice, you might also like to ask your pupils to begin making a ‘mathematical dictionary’ to help them remember the meanings of such terms. Resource 2: A mathematical dictionary gives six examples of the kinds of words that pupils might use to describe the shapes they are working with.
Case Study 2: Using mathematical terms to sort objects
Mrs Johnson asked her pupils to sort a collection of different shaped objects that she had provided. Some pupils decided to group the objects according to where they would be used in the home, such as the bedroom, kitchen and bathroom. Other pupils were looking at whether the objects looked alike. Some groups found it difficult to describe the features of their objects, for example, they said that some shapes were flat, but could only describe the other shapes as ‘not flat’.
Gathering the whole class around her, Mrs Johnson examined some of these problematic ‘not flat’ objects with the pupils. Not using the mathematical terms at first, she began pointing out certain features (like curves, edges and corners) and asked pupils to describe these in their own words. Then, when a few pupils had described these features, and thought of all the words they could use, Mrs Johnson began to introduce the correct mathematical terms, and agreed with the class how they would describe such terms in their own words. She explained that they were beginning to learn ‘the beautiful language of mathematics’ (see Resource 2 for some terms to use).
Mrs Johnson made a large sheet for the wall and wrote the new mathematical words on it, and the definitions they had agreed. She asked the pupils to start to write their own mathematical dictionary at the back of their exercise books, drawing diagrams to show the meanings of these words. They added to this dictionary during subsequent mathematics lessons.
Activity 2: Describing shapes
Using a selection of the objects you have gathered, draw the pupils around you and show them some of the objects.
- Show them an object with a flat surface, then another with a curved surface.
- Ask the pupils to pick out other objects with flat surfaces, or with curved surfaces.
- Ask the pupils to return to their groups, and give each group a selection of objects.
- Their task is to put each object into one of four sets;
- all flat surfaces;
- all curved surfaces;
- flat and curved surfaces;
- others.
You can extend this activity through introducing the further terms ‘vertex’ and ‘edge’ and using these to sort the objects.
Make a table of their results to display in the classroom.
3. Using a game to practice mathematical words
One way to assess how well your pupils have learned to understand and use language to describe shapes is to use ‘feely bags’ (see Resource 1 for more detail). One pupil must carefully describe an object hidden inside a bag. The pupil should use the special words they have learned, and other pupils must try and guess which object is being described.
In this way, pupils have to visualise the shape in the bag, and correctly use the simple geometric terms they have learned, if they are to ‘win’ in the feely bag game. How you organise this, so that all pupils are engaged in the activity, is important because if done well, the learning of more pupils will be enhanced.
Case Study 3: Playing a feely bag game to practise mathematical terms
Mrs Johnson made some cloth bags big enough for a pupil’s hand to fit into, and with a drawstring around the top to close the bag up.
She put one of the objects from her collection into each bag, having carefully chosen the objects to give variation.
Mrs Johnson explained the game to her class and chose the pupil who would feel and describe the shape of the object in the first bag. This pupil had to describe the object using their newly learned words. The other pupils had to put their hands up when they thought they knew what the object was. Being able to feel and describe the object in the next feely bag was the reward for the pupil who guessed correctly.
When doing the activity, Mrs Johnson made sure all the pupils were paying attention, only allowing one to speak at a time so that pupils could think about what each person was saying.
Key Activity: Using a feely bag to think about shapes
First prepare your feely bag or box. You need a bag or box in which you put an object and the pupil can put a hand in to feel the object but not see it (see Resource 1).
You could have one feely bag for the class or, if your class is big, have more than one so that several groups can work at once. This will help more pupils participate.
Then proceed with the game.
- One pupil should feel one object in the bag/box and, without taking it out, describe it very carefully to the others. The pupil must not name the object.
- They should say things like, ‘it has all flat surfaces, it has so many corners, it has so many flat surfaces,’ etc.
- This carries on until one pupil thinks they can name the object.
- If it is the correct answer, the object is pulled out of the bag and the successful pupil is the next to do the feeling (but allowing only one chance per pupil).
Encourage your pupils to use the vocabulary they have learned in the previous activities to describe their objects. Ask them to add them to their mathematical dictionaries.
Resource 1: Using feely bags
![]() Teacher resource for planning or adapting to use with pupils
Teacher resource for planning or adapting to use with pupils
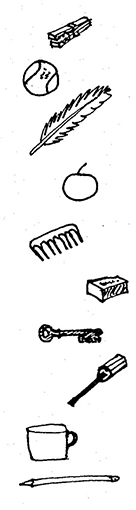
Feely bags or boxes, which can easily be made by you or your pupils (see below) can be used across the curriculum to help develop your pupils’ observations and language skills. In mathematics, it is good way to help pupils explore the properties of shapes and objects. In science, you might explore the textures of materials. Using a feely bag or box is a great motivator for pupils as the involvement in the game, the need to listen carefully and the desire to guess the right answer excites and interests them.
Suggestions for objects for shapes activities
You may use a selection of cubes (dice, blocks), rectangular prisms (boxes, wooden blocks), triangular prisms (wooden wedges, fancy chocolate boxes), spheres (balls), pyramids (wooden or plastic), cylinders (toilet rolls, pens, dowel sticks), cones (party hats, ice cream cones). You may also like to include one or two irregular or semi-irregular objects (stones, shells, leaves) to provoke discussion. All of these could be collected locally to help to link mathematics to the local environment.
Making a feely bag
For this you could use a paper bag that you cannot see through or you could sew a bag out of fabric about 30 cm by 30 cm with an opening at one end. The top of the bag needs to be able to be closed and opened to put in the objects and to allow the pupil to put in their hand to feel the object but ensure that no one else sees what is in the bag. You could use an elastic band or a drawstring to keep the top closed.
Making a feely box
Any medium-sized cardboard box will do for a feely box. You have to cut a hand-sized opening in one side of the box. This is so that a pupil can put a hand into the box and pick up something to feel. Some people cut two holes so that a pupil can put two hands into the box to feel for something. You need to keep the opening away from the rest of the class so they cannot see what is in the box.
How to play the game
The idea of the game is to hide some interesting, different things (which are familiar to your pupils) in the feely bag/box. You could use regular shaped bowls or pots, tools, or even tins of food.
- A pupil comes to the front and feels for something in the feely bag/box. He/she doesn’t take the object out or show it to the other pupils.
- Instead, the pupil then thinks very carefully of ways to describe the thing, without mentioning its name. He/she uses the sense of touch to list and describe observations. At the same time, the pupil has to be quite scientific/mathematical. He/she has to consider the properties the object is made of. He/she also has to think carefully about the shape, size and form of the item.
- Each time the pupil makes an observation, another pupil in the class is given a chance to try to work out what the object is.
- While this is happening, the teacher can act as a scribe (or secretary) and record the observations and the inferences on the board, or on a large sheet of paper. They list the main points only.
- This carries on until someone actually works out what the item is. Then the item can be pulled out of the box and is shown to the rest of the class.
- It is important that a little time is spent discussing the accuracy of the observations – mathematical language skills, the effectiveness of the descriptions, communication skills and the quality of the inferences.
Resource 2: A mathematical dictionary
![]() Teacher resource for planning or adapting to use with pupils
Teacher resource for planning or adapting to use with pupils
There are many on the market. A good one is published by Oxford University Press.
Here are a few words for geometry:
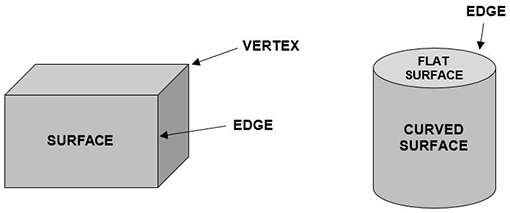
- Curved surface
- Edge
- Surface
- Flat surface
- Vertex
Pupils could fill in their own definitions for each word and check these with their classmates or with you if they are not sure their definitions are correct.
Section 2: Practical ways from sheet to cube
Key Focus Question: How can you help pupils ‘see’ and mentally transform geometric shapes?
Keywords: nets; geometry; visualisation; transformation; boxes; dice; investigations
Learning Outcomes
By the end of this section, you will have:
- explored practical ways to use the local environment and simple nets to help pupils understand 3D objects;
- used investigation and problem solving to extend your pupils’ thinking about the different nets to make cubes;
- used dice to encourage mental visualisation and transformation of cubic nets.
Introduction
Imagine you have to draw a shape on a piece of paper, which can be cut out and folded into a cube. On the paper you will draw the six squares that will fold up to make the six sides of the cube. Can you imagine the shape you would draw on the paper to make the cube?
It is not easy to do, as this imaginary exercise requires two important mathematical skills – mental visualisation (being able to ‘see’ with your mind’s eye a two-dimensional [2D] or three-dimensional [3D] mathematical image) and mental transformation (being able to ‘manipulate’ or change that image in some way).
This section explores practical ways to develop these skills in your pupils as they make nets. (A net is a 2D representation of a 3D shape, with dotted lines to represent folds, and solid lines to represent cuts.) Manipulating a real object will help your pupils visualise the transformations of this object and relate their understanding of shape to their own life.
1. Organising an investigation of 3D shapes
As your pupils work it is important that they feel that they are doing the investigation, that they are solving the problem. As a teacher, you need to be able to stand back and watch your pupils taking over the central stage. At first, this is often difficult to do, but if you can find a way to set up your classroom that gives pupils the space to think, talk and explore, many of them will surprise you with their imagination and understanding. For more information, see Key Resource: Using investigations in the classroom.
Activity 1 and Case Study 1 explore ways of allowing pupils to discover the nets for different shapes themselves.
Case Study 1: Investigating a net for a tin
Mrs Sawula in South Africa was doing work on shape. First, she took her class out into the local environment to look at all the different shapes they could find.
The next day, she wanted to start her lesson on nets by having her pupils discover a simple net for themselves.
Mrs Sawula asked them to think how they could make a paper plan of some of the shapes they had seen. She listened to some of these ideas. Then, having asked her pupils to bring in a tin (she collected a few herself for those who forgot or couldn’t bring one in), she asked them this question to discuss in pairs: ‘Your tin can was made from a flat piece of tin. Imagine your piece of paper is a piece of tin to be made into a can – what shape would have to be cut from the paper? Can you use the can to help you draw this shape on your paper?’ Resource 1: Net of a tin (a cylinder) shows how a 2D net can be folded to make a 3D object.
She gave the pupils time to try and solve this puzzle. Mrs Sawula enjoyed watching her pupils working and did not interfere unless she saw they were stuck.
She was pleased at how many were able to produce the net.
Activity 1: Identifying the net of an open box
For this activity ask each pupil to bring in an empty box. You should collect some too.
- Give each group of four some glue or sticky tape and four sheets of A4 paper.
Tell pupils that together they are going to explore how to make a box the same shape as the box (a rectangular prism – see below), using one A4 sheet and by drawing, folding and sticking.
- Ask them to work together and discuss how to do it before they start. Once they are happy with what they are doing, ask them to use one piece of paper to test their ideas.
- If some groups are stuck, give them a clue about how to start by suggesting they undo the box to make it flat.
- Walk around silently; only help if a group is stuck or asks for support.
- Ask each group to show their work to the class.
- In the next lesson, ask pupils to decorate their boxes and hang them from the ceiling.
- Finally, ask them to draw their plans or nets for the box they made and display these too.
2. Using group work to understand ‘nets’
In this part, you will help pupils extend their understanding by moving from open to closed boxes. This means adding a lid to the box and explaining what changes need to be made to the net.
Using the same groups working together, means that pupils can build on their collective ideas. Putting your pupils into new groups, in this case, would mean they would have to revisit earlier ideas first, which would slow down the development of new ideas.
In this part, you show your pupils how there is not just one correct answer, but many possible answers. By not telling them too much, but asking questions to guide their thinking, you are giving them the satisfaction of discovering things for themselves. This will build their confidence and give them courage to try new ideas.
Case Study 2: Designing nets for closed boxes
Mr Okon was pleased with the progress of his pupils in Activity 1. He explained that, in mathematics, some words have special meanings. In mathematics, for example, the word ‘net’ is sometimes used to mean a plane shape (a flat, 2D shape), which can be folded to form a solid 3D object. He asked his pupils to add this term to their mathematical dictionary and put in a definition. As they had made a net of an open box previously, he asked them to make a net of a closed box. He suggested they looked at the nets they had drawn last time and think how they could add a lid. Using the same groups, Mr Okon asked them to discuss together how to add a lid and draw the new net. He gave the groups ten minutes and then asked each group to draw what they found on the board.
Then he asked each group to look at the different nets and agree whether they all worked.
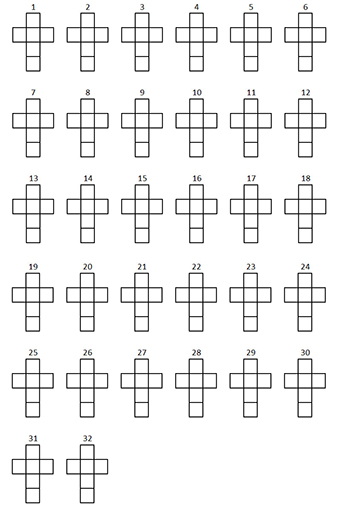
Activity 2: Which nets will fold to make a cube?
Make sure pupils understand what a cube is, then ask pairs of pupils to find as many different nets for a cube as they can. They should first draw each net, then cut it out and check that it makes a cube, before trying to draw a different net.
(You may want to show one or more examples such as those below to get them started.)
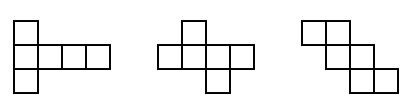
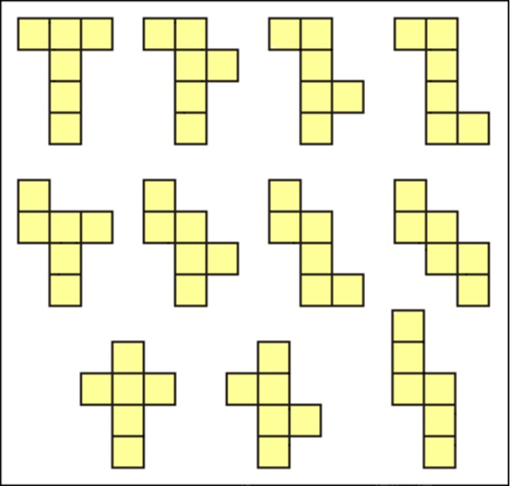
You might like to set this up as a competition, with a reward for the group that can make the most nets for cubes (see Resource 2: 11 nets for a cube).
Again, do not interfere or talk too much during this lesson; make space for the pupils to talk through their ideas and to enjoy the activity. Listen carefully to them and identify how they are able to solve their own problems.
Display the finished cubes and, if there is time, allow them to decorate them to celebrate what they have achieved.
Discuss how many different nets they have found. Ask them to make a wall chart of the 11 possibilities of a net for a cube.
3. Developing problem-solving skills
Having established familiarity with nets, and making cuboid shapes from them, you now move on to ways of helping your pupils to visualise and transform these nets mentally. One way to do this is by using a dice. Another way is to look at shapes in the environment.
A dice is a special kind of cube, where each surface has a unique number between 1 and 6, and where the numbers on opposite surfaces add up to 7. See Resource 3: Dice facts.
In order to correctly number the squares on a cubic net, before it is folded into a cube, the pupil must be able to visualise the transformation from 2D to 3D in their mind’s eye. Case Study 3 and the Key Activity explore these ideas in different ways.
Case Study 3: Drawing nets for different shapes
Mrs Udoh wanted to develop her pupils’ awareness of mathematics in everyday life and so she decided to explore the concept of nets by visiting the local shop. Before her visit, she checked with the shopkeeper if she was happy for children to visit the shop and, after some discussion, the shopkeeper said that she would select a number of different containers for the pupils to think about. On the day of the visit, Mrs Udoh took paper and pencils with her and asked her pupils to look carefully at the different containers the shopkeeper had put out for them. She asked them to draw these containers and their nets.
For homework, she asked them to produce finish their drawings of both the containers and what they thought the nets of these shapes would be, as she wanted to hang them in the classroom. The pupils were very pleased with what they produced and so she asked them to invite their parents to come and see their work. Mrs Udoh knows that it is important to have good parent cooperation, as this enhances teaching.
Key Activity: Making dice nets
Before the lesson, collect up or make several dice to show your class.
- Ask pupils in pairs to look at a dice, and look carefully at the numbers – they should be able to identify that each side has a number between 1 and 6; you may have to prompt them to see that opposite sides add to 7. Allow them time to check if this rule is followed on all their dice.
- Now give each pair two sets of empty 5 x 5 square grid papers. Ask them to design different nets for a dice: a cube net with numbers written on the squares so that they obey the rules above. When they think they have solved the problem, they may cut out the nets and check that they have ‘correct’ dice.
- After the pairs have solved this problem, they could mark dice numbers on some of the other 11 cube nets that they identified.
- Ask each pair to make a poster to display the different numbering patterns for each net.
- You could extend this activity by asking your class to make a board game about shape and use their own dice to play it
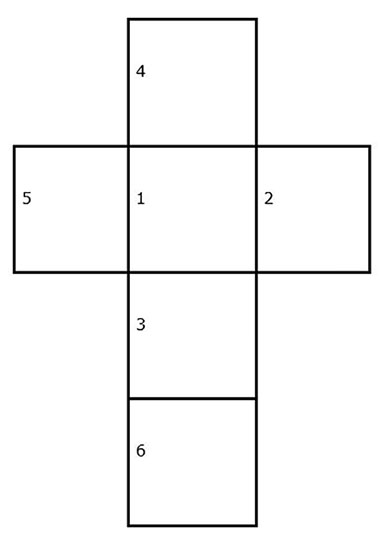
Resource 4: Numbered dice net shows an example of a correct solution and a template for your more able pupils to investigate how many different ways they can place the numbers on the dice so it still works.
You may wish to use a double lesson for this activity.
Resource 1: Net of a tin (a cylinder)
![]() Teacher resource for planning or adapting to use with pupils
Teacher resource for planning or adapting to use with pupils
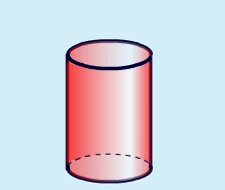
A net is a flat or 2D shape that can be folded to make a 3D object.
Below is the net of a tin, known as a cylinder.
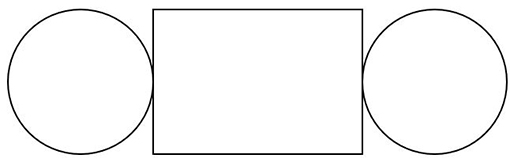
The 3D object below (a cylinder) is what the 2D net looks like when it has been folded.
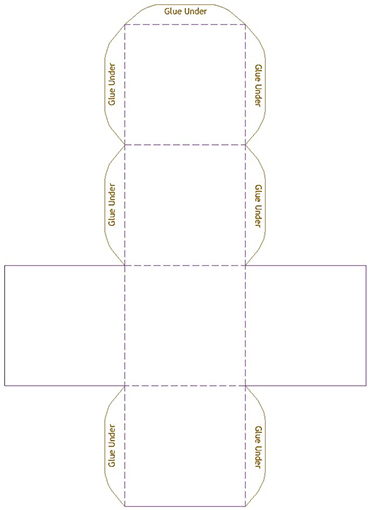
Resource 2: 11 nets for a cube
![]() Teacher resource for planning or adapting to use with pupils
Teacher resource for planning or adapting to use with pupils
Resource 3: Dice facts
![]() Background information / subject knowledge for teacher
Background information / subject knowledge for teacher
- A dice is a cube, each face marked with a number between one and six.
- The sum of the two numbers on the opposite faces is always 7, so the opposite pairs are:
- 1 and 6
- 2 and 5
- 3 and 4

Dice can be used to play games on their own or as part of a board game where by throwing a dice a player is able to move their counter towards a goal. The first person to reach the goal is the winner. Such games include ‘Snakes and Ladders’ and ‘Ludo’ (see Module 1, Section 1, Resource 2 for how to play these).
Resource 4: Numbered dice nets
![]() Teacher resource for planning or adapting to use with pupils
Teacher resource for planning or adapting to use with pupils
This is an example of a correct solution:
Numbering dice nets
How many ways can your pupils set out the numbers on a dice net and still keep to the rule?
Section 3: Exploring 3D geometry
Key Focus Question: How can you use practical tasks to investigate the relationship of 2D to 3D shapes?
Keywords: polyhedra; investigation; patterns; surfaces; edges; vertices; polygons; subject knowledge
Learning Outcomes
By the end of this section, you will have:
- developed your own subject knowledge of regular polygons (2D shapes) and polyhedra (3D objects);
- explored practical activities to help pupils investigate the relationship between polygons and polyhedra.
Introduction
The process of building real geometric solids provides an informal and practical way for pupils to get to know and understand geometric objects.
Because pupils are able to touch the shapes and objects being studied, they feel more confident about thinking in a more abstract way. If these shapes are linked to objects in everyday life, this helps pupils’ thinking and visualisation.
1. Using practical work
To explore and investigate polyhedra, it is important to have examples in your classroom. There are several commercial plastic building sets to make 3D objects that can be bought to use in the classroom, but it is as easy to make your own from recyclable materials such as plastic, card and thick paper. Making their own shapes helps pupils understand the properties of shapes better.
Plastic drinking straws can be used with thread and wire to build ‘skeletons’ of 3D models. As a teacher, make it a habit to keep objects that may be useful in the classroom – for example, always keep a straw whenever you buy a cool drink. Ready-made nets of various solids that fold up for storage can be used to help pupils explore the difference between 2D shapes and 3D objects.
Case Study 1: Differentiating between 3D objects and 2D shapes
Mrs Yomba, a primary teacher in Lindi, Tanzania, wanted her pupils to be aware of the difference between 3D objects and 2D shapes. She knew this was sometimes a difficult concept for them.
She described 3D objects as those ‘one can pick up, like books, pens, desks, etc.’. She said that 2D shapes are things you can see but that you cannot pick up: an image of a horse on a photograph, or a painting of a person, even a square drawn on paper. She said, although one can pick up the photograph or the painting, one cannot pick the horse out of the photograph or the person out of the painting.
She then invited them to suggest other things that could be regarded as either 2D or 3D in the classroom. Some pupils were quite excited about the distinction, but others really struggled to believe that a piece of paper or a window are 3D objects because they were ‘too thin’.
Mrs Yomba decided then to give her pupils homework. She asked them to go home and tell their parents about what they had learned, and that their homework task was to bring a list of at least ten things from home or the local environment that are 3D. She believed that by doing this they would consolidate the work they had done in class.
Activity 1: Understanding 3D shapes or polyhedra
Before you teach this lesson, you need to collect or make some 3D objects and keep these in a box (see Resource 1: Collecting and making shapes and objects).
Organise your class into groups of between six and eight. Ask your pupils to look carefully at the shapes and objects in the box. Ask your pupils what shapes, like squares and rectangles, they can see in the objects.
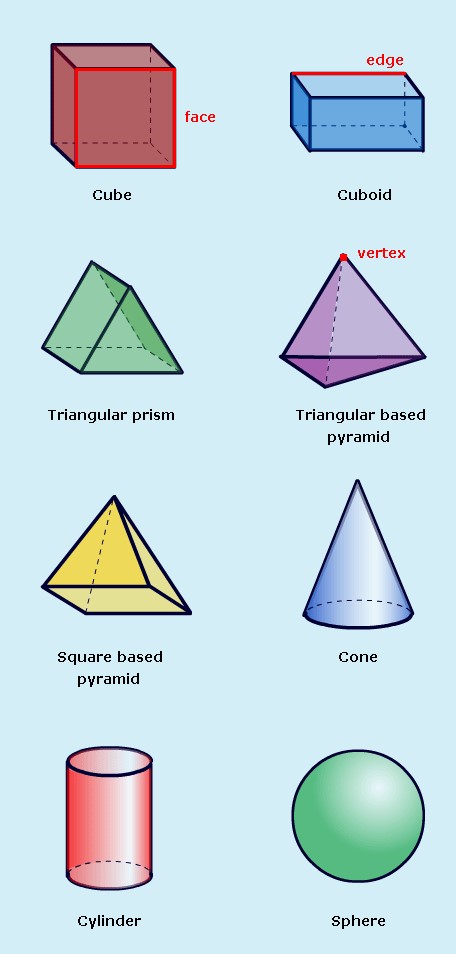
Tell them the names of the objects:
- Prism e.g. cube, cuboid, cylinder
- Pyramid e.g. cone, sphere
Ask them if they know other objects that look like these shapes around the school and near their homes.
Explain that all the solids, except the cylinder and sphere, are also called polyhedra. Ask them: ‘Why do you think cylinders and spheres are not considered polyhedra?’ (See Key Resource: Using explaining and demonstrating to assist learning for some ideas to help you.)
Tell them that the word polyhedron is from a Greek word for ‘a seat’. Prisms and pyramids have many flat surfaces like seats but a cylinder is not a polyhedron as it has a curved ‘surface’.
Finish the activity by asking each group to count the surfaces on each object. Ask them to record their answers in their books. Share each group’s answers as a class.
For homework, ask them if they can see any of these shapes on their way home – or at home – and report back the next day.
2. A cross-curricular approach
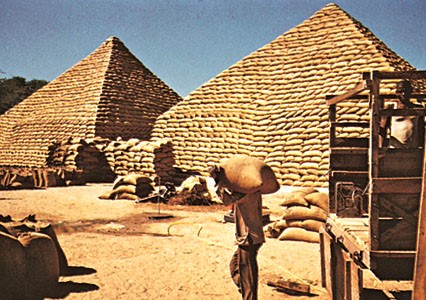
Look at Resource 2: Photograph of a pyramid.
Pyramids interest pupils. Here we explore how to visualise different pyramids. The teacher in Case Study 2, by doing some cross-curricular work, showed his pupils that mathematics has connection to other subjects and to real life. Activity 2 looks at the mathematics of pyramids by asking pupils to make their own, using nets.
Case Study 2: Looking at groundnut pyramids to motivate pupils in mathematics
When Mr Ahmadu planned his lesson, he wanted to involve other teachers and to give his pupils more than just a mathematical experience. He spoke to his colleagues in social studies and they gave him a pictures of groundnut pyramids in Maiduguri, Nigeria (see Resource 2).
He displayed the picture where all his pupils could see it and asked them to tell him what they knew about the picture. Mr Ahmadu made a mind map of what they knew about how the pyramids were built. (See Key Resource: Using mind maps and brainstorming to explore ideas.)
Next, he organised them into small groups to discuss the pyramids and list any questions they had about them. He collected all their questions together and sorted out those that were about the structure of the pyramids and their shape.
He gave each group a pyramid that he had made from cards (see Resource 3: Nets). He asked the groups to think about the shape and structure and any common features – i.e. sides, edges and surfaces on each.
Next, he asked them to think how people were able to build such large structures as the pyramids in Maiduguri. He showed them more pictures of how pyramids were built and this really interested his class. As a result they asked their social studies teacher to tell them more about the pyramids.
Mr Ahmadu felt that this mixing of mathematics and social studies helped his pupils’ motivation as they began their mathematics work.
Activity 2: Making paper pyramids
You will need copies of Resource 3, paper, scissors and sticky tape or glue. If you only have enough materials for one group to work at a time you can spread this activity over a week.
- Explain to your pupils that pyramids can have bases of any number of sides – the simplest have equilateral triangles on all four surfaces, but pyramids can be made with any regular polygon as a base: the groundnut pyramids are made of triangular sides, but have square bases.
- Give out the nets of triangular- and square-based pyramids, and ask pupils to cut, fold and glue these to make paper pyramids. Mount a display of them.
- Next, place some straws or matches on each group’s desk and ask if they can, using string or sticky tape, make a pyramid out of these materials. Go around and support the groups while they work. Let them share what they did to make their pyramids.
3. Using practical work to consolidate learning
In this part, we move to a more formal exploration of different shapes through using activities that involve pupils making careful observations before making some different 3D objects themselves. Resource 4: 3D objects provides a useful summary of pupils’ learning so far.
Case Study 3: Making polyhedra into mobiles
Mrs Bako wanted to extend her Primary 5 class’s understanding by building some polyhedra to make a new set of mobiles to hang in her classroom. She asked her pupils to group themselves into teams of six to eight and gave each group scissors, card and glue. She asked each group to make 32 equilateral triangles, 6 squares and 12 pentagons. She wrote the dimensions for each shape on the board.
She asked them to investigate how many different polyhedra they could make with their polygons by following these rules:
- Use one type of polygon at a time to make the polyhedron.
- The polyhedron must be a closed shape. All the edges must join up.
The pupils really enjoyed the task.
Next, she gave them nets of regular polyhedra and asked them to cut them out neatly, fold them and paste them to make polyhedra (see Resource 3). They found that the shapes they built were the same as the polyhedra they had discovered.
She discussed whether it was easier to make the nets into polyhedra or easier having the shapes loose. Most pupils agreed the nets were quicker.
Key Activity: Features of regular 2D shapes and 3D objects
First, consolidate pupils’ learning from earlier activities. For this, you will need your box of shapes and objects and charts to record results (see Resource 5: Recording results) or ask your pupils to draw the two charts in their books.
Organise your pupils into pairs or small groups. Give them one of the items from your shapes box, and ask them to carefully look at the shape and complete the chart as best they can.
Suggest they complete a row at a time. Ask them to return their shape to the box and take another one until they have looked at every shape.
After an appropriate time, ask one pair or group to give their answers to the class for one shape. Go round the class until all the shapes’ features have been shared and each pair has been able to check their answers against everyone else’s.
Ask them if they noticed any patterns in their observations. Which shapes and objects are related?
Display their charts.
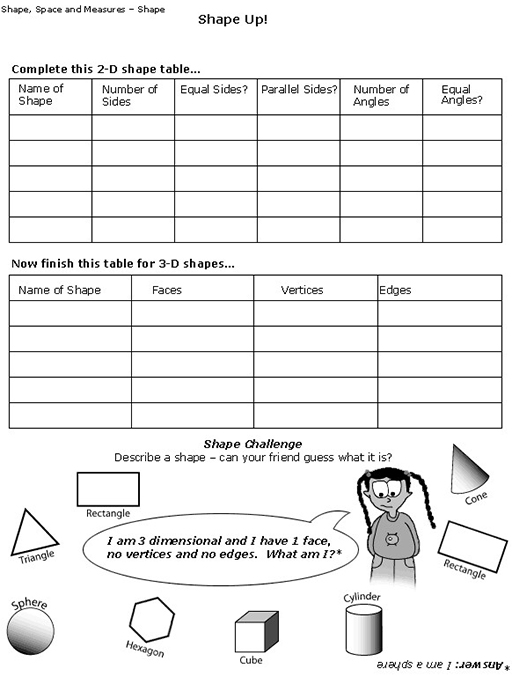
You might want to use the game ‘Shape Challenge’ in Resource 5 to finish this topic and assess their understanding as they play. You could divide the class into teams to play.
You may need to use a double lesson for this activity.
Resource 1: Collecting and making shapes and objects
![]() Teacher resource for planning or adapting to use with pupils
Teacher resource for planning or adapting to use with pupils
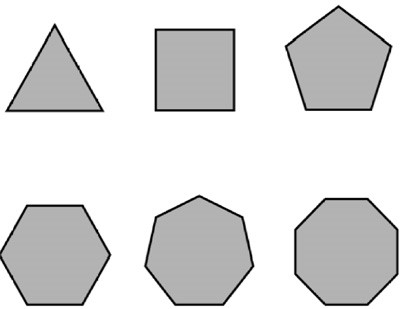
You will need to draw/make cardboard cut-outs of the following 2D shapes:
- Triangle
- Square
- Pentagon
- Hexagon
- Septagon
- Octagon
You can now look at 3D objects.

Resource 2: Photograph of a pyramid
![]() Teacher resource for planning or adapting to use with pupils
Teacher resource for planning or adapting to use with pupils
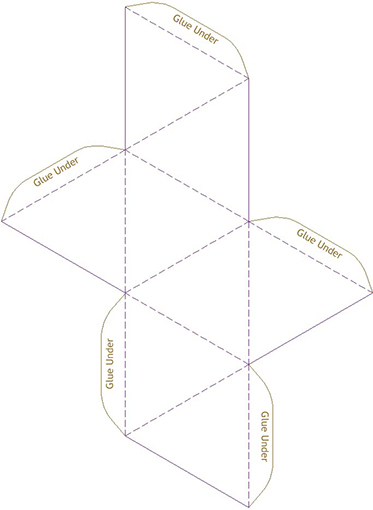
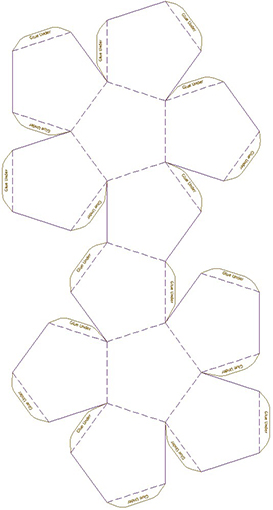
Resource 3: Nets
![]() Pupil use
Pupil use
Below are templates for different 3D objects that your pupils can make.
Tetrahedron template
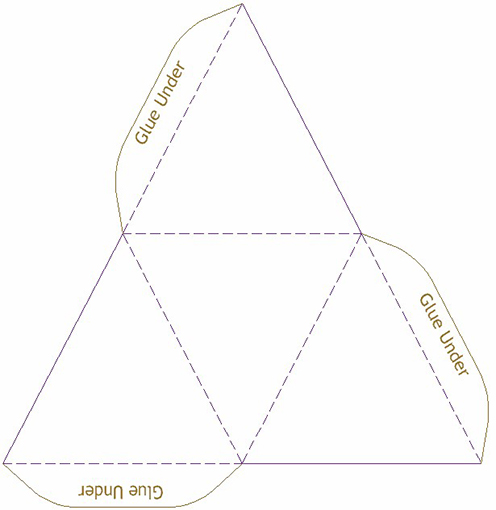
Net Square based pyramid

Cube template
Octahedron template
Dodecahedron template
Resource 4: 3D objects
![]() Background information / subject knowledge for teacher
Background information / subject knowledge for teacher
You will find useful resources on the website below:
http://www.bbc.co.uk/ schools/
This website provides background information on ‘shape, space and measures’. The ‘revision bite’ on 3D objects is particularly relevant.
3D objects have surfaces (sides), edges and vertices (corners).
The exception is the sphere, which has no edges or vertices.
Resource 5: Recording results
![]() Pupil use
Pupil use
Section 4: Exploring symmetry
Key Focus Question: How can you use everyday objects to develop pupils ‘abstract’ understanding of symmetry?
Keywords: lines of symmetry; reflection; rotation; nature; open-ended questions; cross-curricular
Learning Outcomes
By the end of this section, you will have:
- used group work to help develop pupils’ understanding of symmetry, including multiple lines of symmetry and orders of rotational symmetry;
- developed a range of strategies including using open-ended questions to develop thinking skills around symmetry;
- worked across curriculum areas to extend ideas about symmetry.
Introduction
If you fold a blank page in half and open it out again, each side of the fold looks like a reflection of the other. When folded, the two sides overlap and cover each other perfectly. This is reflection symmetry. The ‘mirror’ or ‘fold’ line that gives these two equal reflections is called the line of symmetry.
Many mathematical shapes have lines of symmetry, and many living things are also approximately symmetrical in shape. This section will help you develop your understanding of symmetry, and try a range of strategies for teaching about it.
1. Using group work to explore symmetry
Introducing the concept of symmetry and reflection needs careful planning. Understanding that a shape is symmetrical if both sides are the same when a mirror line is drawn is best explored using practical activities. You need to think of ways to organise and group your pupils so that they can participate fully. One way to introduce this topic is by using drawings, photos and flat items like leaves. To see the line of symmetry you need to try:
- looking at a piece of paper held upright on the line of symmetry – look on one side, then the other;
- putting a piece of paper over an item, along the line of symmetry, then turning the paper over to cover the other half; holding small hand mirrors on the line of symmetry.
When looking at natural objects or images, your pupils need to understand that we are only looking at ‘approximate’ symmetry. For example, the left side of a person’s face is probably not ‘exactly’ the same as the right side. However, by using real examples from the local environment such as fabric patterns or nature, you will motivate pupils more.
Case Study 1: Using group work to explore symmetry
Miss Bwalya, a primary teacher from Juba, Southern Sudan, wanted to introduce her pupils to the concept of symmetry.
She divided her class into groups of four and distributed to each group four pieces of paper that she had cut into the following shapes – rectangle, square, isosceles and equilateral triangles. She asked one pupil from each group to take the rectangle and fold it so that the two parts fitted exactly. The rest of the group could offer advice and support. She noticed that some groups found only one way to fold the rectangle while others found two. Miss Bwalya asked each group to show what they did.
Next, she asked another member of each group to take the square and repeat the exercise. The class agreed that there were four ways for a square. She told the class: ‘These lines are called lines of symmetry. The rectangle has two, while the square has four.’
She drew a table on the chalkboard drawing the shapes and asked them to enter the number of lines of symmetry.
Next, she asked them to explain the meaning of ‘symmetrical’ and ‘line of symmetry’ in words that everyone in the class understood. They then added these terms to their mathematics dictionaries.
For homework, she asked them to collect objects from home or from their journey home that they thought had lines of symmetry to explore in the next lesson.
Activity 1: Observing symmetry in nature
Before the lesson, collect some natural objects that have approximate symmetry: these could include leaves, flowers or vegetables. You could even use local animals (but you must ensure they are well treated) or you could use photos of them (you might ask your pupils to help you). Resource 1: Examples of symmetry found in nature has some useful photos and you may want to collect more from magazines and newspapers, or some samples of local fabrics.
- Divide the class into small groups of five or six and ask each group to consider the objects or images and try to identify all the lines of symmetry. Share their answers as a class (see Key Resource: Using group work in your classroom to plan how to do this).
- Ask your groups to think of other objects from everyday life that are symmetrical. Suggest that on the way home they try to find other examples and either note these down or bring a sample in if possible.
- In the next lesson, ask each group to make a poster of six different objects that they have found that have lines of symmetry and draw the line(s) of symmetry on them. They could draw or perhaps stick on some objects.
- Display the posters for the whole class to see and discuss their ideas after a day or so to remind them.
You may wish to use a double lesson for this activity.
2. A cross-curricular approach
As well as encouraging pupils to see symmetry in the world around them, this topic allows pupils to be creative and make symmetrical patterns and objects. It is a good opportunity to enjoy cross-curricular work with art. These activities can be done with very young pupils, and yet be so open-ended that even the oldest pupils can still stretch themselves.
Case Study 2: Creating symmetrical butterflies
Mrs Atede wanted to use art to help pupils explore symmetry and had decided to spend a lesson making butterfly pictures with her pupils. She had found two pictures of butterflies, which she showed to her class. She explained how the butterfly has four wings, and how varied the size, shape and colour of these wings can be, but that the wings and their patterns are always symmetrical.
Folding a piece of paper, Mrs Atede showed the class how she could cut out a butterfly wing shape, open the page, and have a pair of butterfly wings. She also showed them how they could make butterfly patterns by folding paper with wet paint inside. She invited the class to make their own butterflies, imagining different shapes for the wings and different patterns. The younger pupils used paint blots to colour their butterflies, while the older pupils drew intricate symmetrical patterns.
When the butterflies were finished, Mrs Atede hung them from the class ceiling with string. Her pupils were excited by the display and talked about the patterns a lot.
Activity 2: Symmetrical masks
You will need enough paper and pencils or paints for each pupil to make a colourful mask, string or elastic to tie the masks on, and pieces of cardboard big enough to make the masks with. You may have to spend some time collecting these resources before you can do the activity but your pupils may be able to help you gather materials together (see Key Resource: Being a resourceful teacher in challenging circumstances).
Explain to the pupils that they are going to make masks, but that both the shape of the mask and any drawing or painting on it should be symmetrical. Suggest that they do a rough design before they start working. You could show them some local masks. Perhaps they could gather resources and do a rough design in one lesson, and make the mask in the next lesson or two.
Suggest they make masks of people, leaves, animals, wings, imaginary creatures, or tribal masks. This could be a decision you leave to each pupil, or one you decide for the whole class.
Think about what resources might help the pupils design their masks (such as photos or objects – see Resource 2: Examples of symmetry in African masks). What other creative activities could pupils do to consolidate their understanding of symmetry?
3. Demonstrating rotational symmetry
So far we have mostly looked at one or two lines of symmetry, but some objects have several lines of symmetry – a square has four: one vertical, one horizontal and two diagonally. The square also has rotational symmetry, meaning if we rotate it (turn it around) we can get the same pattern again: a square can be rotated to make the same pattern four times – it has a rotational symmetry of four. This is sometimes called having rotational symmetry of order 4.
This next part explores the idea of multiple lines of symmetry further by using objects in everyday life and searching for patterns in the shapes. Some of your pupils may be able to predict the pattern if you set up the activity so that they can work at their own pace and discuss their ideas with others.
Case Study 3: Investigating multiple lines of symmetry
Mr Okoye thought his pupils had become confident at working with one line of symmetry and he wanted to stretch them further by looking at different kinds of symmetry. He had drawn and cut out four different religious symbols (see Resource 3: Symmetry – lines and rotation), making each one as large as he could on a piece of A4 paper.
Mr Okoye held these shapes up and asked if pupils knew what each one was called. First, he asked his pupils to look for lines of symmetry. On the cross and the mosque, they easily found the line. With a little encouragement, they were then able to see that there were many possible lines of symmetry on the Star of David and the Dharma Wheel. The older pupils were able to count these.
Mr Okoye then put a thumbtack in the centre of the cross, and showed that if he turned it round, it only looked the same in one position – where it started. He said this meant it had no rotational symmetry. He showed the pupils the other shapes and they tried the same rotation with each. They counted a rotational symmetry of six for the Star of David and eight for the Dharma Wheel. His class were eager to look for other shapes in real life that had multiple lines of symmetry, which pleased him.
More examples of symmetry can be found in Resource 4: Examples of symmetry in art and fabrics.
Key Activity: Explaining rotations
You will need a page of polygon shapes (see Resource 5: Polygons) for each small group of pupils.
First, ask pupils to write in their books three column headings: ‘polygon sides’ ‘lines of symmetry’ ‘rotational symmetry’. Then ask them to look at the shapes and, for each polygon, count and record:
- How many sides it has.
- How many lines of symmetry they can find.
- How many orders of rotational symmetry they can find.
After the first few shapes, some pupils may begin to spot a pattern and be able to complete their table without counting; others may not see the pattern. If this happens, ask the pupils who have seen a pattern to explain how it works to those who have not.
Use questions like: ‘How many lines of symmetry would a polygon of [n] sides have? And how many orders of rotational symmetry?’ ([n] could be any whole number.)
Ask each group to complete the chart you have drawn out on a sheet of newsprint and display their charts in the classroom (see Resource 6: Recording symmetry).
Resource 1: Examples of symmetry found in nature
![]() Teacher resource for planning or adapting to use with pupils
Teacher resource for planning or adapting to use with pupils

Resource 2: Examples of symmetry in African masks
![]() Teacher resource for planning or adapting to use with pupils
Teacher resource for planning or adapting to use with pupils

Resource 3: Symmetry – lines and rotation
![]() Teacher resource for planning or adapting to use with pupils
Teacher resource for planning or adapting to use with pupils
| Religious symbol | Lines of symmetry | Order of rotational symmetry |
|---|---|---|
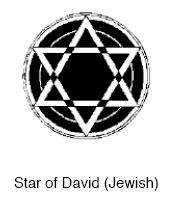 |
12 |
6 |
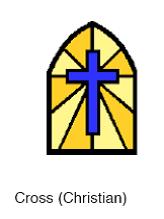 |
1 |
0 |
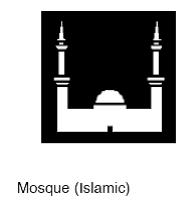 |
1 |
0 |
 |
16 |
8 |
Resource 4: Examples of symmetry in art and fabrics
![]() Teacher resource for planning or adapting to use with pupils
Teacher resource for planning or adapting to use with pupils
Examples of symmetry in Islamic art

Examples of symmetry in Nigerian fabric patterns
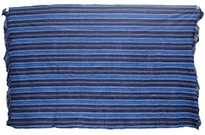 |  |
The Nigerian flag is also symmetrical. Can your class find any other symmetrical flags?
 |
Resource 5: Polygons
![]() Background information / subject knowledge for teacher
Background information / subject knowledge for teacher
You will need to use the following 2D polygons:
- Pentagon
- Octagon
- Square
- Septagon
- Triangle
- Hexagon
Resource 6: Recording symmetry
![]() Pupil use
Pupil use
| Object | Lines of symmetry | Order of rotational symmetry |
|---|---|---|
| ||
| ||
| ||
| ||
| ||
| ||
| ||
|
Section 5: Teaching transformations
Key Focus Question: How can you develop confident mental modelling in geometry?
Keywords: congruence; translation; reflection; transformation; multigrade; differentiation; practical
Learning Outcomes
By the end of this section, you will have:
- introduced pupils to transformation, congruence, translation and reflection;
- used cut-out shapes as a means to develop the mental transformation of geometric shapes;
- considered the challenges of differentiating this work for older and younger pupils, and tried some different approaches.
Introduction
In our daily lives we see many examples of shapes that have been modified (changed) or transformed.
This section will help you develop your own subject knowledge about geometry and transformation, as well as your skills in developing your pupils’ understanding. Most of the resources in this section, therefore, are to support your subject knowledge as a teacher of mathematics.
1. Using practical work
In geometry, ‘transformation’ means altering some geometric property of a shape, (such as rotating it or moving its position on the page) while keeping other properties of the shape the same (we say the shapes are ‘congruent’).
An excellent way for pupils to model transformation is by using physical objects or looking at shapes in everyday life and how they are transformed e.g. in fabric patterns. While pupils are doing this, encourage them to talk with you and each other about what they are doing. Talking about how they are trying to manipulate the objects will improve their understanding of geometry and the language associated with it.
Case Study 1: Planning a lesson in geometry with a colleague
Mrs Ogola, a teacher in a primary school in Masindi, Uganda, was discussing her experience in teaching geometry to her pupils with a senior associate, Mrs Mwanga. She complained that pupils do not like this topic. Her pupils complained that geometry is very abstract, requiring much imagination. Apart from that, it bears little or no relation to real life. Therefore, she herself was not always enthusiastic about teaching it.
Mrs Mwanga admitted to similar experiences, but encouraged her to try using a practical investigative approach and to encourage her pupils to talk about what they were doing. Together they planned a lesson in which pupils would carry out step-by-step activities using samples of fabrics with patterns that contain translations and variations of shapes (see Resource 1: Some Nigerian fabric patterns). This can lead to pupils discovering the concepts to be learned themselves.
Mrs Mwanga and Mrs Ogola both taught the lesson to their classes and then met afterwards to discuss how it went. Mrs Ogola was surprised at the level of her pupils’ thinking and how much they wanted to talk about what they were doing. Mrs Mwanga agreed that allowing pupils to talk about their work not only excited them, but also gave them confidence in their ability to do mathematics.
Activity 1: Investigating congruent shapes
To complete this activity, you will need a piece of cardboard and a pencil and ruler for each pair or small group of pupils, and several pairs of scissors.
- Ask your pupils to draw three different straight-sided shapes on their card and then cut out their shapes. They should number each of their cardboard shapes 1, 2 or 3.
- Next, on a separate piece of paper, ask your pupils to draw around each shape; then move the shapes any way they like without overlapping what they have already drawn, and draw round them again. Repeat this until the page is full of shapes, then label inside each outline with a letter (e.g. a, b, c…). (The finished work should be similar to Resource 2: Examples of congruent shapes.)
- Ask pupils to swap their work with another group. Can they find the outlines that were made with the same shape? (Younger children might need to use the cardboard shapes to help them.) Ask them to write down what they think is the answer – e.g. shape 1, outlines a, b, d, g.
- Using the cut-out shape, can they show you what has to happen in moving from one outline to another? Can they describe this in their own words?
- Early finishers can colour in their work, using one colour for outlines from the same shape. You could display these on the classroom walls, headed ‘Congruent shapes’.
2. Differentiating work
One of the simplest transformations is translation. To translate a shape, we simply move its position on the page, up or down, left or right, but do not change the shape in any other way (see Resource 3: Translation).
Because translating a shape is simple, even very young pupils can grasp the idea, especially if they have physical shapes to manipulate. For older pupils, the activity can be made more challenging by using x-y coordinates and calculation, rather than manipulating physical shapes.
Case Study 2 and Activity 2 look at translation and how to differentiate tasks according to age and stage.
Case Study 2: Extending understanding of translation
Mrs Abdul teaches a multigrade class in which she has a group of older children who are doing well at mathematics. Feeling their current work had not been stretching them enough, Mrs Abdul took an opportunity to let them enjoy a real challenge. (For more information on teaching multigrade classes, see Key Resource: Working with multigrade classes.)
Mrs Abdul had already introduced x-y coordinates to the whole class. One day, while most of the class were working on a triangle translation activity using cut-out shapes, Mrs Abdul gave these four pupils extra support (see Resource 4: Translating and reflecting triangles).
Drawing a triangle with labelled x-y axes on some grid paper, she asked the pupils what the coordinates of the three corners (vertices) were – they answered easily, and wrote their answers down. Next, she asked them, ‘What would happen if I were to move the shape six spaces to the right? What would the new x-y coordinates be?’ When they had answered correctly, she went on: ‘And if I moved the shape 3 spaces down?’ Mrs Abdul went on in this fashion until she felt the pupils clearly understood what was happening.
Next, she said to them, ‘Now, each of you set one another a problem – give coordinates for a triangle, and a translation to apply to the triangle. Write this down, then draw the triangle you have been set, calculate the translated coordinates, and draw the new position. If you do this correctly, you may then try shapes other than triangles to test each other with.’
The pupils enjoyed the respect of their teacher, as well as the opportunity to work more freely and to challenge each other mathematically.
Activity 2: Investigating translations practically
Make sure pupils understand how to give x-y coordinates, through whole-class teaching. To differentiate the task for older or younger pupils, see the notes on differentiation in Resource 4.
- Ask pupils to draw and cut out a triangle, square and rectangle from a piece of squared paper: emphasise that each corner (or vertex) of their shapes should be at one of the ‘crosses’ on their grid paper by drawing an example on the board. No side should be more than 10 squares long.
- On a second piece of grid paper, ask pupils to draw and label x-y axes at least 20 squares long (see Resource 4).
- Putting one of their cut-out shapes on the paper so that its corners are on the ‘crosses’ of the grid, they should mark the vertices (a, b, c & d as appropriate), then draw the shape and write down the coordinates of each vertex.
- Ask them to move their shape to a new position (keeping it the same way up) and repeat this process.
- Ask your pupils: ‘What happens to the x coordinates between the two positions? Does the same thing happen to each coordinate? What happens to the y coordinates?’
What did your pupils learn from this activity?
What did you learn about your pupils learning from this activity?
Would you do anything differently in the lesson next time?
3. A practical approach to ‘reflection’
Translation is relatively simple, because it affects the coordinates of all vertices in the same way (for example, all x coordinates will increase or decrease by the same amount).
Reflection is more mathematically complex, because you must treat each coordinate separately and in relation to another item – the location of the mirror line. Reflection therefore requires pupils to hold quite a number of different ideas in their minds at the same time (see Resource 4).
Think about what familiar examples of reflection you might be able to use to help your pupils with this topic – perhaps some work you may have done on symmetry or patterns and designs in art using local traditional ideas. Consider how pupils could use cut-out shapes as they develop the ability to manipulate such shapes mentally.
In addition, this part suggests you continue to encourage pupils to discuss their thinking – an important key in unlocking their understanding of mathematics. In this way, pupils have to visualise the shape in the bag, and correctly use the simple geometric terms they have learned, if they are to ‘win’ in the feely bag game. How you organise this, so that all pupils are engaged in the activity, is important because if done well, the learning of more pupils will be enhanced.
Case Study 3: Using group work to help think about reflections
Mrs Siaka, an experienced teacher in a primary school in Fiditi in Nigeria, has taught the basics of reflection to her class. She now decides to help them discuss their activity and their findings.
She knows that discussion is not merely answering short, closed questions, so she decides to set up a structure to help discussion among her pupils. She arranges them into pairs. She asks the pairs to look at each other’s work, and make three observations about reflection that they will report back. For each observation, they must both be happy that they have found a way to describe or explain it as clearly as they can. When both members of the pair are in agreement that they have three clear observations, they are to put their hands up.
Mrs Siaka then puts the pairs together to make fours, asking each pair to explain their observations to the other. She then asks the fours to decide on the three best or most interesting observations to feed back to the class.
She realises that she could use this way of working in lessons other than mathematics. To find out what your pupils know and can do see Key Resource: Assessing learning.
Key Activity: Thinking about reflections
Your pupils could reuse the shapes they cut out of grid paper for Activity 2, or make some more if necessary.
- On a second piece of grid paper, ask pupils to draw and label X-Y axes at least 20 squares long (see Resource 3).
- Putting one of their cut-out shapes on the paper so that its corners are on the ‘crosses’ of the grid, they should mark the vertices (a, b, c & d as appropriate) then draw the shape and write down the coordinates of each vertex (corner).
- Ask pupils to draw a vertical or horizontal mirror line on their grid. They should then draw the reflection of the shape on the other side of the mirror line (remind pupils that they may use the cut-out shape if it helps them) and write down the coordinates of the reflection.
- Challenge your pupils to work out the reflection coordinates without using the cut-out shape. Ask them to explain how they did it. Practise using lots of shapes so that pupils become confident.
How well did you introduce and explain this work?
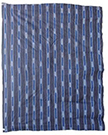
Resource 1: Some Nigerian fabric patterns
![]() Teacher resource for planning or adapting to use with pupils
Teacher resource for planning or adapting to use with pupils

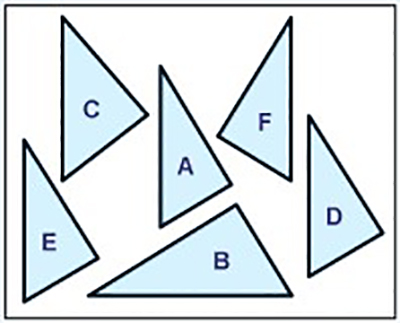
Resource 2: Examples of congruent shapes
![]() Teacher resource for planning or adapting to use with pupils
Teacher resource for planning or adapting to use with pupils
If two shapes are congruent, they are identical in both shape and size.
Question
Which of the following shapes are congruent?

Answers:
- A and G
- D and I
- E and J
- C and H
Remember that shapes can be congruent even if one of them has been rotated (as in A and G) or reflected (as in C and H).
Adapted from: BBC Schools, Website
Resource 3: Translation
![]() Teacher resource for planning or adapting to use with pupils
Teacher resource for planning or adapting to use with pupils
You will find a useful resource on the website below.
http://www.bbc.co.uk/ schools/
This website provides background information on translations, transformations and reflections as well as interactive activities over four pages that you can do to explore the concepts and ideas involved.
If we translate a shape, we move it up or down or from side to side, but we do not change its appearance in any other way.
When we translate a shape, each of the vertices (corners) must be moved in exactly the same way.
Which of the following shapes are translations of triangle A?
Answer: D and E are translations of triangle A.
Resource 4: Translating and reflecting triangles
![]() Teacher resource for planning or adapting to use with pupils
Teacher resource for planning or adapting to use with pupils
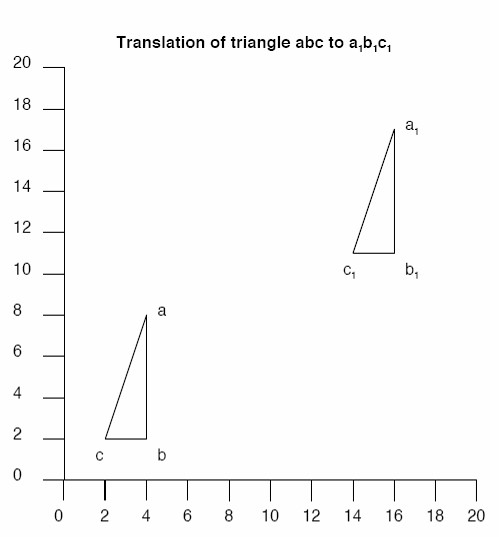
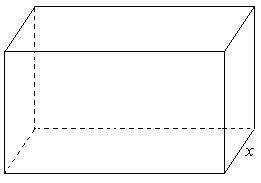
X-Y coordinates always give the ‘x’ (horizontal axis) value before the ‘y’ (vertical axis) value.
So, in the illustration, the X-Y coordinates for abc:
- a = 4, 8
- b = 4, 2
- c = 2, 2
The translation to a1b1c1 increases the value of x by 12, and y by 9. So:
- a1 = 16, 17
- b1 = 16, 11
- c1 = 14, 11
Differentiation
This can be made simple, by moving a cut-out shape around the grid, drawing around it and recording the new coordinates.
This can be made more challenging by giving coordinates for a shape and asking pupils to draw the shape. Then say how a translation affects the X-Y values, and ask them to work out the new coordinates and re-draw the position of the shape.
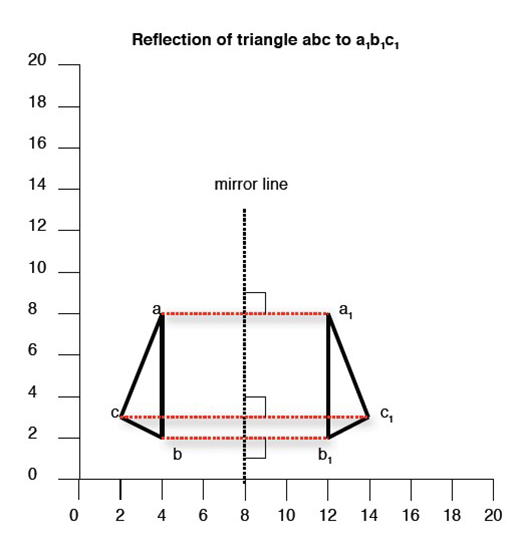
In the illustration, the X-Y coordinates for abc are:
- a = 4, 8
- b = 4, 2
- c = 2, 3
Reflecting abc in a vertical ‘mirror line’ (x=8) gives an image (a1b1c1) at new coordinates:
- a1 = 12, 8
- b1 = 4, 2
- c1 = 4, 3
Note
The object and its image are always at the same perpendicular distance (distance measured at right angles) form the mirror line, e.g. if ‘a’ is 4 squares from the mirror line, ‘a1’ must also be 4 squares from the mirror line.
Compare the X-Y coordinates of abc and a1b1c1 and observe that a vertical mirror line leaves the Y coordinates unchanged.
Similarly, a horizontal mirror line would leave the X coordinates unchanged.
Adapted from: BBC Schools, Website