Use 'Print preview' to check the number of pages and printer settings.
Print functionality varies between browsers.
Printable page generated Saturday, 20 June 2026, 5:51 AM
Module 1: Secondary Science - Biology
Section 1 : Classification and adaptation
Theme: Probing students’ understanding
Learning Outcomes
By the end of this section, you will have:
- used brainstorming to probe students’ understanding of adaptations to different habitats;
- planned questions at different ability levels to help students classify organisms they have found;
- given students the opportunity to devise a key to demonstrate their understanding of the principles of classification.
Introduction
At the end of teaching a topic, teachers usually set a test or exam to find out what the students have learned. They are often dismayed to find that it is not as much as they expected but by this time it is too late to help students. A good teacher will find out what students understand as they go along and what the students are finding difficult, and help them to make progress.
This unit has three short activities that will fit into your normal teaching about classification and adaptation and will show you how to find out what your students understand. The activities will encourage you to bring living organisms into your classroom and will help to develop your students’ understanding. Don’t worry – the activities won’t prevent you from finishing the syllabus; they are quite short and will help your students to learn. Once you have tried these activities, you will be able to adapt them when you teach other topics.
1. Creating a learning environment
Students have their own ideas about a topic and an effective teacher takes account of these ideas when teaching. So a good way to start teaching any topic is to find out what your students already know about it. You may be surprised about what they have learnt from newspapers, peers, adults, older brothers and sisters, and observations. Often their ideas are not the same as the scientific ideas we want them to understand. Sometimes they only begin to realise how much they already know when you give them the chance to think out-loud with each other, in a brainstorming activity. By asking simple, open-ended questions you can make sure that as many students as possible take part in the discussion and you will have a better understanding of what they know.
As a biology teacher, if you are lucky enough to have your own classroom, you should bring in examples of living creatures to keep in the classroom. Pot plants, small insects that the students take it in turns to feed and seeds to plant will all be resources you can draw on in your lessons. Many students may already know a lot about animals and plants. You need to give them the chance to demonstrate their knowledge and interest, but you also need to challenge them to think about why certain living things have certain characteristics. While your syllabus may specify particular organisms that the students should know about, both adaptation and classification are topics based on one or two key ideas that can be applied to the many varied organisms that are found on Earth.
Case study 1 shows how a teacher organised her classroom to inspire and motivate her students and Activity 1 describes a brainstorming session that will provide material you can use as examples throughout the topic.
Case study 1- Creating a stimulating learning environment
Mrs Yara had been teaching biology in MoshiJunior High School for two weeks. She was lucky enough to have her own classroom. Before she started teaching she spent the last week of the holiday preparing her room. She collected pictures of animals from magazines and tourist brochures, making sure she had one from each of the main vertebrate groups and some invertebrates. She brought in a pot plant from home and took some cuttings; a friend gave her a cactus and she bought an old glass tank from a market stall. She collected some insects and filled the tank with twigs, leaves and created a living space for the insects. To do this she used the guidance in Resource 5 . Finally she planted some seeds that were beginning to sprout.
When she started to teach classification, she divided the class into groups of four and gave them 10 minutes to go round the room and look at all the pictures, the plants and the insects. For each one they had to try and identify it and say where it would normally live.
She then gathered them round the front and asked questions about what they had seen. She started off with simple, closed questions such as the name of the organism and where it lived, and moved on to harder questions that challenged them to think about the different adaptations. On the board, she wrote the names of the plants and animals and asked them how the animals could be divided into groups. Finally she asked them about other plants or animals that they knew about and was delighted when Joshua told the class about a carnivorous plant that he had seen.
Mrs Yara was very impressed by how observant they had been and realised that they knew and understood quite a lot about how animals were adapted to their habitats. Finally she asked for volunteers to take responsibility for the plants and insects in the classroom, and was very pleased with the responses.
Activity 1: Conducting a brainstorm
Choose a habitat like the sea, grasslands or a rain forest.
Gather your students round the front desk and ask for some examples of animals that might live in the chosen habitat. You are going to use brainstorming (see Resource 1) to build up a picture of how much your students already know about animals, how they are adapted and how they can be classified.
Once you have gathered some names, you could ask them about how they are adapted for that environment, which ones are vertebrates, which ones are mammals, etc. This is the sort of topic about which students will probably have quite a lot of general knowledge, but have perhaps not thought about it in a scientific sense.
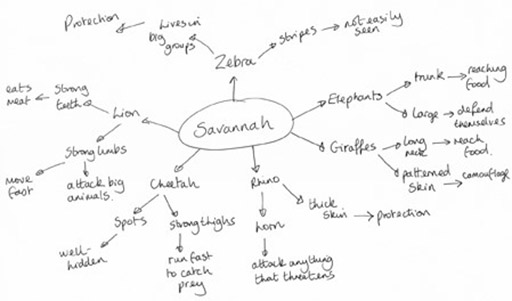
Build a spider diagram on the board using their ideas. You could link specific adaptations to both habitat and mode of life. Encourage them to suggest both structural and behavioural adaptations. You could use coloured chalk to distinguish these. Resource 2 shows an example of a diagram that another class produced. It is important that the one you produce is based on what your students suggest.
2. Peer assessment and using keys
In Activity 1 you have gained some understanding of the breadth of knowledge in the class and have consolidated their understanding of how an organism’s characteristics adapt them for a particular habitat or way of life. Like Mrs Yara you might have realised that as a class, your students already seem to know quite a lot. You will need to start to find out more about your students’ individual understanding. Teachers often do this by setting questions, or by asking them to write about an experiment or activity they have done. Sometimes, however, it is helpful to let them explain their ideas using a drawing or a model and to offer them a choice about what they do. This gives the students who are not so good at writing the chance to demonstrate what they can do and helps them to feel more confident. Confident students learn better and often try harder.
In Case study 2 the teacher uses this technique and gets his students to mark each other’s work. He does this so that they have the opportunity to learn from each other, as well as from him. Activity 2 involves getting your students to construct a classification key. This will tell you whether or not they understand the principles of classification, and doing the activity will help their understanding.
Case study 2: Organising peer assessment
For homework, Mr Uno asks his class to draw a picture of an animal of their choice. He asks them to choose a vertebrate that lives in their country. If they prefer, they can find a picture in a magazine, cut it out and stick it onto a page, so that they can write around it. In class, he asks them to annotate their picture to explain which classification the animal belongs to and how it is adapted to where it lives and its way of life. Before they start he gathers the students round the front and asks them to think about what they would need to do to get a high mark for this activity. He writes their ideas on the board and explains that they are going to use these statements to mark each other’s work. Resource 3 has some ideas about how to help students mark each other’s work.
While the students are working, he goes round and looks at what they are doing. He asks questions to guide them and makes sure that they explain things as fully as they can. After 20 minutes, they swap work with someone who has chosen a different animal. They use the statements on the board to help them make some comments on the work. Finally, the students have 5 minutes to finish off their poster, taking into account the comments from their friends.
Mr Uno collects the posters. He is very impressed by the quality of the work and pleased with the comments they made. Some students have clearly acted on the advice from their friends and improved their work.
Activity 2: Using keys to promote thinking
Your students will need to know some of the main classes of animals. It is easy to test whether they know the names of the groups, but less easy to establish whether they understand the principles of classification. This activity will help with understanding the idea of a hierarchy.
To help them understand the principles we use to put living organisms into groups, you can use an identification key. First you will need to show them a key and let them practice using it (Resource 6). Then, give them (or let them devise) a list of animals that are common to your local area and ask them to work in groups to construct a key that would enable a friend to identify the animals they have chosen. Alternatively you can use the made up animals given on the resource sheet and ask them to construct a key.
Ask them how they decided on the key questions. Let them try out other people’s keys.
3. Encouraging students to ask questions
There is no better way of motivating and engaging students with this topic than using living creatures. In the final activity you are going to collect some insects from the school grounds, or visit a local wildlife park or farm, and think about how you can use questioning to really find out what your students are thinking. It is important to make sure that your questions challenge them. Resource 4 reminds you about the different types of questions that you should be asking. It is a good idea to plan the questions that you could ask before the lesson. You can ask questions of individuals while they are working and then finish off the activity with questions to the whole class. Think about how you will respond to their answers. You could ask several people the same question then ask the students to select the best one. You could also ask a follow up question: ‘Why do you think that?’
Getting your students to ask the questions is a very good way to find out what they are thinking, as the teacher in Case study 3 found when he invited a wildlife ranger into the classroom.
Case study 3: Welcoming visitor into the classroom
Mrs Essuman’s brother, Joseph works for the local wildlife park as a ranger. It is his job to go round the exhibits with the visitors and tell them all about the animals on display. She invited him to come to school to talk to the class.
Joseph started by telling the students about his job and what he does every day. He told them about the qualifications he has and what he needed to do to get a job in a wildlife park. Finally, he told them some stories about some of the animals that he looks after. The students were very interested. Joseph talked about the animals’ behaviour and the sorts of things they liked to eat. Mrs Essuman was pleased and surprised at how many questions her students wanted to ask him about the wildlife park. They were particularly fascinated by the skulls and teeth that he brought to show them. He played a game with the students in which they had to ask questions to try and work out which kind of animal the teeth came from. He could only answer yes or no, so the questions had to be phrased very carefully.
After the visit, some of the students asked Mrs Essuman how they could become a wildlife ranger.
Activity 3: Identifying living creatures
For this activity you should help your students to collect small animals in the school grounds. Resource 5 will give you some information about organising the activity..
Use Resource 4 to help you plan some questions to ask to check your students’ understanding of classification and using a key. The students should work in groups and you should go round asking each group questions. Encourage them to ask each other as well. You could start with simple, closed questions designed to make them observe carefully. How many legs has it got? Does it have antennae? Once they think they know what it is, ask them to classify the animal. Get them to explain why they have chosen a particular group. Are you sure it is in that group? How do you know is it not an X?
They should try to classify the animals they have found using a suitable guidebook or biology textbook for your country. For each one they should be able to classify it at more than one level and should be able to give reasons for their choice. The majority of animals are likely to be arthropods, which should be classified to at least class level.
If you have a local wildlife park then a visit there would be a good alternative to this activity. You will need to go beforehand and devise activities that your students could do.
Resource 1: Brainstorming
![]() Teacher resource to support teaching approaches
Teacher resource to support teaching approaches
What is brainstorming?
Brainstorming is a group activity that generates as many ideas as possible on a specific issue or problem for the group to then decide which ideas offer the best solution. It involves creative thinking by the group to think of new ideas to address the issue or problem they are faced with. Brainstorming helps students to:
- understand a new topic
- generate different ways to solve a problem
- be excited by a new concept or idea
- feel involved in a group activity that reaches agreement.
Brainstorming is particularly useful for helping students to make connections between ideas. In science, for example, it can help them to appreciate the links between the ideas they are learning in class, scientific theories and their everyday lives.
A brainstorm at the start of a topic will give you as a teacher a good idea about the extent and depth of knowledge already held by the class. It will not tell you about individuals’ understanding, but it will provide a wealth of collective ideas that you can refer back to as the topic progresses.
How to set up a brainstorming session
Before starting a session, you need to identify a clear issue or problem. This can range from a simple word like ‘energy’ and what it means to the group, or something like ‘How can we develop our school environment?’ To set up a good brainstorm, it is essential to have a word, question or problem that the group is likely to respond to. The teacher can gather the class round the board and run the session, or, in very large classes, divide the class into groups. The questions can be different for different groups. Groups themselves should be as varied as possible in terms of gender and ability.
There needs to be a large sheet of paper that all can see in a group of between six and eight pupils. The ideas of the group need to be recorded as the session progresses so that everyone knows what has been said and can build on or add to earlier ideas. Every idea must be written down, however unusual.
Before the session begins, the following rules are made clear:
- Everyone in the group must be involved.
- No one criticises anyone else’s ideas or suggestions.
- Unusual and innovative ideas are welcomed.
- Lots of different ideas are needed.
- Everyone needs to work quickly. Brainstorming is a fast and furious activity.
Running the session
The teacher’s role initially is to encourage discussion, involvement and the recording of ideas. When pupils begin to struggle for ideas, or time is up, get the group (or groups) to select their best three ideas and say why they have chosen these.
- summarise for the class what they have done well
- ask them what they found useful about their activity: what did they discover in the brainstorming that they didn’t realise before?
Resource 2: Example of a mind map
![]() Background information / subject knowledge for teacher
Background information / subject knowledge for teacher
Resource 3: Peer Assessment
![]() Teacher resource to support teaching approaches
Teacher resource to support teaching approaches
Peer assessment
Students can learn a great deal by looking at and assessing each other’s work. It can help them to evaluate their own work more objectively and it can help them to understand the assessment criteria. Taking part in peer assessment can also help students to be more involved in the assessment process and take more responsibility for their own learning.
It is important that students understand how to evaluate and they need to take it seriously.
In order to get some of the benefits of peer assessment, you need to teach your students how to do it:
- They need some basic ground rules.
- They need very clear criteria against which to make the assessments.
Ground rules
When commenting on other people’s work they should start with at least two positive comments:
‘I like the way you did…’
‘That is a really good idea…’
‘You have made it very clear…’
The first few times you try this with a class, it is best to limit them to making positive comments or suggestions (‘it would be really good if you had coloured in that part as well…’)
Any criticisms should be worded in terms of things that could be improved or developed, rather than a negative point.
‘I liked the way you …, it would be even better if…’
‘That was a good decision, but perhaps you could have done … as well’
Clear criteria
Your students will need very clear guidelines about what they are looking for. These can be in the form of questions. For the poster in Case study 2 a set of suitable questions would be:
- Does the drawing/picture make it clear what type of animal it is?
- How many adaptations have been identified?
- Are the reasons for the adaptations clearly explained?
- Did you learn something from this poster?
- Is the work clear and well-presented?
When your students have had the chance to look at other students’ work, they should have the opportunity to look at their own again and make some changes if they wish. This process will make them more aware of the assessment process and more critical of their own work.
Resource 4: Questioning
![]() Teacher resource to support teaching approaches
Teacher resource to support teaching approaches
Questioning
Good questioning is really important and is not as simple as it first may seem. It can help you develop good relationships with your students, it can help your students to organise their thoughts and therefore help them to learn, and it can provide you with valuable insights into their thinking. Good questions can promote thought, encourage enquiry and help with assessment.
By thinking carefully about the sorts of questions that you can ask, you will improve your teaching.
It is helpful to think of questions as being ‘open’ or ‘closed’ and ‘person’ or ‘subject-centred’.
Closed questions have a single correct answer. They can reassure students and help you to find out what they remember. But too many closed questions can limit the opportunities to explore thinking and develop understanding. They are often undemanding and can be quite threatening if the student lacks confidence.
Open questions have no right answer, or several right answers. They give you opportunity to find out what your students are thinking, and can be less threatening for some students.
Subject-centred questions ask things like ‘what goes into a plant?’ and ‘what sort of rock is this?’
Person-centred questions focus on the student and are less threatening and more learner-friendly: ‘What do you think goes into the plant?’ ‘What do you notice about the rock?’
A committee of educators chaired by Benjamin Bloom devised a taxonomy of types of questions in which they identified ‘lower order questions’ and ‘higher order questions’. Research shows that lower order, recall-type questions tend to dominate classrooms. This leads to an emphasis on remembering facts and reduces the opportunities for creativity, thinking and developing understanding (see table).
It is important that you plan your questions appropriately. When you are doing a practical demonstration, for example, or introducing a new topic, write out a list that includes some lower order and some higher order questions. This way, you will be using questions to help your students to learn. Just like every aspect of teaching, you need to practise! You also need to think about how you respond to your students’ answers. Try and give them time to think, ask several students the same question or let them discuss the answer before they respond.
Conventionally, students are asked to put their hands up when they answer a question. You probably find that the same students frequently put their hands up and some do so very rarely. It can be very effective to ask specific students to answer your questions and not to ask them to put their hands up. Everyone will have to listen as they know that they might get asked. When you first start doing this, make sure that you direct easy questions at students who you know will find the work difficult. If they can successfully answer some of your questions, they will become more confident.
| Type of questions | Purpose | Examples |
| Lower order questions | ||
| Recall | To see what your students remember | Who is? What are? Where are? When did? |
| Comprehension | To see if your students understand what they can remember | Explain why? What are the differences between? What is meant by? |
| Application | To see if your students can use their knowledge | How would you classify these invertebrates? What is the evidence that this is a metal? |
| Higher order questions | ||
| Analysis | To help your students think critically To see if they can make deductions and draw conclusions | Why? What do you think will happen if? What do your results show? What would be the effect on? |
| Synthesis | To help your students create new ideas from existing information | What would happen if there was no friction? Suppose the Earth rotated at half the speed? |
| Evaluation | To encourage your students to form opinions and make judgments | How effective is? Which is best and why? What do you think? |
Resource 5: Working with insects
![]() Background information / subject knowledge for teacher
Background information / subject knowledge for teacher
Collecting small animals
Caution: You will need to research the ‘bugs’ in your local area and be aware of any that are poisonous or dangerous.
You will also need a reference book that describes the insects that might be found in your country so that you can help your students identify what they find.
Students of all ages are usually quite keen to collect small animals, such as invertebrates (which include 97% of all known animal species), from the school playground or surrounding areas. However, you should point out to them that, although apparently insignificant, these are living creatures; they and their habitats must be treated with respect and consideration; e.g. any lifted stones must be replaced with great care. If pupils are going to collect creatures and bring them into school, you need to show them how to set up a temporary habitat for them in a suitable container such as a margarine tub or similar.
- The environment should be quite moist and placing a small piece of rolled up damp tissue paper in the bottom of the tub will ensure this.
- Placing a few leaves inside the tub is a good idea, preferably those of the plant or shrub near or on which the creature was found.
- Each different type of animal should, ideally, be kept separate; slugs, for example, leave a trail of slime in their wake and other animals legs’ may stick together if they are placed in a container with slugs.
Once they have transported them appropriately from home or the playground they should be transferred to a more suitable habitat within the classroom if a longer study is required. A large plastic or glass tank with leaf mould in the bottom together with a few stones will suffice. A piece of linen or muslin held in place by an elastic band or piece of string would serve as an appropriate cover. The animals should be returned to their natural habitat as soon as possible.
Equipment
Assortment of small jars, boxes and containers
Nylon netting or muslin, elastic bands
Hand lenses
Plastic or glass tanks
Cardboard boxes
Black plastic sheet or large piece of card
Old white sheet
Sheets of card
Small lengths of wood
Trowel (to dig in soft earth)
Clipboards
Paint brushes/plastic spoons (also for transferring creatures into the containers)
Methods of collection
There are several ways in which small creatures can be collected, which should not cause them distress.
- Small paintbrushes can be used tovery gently brush animals from leaves, tree bark, rocks, etc. into small containers.
- Pitfall traps: these are small holes dug into the soil and filled with small containers, such as jam jars, so that the mouth of the container is just below the surface of the soil. In each container should be placed a few morsels of ‘bait’ to entice the creatures in. The container should be covered so that light cannot enter directly. Placing a few stones around the edge and covering the stones with an appropriately sized piece of card can achieve this. There should, of course, be sufficient space between the stones to allow the creatures’ entry. The traps can be inspected daily to see what creatures have been caught.
- Lay a piece of black plastic sheeting over the ground, say 1 square metre, early in the morning and see what creatures are under it towards the end of the day.
Main groups of invertebrates
You will need to research the invertebrates that live in your local area.
Organisation
The class can be divided up into groups of three or four. Each group can be given the task of collecting small creatures by one or more of the methods described above. Their task will be:
- To identify each of the animals they collect.
- To classify them into groups justifying why they have assigned each one to a particular group.
- To gather evidence to support their classification in terms of the animal’s structure and habitats.
Choice chambers
You could also carry out investigations into which types of environment each of the groups of animals prefer, e.g. light or dark, dry or moist, by constructing choice chambers. These are closed containers with several chambers, each of which comprises a different environmental variable, as suggested above.
Setting up a dry environment will require the use of a desiccant such as silica gel. An example of a choice chamber is shown on the next page.
Resource 6: Examples of classification keys
![]() Background information / subject knowledge for teacher
Background information / subject knowledge for teacher
Examples of classification keys
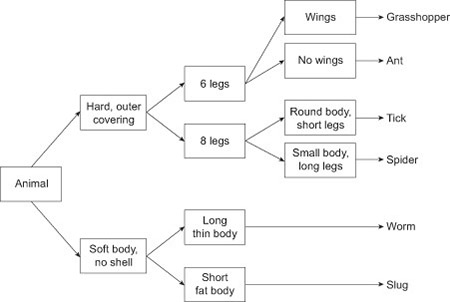
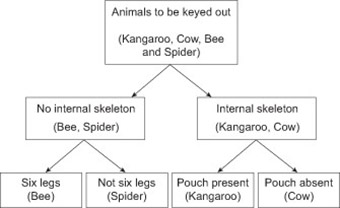
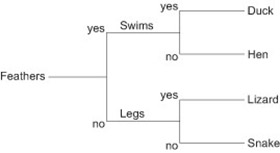
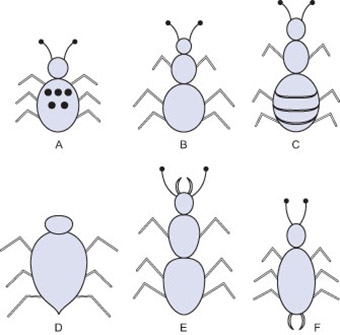
Six animals and a key that could be used with your students to illustrate how a key works
The students have to use the key to name each of the animals.

Section 2 : Transport
Theme: Making science practical
Learning Outcomes
By the end of this section, you will have:
- used a demonstration practical as a stimulus to generate students’ questions;
- used practical work to encourage students to observe carefully and to explain their observations;
- supported students in groups to plan an investigation.
Introduction
Practical work is a really important part of being a scientist and can help students to learn. There are a lot of different types of practical work including demonstrations; investigations in which students plan, carry-out and analyse their own experiment and experiments designed to help students learn specific skills or understand scientific ideas. Gaining first hand experience of materials, organisms and processes can increase understanding and help students to remember what they have been taught. Shared experiences and real objects may also be helpful for students who find English difficult. All practical work requires careful planning and some improvisation.
In this unit the activities are all linked to the topic transport. They involve students taking part in a practical demonstration, a practical activity designed to illustrate theory in which they are required to make very careful observations and an open-ended practical investigation. Resource 1 has some general information about practical work and Resource 2 has some background information to the topic.
1. Demonstrating transport in plants
Practical work is a very good way to engage your students with an idea or problem and help them to see the relevance of the theories that you want them to learn. As a teacher you will be keen to explain the scientific ideas. Often teachers are too ready to offer an explanation and miss the opportunity to really engage and interest their students. If you can show your students something that surprises or intrigues them, they will be keen to find out more. Sometimes, therefore, it is better to withhold information and let your students ask questions or suggest an explanation. In Case study 1, the teacher gets her students to set up an experiment but does not tell them why they are doing it. This is important; she wants them to think about what might happen and give them the opportunity to share their ideas. In Activity 1 a slightly different way of presenting the same experiment is suggested.
Case study 1: Organising a demonstration
At the end of the topic on nutrition Mrs Ngnomo found that she had 15 minutes at the end of the lesson. The next topic she was due to teach was transport, and she had been collecting plants and flowers for a while. She got out her plants, some jars and some food colouring. She asked some of the students to half-fill the jars with water and to add a few drops of food colouring to each one. A pale coloured flower or a stick of celery was placed in each jar and they were left on the window sill of the classroom until the next lesson. The class were intrigued. Mrs Ngnomo gathered them round the front and asked them what they thought might happen. She did not tell them any answers.
She wrote all their suggestions on the board. Then she gave them five minutes to talk to each other. She asked each pair to write down a prediction and a reason for their prediction. She collected in their suggestions and kept them until the next lesson.
The next day the class rushed into the lab, keen to see what had happened to their flowers. The white carnations had gone blue and the veins could be seen all the way through the celery.
The students were really interested in what had happened and Mrs Ngnomo let them cut thin sections of the stems of the plants and look at them with a hand lens. She gave out the predictions they had made, gathered them round the front and asked them questions about the experiment. She started with simple, closed questions, based on their observations and moved on to harder questions that challenged their thinking.
Activity 1: Encouraging student questions
Set up a plant in a beaker of coloured dye. Choose a plant or flower that clearly shows the path of water through vascular bundles and that has a stem that you can cut easily with a razor. Your school text book should suggest suitable plants found in your area.
You should do this at the end of a lesson, so that the students can see what you are doing – but don’t tell them anything about it. Leave it until the next lesson so the dye has time to move up the stem. (If you have not done this before try it beforehand to see how long it takes. If it is a long time until the next lesson, you might need to set up another one).
You should use probing questions aimed at helping students to predict, observe and explain what the experiment shows. You may also choose to show the same experiment with a plant that has a pale coloured flower where the dye is seen moving through the flower. Ask students to suggest what further questions this experiment raises. Write all suggestions on the board. Then ask students to predict the answers to their questions and to suggest how scientists could investigate these questions.
2. Organising a class practical
Demonstrations can be a good way to enthuse and interest your students, but they really begin to learn about being a scientist if they have the chance to do the experiments themselves. Activities 2 and 3 describe two different approaches to class practical work.
Firstly, you can use experiments to illustrate key concepts and to help your students understand the theory, or secondly, you can support them in designing their own experiments in order to investigate a hypothesis. If you do this they will begin to learn about how scientists work as well as understanding the theory. In Case study 2 the teacher does not have very much equipment but manages to do some simple experiments. Rather than get her students to copy notes about the experiments from the board, she uses a sentence matching exercise that will encourage her students to think about what the experiment has shown them. Resource 3 provides ideas about how you can use students’ writing to enhance learning. Activity 2 shows what you could do if you have access to microscopes or balances or a source of heat. Firstly students are encouraged to look very carefully at something they see every day. Then, they put the leaves in special conditions to find out more and finally, they use a microscope to see something invisible to the naked eye. This illustrates three approaches that biologists use to build their understanding of the living world.
Case study 2: Doing practical work with limited resources
Mrs Ogina works in a secondary school near to a large city slum and has very few resources, but she is very resourceful. She is passionate about living things and her students love coming to her room because there are lots of plants growing in pots and pictures of living things that she has collected from old magazines and tourist brochures.
Before the lesson, Mrs Ogina had put a plastic bag over one of the plants in a pot. By the time the lesson began, droplets of water had collected in the bag. She gathered her class round the front and asked them where the water had come from. She didn’t tell them the answer but was encouraged when someone suggested that it might be something to do with the leaves.
She sent them out of the classroom to collect leaves. She asked each group of five students to collect three different types of leaf. (She had also brought some in from where she lives as she knew there was not much variety near the school). She asked them to look at the leaves very carefully and to write down four ways in which they are adapted for photosynthesis. She asked them to think about what they all had in common and what the differences were between them.
When they had been working for a while she stopped them and went back to the suggestion that the water might have come from the leaves. She drew a diagram of a leaf on the board and explained about the stomata. She encouraged them to look carefully at their leaves and see where the stomata should be but explained that they would need a hand lens or microscope to see them.
The next lesson, Sam came rushing into the classroom to show Mrs Ogina a magnifying glass that his uncle had given him. He was happy for the students to take turns in looking for the stomata, provided they were careful with the magnifying glass. To finish the activity, Mrs Ogina wrote statements on the board (see Resource 4) and the students had to match them correctly to make sentences.
Activity 2: Encouraging careful observations
Organise the students into groups of three or four. Ask each group to collect four different leaves. Challenge the groups to find five adaptations for photosynthesis that they can observe without a microscope or hand lens.
Now give each group a beaker or tin of boiling water. Ask them to put each leaf in turn into the water, observe what happens on both sides of the leaf and explain what they see. They should notice that air bubbles appear at the lower surface of the leaf, showing that air is escaping through tiny holes.
Show them a diagram of a section of a leaf seen under a microscope and ask them to relate their observations to the diagram. If your school has a microscope you can show them the stomata or better still get them to make their own slides.
3. Planning investigations
Students enjoy planning experiments for themselves. In doing so, they develop thinking skills and the ability to ask questions, both of which will help them to learn. In order to plan an experiment, students need a question to answer or a hypothesis. It might be something like ‘which plastic bag is the strongest?’ or ‘which design of paper airplane flies the furthest?’
In Case study 3 the teacher chooses a simple question that she thinks will interest her students. Activity 3 describes an investigation linked to the topic of transport which involves thinking about where on the leaf the water is coming from. You will to need to lead them to the idea that spreading petroleum jelly on the surface of the leaf will prevent water from leaving, but leave the details of the plan to them. Use questioning to encourage them to think about how they will detect water loss, how they will decide on where the water is coming from, what the control will be and why they need a control. Some groups will need more help than others.
When students plan their own experiments, they don’t always come up with the best way of doing it, but that doesn’t matter because you want them to learn about the process as much as the theory. If you make sure that they evaluate their experiment carefully they will still learn and will be receptive to your suggestions of how it might be improved. The more investigations you do, the better they will be at doing them.
Case study 3: A simple investigation
Mr Machacha did an investigation with his class in biology. However, it was not a very successful lesson as his students found it very difficult – they were not used to designing experiments. They did not appreciate the importance of a ‘fair test’ or the benefit of testing their idea before they started collecting data. He realised that they needed the opportunity to do a really simple investigation that would help them to understand the principles involved in planning experiments.
Mr Machacha made two different paper helicopters (see Resource 5). He asked the class which one was the best. This got them thinking about how to decide what was ‘best’ and how to measure it. He got them to predict how the size of the rotors would affect the time it took to fall. He purposefully didn’t tell them how to do the experiment or how to record the results. They soon realised that they had to drop it from the same height each time and that they needed to think about how best to record the results.
His class spent about 20 minutes taking readings and plotting a graph. Mr Machacha went round asking them questions about how best to record the results and helping them plot a graph. At the end he asked the group who had done the best to draw their table of results on the board so everyone could see what they had done. They had a lot of fun and learnt a lot about how to plan experiments.
Activity 3: Investigating leaves
Tell the students that they are going to plan their own investigation into how water is lost from leaves. Ask them to predict whether more water will be lost from the upper or lower surface of leaves. If they have done Activity 2, ask them to think about what they observed when they put leaves in boiling water. Do not tell the answer to this, but ask them to work in groups to design an experiment to answer the question. You will need to give them some clues and prompts (see Resource 5) but should not give them more information than they need.
Collect the written plans. Check whether they are reasonable and collect apparatus to do as many different ones as possible. In the next lesson, give them feedback on their suggestions and allow students to set up all the ones that are possible.4
Resource 1: Practical Work
![]() Teacher resource to support teaching approaches
Teacher resource to support teaching approaches
Practical work
Introduction
Practical work is an important part of learning about science and learning to be a scientist.
The TESSA materials consider practical work in science involves pupils finding out, learning and verifying through observation and experiment, using skills and methods that are used by scientists in the real world. There are different types of practical work, which serve different purposes. Over time, a good teacher will make sure that their students experience different types of practical work.
Purposes of practical work
Different types of practical work and particular experiments will meet different objectives, but the benefits of practical work include:
- Developing practical skills and techniques such as how to use a microscope.
- Gaining first hand experience of materials, organisms and processes that may increase their understanding of science and help the retention of knowledge.
- Developing inquiry skills, such as control of variables, analysis and recording of data and looking for patterns.
- Motivation and enjoyment.
- Encouraging and promoting higher levels of thinking. Pupils can be asked to predict and explain when presented with problems and phenomena.
- Communication skills. Practical work may provide a context for the development of communication skills. The link to shared experiences and real objects may be very helpful for learners with limited proficiency in English.
Types of practical work
- Demonstrations – A teacher may decide to do a demonstration for reasons of safety or due to lack of time or resources. They may also be the most suitable method for consolidating understanding or providing challenge. Try to actively involve pupils through questioning or through participating in conducting the experiment or activities before or during the demonstration (e.g. predicting if statements are true or false and then using observations to confirm or change their decision).
- Structured practical – Pupils do an experiment in groups. The teacher may give them instructions to follow, advice on recording and analysis and questions to help them relate their observations to theory. These may be suitable for practising skills and techniques, supporting particular inquiry skills, and gaining experiences.
- Rotating (circus) practical – Pupils in groups move from one experiment to the next at ‘stations’ in the classroom. The experiments should be related and instructions should be brief. Similar questions at each experiment will help pupils gradually build their understanding of a key concept, e.g. particle theory of matter or adaptation. Some of the stations may include a card sort or problem to solve rather than an experiment.
- Investigation – Pupils plan, carry out and analyse their own experiment. They may have freedom to choose what they investigate or the teacher may limit the materials available or specify a topic to investigate. The teacher has a role as a facilitator rather than teacher. They will usually give pupils guidance on ‘the scientific method’ or carrying out a ‘fair test’.
- Problem solving – this is similar to an investigation, but pupils have more freedom of approach. It may be a practical problem, such as dropping an egg from the top of a building without breaking it, which can be solved in a number of ways. This can be motivating and a good vehicle for the promotion of communication skills.
Organising practical work
Whenever you are planning an experiment, you should try it out yourself before the lesson. Simple experiments are often more complicated than you might think. You will also need to do a risk assessment. This means thinking about the potential hazards and taking steps to reduce them.
When dealing with chemicals other than water, students should wear safety goggles. If safety goggles are not available, you need to use very dilute solutions (0.1 M). The chemical that is most likely to cause permanent eye damage is sodium hydroxide (above a concentration of 0.4 M).
You will need to think about how your students will get the apparatus they need. The things you might consider could include:
- Give them an activity to do at their desks and, while they are doing it, you distribute the apparatus they will need.
- Spread out the different items around the room and ask one person from each group to collect what they need. By spreading it out, you will avoid the potentially dangerous situation of lots of people gathering in the same place.
- Give out the chemicals yourself with a teaspoon on to small pieces of paper that they can take back to their place. This will ensure that they get the right amount and will avoid a lot of mess!
Resource 2: Transport in plants
![]() Background information / subject knowledge for teacher
Background information / subject knowledge for teacher
Transport in plants
It is amazing!
Plants include trees such as the giant redwood trees of California, USA. These trees are often over 100 metres tall.
Even these tall trees can transport many litres of water up their trunks in just a few hours on a hot day.

What are the main substances transported by plants?
Water is transported from the roots through the plant and out through the leaves.
Mineral salts (ions) are transported from the roots to all parts of the plant.
Sugar, made in photosynthesis, is transported from the leaves to all parts of the plant.
Oxygen and carbon dioxide are transported through tiny holes (pores) on the surface of leaves and stems through a network of air spaces within the plant to and from all living cells.
What are the routes and mechanism of transport?
Water moves from the outer layer of the young roots to the centre of the roots, via cell walls and cytoplasm. It moves by diffusion and osmosis.
It then passes into the xylem cells. It passes up to the stem and leaves in the xylem in the transpiration stream.
Once in the stem and leaves water can pass out of the xylem to all the cells via the cell walls and cytoplasm, as in the root.
Mineral salts pass along the same route as water. They pass from cell to cell by diffusion or active transport. They pass up the xylem in the transpiration stream.
Sugar passes by diffusion from leaf cells to the phloem.
It passes from the leaves to the stem and root via the phloem. The mechanism for this is not fully understood.
Oxygen and carbon dioxide are transported through tiny holes (pores) on the surface of leaves and stems through a network of air spaces within the plant to and from all living cells.
The transpiration stream
Most of the water moving through the plant evaporates from the surfaces of the cells inside the leaves and escapes from the leaves as water vapour. The evaporation from the aerial parts of the plant is known as transpiration. The sun provides the heat energy for this evaporation to occur.
A continuous column of water extends from the outer surface of the cells inside the leaf through tiny spaces in the plant cell walls to the water inside the xylem vessels.
Because of its special cohesive properties (water molecules ‘want’ to stick together) water that has evaporated from the leaves is replaced by water drawn up through the xylem.
The water column at the bottom of the xylem in the roots is continuous with a water network in the walls and cytoplasm of the root cells all the way to the outer surface of the root.
Stomata
Stomata (singular, stoma) are found on the surfaces of leaves – also of stems and flowers. A stoma is a pore or hole. It is surrounded by two cells called guard cells. These guard cells can change shape and this alters the size of the pore, allowing the amount of water vapour, oxygen and carbon dioxide that can pass through the pore to be controlled.
Water uptake by the roots
Plant roots form a branching network in the soil. Uptake of water and mineral salts is mainly carried out by the ends of the youngest roots. Just behind the tips of the branches of the roots is a region of root hairs. These are formed as extensions of the cells in the outer layer of the root (root epidermal cells). These root hairs increase the surface area for absorption of water and minerals from the soil.
If the stem of a plant is cut at its base, water exudes from the cut stem. This suggests that a pushing force is generated in the roots – root pressure. Root pressure on its own is not enough to drive water to the top of the tallest trees.
Resource 3: Students’ Writing
![]() Teacher resource to support teaching approaches
Teacher resource to support teaching approaches
Students’ writing
Getting students to write about their ideas is a good way to find out what they understand. Traditionally most of the writing that students do in science involves writing short answers to closed questions, or copying notes from the board. If this is all the writing that your students do, then you will be missing opportunities for them to demonstrate what they know and to be creative.
Writing in science should definitely not be restricted to answering questions and copying notes. There are a variety of ways in which you can use children’s writing to probe their understanding, develop their knowledge and refine their skills and some of these are summarized below.
DARTS
This stands for Directed Activities Related to Texts. As the name suggests the activities involve pupils working with texts that have been changed in some way. One common device is text with words missing that pupils have to supply. The missing words can either be listed below, or not, depending on the abilities of the pupils.
Sentences that link together to explain a process or phenomenon can be jumbled up and pupils have to decide their correct order.
Learning diary
This is a useful way of helping pupils reflect on their learning and even evaluate it. They will need to be trained to do this as it usually does not happen naturally.
Word matching
You supply a list of scientific words and definitions. Students have to match the right word with the correct definition.
Poster production
Producing a poster will not only give pupils an opportunity to demonstrate their knowledge and understanding in writing but also enable them to use drawings and diagrams to illustrate science concepts
Leaflet production
This is similar to poster production but with the added dimension that it normally expresses a particular view or opinion. It is often useful to ask pupils to produce leaflets expressing a view that is opposed to their own.
Pressure group letter writing
This is similar to leaflet production but is just text written in continuous prose with the intention of expressing a usually strongly held view. This provides pupils with an opportunity to marshal their thoughts and to construct a persuasive argument.
Experiment write up
Encouraging your students to write about their experiments in their own words will show you how much they understand. A strategy that teachers often use is to provide some headings and some key words that their students should be trying to use so that they can structure their writing.
Concept map construction
This involves breaking down a complex idea, process or phenomenon into sub-components and linking them graphically to display their logical sequential relationships and how they contribute to an understanding of the whole. This is normally quite a cognitive challenge and requires a lot of practice to perform successfully. Probably more significantly it requires a sound knowledge of the subject if the maps are to make sense.
Summarising
Pupils have to decide on key points from an extract and either rewrite them to fit in with a restricted word limit or number of points.
Story boarding
Pupils illustrate a particular process by transcribing from text to a series of pictures in cartoon form that describe the process.
Using flow diagram
This is similar to storyboarding except that the main features or aspects of the process are represented by particular diagrammatic symbols either of your choice or your pupils’.
Resource 4: Understanding the structure of leaves
![]() Teacher resource for planning or adapting to use with pupils
Teacher resource for planning or adapting to use with pupils
This resource can be copied for all students, or you can copy it on to the board.
Leaves
Look at the different leaves you are given.
Read the statements a to e below.
Write the statements in your book, leaving a clear line after each one.
- a.Leaves are flat with a large surface area
- b.Leaves have lines called veins on them
- c.Leaves are usually green
- d.The upper surface is darker green than the lower surface
- e.Leaves are thin
Complete your sentences using statements f to j below.
- f.to take water to all parts of the leaf.
- g.so a lot of sunlight falls on them.
- h.because there is more chlorophyll near the top of the leaf.
- i.because they contain chlorophyll to absorb light energy.
- j.so gases don’t have far to move.
Draw one of the leaves.
Label the following parts:
- Veins
- Midrib (a big vein in the middle)
- Blade (the flat part).
If you notice anything else the leaves have in common write it down.
Resource 5: Investigations
![]() Teacher resource for planning or adapting to use with pupils
Teacher resource for planning or adapting to use with pupils
Simple investigations
In order to help their students learn about how to do investigations, teachers often choose a simple problem or question. Students can then concentrate on the investigation and not worry about the science.
Testing household products is popular, such as investigating which is the strongest bag for carrying groceries.
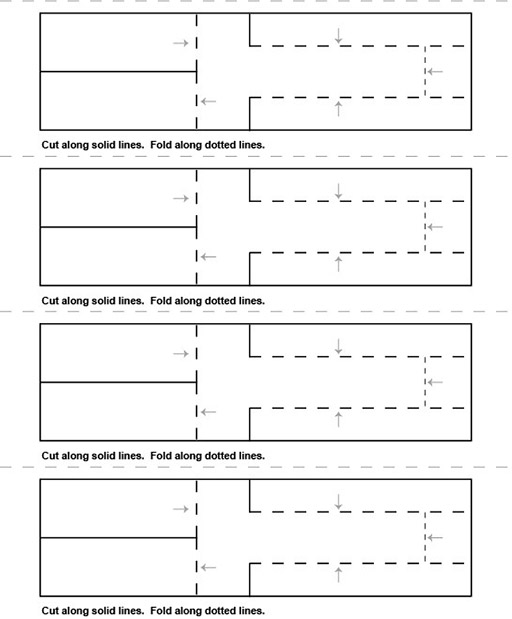
At the end of this resource is a template for a simple paper helicopter. Students can time how long it takes to fall from a height. They can change the area of the blades (by cutting them down) or change the mass by adding paperclips. In the process they learn about predicting, fair-testing, repeating readings, taking averages and spotting results that should be discounted.
To help your students plan a simple investigation you could write these questions on the board:
- What question are you trying to answer?
- What do you predict the answer will be and why?
- How will you measure … [the strength of the material, the time for the fall, etc.]
- What will you have to keep the same for each test?
- How will you record the results?
- How will you make sure the results are reliable? [They may need prompting to repeat readings.]
- What do you think the difficulties will be with your experiment? [Encourage them to do some trials to test their method.]
In an investigation like this the process is more important than the results. At the end gather your class round the front and use questions to draw out the important features of the process. Highlight the importance of making a prediction, testing the method, controlling variables, repeating the measurements, looking critically at the results and being prepared to ignore any where an error has been made. Once your students understand the principles of a scientific investigation, they will find it easier to plan an investigation to test a scientific question.
Leaf investigation
This is a simple investigation but it is important to let your students work out how to do it. Resist telling them the answers, but do ask leading questions if they are stuck.
You can tell them that rubbing petroleum jelly on a leaf will seal it and prevent water escaping.
Let them work out how to test whether both sides of the leaf lose water, or whether one side loses more than the other.
Each group will need some leaves or access to a small plant in a pot.
There are two ways you can set this experiment up.
- Experiment to show that more water is lost from the under surface than from the upper surface of most leaves
- As many leaves as possible (preferably still attached to plants) are treated as shown:
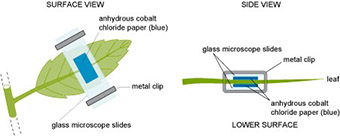
- Leave for several minutes.
- Result

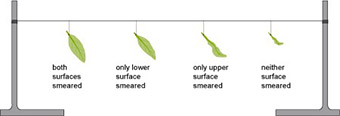
A series of leaves have their surfaces variously smeared with petroleum jelly
The leaves are left for a few days and observed at various intervals
Result
Below is a template for making a simple helicopter. Cut round the bold lines and fold the dotted ones.
Section 3 : Respiration
Theme: Science lived – relevant and real
Learning Outcomes
By the end of this section, you will have:
- helped your pupils to learn some science by studying the working of their own bodies;
- helped your pupils to collect data related to exercise and blood supply and record it appropriately and helped them to analyse and interpret patterns in this and additional second-hand data;
- taken pupils to visit a local industry to see how knowledge of respiration and microbial activity is applied.
Introduction
Science is all around us. Too often young people see science as something learnt from a textbook that is not relevant to their everyday lives. An effective way of demonstrating that this is not the case is to start with the everyday context and use it to draw out scientific principles. Activities like baking cakes, growing vegetables, and mending a bicycle all involve scientific principles. Making connections between the things they do at home and the science they learn in school can help to reinforce the scientific principles that your students need to learn. Asking students about things outside school that are important can get them engaged and interested – especially if some controversy is involved. Most real-life situations are actually quite complicated and it is easy to find yourself talking about chemistry, biology or physics, or even wider issues. This will help to keep your students interested in science and help them to see how science can help them to understand the world.
Resource 1 gives some strategies that you can use in order to help your students make these connections. We want to encourage you to develop the habit of relating all the areas of science that you study with your students to their everyday lives. Try to refer to the list in Resource 1 whenever you start planning a new topic for your pupils and ensure that you incorporate some of the ideas. In this unit we demonstrate how you can use some of these ideas in the context of learning about respiration.
In this unit we start with aspects of science relevant to the students’ own bodies and their experiences at school, home and in their leisure time. We then move on to consider issues of wider importance to their own lives and to society as a whole.
1. Measuring changes in pulse rate
In biology one of the best ways of making students see the subject as relevant to them is to relate it to their own bodies. In Activities 1 and 2 they consider the way their bodies respond to increased exercise. When you introduce the topic, you should be able to refer to their participation in physical education (PE) and school sports. They should be able to draw on their own experience in class discussions of the activities. Activity 1 is a standard practical that the students will enjoy, especially if you are able to take them outside to do the exercise. By asking them to design their own table you are helping them to develop an important skill – communicating experimental results clearly. They may need some assistance with this. Make sure you have worked out a suitable table yourself, so that you can help them if they have any difficulty. A traditional way to explain these results might be to discuss them as a class and to give them notes summarising the processes that occur during exercise. The written exercise replaces the notes and gives them practice in writing a clear concise paragraph about scientific ideas (an important skill for exams). It is designed to give the students enough help to work it out for themselves. You should discuss the results as a class before asking them to do the writing, but let them do the writing themselves.
Case study 1: Organising groups to do an experiment
Mrs Addai had explained the terms pulse and pulse rate and shown her students how to measure their pulse. She planned a practical in which her students investigated changes in their own pulse rate, in beats per minute, before and after exercise. She had a stop watch on her mobile phone and two egg timers. Before they started, they practised measuring a minute by counting slowly to sixty. This was necessary so that those without a timer could still do the experiment.
She divided the class into groups of three or four with each person performing a specific task: one person in each group acted as the subject; another took the pulse of the subject; a third did the timing and the fourth recorded the results in the table. The third and fourth task could be combined. The students could change tasks, so that everyone had a chance to have their pulse measured. Mrs Addai noticed that last time they did an experiment, the boys did the practical work and the girls tended to hang back. This time, she insisted that they worked in groups of boys or girls. They started by measuring the pulse rate of the subject while he or she was sitting down comfortably. They then had to run either outside or on the spot in the classroom for two minutes. Their pulse rate was measured again immediately afterwards.
At the end she gathered them round the front to discuss the significance of the changes in pulse rate before and after exercise and the reasons for variation in rates between individuals. For their homework, Mrs Addai asked the students to make a poster outlining the investigation and highlighting the key results. She told them what they had to include in the poster (what they did, why they did it, what they found out and what it showed) but let them choose how to present their work. She was amazed by the creativity and enthusiasm that they showed.
Activity 1: Investigating pulse rate
You could do this activity when you have taught your students the principles of respiration; or you could do the experiment first and then use the results to help you explain respiration. Think about what would work best for your class. Divide your students into groups of three or four. Explain what they are going to do and ask them to design a table in which to record their results. Tell them they are going to investigate the effect of exercise on pulse rate and describe what they should do. They will measure the pulse rate (pulses per minute) for each person in the group at rest (sitting down). They should then walk for 30 seconds before taking the pulse again. They should repeat this after running.
They could exercise by walking or running on the spot, but, if you can, take them outside to do this. After they have finished, if you have already explained respiration, ask them to write a paragraph describing their results using the following words and phrases: average; differences between individuals; increase heart beat; oxygen; muscles; respiration; rate; energy.
2. Focus on interpreting data
Scientists need to be able to identify patterns in experimental data. This can be a complex skill and students may face difficulties doing this in exams if they have not practised it beforehand. In Case study 2, the teacher shows her students examples of how data are presented in the media. It is a good idea, as a science teacher, to keep a file of cuttings from newspapers or magazines that you can use with your students. Any story related to science is worth keeping – you never know when it might be useful. Sometimes, newspapers present data in a particular way to make a specific point. Your students need to learn to be critical about what they read or hear. In the main activity, students are given the data in graphical form, but you could show them the graphs and the tables and get them to decide on the best way to display the data.
Case study 2: Explaining patterns in data
Mrs Maduhu had prepared a poster of graphs, charts and tables cut out of newspapers and magazines to show her class that these ways of presenting information are commonly used in many situations in daily life as well as in science, and science examinations. The ways of presenting the data included tables, line graphs and pie charts. She told her students that it was important that they became familiar with reading graphs, charts and tables and looking for patterns in the data so they could understand and explain what these forms of presentation showed. She also showed them how easy it is to emphasise a particular point by changing the scale on a graph.
Mrs Maduhu wrote three tables on the chalk board with data about cardiac output (Resource 4). She asked her students to copy the tables into their science books very carefully, to study the tables for their homework and to look for patterns in the figures.
She also asked them to use their knowledge of respiration to explain each pattern. For students who had time and were interested, she said they could do the same for Table 3. Next lesson, she put the students in groups of four and asked them to share their ideas. They had to choose one pattern they all agreed about, together with its explanation, and present this to the whole class.
Activity 2: Explaining patterns and peer review
Divide the class into groups of three to five students. Hand out a copy of the data on cardiac output and blood distribution to each group (Resource 3). If you do not have access to a copier, use Resource 4 and write the information on the chalkboard. Tell them to write three sentences that describe patterns in the data on a sheet of paper. Give them this example to start them off: ‘The amount of blood going to the brain stays almost the same during exercise.’ Tell them to pass their sheet to the next group, who should decide whether they think each statement is correct. If it is correct they should try to explain the reason for the pattern, using their knowledge of respiration and exercise. They should hand the paper on to a third group for checking. Each group should be asked to read to the class one of the patterns and the explanations written by their neighbours.
You can round off the lesson by reviewing two or three of the key patterns reported and their explanations. You can point out any important patterns that have not been reported on and you can congratulate your class on their developing analytical and interpretative skills.
3. Baking and brewing
All living things respire and the respiration of yeast forms the basis of the brewing and baking industries. Case study 3 and Activity 3 show how you can make use of this in your classroom. In the case study, the teacher gets a visitor into the classroom and the activity involves a visit. While it requires time and careful planning, a visit to a local industry (e.g. bread making) will have real value in motivating students and in helping them to understand the relevance of what they do in class to the real world. It should also help them to realise that ordinary people have used aspects of the scientific process to refine their methods. Over hundreds of years scientists have observed, carefully experimented with different methods, evaluated the results and where necessary modified their methods. Before you go, try to prime students on what they should look out for. It will help if they have studied yeast and fermentation before they go and are asked to relate what they see to what they have learned.
Case study 3: Inviting a visitor to school
One of Mr Nkala’s former students, David, had started working in a local bakery. Mr Nkala asked David to come and talk to his students about work in the bakery. David enjoyed his job and was pleased to do this.
He explained that the main ingredients of bread are flour, yeast, and water. He had brought some fresh yeast and some dried yeast to show the students. He put some of the yeast in a small bowl, added some warm water and a small spoonful of sugar. He asked the students to keep an eye on the mixture to see if they noticed any changes. In the meantime, he explained how to make bread.
David told the class that yeast is a single-celled fungus. Like all living organisms, yeast gets its energy during respiration. He asked them what they knew about respiration and was impressed with the replies. Yeast can respire without the need for oxygen (anaerobic respiration). As it respires yeast produces carbon dioxide gas and alcohol.
By now the students had noticed that the bowl of yeast, water and sugar had started to froth up with lots of tiny bubbles. David had brought some samples of the bread he made which he passed round for the students to examine. He asked the students why the bread did not taste of alcohol. Before he left, David explained what qualifications he had and described the training he had received. One day he hopes to own his own bakery and intends to specialise in making different kinds of bread from other countries. He gave the class a recipe for making bread (Resource 5) which they could do at home.
Activity 3: Organising a visit
Set up an experiment to show that yeast, sugar and water produce carbon dioxide and ethanol, provided that they are kept in a warm environment, in the absence of air. Explain to your students how this process is used in bread making and in brewing.
Try to arrange a visit to a local bakery or brewery, to reinforce learning and demonstrate the practical uses of this process. Depending on the size of your local bakery or brewery, there may not be enough space for the whole class to go on the visit. Those who do go could give a short presentation to the rest of the class when they return. You and your students will need to be aware of strict rules on cleanliness and hygiene associated with any business concerned with food. You can ask your students to look out for ways the bakery workers ensure that cleanliness is maintained. Some equipment and processes could cause injury to your students, such as the hot ovens, so it is important that they act responsibly and listen to instructions carefully. During the visit students should try to find answers to a number of questions. Possible questions, together with suggested answers are included in Resource 6 . Students should also be encouraged to think of and to ask questions of their own.
Resource 1: Making Science relevant
![]() Teacher resource to support teaching approaches
Teacher resource to support teaching approaches
Making science relevant to everyday life
Introduction
The TESSA resources are underpinned by a view that science is not just an activity that is carried out by people in white coats in a laboratory. Science helps students to make sense of the world and they need to realise that it is taking place all around them. Many everyday activities involve scientific principles. It is important that pupils get the opportunity to apply their scientific knowledge to an understanding of their own environment and that they understand that the skills they develop in science are relevant to some of the problems they face in everyday life.
Possible strategies
Class discussion
Use local examples where possible, but also encourage pupils to draw on their own experience in the classroom.
Practical work
- Use local examples and materials, e.g. hibiscus indicator; local minibeasts for work on classification or adaptation; wood and kerosene to compare calorific content of fuels.
- Give pupils a challenge using scrap materials, e.g. obtain clean salt.
Research projects
Pupils could find information from local newspapers or magazines or interview adults in the community, such as brewers, mechanics or health workers. This could be the basis of a poster, oral presentation or role play.
Making use of the school grounds
Besides the obvious opportunities for ecological investigations, the school grounds are a source of teaching examples in other topics such as corrosion, structures and forces. Take pupils to see them or ask them to find examples or collect data for analysis.
Day visits
Visit local industries, agricultural sites or museums. The effective teacher will link this to classroom work both before and after the trip.
Homework
Ask pupils to write about examples of science around them (e.g. chemical change in the kitchen or forces on the football field) or to bring materials to the classroom.
Writing tasks
Use local issues as a stimulus for creative written work, e.g. a letter to a newspaper or radio script on local environmental or health issues.
Discussion tasks
- Interviews – one child could be the ‘expert’ and the interviewer can ask questions as if they were producing a news item for the radio.
- Pupils come to a decision about a local issue, e.g. health promotion or energy supply.
You should create a file for yourself and keep any newspaper and magazine articles that you find that contain or are about scientific issues. Every time you start a new topic, ask yourself how it relates to everyday life and help your students to make those connections.
Brainstorming
Brainstorming as a class or in smaller groups can help students to make connections between the science they learn in class and their everyday lives.
Resource 2: Experiments on pulse rate
![]() Background information / subject knowledge for teacher
Background information / subject knowledge for teacher
Practical hints on measuring pulse rate
Investigating the effect of exercise on heart rate/pulse rate
You can find out how fast your heart is beating, that is your heart rate, by feeling your pulse. The wave of pressure which passes down an artery as a result of each heart beat is felt as a pulse when an artery is near the surface of the body and runs over a bone.
Finding the pulse
You can find the pulse in your wrist by turning your hand palm-side up. Gently place the middle and index finger of your other hand on the inside of the wrist at the base of the thumb. Press your fingers down in the groove between your middle tendons and your outside bone.
Do not use your thumb to feel the pulse as it has a pulse of its own.
You can also use a pulse in your neck region. To find this pulse, place your fingers gently on one side of your neck, below your jawbone and halfway between your main neck muscles and windpipe.
Do not press too hard when measuring your pulse.
Extension investigation on the effect of exercise on heart rate/pulse rate
For an extra investigation, some groups could choose one pupil to be the subject. The subject should then do two minutes of exercise again. Their pulse rate is measured immediately after this as before and then at one minute intervals until the pulse rate has returned to the resting rate. The fitter a person is the quicker the rate will return to normal.
Resource 3: Data on the effect of exercise
![]() Teacher resource for planning or adapting to use with pupils
Teacher resource for planning or adapting to use with pupils
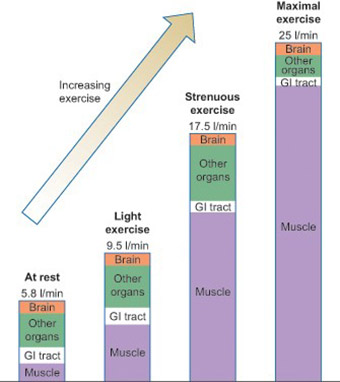
Effect of exercise on cardiac output and blood distribution
Resource 4: Data Pulse
![]() Teacher resource for planning or adapting to use with pupils
Teacher resource for planning or adapting to use with pupils
Cardiac output data
| Condition | Rest | Light exercise | Strenuous exercise | Maximal exercise |
| Cardiac output l/min | 5.8 | 9.5 | 17.5 | 25.0 |
| Body area | Brain | Other | Gastro-intestinal | Muscle | Total |
| Rest | 0.9 | 2. 4 | 1. 2 | 1. 3 | 5.8 |
| Light exercise | 0.9 | 2. 9 | 1. 3 | 4.4 | 9.5 |
| Strenuous exercise | 0.7 | 4.0 | 0.7 | 12. 1 | 17.5 |
| Maximal exercise | 0.7 | 1. 8 | 0.5 | 22. 0 | 25.0 |
| Body area | Brain | Other | Gastro-intestinal | Muscle | Total |
| Rest | 16 | 41 | 20 | 23 | 100 |
| Light exercise | 9 | 31 | 14 | 46 | 100 |
| Strenuous exercise | 4 | 23 | 4 | 69 | 100 |
| Maximal exercise | 3 | 7 | 2 | 88 | 100 |
Resource 5: Making bread
![]() Teacher resource for planning or adapting to use with pupils
Teacher resource for planning or adapting to use with pupils
Recipe for making bread
700 g (1½ lb) strong plain flour
15 ml (1 tablespoon) salt
15 g (½ oz) butter (for greasing the tin)
425 ml (3/4 pt) lukewarm water
15 g (½ oz) fresh yeast, or 10 ml (2 teaspoons) dried yeast with 5 ml (1 teaspoon) sugar
Method
Stir fresh yeast into the water or mix dried yeast and sugar with a few drops of water and add to the rest of the water.
Sift the flour and salt into a bowl. Make a well in the centre and add the water and yeast. Mix well until the dough comes away from the sides of the bowl.
Knead the dough with your hands for 10 minutes.
Put the dough into the bowl and cover with a damp cloth. Leave it for an hour in a warm place until it has doubled in size.
Knead the dough again for a few minutes Place the dough into a greased loaf tin or shape into balls and place on a baking tray.
Let the dough rise again in a warm place for another hour.
Bake the dough for 30–35 minutes in an oven at 230˚C (450˚F) or gas mark 8.
Resource 6: Background information on Yeast
![]() Background information / subject knowledge for teacher
Background information / subject knowledge for teacher
Yeast and baking
Background information for bakery visit
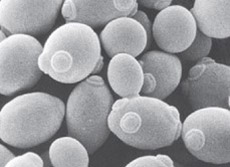
There are many types of yeast. The species of yeast used in baking is known as Saccharomyces cerevisiae.
Yeast cells are globose to elongate in shape. They are found in soils and on plant surfaces and are especially abundant in sugary media such as flower nectar and fruits.
Yeasts are saprophytes and feed mostly on sugars in the medium around them. Saprophytic organisms feed by secreting digestive enzymes on dead organic material and absorbing the products of digestion.
Yeasts reproduce by budding. During this process a small bump, the bud, protrudes from the parent cell. This enlarges and matures. The bud eventually breaks away from the mother cell to form a separate daughter cell. Some of the yeast cells in the photograph above can be seen with buds on them.
The production of alcohol by yeast is exploited in wine and beer making. Saccharomyces cerevisiae is most commonly used, but other species are important for some types of beer.
Several yeasts have been used in scientific research into genetics and cell biology. In 1996 S. cerevisiae was the first eukaryote to have its DNA fully sequenced as part of the Genome project.
Other species of yeast, such as Candida albicans, are pathogens and can cause infections in humans.
Notes on constituents of bread making
Amylase enzymes in the moistened flour convert the starch in flour to glucose, which the yeast cells use as their respiratory substrate.
Flour protein, called gluten, helps make the dough stretchy (elastic and plastic). This helps to ensure that the carbon dioxide remains trapped as it enlarges the bubbles within the dough. Kneading the dough changes the structure of the proteins in the flour, making them more elastic so the bubbles of gas are trapped. This makes the bread light and chewy.
Types of flour: strong flours contain plenty of gluten, but very little α-amylase enzyme. Wholemeal flour is rich in α-amylase.
Ascorbic acid (vitamin C) may also be added as a flour improver. It makes the dough more elastic and better at trapping gases and as a result reduces the time required for leavening. This is an important consideration in commercial bread production.
Potassium bromate is sometimes used as a flour improver.
Salt is often added in the bread making process. It inhibits the action of proteases (protein digesting enzymes) and so prevents gluten from being weakened into a sticky mass that cannot retain carbon dioxide.
Excess salt forms strong ionic bonds with side chains of protein molecules. This makes them less stretchy and leads to tough bread. Excess salt also inhibits yeast growth.
Questions about yeast.
Q1 Where do you find yeasts naturally?
A Yeasts are found worldwide in soils, on plant surfaces and in the atmosphere. Yeasts are especially abundant in sugary mediums such as flower nectar and fruits.
Q2 When did people first learn about yeast and how it could be used in bread-making?
A Yeast is probably one of the earliest domesticated organisms. People have used yeast for fermentation and baking throughout history. Archaeologists digging in Egyptian ruins found early grinding stones and baking chambers for yeasted bread, as well as drawings of 4000-year-old bakeries and breweries. In 1680, the Dutch scientist Anton van Leeuwenhoek first observed yeast cells under the microscope. At the time he did not consider them to be living organisms. In 1857, the French scientist Louis Pasteur proved that alcoholic fermentation was caused by living yeast cells.
Q3 How is yeast produced commercially now?
A Yeast is grown in a medium of sugar beet or cane molasses in large batch culture vats (50 000-200 000 litre capacity). Yeasts can grow in the presence or absence of oxygen.
The commercial production of yeast occurs in aerobic conditions. These conditions allow maximum multiplication of yeast cells. If multiplication is too rapid, oxygen levels fall and respiration becomes anaerobic. Hence oxygen levels must be monitored.
(N.B. When baking bread, the yeast in dough must be allowed to respire anaerobically. There is very little cell multiplication. Instead, the sugar is used mainly to produce alcohol and carbon dioxide).
After removal from the vats, the yeast is centrifuged and washed several times, then chilled to 2–4˚C.
Water is removed by dehydrators and the yeast packaged.

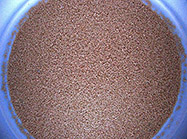
From http://en.wikipedia.org/wiki/Baker's_yeast (Accessed 2008)
Q4 What special conditions are required for yeast growth and multiplication?
A Yeast must be grown under aerobic conditions in order for the cells to multiply. Hence oxygen must be supplied and levels must be monitored carefully.
Ammonium sulphate, (NH4)2 SO4, is often added as a source of nitrogen for the yeast cells.
The pH must be kept in the range 4.0–5.5. As the yeast cells use up ammonium ions from the ammonium sulphate in order to get nitrogen, this tends to create acid conditions. This must be adjusted by periodic addition of alkali to keep the pH in the correct range.
Other substances may be added to aid growth, e.g. biotin or pantothenic acid.
The temperature must be kept at 30–35˚C to ensure reactions work most efficiently. Enzymes in the yeast cells are essential for respiration to happen. Enzymes are very sensitive to temperature.
Q5 How big is a yeast cell?
A The typical yeast cell is approximately equal in size to a human red blood cell and is spherical to ellipsoidal in shape. Because of its small size, it takes about 30 billion yeast cells to make up to 1 g of compressed baker’s yeast.
A yeast cell is around 5–10 micrometres (μm) by 4–8 micrometres (μm).
There are 1000 micrometres in one millimetre.
The very sharp point on a pin is about 100 micrometres (μm) across.
Q6 What is the most important difference in the growth conditions for the production of yeast cells and the use of yeast cells in baking?
A The production of yeast cells occurs in aerobic conditions, so oxygen must be supplied. For baking, no oxygen should be supplied and the yeast must be allowed to respire anaerobically.
Q7 What is the meaning of the scientific name of bakers yeast, Saccharomyces cerevisiae?
A Saccharomyces means sugar loving. The species name, cerevisiae, comes from the name Ceres, the Roman goddess of agriculture.
Section 4 : Nutrition, conservation and ecology
Theme: Problem solving and creativity
Learning Outcomes
By the end of this section, you will have:
- told a story about problems in a local area and given students the opportunity to work out the reasons for the problems and to suggest a sensible course of action;
- supported students in using their knowledge of nutrients to plan a day’s diet;
- organised students into groups to conduct research within their community and present it to the class.
Introduction
When your students start to look for a job, the qualifications that they have will obviously be very important. However, potential employers will also be looking for people who are creative and who are able to solve problems; they will be looking for people who can think for themselves. Students can sometimes view science as a subject that provides absolute answers that lead to technological advances which can be used directly to solve practical problems. In reality, many problems have cultural and economic perspectives that must be considered as well. Scientists must consider all perspectives when seeking solutions which will be successful in the real world. They need to be creative and able to work effectively with others. The case studies and activities in this unit are designed to show you how you can give your students the opportunity to be creative, to develop their thinking skills and to work effectively with others. They will fit into your normal teaching of nutrition, ecology and conservation. Some general strategies are given in Resource 1 .
1. Using a story to think about local issues
Working effectively with others entails listening carefully to what they say. You need to respect, and also critically analyse, their knowledge and opinions. Students should be able to present their own knowledge and ideas in a clear and honest manner. They need to learn to work together to come up with solutions acceptable to all. There should be give and take on all sides. This is an important and difficult skill to acquire. Students will become more proficient at it the more they practise it.
In Activity 1 and Case Study 1, we ask students to consider the possible benefits of applying their knowledge of ecology and conservation to a real problem. However, they also need to take into account the views of people who may be resistant to change. They not only need to look for ways to persuade local people of the benefits of change, but should also consider whether the local community may know of factors that scientists have not considered. Case study 1 shows how one teacher used the story to revise certain topics. The activity uses a story to create interest and then a table to record key points.
Case study 1: Using a story to make revision fun
Christina Majula has a dilemma. She is keen to show her students that what they learn about ecology and conservation in school is very relevant to the daily lives of us all. She also wants the students to do well in their exams but is struggling to finish the syllabus. She plans a revision lesson which includes a story (Resource 2) to illustrate a real problem which biological knowledge and understanding could help resolve. Christina has prepared five posters which she will use as a circus of activities with her class. The posters will act as revision of the topic she has just covered with the class. Each poster provides information relevant to the problem (Resource 3). Christina reads the story to the class. She then divides the students into five groups. Each group has 10 minutes to look at each poster. She asks them to read the information and to note down some advice to the villagers with an explanation of why that would help solve their problems. She then gathers her students around the front and asks each group to report on what they have learned from one of the posters. Finally, she asks them to imagine that they were Kabwe. How could he convince the village headman that the ideas they were suggesting would work? He is young and new to the area, whereas the village headman is held in great respect. People are not likely to listen to what Kabwe has to say. The students became very animated and interested in a problem that some of them recognised.
Activity 1: Using a story to highlight a controversial issue
Tell the students you are going to read them a story about a village with problems. Ask them to note down the problems the village has faced, while you are reading. Read Kabwe’s story (Resource 2) quickly. After you have done this ask the students to tell you about the problems the village faced. They should have noted the lack of wild fruits, the poor harvests, low rainfall and lack of water (see Resource 2). Now put a table on the board with two headings: Kabwe’s views; Chanda Bwalya’s views. Ask students to take turns to read a paragraph and after each paragraph, add points to the table. Then organise them into groups and ask them to produce a poster suggesting ways of improving the situation. They should use their knowledge of science to suggest some solutions, but they should also think about who they would consult to help them and how they will convince the headman and villagers to adopt their ideas.
2. Thinking about nutrition
As you know, there is a lot to learn in science. You will find that if you can present the information in the form of a problem or issue, then it will be much more interesting for the students – much better than simply copying notes or listening to a lecture. In Case study 2 and Activity 2 we apply this idea to nutrition. Your textbook will explain the need for a balanced diet and give examples of foods rich in particular nutrients. In this activity, we ask students to create their own menu for a day. Students will enjoy the opportunity to make their own decisions about what they could eat and to compare these with their friends’ choices. They will also reinforce their knowledge of the basic ideas and terminology of the topic. The case study shows how one teacher used this as an opportunity to differentiate the work. (Resource 4 has more information on catering for students with different abilities). Just as with Activity 1, students will apply their scientific knowledge to a practical problem with a wide range of possible answers. A key aspect of the problem-solving approach is the development of the students’ ability to think for themselves and to find and justify an answer that is unique. This helps students to realise that success in science is not simply a matter of learning and remembering facts from a textbook.
Case study 2: Differentiating work
Mrs Kaddu is teaching nutrition to her students. She knows that it is important that the whole class knows the main types of food required for a healthy diet. She also knows that some of the students in the class are particularly able. She decides to set two different tasks for students, depending on how easy or difficult they find science. This will help maintain the interest of the students who find science easy and extend their abilities. She uses Activity 2 but also prepares some extra materials. These include two tasks that will challenge the more able students to use detailed nutritional information and provide them with an opportunity to practise their numeracy skills. She gives these students information on the energy content of foods in kilojoules and gives them values for the energy requirements of an active teenage girl and boy. She also gives them information on the energy needed for different types of activity. This provides a range of possible extension work. All the students in her class have work that is suitable for their current stage of development and ability. You can see the extension work Mrs Kaddu made in Resource 5 .
Activity 2: Working in groups to learn about nutrition
Organise your students into groups of three to five. Ask them to use the textbook or Resource 5 to identify foods that they eat regularly which are rich in proteins, carbohydrates, fats or vitamins and minerals. Discuss their lists and remind them of the idea that some nutrients (e.g. carbohydrates) are needed in much larger quantities than others (e.g. vitamins and minerals). Approximate amounts of the daily requirements of some nutrients are shown on the resource sheet. Explain that actual amounts will vary according to how old you are, how active you are, whether you are a boy or a girl and how big you are. Ask each student to design a menu for the day that would give them a balanced diet as well as being nice to eat.
If there is time at the end of the lesson, some students could read out their diets. Alternatively, students could exchange their work with their neighbour and read their diets.
3. Conducting research on local food issues
Encouraging students to ask questions and giving them choices about their work are both important when you are teaching them to be creative and to solve problems. By conducting their own research on a topic of their choice, they have ownership of the problem and will develop other skills alongside learning about science. The work they produce could even be of interest to future employers. They have freedom to choose an area of interest and to research it in their own time and in their own way. While this activity will take the students some time to complete, it does not take up much class time and it will give them an opportunity for independent learning. Case study 3 shows what students can do by simply making use of friends and families and Activity 3 also shows what else they could do if they have access to a library or computers. They will practise sorting through a range of information and presenting it in a poster or booklet to their colleagues. You could explain that this is an important way that scientists communicate their research to other scientists at international conferences.
Case study 3: Research using friends and family
Mr Saiti is worried that some of the pupils in his class do not get a good balanced diet. Many have family plots at home for growing food, but these do not always yield a good harvest. He decides to set his class a competition to research good techniques for growing crops on a small scale. They should base their research on talking to people they know and other people in the community. He wants them to use their scientific knowledge to explain the techniques that they hear about. He divides the class into groups of four students. He asks each group to display their findings in a poster and tells them that there will be a prize for the best plan. He puts the judging criteria (Resource 6) on the classroom wall so that the students can see what he will be looking for and plan their work accordingly. Hari’s group are very enthusiastic. Hari goes down to the local market. He picks the stall with the nicest looking vegetables and chats to the owner about how he grows them. Sakina’s aunt works in a local clinic. Sakina asks her about the sorts of illnesses that local people have and as a group they work out what sort of food would help improve local diets and reduce the likelihood of illness due to nutrient deficiencies.
Mr Saiti has already noticed a small plot of land that belongs to the school, but which is not being used. He has asked the headteacher if he could use this plot with his class to develop a small garden to grow vegetables and fruit. The headteacher has agreed to his request.
Activity 3: Organising a research project
Divide your class into groups of up to four students. Explain that you would like them to identify a local food issue to research. Give them time in class to decide on the issue they will research and to plan how they will carry out their research. Encourage them to talk to their family and other friends to identify a local issue or concern. If possible, they could also use a library or the internet. You could spend a short time with the whole class doing a brainstorming activity to generate ideas for suitable topics. Resource 6 has some ideas to start the students thinking. Tell them they have 3 weeks to do the research and prepare a poster, a set of leaflets or a scrap book that will be displayed in the classroom. When they have done this allow them time in the lesson to go round the exhibition and to evaluate each others’ work.
Resource 1: Problem Solving and Creativity
![]() Teacher resource to support teaching approaches
Teacher resource to support teaching approaches
Problem solving and creativity
Through being resourceful and engaging and providing variety, you will be able to motivate your students. If you are willing and able to solve problems and be creative, you will be able to help your students develop these skills. And it is not as difficult as it might seem!
Creativity
Creativity is about the ability to think. It is not just about remembering, but also applying, suggesting, extending, modelling, and offering alternatives. It is something that you can model for your students. Students need to be encouraged to think differently and come up with original ideas. They also need to feel confident in the reception they will get before they make such suggestions.
Some teachers will naturally be very creative, but some will not – and that is fine as long as you are resourceful and willing to try new ideas. A creative teacher, for example, will take the TESSA Secondary Science units and apply the strategies we suggest to different contexts. You could use news items from radio, television or newspapers and relate this to the science you are teaching. You can set open-ended tasks and allow students to make choices about how they present their work. You may take some risks in your teaching. Above all, you will create an atmosphere of excitement and enquiry with dramatic demonstrations, enthusiasm or amazing and unbelievable facts.
Strategies to promote creativity
Get students to:
- write a story to illustrate a scientific principle
- draw a picture to illustrate a scientific principle
- make up a play
- make a model
- take part in a role play (e.g. be the particles in a solid, liquid or gas)
- make up a poem or a rap
- think up alternative explanations for something they see
- write a letter or newspaper article or podcast.
Problem solving
Helping students to develop problem-solving skills is a frequently cited goal of science teachers. As with creativity, you can model these skills in your own classroom. For example, if you can’t answer a student’s question, you can come back next lesson with a solution and explain how you worked it out and why you found it hard. Being able to solve problems involves developing thinking skills. There are various strategies that you can adopt to help children develop these skills (Wellington and Ireson, 2008):
- Encouraging student-generated questions. The act of asking questions requires engagement and creative thought, two core cognitive strategies.
- Being clear about ‘purpose’. Students should be encouraged to ask: what is this all about?’ ‘What does this relate to?’ ‘Why do you want us to do this?’ – rather than embark on activities in an unthinking, recipe-following fashion.
- Setting open-ended activities. Teachers should set activities that can be tackled in a variety of ways so that children have to think about how they will tackle the problem.
- Planning. Teachers need to provide opportunities for children to plan their problem-solving strategy in a systematic way.
- Paraphrasing. It is well known that you really get to know and understand ideas when you try to teach them to someone else. Giving children opportunity to paraphrase an explanation will help them to understand difficult ideas and to be aware of their own learning.
- Learning to learn (metacognition). Teachers can encourage children to become more conscious of their learning by getting them to think about why they don’t understand and what strategies helped them that might be useful in the future.
Reference
Wellington, J. and Ireson, G. (2008) Science learning, Science teaching. Abingdon: Routledge.
Resource 2: Kabwe’s Story
![]() Teacher resource for planning or adapting to use with pupils
Teacher resource for planning or adapting to use with pupils
Kabwe’s story
Kabwe, a 21-year-old man, is a newly appointed Basic School Diploma teacher. He was recently recruited from Kasama Teacher Training College to teach grades 8 and 9 at Katoma Basic School in Chinsali District of Zambia. In order to familiarise himself with this new school, Kabwe went to meet the local village headman, 75-year-old Chanda Bwalya. Kabwe wanted to shed some light on the history of the village and the development and future of the school.
Kabwe noticed that there were problems in the village. There were very few trees in the area, recent harvests had been poor and there were low levels of rainfall. Some of the children in his class did not come to school very often and several of them had protruding tummies, and small legs showing a lot of suffering and hunger.
Chanda Bwalya, the local village headman, praised the ancient days when they founded the village; there was plenty of water in the surrounding streams, and large number of large wild trees with fruits which engulfed the new village. They used to get large crop harvests from very small portions of land they had tilled. It was their custom to use the shifting cultivation system known as chitemene for farming, which involved growing maize or food in one field until it no longer produced enough food then shifting to another area. The trees had provided fruits but also firewood and charcoal. Now the area is a semi-desert. The plants are growing stunted, the yield is poor and there are very few trees left.
Chanda Bwalya blamed the crop failure, lack of wild fruits and the lack of water in most of the streams on misfortune which had befallen the village. Respect for the ancestors had reduced drastically and no yearly rituals for thanking them had been conducted for several years. Chanda also blamed the schools for the bad manners they were teaching the children such as stopping the villagers from cutting trees and planting maize for several years in one garden. The issue of planting new trees was not a village problem but God’s problem as he comes to replace the trees after some time. Chanda Bwalya hinted at the bad times they were going through and was hopeful that things would change for the better once certain solutions were introduced such as paying homage to the ancestors, respect of elders and many more.
Kabwe, the teacher, reminded the village headman that there were no new trees coming up to replace the ones that had been cut down and this was causing the area to become desert. He suggested they planted trees and changed to new methods of organic farming. The old man refused to agree with Kabwe reminding him that he was too young to understand how God and our ancestors replace the lost trees. He should first spend some time in this village and then he would experience the growth of new trees. Chanda Bwalya suggested that Kabwe was too young to understand how these problems had befallen his village and its school.
Kabwe, after listening to the old man for over 2 hours, became more tense in his mind and started contemplating how he would manage his new job in such an environment and what he could do to change the existing beliefs and norms to more modern approaches so that the pupils and the community could move forward and their health could improve.
The poor health of most of his pupils worried him and the newly created desert in an area which previously had large trees and the poor harvests the people were experiencing concerned him. .
The next day, Kabwe returned to his classroom. Overnight he had fully reflected on the stories he had heard from old Chanda Bwalya. He was determined to help the village find a solution to their problems.
Notes on Kabwe’s story
Below are some problems in the village that your students should be able to identify. See what ideas they think of themselves before you share these with them.
- Poor crop harvests.
- No wild fruit or other forest foods such as mangos which can supplement diet.
- Poor nutrition of some pupils – affecting health and school attendance.
- Low rainfall.
- Greatly reduced water flow in local streams.
- Soils lacking in nutrients and becoming dry and desert like.
- Resistance to organic or different farming methods, e.g. the same crops grown on a plot of land every year; not using animal manure and collecting organic waste to make compost.
- Loss of native forest trees.
- Poor communication and mutual understanding between traditional villagers, such as the headman who feels that traditional ways and respect for ancestors is being lost, and younger people from outside the village with new ideas.
Here are some questions you could get your students to think about:
- Why was their village lacking wild fruits?
- Why was the area resembling a desert?
- What was causing the shortage of water in streams which used to be perennial?
- Why were the harvests from their parents’ gardens yielding very little?
- What measures would they take to resolve these problems in their village?
- Who should they consult to assist with resolving these problems?
- What examples would they show to the local people that these problems could be resolved?
Resource 3: Background knowledge for Kabwe’s story
![]() Background information / subject knowledge for teacher
Background information / subject knowledge for teacher
Solutions using biological knowledge
Knowledge and understanding of natural interactions between living organisms and their environment, including soil and water availability, can be applied to situations where human intervention has created problems. It can be used to develop solutions to help alleviate the problems.
Main areas of biology syllabus which relate to this story
- Nutrient cycles such as the nitrogen cycle and carbon cycle.
- Problems associated with human population growth and depletion of resources.
- Soil fertility, resource management and improved farming practices.
- Effects of human activity in causing deforestation, soil erosion, drought, flooding, loss of biodiversity (genetic material for future crop breeding and potential economic resources such as yet undiscovered medicines).
- Components of a healthy diet.
Scientists and communication
As well as doing and understanding science themselves, scientists must be able to explain scientific ideas to the general public and persuade them of the advantages of new techniques where appropriate. They need good communication skills. This includes listening to the views of others, analysing them critically and being prepared to learn from others. Some problems need to be solved by taking account of a balance of scientific, economic and cultural considerations.
In this story, the headman laments the lack of respect for ancestors. Biologists have a respect for the natural environment. It may be that common ground can be found by negotiation.
Listening is also important as the local knowledge of community members can be extremely valuable. This is internationally recognised as an important concept. Such knowledge should not be stolen nor its holders exploited.
Poster 1 The nitrogen cycle and the carbon cycle
Harvesting crops reduces the carbon and nitrogen going back into the soil.
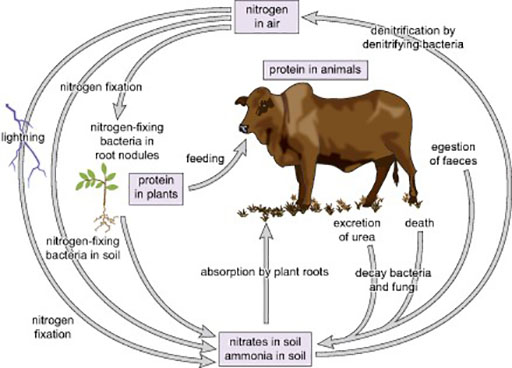
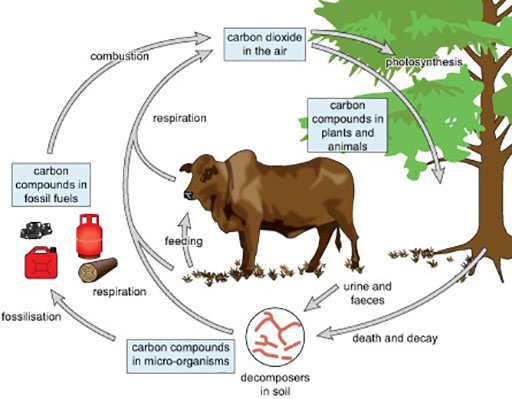
Methods of conserving and renewing soil fertility
Application of manure, compost or artificial fertilisers: Removing crops at harvest interrupts natural nutrient cycles and prevents nutrients from dead remains returning to the soil to replenish nutrients. To make good the losses, farmers can apply manure, compost or artificial fertilisers. Animal manure decays to give nutrient salts. It also supplies humus which improves the water holding capacity of soils.
Crop rotation: If crops are chosen carefully this can reduce the amounts of any one mineral which is removed from the soil. It also reduces the likelihood of harmful pests and parasites building up in the area and adversely affecting crop yields. A leguminous crop is often included in the rotation so nitrogen levels can be built up in the soil due by the action of the nitrogen-fixing bacteria in their root nodules.
Poster 2 Human population growth – depletion of resources
As the population grows, more food is needed. If it is not available, people suffer from malnutrition. Also, people need to make a living and they often do so by selling resources such as timber from rainforests.
Malnutrition
This is caused by not eating enough of all the necessary components of a healthy diet. The main components of a healthy diet are protein, carbohydrate, lipid, vitamins, minerals and water.
Why traditional practices that used to be successful now need to be modified
Traditional practice of ‘slash and burn’ agriculture did no long-term damage to forests when population densities were low. Given time, the ‘bush fallow’ between clearances provided a natural rotation system that allowed the forest and its soil time to recover. Human population expansion and competing land uses such as plantation agriculture (rubber, oil palm) and hydroelectric power schemes have reduced the fallow period.
In addition to subsistence farming systems, forests are being removed for fuel wood gathering. Also, they are now being removed at an increasing rate by commercial logging for tropical hardwood timber (mainly for rich countries), for wholesale burning and clearing for cattle ranching (beef at cheap prices).
Poster 3 Soil fertility, resource management and improved farming practices
Organic practice
Organic practice focuses on maintaining a healthy and fertile soil using animal manure and compost rather than artificial fertilisers. This provides nutrients and also increases the water holding capacity of the soil. It also advocates using crop rotation. Where possible, rainwater should be collected. The need for watering can be reduced by improving the soil and growing appropriate plants. Native species should be grown where possible. Natural wildlife areas should be encouraged adjacent to crops so crop pests are controlled by natural predators.
Sustainable resource use
Where forests are cut down, for example as a timber resource, this should be done in a sustainable way. This means, with thought for future generations, i.e. as trees are cut down, new saplings should be planted.
Poster 4 The effects of human activity
Water and nutrient availability and soil erosion
Deforestation accelerates desertification by reducing rainfall. When the forest trees are cut down, the water cycle is disrupted. The reduction in transpiration (the evaporation of water vapour from the surface of the plants) results in fewer clouds and less rainfall in the vicinity. Surrounding forests are threatened by desiccation. As the land becomes hotter and drier, more of the soil is eroded.
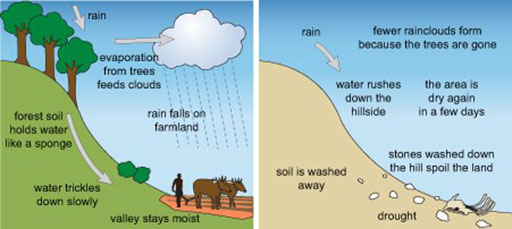
Rainforest soils are poor in nutrients. In rainforests, virtually all the nutrients are in the organic matter of the forest canopy. Normally when dead organisms fall to the floor and are decomposed into nutrients, these nutrients are quickly reabsorbed into the living plants. If, however, the forest is felled and the trees removed, the soil nutrient source is removed too, so soils quickly become nutrient poor. The soil is of little use even for subsistence agriculture and soil erosion usually follows.
Forests are often on uplands and on watersheds. They catch and hold large amounts of rain and release the water slowly and reliably into rivers and streams. Deforestation of uplands disrupts regular water supplies and can result in much disastrous flooding of the plains below.
Trees help to stabilise soil. Deforestation results in soil erosion. This means food production is affected and can result in hunger and economic losses. Reservoirs and water supplies can silt up and harbours and estuaries must be continually dredged to keep them open.
Loss of biodiversity
Forests are extremely species rich. Their destruction will lead to innumerable extinctions of unknown and little known species, with consequent loss of genetic variety and potential resources.
Forests and climate change
Forests are an important carbon sink (together with plankton in the oceans). This is an important role within the carbon cycle. Removal of forests contributes to an increase in atmospheric carbon dioxide, which can lead to climate changes due to the greenhouse effect.
Poster 5 Components of a healthy diet
If there is not enough of the necessary types of food available, people will suffer from malnutrition. Malnutrition is caused by not eating enough of all the necessary components of a healthy diet. The main components of a healthy diet are protein, carbohydrate, fat, vitamins, minerals and water.
| Food | Rich source of | Moderate source of |
|---|---|---|
| Cereals | Starch, fibre | Protein, B vitamins, many minerals |
| Starchy roots and fruits (yams, maize, cassava, potatoes, rice) | Starch, fibre | Some minerals, vitamin C if fresh, vitamin A if yellow or orange |
| Beans and peas | Protein, starch, some minerals, fibre | B vitamins |
| Oilseeds | Fat, protein, fibre | B vitamins, some minerals |
| Fats and oils | Fat | Vitamin A if orange or red |
| Dark to medium-green leaves | Vitamins A and C, folate | Protein, minerals |
| Orange vegetables | Vitamins A and C | Fibre |
| Orange fruits | Vitamins A and C | Fibre |
| Citrus fruits | Vitamin C | Fibre |
| Milk | Fat, protein, calcium, vitamins | |
| Eggs | Protein, vitamins | Fat, minerals (not iron) |
| Meat | Protein, fat, iron | |
| Fish | Protein, iron | |
| Liver | Protein, iron, vitamins |
Resource 4: Differentiating work
![]() Background information / subject knowledge for teacher
Background information / subject knowledge for teacher
Differentiating work for students of varying abilities
As you know, each pupil has different abilities. There can also be a significant difference in age between the oldest and youngest pupil in the class. Some students will learn more effectively by reading a book, some by carrying out a practical activity and some by listening to and absorbing spoken instructions. Some will understand the work very easily, some will take more time. Some will work very quickly through any task you set, some will work slowly. It is impossible for you as a teacher to take all the differences into account all the time, but there are things that you can do to support individuals within a class.
If you have a class of 40 or more pupils this might sound like a daunting task. There are two important things that you need to do to be able to effectively cater for everyone in your class:
- Know your students. You need to give them opportunities to work in groups and listen to their conversations; you need to mark their written work; you need to ask questions of individuals in class and you need to encourage them to ask you questions if they don’t understand or just want to know more. When you know who understands easily, who finds science difficult, who likes to talk, who likes to write, who likes to draw and who likes doing experiments, you will be in a much better position to help individuals.
- Know your subject. It is unrealistic to expect everyone to remember and understand everything that you do. Students who find science difficult will be overwhelmed if you try to tell them everything. You need to break each topic down into simple steps and make sure that everyone understands the most important ideas. You also need to know how to challenge students who have grasped the basic ideas.
You can cater for the range of abilities within your group in two main ways:
Differentiating by outcome
This involves setting some questions that get progressively more difficult. Everyone gets as far as they can. Alternatively, you can set open-ended tasks in which students demonstrate what they can do. This also enables you to give them a choice about how they present their work, which can be very motivating. You may find that the degree of support that you need to provide to individuals, pairs or small groups within the class varies significantly.
Differentiating by task
For this, you set different students, or groups of students, different tasks. For example, in a practical session some pupils could have instructions provided for them in written form and some could have them in diagram form and some could have a combination of both.
You could provide a set of questions that cover the basic ideas that you judge that everyone needs to understand and a set that are more challenging. The students who you expect to get a grade A could be given the more challenging ones.
Learning style
There is a lot of research that suggests that different students prefer to learn in different ways. The three learning styles that are more commonly referred to are visual, audio and kinesthetic, i.e. some students prefer diagrams and pictures, some learn best by listening and some prefer to be able to do things.
As a teacher you cannot be expected to cater for all the students all the time, but a good teacher will make sure that their lessons contain activities that cover all three learning styles.
There is a tendency to expect students to do a lot of listening. You should make sure that your students also get to do experiments or activities that involve moving around the room and talking about science. Encourage them to use mind maps and diagrams or pictures to summarise key ideas, rather than simply copying notes off the board.
Resource 5: Data on food and energy
![]() Teacher resource for planning or adapting to use with pupils
Teacher resource for planning or adapting to use with pupils
Food
A healthy diet requires adequate amounts of protein, carbohydrate, fat, vitamins, minerals and water.
A rough guide to daily requirements is as follows:
- protein 50 g
- carbohydrate 300 g
- fat 65 g
- fibre 30 g
- vitamin A 730 μg
- vitamin C 60 mg
- iron 11 mg (males), 15 mg (females)
- calcium 1300 mg.
Note the different units for different nutrients:
1 mg = 1/1000 g 1 μg = 1/1000 mg.
| Food | Rich source of | Moderate source of |
|---|---|---|
| Cereals | Starch, fibre | Protein, B vitamins, many minerals |
| Starchy roots and fruits (yams, maize, cassava, potatoes, rice) | Starch, fibre | Some minerals, vitamin C if fresh, vitamin A if yellow or orange |
| Beans and peas | Protein, starch, some minerals, fibre | B vitamins |
| Oilseeds | Fat, protein, fibre | B vitamins, some minerals |
| Fats and oils | Fat | Vitamin A if orange or red |
| Dark to medium-green leaves | Vitamins A and C, folate | Protein, minerals |
| Orange vegetables | Vitamins A and C | Fibre |
| Orange fruits | Vitamins A and C | Fibre |
| Citrus fruits | Vitamin C | Fibre |
| Milk | Fat, protein, calcium, vitamins | |
| Eggs | Protein, vitamins | Fat, minerals (not iron) |
| Meat | Protein, fat, iron | |
| Fish | Protein, iron | |
| Liver | Protein, iron, vitamins |
| Vitamin | Good sources |
|---|---|
| Vitamin A | Liver, fish liver oils, egg yolk, milk and dairy products, green leafy vegetables (especially kale, amaranth, sweet potato, cowpea and cassava leaves), yellow and orange-coloured fruits and vegetables (carrots, pumpkin, mango, papaya, oranges), orange-coloured sweet potato, palm oil |
| Vitamin D | Cod-liver oil, oily fish, liver, egg yolk |
| Vitamin E | Vegetable oils (such as maize, soybean and sunflower oils), nuts, soybeans, cereals, egg yolk |
| Vitamin K | Green leafy vegetables, vegetable oils, egg yolk, beef, mutton, poultry |
| Thiamine (vitamin B1) | Millets, sorghum, wheat, maize, dried beans, rice, liver, kidney, beet, nuts |
| Riboflavin (vitamin B2) | Green leafy vegetables, liver, kidney, milk, cheese, eggs, whole grains |
| Niacin (nicotinic acid and nicotinamide) | Lean meat, poultry, fish, groundnuts, dried beans, wheat, yam, potato |
| Pantothenic acid | Kidney, fish, egg yolk, most vegetables, most cereals |
| Pyridoxine (vitamin B6) | Meat, poultry, fish, egg yolk, whole grains, banana, potato, dried beans, lentils, chickpeas |
| Biotin (vitamin H) | Groundnuts, dried beans, egg yolk, mushrooms, banana, grapefruit, watermelon |
| Folic acid | Green leafy vegetables (losses from cooking can be high), fresh fruits (especially orange juice), dried beans, peas, nuts, egg yolk, mushrooms, banana, liver |
| Vitamin B12 (cyanocobalamin) | Liver, kidney, chicken, beef, fish, eggs, milk, cheese |
Extension activities: food and energy
We need energy to stay alive and carry out our daily activities. This energy comes from the food we eat. Energy is measured in units called joules (J). One joule is quite a small amount of energy, so we usually use kilojoules (kJ) to measure our energy requirements.
- 1 kilojoule = 1000 joules.
Teenagers should eat enough food to provide them with between 10 000 and 15 000 kJ each day. The exact amount required will vary according to size (mass), age, sex (in general boys need more than girls) and activity.
On average, a teenage girl needs 11 000 kJ of energy each day.
On average, a teenage boy needs 13 000 kJ of energy each day.
Task 1
Plan a diet for a day for a teenage boy or girl. The food you select and the amounts of each food should be enough to meet the energy requirements of an average teenager as given above. Do not forget to include snacks as well as main meals.
Use the information in the table below to help you. You will need to estimate how many grams of each food you will require before you calculate the energy it provides.
| Food | Energy content in kJ per 100g | Food | Energy content in kJ per 100g | |
|---|---|---|---|---|
| Milk | 272 | Rice | 1504 | |
| Eggs | 662 | Banana | 318 | |
| Chicken | 771 | Melon | 96 | |
| White fish | 289 | Orange | 147 | |
| Oily fish | 796 | Spinach | 88 | |
| Haricot beans | 1073 | Biscuits (sweet, rich) | 2078 | |
| Broad beans | 289 | Bread (brown) | 993 | |
| Lentils | 1236 | Bread (white) | 1060 | |
| Green peppers | 88 | Pasta | 1525 | |
| Potato | 364 | Maize meal | 1350 | |
| Cassava | 667 | Yams | 462 |
You can record your diet plan in a table like the one below.
| Meal | Food item | Amount of this food in g | Energy content of this food in kJ per 100g | Total energy provided by this food item in your diet |
|---|---|---|---|---|
| ||||
| ||||
| ||||
| ||||
|
- Calculate the overall total energy in kJ that your diet will provide.
- How does this compare with the average requirements for a teenager of your sex?
Diet, energy and activity
Your energy requirements will vary according to your activities. The table below shows the energy requirements for different activities.
| Activity | Energy required for each minute by an average teenager in kJ | Activity | Energy required for each minute by an average teenager in kJ | |
|---|---|---|---|---|
| Sleeping | 4 | Sewing | 12 | |
| Watching TV | 5 | Digging the garden | 24 | |
| Eating | 6 | Swimming | 30 | |
| Washing clothes | 10 | Playing football | 36 | |
| Gentle walking | 12 | Sprinting | 60 |
Task 2
Plan a day where you do various activities for a certain length of time.
A day lasts 24 hours or 1440 minutes.
Activities (and their durations) you might choose could be sleeping, 480 minutes; eating, 50 minutes; swimming, 70 minutes and so on.
Work out how many kilojoules of energy you would need for each activity.
You could record your answer in a table like the one below.
| Activity | Minutes | Energy required per minute for this activity in kJ | Total energy required for the duration of this activity |
| |||
| |||
| |||
| |||
| |||
| |||
| |||
| |||
|
- Calculate the overall total energy in kJ that your activity plan would require.
- How does this compare with the amount of energy your diet in Task 1 would provide?
Resource 6: Suggestions for conducting and assessing research
![]() Background information / subject knowledge for teacher
Background information / subject knowledge for teacher
Suggestions for research
- Nutritional values of local foods not mentioned in national textbook.
- The organic movement.
- Mother’s milk or powdered milk?
- Health problems associated with obesity.
- How our diet has changed. (Encourage students to interview grandparents – if possible use a recording device.)
- Can we believe adverts about food?
- What are the main causes of malnutrition in our country?
- Assess the nutritional value of the meals served in the dining hall of students in a boarding house of a senior high school in your locality.
- Determine the calorific value of the meals served to pupils under the school feeding programme of the government.
Criteria to evaluate the projects
The criteria used by Mr Saiti in (Case study 3) to judge the competition he set his class to research good techniques for growing crops on a small scale were as follows:
- Have the pupils taken note of the existing conditions in the plot?
- Have they suggested what tests, if any, they will do to find out more about how the plot is suited to crop growing?
- Have they suggested what preparatory work must be done before planting, including what measures they have taken to prevent stray animals from invading the plot?
- Have they researched what crops are grown successfully in the locality by other people?
- Have they tried to choose a mix of crops that will provide all the requirements of a healthy diet?
- What special conditions do these crops need and how could they meet these conditions?
- What plans have been made for looking after the crops?
- How will they organise a water supply for the plot?
- How will they prepare for and deal with potential pests or disease?
- When would planting take place?
- When would harvesting take place?
- What do they suggest is done with the harvest?
- Have they thought ahead about what would be planted in future years (crop rotation) and how they can recycle nutrients (composting)?
- What plans do they have for making other people aware of the scheme?
Criteria for evaluating research projects
These criteria relate to Activity 3 and the score card below.
- Has the group stated the aims of their research clearly?
- Has the group collected sufficient evidence from a range of reliable resources?
- What scientific knowledge and understanding from their biology course has the group used in their research?
- How clearly have they explained the results of their research findings?
- To what extent have they used diagrams in an imaginative and creative way to explain their findings?
- Do you think they have covered the main issues in their chosen area of research? Are there any additional questions you think they should have considered?
- Is the project attractively presented? Is there an appropriate amount of text – not too much and not too little? Does the layout make you want to read it?
- Have they suggested areas in which their research could be continued if they had more time to develop it?
- Is there evidence that all members of the group have made an appropriate contribution to the work, using their particular skills?
For each poster, evaluators should give a score for how it was rated on each criterion.
Scores can be between 1 and 5:
5 Excellent
4 Very Good
3 Good
2 Needs more attention
1 Needs a lot more attention.
| POSTER NUMBER | 1 | 2 | 3 | 4 | 5 |
| QUESTION SCORE | |||||
| Question 1 | |||||
| Question 2 | |||||
| Question 3 | |||||
| Question 4 | |||||
| Question 5 | |||||
| Question 6 | |||||
| Question 7 | |||||
| Question 8 | |||||
| Question 9 | |||||
| TOTAL SCORE | |||||
Section 5 : Cells
Theme: Dealing with challenging ideas in science
Learning Outcomes
By the end of this section, you will have:
- used pair discussion and probing questions to review and develop students’ understanding of the basic structure of plant and animal cells;
- used mathematical activities that help students gain an idea of the relative size of cells;
- helped students make and evaluate their own models of cells.
Introduction
Your students will have been taught about cells in primary school. However, they are likely to have a number of misconceptions about what cells are really like. Developing an understanding of the size of cells is difficult. The fact that cells can only be seen with the aid of a microscope adds to this difficulty. Research has shown that some students confuse ideas about cells and molecules, including their relative sizes. Although three-dimensional diagrams of cells may be shown in textbooks, photographs of cells as seen under the microscope are always two dimensional. It is difficult for students to imagine the 3D structure. Other common incorrect ideas that students may hold about cells include thinking that plant cells are surrounded by cell walls instead of cell membranes, rather than by both a membrane and a wall.
1. Focus on language to support understanding
Researchers have established a clear link between language and learning. When students discuss ideas with peers, they have time to draw on their memory of what they have done before, share ideas with their partner and clarify their thoughts by having to explain them to others. It also helps them to get used to the scientific words, which might not be familiar to them. You get the chance to listen to what they are saying and look at what they are writing, so that you are aware of their misconceptions when you plan your questions at the end. You are far more likely to address their misconceptions in this way. Too often when we use questions in a whole class discussion, we assume that because one student can give us a correct answer, the class as a whole understands the topic well.
Activity 1 will take more time than simply explaining cell structure to the whole class and asking them to copy labelled diagrams and notes. However, it will help the students to understand.
Case study 1: Creating a word wall
Mrs Keraro worked in a secondary school in Moshi, Tanzania. She was concerned that her 13-year-old students found scientific words difficult to pronounce and remember. She created a ‘word wall’ in the classroom. Every time they started a new topic she wrote the key words on card from an old cereal packet and stuck them on the wall. Whenever she had 5 or 10 minutes to spare in a lesson, she would play a game with her class. One person pointed to a word and someone else had to say it and explain the meaning. Alternatively, she divided the class into teams. She would say the meaning and one person from each team had to run to the wall and point to the word. She encouraged her students to make up different games. At the end of the year, their understanding of scientific words had improved a great deal.
She did this with the cells topic; she put up the technical words like ‘chloroplast’ and ‘membrane’, but also the easy words like ‘cell’ and ‘cell wall’. This is because she thought her students might think they knew what a ‘cell’ was – a small room where a prisoner is kept! Lots of scientific words have different meanings in real life and she knew that this often confused her students. She also put up two large photographs of cells as seen using a light microscope. She asked the students to look carefully at the pictures and to talk about them in their pairs. During their discussions, she asked them to write down three interesting observations about the object in each photo. She also asked them to think of two questions which they would like to ask about each of these objects.
Activity 1: Working in pairs to discuss cells
Before the lesson, draw diagrams of generalised animal and plant cells on the board, without labels. Ask each student to copy the diagrams. Also, on the board write the names of the main structures (see Resource 1). Tell pupils to work in pairs or threes to label the diagrams and annotate them with the functions of each part. No one is allowed to write in the label or the function until they all agree. Talking about the answers will help them to learn. While they are working, move round the room. Visit the back of the room first. When you discuss the labels, your initial questions will mainly focus on recall, but try to follow these up with a more demanding question. You could check their understanding at the start of the next lesson by using the true/false exercise (Resource 2). Again, let your students work in pairs and discuss the answers.
2. How big are cells?
It is very difficult for us to get a real idea of very small and very large sizes. So, when we are thinking about things like molecules, cells or the solar system it can be helpful to compare their size with things we are familiar with. In Case study 2, the teacher was fortunate enough to have a good, working microscope and was able to give concrete experience of one of the measurements on the worksheet. When the students do the calculations in Activity 2 they will consider the dimensions of a cell in a number of ways. The activity will help them to develop an understanding of cells, as the building blocks of living things, rather than as diagrams in a book. It will also give them practice of numeracy skills in science and give you an understanding of their ability in maths. This may affect your planning when teaching other science topics with a mathematical content.
Case study 2: Looking at onion cells
Mr Baguma had one microscope to use with his class. He also had 40 glass microscope slides. He did not have cover slips for the slides, but he used a second slide instead of a cover slip when preparing slides with his class. He divided the class into groups of four. Mr Baguma showed the microscope to the whole class and pointed out the main parts and what they do. He demonstrated how to prepare a slide of onion cells to view using the microscope and explained how to use a ruler with the microscope to estimate the size of the cells (Resource 3). He then asked each group to make a slide of onion cells. The groups took it in turns to come up to the front bench to look at their slide using the microscope. While they were waiting to use the microscope, Mr Baguma set some questions and calculations for the class to work on to help them appreciate just how small cells really are (Resource 4). He realised that some of the students were finding the questions difficult, which was a problem as he needed to help with the microscope. So he encouraged the students to help each other. The rule was that they could only write down the answer if they understood where it had come from. Jophus is very good at maths and really enjoyed helping his friends. After each pair had measured their onion cells, they were allowed to write the measurements in a table Mr Baguma had drawn on the board. At the end of the lesson, they could see that there is variation in cell size, but that the variation falls within certain limits.
Activity 2:Thinking about the size of cells
Remind students that you can only see cells with a microscope. Discuss why this is so. Probe their understanding of magnification and use analogies such as buildings made of stones or bricks. If you are far away you can only see the building, but as you get closer you see the bricks or stones. Compare cells to atoms and molecules which are much too small even to see under a normal microscope. Ask pupils to guess how big cells really are. Explain that most cells are between 0.01 mm and 0.1 mm in size. Do they know anything else that is so small? Can they imagine this size? Ask them to carry out all or some of the calculations in Resource 4 . If there are students who find maths difficult, you could ask them to work in pairs. When you check the answers, discuss the extent to which these exercises helped their understanding and ask them to write their own questions.
3. Building Models of cells
One way of helping your students to visualise things like cells (or viruses or molecules) is to let them build models. Resource 6 explains some of the advantages of using models in science. A resourceful science teacher will collect materials such as cardboard packets, plastic, packaging materials, wood and clay so that when they wish to build models, they have materials the students can use. You could also ask your students to collect materials and keep them in a cardboard box in your classroom. When students see cells in diagrams or on microscope slides, it is quite difficult for them to imagine the cells in 3D. You should encourage them to think about materials that will best represent their ideas of what a cell is like. Getting them to plan and deliver a presentation about their model means that they will have to clarify their own thoughts and explain them to others. Our understanding of abstract concepts is closely linked to our ability to use language to order our thoughts about them. While there are advantages in asking students to present to the whole class, this can take a lot of time and many of the benefits are just as great if they do the presentation to a partner.
Case study 3: Making and assessing models
Mrs Muthui had been teaching for 2 years. When she was at college her tutor had encouraged her to use models with her students. Last year her students made models of cells, but Mrs Muthui did not think it had worked very well. The students did not really understand what she was looking for. So this year, she did it differently. She showed her students some of the ones that she had saved from last year. She asked them which one they thought was the best and to explain why. Together, they made a list of marking criteria for the models. She then gave the class two weeks to make a model, working in groups of two or three, and was delighted to find them in the classroom before and after school, working on their ideas. She organised a display and asked her students to mark each others’ models. She invited the head of department and the headteacher to see the display. Everyone was talking about it and some of the other teachers came to see as well. Mrs Muthui was delighted. The models were much more creative and imaginative than last year and she realised that sharing the marking criteria with the students had helped them to understand what was expected of them. She began to do this more often and gradually found that the students took more responsibility for their own learning.
You can see the criteria in Resource 5 – but don’t just use those, make up some of your own.
Activity 3: Making and presenting models
In teaching about cells, you will have introduced your students to cells that are adapted to a particular function, and you will have encouraged them to draw diagrams of the cells in their notebooks. Ask them to make a 3D model of one of the cells they have learned about. Give them materials such as cardboard, water, clay, wool, plastic drinks bottles, plastic bags or yoghurt pots, but also encourage them to use any other available materials.
When they have made their models, ask them to prepare a spoken presentation on the model. They should explain the structure of their cell and how it is adapted to its function. Encourage them to point out any aspects of the real cell which they could not show accurately on their model. They should all get the chance to work in pairs, giving their presentation to their partner. If you have time, you could choose the best models and ask those students to make a presentation to the whole class.
Resource 1: Background information on cells
![]() Background information/subject knowledge for teacher
Background information/subject knowledge for teacher
Diagrams of a plant and an animal cell
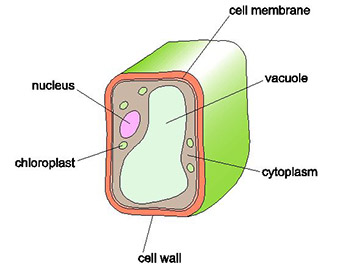
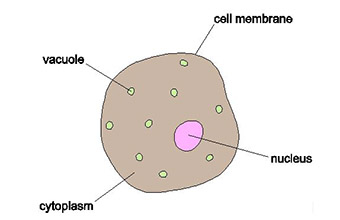
Teachers’ resources
Names of cell structures for students to label diagrams of plant and animal cells:
- A.Central cell vacuole
- B.Cell membrane
- C.Nucleus
- D.Cytoplasm
- E.Chloroplast
- F.Vacuole (small)
- G.Cellulose cell wall
Information about cell structures for students to use as annotations on diagrams of plant and animal cells:
(A structure may have more than one annotation. Some annotations apply to both plant and animal cells.)
- The outer layer of this cell is firm and rigid. It is made of cellulose. It gives the cell a definite shape.
- The outer layer of this cell is not very rigid. It causes the shape of the cell to be flexible.
- This is a large central area in the middle of the cell. It is filled with liquid. This helps to make the cell firm and gives support to the whole plant.
- This structure controls what goes into and what comes out of the cell.
- This structure controls what the cell is like and how it works.
- This is a jelly like fluid containing many granules. Activities such as releasing energy and making proteins happen here.
- These structures are used to make food by photosynthesis.
- These are small vacuoles found in cells. They may contain food particles, chemicals made by the cell or germs that are being destroyed by the cell.
Photographs of plant and animal cells as seen using a light microscope:
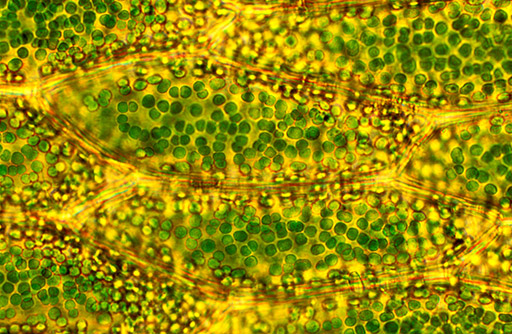
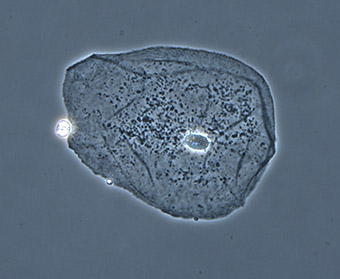
Resource 2: True/false exercise on cells
![]() Teacher resource for planning or adapting to use with pupils
Teacher resource for planning or adapting to use with pupils
Plant and animal cells: true–false exercise
The following statements are about cells.
Read each statement and then in your group decide, for each statement, whether it is true (T) or false (F). If you are not sure put ‘?’.
Write the letter or symbol to show your decision in the middle column. Use the last column to explain your reasons.
| Statement | True, false or unsure | Comment – reasons for your choice | |
| 1 | All cells have a nucleus. | ||
| 2 | There is a cell membrane around all cells. | ||
| 3 | All cells have a cell wall. | ||
| 4 | Chromosomes are found in the cytoplasm. | ||
| 5 | The cell membrane controls what the cell will look like and how it behaves. | ||
| 6 | The nucleus controls what passes into and out of a cell. | ||
| 7 | A nucleus is smaller than a chloroplast. | ||
| 8 | A chloroplast is larger than a mitochondrion. | ||
| 9 | All cells have a central cell vacuole filled with fluid. | ||
| 10 | The cell membrane is made of cellulose. | ||
| 11 | The nucleus is always found in the middle of a cell. | ||
| 12 | A nucleus is smaller than a molecule. | ||
| 13 | Some cells in your body are one metre long. | ||
| 14 | If you looked through a magnifying glass at a red blood cell, it would look like the dot at the end of this sentence. | ||
| 15 | A fully grown human is made of about one hundred million, million cells. | ||
| 16 | Fifty typical cells lying side by side would measure about 1 mm. | ||
| 17 | Cells are black and white. There is no colour in a cell. | ||
| 18 | If you could shrink and stand in a cell, everything would be silent and still. |
| Statement | True, false or unsure | Notes for teachers |
| All cells have a nucleus. | True, with some qualifications. See notes. | All plant and animal cells have a nucleus. In some cells, the nucleus may have disintegrated by the time the cell reaches maturity. Red blood cells have a nucleus when they are developing. However, when they are mature and doing their job of carrying oxygen round the body, the nucleus has broken down. The whole cell is full of the oxygen-carrying pigment called haemoglobin. Bacterial cells are usually described as having a nuclear area, rather than a true nucleus, because there is not a nuclear membrane round the nuclear area. |
| There is a cell membrane around all cells. | True | |
| All cells have a cell wall. | False | Plant cells are surrounded by a cell membrane and outside this is a fairly rigid cell wall. The cell wall gives the plant cell a more definite shape than an animal cell. Animal cells do not have a cell wall. They are surrounded by a cell membrane only. A cell membrane is much more flexible that a cell wall. |
| Chromosomes are found in the cytoplasm. | False | Chromosomes are found in the nucleus. |
| The cell membrane controls what the cell will look like and how it behaves. | False | The nucleus controls what the cell looks like and how it behaves. |
| The nucleus controls what passes into and out of a cell. | False | The cell membrane controls what passes into and out of a cell. |
| A nucleus is smaller than a chloroplast. | False | A nucleus is about three times as big as a chloroplast. |
| A chloroplast is larger than a mitochondrion. | True | A chloroplast is three or four times larger than a mitochondrion. |
| All cells have a central cell vacuole filled with fluid. | False | Plant cells have a central cell vacuole filled with fluid, called cell sap. Animal cells do not. Animal cells may contain one or several small vacuoles. |
| 10 | The cell membrane is made of cellulose. | False | Plant cell walls are made of cellulose. Cell membranes of both plant and animal cells are made of protein and lipid. |
| 11 | The nucleus is always found in the middle of a cell. | False | The nucleus may be found in the middle or around the edge of a cell. |
| 12 | A nucleus is smaller than a molecule. | False | A nucleus is much larger than a molecule. The nucleus contains chromosomes – 46 in human cells. Each chromosome is made of a DNA molecule. |
| 13 | Some cells in your body are as long as metre. | True | Nerve cells are made up of a compact cell body with long thread like fibres extending out from the cell body. Some of these fibres, called axons, may be up to one metre long. Nerve messages are carried along these fibres. |
| 14 | If you looked through a magnifying glass at a red blood cell, it would look like the dot at the end of this sentence. | True | |
| 15 | A fully grown human is made of about one hundred million million cells. | True | |
| 16 | Fifty typical cells lying side by side would measure about 1 mm. | True | |
| 17 | Cells are black and white. There is no colour in a cell. | False | Chloroplasts are found in most plant cells. Chloroplasts contain the green pigment chlorophyll. Cells in flower petals will contain coloured pigments either in special structures like chloroplasts in the cytoplasm or dissolved in the cell sap. Animal cells, e.g. in the skin and eye of human will also contain coloured pigments. |
| 18 | If you could shrink and stand in a cell, everything would be silent and still. | False | Everything would certainly not be still. Cytoplasm is continually moving around. Molecules would be moving in and out of cells. In a muscle cell you might find yourself squeezed and released from time to time. The swishing of the streaming cytoplasm is likely to set up vibrations. Sound is vibration. If you could manage to shrink to fit in a cell your ears could probably manage to detect these vibrations as sounds! |
Resource 3: Working with onion cells
![]() Teacher resource for planning or adapting to use with pupils
Teacher resource for planning or adapting to use with pupils
Preparing a slide of an onion cell and measuring a cell
You will need:
Microscope
Scissors
Microscope slide
Dropper pipette
Cover slip
Clear plastic ruler
Dilute iodine solution.
Preparing the onion slide
What to do:
- Slice an onion in two, lengthwise.
- Remove one of the thick leaf-like structures from inside.
- Pull away a piece of the thin papery lining of its inner surface.
- Using scissors, cut a small square of this lining, about 5 mm x 5 mm.
- Place this square on the centre of a slide.
- Add a drop of dilute iodine solution – make sure the solution spreads below as well as above the square of onion skin. The iodine acts as a stain to make the structures in the cell easier to see.
- Carefully lower a cover slip over the onion skin. Try to avoid trapping air bubbles.
- Place the slide on the microscope stage. Examine first using the low power. Focus carefully.
- Choose an area of the slide where the cells can be clearly seen. Switch to high power and refocus.
- Look for the structures shown in the photographs in Resource 1.
Measuring the onion cell
What to do:
- Place the ruler on the microscope stage under the low power objective lens.
- Move the ruler so the edge with the scale can be focused in the centre of the field of view of the microscope, as in Diagram 1 below.
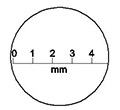
- Use the scale to measure the field of view of your microscope.
- The diameter of the field of view in Diagram 1 is approximately 5 mm.
- You can use the measurement of the field of view in your microscope to estimate the size of objects viewed with the same objective lens.
- The cell viewed in Diagram 2 would be about 2 mm long if viewed with the microscope with the field of view shown above.
- Estimate the length and width of your onion cell using this method.
Using a microscope
The main parts of a light microscope are shown below
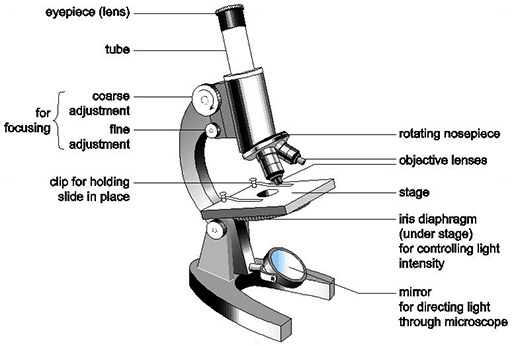
Resource 4: Magnification exercise
![]() Teacher resource for planning or adapting to use with pupils
Teacher resource for planning or adapting to use with pupils
Magnification exercise
1
One of the plant cells in the photograph really measures about 0.01 mm x 0.07 mm. Draw it in your book so its shape and proportions are nearly the same as in the picture.
Calculate magnification of the cell in this way:
Length of cell in drawing ÷ width of real cell = X ______
Mean magnification = X _________
Add this magnification to your drawing.

2
Draw an animal cell that is nearly round in shape.
Measure the diameter of your drawing.
Assume this cell is really 0.02 mm in diameter.
Calculate the magnification and show it on your drawing.
3
Draw a line, 10 mm long.
How many of the animal cells could fit on this line side to side?
How many of the plant cells could fit lengthwise on this line side to side?
4
A person’s stride length is about 1 metre.
If you were magnified by the same amount as your drawing of an animal cell, how far could you go in one stride?
5
Measure the length of a small animal such as an ant.
If its skin cells are 0.02 mm long. How many are there along the length of the animal?
6
Write your own question that helps you to understand the size of a cell.
Why does it help you to get a better understanding of this?
See if your neighbour or the rest of the class can work out the answer.
Resource 5: Assessing models
![]() Teacher resource for planning or adapting to use with pupils
Teacher resource for planning or adapting to use with pupils
Criteria for assessing models of cells
Is the model clearly labelled?
It should be obvious what all the parts are and they should be labelled.
Does it include all the relevant parts?
All the key parts should be present.
Are the parts in the right proportion in terms of size?
For example, if a tennis ball is used for the nucleus, the chloroplasts could be marbles.
Does the model reflect the nature of the cell? Have appropriate materials been used to represent the parts?
For example, is the cell wall made of a rigid material? Is the cytoplasm squashy?
Does the model reflect the 3D aspects of cells?
Children find this aspect of cells difficult to imagine and one of the main reasons for making a model is to show the 3D nature of the cell.
Resource 6: Using models in science
![]() Teacher resource to support teaching approaches
Teacher resource to support teaching approaches
Using models in science
Using models or analogies is a very powerful way of helping children to understand scientific ideas. Used properly, models can also help to develop critical thinking. You can do this by helping children to evaluate the strengths and weaknesses of a model.
Some general principles to think about when planning lessons with models are:
- introduce the model early in the teaching of the topic, then use the model consistently until it is replaced by a more sophisticated one
- ensure students make links between the model and the real situation
- ensure students recognise the differences between the model and what it is illustrating
- encourage students to apply their understanding to explain new ideas
- encourage students to identify strengths and weaknesses in any model
- increase the sophistication of the model when necessary.
A useful approach when you are planning a sequence of lessons based on a model such as the particle model might be:
- Teach the original model explicitly – show which part relates to which, making sure students understand and picture it.
- Test the original model by applying it – students practise using the model to explain simple ideas. For example, explaining why gases can be compressed, liquids can’t be compressed, solids are hard, etc.
- Challenge the original model – by using it to explain more complicated things like melting, dissolving and evaporating.
- Develop a ‘better model’ – if necessary explore the development of a better model with the students or provide a more sophisticated one.
Once students have a good understanding of the particle model, this will help them to understand concepts such as why materials have different properties, osmosis, Brownian motion, density, elements, compounds and chemical change.