Use 'Print preview' to check the number of pages and printer settings.
Print functionality varies between browsers.
Printable page generated Monday, 27 July 2026, 5:10 AM
Module 1: Investigating Number and Pattern
Section 1: Learning through games
Key Focus Question: How can games help pupils learn basic number skills?
Keywords: games; group work; investigation; number skills
Learning Outcomes
By the end of this section, you will have:
- developed ways to use games to raise interest in mathematics;
- used a range of games to help enhance mathematical understanding and number skills.
Introduction
Using games in your classroom can enhance your pupils’ mathematical understanding and skills. These games can range from mental arithmetic games played with the whole class to more complex board games.
This section explores how games provide a cooperative way to stimulate interest and thinking about numbers.
By using local cultural games you help relate mathematics to pupils’ everyday lives.
1. Using games to support mental maths
Using games to motivate all pupils, even those who are sometimes reluctant in mathematics lessons, can have very positive effects.
Children are able to practise mental calculations and other skills while enjoying playing games.
You should always practise each game yourself before introducing it to pupils. This will ensure you understand it and can explain it clearly; it will also help you to identify the mathematical thinking needed to play the game. You can make the games yourself or with your class and they can be used again and again.
Case Study 1 shows how one teacher played games to help pupils’ skills in mental arithmetic. Activity 1 shows a simple matching memory game.
Case Study 1: Playing number games to aid mental arithmetic
Miss Isah, a Primary 2 teacher in Nigeria, found that her pupils enjoyed playing number games at break time. The boys rolled balls through numbered arches on a table and the girls tossed beanbags onto a target. In each game the winner was the first pupil to score 20 points, and Miss Isah noticed how some of her pupils were better than others at adding scores together.
She decided to introduce similar games into her teaching to find out if all her pupils could add up. She used the same game each day with one group at a time for a week. The rest of the class worked on practice exercises and she divided her time between supporting those playing and the rest of the class (See Key Resource: Using group work in your classroom).
She found that there was a small group of pupils who were less sure of adding numbers mentally and she gave these pupils extra opportunities to play and planned other mental arithmetic sessions for them.
Miss Isah also found that her pupils were more eager to come to class and she decided to use more games in her class in future.
Activity 1: Question and answer matching game
You should play any games yourself first, so you know the rules and can explain them clearly to your class.
This game enables your pupils to practise their simple number bonds and use their observational and memory skills. If you have older pupils you could adapt this game using other numbers and sums. See Resource 1: Number bond games for how to play, and ways to adapt the game.
You will need to make several copies of the game or you could involve pupils to help you make their own copies.
- Organise your pupils into groups of five or six, and provide each group with a game.
- Encourage groups to talk to one another about the game and the rules.
- Each group selects a leader who makes sure the game is played fairly.
- As the pupils are playing, go around the class observing anyone having problems so you can plan ways to help later.
Ask yourself:
- What number skills are pupils practising as they play these games?
Questions you may wish to consider or discuss with a colleague:
- Did the pupils enjoy the games? How do you know they enjoyed them?
- Did all the pupils participate? If not, how could you ensure everyone takes part?
- Did you feel that you were in control of the whole class?
- How could you improve this lesson? Would smaller groups be better?
- Did you give the pupils enough time for their tasks?
2. Games and group work
Games can be played in small groups or as a class. Playing with the whole class needs preparation and adequate resources. Allowing games to be played at times other than class time will encourage more learning and help to consolidate ideas. Setting up a games club in your school may also encourage more pupils to play.
It will also be important to understand a game’s level of difficulty so that you pick the right game for your pupils. Case Study 2 shows one teacher playing a game with her class and Activity 2 shows how to organise using more than one game at a time.
Case Study 2: Playing Bingo to aid number recognition
Lucy played Bingo with her Grade 2 class because she thought it was a great game to help pupils recognise two-digit numbers.
She played the game with the whole class first. She gave each pupil a card and some buttons. A pupil took cards, numbered 1 to 50, from a box and read them to the class. If a pupil found the number read out on their card, they placed a button over it. The first pupil who had buttons covering a row, column, or diagonal correctly won the game. As the pupils played the game, Lucy went around the class helping. The successful completion of a row, column, or diagonal is evidence of the ability to recognise two-digit numbers correctly.
Next, she divided the class into groups of eight and they played the game at their own pace, taking it in turns to be the caller.
Lucy also allowed pupils to play Bingo at break and she was surprised how many pupils played, especially on a wet day. She also noticed how much more confident they became in mathematics classes. She extended the game by putting more cards into the game using numbers 51–99 for her more able pupils.
See Resource 2: Games to practise numeracy skills for the rules of Bingo and other simple games.
Activity 2: Identifying the mathematics in games
In this activity, ask your pupils to play one of five games and identify any mathematics they think they are learning (see Resource 2). You may need to help them identify the mathematics.
- Organise your pupils into groups of four or five.
- Provide each group with one of the five number games.
- Ask each group to discuss the game, checking they understand the rules before playing.
- After playing each game for a set time, ask groups to list what mathematics they think they have practised using the table in Resource 3: Table to record numeracy skills.
- You may then want groups to try one of the other games. If you have time, you could continue until each group has played all five games (rotating different activities like this is sometimes called a ‘circus’; using a circus approach allows one set of equipment, in this case a particular game, to be used by the whole class).
- Pin all the results on the wall so that they can be discussed.
You may have to let them play over more than one lesson or let them play during break times.
3. Cultural games
Playing cultural games is another way of motivating pupils. This helps them see that mathematics is a popular, universal and historical activity. There is one very popular game (Resource 4: The cultural game of Africa) played all over Africa, which has a variety of names.
There are many versions of this game. It involves important mathematical skills and can be played by pupils of different ages.
Understanding how games can be adapted for use by pupils of different ages is important for a teacher. For example, in its simplest form, this game is suitable for younger pupils as it encourages counting and understanding the concept of one-to-one correspondence. As you extend the game, pupils learn about addition and subtraction. If you are teaching pupils at different levels, see Key Resource: Working with multigrade classes.
Case Study 3: Identifying number skills with a cultural game
Mr Mathivha told his class about a game (see Resource 4) that he had played as a child. He said they would play it in their next mathematics lesson.
He showed the class the board used and demonstrated the game by asking two pupils to play as he explained the moves. While the class watched, he encouraged them to ask questions.
He then gave out resources for pupils to play the game in pairs (four pupils per game) so they could talk with their partner about the moves. As they finished, he asked them to identify the number skills needed to play the game.
Finally, he gave the pupils permission to take the games home and play with someone there for the rest of the week.
At the end of the week, Mr Mathivha asked his class what those at home thought about the game. Many said their parents and grandparents had played the game as children.
Key Activity: Playing a cultural number game
Before you start, check you know the rules of the game (see Resource 3). Collect enough boards and 48 seeds/beans for each group.
- Divide the class into groups of four and provide each group with a board and 48 seeds/beans.
- Ask each group to identify two volunteers who will play the game.
- Let two other pupils help the volunteers play.
- While the game is in progress, move around the class, helping where needed. Listen to what the pupils are saying and write down any mathematical words they use.
- Discuss with the pupils what you heard. What mathematical skills were they practising in the game?
Resource 1: Number bond games
![]() Teacher resource for planning or adapting to use with pupils
Teacher resource for planning or adapting to use with pupils
Here are the instructions for the question and answer match game. Below are some examples of questions and answers. You could either copy these or ask your pupils to draw the squares themselves.
- Cut up each square separately.
- 2–6 players can play this game at any one time.
- Place all the cards face down on the table. Keep the answers and questions separate to help the players.
- Decide who goes first. Each player takes it in turn to turn over two cards – one from the sums first and then one from the answers. If the answer is right for the sum the player calls the first ‘match’. If they get a match, they can have another go. If not, the next player has their turn and does the same. Carry on in this way until all the sums are answered. The winner is the one who has most matches.
- You could make this more challenging for older pupils by using more difficult sums, which include subtraction, multiplication or division. You will have to adapt the ‘answers’ accordingly.
Examples of questions/sums
| 1+0= | 0+2= | 1+1= | 2+0= |
| 1+2= | 2+1= | 0+4= | 1+3= |
| 3+1= | 2+2= | 0+5= | 4+1= |
| 1+4= | 2+3= | 3+2= | 0+6= |
| 1+5= | 5+1= | 2+4= | 4+2= |
| 3+3= | 0+7= | 1+6= | 2+5= |
| 5+2= | 3+4= | 4+3= | 8+0= |
| 1+7= | 2+6= | 6+2= | 3+5= |
| 4+4= | 0+9= | 8+1= | 2+7= |
| 3+6= | 4+6= | 7+3= | 9+1= |
Examples of answers
| 1 | 2 | 2 | 2 |
| 3 | 3 | 4 | 4 |
| 4 | 4 | 5 | 5 |
| 5 | 5 | 5 | 6 |
| 6 | 6 | 6 | 6 |
| 6 | 7 | 7 | 7 |
| 7 | 7 | 7 | 8 |
| 8 | 8 | 8 | 8 |
| 8 | 9 | 9 | 9 |
| 9 | 10 | 10 | 10 |
Resource 2: Games to practise numeracy skills
![]() Teacher resource for planning or adapting to use with pupils
Teacher resource for planning or adapting to use with pupils
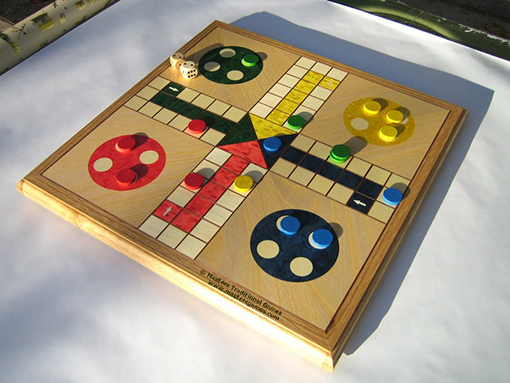
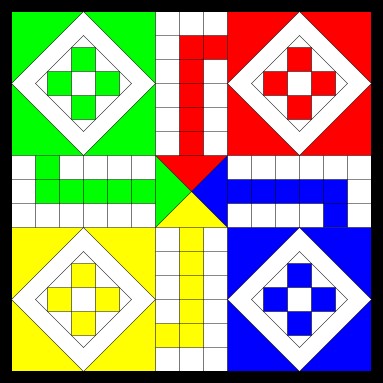
Ludo
A simple children’s board game for two to four players, in which the players race their four tokens from start to finish according to the way the dice falls.
Players take it in turns to throw the dice and move their tokens round the board. When a player throws a 6 they have the option to start to move another token around the board. If a player’s token lands on a space that is already occupied by another player’s token, that player has to remove their token from the board and wait until they have thrown a 6 to start again. The winner is the first player to get their four tokens to the centre of the board landing on their matching coloured area.
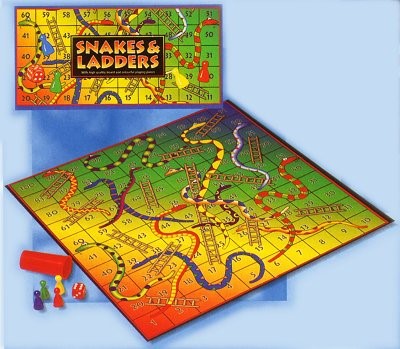
Snakes and ladders
Players take it in turns to throw the dice and move their tokens around the board. If they land on the bottom of a ‘ladder’ they go up to the square at the top of the ladder. If they land on a ‘snake’s’ head they travel down to the square at the tail of the snake.
Bingo
This is a game of chance where randomly selected numbers are drawn on a bingo card which includes blank squares. One example is below:
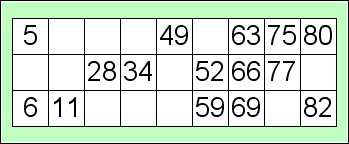
One person, ‘the caller’, writes the numbers 1–100 usually on small balls (but you could use cards). The caller then selects these one by one without looking and calls the numbers out. If the player can match that number they cover the number on their card with a counter, or cross it off. It is important that the caller remembers to keep the numbers that have already been called separate, as they will need them later for checking. The caller selects and then calls until one person has covered all the numbers on their card and shouts out ‘BINGO!’. The caller needs to check their card is correct and declares the person the winner.
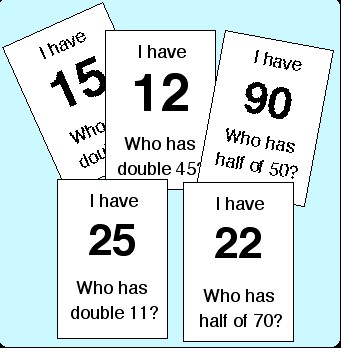
A loop card game
‘Loop card’ games keep pupils ‘on their toes’ and listening, as all are involved and they do not know when their card will come up.
Instructions
Each card has a number such as 12 (or any other number) and a question. The question can simply be about adding or multiplying numbers, or could involve all four rules of number depending on what you want the pupils to practise. You can therefore make different sets of these cards, easy and hard, to use at different times. For example, some cards could help pupils who have particular problems with larger numbers. The examples in the picture below are about halving and doubling.
You need enough cards for each pupil to have one card. You could also make cards using money, distance etc. as a topic.
To play the game, the pupils could sit at their desks or you could organise them into a big circle. Give out a card to each pupil. Choose one pupil to start by reading out their question. The child who has the correct answer stands up and says the answer. If they are correct, they read their question. The child with the correct answer to this new question stands up and reads out their question and so it goes on until all the pupils are standing (or sitting if they all start standing up).
Do not have more than one card with the same number as this will confuse the pupils. You can use this game often as your pupils will get different cards each time. It is a good activity to use at the end of a lesson when all other work is finished, and is good practice for their mental mathematics skills.
The triangle number game
The triangle number game is the most versatile mathematics game for primary children. The game is played much like dominoes, where numbers are matched to each other to make a pattern. Two sides of the triangles are put together according to a chosen rule. In the example below, the ‘rule’ is that the two numbers must add up to 9.
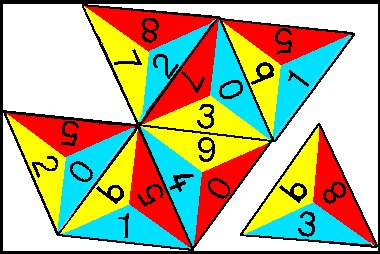
For older pupils, the winner is the one to finish their cards first, but younger children usually play cooperatively. The game is best with 2–4 players, although it can be used by one as a ‘patience’.
Some of these examples have been adapted from http://homepages.which.net/~jenny.murray/games.htm (Accessed 2008). This website is no longer active but you can find more examples of maths games at: http://primarygamesarena.com/ Subjects/ Maths (accessed 5/05/2016).
Resource 3: Table to record numeracy skills
![]() Pupil use
Pupil use
Tick the mathematics practised by each game; for example, game 1 helps addition.
| game 1 | game 2 | game 3 | game 4 | game 5 | |
| number | |||||
| addition | ✔ | ||||
| subtraction | |||||
| multiplication | |||||
| division | |||||
| making sets |
Resource 4: The cultural game of Africa
![]() Teacher resource for planning or adapting to use with pupils
Teacher resource for planning or adapting to use with pupils
This game has many names, for example:
- Moruba (also maruba) by the Pedi of South Africa
- Kpo by Vai people of Sierra Leone and Liberia
- Ajua by Luo in Kenya
- Omweso by Ganda of Uganda
- Bao by Swahili in East Africa
- Gambatta in Ethiopia
- Ayo by Yoruba in Nigeria
- Oware by Igbo in Nigeria
- Warri by Asante in Ghana
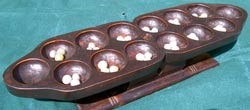
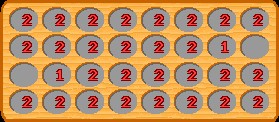
In the past, boards for playing the game have been made from beautifully carved wood, bronze (in the royal court of Benin, Nigeria) or gold (by the Asante Kings in Ghana). Now there are less elaborate versions available and you can make your own using a piece of cardboard and drawing the required number of circles.
RULES FOR PLAYING MORUBA
The size of the game board depends on the number of players. Most common is a board which consists of four rows of eight holes (mekoti) each, but there are old photos which show boards that had up to 16 holes per row. The holes are dug into the earth. The counters are usually pebbles called mathlapa (‘cattle’).
Each player only uses his/her side of the board, which consists of two rows.
At his/her turn, a player takes the contents of one of his/her holes, which must contain at least two stones, and distributes them, one by one, counterclockwise into consecutive holes on his/her own side.
If the last stone falls into a non-empty hole, its contents are distributed in another lap in the same direction.
The move ends when the last stone is dropped into an empty hole.
If the last stone is put into an empty hole of the inner row and the opposite hole of the opponent contains stones, these enemy stones are ‘killed’ (tlaba). Additionally, the stones of the outer hole directly behind it are ‘captured’ (tlola) and the contents of any other enemy hole. The killed or captured stones of the opponent are removed from the board.
When a player has only singletons, he/she is permitted to move them, but only in empty holes.
The player who has still stones at the end of the game is declared the winner, while the other player who has no stones left, has lost. Draws are not possible.
Acknowledgements
Grateful acknowledgement is made to the following sources:
Photographs and images
A typical Ludo board - Original source: http://www.mastersgames.com/ images/ board/ ludo-colour-1.jpg (Accessed 2008)
Other
Resource 2: Games to practise numeracy skills - some of these examples have been adapted from http://homepages.which.net/ ~jenny.murray/ games.htm (Accessed 2008)
Every effort has been made to contact copyright holders. If any have been inadvertently overlooked the publishers will be pleased to make the necessary arrangements at the first opportunity.
Section 2: Patterns in number charts
Key Focus Question: How can you use number charts to help pupils find patterns in numbers?
Keywords: number chart; number pattern; multiplication; investigation; group work; basic operations
Learning Outcomes
By the end of this section, you will have:
- helped pupils to find patterns using number charts;
- set up and managed investigations using number charts;
- improved your skills at working with groups.
Introduction
A number chart of 100 is a simple aid for helping pupils see pattern in number, and can support a wide range of learning activities. Number charts can be used for young pupils to practise counting, yet can also be used for open-ended investigations with older or more able pupils.
In this section you will help your pupils to understand mathematical concepts through investigational and group work.
1. Using number charts in groups
It is important that you help pupils get a sound understanding of number work, in order to lay a solid foundation for their future mathematics education. In this part, you will learn to use guiding questions to lead pupils to investigate a number chart and increase their skills in the basic operations of numeracy. By asking them to work in groups, you will be helping them learn to cooperate with one another. They will also be making their thinking explicit as they explain their ideas to others. See Key Resource: Using group work in your classroom for ideas.
Case Study 1: Using guiding questions to encourage investigation of a number chart
Mr Musa in Nigeria planned to help his pupils investigate number work using 100-square number charts (see Resource 1: 100-square number chart).
He brought copies of 100-square charts to the class and divided the pupils into groups of four, giving each group a copy of the chart. He asked them to investigate their chart, noting any patterns they observed. He asked guiding questions (see Key Resource: Using questioning to promote thinking ) such as:
Going across the rows, what can you say about the numbers?
What is the difference between a number and the one to its right?
What is the difference between a number and the one below it?
Can you identify multiples of 2 and multiples of 5 in the chart?
As his pupils were working, Mr Musa moved around the class, checking that everyone was participating. When he noted those who were having difficulties he provided support by suggesting strategies or asking questions to guide their thinking. After 20 minutes, he brought the class back together. He asked the pupils to share the patterns they had observed and try to formulate the rules for the patterns. He summarised these on the chalkboard (see Resource 1) to help everyone see what they had achieved).
Activity 1: Four in a row
Prepare a 100-square number chart on a chalkboard or hand out copies to groups of four in your class.
Cover or mark four numbers together in a row or column.
Ask the groups to make up some sums. The answers should be the numbers that are covered.
e.g. if 10, 11, 12, 13 are covered, the sums might be:
- 5+5=
- 13-2=
- 3x4=
- 9+4=
The first group to finish asks the class the sums and chooses a person to answer. If all the sums provide the right answer the group gets a point.
Ask other groups to share their questions with the group next to them. If they are correct they gain a point too.
Continue the game for 10 or 15 minutes to give them practice in making up sums.
Resource 2: Thinking about your lesson gives some examples of the kinds of questions that will help you evaluate this activity. Use these and other questions you may think of to reflect upon the activity – it may be particularly helpful to do this with a colleague.
2. Encouraging pupils to ask questions
Investigations in which pupils have opportunities to discover facts by themselves or in small groups are effective ways of working in mathematics. Key Resource: Using investigations in the classroom will help you look at different approaches to investigation. By asking pupils to make up their own simple questions you can improve their investigatory powers. This part explores number charts in a different way to extend pupils’ thinking about number and pattern.
Case Study 2: Moving around the number chart
Mrs Mudenda wanted to develop her pupils’ confidence in their mathematical thinking. She made many copies of a 100-square number chart, divided her class into pairs and gave a chart to each pair. She then asked the following questions for the pairs to solve using their charts:
How can you move from 10 to 15? E.g. move right 5 squares.
How can you move from 10 to 35? E.g. move right 5 squares and down 2 squares; or down 2 squares and right 5 squares.
She discussed with the class the possible ways of moving from 10 to 35 on the chart and helped pupils understand that there are sometimes many ways to answer a question in mathematics.
Mrs Mudenda then asked the pupils to make up ten similar questions each and take turns with their partner to answer them with the help of the number square. She asked her more able pupils to try to write the sums down.
Activity 2: Addition and subtraction from number charts
Before the lesson, prepare some number charts (see Resource 1). Also, do the activities yourself and find out how many different ways there are of answering each question.
Ask the pupils to go into pairs and hand out a chart to each pair. Now ask them to investigate questions such as:
How many ways can I move from ‘21’ to ‘34’ on the chart?
Go round the class, listening to their reasoning and making notes. Different pairs may give different answers, for example: ‘I will go down 1 and along 3’ or ‘I will go along 3 and down 1’.
Next, ask your pupils to each make up five similar questions, moving from one square to any other, and ask their partner to solve each of these in at least two ways.
Finally, you could extend this work by asking the pupils to agree with their partner, ‘what is happening to the tens and units with each move?’ e.g. moving from 19 to 47 is going down 3 rows, (adding 30), and moving left 2 columns (removing 2). This is the same as adding 28.
3. Simple investigations
When pupils are confident in moving around the number chart, they can begin to stretch their ability to ‘see’ or visualise mathematical patterns. A simple starting point is to colour in (or put counters on) all the squares that meet a certain condition, e.g. multiples of a given number. This is what the teacher in Case Study 3 did.
In the Key Activity you will take away most of the squares (see Resource 3: Partial number squares for some examples) and see if pupils can work out what numbers should go in particular places.
Case Study 3: Investigating multiplication with number charts
Mrs Kashina, who teaches a Grade 4 class of 41 pupils, gave groups of four pupils a number chart, and 15 small stones. On the board, she wrote down
4, 6, 9, 11
and asked the groups to take one number at a time, and put a seed on all the multiples of that number (e.g. for number 4, multiples are 4, 8, 12, 16). Some of her pupils coloured or shaded in the multiples instead of putting seeds. Then pupils had to write down the patterns they could see, as she showed them with 4, before trying the next number. She asked them to look for any patterns in the answers:
- 4
- 8
- 12
- 16
- 20
- 24
- 28
- 32
- 36
- 40
She asked a different group each time to show their answers and they discussed any patterns on the chart and in their answers.
To see an example of the work Mrs Kashina’s class did, see Resource 4: Mrs Kashina’s multiplication charts.
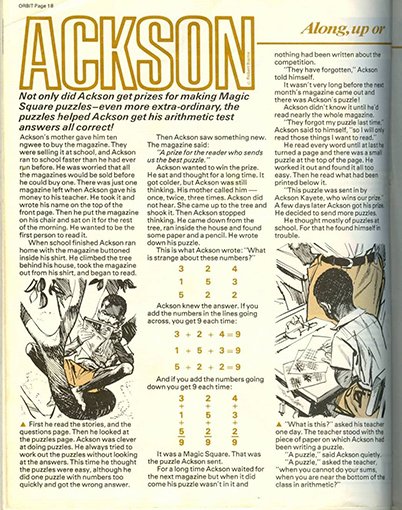
In a later lesson, Mrs Kashina told a story from a Zambian magazine about a boy who made his own number patterns (see Resource 5: Magic square puzzles). She used a mixture of ciTonga and English. (In this way she built on the pupils’ knowledge of their own language to help them understand the new language.) The pupils became very enthusiastic about number patterns, and Mrs Kashina believed they would enjoy doing similar investigations for multiplication.
Key Activity: Using a chart of multiplication facts
Building on the previous work, give your pupils an investigation using charts of multiplication facts. Before the lesson, prepare a large chart of number facts for 5, 6, 7, 8 and 9, leaving some squares empty. You are going to ask your pupils to find the missing numbers using their previous knowledge.
Split your pupils into groups of four or five and ask each group to copy your chart.
Ask pupils to discuss together what the missing numbers should be and, if they agree, to fill in their copies and then pin their results on the wall. As they are working, go round the class listening and helping – only where absolutely necessary – by asking questions rather than giving answers.
What facts do you know?
What numbers are missing?
Can you see a pattern in the row? In the column?
Ask a member of each group to explain how they arrived at their answers and have a class discussion to decide the correct solution.
Ask each group to do a neat copy for one multiplication table and mark in the multiples clearly. Display each chart on the classroom wall in order from 2 times to 10 times so they can look at the patterns easily.
Finally, look at the questions in Resource 2 to help you think about how the lesson went.
Resource 1: 100-square number chart
![]() Teacher resource for planning or adapting to use with pupils
Teacher resource for planning or adapting to use with pupils
A 100-square number chart is simply a grid, 10 squares long on each side, with the squares numbered in rows, starting with ‘1’ in the top left corner.
You may be able to buy a large chalkboard number chart, print one out from this resource or make one yourself.
Here are some example rules that pupils can easily discover when working with the 100-square number chart:
- To go upwards by one step, subtract 10
- To go downwards by one step, add 10
- To go left by one step, subtract 1
- To go right by one step, add 1
| 1 | 2 | 3 | 4 | 5 | 6 | 7 | 8 | 9 | 10 |
| 11 | 12 | 13 | 14 | 15 | 16 | 17 | 18 | 19 | 20 |
| 21 | 22 | 23 | 24 | 25 | 26 | 27 | 28 | 29 | 30 |
| 31 | 32 | 33 | 34 | 35 | 36 | 37 | 38 | 39 | 40 |
| 41 | 42 | 43 | 44 | 45 | 46 | 47 | 48 | 49 | 50 |
| 51 | 52 | 53 | 54 | 55 | 56 | 57 | 58 | 59 | 60 |
| 61 | 62 | 63 | 64 | 65 | 66 | 67 | 68 | 69 | 70 |
| 71 | 72 | 73 | 74 | 75 | 76 | 77 | 78 | 79 | 80 |
| 81 | 82 | 83 | 84 | 85 | 86 | 87 | 88 | 89 | 90 |
| 91 | 92 | 93 | 94 | 95 | 96 | 97 | 98 | 99 | 100 |
Resource 2: Thinking about your lesson
![]() Background information / subject knowledge for teacher
Background information / subject knowledge for teacher
At the end of any teaching session it is always good to pause and think about how the lesson went. By asking yourself a few questions and answering them honestly you will think more deeply about your roles and responsibilities as a teacher.
Below are some questions to help you think about what you did well and what areas you could improve or develop further.
- Did the early work with the number chart lay a good foundation for the further lessons? How did this happen?
- Did the pupils enjoy this investigation? How do you know they enjoyed it?
- Did all the pupils participate? If not, how could you ensure everyone takes part next time?
- Did you feel that you were in control of the class?
- How could you improve this lesson?
- Would smaller groups be better? Why?
- Did you give the pupils enough time for their tasks?
- Did you give all pupils a chance to discuss what they did?
- What did the pupils learn?
Resource 3: Partial number squares
![]() Teacher resource for planning or adapting to use with pupils
Teacher resource for planning or adapting to use with pupils

- Can pupils fill in the missing numbers?
- Ask them to explain how they did this.
- See if pupils can create and solve their own ‘missing number’ puzzles.
Resource 4: Mrs Kashina’s multiplication charts
![]() Example of pupils' work
Example of pupils' work
Here is a multiplication chart filled in by a pupil in Mrs Kashina’s class. It shows the multiples of 4.
| 1 | 2 | 3 | Highlighted4 | 5 | 6 | 7 | Highlighted8 | 9 | 10 |
| 11 | Highlighted12 | 13 | 14 | 15 | Highlighted16 | 17 | 18 | 19 | Highlighted20 |
| 21 | 22 | 23 | Highlighted24 | 25 | 26 | 27 | Highlighted28 | 29 | 30 |
| 31 | Highlighted32 | 33 | 34 | 35 | Highlighted36 | 37 | 38 | 39 | Highlighted40 |
| 41 | 42 | 43 | Highlighted44 | 45 | 46 | 47 | Highlighted48 | 49 | 50 |
| 51 | Highlighted52 | 53 | 54 | 55 | Highlighted56 | 57 | 58 | 59 | Highlighted60 |
| 61 | 62 | 63 | Highlighted64 | 65 | 66 | 67 | Highlighted68 | 69 | 70 |
| 71 | Highlighted72 | 73 | 74 | 75 | Highlighted76 | 77 | 78 | 79 | Highlighted80 |
| 81 | 82 | 83 | Highlighted84 | 85 | 86 | 87 | Highlighted88 | 89 | 90 |
| 91 | Highlighted92 | 93 | 94 | 95 | Highlighted96 | 97 | 98 | 99 | Highlighted100 |
Resource 5: Magic square puzzles
![]() Teacher resource for planning or adapting to use with pupils
Teacher resource for planning or adapting to use with pupils
Acknowledgements
Every effort has been made to contact copyright holders. If any have been inadvertently overlooked the publishers will be pleased to make the necessary arrangements at the first opportunity.
Section 3: Ways to solve number problems
Key Focus Question: How can you develop pupils’ problem-solving skills using number problems?
Keywords: meta-cognition; differentiation; tasks; creativity; ‘thinking about thinking’; problem solving; number
Learning Outcomes
By the end of this section, you will have:
- used strategies to explore pupils’ ways of solving mathematical problems;
- distinguished between deep and superficial features of mathematical problems;
- used techniques to develop thinking about thinking in your pupils.
Introduction
Problem solving is an interesting way to develop your pupils’ mathematical thinking. Pupils have to work out what calculations need to be done before they can find the answer. This means sorting the information given to establish what it is they need to find out and how to do it.
This will help them make explicit their mathematical thinking, and understand and recognise the deep features of a mathematical problem. You might find it useful to think of why problem solving is important. Some reasons are given in Resource 1: Why problem solving is important.
1. Helping pupils think
‘Thinking about thinking’, or meta-cognition, is a powerful means for helping pupils understand and recognise the ‘deep’ features of particular kinds of problems, and how to solve such problems.
The first step towards such thinking is to give pupils the opportunity to talk about the problems they are trying to solve and how they are trying to solve them. When pupils are explaining their thinking, it is important to listen and not dismiss any ideas.
There are many different ways of solving mathematical problems (see Resource 1). You may be surprised at how many other ways pupils find, other than the way you may have expected them to use.
Case Study 1: Listening to pupils’ voices in mathematics
Nomonde in South Africa reminded her pupils that, when they go home from school, there isn’t only one way to get home: there are many possible ways. Some are shorter, some longer, some safer, some more interesting. She told them it was the same with mathematics problems – there is often more than one way to get to the right answer, and looking at the different ways might be interesting.
Nomonde put the following questions on the board.
- Sipho has 24 stones. He gives 9 stones to a friend. How many stones does he have left?
- Thembeka eats 7 sweets every day. She has 42 sweets. For how many days does she have sweets?
- The teacher buys 25 packets of crayons. There are 12 crayons in each pack. How many crayons does she have?
Next she asked the pupils to answer the questions using any method they liked. She gave her pupils ten minutes to answer the questions. She checked their answers and then asked one or two to explain how they worked out each question.
Nomonde listed these methods to find the answers and made a note of which methods were most popular. She reminded her pupils about the different routes to school.
Activity 1: Helping pupils think
Try this activity yourself first, preferably with two or more colleagues. Then try it with your pupils.
Ask your pupils to try to answer Nomonde’s three questions by working individually.
Split the class into groups of four or five and ask them to take turns to explain carefully to each other how they worked out their answers.
Next, ask the groups to make a list of the strategies used, then ask these questions:
- Did you all have the same answer?
- Did you all work it out in the same way?
How many different ways can your group find to work out a correct answer for each question?
List these on the board.
Explain how important it is to your pupils to try different ways to solve problems to help their mathematical thinking.
2. Identifying different types of problem
With any mathematical task or problem you set your pupils, there are ‘deep’ features – features that define the nature of the task, and strategies that might help solve it.
Almost all mathematics problems have these deep features, overlaid with a particular set of superficial features. As a teacher, you have to help your pupils understand that once they have recognised the superficial features, changing them does not have any effect on how we solve the problem. The strategies for solving a problem remain the same. (See Resource 2: Ways to help pupils solve problems.)
Case Study 2: The essence of the problem
Amma wrote this problem on the board:
In one family, there are two children: Charles is 8 and Osei is 4. What is the mean age of the children?
Some pupils immediately wanted to answer the question, but Amma told them that before they worked out the answer, she wanted them to look very closely at the question – at what kind of a question it was. Was there anything there she could change that would not alter the sum?
Some pupils realised that they could change the children’s names without changing the sum. Amma congratulated them.
She drew a simple sum on the board (1+1=2) and then said, ‘If I change the numbers here,’ (writing 2+5=7) ‘it is not the same sum, but it is still the same kind of sum. On our question about the mean, what could we change, but still have the same kind of sum?’
Some pupils suggested they could change the ages of the pupils as well as the names.
Then Amma asked, ‘Would it be a different kind of sum if we talked about cows instead?’
They kept talking in this way, until they realised that they could change the thing being considered, the number and the property of these things being counted, all without changing the kind of sum being done.
The pupils then began writing and answering as many different examples of this kind of sum as they could imagine.
Activity 2: What can change, what must stay the same?
Try this activity yourself first.
- Write the following question on your chalkboard: Mr Ogunlade is building a cement block wall along one side of his land to keep the goats out. He makes the wall 10 blocks high and 20 blocks long. How many blocks will he need in total?
- Ask your class to solve the problem.
- Check their answer.
- Next, ask your pupils in groups of four or five to discuss together the answer and what can be changed about the problem, yet still leave it essentially the same so it can be solved in the same way.
- Ask the groups to make up another example, essentially the same, so that the basic task is not changed.
- Swap their problem with another group and work out the answer.
- Do they have to solve this new problem in the same way?
3. Thinking about problems
Problem solving can be adapted so that every pupil can contribute. For example, all pupils can discuss what makes a problem easy or difficult to solve. It can be the variations in the superficial features – for example, using large numbers, decimals or fractions rather than small integers – that often make a problem harder to solve.
Sometimes, setting a question in a ‘context’ can make it easier, but sometimes this can distract pupils from the deep features of the problem, so they may not easily see how they are meant to solve it.
When pupils begin to see the deep features of a problem, they can also begin to ‘see through’ the superficial features, so they recognise the underlying task. Pupils can then confidently tackle any task with the same deep features. See Resource 2 for important factors for you to consider when setting and solving problems with your class.
Case Study 3: Make it easy, make it hard
Agnes was working with her pupils on the topic of division.
She wrote three division problems on the board:
- Kofi has 12 oranges, and 3 children. If he shares the oranges equally, how many should each child get?
- Divide 117 by 3.
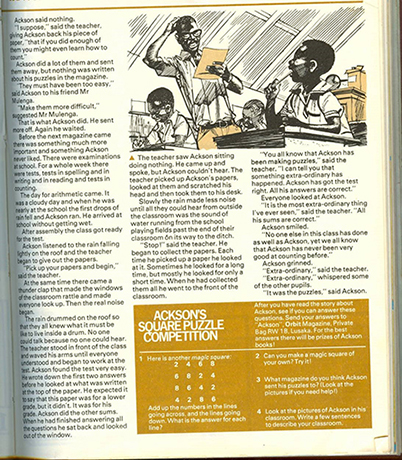
- Amma has 20 Gp for travelling to work. She spends 3 Gp each day on a taxi. One day, she doesn’t have enough money for the taxi. How many days has she travelled to work? On the day her money runs out, how much extra does she need for the taxi that day? You might like to use pretend paper coins based on real coins to help with this activity – see Resource 3: Coins of Ghana).
She asked pupils in groups of four to try to answer these problems together.
After ten minutes, Agnes asked her pupils which problems were easier or harder to answer. Together they made two lists on the board – ‘things that make the problems hard’ and ‘things that make the problems easier’.
Agnes asked the groups to find how many different ways they could solve the problems they had been given. She said she would reward the group that found the most ways by displaying a ‘maths champions’ certificate, with their names on it, on the classroom wall.
Key Activity: Pupils writing their own tasks
- Make a list on the board of ‘things that make the problems hard’ and ‘things that make the problems easier’.
- Ask your pupils, in groups, to write three questions of their own. They should make one question easy, one harder and one very hard.
- After ten minutes, ask the groups to swap the problems they have written with another group and to solve the questions they have been given by the other group.
- Ask the groups to report back. Were the ‘very hard’ questions really much harder than the ‘easy’ questions? What made the questions hard or easy? Revisit your lists on the board – is there anything pupils want to change or add now about making problems hard or easy?
- Ask them to make up problems for homework related to their local community e.g. about the number of trees, the cost of a taxi.
- Next day, share these in class and ask pupils to solve them.
Resource 1: Why problem solving is important
![]() Background information / subject knowledge for teacher
Background information / subject knowledge for teacher
Problem solving:
- adds enjoyment and interest to mathematics lessons;
- helps pupils gain confidence in their mathematical ability;
- helps pupils see the interaction between mathematics and everyday life;
- helps pupils value mathematical learning;
- improves communication skills in mathematics;
- develops the process of making and testing hypotheses;
- develops abstract thinking.
Strategies for solving problems
- Draw a picture or diagram.
- Make a table.
- Make a list.
- Look for a pattern.
- Guess and check.
- Say the problem in a different way.
- Look at all possibilities systematically.
- Work backwards.
- Solve a simpler problem with fewer variables.
- Explore the role of each variable in turn by fixing the others.
- Explore any previous similar problems.
- Look for the ‘deep’ features.
Resource 2: Ways to help pupils solve problems
![]() Background information / subject knowledge for teacher
Background information / subject knowledge for teacher
You can help your pupils become confident problem solvers by helping them to understand the importance of:
- reading the problem carefully to find the important parts;
- identifying the ‘deep’ features of a problem;
- deciding what exactly is involved;
- discussing and sharing different methods to solve the problem;
- testing out ideas;
- working alone and with others;
- being prepared to start again if there is a mistake;
- checking their work;
- asking other pupils or you for help when needed.
You can also help your pupils become confident problem solvers by:
- using contexts that are interesting to pupils when setting problems;
- making the classroom environment supportive so they can share ideas without fear of being laughed at.
Resource 3: Coins of Ghana
![]() Teacher resource for planning or adapting to use with pupils
Teacher resource for planning or adapting to use with pupils
As part of this activity, you might like to use paper or real coins to help pupils work on mathematical problem solving.
Pictured left to right: 10 Pesewas, 20 Pesewas, 50 Pesewas, 100 Pesewas, 200 Pesewas, 500 Pesewas
Acknowledgements
Every effort has been made to contact copyright holders. If any have been inadvertently overlooked the publishers will be pleased to make the necessary arrangements at the first opportunity.
Section 4: Seeing multiplication visually
Key Focus Question: How can you help pupils to see patterns in number?
Keywords: visualisation; multiplication; shape; imagination; sequence; planning; group work
Learning Outcomes
By the end of this section, you will have:
- explored multiplication with your pupils through visual means;
- used rectangular shapes to help pupils understand factors;
- used investigations to explore patterns in number series.
Introduction
The ability to ‘see’ or visualise mathematical patterns is a basic skill for developing further understanding. It can also be an exciting process of discovery as pupils learn to see numbers and shapes in new ways.
This section shows you ways to help your pupils to ‘see’ actual shapes and patterns in numbers.
1. Working in pairs
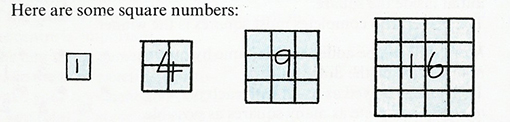
The concept of ‘square numbers’ can be very abstract. Drawing squares, or making squares with counters can help pupils begin to gain a visual understanding. What numbers of counters do we need to make square shapes (i.e. those with equal numbers of counters in each row, and as many rows as columns)?
You need to plan your lessons to ensure that all pupils are participating. In Activity 1 you will ask your pupils to work in pairs.
Case Study 1: Drawing square numbers
Mrs Baale in South Africa wanted her pupils to do some investigations in pairs with only some guidance from her. She was keen to see if the pupils could investigate square numbers for themselves.
She began the lesson by asking pupils to work in pairs. She drew a square on the board; then she drew a larger square, made up of four smaller squares (see Resource 1: Square numbers). She asked the pupils to draw as many other squares like these as they could in five minutes. She told the class that these numbers were called ‘square numbers’.
Mrs Baale asked the class if they could make more square numbers, and to note the number of little squares needed to make each big square.
By allowing the pupils to work mainly unaided, Mrs Baale felt they would gain confidence and find enjoyment in the lesson. She found that most pairs worked well together.
Activity 1: Making square numbers with objects
Look at the task in Resource 1. Read it through carefully and try the task yourself before doing it with your class.
Encourage each pupil to participate by asking the pairs to choose first one member to be the scribe (the one to draw) and the other the recorder, and then to swap these tasks. In this way, you can make sure each pupil is participating.
You could also give your pupils objects (seeds or small stones) as counters. Ask pairs of pupils to find ‘square numbers’ (those with equal numbers of counters in each row, and as many rows as columns).
2. Using games to explore rectangular numbers
From square numbers we move to rectangular numbers. The only requirement now is that there must be at least 2 rows and 2 columns. Each row must have the same number of crosses, e.g.
| Number | Rectangular Patterns |
|---|---|
| 1 | X |
| 2 | X |
| 3 | X |
| 4 | 2x2 |
| 5 | X |
| 6 | 2x3, 3x2 |
| 7 | X |
This allows for ‘rectangular’ numbers. Would you expect there to be more or fewer ‘rectangular’ numbers than ‘square numbers’, and can you explain why?
Looking at the numbers that form rectangular shapes is one way for pupils to explore multiplication (or division) through seeing and doing, as well as carrying out mental and written sums.
Trying out the investigations yourself to see where pupils may find difficulties and planning how you can help those who do will help you be more effective in supporting their learning.
Case Study 2: Playing a game to find factors
Mrs Ali planned to ask her pupils to find different rectangular numbers by using multiplication facts.
She decided to have a class competition. She divided the class into two teams and asked each team to choose a scorekeeper. The game was that she would write a number on the board and the first pupil who gave her two correct factors for that number scored a point for their team. Mrs Ali explained that there would be more than one correct answer – sometimes many. She then showed the class an example by writing 6 and saying that she would have given a point to any one who said ‘2 times 3’ or ‘3 times 2’ or ‘1 times 6’ or ‘6 times 1’. The class enjoyed the game and became quite excited. Mrs Ali was very happy, as she had planned ahead that this game would help her pupils with their next activity.
In later tasks, she often played this game with her pupils when she had five minutes left at the end of the day.
Activity 2: Multiplication using counters
You will need 20 counters, bottle tops, beans or stones, for each group of four/five pupils.
- Begin by dividing the class into their groups and handing out the counters.
- Copy or draw the table in Resource 2: Table of multiplications on the board for each pupil to copy to record their findings.
- Ask the groups to take 6 counters and arrange them in rows of equal numbers, exploring all the possible arrangements they can make.
- After five minutes, let the groups share the possible arrangements they found for the number 6. Check that at least one group included an arrangement with only one row. Ask them to fill in their table for 6 as shown in Resource 2.
- Next, let them try number 12 but, before they make the arrangements, they must predict the number of possible arrangements, and then check if their predictions are true.
- Repeat with all the numbers on the table.
Resource 5 has more examples of maths games that you can use with your pupils
3. Looking for patterns
In this part, we look at another way of seeing patterns in multiplication, which is not based upon shapes and counters, but still looks for patterns in rows and columns. Helping pupils explore patterns through practical activities will develop their deeper thinking.
Imagine two columns, one for ‘tens’ another for ‘units’. If we think, for example, of the 8 times table, the first four numbers are 8, 16, 24, 32.
What happens to the tens and the units as you look down the two columns? You should notice that the tens increase by 1 each time, while the units decrease by 2. Using this observation, what would be the next three numbers? See Resource 3: Tens and units for an example of this exercise.
Such observations and questions can be used to help pupils learn about both multiplication and pattern recognition.
Case Study 3: Recognising patterns in sequences
Mr Lutengano wanted to do an activity exploring number. He wrote the following number sequences on the board, then asked the pupils to help him find the missing number. Pupils had to put their hand up and say what they thought the missing number was, and why.
- 4, 6, 8, [ ] , 12, 14
- 3, 6, [ ] ,12, 15
- 16, 25, [ ] ,49, 64
- 1, 11, 111, [ ] ,11111
- 1, 1, 2, 3, [ ] ,8, 13
When the pupils had finished, he asked them to make up their own patterns and leave a number out. They then swapped their pattern with their partners and tried to fill in the missing numbers.
They were very excited and enjoyed the activity. Mr Inekwe asked if they could see a pattern? Could they predict the last number and each answer? He was pleased some could.
Mr Lutengano used pair work often, as it allowed all pupils to talk and helped their thinking.
Key Activity: Exploring the multiples of 9
You will need Resource 4: Times table
- Stand by the chalkboard and ask pupils to be totally silent. Ask them to watch carefully.
- Write the first five multiples of 9 on the blackboard.
- Pause. Ask them to look at what is happening to the numbers.
- Ask a pupil to complete the pattern to 10 x 9, under the heading ‘tens’ and ‘units’.
- Ask the class to share anything they notice, recording and accepting everything without commenting.
- Carry on, but stop after 13 x 9, skip some and then write 17 x 9 = ? Now, watch carefully while they try to make sense of what is going on. You may have to prompt them to see the pattern in tens and units.
- Finally ask pairs of pupils to investigate other multiples (it is best to start with single digit numbers, 1–9). Can they work out together the pattern for tens and units?
Resource 1: Square numbers
![]() Teacher resource for planning or adapting to use with pupils
Teacher resource for planning or adapting to use with pupils
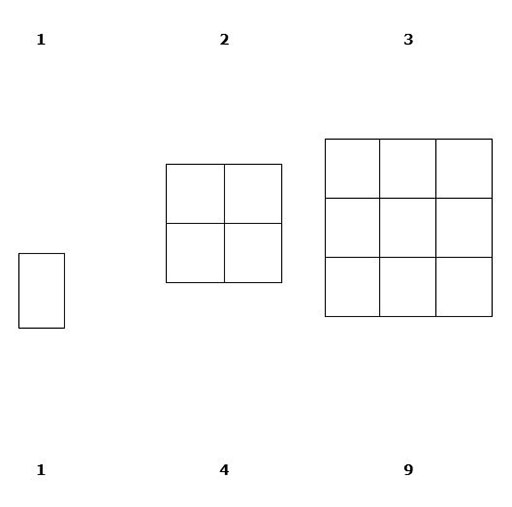
- First draw a square on the chalkboard labelling the sides 2 cm and divide it as shown into 1 cm squares.
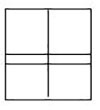
- The first recorder has to count the 1 cm squares and write down the number.
- The first scribe has to draw a 3 cm square and divide it similarly into 1 cm squares and the recorder will count and record these small squares.
- This activity continues with a 4 cm square, a 5 cm square, a 6 cm square.
Examples
- Ask the pairs to draw other square numbers to a hundred. The pairs take turns to draw and count/record the numbers.
Resource 2: Table of multiplications
![]() Teacher resource for planning or adapting to use with pupils
Teacher resource for planning or adapting to use with pupils
| The number | The possible arrangements | Number of arrangements |
|---|---|---|
| 3 | ||
| 4 | ||
| 6 | (1 x 6), (2 x 3), (3 x 2), (6 x 1) | 4 |
| 8 | ||
| 9 | ||
| 10 | ||
| 12 | ||
| 14 | ||
| 15 | ||
| 16 | ||
| 18 | ||
| 20 |
Resource 3: Tens and units
![]() Teacher resource for planning or adapting to use with pupils
Teacher resource for planning or adapting to use with pupils
Ask your pupils to fill in the next three sets of numbers in this table.
| Tens | Units |
|---|---|
| 0 | 8 |
| 1 | 6 |
| 2 | 4 |
| 3 | 2 |
| ? | ? |
| ? | ? |
Resource 4: Times table (Example 9 times table)
![]() Teacher resource for planning or adapting to use with pupils
Teacher resource for planning or adapting to use with pupils
- 1 x 9 = 9
- 2 x 9 = 18
- 3 x 9 = 27
- 4 x 9 = 36
- 5 x 9 = 45
- 6 x 9 = 54
- 7 x 9 = 63
- 8 x 9 = 72
- 9 x 9 = 81
- 10 x 9 = 90
- 11 x 9 = 99
- 12 x 9 = 108
- 13 x 9 = 117
- 14 x 9 = 126
- #
- #
- 17 x 9 = ?
The units decrease by one each time you go down and the tens increase by one except between 10 x and 11 x
When the digits are added the sum is 9.
Resource 5: Multiplication games
![]() Teacher resource for planning or adapting to use with pupils
Teacher resource for planning or adapting to use with pupils
The games below come from http://www.multiplication.com/ (Accessed 2008)
They are great fun for your pupils. If you have any other ideas for multiplication games and can access the Internet, why not send your ideas in to the TESSA website? Put Ghana on the mathematics map!
1. Times tables card game
This game is played by two players with a deck of cards with the jokers and face cards removed. Players shuffle the deck and deal them all out face down. Each player flips over a card from his or her pile. The first player to call out the correct answer gets to collect two flipped over cards. If a player calls out the wrong answer the other player gets the cards. Players continue until all the cards have been flipped over. The winner is the player with the most cards at the end.
2. Buzz
This game is used to practise multiples of a particular number. It can be played in a small group or with the entire class. The leader chooses a number between 2 and 9. The leader says 1, the next player says the 2, and so on. When a multiple of the number chosen is reached, the player says ’buzz’ instead of the number. If a player forgets to say ‘buzz’, or says it at the wrong time, he or she is out. Play continues until the group reaches the last multiple of the number times 9.
3. Around the world
Large group flash cards are great for ’Around the world’. Players sit in a circle. One pupil starts by standing behind the next pupil in the circle. The teacher holds up a flash card. The first pupil to say the answer stands behind the next person in the circle. If a sitting pupil says the answer first, the standing pupil sits down in the winner’s chair. This process continues until at least one student makes it completely around the circle. The cards have multiplication sums on them. You can make these and use them over and over. You can use different tables e.g. 3, 6 and 8.
4. Dots
You will need a dice to play this game.
- Ask a pupil to join you at the board to model the game.
- Do each step yourself and then ask your partner to do the step.
- Roll the dice and announce the number you rolled.
- Draw that number of big circles on the board, e.g. if you rolled a 2, you draw two large circles on the board.
- Roll the dice again and announce that number.
- Draw that number of dots in each of your circles, e.g. if you rolled a 6, you draw six dots in each circle.
- Write a multiplication equation to match your drawing, e.g. 2 x 6 = 12 (2 groups of 6 equals 12).
- Record the total number of dots in your drawing. 12 is your score for this round.
- Continue with your partner for four more rounds of play.
- After five rounds, total all the dots.
- The player with the most dots wins.
5. Number names
On a name tag write a multiplication problem, e.g. 7 x 5. Each pupil gets to wear one for the day. They no longer have a name. When you or your pupils want to speak to someone, you must call that person by their ‘number name’ – the answer to the multiplication problem they are wearing, e.g. 35.
Acknowledgements
Every effort has been made to contact copyright holders. If any have been inadvertently overlooked the publishers will be pleased to make the necessary arrangements at the first opportunity.
Section 5: Practical work with fractions
Key Focus Question: How can you help pupils to understand fractions?
Keywords: fraction strips; fraction discs; simple operations; group work; problem solving; definition; numerator
Learning Outcomes
By the end of this section, you will have:
- developed pupils’ understanding of fractions using simple resources;
- used group work and problem solving to increase pupils’ confidence in dealing with fractions.
Introduction
Allowing pupils to divide things into ‘parts of a whole’ using real objects helps them move more easily onto abstract ideas, such as fractions, division, ratio and proportion. This section will help you use simple physical objects and practical activities to develop your pupils’ understanding of these concepts.
1. Group work on fractions
In this section you will introduce the concept of fractions. By trying tasks with groups of different sizes, you will be able to consider what is most suitable for your situation and for each practical task. For more information, see Key Resource: Using group work in your classroom.
Case Study 1 and Activity 1 use simple resources – a fruit, paper and fraction strips – to help pupils understand the concept of fractions more easily. Also, by using groups and asking the pupils to discuss their conclusions, you will be exposing them to different fractions. Understanding fractions provides a foundation for thinking about division (‘share by’ equal parts is the first grasp of understanding division), ratio, proportion and decimals.
You may first want to refresh your own understanding of fractions by looking at Resource 1: Fractions.
Case Study 1: Using group work to explore simple fractions
Mr Umaru in Nigeria began his lesson with his Primary 5 class on fractions by cutting an orange into two equal parts and then into four equal parts, asking the pupils to name the parts – halves and then quarters. He introduced more simple fractions, showing each by folding rectangular pieces of paper. He emphasised that two halves make a whole, etc.
He then discussed with the pupils how things are shared in real life. As his class was large, he divided it into small groups of three. He drew a circle, a rectangle and a square on the chalkboard and asked each pupil to choose one shape and to draw it six times. He asked them to shade their drawings to show
- a half
- two halves
- a quarter
- two quarters
- three quarters
- four quarters
Each pupil in the group showed the others what they had done. He asked them if they could see any patterns in their pictures and some pupils pointed out that two quarters is the same as one half etc. They shared this with the other members of their group and with the class.
Even though his class was large, Mr Kofi found that his approach of working in groups meant that all the pupils got an initial understanding of equivalent fractions from their drawings and interaction with each other. He also felt they were well prepared for the next lesson he had planned.
Resource 2: Practical fractions gives another example which can be used with pupils.
Activity 1: Using fraction strips
Arrange pupils into groups of four. Give each group four strips of paper of equal length (see Resource 3: Fraction strips). In each group, ask one pupil to fold a strip into 2 equal parts; another into 4, and another into 8. One person in the group should not fold their strip.
Using the strips, can the groups agree:
- How many halves (1/2) make a whole?
- How many quarters (1/4) make a half (1/2)?
- How many eighths (1/8) make a quarter (1/4)?
- Then you could ask them to try some more difficult equivalent fractions, e.g.
- How many eighths (1/8) are there in a half (1/2)?
- How many eighths (1/8) are there in three-quarters (3/4)?
While the pupils are working, go around to help them. Share some of their answers with the class to show how fractions work.
2. Adding and subtraction with fraction strips
In this part, we build on the previous work with fraction strips to add and subtract simple fractions.
As you work, ask yourself these questions:
Are you having to help your pupils a lot? If so, why do you think this is?
Are you and the pupils enjoying the practical activities?
Do you think the pupils learn more this way than if you had just told them? How do you know this?
Case Study 2: Further work with fraction strips
Mr Agbe brought to his lesson a large fraction strip of tenths that he had made and asked each pupil to make a similar one using the resources he provided. After 15 minutes, he helped pupils use their fraction strips to find answers to these questions:
By how much is 8/10 bigger than 5/10?
What is the difference between 8/10 and 5/10?
What is 8/10 - 5/10?
He wrote on the chalkboard the sum 8/10 - 5/10 = 3/10 and asked the pupils to copy this in their exercise books.
He then asked his pupils to work in pairs and do some addition sums with tenths using their fraction strips. He made up some sums for them, and then asked those who were working well to make up some sums for each other.
Mr Agbe was amazed at what the pupils were able to do, but also realised that he needed to give some pupils more practice and time to talk about their ideas as they worked.
Activity 2: Adding and subtracting simple fractions
Before the lesson, prepare three discs – a complete disc, a quarter disc and a half disc, each with all the quarters shown (see Resource 4: Fraction discs).
Hold up the quarter disc and the half disc and ask your pupils what would be the total if you added these two discs. Give them time to answer, and when you get the right one, write the sum on the board: 1/4 + 2/4 = 3/4
Next, hold up all three discs and ask what would be the total if they were all added together.
Again, wait for the right answer and then write the sum on the board: 1 + 1/4 + 2/4 = 1 3/4
Now pair your pupils, and ask them to draw similar discs with thirds. Ask them to make up addition sums to give to their partner and to write down the complete sum and answer in each case.
As they are working, go around the class and help where needed. If necessary, let them try other fractions to see if they really understand the idea.
Display some of the different fractions on the wall.
You may want to do this activity over two lessons to consolidate pupils’ learning.
3. Using group work to explain equivalent fractions
How can pupils compare fractions that have different denominators (e.g. 3/5 + 1/4)?
They could make fraction strips to compare the different fractions, but although this supports comparison, it doesn’t help them add or subtract such fractions. To do this, they must understand common denominators. Resource 5: Comparing fractions explains how these work.
Case Study 3: Using the part-whole model
Mrs Dokono decided to use the part-whole model to introduce equivalent fractions to her class and to develop her skills of using group work and practical work.
She knew that using everyday objects helps pupils’ understanding, and took to her class some biscuits to help her explain equivalent fractions. First, she divided the class into groups of eight and told them they were going to explain how 20 biscuits could be shared equally among a number of children.
Next, she assigned each group a different number of biscuits. She gave one group 2 biscuits and asked them to share these biscuits among 4 pupils. They saw that 2 divided by 4 gave each pupil 1/2 a biscuit. She wrote on the board 2 divided by 4 = 2/4 = 1/2.
She repeated this problem with other groups and 3 biscuits among 6 of the pupils.
Then she gave 4 biscuits among 8 pupils, each getting half a biscuit.
Each time she wrote the fractions on the board 2/4, 3/6, 4/8 with each equal to 1/2.
She told the pupils that these are called equivalent fractions.
Mrs Dokono was pleased with the class response to her mathematics lesson using the biscuits to explain equivalent fractions.
Key Activity: Equivalent fractions
Using halves, thirds and quarters, write down five additions, e.g.
- (1/2 + 1/4)
- (1/3 + 1/2),
- (3/4 + 2/3),
- (2/4 + 1/3),
- (2/3 + 1/4).
Show how to work out the common denominator of the first sum. Ask pairs of pupils to calculate the remaining common denominators.
Show pupils how to convert the numerator for the first two sums; ask pupils to complete the next three sums.
Show how to find the answer to the first two sums; ask pupils to complete the last three sums.
Ask each pair of pupils to make up and solve as many similar problems as they can in ten minutes.
After the lesson, look at Resource 6: Questions for self-evaluation and ask yourself questions on your use of practical activities and resources.
Resource 1: Fractions
![]() Background information / subject knowledge for teacher
Background information / subject knowledge for teacher
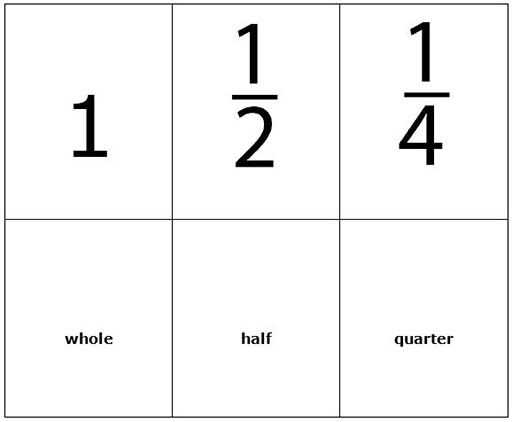
What is a fraction?
A fraction is a part of a whole. There are two numbers to every fraction:
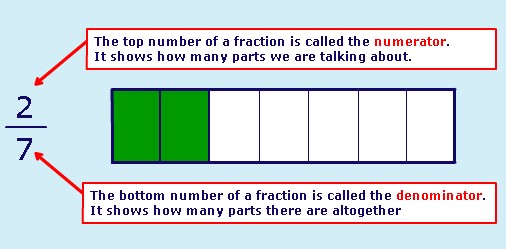
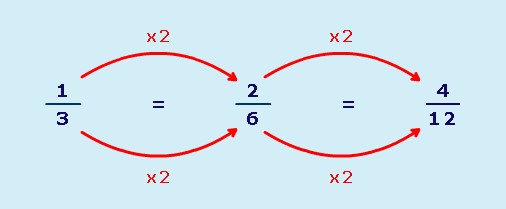
Equivalent fractions
Equivalent fractions are fractions that look different but show exactly the same amount:
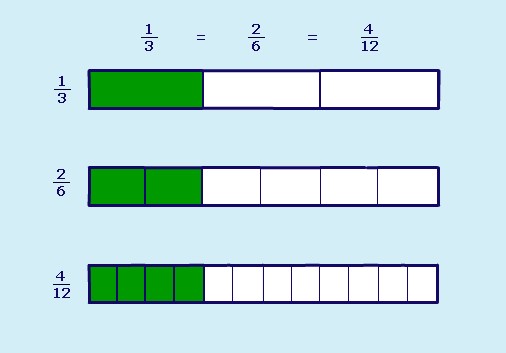
You can make equivalent fractions by multiplying or dividing the numerator and denominator by the same number:
Resource 2: Practical fractions
![]() Teacher resource for planning or adapting to use with pupils
Teacher resource for planning or adapting to use with pupils
Fractions may be easier to understand when related to everyday objects that pupils recognise.
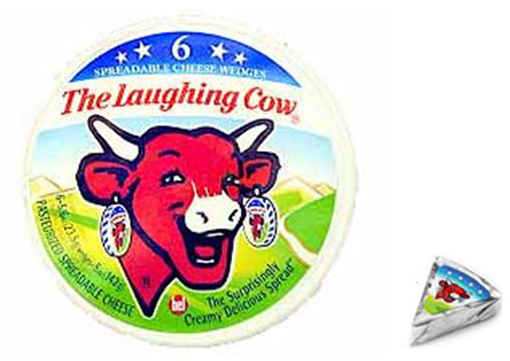
Show your pupils an object (or picture of an object) that can easily be divided into fractions, like the cheese pictured above.
Set pupils a series of questions relating to the object. For example:
- If there are 6 cheese triangles in one packet and Kofi eats half of them, how many are left for his brother Kwame?
- Can you express one cheese triangle as a fraction?
- How many cheese triangles will be left after Abina eats two-thirds of them?
Resource 3: Fraction strips
![]() Teacher resource for planning or adapting to use with pupils
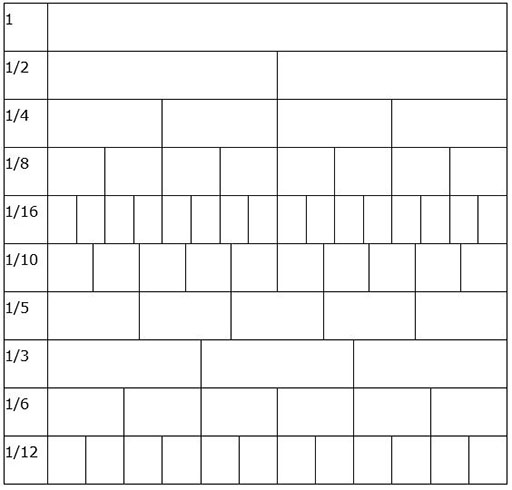
Teacher resource for planning or adapting to use with pupils
Some fraction strips are shown below. These can be made from any paper by folding and/or measuring.
Resource 4: Fraction discs
![]() Teacher resource for planning or adapting to use with pupils
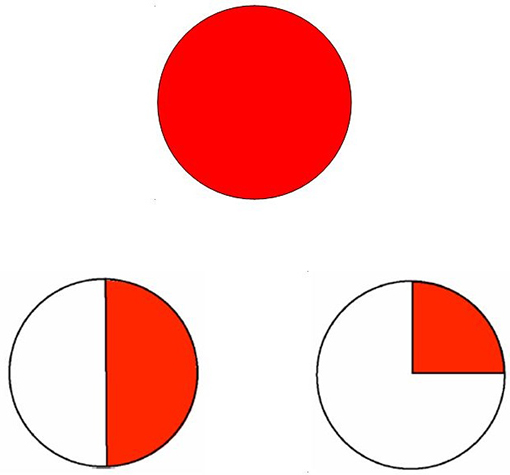
Teacher resource for planning or adapting to use with pupils
These are made by drawing a circle and dividing it into halves, quarters, etc. by folding.
Resource 5: Comparing fractions
![]() Background information / subject knowledge for teacher
Background information / subject knowledge for teacher
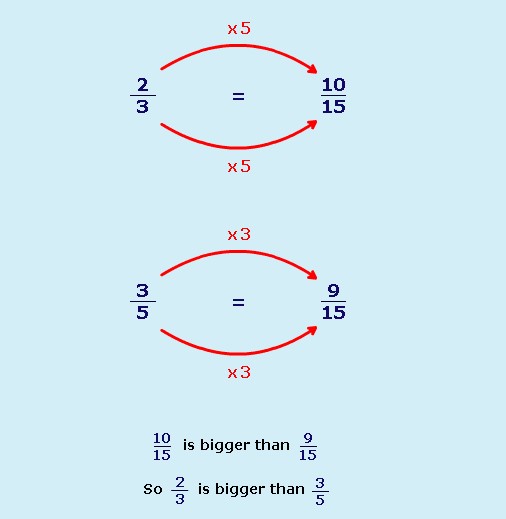
To compare fractions, you must first change them so they have the same denominator.
To compare ![]() and
and ![]() :
:
- First look at the denominators (the bottom numbers).
- Decide which number they both go into. They both go into 15.
- Change both numbers into 15ths.
Resource 6: Questions for self-evaluation
![]() Background information / subject knowledge for teacher
Background information / subject knowledge for teacher
When answering these questions, it is very important that you answer the questions honestly so that you can reflect on your practice better in order to develop as a more effective teacher
- Do I feel more confident in using group work?
- Did using different group sizes and types improve my lessons and make it easier for pupils to understand?
- Do I feel practical work helps pupils’ understanding, and am I confident in using it?
- Did my pupils enjoy doing these practical mathematical activities?
- Did I give my pupils enough time to do their practical tasks?
- How can I improve my teaching of this topic?
- What would I change next time?
Questions about the use of practical activities and simple resources
- Did the activities help me meet my learning objectives?
- Were the activities appropriate for my class?
- Did the activities stimulate the pupils’ interest?
- Did the resources help me meet my learning objectives?
- Were the resources appropriate for my class?
- Did the resources stimulate the pupils’ interest?
- How enjoyable were the lessons?
Acknowledgements
Grateful acknowledgement is made to the following sources:
Other
Resource 1: Fractions: Original source: http://www.bbc.co.uk/ schools (Accessed 2008)
Resource 2: Practical fractions: Original source: http://www.bel-uk.co.uk/ images/ (Accessed 2008)
Resource 5: Comparing fractions: Original source: http://www.bbc.co.uk/ schools (Accessed 2008)
Every effort has been made to contact copyright holders. If any have been inadvertently overlooked the publishers will be pleased to make the necessary arrangements at the first opportunity.