Use 'Print preview' to check the number of pages and printer settings.
Print functionality varies between browsers.
Printable page generated Monday, 15 June 2026, 9:37 AM
Module 2: Investigating history
Section 1: Investigating family histories
Key Focus Question: How can you structure small-group activities in your classroom to develop collaborative working and build self-confidence?
Keywords: family; history; confidence; investigation; small-group work; discussion
Learning Outcomes
By the end of this section, you will have:
- structured your activities to help pupils understand themselves and their relationships with other family members;
- used small-group discussions to build pupils’ self-confidence as they investigate their family histories.
Introduction
Good teaching often starts by encouraging pupils to explore situations that they are already familiar with. In terms of history, this means using their own lives, and the lives of their immediate families, as a source of investigation. The skills used to explore this familiar history can then be used in the study of broader historical questions.
All of us have a history, which starts from the moment we are born. This will include all our experiences and all the people we interact with.
In this section, you start by exploring your pupils’ immediate family situations and their roles and responsibilities within the family. You will also look at the wider context of the extended family. As you work in this area, you will have to be sensitive to different backgrounds and family or other structures that your pupils live in.
1. Working in groups to discuss families
When investigating the family, it is useful to first explore pupils’ understanding of what a family is and show them the diversity among families. Celebrating such diversity helps pupils feel better about themselves when they realise how different families can be. Case Study 1 and Activity 1 explore different ways to do this.
In the case study, the teacher encourages his pupils to work in small groups (see Key Resource: Using group work in your classroom) and to remember the rules that they have agreed for small-group discussions.
Case Study 1: Using group work to explore my own family
Mr Nguzo is a social studies teacher at Muhimu Primary School in Tanzania. He wants his pupils in Standard 3 to learn about families and the roles of different family members.
He organises groups of not more than six; he puts pupils together who do not usually work with each other.
In the groups, pupils take it in turns to answer the following questions, which he has written on the board.
- What is your name?
- Who are your father and mother? What are their names?
- Who are your grandfathers and grandmothers? What are their names?
- How many sisters and brothers do you have? What are their names? Are they older or younger than you?
- How many cousins do you have? What are their names?
During the discussion, Mr Nguzo goes to each group to check that all the pupils are being given a chance to contribute. After 10 to 15 minutes, he asks the groups to share with the whole class what they have found out about different families: What were the similarities between the families? What were the differences? (For younger or less confident pupils, he would have to ask more structured questions, e.g. ‘Who had the most brothers?’)
Then he asks the groups to consider this question:
- What makes someone your sister, your brother, your aunt, etc.?
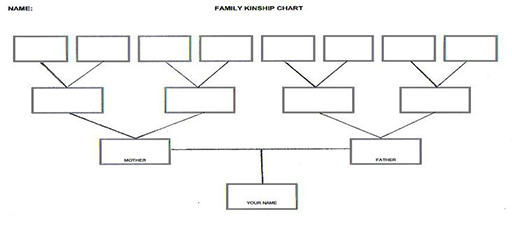
After 10 minutes, one member of each group presents their answers to question 6 to the class. Mr Nguzo prepares a large, basic kinship chart to help focus the discussion (see Resource 1: Kinship chart).
Mr Nguzo and the pupils note that although there are words in their language that express cousin, uncle and aunt, these relations are normally referred to as brother or sister; grandfather, father are usually simply father; grandmother, mother are similarly simply mother.
There is a distinction between the uncles and aunts from the mother’s side and those from the father’s side. Mr Nguzo realises that teaching pupils about the relationships within families can be confusing for younger pupils.
Activity 1: Who am I?
Before the lesson, prepare a kinship chart as a handout (see Resource 1).
Ask the pupils to work in groups of three or four. One pupil volunteers to list all the people they know in their family and fill in the details on a kinship chart. (You may wish to select which pupil is chosen.)
Pupils might want to draw pictures of their relatives on the chart.
Share these charts with the class.
Discuss the variation in families and emphasise how good this variety is.
At the end of the lesson, display the kinship charts on the wall of the classroom.
2. Modelling making a timeline
When studying past events, it is important to help pupils understand the passage of time and how things change from generation to generation.
Developing the ways that young pupils look at their family histories will help them link events together as well as put them in sequence. Resource 2: Another kinship chart provides a family tree that will help pupils see relationships between family members, e.g. their cousin is their mother’s or father’s sister’s or brother’s child.
Case Study 2: Family histories
Elizabeth Aguti plans to teach about family relations over time with her Primary 5 pupils.
She cuts a series of pictures from magazines of people of different ages, doing different things, e.g. at a wedding, a school prize day, and writes numbers on the back of each picture. She tells her pupils that the photographs represent different events in one person’s life and asks her pupils, in groups of six, to sequence the photos in terms of the age of the person. She gives them 15 minutes to discuss the order and then asks each group to feed back. She asks why they chose the order they did and lists the clues they found in the pictures to help them order the events. They discuss the key events shown in the pictures and Mrs Aguti tells the pupils they have made a ‘timeline’ of life.
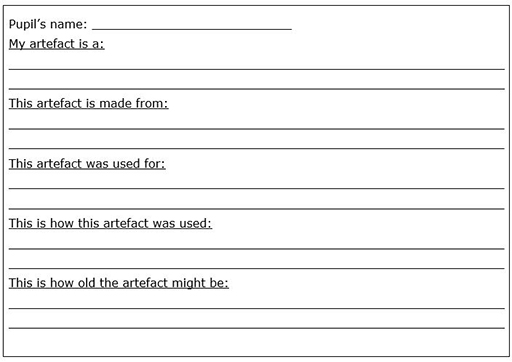
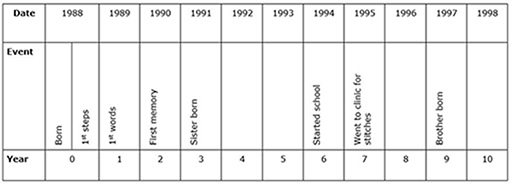
Activity 2: Pupils creating their own timeline
Resource 3: My timeline can be a starting point for your class to do their own timeline.
First, discuss the importance of knowing one’s own origins and members of one’s family.
Explain what a timeline is.
Model (demonstrate) the making of a timeline yourself (you don’t have to use your own life – you could do a realistic one based anonymously on someone you know). Modelling is an excellent way of supporting pupils to learn a new skill/behaviour. Draw this timeline on the board and talk through what you are doing, or have one prepared on a large roll of paper. Remember to use a suitable scale – a year should be represented by a particular length. (When your pupils come to do their timelines, they could use 5 cm or the length of a hand if they don’t have rulers.)
Ask pupils to write down key things they remember about their lives and also give them time to ask their parents/carers about when they first walked etc.
Ask them to record any other information they want to include on their timeline.
Support them as they make their timelines. You could encourage them to write in the main events that have happened to them personally, and in a different colour (or in brackets under the line) the main events that happened to their wider family (e.g. older sister went to college, father bought a field etc.).
Display their timelines in the classroom.
Pupils who finish quickly could be asked to imagine and draw a timeline of their future. What will be the main events when they are 20, 25, 40 etc.?
3. Helping pupils explore their past
Helping pupils to develop their understanding of past and present takes time, and involves giving them a range of activities where they have to observe, ask questions and make judgements about what they find out.
How can they develop skills to help them think about how things change over time? Case Study 3 and the Key Activity use the wider environment to extend your pupils’ understanding of time passing and things changing.
Case Study 3: Visiting an older citizen
Mr Okot, Mrs Rutebuka and Miss Ngaro planned their social studies together. They did not all do the same topic at the same time, but it helped them to share ideas.
They all read Key Resource: Using the local community/environment as a resource. They planned to take their classes to visit an older member of the community to talk to them about how the village has changed since they were a child. They decided to organise the classes into groups and each group would prepare questions to ask the elder.
Each group would have a different area to think about such as games they played, food they ate, houses they lived in etc.
Key Activity: Using different sources to investigate family life in the past
Do a brainstorm with your class. Ask them to consider how they could investigate the ways in which life for their families has changed in the village/community over time. What sources could they use to find out about this?
They are likely to come up with ideas such as: using their own observations and memories to think about what has changed in their own lifetime; asking their parents; talking to other older people; talking to people in authority (such as the chief); looking at older maps; using a museum (if there is one); reading from books about the area etc.
Ask the pupils to gather stories from their own families about how life has changed for them over the last few generations. What was everyday life like for their grandparents and great grandparents? What are the family stories from previous times? Does the family have any old newspapers, photos, letters, etc. that help show what life used to be like?
Pupils could share their stories with each other in class and use them as a basis for presentations – these could include pictures of what they think life was like, role plays about life in the past, written factual accounts based on family stories and other documents, and imaginary stories e.g. ‘describe a day in the life of your grandmother when she was young’.
Resource 1: Kinship chart
![]() Teacher resource for planning or adapting to use with pupils
Teacher resource for planning or adapting to use with pupils
A kinship chart shows how each person is related or connected to the others and their family or community. Different cultures have different ways of describing relatives.
Below is a simple kinship chart for Zambia.
| Me | My Parents | My Grandparents |
| Father________ | Grandfather________ | |
| Grandmother________ | ||
My Brothers/ Sisters ________ ________ ________ | Mother________ | Grandfather________ |
| Grandmother________ |
Resource 2: Another kinship chart
![]() Teacher resource for planning or adapting to use with pupils
Teacher resource for planning or adapting to use with pupils
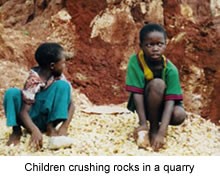
Resource 4: Child labour in Africa
![]() Teacher resource for planning or adapting to use with pupils
Teacher resource for planning or adapting to use with pupils
What is child labour?
Child labour: all forms of work by children under the age laid down in the International Labour Organisation (ILO) standards (normally 15 years or the age of completion of compulsory schooling subject to some exceptions).
Worst forms of child labour: slavery, debt bondage, prostitution, pornography, forced recruitment of children for use in armed conflict, use of children in drug trafficking and other illicit activities, and all other work likely to be harmful or hazardous to the health, safety or morals of girls and boys under 18 years of age.
What is the situation of child labourers?
The ILO has recently estimated that some 246 million children aged 5–17 years are engaged in child labour around the world. Of these, some 179 million are caught in the worst forms of child labour.
Roughly 2.5 million children are economically active in the developed economies, 2.4 million in the transition countries, 127.3 million in Asia and the Pacific, 17.4 million in Latin America and the Caribbean, 48 million in Sub-Saharan Africa and 13.4 million in the Middle East and North Africa.
Workers under 18 face particular hazards. For example, in the US, the rate of injury per hour worked appears to be nearly twice as high for children and adolescents as adults.
Similarly, a survey of 13 to 17 year olds in Denmark, Finland, Norway and Sweden in 1998–99 revealed injury rates ranging from 3 to 19% of children working before or after school. In the developing countries, an ILO study found average rates of injury and illness per 100 children ranging from a low of 12% in agriculture (for boys) to a high of 35% (for girls) in the construction sector.
Africa has the greatest incidence of economically active children: 41% of children in the continent are at work.
On average, more than 30% of African children between 10 and 14 are agricultural workers.
In Rwanda, there are an estimated 400,000 child workers. Of these, 120,000 are thought to be involved in the worst forms of child labour and 60,000 are child domestic workers.
A recent survey by the Ministry of Public Service and Labour in Rwanda of children involved in prostitution in several large Rwandan cities found that 40% of child prostitutes had lost both of their parents, 94% lived in extreme poverty and 41% had never been to school.
In Tanzania, some 4,600 children are estimated to be working in small-scale mining.
In Tanzania, children as young as eight years old dig 30 metres underground in mines for eight hours a day, without proper lighting and ventilation – constantly in danger of injury or death from cave-ins.
The Government of Kenya has recently reported that 1.9 million children between the ages of 5–17, are working children. Only 3.2% of these children have attained a secondary school education and 12.7% have no formal schooling at all.
During the peak coffee picking season in Kenya, it has been estimated that up to 30% of the pickers are younger than 15.
According to the Government of Zambia, there are some 595,000 child workers in Zambia. Of these, 58% are 14 or younger and, thus, ineligible for any form of employment under the Employment of Young Persons Act.
It has been estimated that as many as 5 million children in Zimbabwe between the ages of 5 and 17 years are being forced to work in Zimbabwe.
An International Programme on the Elimination of Child Labour (IPEC) survey of children working in small scale mines in Madagascar showed that more than half (58%) were aged 12 or under, only a third had opportunities to learn skills and half came from families that were in a precarious economic situation with difficult living conditions.
Some 120,000 children under the age of 18 are thought to have been coerced into taking up arms as child soldiers, or becoming military porters, messengers, cooks or sex slaves in Africa.
Between 10,000 and 15,000 children from Mali are working on plantations in Côte d'Ivoire. Many of them are victims of child trafficking.
It is estimated that 50,000 children are working as domestics in Morocco.
In West Africa, an estimated 35,000 children are in commercial sexual exploitation.
Adapted from: Cornell University, Website
Reducing Child Labour in Tanzania through Education
In rural Tanzania, one out of three children between the ages of 10 and 14 work outside the family. They labor as farm workers, miners, domestic servants, and prostitutes, often under abusive and exploitive conditions.
Detrimental Working Conditions
Commercial agriculture in Tanzania employs large numbers of these youngsters. They provide much of the manual and machine-based labour on tobacco, coffee, tea, sugarcane, and sisal plantations. For example, in one area of the coastal region, 30 percent of the sisal plantation workers are children aged 12 to 14. They labour up to 11 hours per day with no specific rest periods, six days a week. Their wages are half that of adults, while nourishment and lodging are inadequate. Only half have completed primary school. Some plantations require as much as 14-, 16-, or even 17-hour work days. Mines and quarries also employ large numbers of youth who spend most of their days toiling above or below ground in very hazardous conditions. They risk injury from dust inhalation, blasting, mine collapse, flooding, as well as illness from silicosis.
Young girls are often lured away from their rural families with schemes that promise lucrative employment in towns and cities, only to be exploited as underpaid domestic servants that work as many as 16 or 18 hours per day. Domestic servitude in urban areas also make for an easy transition to child prostitution, which is a growing industry in Tanzania. As much as 25 percent of child prostitutes are former domestic servants.
Why Such Widespread Child Labor?
Poverty is one obvious reason for such widespread child labor in Tanzania. Over 50 percent of Tanzania's 36 million people live in extreme poverty, surviving on less than one US dollar per day. Many parents feel their survival is dependent on sending their children to work. Fortunately, income generation loan programs, also known as micro-credit disbursements, have had some success in giving families an economic boost.
Meanwhile, Tanzania's education system has drastically declined over the last 20 years due to funding cuts and teacher shortages. Currently, either no education is available or it is of such poor quality that it makes little sense for parents to send their children to school. Close to half the children are not enrolled, while the majority of those enrolled also work and are in constant danger of dropping out. If high quality education were made available, many more children would attend and fewer would enter the labor force. Education plays a critical role in combating child labor.
An Innovative Educational Strategy
To address this need for high-quality basic education, Education Development Center (EDC) and its partner, Research Triangle Institute (RTI), are key players in a program called Time-Bound Program on Eliminating Child Labor in Tanzania, which is funded by the US Department of Labor. EDC and RTI are establishing community learning centers in the 11 Tanzanian districts that have the highest incidence of child labor. 200 Interactive Radio Instruction (IRI) lessons for each of the first four grades will be developed in these centers. IRI is an innovative methodology that uses radio broadcasts that summon the participation of groups of listening students while their activities are facilitated by onsite teachers. The IRI curricula will include Swahili, mathematics, English, science, social studies, essential life skills, and navigating Tanzania's job market. International Labor Organization (ILO) and other NGOs are also identifying children who work, negotiating with employers, and bringing them to the community learning centers for their participation. When children complete the fourth grade, they will be assisted to integrate back into the formal school system or into a vocational program to prepare them for more stable, less dangerous work in the years ahead.
Adapted from: International Educational Systems, News, Website
Section 2: Investigating how we used to live
Key Focus Question: How can you develop your pupils’ thinking skills in history, using oral and written sources?
Keywords: evidence; history; thinking skills; interviews; questions; investigations
Learning Outcomes
By the end of this section, you will have:
- used oral history and documents to develop pupils’ thinking skills in history;
- planned and carried out activities that help pupils gather and use oral evidence to find out about past events.
Introduction
When we study history as part of social studies, we place a great deal of importance on the sources of evidence that can tell us something about the past.
There are two important ways of gathering evidence about the past – finding and analysing documents that record what happened and using oral history. Oral history is the gathering of people’s stories about particular events. We can also look at objects, pictures and buildings from the past to find out more.
In this section, you will encourage your pupils to investigate documents and conduct oral interviews in order to help build their understanding of their own past. It is important to encourage pupils to ask questions and listen to each other’s ideas, so they develop skills in assessing evidence and drawing conclusions.
1. Gathering oral histories
Teaching history does not only involve facts about historical events, but also the development of pupils’ historical skills. As a teacher, you need give your pupils the opportunity to develop and practise these skills. The kinds of events you explore with your pupils will depend on their ages. With younger children, you will also take more of a lead in helping them find out and understand what happened.
In this part, pupils will conduct oral interviews with an older family member or another member of the community. The aim of the interview is to find out how different their own lifestyles and interests are, compared with those of people in the past. By showing pupils how to conduct an oral interview, you can help develop important skills – being able to see the value of oral history and being able to listen. (Read Resource 1: Oral history now to find out more about this valuable resource.)
Case Study 1 shows how one teacher introduced her pupils to the idea of using oral history to find out about the past. Read this before trying Activity 1 with your class.
Case Study 1: Family oral histories
Every person has a history. Mrs Eunice Shikongo, a Grade 5 teacher at SheetheniSchool on the outskirts of Windhoek in Namibia, wants her pupils to explore their own family histories by interviewing one family member.
First, she discusses what oral evidence is, by encouraging pupils to share things they have learned from their grandparents. She asks them: ‘Has what you have learned been written down?’ Most agree that things learned in this way are not written, but passed on by word of mouth. Mrs Shikongo then explains that, by conducting an interview, pupils will collect oral evidence about what the past was like and will find out what a valuable source of evidence this can be.
She helps them compile a list of interesting questions to use to interview their family members (see Resource 2: Possible interview questions). The pupils then add their own questions to the list before carrying out these interviews at home.
The next day, they share their findings with the rest of their class. Mrs Shikongo summarises their findings on the board under the heading ‘Then’. Next, she asks them to answer the same questions about their own lives, and summarises this information under the heading ‘Now’. She asks them to think about how their lives are different from the lives of their family members in the past. She then asks the pupils, in pairs, to compare ‘Then’ and ‘Now’. Younger pupils write two/three sentences using words from the board. Older pupils write a short paragraph.
Activity 1: Oral interviews about childhood
- First organise your pupils into pairs. Then tell them to think of some questions they can ask an older person about his/her childhood. Give the pupils time to think up their questions and tell them how long they have to do this task – maybe two or three days. If you have younger pupils, you could work together to make up three or four questions they could remember and ask at home.
- When they have asked the questions at home, ask the pupils to share their information with their partners.
- Then ask each pair of pupils to join with another pair and share what they have found out.
- Now ask each group of four to complete a table to show how life has changed.
| Older person | Me |
I would travel to market by donkey
| I travel to market by bus |
| |
|
- Discuss with the whole class how life has changed since their parents and/or grandparents or other older people were children. Pose questions that encourage them to reflect on why such changes have taken place. (Key Resource: Using questioning to promote thinking can help you think of the kinds of questions you need to ask to stimulate pupils. You could note some of these down before the lesson to remind you at this stage.)
Make a list of the key changes on the board.
2. Investigating a historical event
As well as using oral histories to find out about life in the past, you can use written records with your pupils.
In this section, we look at how different sets of records can help pupils build up their understanding of the past. In Activity 2 and the Key Activity, pupils explore written records of past events and conduct oral interviews with community members. How you organise and gather resources together is part of your role and advice is given on how you might do this.
Case Study 2: Using written records to explore past events
Mr Kaguri is a teacher of a Primary 6 class in Kanungu district, Uganda. The anniversary of Ugandan independence is coming up and he wants his pupils to think about the events that led up to it and some of the things that it led to.
He sends his class to the library where they read up on the events. A daily newspaper, The Monitor, has just published supplements about the granting of independence on 9 October 1962. Mr Kaguri reads from these to his pupils to stimulate their interest. These articles contain profiles of the lives of some of the people who were involved. He divides his class into groups and asks each group to take one of these people and to research and then write a profile of that person on a poster, for display in the school hall. The poster must include how they were involved and what has happened to them since.
Mr Kaguri’s pupils then plan to present their findings to the whole school. Their posters are displayed around the hall and some of the pupils speak at the assembly.
Resource 3: Ugandan independence gives some background information.
Activity 2: Researching an important date in history
This activity is built on a visit to a museum, in this case the UgandaMuseum, Kampala, but you could use a more local site or contact the education officer at the UgandaMuseum as there may be materials available to schools where museum visits are not possible. (If it is not possible for you to visit a museum, you could also collect together some newspaper articles, pictures and books to help your pupils find out for themselves about an event.)
Decide on a particular historical event that you wish your pupils to investigate during the visit to the museum (or in class if you have the resources), e.g. Resource 4: The exile of Ugandan Asians – a news report in 1972. It is important that you focus the attention of your pupils on a particular event, especially if they are visiting a museum covering many years of the past.
- Divide the class into groups, giving each a different issue or aspect of the historical event to focus upon.
- Discuss what kinds of questions they might need to find the answers to as they read and look at the exhibitions (if at museum) or materials (if in school).
Back in class, ask the pupils in their groups to write up their findings on large posters. Display these in the classroom or school hall for all to see.
3. Thinking critically about evidence
This part is intended to extend your ideas of how to help pupils use oral history as a resource for finding out about the past. You will encourage them to think critically about the validity and reliability of such evidence, and to compare oral testimonies of a historical event with written evidence of the same event. Investigating the similarities and differences in the two types of evidence provides an exciting learning opportunity for pupils.
Case Study 3: Collecting oral testimonies
Mrs Kasigwa teaches social studies to Primary 6 at a small school in the Jinja district. Many of the families have older members who remember or were affected by the expulsion of Ugandan Asians in 1972. Resource 4 gives some background information. Mrs Kasigwa has invited two Asians, who have returned to the country, to speak about their experiences. (See Key Resource: Using the local community/environment as a resource as this will help you plan and organise such a visit.) They will come on consecutive days as they have businesses and have to arrange for other people to look after them.
Mrs Kasigwa warns her class that these two people were children, one a teenager and one younger, when they left – their memories will be different from those of their parents and from each other. Before the guests arrive, the pupils prepare some questions that they want to ask. Over two days, the visitors come and tell their stories. The pupils listen carefully and ask them questions.
In the next lesson, Mrs Kasigwa and the class discuss the similarities and differences between the two accounts. They think about why the two visitors have different views on the events.
Mrs Kasigwa lists the key points that came out of their stories and also stresses that, when they were young, the journey to another part of the world might have been more exciting and less worrying than it would have been to their parents. She explains that while these oral histories may give pupils some understanding of the exile, they may not always be accurate, and the stories that different people tell may vary considerably.
Mrs Kasigwa believes her class learned a valuable lesson in the uses and problems of gathering oral evidence of history.
Key Activity: Comparing oral interviews and written texts
- With your pupils, identify an important historical event (such as a local feud or uprising) that took place in your area in the past. If you can, find a short written text about it. Resource 4 gives one example you could use if you cannot find another event.
- In preparing this activity, you need to gain an understanding for yourself (as a teacher) about what people in your community know about the uprising or event in question. These ‘memories’ are the oral stories that have been passed down from person to person. Identify some key people who your pupils could talk to at home or could come into school.
- Send your pupils out in groups to interview these older people. Ask the pupils to record ten key points made by each interviewee. (Make sure that pupils only go in groups and that they are safe at all times.)
- Back in class, ask your pupils to feed back their key findings.
- Ask each group to design a poster of the event, including the key events and using some of the visitor’s comments to give a feeling of what it was like to be there.
- Display these in class.
Discuss with your pupils whether they think they have enough clear evidence about what happened from the people they spoke to. If not, how could they find out more?
Resource 1: Oral history
![]() Background information / subject knowledge for teacher
Background information / subject knowledge for teacher
Introduction
We all have stories to tell, stories about our lives and special events that have taken place. We give our experiences an order and organise such memories into stories. These stories could, if collected together with other people’s memories of the same event, allow us to build up a clearer picture of what actually happened.
Your local community will be a rich source for exploring what happened at a particular event or what it was like to live there 20 years ago. Your pupils could investigate the Ugandan Civil War or some other more local event.
What is oral history?
Oral history is not folklore, gossip, hearsay or rumour, but the real history of people told from their perspectives, as they remember it. It involves the systematic collection of living people’s stories of their own experiences. These everyday memories have historical importance. They help us understand what life is like. If we do not collect and preserve those memories, then one day they will disappear forever.
Your stories and the stories of the people around you are unique and can provide valuable information. Because we only live for so many years we can only go back one lifetime. This makes many historians anxious that they may lose valuable data and perspectives on events. Gathering these stories helps your pupils develop a sense of their own identities and how they fit into the story of their home area.
How do you collect people’s stories?
When you have decided what event or activity you want to find out about, you need to find people who were involved and ask if they are willing to tell you their stories.
Contact them to arrange a time of day and tell them what you want to talk about and what you will do.
You need to record what your interviewee says. You can do this by taking notes by hand or possibly by tape recording or video recording.
Having collected your information or evidence, it is important to compare and contrast different people’s views of the same event, so that you can identify the facts from the interpretations that different people put on the same event. You could ask your pupils, in groups, to interview different people and then to write a summary of their findings to share with the rest of the class. These could be made into a book about your class’s investigation into a particular event.
Adapted from: Do History, Website
Resource 2: Possible interview questions
![]() Teacher resource for planning or adapting to use with pupils
Teacher resource for planning or adapting to use with pupils
Below are some questions to use with a visitor to find out about an event in the past or how they used to do things in the past. Areas you could explore include:
- growing food;
- traditional dress;
- traditional healing;
- building houses;
- education.
These three sets of starter questions will help you support your pupils in thinking of their own questions.
(1) Historial events
- What historical events took place when you were young?
- What did you wear when you went to a party or a wedding?
- Which event do you remember most?
- What do you remember about it?
- What happened? Tell me the story as you remember it.
- Who else was with you?
- Could I speak to them about this still?
(2) Games
- What games did you play when you were a child?
- How did you play these games?
- Who taught you to play these games?
- When did you play them?
- Where did you play them?
- What other activities did you enjoy?
(3) Growing food
- What vegetables and fruit did you grow?
- How did you grow them?
- Where did you grow them?
- What tools did you use?
- What did vegetables cost at the time?
- Where did you buy them? Which ones did you buy?
- What else did you eat that you liked?
- Do you still eat these foods?
Resource 3: Ugandan independence
![]() Background information / subject knowledge for teacher
Background information / subject knowledge for teacher
The first Europeans to visit Uganda were the British explorers John Hanning Speke and James Grant when they were searching for the source of the Nile in 1862. They were followed by Samuel White Baker and Charles George Gordon commanding Egyptian troops.
The Anglo-American explorer Henry Morton Stanley, welcomed by Kabaka Mutesa I (reigned 1852–1884), reported the king's eagerness to understand Christianity. Soon both Protestant and Roman Catholic missionaries were working in Buganda. Within a decade the factions they created caused a civil war.
Once isolated, the region became, by 1890, a major object of the European nations’ scramble for African territory. Britain, after securing German recognition of its rights, moved to secure Buganda. Frederick Lugard, working for the British East Africa Company, ended the civil disturbances, and his successors used the Bugandan army to help conquer the other kingdoms and tribes. By 1896, a British protectorate administration had extended its authority over most of the region, and the name Uganda was adopted.
Final details concerning the administration of Uganda were settled by a series of agreements in 1900, the most comprehensive of which guaranteed special status to Buganda, including the continuation of its social and political system. Britain's almost 70 years of rule in Uganda was thus a centralised European bureaucracy superimposed on a federation of kingdoms and tribes. This worked well until the independence movements of the 1950s, when Buganda demanded separation from Uganda. Only after Kabaka Mutesa II was exiled for two years in 1953 was it possible to proceed with developing a united government.
After much experimenting, a federal constitution was promulgated in April 1962. The Uganda People's Congress won the elections, and Milton Obote became prime minister. Independence was granted in October 1962.
Events after independence
Dissension continued, however, and in May 1966 Obote sent the army into Buganda and drove the kabaka into exile. He then proclaimed a new republican constitution, which formally abolished the kingships, and became Uganda's first president of a unitary government. Bugandan recalcitrance, a fall-off in the economy, and charges of corruption led to an army coup in January 1971. Power devolved upon the army commander, Idi Amin, who began eight years of misrule. He increased the size of the army, eliminated his political opponents, and began a reign of terror directed at the people of Buganda, Obote's Lango people, and their neighbours the Acholi.
He also expelled approximately 70,000 Asians from the country. By 1978, Uganda was bankrupt, and the government was dependent on massive loans from Arab states friendly to Amin. Uganda went to war with neighbouring Tanzania in late 1978, and Tanzanian forces allied with Ugandan rebels drove Amin from the country early the following year. Three provisional presidents served before elections under a new constitution were held in December 1980. Obote's party was successful, and he became president once again of a changed Uganda. Once thriving, the nation had become an economic disaster, with an inflation rate of more than 200%, no consumer goods, few jobs, rampant thievery, famine in the north, and no effective government in the countryside. In 1982, after Tanzanian troops had been withdrawn, antigovernment guerrillas became active, and thousands of young men were arrested, suspected of being guerrillas. Thereafter, more than 100,000 Ugandans were killed or starved to death.
The constitutional government was overthrown in July 1985 in a coup by Acholi army officers; Obote fled the country and settled in Zambia. The new Acholi-dominated regime had little popular support, and quickly fell apart. After four days of fighting in Kampala in January 1986, National Resistance Army leader Yoweri Museveni took over the government.
Since Museveni's ascension to power, Uganda's economy has prospered. Foreign investment has increased and many Asian Ugandans have returned to open businesses. Museveni forbade the creation and activity of political parties, believing that parties would form along ethnic lines and further divide the nation.
The early 1990s saw an upsurge in terrorism in northern Uganda, the home of Museveni's political enemies. In the mid-1990s hundreds of Ugandan soldiers and civilians were killed in attacks by the Lord's Resistance Army, a Christian fundamentalist rebel faction led by a former faith healer. A new constitution was adopted in 1995 that established a democratic, though non-party, system of government.
Despite unrest and dissent in the north, presidential and legislative elections proceeded as planned in 1996. Museveni won 74% of the vote in Uganda's first presidential elections in 16 years. Opposition candidates, forced to run unaffiliated with a political party and limited to one month of campaigning, claimed the vote was unfair, but the elections were widely endorsed by international observers.
Adapted from: Microsoft Encarta
Articles containing text from articles and programmes associated with the granting of independence in 1962 can be found at http://www.ugpulse.com (Accessed 2008).
An obituary to Dr Milton Obote can be found at http://news.bbc.co.uk/go/pr/fr/-/2/hi/africa/4353286.stm and others should be available from Ugandan newspaper archives.
Resource 4: The exile of Ugandan Asians – a news report in 1972
![]() Background information / subject knowledge for teacher
Background information / subject knowledge for teacher
1972: Asians given 90 days to leave Uganda
The Ugandan leader, Idi Amin, has set a deadline for the expulsion of most of the country's Asians. General Amin said all Asians who are not Ugandan citizens – around 60,000 – must leave Uganda within 90 days. The military ruler's latest statement amended his original expulsion order two days ago when he said all the country's 80,000 Asians had to go. Asians, who are the backbone of the Ugandan economy, have been living in the country for more than a century. But resentment against them has been building up within Uganda's black majority.
Expulsion surprises Britain
General Amin has called the Asians ‘bloodsuckers’ and accused them of milking the economy of its wealth. Up to 50,000 Asians in the former UK colony are British passport holders. In a broadcast, General Amin said he would be summoning the British High Commissioner in Kampala to ask him to arrange for their removal. The expulsion order has taken Britain by surprise. General Amin overthrew Uganda's elected leader in a military-backed coup last year but the British authorities had regarded him as a man they could work with.
Some British MPs have warned that letting more Ugandan Asians into the UK could raise racial tensions. They are urging the government not to take them in. MP Ronald Bell said Uganda's Asians had no real links to Britain. Mr Bell said: ‘They were either born in India or have retained close connection with India. They have no connection with Britain either by blood or residence.’
Adapted from original source: http://www.bbc.co.uk (Accessed 2008)
Section 3: Using different forms of evidence in history
Key Focus Question: How can you use mind mapping and fieldwork to develop historical skills?
Keywords: historical skills; mind mapping; fieldwork; investigations; history; maps
Learning Outcomes
By the end of this section, you will have:
- used pictorial maps to help pupils see the importance of the natural environment in human settlement patterns (see also Module 1, Section 2);
- used small-group investigations, including fieldwork, to develop pupils’ understanding of early African societies.
Introduction
In addition to looking at oral and written evidence, your pupils can also learn about the past from other sources, for example maps.
In this section, you will structure lessons and activities that will help pupils understand the factors that led to the emergence of strong African kingdoms in the past. It provides you with insight into the kinds of evidence and resources you can use.
It covers:
- using maps and other documents to examine factors in the natural environment that influenced the nature of the settlement and the kingdom;
- exploring the role of pastoral and agricultural practices in shaping African lifestyles and culture;
- exposing pupils to the material evidence that remains in and around settlements, which will help them examine how the past is reconstructed.
1. Thinking about the location of settlements
By looking at the local environment and the physical layout of the land, it is possible to think about why a community settled in a certain place.
Great Zimbabwe provides a good example. It is important that as a social studies teacher you understand a case like this, as it gives you the skills to relate these ideas to a number of different ancient African kingdoms and to your local setting. Using fieldwork, such as actual trips to a site, allows pupils to see for themselves why one place was chosen for settlement and why some developments survived longer than others.
Most settlements are where they are because the environment provides some kind of resource, such as water or trees, and/or the site provides protection from the elements and, in earlier times, from enemies. Villages and towns are often found near a stream or wood to provide water and wood for shelter and to burn for heat and cooking. By looking closely at your school’s local environment or your pupils’ home environment, whichever is easier, you can help them to begin to understand how settlements developed.
Maps from earlier times will show how a site has changed over time (this can build on the time walk activity from Module 2, Section 1).
Case Study 1: Investigating heritage sites
Ms Sekai Chiwamdamira teaches a Grade 6 class at a primary school in Musvingo in Zimbabwe. Her school is near the heritage site of Great Zimbabwe. She knows that many of her pupils pass by this magnificent site of stone-walled enclosures on their way to school. But she wonders whether they know why it is there. Ms Sekai wants to help her pupils realise that the landscape and its natural resources played an important part in people’s decision to settle in Great Zimbabwe.
She begins her lesson by explaining how Great Zimbabwe was a powerful African kingdom that existed between 1300 and 1450 (see Resource 1: Great Zimbabwe). She asks the pupils to consider why the rulers of this kingdom chose to settle in the Zimbabwe Plateau rather than anywhere else in Africa. A map is her key resource for this discussion (see Resource 2: Pictorial map of Great Zimbabwe). One by one, she points out the presence of gold, ivory, tsetse fly, water supply and access to trade routes on the map; she asks her pupils to suggest how each of these led people to establish the settlement where they did. As her pupils suggest answers, Ms Sekai draws a mind map on the board (see Key Resource: Using mind maps and brainstorming to explore ideas).
Ms Sekai is pleased at the level of discussion and thinking that has taken place.
Activity 1: Using a map to gain information about Great Zimbabwe
Before the lesson, copy the map and questions from Resource 2 onto the chalkboard or have copies ready for each group.
- First, explain what a key represents on a map. Then divide the class into groups and ask each group to analyse the key relating to the map of Great Zimbabwe. Agree what each item on the key represents.
- Ask your pupils why they think the people first settled here. You could use the questions in Resource 2 to help them start their discussion.
- As they work, go around the groups and support where necessary by asking helpful questions.
- After 15 minutes, ask each group to list their ideas.
- Next, ask them to rank their ideas in order of importance.
- Write down their ideas on the chalkboard.
- Finally, ask pupils to vote on which they think are the three most important factors.
With younger children, you could look at local features and ask them to think why people settled here.
2. Using mind maps to structure thinking about the past
In the past, cattle were always viewed as an important resource, and many farmers and communities still view cattle this way.
The purpose of Activity 2 is for pupils to investigate the traditional role of cattle in African societies using the local community as a source of information. They will then determine how much African farming societies have changed.
Case Study 2 and Activity 2 use mind mapping and a template to help pupils think about the task as they work together in groups to share ideas.
Case Study 2: Farming in the Mbarara district
There are many farmers living in the Mbarara district and many of the pupils in the school are children of farmers. Mrs Kanyesigye wants to investigate with her class how important cattle were to the lifestyle and culture of the early African farmers who settled in Uganda. She also wants her pupils to think about the extent to which African farming societies have changed. She plans to use the local community as a resource of information.
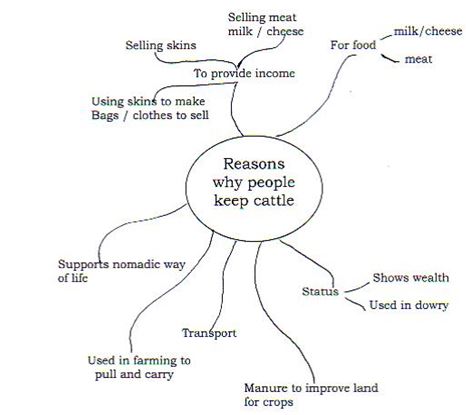
Mrs Kanyesigye begins her lesson by explaining the important role of cattle in early African societies. She draws a mind map on the chalkboard that highlights the importance of cattle, and what cattle were used for. (See Key Resource: Using mind maps and brainstorming to explore ideas and Resource 3: A mind map about keeping cattle to help you question your pupils.) The class discuss these ideas.
In the next lesson, in small groups with a responsible adult, the pupils go out to interview local farmers. Mrs Kanyesigye has talked with them beforehand to see who is willing to talk with her pupils.
The pupils had two simple questions to ask local farmers:
- Why are cattle important to you?
- What are the main uses of cattle?
Back in class, they share their findings and Mrs Kanyesigye lists their answers on the chalkboard. They discuss what has changed over the years.
Activity 2: Farming old and new
Before the lesson, read Resource 4: Cattle in traditional life – the Hima
- Explain to pupils why cattle were important to the people who live in Uganda.
- Ask them, in groups, to list reasons why people used to keep cattle.
- For homework, ask them to find out from older members of the community how keeping cattle has changed.
- In the next lesson, ask the groups to copy and then fill out the template in Resource 5: The role of cattle – past and present to record their ideas.
Share each group’s answers with the whole class and display the templates on the wall for several days so pupils can revisit the ideas.
3. Fieldwork to investigate local history
One way to reconstruct how societies in the past lived is to analyse buildings, artefacts, sculptures and symbols found on sites from a long time ago.
In this part, pupils go on a field trip to a place of historical interest. If this is not realistic for your class, it is possible to do a similar kind of task in the classroom by using a range of documents, photographs and artefacts. Pupils can start to understand how to investigate these and fill in some of the gaps for themselves about what used to happen.
Case Study 3: Organising a field trip
Mrs Kanyesigye has already explored with her pupils that the AnkoleKingdom was a powerful political empire with a strong ruler. Now she wants them to think about how we know this. As her school is near Mbarara, she organises a field trip. She wants the pupils to explore the seat of the capital of the Kingdom of Ankole at Kamukuzi, where the relics of the old palace can be seen and also the remains of the site of the Nkokonjeru Tomb.
At the site, the pupils take notes about what the remains look like. They also describe and draw some of the artefacts and symbols that can be found in and around the site.
Back at school, they discuss all the things they saw and list these on the chalkboard. Mrs Kanyesigye asks them to organise their findings under headings for the different types of thing they have seen. The pupils then discuss what they think the different sites were used for, based on what they looked like and the artefacts that were found there. Mrs Kanyesigye helps fill in the gaps by explaining aspects of Ankole culture and the meaning of some of the artefacts. The ideas are displayed and other classes are invited to see the work.
See Key Resource: Using the local community/environment as a resource.
Key Activity: Exploring local history
Before you start this activity, gather together as much information as you can about the local community as it used to be. You may have newspaper articles, notes of talks with older members of the community, names of people who would be happy to talk to your pupils.
- Organise your class into groups. Explain that they are going to find out about the history of the village using a range of resources. Each group could focus on one small aspect, for example the local shop, or church, or school.
- Look at the resources you have, if any, before going to talk to people.
- Give the groups time to prepare their questions and then arrange a day for them to go out to ask about their area.
- On return to school, each group decides how to present their findings to the class.
- Share the findings.
You could make their work into a book about the history of your local area.
Resource 1: Great Zimbabwe
![]() Background information / subject knowledge for teacher
Background information / subject knowledge for teacher
Great Zimbabwe, or ‘houses of stone’, is the name given to hundreds of great stone ruins spread out over a 500 sq km (200 sq mi) area within the modern-day country of Zimbabwe, which itself is named after the ruins.
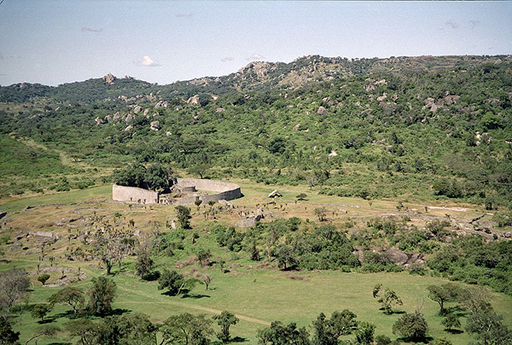
The ruins can be broken down into three distinct architectural groups. They are known as the Hill Complex, the Valley Complex and the famous Great Enclosure. Over 300 structures have been located so far in the Great Enclosure. The types of stone structures found on the site give an indication of the status of the citizenry. Structures that were more elaborate were built for the kings and situated further away from the centre of the city. It is thought that this was done in order to escape sleeping sickness.
What little evidence exists suggests that Great Zimbabwe also became a centre for trading, with artefacts suggesting that the city formed part of a trade network extending as far as China. Chinese pottery shards, coins from Arabia, glass beads and other non-local items have been excavated at Zimbabwe.
Nobody knows for sure why the site was eventually abandoned. Perhaps it was due to drought, perhaps due to disease or it simply could be that the decline in the gold trade forced the people who inhabited Great Zimbabwe to look elsewhere.
The ruins of Great Zimbabwe have been a UNESCO World Heritage Site since 1986.
More information can be found at https://en.wikipedia.org/ wiki/ Great_Zimbabwe
Resource 2: Pictorial map of Great Zimbabwe
![]() Teacher resource for planning or adapting to use with pupils
Teacher resource for planning or adapting to use with pupils
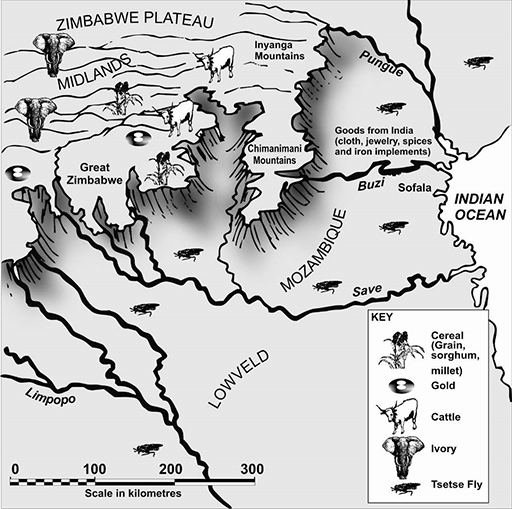
- Find Great Zimbabwe.
- Find the Zimbabwe Plateau. Why do you think the founders of Great Zimbabwe decided to build the settlement on a plateau?
- What natural resources were found in and around the region of Great Zimbabwe?
- Why were these resources important?
- What other environmental factors may have contributed to the people’s decision to settle on the Zimbabwe Plateau?
Original source: Dyer, C., Nisbet, J., Friedman, M., Johannesson, B., Jacobs, M., Roberts, B. & Seleti, Y. (2005). Looking into the Past: Source-based History for Grade 10. Cape Town: Maskew Miller Longman. ISBN 0 636 06045 4.
Resource 3: A mind map about keeping cattle
![]() Teacher resource for planning or adapting to use with pupils
Teacher resource for planning or adapting to use with pupils
Resource 4: Cattle in traditional life – the Hima
![]() Background information / subject knowledge for teacher
Background information / subject knowledge for teacher
Ankole (Nkole) is a large kingdom in southwestern Uganda, where the pastoralist Hima established dominion over the agricultural Iru some time before the 19th century. The Hima and Iru established close relations based on trade and symbolic recognition, but they were unequal partners in these relations. The Iru were legally and socially inferior to the Hima, and the symbol of this inequality was cattle, which only the Hima could own. The two groups retained their separate identities through rules prohibiting intermarriage and, when such marriages occurred, making them invalid. The name Hima actually comes from early Cushitic cattle herders who invaded the Bantu farmers. Being the elite, they identified with the tall, darker Nilotic invaders who came later from the north, like the Bito. Both these invading peoples settled down and took up the language of the earlier Bantu people. The Hima gave their name to a form of the Bantu speech they, along with their relatives the Tutsi, learned from the Bantu they conquered.
The Hima provided cattle products that otherwise would not have been available to Iru farmers. Because the Hima population was much smaller than the Iru population, gifts and tribute demanded by the Hima could be supplied fairly easily. These factors probably made Hima-Iru relations tolerable, but they were nonetheless reinforced by the superior military organisation and training of the Hima.
The kingdom of Ankole expanded by annexing territory to the south and east. In many cases, conquered herders were incorporated into the dominant Hima stratum of society, and agricultural populations were adopted as Iru or slaves and treated as legal inferiors. Neither group could own cattle, and slaves could not herd cattle owned by the Hima.
Ankole society evolved into a system of ranked statuses, where even among the cattle-owning elite, patron-client ties were important in maintaining social order. Men gave cattle to the king (mugabe) to demonstrate their loyalty and to mark lifecycle changes or victories in cattle-raiding. This loyalty was often tested by the king's demands for cattle or for military service. In return for homage and military service, a man received protection from the king, both from external enemies and from factional disputes with other cattle owners.
The mugabeauthorised his most powerful chiefs to recruit and lead armies on his behalf, and these warrior bands were charged with protecting Ankole borders. Only Hima men could serve in the army, however, and the prohibition on Iru military training almost eliminated the threat of Iru rebellion. Iru legal inferiority was also symbolised in the legal prohibition against Iru owning cattle. And, because marriages were legitimised through the exchange of cattle, this prohibition helped reinforce the ban on Hima-Iru intermarriage. The Iru were also denied high-level political appointments, although they were often appointed to assist local administrators in Iru villages.
The Iru had a number of ways to redress grievances against Hima overlords, despite their legal inferiority. Iru men could petition the king to end unfair treatment by a Hima patron. Iru people could not be subjugated to Hima cattle-owners without entering into a patron-client contract.
A number of social pressures worked to destroy Hima domination of Ankole. Intermarriage took place despite prohibitions, and children of these unions (abambari) often demanded their rights as cattle owners, leading to feuding and cattle-raiding. From what is present-day Rwanda, groups launched repeated attacks against the Hima during the 19th century. To counteract these pressures, several Hima warlords recruited Iru men into their armies to protect the southern borders of Ankole. And, in some outlying areas of Ankole, people abandoned distinctions between Hima and Iru after generations of maintaining legal distinctions that had begun to lose their importance.
Adapted from: Country Studies, Website
Cattle raising is still a prestigious occupation, generally reserved for people of Hima descent. A typical Hima herdsman will be out grazing his herd. His home is a group of huts. Before his marriage, he may share one with his mother, one is a kitchen, the others may belong to a brother with a wife and children. When the herdsman is to be married, his bride’s family select ten cows from his kraal. This is called okujugisa.
Ankole means ‘the land where milk and honey freely flow down the village paths’.
The Ankole cow is the symbol of the Mbarara district.

Adapted from: OK State, Website
The Ankole cattle are distributed from Lake Mobutu to Lake Tanganyika in eastern Africa. The original animals are thought to have been brought to northern Uganda by Hamitic tribes sometime between the 13th and the 15th centuries. The Ankole's susceptiblity to the tsetse fly forced the tribes and their cattle further south. The Hima or Bahima people settled on the shores of Lake Victoria in Uganda, Kenya and Tanzani. The Watusi or Tutsi people continued to Rwanda and Burundi with their cattle, some of which have spread to the lake districts of Zaire. All these groups select cattle based on horn size.
The small-uddered Ankole cows yield small amounts of milk but milking is an important ritual in some groups. A few groups use the cattle for work, none use them for meat. In general the animals are highly prized as status symbols, for ceremonial functions and not for their productivity.
Resource 5: The role of cattle – past and present
![]() Pupil use
Pupil use
| The role of cattle in the past | The role of cattle today |
| Cattle were important for:
| Cattle are important for: |
| |
| |
| |
|
Section 4: Understanding timelines
Key Focus Question: How can you use timelines and other sources to develop understanding of cause and effect?
Keywords: timelines; historical change; chronology; history; historical sources; debate
Learning Outcomes
By the end of this section, you will have:
- used timelines to represent historical change over time;
- helped pupils to identify the key events in a particular historical process;
- encouraged pupils to view history not just as a series of dates to be learned but as a process to be investigated;
- used a variety of sources to help pupils see that one event may have many causes.
Introduction
When developing an understanding of time past and passing, it is important to be able to sequence events into the order in which they happened.
Pupils often struggle with the concept of time. In this section, you will first help your pupils to divide time into periods that are more manageable and then, once they are able to do this, think about the order of events and why this is important. (With young pupils, this might be as simple as helping them order how they do certain tasks, leading on to more complex activities as their understanding grows.) You will then help your pupils identify the most important events in a particular passage of time. This can lead, with older pupils, into an analysis of cause and effect, and the understanding that there is usually more than one cause of an event.
1. Building a timeline
Investigating a particular period in history, and trying to sequence events in the order in which they happened, will help pupils begin to see the links between events and some of the possible causes. Understanding the causes of change in our countries and societies may help us to live our lives better.
The purpose of this part is to explore how using timelines in history can be a useful way to divide time into more manageable ‘bits’, so that we know which ‘bit’ or period we are dealing with. This is particularly important when we are teaching history, because it is crucial that pupils understand the idea of change over time.
From an early age, pupils need help to sort and order events. As they grow and experience life, they can revisit activities like these ones, using more complex sequences and events.
(Section 1 in this module used timelines to explore family history. You might find it helpful to look at that section if you have not done so already, particularly if you are working with younger pupils.)
Case Study 1: Ordering events
Ms Tetha Rugenza, who teaches history at a small school in Rwanda, wants to show her Grade 4 class how to divide up time into smaller periods. In order to do this, she plans a lesson where she and her pupils explore how to construct a timeline and divide it into periods.
Ms Rugenza decides to use the example of Rwanda. She draws a timeline on the board of the history of Rwanda. To help pupils understand the concept of periods, she divides the history of Rwanda into the pre-colonial, the colonial and the independence period. To give a sense of how long each of these periods is, she draws each period to scale.
She writes a list of important events, together with the date on which they took place, on separate pieces of paper and displays these on a table. Each event, she tells the class, falls into a particular period. She asks her pupils to work out which events fall into which period and in which order, doing a couple of examples herself. She calls out one event at a time and allows a pupil to come and stick it next to the appropriate place on the timeline. The rest of the class check that it has been put in the correct place. Through discussion, she helps the pupils if they are not sure where an event should go. She asks them if they can think of any other national events that should be placed on the timeline and adds them as appropriate.
Activity 1: Drawing timelines
Tell the class that they are going to make a timeline of the school year together.
- Start the lesson by asking your pupils to write down the most important events that have taken place in school during the year.
- Ask them to give each event a date if they can, or to find this out.
- Ask pupils to order these events from the beginning to the end of the school year.
- Help pupils to decide on how big they want their timelines to be and to create a scale accordingly.
- Ask pupils to mark out each month correctly in terms of their chosen scale and to write down the event dates on the left-hand side of the timeline – starting at the bottom of their timeline with the past, and working up to the present at the top.
- On the right-hand side of the timeline, ask pupils to write a short description of the appropriate event next to each date.
- Display the timelines for all to see.
(If you do not have enough resources for this to be done individually then it can be done in groups of up to five pupils.)
Discuss as a whole class whether there are some school events that could happen at any time of the year. Are there some that have to happen at a particular time? Why? (End-of-year exams, for example – why can’t they happen at the start of the year?)
2. Introducing the concept of chronology
The study of time and the order in which events took place over time is called chronology. This part explores how you can help pupils understand this sequencing of events, the relationship between the order events happen and the outcomes. In using these activities with pupils, you will realise the importance this has on their understanding of the past.
Case Study 2: Ordering events
Mr Barumba wants to show his Primary 5 pupils how chronology affects their understanding of events. He writes the following sentences on the chalkboard:
- A body of a man lies on the floor in the room.
- A man is arrested for murder.
- Two men go into the room.
- A man leaves the room.
- A man screams.
He asks the pupils to rearrange these sentences into an order that makes sense and to provide a reason for why they think the sentences should go in that particular order. Mr Barumba uses this exercise to show how important it is to place events in a logical order.
However, he also wants pupils to begin to see the connections between events, and how one event influences another. He tells the class about the events in Uganda since independence from British rule to the present democratic rule. (See Resource 1: Some important historical events since independence.) Using some of these events, he and his pupils construct a timeline on the chalkboard. He has selected a short section of Resource 1 so that his pupils are not confused by too much information. He cuts these events up into strips and asks his pupils to put them in date order. He asks his pupils if they can identify the most important events that changed the course of Ugandan history.
Mr Barumba is pleased that his pupils are beginning to see chronology as the first step in explaining why things happen.
Activity 2: Identifying key events
Give pupils, individually or in groups, a copy of a story from a local newspaper; or you could read the story to them and ask them to make notes as they listen; or you could copy the story onto the chalkboard for pupils to read. Choose the story for its interest and the sequence of events it contains. See Resource 2: The rise and fall of Idi Amin for an example of an account that you might like to use.
Ask pupils to:
- read through the story;
- underline what they think are the important events that took place;
- using the events that they have underlined, create a timeline. Remind them about the importance of listing the events in order;
- mark on their timeline the event they believe is the key event;
- explain below the timeline why they have chosen that particular event as most important. In other words, how did that event cause later events?
share their answers and, by discussion, agree the key event and then discuss whether or not this key event was the only cause of later events.
3. Comparing African histories
Timelines can help us compare the similarities and differences in a series of events for different people, or different groups, or different countries.
For example, if your pupils drew timelines for themselves, there would be some events the same (starting school) and others different (birth of baby brother or sister for example).
Using timelines to compare the history of a variety of African countries during the time of moving to independence can help your pupils see common themes but also differences between their experiences.
Case Study 3: Examining the passage of different African countries to independence
Mrs Okot organised her class to work in groups to make a comparative multiple timeline that helped them to learn about the experiences of their own and other countries’ journey towards independence.
For each country that she chose she made a long strip of paper (she did this by sticking A4 pieces of paper together, one piece equalling five years). See Resource 3: African timelines template.
This would enable the groups, when finished, to place one under another to allow for easy comparison.
With her own books, and books and other materials borrowed from a colleague in a secondary school, the groups carried out their own guided research to find out the major events for each chosen country and then wrote each event in at the correct time on the chart. (For younger classes you could provide the events and dates yourself to help them construct the timeline.) Resource 4: Key events in the move to independence provides examples of some key dates and also suggests websites where further information can be found if necessary.
Mrs Okot made the timeline for ‘World events’ as an example (World War II, independence for India, first flight in space, the Cold War, Vietnam War, the invention of the Internet, Invasion of Iraq etc.).
She made sure that each ‘country’ wrote ‘Independence’ in the appropriate time spot in another colour.
When all the groups had finished, she asked them to line up their timelines one under the other neatly. This enabled easy comparison between the countries.
Key Activity: Comparing the African experience
Follow the activity carried out in Case Study 3.
When the timelines have been completed, let each group introduce their country and talk through their timeline.
Prepare a series of questions for the class to answer, for example:
- What are the major events on the timelines?
- What similarities can you see between the experiences of different African countries?
- What are the major differences?
- Which countries were the first to gain independence and which were the last?
- Which countries have suffered most from internal wars since independence?
- What major events are soon to happen (e.g. South Africa hosting the World Cup in 2012)?
(This sort of work can easily be extended. Groups can carry on researching their designated countries to find out more about them: languages spoken; major industries; agriculture; cities and towns etc. They could draw maps of their countries and label them. There are many possibilities.)
Resource 1: Some important historical events since independence
![]() Background information / subject knowledge for teacher
Background information / subject knowledge for teacher
- 1958 – Internal self-government is allowed.
- 1962 (1 March) – Uganda begins self-government, with Benedicto Kiwanuka as prime minister.
- 1962 (9 October) – Uganda gains independence after nearly 70 years of British rule.
- 1962 Milton Obote leads Uganda to independence but establishes a dictatorship.
- 1962 (25 October) – Uganda is admitted as a member state to the United Nations.
- 1967 (8 September) – A new constitution comes into effect, which makes Uganda a republic.
- 1971 (25 January) – A former private in the Ugandan army, Idi Amin, seizes power in a military coup and overthrows Milton Obote. Amin declares himself president for life. Amin kills anyone who opposes him or who is perceived as a threat. Estimates of over 300,000 people, mostly Christians, were killed.
- 1972 (4 August) – President Idi Amin begins a three-month-long process to expel from Uganda 50,000 Asians with British passports. Many left almost everything they owned behind to be pilfered by Amin's henchmen and handpicked supporters. People without one day’s experience in running a business were made business owners by Amin. Their lack of experience and understanding in business only lead to further decline of the economy of Uganda.
- 1972 (17 September) – It is announced in Uganda that Tanzanian forces (later reported to be Ugandan exiles who opposed Idi Amin's government) have crossed the border and captured three Ugandan towns before being driven out by Amin's troops.
- 1972 (18 December) – Idi Amin nationalises 41 foreign-owned farms and tea estates, of which 34 were British. This eventually leads to the expulsion of all foreign business interests from Uganda, the effects of which are still felt today.
- 1976 (27 June) – Palestinian extremists hijack Air France flight 139 in Greece with 246 passengers and 12 crew. The flight eventually lands at Entebbe Airport, as Idi Amin's government alone offers them safe passage.
- 1976 (3/4 July) – Operation Jonathan takes place. Originally known as Operation Thunderbolt, this was the Israeli commando raid on Entebbe Airport led by Jonathan Netanyahu (the only commando who was killed and for whom the operation was later renamed) to free Israeli highjack victims from Air France flight 139.
- 1976 (27 July) – After four years of tension with the government of Idi Amin, Britain broke off diplomatic relations with Uganda. It had been 30 years since the British government had taken such a drastic step against another country.
- April 1979 – Tanzania invades Uganda, unifying the various anti-Amin forces under the Uganda National Liberation Front and forcing Amin to flee the country; Yusufu Lule installed as president, but is quickly replaced by Godfrey Binaisa.
- 1980 – Godfrey Binaisa overthrown by the army and Milton Obote becomes president.
- 1985 – Obote deposed in military coup and is replaced by Tito Okello.
- 1986 (26 January) – After years of civil war in which hundreds of thousands are either killed or displaced, Yoweri Museveni's National Resistance Army takes power. Under his leadership, Uganda has steadily achieved economic growth, the rebuilding of the shattered infrastructure, a free press and judiciary, and peace in most parts of the country.
- 1993 – President Museveni restores traditional kings, but with no political power.
- 1995 – New constitution adopted but maintains ban on political activity.
- 1996 (9 May) – Uganda holds its first presidential election in 16 years and President Yoweri Museveni wins in excess of 78% of the vote.
- 1997 (20 June) – Death of John Akii-Bua, Uganda's only Olympic gold medallist. He won the 400-metre hurdles at the 1972 Munich Olympics.
- 1997 – Ugandan Peoples Defence Force (UPDF = army) helps depose Mobutu Sese Seko of Zaire, who is replaced by Laurent Kabila.
- 1998 – UDPF again intervene in Zaire (newly named Democratic Republic of Congo) to help rebels seeking to overthrow Kabila.
- 1999 (2 March) – Rwandan Hutu rebels kill eight foreign tourists (gorilla trackers at Bwindi Impenetrable Forest) they had kidnapped the day before. The US government later arrest threerebels for this crime in March 2003.
- 2000 (17 March) – Nearly 500 members of the cult Movement for the Restoration of the Ten Commandments die as a result of fire at Kanungu in southwestern Uganda. It is later discovered that as many as 500 others had been previously murdered.
- 2000 – Ugandans reject multiparty politics favouring a continuation of President Museveni's ‘no-party’ system.
- 2001 (March) – Uganda classifies Rwanda, a former ally in the war in the Congo, a hostile nation due to fighting in 2000 between the two countries' armies in the Democratic Republic of Congo.
- 2001 – President Museveni wins another term, over rival Kizza Besigye by 69% to 28%.
- 2002 (March) – Uganda signs agreement with Sudan seeking to contain the rebel group, Lord's Resistance Army (LRA), active along their common border. (The LRA wants to run Uganda along lines of biblical Ten Commandments. Led by ‘prophet’ Joseph Kony they have kidnapped thousands of children and displaced many civilians.)
- 2003 (May) – Uganda pulls last of its troops from eastern Democratic Republic of Congo and tens of thousands of civilians seek safety in Uganda.
- 2003 (August) – Former Ugandan dictator Idi Amin dies in Saudi Arabia.
- 2004 (February) – LRA rebels slaughter more than 200 displaced people in the north.
- 2004 (December) – Government and LRA rebels hold their first face-to-face talks, but there is no breakthrough in ending the insurgency.
Adapted from original source: http://www.ugandamission.net/ aboutug/ histimeline.html
Resource 2: The rise and fall of Idi Amin
![]() Background information / subject knowledge for teacher
Background information / subject knowledge for teacher
1962 (1 March) – Uganda becomes a self-governing country under PM Benedicto Kiwanuka.
1962 (30 April) – Milton Obote takes over as prime minister of Uganda.
1962 (9 October) – Uganda becomes an independent state within the BritainCommonwealth.
1963 – PM Obote abolishes Uganda's status as a Commonwealth realm and replaces the post of governor-general with a figurehead presidency. Edward Mutesa, king of the Buganda region, is elected president in rigged elections.
1966 (2 March) – Milton Obote stages a coup against President Edward Mutesa and has himself declared president of Uganda.
1966 – President Obote of Uganda makes Idi Amin military chief of staff.
1966–1986 – For two decades, Ugandans live under the rule of Idi Amin and Milton Obote.
1971 (25 January) – Idi Amin leads a military coup that seizes power while President Obote is at a summit in Singapore. Obote seeks refuge in Tanzania.
1971 (2 February) – Idi Amin assumes power in Uganda.
1971 (20 February) – Major General Idi Amin Dada appoints himself president of Uganda.
1972 (4 August) – President Idi Amin gives some 50,000 Asians 90 days to leave the country following an alleged dream in which, he claimed, God told him to expel them.
1972 (18 September) – Thousands of Gujarati Indians begin arriving in Britain following their expulsion from Uganda by Dictator Idi Amin. Deprived of its business class the nation soon plummets into economic chaos.
1974 – The documentary film General Idi Amin Dada: A Self Portrait is directed by Barbet Schroeder.
1976 (27 June) – An Air France airbus is hijacked in Germany and taken to Uganda.
1976 (3 July) – Israel launches its daring mission to rescue 103 passengers and Air France crew members being held at Entebbe Airport in Uganda by pro-Palestinian hijackers.
1976 (4 July) – Jonathan Netanyahu, brother of Benjamin, leads and is killed in an Israeli raid called Operation Thunderball that rescues the hostages held at Entebbe Airport in Uganda. The raid frees all but three of the 104 Israeli and Jewish hostages and crew of an Air France jetliner seized by pro-Palestinian hijackers. 20 Ugandan soldiers, one Israeli officer, three hostages and seven hijackers died. The hijacking was linked to Carlos the Jackal, aka Ilich Ramirez Sanchez.
1976 (9 July) – Uganda asks UN to condemn Israeli hostage rescue raid on Entebbe.
1977 (16 February) – Janani Luwum, the Anglican archbishop of Uganda, and two other men are killed in what Ugandan authorities said was an automobile accident.
1977 – Henry Kyemba, a former Uganda minister in Idi Amin’s government, authored in exile A State of Blood, a description of his years as a minister under Amin.
1978 (30 October) – Ugandan troops attack Tanzania.
1978 - Uganda under Idi Amin goes on to annex a 700-square-mile section of Tanzania. President Nyerere sends Tanzanian soldiers and Ugandan exile volunteers to push back Amin's forces.
1979 (11 April) – Idi Amin deposed as president of Uganda as rebels and exiles backed by Tanzanian forces seized control. Amin flees into exile in Saudi Arabia.
1979 (3 June) Amin flees to Libya.
1980 – Elections in Uganda return Milton Obote to power.
2003 – Idi Amin dies in Saudi Arabia.
Adapted from original source: http://timelines.ws/ countries/ UGANDA.HTML
Resource 3: African timelines template
![]() Teacher resource for planning or adapting to use with pupils
Teacher resource for planning or adapting to use with pupils


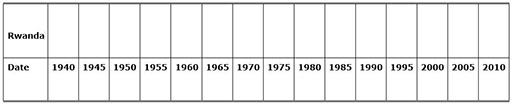
Resource 4: Key events in the move to independence
![]() Background information / subject knowledge for teacher
Background information / subject knowledge for teacher
| 1957 | Ghana becomes first independent black state in Africa under Kwame Nkrumah through Gandhi-inspired rallies, boycotts and strikes, forcing the British to transfer power over the former colony of the Gold Coast. | |
| 1958 | Chinua Achebe (Nigeria): Things Fall Apart, written in ‘African English’, examines Western civilisation's threat to traditional values and reaches a large, diverse international audience. | |
| 1958 | All-African People's Conference: Resolution on Imperialism and Colonialism, Accra, 5–13 December 1958 | |
| 1954– 1962 | French colonies (Francophone Africa) oppose continued French rule despite concessions, though many eager to maintain economic and cultural ties to France – except in Algeria, with a white settler population of 1 million. Bitterly vicious civil war in Algeria ensues until independence is gained in 1962, six years after Morocco and Tunisia had received independence. | |
| 1958 | White (Dutch-descent) Afrikaners officially gain independence from Great Britain in South Africa. | |
| 1964 | Nelson Mandela,on trial for sabotage with other ANC leaders before the Pretoria Supreme Court, delivers his eloquent and courageous ‘Speech from the Dock’ before he is imprisoned for the next 25 years in the notorious South African prison Robben Island. | |
| 1960– 1961 | Zaire (formerly Belgian Congo, the richest European colony in Africa) becomes independent from Belgium in 1960. Then, in Elisabethville (now Lubumbashi), ‘charismatic nationalist Patrice Lumumba was ... martyred in 1961, with the connivance of the [US] Central Intelligence Agency and a 30-year-old Congolese colonel who would soon become president of the country, Joseph Deséré Mobutu.’ (Bill Berkeley, ‘Zaire: An African Horror Story’, The Atlantic Monthly, August 1993; rpt. Atlantic Online) | |
| 1962 | Algeria (of Arab and Berber peoples) wins independence from France; over 900,000 white settlers leave the newly independent nation. | |
| 1963 | Multi-ethnic Kenya (East Africa) declares independence from the British. | |
| 1963 | Charter of the Organisation of African Unity, 25 May 1963. | |
| mid-60s | Most former European colonies in Africa gain independence and European colonial era effectively ends. However, Western economic and cultural dominance, and African leaders’ and parties’ corruption intensify the multiple problems facing the new nations. | |
| 1965 | Rhodesia: Unilateral Declaration of Independence Documents. | |
| 1966 | Bechuanaland gains independence and becomes Botswana. | |
| 1970s | Portugal loses African colonies, including Angola and Mozambique. | |
| 1976 | Cheikh Anta Diop (Senegal, 1923–1986), one of the great African intellectuals of the 20th century, publishes the influential and controversial book, The African Origin of Civilization, his project to ‘identify the distortions [about African history] we have learned and correct them for future generations’. | |
| 1980 | Zimbabwe (formerly Southern Rhodesia) gains independence from large white settler population after years of hostilities. | |
| 1970s–1980s | Police state of South African white minority rulers hardens to maintain blatantly racist and inequitable system of apartheid, resulting in violence, hostilities, strikes, massacres headlined worldwide. | |
| 1986 | Nigerian poet/dramatist/writer Wole Soyinka awarded the 1986 Nobel Prize in Literature. | |
| 1988 | Egyptian novelist and short story writer Nabuib Mahfouz awarded the 1988 Nobel Prize in Literature, the first prizewinning writer with Arabic as his native tongue. | |
1994 | The Hutus massacre up to a million Tutsis in Rwanda; then fearing reprisals from the new Tutsi government, more than a million Hutu refugees fled Rwanda in a panicked mass migration that captured the world's attention. | |
1996 | 500,000 of Hutu refugees streamed back into Rwanda to escape fighting in Zaire. | |
| 2001 | After 38 years in existence, the Organisation for African Unity (OAU) is replaced by the African Union. | |
Resource 5: Recording sheet
![]() Teacher resource for planning or adapting to use with pupils
Teacher resource for planning or adapting to use with pupils
| Why did the Aba women’s riot happen? Record your reasons here | |
|---|---|
| Source A | |
| Source B |
Section 5: Using artefacts to explore the past
Key Focus Question: How can you use artefacts and other evidence to explore local and national history?
Keywords: artefacts; evidence; group working; local history; environment; questioning
Learning Outcomes
By the end of this section, you will have:
- used artefacts to help pupils raise questions about and understand the past;
- developed lessons that allow pupils to think about their national history in relation to their own identities;
- involved local experts and the environment in your lessons to stimulate pupils’ interest in local history.
Introduction
Understanding who you are and having good self-esteem is enhanced if you have a strong sense of your identity and can see your place in the bigger pattern of life. Studying what happened in the past can contribute to this. Through the activities in this section, you will encourage your pupils to think about history as it relates to them. Using group work, inviting visitors into the classroom and using practical hands-on activities to investigate artefacts will allow your pupils to share ideas and develop their historical skills.
1. Discussing artefacts in small groups
Handling artefacts or looking at pictures of them provides a means for you to draw attention to both the factual aspects of history and the interpretation involved. Something that will help you in this work is collecting resources as and when you can. Often it is possible to find old utensils and artefacts from the home and in markets.
This part will help you to plan tasks for your pupils to think about how things that we use in our everyday lives have changed over time. For example, by looking at what we use for cooking now and what we used in the past, we can begin to think about how people used to live. We can compare utensils and, from this, speculate about what it would have been like to live in the past and use such artefacts. This will stimulate pupils’ thinking about themselves and their place in the local community and its history.
Case Study 1: Finding out about objects
Mr Ndomba, a Standard 5 history teacher in Mbinga township, Tanzania, has decided to use artefacts used in farming in his lesson to stimulate pupils’ interest and encourage them to think historically.
He organises the class into groups, giving each group an actual artefact or a picture of one. He asks the groups to look closely at their object or picture and to write as much as they can about it by just looking at it. His pupils do well, as they like discussion, and it is clear to Mr Ndomba that they are interested and enjoying speculating about their artefacts. (See Key Resource: Using group work in your classroom.)
After a few minutes, he asks each group to swap its picture or artefact with that of the next group and do the same exercise again. When they finish, he asks the two groups to join and share their views of the two pictures or artefacts. What do they think the artefacts are? What are they made of? What are they used for? How are they made? They agree on five key points to write about each artefact with one group doing one and the other group the second. Mr Ndoma puts the artefacts on the table with their five key points and makes a display for all to look at for a few days.
At the end of the week, he asks each group to write what they are certain they can say about the object on one side of a piece of paper and on the other side they write things they are not sure about, including any questions. For him, it is not so important that there is agreement on what the object is, but that there is lively, well-argued debate on what it might be used for and how old it might be.
Activity 1: Being a history detective using artefacts
Read Resource 1: Using artefacts in the classroom before you start.
- Ask your class to bring in any traditional objects that they have at home. Tell them that you want the object to be as old as possible, perhaps used by their grandparents or before. But remind them they have to look after it carefully so it is not damaged. Have a table ready to display them on when the pupils bring them in the next day.
- Explain to your pupils that they are going to be like detectives and piece together as much information and evidence as they can about their objects.
- Ask them, in pairs, to look at all the artefacts and try to name each one and make a list of them in their books. Just by looking and holding, ask them to note what they think each is made of, how it is made and what it might be used for. You could devise a sheet for them to use.
As a whole class, look at each artefact in turn and discuss the different ideas. Agree which idea is most popular and ask the person who brought the object in what they know about it. Or send them home with some questions to ask and bring answers back to share with the class the next day.
2. Welcoming visitors to enhance the curriculum
One of the purposes of teaching history to your pupils is to allow them to understand and discover their own and their community’s identity. As a social studies teacher, even of primary school children, you should always be looking for interesting ways of helping pupils understand this past, their history. Considering how local customs, everyday tasks and the objects used for them have changed helps builds this identity.
Case Study 2: Investigating traditional dress
Mrs Nsubuga has asked two older members of the local community to come to class in their traditional dress and talk about what has changed about traditional dress since they were young.
Before the visit, Mrs Nsubuga reads Key Resource: Using the local community/environment as a resource and, with her class, prepares for the visit. Once the date and time have been agreed, the pupils devise some questions to ask the visitors about what has changed over time.
On the day of the visit, the classroom is organised and the welcome party goes to meet the visitors. The class is excited but shy with the visitors. However, the visitors are so pleased to come and talk that everyone soon relaxes and there is much discussion about the dress they are wearing and the importance of each piece. The visitors also brought some traditional clothes that belonged to their parents for the children to see.
After the visitors have left, Mrs Nsubuga asks her pupils what they had learned that they did not know before, and she is surprised and pleased by what they remembered and liked about the event.
Activity 2: Exploring traditional crafts
This activity aims to put in place a frame that you, as a teacher, can use to conduct a classroom discussion about any aspect of social studies or history. In this case, we are looking at local artefacts and their traditional use.
- Arrange for your class to visit a local craftsperson or ask them to come to school to talk with your pupils about their craft now and how it used to be.
- Before the visit, you will need to organise the date and time and what you want to talk about, so the visitor can prepare what to bring.
- Next, with your class, decide what kinds of things they want to know and what questions they would like to ask about the artefacts that the visitor might show them or they might see on their visit. Maybe the visitor could demonstrate their craft for the class.
- On the day, tell your class to enjoy the visit and to be respectful to the adults.
- In the next lesson, discuss their findings and ask pupils, in groups of four, to choose one item, draw it and write what they can about it from memory and the notes they took. (See Key Resource: Using group work in your classroom.)
- Ask your pupils to put their work on the wall for all to read and see.
You may be able to organise a craft lesson with the visitor, so your pupils can try the particular crafts.
3. Interpreting evidence from artefacts
History is always about balancing subjective claims (peoples’ personal accounts and opinions) against objective (independent) evidence. When exploring artefacts, rather than oral or written evidence, the same balancing applies. There are definite things that can be said about a pot for example, i.e. its shape, what it is made of etc. Something like ‘what it was used for’ can only be speculation, based on what we use such pots for now. By looking at the pot carefully, consulting old drawings and paintings and talking to others, we can build up a more certain picture of how it was used.
This part explores ways of helping pupils question their thinking and understanding about artefacts.
Case Study 3: Interpreting historical events using letters as artefacts
Mrs Kadaga decides to use a book about the events of Idi Amin’s rule that started in 1971. She plans to use the book State of Blood: The Inside Story of Idi Amin by Henry Kyemba as the text for the lesson. She chooses a range of paragraphs of his account. After studying these accounts carefully, Mrs Kadaga realises that they are based on one person’s view, and thinks that it would be a good idea to compare them to more objective historical evidence in the lesson. Therefore, Mrs Kadaga gathers a range of documents, books and newspaper reports containing key events. She makes a summary of the key ideas to use in class.
First, she asks each group to read the chosen paragraphs from State of Blood and then asks them to look at her chart of key events and thoughts by respected historians and journalists. Do they see any similarities or differences in these accounts of the same event? They discuss whether the subjective accounts in the book can be supported by the objective historical evidence put forward by historians. They agree that both give insights. The book is one person’s account from one viewpoint, but the chart just has facts.
At the end, Mrs Kadaga summarises for her class the difference between subjective and objective evidence when looking at the past.
Key Activity: Displaying some of our history
- Ask your class to bring in any old items they have in their homes, such as traditional dress, old cooking utensils, woodwork, masks, bead and craftwork, pots etc.
- Remember that for your pupils things that are only 20 or 30 years old will seem very old. The important part of the exercise is for them to gather evidence about the artefact and, by looking at lots of old objects, to develop some idea of how to make sense of life in the past. If you can, make sure you have also collected some items, so that you can give to those who are unable to bring in anything.
- Ask your pupils, in pairs, to produce a sheet (see Resource 2: My artefact) to display with the artefact.
When the display is complete, ask other classes to visit your exhibition. You could even ask parents and the local community to come to see the exhibits. You may find out more from your visitors about some of your artefacts.
Resource 1: Using artefacts in the classroom
![]() Background information / subject knowledge for teacher
Background information / subject knowledge for teacher
The opportunity to handle actual artefacts is a unique experience. For some reason that no one is quite sure of, the act of touching an object, which obviously has its own history and story, inspires everyone. Pupils will inevitably be curious about the artefacts and this will naturally lead to good discussion.
Handling an artefact allows pupils to use their senses, develop questioning and problem-solving skills, strengthen their understanding of a period, and empathise with people from the past.
What is the purpose of an artefact handling session?
Artefact handling sessions can be used to:
- motivate pupils at the start of a new topic;
- attract and hold the attention of pupils;
- deepen their understanding of a topic they are studying;
- lead to an in-depth study within a broader unit of work;
- act as a bridge between several different subjects or units of study;
- assess pupils’ developing understanding at the end of a lesson.
What questions should I ask during an artefact handling session?
The type of question you ask will depend on what you are using the artefacts for. The questions below should help you get the most out of using the artefacts.
Questions about the physical characteristics of an object
|
Questions about the design and construction of an object
|
Questions about the importance and value of an object
|
Questions about the function of an object
|
Teaching with objects – some approaches
Many of the approaches detailed below can also be used when interrogating documents, prints and paintings with pupils.
Visual stimulus
Objects can be used to stimulate discussion at the beginning of a lesson. The same objects can be used to recap what pupils have learned and to see if any of their ideas and understandings have changed in the course of the lesson.
Historical inquiry
A selection of objects can be used by pupils for an exercise in historical inquiry – obtaining information from sources. Allow time for pupils to look at the object carefully before exploring some of the following questions:
- What is it made of?
- What tools or techniques were needed to make it?
- Who might have made it?
- Did making it require specialist skills?
- Is it decorated? How?
- Who might have used it?
- What was it used for?
- Did it have a practical function, or was it used in other ways?
- How large or heavy is it?
- Is it a valuable or rare object?
Drawing comparisons and relating objects to each other
Use two objects or images side by side and ask pupils to draw comparisons, exploring the similarities and differences. Use groups of objects and talk about the relationships between them.
Representations and interpretation
Some artefacts may show evidence of a particular viewpoint or bias. Who created the object and for what purpose? Is it an item of propaganda? Does it tell the whole story? What doesn’t it tell?
Other activities using objects include
Prediction activities – show pupils an object and ask them to work out which period of history it relates to.
Case study – pupils can use a single object or group of objects to build up a case study, for example, life in West Africa before the slave trade.
Groupings – pupils can group objects into sets that have particular things in common (such as the materials they are made from, the country they originated from, how they were used). Pupils can consider how to curate a museum display by grouping objects in different ways.
Caption or label writing – pupils can write their own captions or exhibition labels, either from a modern viewpoint or as if they were writing at the time the object was made.
Emotional intelligence – pupils can list adjectives that describe how they feel about an object, demonstrating empathy as well as understanding.
Creative responses – pupils can respond to an object through creative writing, drama or art.
Which subjects can benefit from using artefacts?
Learning from objects is beneficial to subjects across the curriculum:
- History: sense of chronology, empathy and key skills.
- Science: properties of materials, observation, comparing, classification and questioning skills.
- English: asking and answering questions, contextual materials.
- Drama: stimulus materials, developing empathy.
- Art and Design: stimulus materials, contextual materials, still-life drawing.
Resource 2: My artefact
![]() Pupil use
Pupil use