Use 'Print preview' to check the number of pages and printer settings.
Print functionality varies between browsers.
Printable page generated Friday, 10 July 2026, 10:17 PM
Lesson 1: Communicating
Introduction
Welcome to Lesson 1 of Everyday computer skills: a beginner’s guide to computers, tablets, mobile phones and accessibility. This lesson will allow you to practise some of the skills you already have and get you started on creating documents, setting up an email account and social networking. We begin by looking at adapting your computer to suit your access needs.
Key words and concepts are in bold. There is a course glossary you can refer to if any of these are unfamiliar to you.
This lesson is in four sections:
- Using a mouse and keyboard.
- How to create a document using Word.
- Setting up an email account.
- Social networking.
If you already feel confident on the basics, you can skip to the next section, or go straight to Lesson 2.
Learning outcomes
When you have completed this lesson, you will be able to:
use a mouse and keyboard
create documents using Microsoft Word or a similar program
set up an email account
identify different social networks.
1.1 Using a mouse and keyboard
Whether you are using a desktop computer or a laptop, you will need a mouse and a keyboard to communicate with your device.
If you already know how to use a mouse and a keyboard, please jump to the next section, ‘How to create a document using Word’.
Mouse
You use a mouse to move around the screen of your computer and tell it what you want to do. When you move the mouse, a pointer moves around the screen to show you where you are. This is also called a
Besides moving the pointer, a mouse can be used to make computer commands using actions: left-click, right-click, double-click, left-drag, right-drag, rotate wheel and press wheel.
Guide: How to use a mouse
DigitalLearn.org has a short visual guide on how to use a mouse.
You can turn on captions by clicking on the icon in the bottom left corner. A transcript is also available.
How to move an item from one location to another
Point to an item with your mouse pointer.
Press and hold down the left mouse button.
Move the item to where you want it on the screen.
Release the left mouse button.
How to copy and paste text
Left-click your mouse and run the pointer over the text you want to copy. You may select a word, a line, a paragraph or all the text in the document. Right-click your mouse and select ‘Copy’. Move your pointer to where you want the text to go, then right-click and select ‘Paste’.
You can also drag your mouse over text you want to delete, then right-click and select ‘Cut’.
Practise your mouse skills
There is a short activity on the Palm Beach County Library website if you want to practise your mouse skills.
Mouse alternatives
Touchpads
Laptops have integrated touchpads that you can use instead of a mouse, and it is possible to add a
- Tap one finger on the touchpad: Select an item (like a left-click on a mouse).
- Tap two fingers on the touchpad: Show more commands (like a right-click on a mouse).
- Swipe up or down with two fingers: Scroll a page up or down.
- Pinch or stretch out two fingers: Zoom in or zoom out (to make text or images bigger or smaller)
- Swipe up with three fingers: Show all recent activity and open Windows.
- Swipe down with three fingers: Minimise everything and show the desktop.
- Tap three fingers on the touchpad: Open
Cortana or search. - Tap four fingers on the touchpad: Open Action Centre.
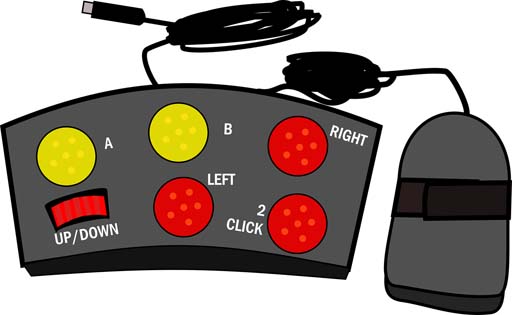
Some people find it difficult to use a standard mouse. The items below show some of the alternatives available, but new computer hardware is being developed all the time. Once you are confident using the internet, you can search for products that suit your needs.
A handheld finger trackball mouse allows you to hold and operate the mouse without having to place it on a surface. This means you can operate your computer from any position, including lying down or from a wheelchair.
A
A
Keyboard
A keyboard is like a typewriter. It allows you to type text and commands into your computer.
The largest key on the keyboard is the
Guide: How to use a keyboard
DigitalLearn.org has a short visual guide on how to use a keyboard.
You can turn on captions by clicking on the icon in the bottom left corner.
A transcript is also available.
Control commands
If you find it difficult to use a mouse, the keyboard has control functions that you can use to give the computer commands by pressing the Ctrl key and another letter at the same time.
The following list shows some of the most common control key commands:
Ctrl+A: select all items (such as text, images or a web address)
Ctrl+C: copy selected item
Ctrl+V: paste selected item
Ctrl+X: cut selected item
Ctrl+Z: undo previous action
Ctrl+Y: redo action
Ctrl+N: open a new window in your browser
Ctrl+B: make selected text bold
Ctrl+U: underline
Ctrl+i: italics.
Keyboard alternatives
Standard keyboards may not suit everyone.
| Impairment | Examples of adaptive technology |
|---|---|
Speech impairment |
Picture boards Speech-to-text software |
Hearing impairment |
|
Visual impairments |
Apeech output that scans book pages so the computer can read printed materials Screen reader or Read Aloud function Speech-to-text software that writes what you say Keyboards with enlarged keys or large print key top stickers Braille displays and Braille printouts |
Light sensitivity |
Brightness and contrast controls to adjust your screen |
| Mobility and other physical impairments | Flexible tabletops, monitors and keyboards Mouthpieces for typing Trackball and Sticky Keys that hold down the Ctrl and Shift keys Keyboards with enlarged keys Left- and right-handed keyboards Onscreen keyboards Head-controlled mouse and keyboard Software that translates Morse code Voice-activated systems that replace the keyboard |
If you are unable to use your hands, eye-tracking technology uses infrared signals to let the eye tracker know where your eyes are looking. You may have heard of Stephen Hawking (1942–2018), a famous physicist who lived with motor neurone disease. Hawking’s assistive technologies included a tablet computer mounted on the arm of his wheelchair, speakers and amplifiers with custom-built speech synthesisers, and a software speech emulator.
Activity 1.1: Keyboard and mouse alternatives
AbilityNet has a useful guide to different types of keyboards and mice. Its factsheet on keyboard and mouse alternatives gives details of some of the alternative devices available. It also gives information on adaptations you can make to standard keyboards and mice.
Take a few minutes to read through the alternatives and adaptations covered. Make some notes in the box below on some of the things that might make it easier for you to use the computer.
1.2 How to create a document using Word
A document is a collection of words. You can create electronic documents on your computer using a keyboard and software such as
Free alternatives to Word include the following:
Google Docs, if you have a Google account.
LibreOfficeWriter, for an
open-source word processing product.
WPS Office Writer, which has similar features to Microsoft Word.
In order to write a document, such as a letter or a job application, you need to install word processing software on your computer. Word may already be installed if you have a Windows computer. If not, you can buy it online from the Microsoft store. If you have a Microsoft account, you can get the online version of the Microsoft Office package for free.
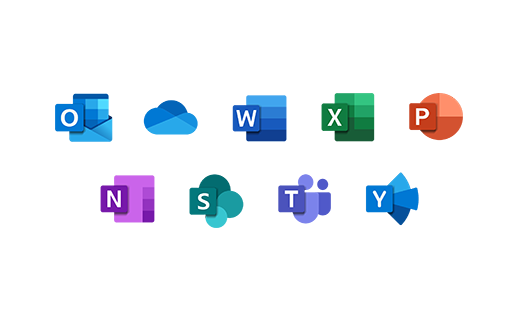
For the purpose of this lesson, we are only interested in Microsoft Word, middle icon on the top row.
Guide: Free online Microsoft Office package
An online version of the Microsoft package is available for free. This version does not have all Office features and you won’t be able to access your files without the internet. For the full package and to be able to use it offline, you’ll need to buy the software.
Ask Leo! explains how to get free Microsoft Office in Windows 10 in this short video. You can turn on captions by clicking on the subtitles icon in the bottom right corner of the video.
Opening your Word document
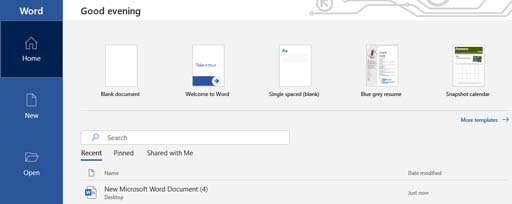
Once you have installed the software on your computer, open the program by double-clicking on its icon. You will see the options below. Click on ‘Blank document’ to get started.
Once you have opened your Word document, you can use your keyboard to write words in it. Use your mouse to position the pointer on your computer screen. Your mouse, or trackpad if you are using a laptop, allows you to select, click and perform actions on items in your document.
Spelling and grammar
Word has a built-in spelling check and grammar check that will automatically correct most mistakes. When Word is unable to recognise what you mean, it points out misspelled words by marking them with a red, squiggly underline. Grammar mistakes are marked with a blue double underline. If you right-click on the underlined text, Word will make suggestions to correct your spelling or grammar.
Word count
There is a status bar at the bottom left of the Windows screen that keeps a running count of the pages and number of words in the document. For example, it might say:
Page 3 of 7 550 words
How to save your document
Use your mouse to point to the ‘File’ tab in the top left corner and click to select. Word will reveal the panel below. It may look slightly different if you are using an older version of Windows. Click on ‘Save As’ to name your document and then save it.
 |
When you click on ‘File’, you will see a grey or blue panel similar to the image on the left. Click on ‘New’ if you want to open a blank document. Click ‘Open’ if you want to access a saved document. A saved document becomes a file. The ‘Info’ tab gives you access to useful information, such as the title of the file, the number of words and pages, the date it was created and other intricate data. The ‘Save tab’ is used when you wish to save what you have newly created into an existing document. ‘Save As’ is used when you want to first save what you have created and need to give your new document a name or title. Take note where you have saved the file so that you can find it later. Click ‘Print’ when the document is ready for printing. Word gives you the option to ‘Share’ your document with others. They will get an email from you with a link to your document. To ‘Export’ a file means to convert it into another format. For example, a Word file can be changed to a portable document format (PDF) file. Unlike Word, a PDF file cannot be modified without installing a specialist application, such as Adobe Acrobat. ‘Transform’ is a link between Word and another Microsoft program called Sway that allows you to produce multimedia documents. Click ‘Close’ when you are ready to close the document. |
How to name your file
When you click ‘Save As’, it will allow you to choose where you want to save your document. If you click on ‘Browse’, you will have options such as ‘Desktop’ and ‘Documents’. ‘Desktop’ here refers to the main area of your screen rather than the type of computer.
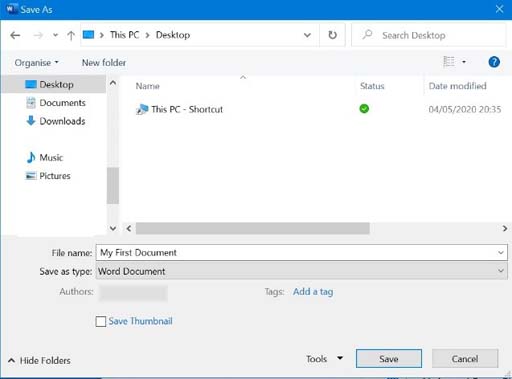
Give your document a title and type this into the ‘File name’ box. An example might be ‘My First Document’, as seen in the image below. You can choose any words you like but you can’t use punctuation in a file name.
The image below shows what the pop-up panel looks like when you save My First Document to your desktop. When you click on the ‘Save’ button, the file will appear on your desktop screen.
Printing your document
When your document is ready to be printed, click on ‘File’ and then click ‘Print’.Your computer needs to be connected to a printer.
Closing your document
To close your document, click on ‘File’ and go to ‘Close’ in the blue panel to the left of your screen. A small window will appear asking:
‘Want to save your changes to “My First Document”?’
If you don’t want to save any changes you have made to the document, click ‘Don’t Save’.
Formatting your Word document
Each time you open a Word document, you will see an assortment of words, icons and symbols at the top of the screen. This is called a toolbar and has three parts:
Tabs (top row).
Commands (middle rows).
Groups (bottom row).
Depending on which version of Word you are using, there will be up to 11 tabs. Tabs function as headings to help you navigate to different sections of Word.
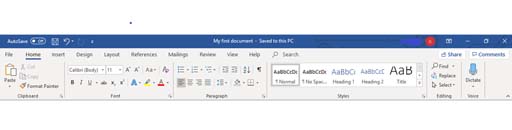
The ‘Home’ tab is the most essential in Word.
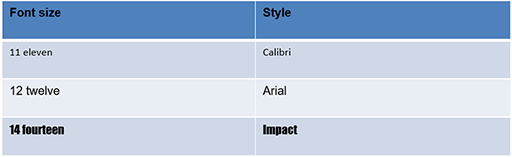
In the ‘Home’ tab you can make the text bold, underline it or use italics. You can choose a new font colour. You can also choose the font size and style as shown in the table below.
If you make a mistake
The undo command is in the top left corner of the screen. This is an arrow curved to the left. It undoes the last action you did in Word, such as typing, formatting or deleting text. You can also use Ctrl+Z (see Control commands). To redo what has been undone, click the arrow beside it coiled towards the right, or use Ctrl+Y. You can also drag your mouse over any text you want to delete, then right-click your mouse and select ‘Cut’, or press the Delete key.
Adjusting text size
To make all the text in the document larger and easier to read, use the slider function at the bottom right of your Word document. The default is usually 100% but may be smaller. Drag the marker to the right to enlarge text or to the left to make it smaller.
Speech options
If you prefer listening over reading, click on the ‘Review’ tab and go to ‘Speech’. Click on ‘Read Aloud’ and Word will read back what you have written.

Activity 1.2: Exploring Word
The best way to gain confidence with Word is to open a document and explore the tabs and commands. If you don’t have Word, you can use Google Docs or other similar software.
Click on the Word icon on your screen.
Use your keyboard to write a few sentences on what you think about Word so far.
Take note of your word count.
Has Word spotted any grammar or spelling mistakes?
Make some text bold, change the font colour and adjust the font size.
Save your document and give it a file name.
Close Word.
Discussion
Congratulations! You have successfully saved your first Word document.
1.3 Setting up an email account
Once you have set up your internet connection, sending emails is free.
You need to use an internet service provider (ISP) that allows your computer, or any mobile device, to connect to the internet. As well as being search engines, Google and Yahoo are
For this lesson, we have chosen Gmail to show you how to set up your free, personal email account. This will allow you to send and receive email messages.
The different parts of an email address
The first part is the unique username. This is something you can choose for yourself. You can use your first and second name or any combination of words and numbers. You may not be able to use your first choice if someone else already has that username.
The next part is the ‘@’ symbol (pronounced ‘at’). This indicates that this is an email address and not a website address.
The last part of an email address is the name of the email provider followed by something like ‘.com’, ‘.co.uk’ or ‘.org’. For example: username@gmail.com.
The part of the email after the dot tells you something about the organisation that owns it. For example, ‘.com’ is usually used by large, global companies like Google, ‘.org’ is often used by non-profit organisations and ‘co.uk’ is used by companies registered in the UK. Other countries have their own endings, such as ‘.fr’ (France) and ‘.ie’ (Ireland).
For example, Lead Scotland emails end in @lead.org.uk, which tells you they are a non-profit organisation based in the UK. The Open University emails end in @open.ac.uk which tells you that it is a university in the UK.
Setting up an account from your computer
To create an email account, you need to go to the email provider’s website. From Google’s home page (https://www.google.co.uk/), click on the blue ‘Sign in’ button in the top right corner. Select ‘Create account’. This takes you to the page shown below.
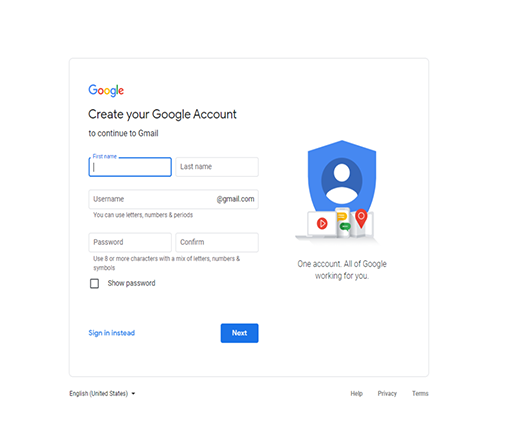
Complete the form to register your email account.
Enter your unique username and create a password.
Here’s an example:
| username | Jane.Lynch21 |
| password | OrangeLadderFlipper |
A password needs to be safe, secure and memorable. It needs to be easy for you to remember but difficult for others to guess. If you have to, write your password down then keep it in a safe place.
A strong password is long, and ideally contains a mixture of letters, numbers and symbols. It should be at least 10 characters long. We will talk more about creating strong passwords in Lesson 3.
To finish setting up your account, you need to agree to the terms and conditions of the email service.
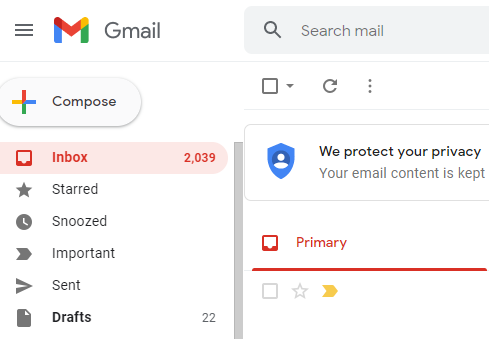
Accessing your email inbox
Once you have created an account, you will be able to access your inbox. Here you will find a welcome email from Google addressed to you.

Sending an email
When you click on the ‘Compose’ button in the top left corner of your inbox, a blank panel opens showing three important spaces:
‘To’.
‘Subject’.
‘Your message’.
Some email providers call this button ‘New’ instead of ‘Compose’, or use a paper and pen icon. Gmail may use a multicoloured ‘+’ sign.
‘To’ is where you insert the email address of the person you want to send your message to (the recipient).
‘Subject’ is where you type a brief description of what the email is about. The person you send it to will see the subject of the email before they open it. It will help them decide if they want to read the message, so make sure the subject is as clear as possible.
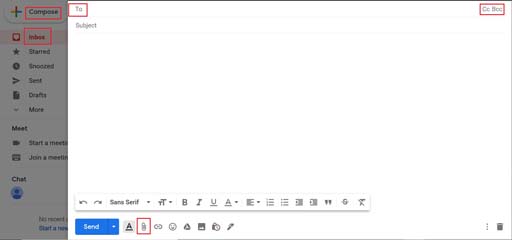
If you want to copy other people into your email, click on ‘Cc’ (carbon copy) in the top right corner. This opens a new space where you can type in email addresses. ‘Bcc’ (blind carbon copy) allows you to add people to your email without other recipients being able to see their email addresses.
The larger space below the ‘Subject’ line is where you type your message. Emails are usually set out like a letter but are generally less formal in tone and style.
Guide: Intro to email
DigitalLearn.org has a series of visual guides to setting up and using email:
You can turn on captions by clicking on the icon in the bottom left corner. A transcript is also available.
There is a short quiz at the end if you’d like to test your knowledge.
Activity 1.3: Setting up a Gmail account
Now have a go at setting up a Gmail account or other email service. Send yourself a message. Make some notes here about how you get on.
1.4 Social networking
In this section we will look at Facebook, Twitter and Zoom, which are platforms that support
They are also known as
Zoom |
|||
YouTube |
TikTok |
Viber |
|
Skype |
Snapchat |
Flickr |
Different platforms offer different features. Some enable you to create or join

Facebook has made communicating much easier. Instead of phoning one person to tell them your news, you can communicate with them and others by sharing it on Facebook. Some people find it easier to communicate online rather than face-to-face.
Signing up for Facebook
Go to https://www.facebook.com/ to sign up for Facebook. You will need to give them the following information:
First and last name.
Email address or mobile number.
Password (this should be different from your email password).
Date of birth.
Gender.
Click on the green ‘Sign Up’ button and you can start using your account straight away.
The sign-up page may look different depending on the device you are using.
| Advantages | Disadvantages |
Most popular social network Easily connect with friends and family around the world Join private or public Facebook groups with people who share your interests People can only ‘friend’ you if you approve their request Share information, images, videos and updates with all your Facebook friends at once Most businesses and organisations have Facebook pages you can like and follow Facebook Messenger enables private messaging, group chats and video calls |
The personal information you share may not be as private as you think Misinformation and illegal images can spread quickly through Facebook groups Some profiles on Facebook are fake and can be used to scam people If you have a lot of Facebook friends you may end up spending a lot more time online than you plan to |
Guide: Intro to Facebook
DigitalLearn.org has a series of visual guides to setting up and understanding Facebook:
You can turn on captions by clicking on the icon in the bottom left corner. A transcript is also available.
The Twitter timeline displays a stream of tweets from other users you have chosen to follow. They may be friends, celebrities or companies. In turn, other Twitter users can choose to follow you. When you access your timeline, you may choose to reply to the tweets you see, retweet them so your followers can read them, or ‘Like’ them.
| Advantages | Disadvantages |
|---|---|
Messages are short Like-minded people worldwide can communicate easily You can get the latest news You can follow different types of people by using lists Real names are not required Free speech and self-expression is allowed |
You may feel inundated with bad news or overwhelmed by the number of updates Fake accounts are a problem, despite crackdowns Accounts called ‘trolls’ and ‘bots’ can respond to tweets in nasty ways It can be used to divide and manipulate public opinion |
Signing up for Twitter
You can create a Twitter account in a few easy steps. Go to https://twitter.com/ and click on the ‘Sign up’ button. You will need to provide a username and phone number or email address. Your username does not have to be your real name.
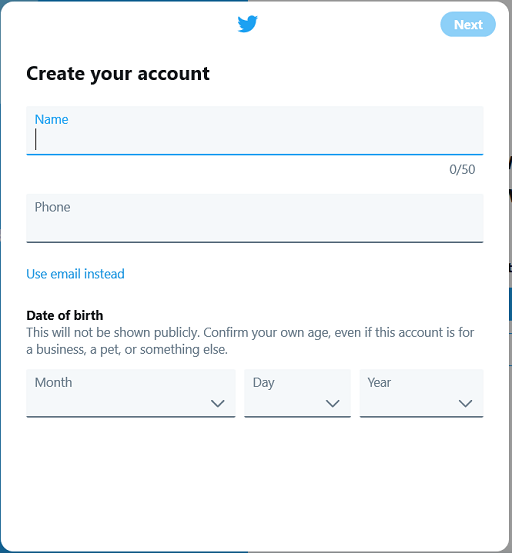
You may be asked to go to your email inbox to open an activation email. This will have a link you need to click on to open your account. The next step is to create a memorable password that has six characters or more (see Lesson 3 on creating strong passwords).
Your Twitter profile
You will be asked to add a profile picture, write a short biography, or bio (information about yourself), and choose which people to follow.
Twitter gives you the option to choose followers of a specific category or group, such as ‘Science and Technology’, ‘TV and Movies’, ‘Politics and Government’, ‘Sports’, ‘Music’ or ‘Entertainment’.
After creating your Twitter account, you can log in and make changes to your profile whenever you want. You can also synchronise your Twitter account with your email account or your accounts on other social networks, such as Facebook. Common Twitter terminology is explained below.
Twitter terminology. Adapted from metricool, ‘How to create a Twitter account’.
Tweet: To write a post of up to 280 characters and share it on Twitter.
Retweet: To share a tweet posted by another person and show it on your Twitter profile. When you ‘Retweet’, you can either share the tweet as it is or ‘Quote Tweet’. When you ‘Quote Tweet’, you can add your own comment with the tweet you quoted.
Followers: Users who follow your Twitter account so they can see your tweets in their timeline.
Hashtag: A word or string of words with no spaces preceded by the symbol ‘#’ that is used to identify specific topics.
Trending topic: Refers to topics receiving more comments and attention than others on the social network in a specific time period. Topics can trend in a specific country or at a global level.
Unfollow: When a user decides to stop following a particular account.
Twitter verified account: Some Twitter accounts have a blue tick, but this doesn't always mean that the account belongs to the person or company it says. Someone could be trying to imitate them.
Zoom
Zoom is software that enables people to have conversations over the internet, wherever they are in the world. Zoom calls are free and can be voice only or video calls.
A Zoom video call lets you see and hear the person or people you are talking to. You can make calls between two people or with a group. It is free to meet with one other device with no time limit, and you can meet for free with two other devices for up to 40 minutes at a time.
You can use the host or join functions to either start a call or join someone else’s call. You will need their meeting ID to join.
You can also send instant messages and share files, including text, video and audio, with other people. You can use Zoom on computers, tablets, mobile devices, games consoles, and smart watches.
You will need a webcam and microphone to make video calls. These are often built into laptops and desktop computers, but you can also buy them separately and connect them using a USB port.
There are other services that offer similar functions to Zoom, including:
FaceTime: comes free on iPhones, iPads and Mac devices. Can only be used to call other Mac users.
Messenger: comes with Facebook to enable private messages and calls, or you can download it as a separate app on your phone.
WhatsApp: download from your App Store to have free private messages, calls and video calls with other people that use WhatsApp.
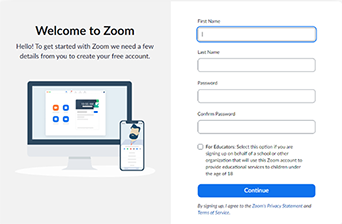
How to create a Zoom account
Head to https://zoom.us/.
Click on sign up, it’s free.

Enter your date of birth.
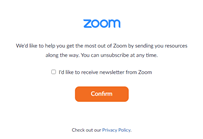
Enter the email address you’d like to sign up with and click confirm.
On the pop up that appears, decide whether or not you would like Zoom to send you their newsletter, and then click confirm.
Go to your email inbox and open the confirmation email Zoom has sent. Click Activate account.
Fill in your details on the webpage.
On the next page, there are a couple of options. You can start a meeting now or you can go to your account. It also shows you the link to your personal meeting room, which you can copy and send to people so that you can meet with them without needing to set up a meeting.

The first time that you go to your account, Zoom will prompt you to download Zoom’s desktop client. This is the software that allows Zoom to contact other accounts and actually hosts the meeting. Click download now to start this.
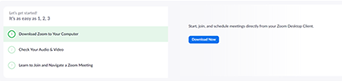
There are some useful video tutorials you can watch while this is downloading, which explain how to join and set up meetings. You can access these from your account, or by following this link: Zoom learning tutorials.
Lesson 1: Summary
In this lesson you learned how to use a mouse and keyboard, how to create Word documents and files, how to set up an email account, and how to join social network platforms. You considered how adaptive technologies can improve access for disabled people.
You looked at word processing software, specifically Microsoft Word, which allows you to save files on your computer. You learned how to open an email account so you can keep in touch with friends, family and organisations.
Finally, you considered three social networking platforms: Facebook, Twitter and Zoom. All three use the world wide web to enable us to connect with other people no matter where they are in the world.
Facebook encourages instant communication with friends and family, while Twitter allows you to post and receive tweets, or to follow, and be followed by, people you may not know. Zoom enables you to make audio and video calls, send instant messages, and share files.
Activity 1.4: Looking back on Lesson 1
Use this box to make notes on what you’ve learned in Lesson 1. Think about what was new to you and what you already knew.
Here are some ideas to get you started:
I can choose a mouse and keyboard that are right for me.
I know how to create a Word document.
I have opened an email account and sent an email.
I plan to start tweeting.
Resources
AbilityNet: makes a digital world accessible to all.
DigitalLearn.org: ‘Getting started on a computer’ (online course).
Lead Scotland: specialists in linking education and disability.
Learn My Way: free online resources to help develop your digital skills. You may have to register on the website to access some of their courses.
Useful videos
You can add captions to YouTube videos by clicking on the subtitles/closed captions icon. Please note that some of these YouTube videos may have adverts.
'How To Use Zoom Step by Step For Beginners' (Zoom Tutorial 2022).
‘Beginner’s guide to Microsoft Word' (Technology for Teachers and Students).
‘How Tobii Dynavox eye tracking works’ (Tobii Dynavox).
‘How to create an email account on iPhone’ (Payette Forward).
‘How to operate a webcam’ (Gadgets and Gears).
‘How to use Skype: making and answering calls’ (HowcastTechGadgets).
‘Solution showcase: alternative mice’ (JANinformation).
‘Stephen Hawking’s voice and the machine that powers it’ (Bloomberg QuickTake Originals).
‘Working together: people with disabilities and computer technology’ (TheDOITCenter).
You should now try the quiz for this lesson before moving on to Lesson 2.
Acknowledgements
Except for third party materials and otherwise stated (see terms and conditions), this content is made available under a Creative Commons Attribution-NonCommercial-ShareAlike 4.0 Licence.
The material acknowledged below is Proprietary and used under licence (not subject to Creative Commons Licence). Grateful acknowledgement is made to the following sources for permission to reproduce material in this free course:
Every effort has been made to contact copyright owners. If any have been inadvertently overlooked, the publishers will be pleased to make the necessary arrangements at the first opportunity.
Images
1.1 Foot mouse: Image by OpenClipart-Vectors from Pixabay
1.2 Microsoft icons: Microsoft
1.2 Microsoft Word home tab screen: Microsoft
1.2 Microsoft Word panel menu: Microsoft
1.2 Microsoft Word file save: Microsoft
1.2 Microsoft word toolbar: Microsoft
1.2 Microsoft word read aloud: Microsoft
1.3 Gmail logo: Google Gmail
1.3 Gmail inbox: Google Gmail
1.3 Gmail account: Google Gmail
1.3 Gmail Inbox: Google
1.3 pen and paper icon: https://icon-library.com/ icon/ compose-icon-22.html
1.3 Gmail draft message: Google
1.4 App icons: Image by Pixelkult from Pixabay
1.4 Social media word cloud: Image by kropekk_pl from Pixabay
1.4 Facebook logo: Image of Facebook logo. Image by Josh Borup from Pixabay
1.4 Twitter logo on card: Image by Gerd Altmann from Pixabay
1.4 Like icon: Image by Gerd Altmann from Pixabay
1.4 Twitter create account: Twitter
1.4 Twitter logo: Image by Josh Borup from Pixabay
1.4 Skype logo: Skype
1.4 Webcam: Image by Aksa2011 from Pixabay
1.4 Skype create account: Skype
1.4 Skype profile: Skype
1.4 Skype homepage: Skype
1.4 Skype contacts: Skype
1.4 Skype options icon: Skype
1.4 Skype contacts tab: Skype
1.4 Skype enlarge icon: Skype
1.4 Skype call: Skype
1.4 Skype hang up icon: Skype
1.4 Skype Add and share screen icon: Skype
1.4 Skype microphone icon: Skype
1.4 Skype video icon: Skype
1.4 Skype start icon: Skype
1.4 Zoom welcome: Zoom
1.4 Zoom start: Zoom
1.4 Zoom signup: Zoom
1.4 Zoom confirm: Zoom
1.4 Zoom download: Zoom