Use 'Print preview' to check the number of pages and printer settings.
Print functionality varies between browsers.
Printable page generated Thursday, 9 July 2026, 6:30 AM
2 Using technology for design thinking
2 Using technology for design thinking
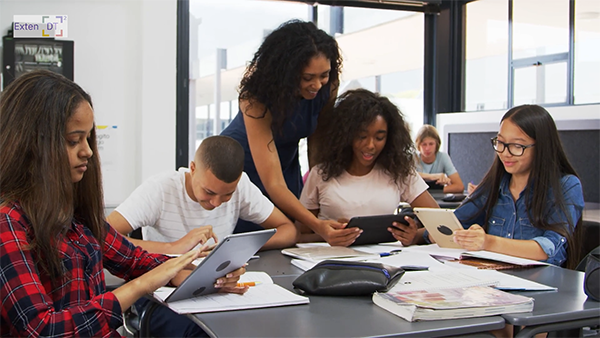
In design thinking activities for classroom environments, digital technologies can help both pupils and teachers carry out actions at different stages of the design thinking process.
Some technologies can speed up design thinking processes and help achieve tangible outputs. Creating and distributing an online form to users to understand needs and feelings at the ‘empathise’ stage of design thinking is a good example of this. In this case, the application that helps create the online form speeds up the process by enabling design thinking activity to reach several members at once, irrespective of temporal and spatial barriers.
This section introduces you to a number of popular design thinking models then focuses on the Exten(DT)² Digital Design Thinking Model, which has been designed to help teachers prepare and teach design thinking to students. You will also cover how emerging technologies can assist both teachers and students at different stages of design thinking activity.
Next, go to 2.1 The Exten(DT)² Digital Design Thinking Model.
2.1 The Exten(DT)² Digital Design Thinking Model
There are several models available that describe the process and stages of design thinking. Amongst the most popular are the:
- Stanford Design School Design Thinking Process
- Double Diamond model
- IDEO model.
These models help guide users through design thinking activity and facilitate design thinking projects. Video 1 is an overview of the five stages of design thinking.
Transcript: Video 1 The design thinking process
Design thinking is a five-step process to come up with meaningful ideas that solve real problems for a particular group of people. The process is taught in top design and business schools around the world. It has brought many businesses lots of happy customers and helped entrepreneurs from all around the world to solve problems with innovative new solutions.
Step 1: Empathize
The purpose of step one is to conduct interviews that give you an idea about what people really care about. We need to empathize with their situation.
For example, if you want to help old people, you might find that they want to keep the ability to walk around. In your conversations, they might share with you different ways they can do that. Later into the interview you'll want to dig a little deeper, look for personal stories or situations where things became difficult. Ideally, you redo the process with many people with the same problem.
Step 2: Define the Problem
Looking at the interviews, you can now understand the actual needs that people are trying to fulfill with certain activities. One way to do that is to underline the verbs or activities that the people mentioned when talking about their problems: like going for a walk, meeting old friends for tea, or simply going grocery shopping around the corner store. You might realize it's not so much about going out, but more about staying in touch. After your analysis, formulate a problem statement: “Some elderly are afraid to be lonely. The want to stay connected.”
Step 3: Ideate
Now focus only on the problem statement and come up with ideas that solve the problem. The point is not to get a perfect idea, but rather to come up with as many ideas: like unique virtual reality experiences, senior friendly hover boards or a modified pushcart. Whatever it is, sketch up your best ideas and show them to the people you are trying to help, so you get their feedback.
Step 4: Prototype
Now take a moment to reflect on what you have learned from your conversations about the different ideas. Ask yourself, how does your idea fit in the context of people's actual lives. Your solution could be a combination of a new idea and what is already being used. Then connect the dots, sketch up your final solution and go build a real prototype that's just good enough to be tested.
Step 5: Test
Now test your prototype with actual users. Don't defend your idea in case people don't like it, the point is to learn what works and what didn't, so any feedback is great. Then go back to ideation or prototyping and apply your learning. Repeat the process until you have a prototype that works and solves the real problem. Now you are ready to change the world or open shop.
To experience design thinking first hand, do the free virtual design thinking crash course from Stanford’s D-School right now. You will learn to design a new gift giving experience. Find the link and a guide for facilitators in the description below. After you are done, share your experience and gift idea in the comment To learn more about creative and critical thinking, check out our other sprouts videos. And if you want to support our channel, visit patreon.com/sprouts.
In this course you will learn about the Exten(DT)² Digital Design Thinking Model (Figure 1a and 1b) which has been developed to support teachers when applying design thinking in practice. It draws from existing models like the ones mentioned above, but it has been developed to use simple language and a set of prompting questions that are easy for students and teachers to understand and follow.
The Exten(DT)² Digital Design Thinking Model’s unique selling point is that it recommends digital applications that can be used at each stage of design thinking, enabling online implementation of design thinking activity. This is a sustainable approach to design thinking as students and teachers can work through different design thinking stages at any time and place, providing they have access to the internet. It can be particularly useful in situations when students are homeschooled or need to attend school remotely.
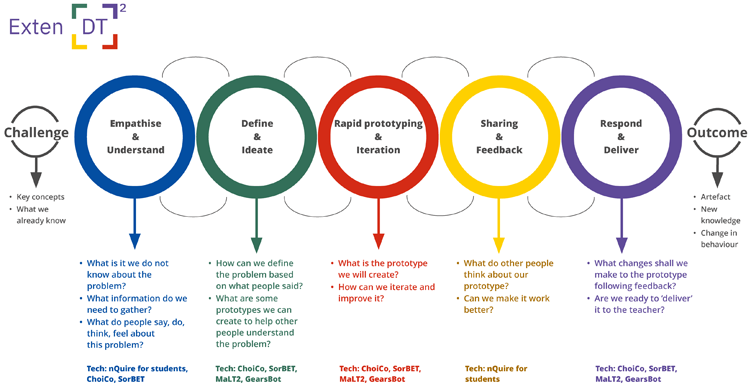
All the applications listed below that are mentioned in the Exten(DT)² Digital Design Thinking Model (Figure 1a and 1b) will be covered in Section 3 of the course.
- nQuire for students
- ChoiCo
- SorBET
- MaLT2
- GearsBot
Now view the interactive version of the model below (Figure 1b), which elaborates on each of the design thinking stages.
Click through the design learning stages in the model below to see more detailed descriptions of each stage displayed in the text box underneath.
Note: The proposed tools are suitable for, but not limited to, being used in the specific stages of the Exten(DT)² Digital Design Thinking Model.
2.2 Project example using the Exten(DT)² Digital Design Thinking Model

The Exten(DT)² Digital Design Thinking Model breaks down the process of design thinking into five different stages, as described below. The starting point of the process is for teachers or students to identify a challenge or a problem they would like to engage with and try to solve.
The example challenge in this case is:
How can a city be designed to function sustainably?
Empathise and Understand
Students are asked to survey people who live in their city and ask them questions such as whether they think their city is sustainable, how a city can become more sustainable (empathise). They can use an online application designed to support research activities (you will learn more about nQuire for students in Section 3.1). In addition, they can search online and find more information about this challenge. These sources of data should help students understand the specifics of the problem they are asked to examine.
Define and Ideate
Students in small groups or pairs read survey responses and concluded peoples thoughts about the challenge. Let's assume the issue they found is that people living in cities don’t believe that sustainable cities are important and therefore the ‘solution’ is a game that teaches them the importance of sustainable cities. The students decide to use an online application that creates online games, e.g. ChoiCo to teach others about the importance of sustainable cities − you will learn more about ChoiCo in Section 3.2.
To create the game, students need to define what information they will use in the game – these will be the parameters of the game – and how to come up with different ideas of games they could develop (ideate).
Rapid prototyping and Iteration
Students start creating rapid prototypes of their games using ChoiCo to test their games and improve them (iteration). As students work in groups, some students can create the prototype of the game and others can test it and improve it.
Sharing and Feedback
When game prototypes are ready, students are asked to share their games with other students beyond their group, either other students in their class or students across the school. The aim is to collect feedback from a relatively large number of students that can help them further iterate and improve their games.
To collect feedback, they can use an online application designed to support research activities (nQuire for students). They can ask students to play the game and answer questions based on improving the game, whether they liked it, and whether the game helped them to understand what makes a city more sustainable.
Respond and Deliver
This is the last step of the design thinking process. Students should read the feedback they received and make changes to their game accordingly (respond). When ready, they share the digital version of their game with their teacher for assessment (deliver).
The ending point of the process is the production of an outcome − this can be:
- a digital artefact like a game
- enhanced understanding of the importance of sustainable cities
- skills in developing and iterating games as well as research skills
- possible change of attitudes or behaviour as to what a student can do to contribute to a more sustainable city.
Now you’ve been presented with an example challenge and have covered each stage of the Exten(DT)² Digital Design Thinking Model in more detail, have a go at completing Activity 3.
 Activity 3 Exten(DT)² Digital Design Thinking Model
By picking out the key vocabulary at each stage of design thinking, summarise how you would explain each stage of the model to your students in no more that 200 words below.
Comment
You should use and explain words such as:
- empathise
- ideate
- rapid prototyping
- iteration
- survey
- feedback.
An example exercise could be giving students cards that define each key word, and to have these in front of them while they design their projects. You could use examples or analogies such as the cake analogy used in Section 1 to help students understand the meaning of each stage of design thinking.
Next, move onto 3 Digital technologies at each stage of design thinking.