Use 'Print preview' to check the number of pages and printer settings.
Print functionality varies between browsers.
Printable page generated Saturday, 4 July 2026, 10:42 AM
Labour and Delivery Care Module: 2. Assessing the Woman in Labour
Study Session 2 Assessing the Woman in Labour
Introduction
In the first study session in this Module, you learned how to tell if true labour has begun, about the four stages of labour, and the movements the baby makes as it descends through the birth canal. In this study session, you will learn how to assess the condition of a woman who is already in labour, the condition of the fetus, and how it is positioned in her uterus. We also want you to pay attention to giving ‘woman-friendly care’ which respects her beliefs and rights.
Labour will already have begun in almost all cases when you are called to a woman’s home or when she arrives at your Health Post. One of the most critical assessments you have to make in Labour and Delivery Care is at the time when you first attend a labour. Rapid early assessment is required so that you can decide on the care needed for the labouring mother, in case immediate referral or emergency measures are required. If all is well, you need to take the woman’s history in detail and conduct a physical examination in order identify the stage of labour that she has reached, and discover any information from her history that may affect the progress or outcome of her labour. This study session builds on the assessment and history-taking skills you developed during your study of the Antenatal Care Module.
Learning Outcomes for Study Session 2
When you have studied this session, you should be able to:
2.1 Define and use correctly all of the key words printed in bold. (SAQ 2.5)
2.2 Describe how you would conduct a rapid assessment of a woman in labour. (SAQ 2.1)
2.3 Describe the features of woman — friendly care during labour and delivery. (SAQ 2.3)
2.4 Describe the steps in history taking of a woman in the first stage of a normal labour. (SAQ 2.3)
2.5 Explain how you would palpate the abdomen of a woman in labour to assess the size, lie and presentation of the baby. (SAQ 2.2)
2.6 Explain how you would conduct a vaginal examination of a woman in labour to assess the progress of labour. (SAQ 2.4)
2.7 Differentiate between normal and abnormal findings during the assessment of a woman in labour. (SAQ 2.4)
2.1 Rapid evaluation of a woman in labour
On first seeing a woman who is already in labour, your immediate task is to make a rapid assessment of whether there is any cause for concern. Does she need an urgent referral for emergency care, or is her labour progressing normally at this stage?
2.1.1 What you must do for a rapid assessment
Things you need to have
- Her Antenatal Care Card (if she has been in your care previously); if she has come to you for the first time and she is already in labour, start a new health record for her
- Partograph for recording the progress of labour (you will learn how to use the partograph in Study Session 4).
- Sterile gloves
- Fetoscope to listen to the baby’s heart beat
- Thermometer to take the mother’s temperature
- Watch or other timer to help you measure the fetal heart rate and the mother’s pulse rate
- Blood pressure measuring cuff with stethoscope
- Swabs (3-4 balls of gauze soaked with antiseptic solution such as savlon (chlorhexidene 2-4%) to clean the perineum before doing a vaginal examination. You can prepare warm water and soap if you have no antiseptic solution.
![]() Never use alcohol to swab the genital area!
Never use alcohol to swab the genital area!
Sometimes a woman may come to you at the Health Post already in the second stage of labour. In this case, take her to the delivery couch immediately and make her as comfortable as possible. If you are seeing her at home, select an appropriate place and make it as clean and safe as you can in the available time. It is important to prepare in advance the equipment you will need for attending a delivery and keep it packed and ready at all times in case you are called to a woman who is close to giving birth.
The equipment for attending a normal delivery is described in Study Session 3.
Check her vital signs
- Blood pressure: normal values range between 90/60 mmHg to below 140/90 mmHg.
- Maternal pulse rate: normal range is 80-100 beats/minute, but should not be greater than 110 beats/minute in a woman in labour.
- Temperature: average 37oC; if it is between 37.5-38.4oC the woman has a low grade fever; if it is 38.5oC or above, she has a high grade fever.
You learned how to start IV fluids in Study Session 22 of the Antenatal Care Module and your practical skills training.
If one or more of these vitals signs is outside of the normal range, you should refer her immediately (Figure 2.1). If the values deviate a long way outside the normal range (and you have been trained to do so), refer her after you have begun an infusion of intravenous (IV) fluids.

Look at and listen to the woman
- Did someone carry her into the Health Post?
- Is there blood on her clothing or on the floor beneath her (Figure 2.2)?
- Is she grunting, moaning, or bearing down?

Ask her, or someone who is with her, whether she has now or has recently had:
- Vaginal bleeding
- Severe headache/blurred vision
- Convulsions or loss of consciousness
- Difficulty breathing
- Fever
- Severe abdominal pain
- Premature leakage of amniotic fluid (waters breaking early).
If the woman currently has any of these symptoms, immediately:
- Shout for help
- Stay calm and focus on the woman
- Stay with her — do not leave her alone
- Take immediate action to give the necessary pre-referral treatments and refer her urgently to the nearest hospital or health centre.
Management of complicated labours is covered in detail in Study Sessions 8-11 of this Module, including referral procedures and what to do on the journey to the health facility.
2.2 History-taking in labour
History-taking was covered in Study Session 8 of the Antenatal Care Module.
The best way to learn about a woman’s history is to ask her, but you must do this sensitively. At first, she may not be comfortable talking with you. If she feels shy about her body or about sex, it may be difficult for her to tell you things that you need to know about her health. Try to help her feel comfortable by listening carefully, answering her questions, keeping what she tells you private, and treating her with respect.
2.2.1 The importance of woman-friendly care
The principles of woman-friendly care are shown in Box 2.1.
Box 2.1 Woman-friendly care in labour and delivery
- It provides a service that is acceptable to the woman, which:
- Respects her beliefs, traditions and culture
- Considers the emotional, psychological, and social well-being of the woman
- Provides relevant and feasible advice.
- It empowers the woman, and whoever she wants to be with her during the labour, so that they can become active participants in her care. Your role is then to teach them how to care for her and keep them all informed about what is happening.
- It considers and respects the rights of the woman:
- Her right to information about her health and that of her baby
- Her right to be informed about the process of labour and deliver and what to expect as it progresses
- Her right to give or withhold her permission/consent for all examinations and procedures.
- It requires all healthcare staff to use good interpersonal skills and communicate clearly in language the woman can understand.
2.2.2 Recording socio-demographic data
If you have looked after the mother during her antenatal care check-ups, you will already know this information. If this is the first time you have seen her, record her name and her age: this is particularly important if she is a very young first-time mother, below 18 years of age, which is common in Ethiopia.
Also record her height if possible, or estimate it; this will help you to evaluate whether she is ‘small’ for the size of the baby, which may mean that she could have problems giving birth if the baby’s head cannot fit through her small pelvis.
You will learn more about ‘cephalopelvic disproportion’ in Study Session 9 of this Module.
Next ask her address, religion (if she chooses to share this information with you) and occupation (if she is in employment), and record it in the appropriate space in the chart.
Write down what is her main presenting symptom (her complaint), which in this case is usually labour pain (contractions), and a bearing-down sensation if she is already in second stage of labour.
2.2.3 History of past and present pregnancy
Ask about the number of previous pregnancies and births (if any) the woman has had, and about the current pregnancy. Box 2.2 shows you how to record the number of pregnancies and/or the number of births, using the traditional terminology. Gestational age is the number of weeks the fetus has been in the uterus; the average number of weeks at full term is 40, calculated from the date when the woman’s last normal menstrual period (LNMP) began.
Box 2.2 Gravidity and parity status
Gravidity is the total number of previous pregnancies, regardless of the outcome, including spontaneous miscarriage or abortion before 28 weeks of gestation.
- Gravida 1 or primigravida: first pregnancy
- Gravida 2: second pregnancy, etc.
- Multigravida: pregnant two or more times (number not specified)
Parity is the number of babies delivered either alive or dead after 28 weeks of gestation.
For women who can’t tell you the exact number of gestational weeks, any delivery they think was after about 7 months (30 weeks) counts in the parity number.
- Nullipara or Para 0: no pregnancy reached 28 weeks
- Primipara or Para 1: one birth after 28 weeks
- Para 2: two births after 28 weeks
- Multipara: two or more births after 28 weeks (number not specified)
- Grand multipara: five or more births after 28 weeks.
A woman comes to your Health Post in labour at full term. She tells you that she has previously given birth to two live babies (both at the gestational age of 40 weeks), and one dead baby (stillbirth) at 32 weeks. She also had a spontaneous miscarriage at 26 weeks. Record the gravidity and parity of this woman.
She will be Gravida 5: she has had 2 live babies + 1 dead baby at 32 weeks + 1 miscarriage at 26 weeks + 1 current pregnancy. She will be Para 3: she has given birth to 2 live babies + 1 dead baby after 28 weeks.
Estimating the expected date of delivery
You should also ask when was the first day of her last normal menstrual period (LNMP). This will help you to calculate the expected date of delivery (EDD) and the gestational age of the fetus. Calculating the EDD and gestational age will help you to identify whether the labour is preterm, term or post-term. Often women do not recall their LNMP; in such cases it is useful to ask her when she first felt her baby’s movement inside her (quickening or fetal kick). This occurs at approximately 18-20 weeks in primigravida mothers and 16-18 weeks in multigravidas.
2.2.4 Danger signs and symptoms
Ask her about any danger symptoms that she has noticed. (A symptom is something that a person experiences and can tell you about; a sign is something that only a trained health worker will notice, or can discover from an examination or test.)
Can you recall the danger symptoms in pregnancy from Study Session 17 of the Antenatal Care Module?
Danger symptoms include vaginal bleeding (heavier than show), persistent headache, blurring of vision, convulsions, loss of consciousness, epigastric or severe abdominal pain, fever, leakage of amniotic fluid before the onset of labour, and abnormal vaginal discharge. If she reports any of the above danger symptoms, refer the mother to the nearest health facility as soon as possible.
2.3 Physical examination in labour
When you physically examine a woman in labour, your focus will be on her abdomen, vagina and cervix, so remember to:
- Maintain her privacy
- Follow the principles of woman-friendly care (see Box 2.1)
- Examine her comprehensively (head to toe)
- Look for signs of anaemia (paleness inside the eyelids, pale fingernails and gums)
- Look for yellowish discoloration of the eyes (jaundice), which indicates liver disease.
2.3.1 Inspection of the abdomen
In order to memorise what aspects to inspect on the abdomen of a woman in labour, you can take the initial ‘S’ letters of the three points to look out for: size, shape and scars.
- Size: Is the abdomen too big or too small for the gestational age of the fetus? If it is too small, the baby may not have developed properly; if it is too big, the woman may have twins, or a condition called polyhydramnios (too much amniotic fluid). If the abdomen is either too big or too small, refer the mother to a health facility.
- Shape: Does the abdomen have an oval shape (like an egg — a little bit wider at the top of the uterus and narrower at the lower segment)? At near to full term, or in labour, this shape usually indicates that the baby is presenting ‘head-down’. If it is round like a ball, it may indicate an abnormal presentation (as you will learn below, and in Study Session 8).
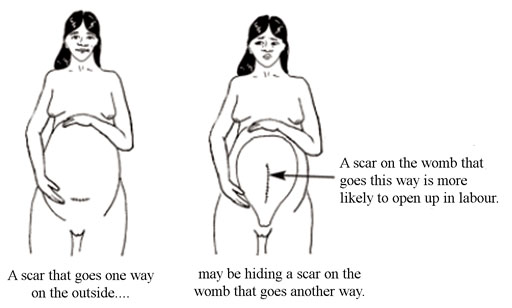
- Scar: Observe if she has a scar from an operation in the lower abdomen, from a previous caesarean delivery (Figure 2.3); the scar will usually be just above her pubic bone; if she has had surgery on her uterus previously, refer her to the nearest health facility. Scarring of the uterus puts her at risk of uterine rupture during the current delivery (as you will learn in Study Session 10).
2.3.2 Palpation of the abdomen
Palpation means feeling the abdomen with your hands in specific positions, or moving them in particular ways, using certain levels of pressure. Ask the mother to lie down on her back and bend her legs at the knees, with her feet flat on the bed. You need to be able to move around her: sometimes you will be palpating her abdomen while standing at her feet and looking up her body towards her head; sometimes you will be standing behind her and facing her feet; and sometimes you will stand beside her.
Can you recall the purposes of abdominal palpation in a woman in labour? (They are the same as during the pregnancy; see Antenatal Care Module, Study Session 11.)
Palpation helps you to assess the size of the fetus, its presentation (which part of the baby will ‘present’ at the cervix during delivery), and its position relative to the mother’s body (e.g. is it facing towards her front or her back).
There are four palpations of the abdomen, which are commonly referred to by midwives and doctors as Leopold’s manoeuvres. You need to do them in the correct sequence.
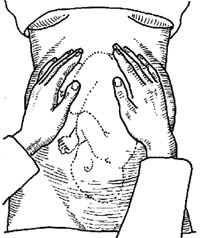
First Leopold’s manoeuvre: fundal palpation
Fundal palpitation means palpating the dome-shaped upper part of the uterus, called the fundus. During antenatal care, you should have been measuring the length of the uterus from the mother’s pubic bone to the fundus, and comparing this with the baby’s gestational age to see if it was growing normally. The purpose of palpating the fundus in a woman in labour is to discover how the baby is lying in the uterus.
Use the palms of both hands to palpate on either side of the fundus, with your fingers quite close together (see Figure 2.4). Feel whether the top part of the uterus is hard and rounded or soft and irregular. If the shapes feel soft and irregular and they don’t easily move under gentle pressure from your hands, then the baby’s buttocks are occupying the fundus (as in Figure 2.4) and it is ‘head-down’. This is cephalic presentation (cephalic means head). There are several different cephalic presentations, which you will learn about in Study Session 8. The most common, and the easiest for the baby to be born, is called the vertex presentation.
If you can feel a hard, round shape in the fundus, this is the baby’s head. In a woman who is already in labour, this means the baby is in the breech presentation (the buttocks are the presenting part). It is safest to refer a woman whose baby is in the breech position because the birth is likely to be more difficult and the risk of complications is higher. If the fundus feels ‘empty’, the baby may be lying diagonally or transversely across the uterus. The second manoeuvre will help to clarify this.
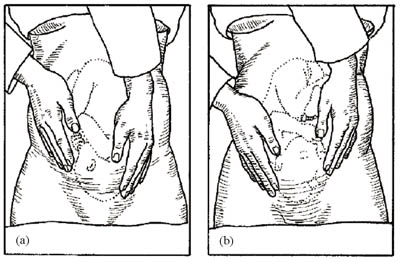
Second Leopold’s manoeuvre: lateral palpation
The second manoeuvre helps you to discover the fetal lie: is the baby lying longitudinally (straight), obliquely (diagonally across the uterus), or transversely (horizontally)? The longitudinal lie is normal (see Figures 2.4 and 2.5). A transverse lie in labour should be referred urgently; the baby cannot be born through the vagina in this position and may need caesarean surgery to deliver it.

Place your hands on either side of the middle of her abdomen. Push gently with one hand while holding the other hand firm to steady the uterus; alternate the pressure between your two hands. If you feel the round, hard shape of the baby’s head at one side, and the fundus feels empty, it may be a transverse lie and you should refer the mother urgently.
The second manoeuvre also helps to determine whether the baby is facing inwards or outwards. Note the regularity of the shapes you can feel under your hands. If you can feel a large smooth shape under one hand, this is probably the baby’s back, which means it is facing inwards (Figure 2.5a). In this starting position it is easier for the baby to begin the seven cardinal movements you learned about in Study Session 1 (look back at Figure 1.3). If you can feel small irregular ‘lumps’ under your hands, these are probably the baby’s feet, knees and elbows and it is facing outwards (Figure 2.5b). It is not so easy for it to rotate as it passes down the birth canal from this starting position.
Third Leopold’s manoeuvre: deep pelvic palpation
The third manoeuvre helps to confirm your earlier findings about the fetal presentation—is it cephalic or breech?
What is cephalic presentation?
The fetus is head down with its buttocks occupying the fundus (the upper part of the uterus).
Face the woman’s feet and place your hands on the lower part of her abdomen, with your fingers gently pressing inwards just above her pubic bone (see Figure 2.6). You are feeling for the presenting part of the fetus as it engages with the cervix. If it is hard and round, the presentation is cephalic; if it is softer and irregular, suspect a breech presentation.
You learned directional terms in anatomy, like anterior and posterior, in Study Session 3 of the Antenatal Care Module, Part 1.
You may also be able to confirm your findings from the second manoeuvre about whether the baby has its back towards you or not. If it does, this is called the occipito-anterior position: the occiput is the point at the back of the fetal skull, which is lying in the anterior position (Figure 2.6a), that is, towards the front of the mother. A baby that presents in the occipito-posterior position (Figure 2.6b) may encounter more difficulties during delivery.
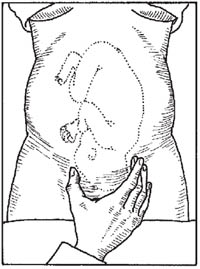
Fourth Leopold’s manoeuvre: Pawlick's grip
The purpose of the fourth manoeuvre (also known as Pawlick’s grip) is to help determine whether the fetal head (in a cephalic presentation) has descended into the mother’s pelvis and engaged in the cervix. (Engagement was explained in Study Session 1.) The extent of engagement is estimated by how many fingers you can grip the fetal head with (Figure 2.7). If all five fingers can grip the fetal head just above the mother’s pubic bone, the head is not yet engaged. When you can only grip it with the width of two fingers, the head is engaged.
2.3.3 Measuring fetal heart rate
Use a fetoscope or stethoscope to listen to the fetal heart rate immediately after a contraction. Listening to sounds inside the abdomen is called auscultation. Count the number of fetal heartbeats for a full minute at least once every 30 minutes during the active phase first stage of labour and every 5 minutes during the second stage. If there are fetal heart rate abnormalities (less than 120 or more than 160 beats per minute, sustained for 10 minutes), suspect fetal distress and refer urgently to a health facility, unless the labour is progressing fast and the baby is about to be born. (You will learn about fetal distress in Study Session 4.)
Auscultation is pronounced ‘oss-kool-tay-shun’.
2.3.4 Measuring contractions
To assess the frequency and duration of contractions, put your hand over the mother’s abdomen, around the fundus. You will sense the abdomen starting to tighten and become hard. The mother may make ‘pain’ sounds with the contraction. Count the frequency, i.e. number of contractions in 10 minutes, and the duration (the time elapsed during each contraction in seconds). You will learn how to record these measurements, the mother’s vital signs and your measurements of the fetal heart rate on a chart called a partograph in Study Session 4.
2.3.5 Vaginal examination
The functions of a vaginal examination are to:
- Determine if true labour has begun and the stage it has reached, based on measuring the dilatation of the cervix
- Assess the progress of labour in terms of the rate of increase in cervical dilatation and the descent of the fetus down the birth canal
- Identify the fetal presentation and position
- Detect any moulding of the fetal skull bones (the extent to which they overlap under pressure from the birth canal)
- Assess the size of the mother’s pelvis and its adequacy for the passage of the fetus
- Check the colour of the amniotic fluid.
In this study session, we will only focus on the first of these reasons for conducting a vaginal examination: assessing the stage of labour by measuring the dilatation of the cervix. All of the other functions of vaginal examination will be covered in later study sessions.
Assessing cervical dilatation
Wash your hands thoroughly with soap and clean water for two full minutes. Then put on new sterile gloves. Tell the mother what you are going to do. Vaginal examination is done using two gloved fingers. Try to collect all the information you need before withdrawing from the vagina, because once you have withdrawn your fingers you should not put them back in again.
Can you explain why not?
Putting your examining fingers back into the vagina could introduce infection.
In particular repeated vaginal examination causes infection: it should not be done more often than every 4 hours, unless there is a justifiable need (e.g. to confirm second stage of labour).
The woman should lie down on her back, bend her legs and open her knees. Gently swab the external genitalia with sterile gauze dipped in antiseptic solution. Separate the labia with two fingers on your non-dominant hand (the dominant hand is the one you write with). Dip your examining fingers (index and middle fingers) into an antiseptic lubricating cream and insert them very gently into the vagina, following the direction of the vagina, upwards and backwards. Ask the woman to take deep breaths and try to relax, as this will help to decrease the discomfort of the procedure.
Cervical dilatation is the increase in diameter of the cervical opening, estimated in centimeters. Dilatation happens after the cervix has effaced (the 3 cm length of the cervix has been drawn up into the uterus, as you saw in Figure 1.1 in the previous study session.) Estimating the diameter of the cervical opening takes practice. Activity 2.1 will help you.
Activity 2.1 Practice measuring cervical dilatation
Allow about 20 minutes for this activity. You will need a piece of hard paper or thin card, a ruler, compass (for drawing circles), pencil and scissors.
- Make 10 circles on the hard paper, with increasing diameters: 1 cm, 2 cm, 3 cm, etc. up to 10 cm.
- Leave a wide margin around each circle and cut the card into 10 squares of the same size.
- Remove the inside of each circle with scissors.
- Write the diameter of each circle on the card.
- Choose a circle and place one or both your examining fingers into the hole. Can you get both fingers into the hole? Then cover your eyes and try to estimate the diameter of the hole in centimetres.
- Try to estimate the diameter of each hole with your eyes closed. Then check to see if you are correct. Try this repeatedly.
From Study Session 1, what diameter will the cervix have reached when the labour progresses from (a) latent to active first stage? (b) active first stage to second stage?
(a) 4 cm; (b) 10 cm (fully dilated).
2.3.6 Assess the external genitalia and vagina
The final assessment we will describe in this study session is to check the mother’s external genitalia and the inner surface of her vagina for warning signs. Look carefully to see if there is:
In the Postnatal Care Module you will learn how to put ointment (tetracycline) in the newborn’s eyes to protect them from infection acquired from the mother’s birth canal.
- Any abnormal discharge (thick yellowish or white and foul smelling) from the vagina, or inflamed sores on the external genitalia, which may be due to a urinary tract infection or sexually transmitted infection.
- Vaginal scarring due to injury during a previous birth, or from female genital mutilation (circumcision). This increases the risk of a fistula occurring during labour (a torn opening between the vagina and other organs).
- Is there swelling in the vagina, and if there is, could it obstruct the passage of the baby?
If you see any of the signs above, you should refer the mother to a health facility, unless the labour is advanced and the baby is about to be born. In the next study session, we describe how to care for the woman in labour.
Summary of Study Session 2
In Study Session 2 you have learned that:
- Prepare your equipment for attending a labour and delivery in advance, so you are ready to go immediately if called.
- Make a rapid evaluation of the labouring woman’s vital signs (blood pressure, pulse rate and temperature).
- Follow the principles of woman-friendly care by respecting her beliefs, wishes and rights, and empowering her and her chosen caregivers to support the labour and delivery.
- Ask about and record the woman’s name, age, address, gravidity and parity, last menstrual period, when she first felt the fetus move, and how long since the first contraction.
- Ask about danger symptoms: vaginal bleeding, headache, convulsions, breathing difficulties, fever, severe abdominal pain or premature leakage of amniotic fluid (waters breaking).
- Use abdominal palpation using the four Leopold’s manoeuvres to determine the fetal presentation and position, and the extent of engagement of the presenting part.
- Do your vaginal examination of the woman in labour to assess cervical dilatation, fetal presentation and descent, the condition of the fetal skull, and signs of vaginal infection, scarring or swelling.
Self-Assessment Questions (SAQs) for Study Session 2
Now that you have completed this study session, you can assess how well you have achieved its Learning Outcomes by answering the following questions. Write your answers in your Study Diary and discuss them with your Tutor at the next Study Support Meeting. You can check your answers with the Notes on the Self-Assessment Questions at the end of this Module.
SAQ 2.1 (tests Learning Outcome 2.2)
Imagine that you are called to the home of a young woman. She is in labour. What do you immediately do?
Answer
You need to immediately undertake a rapid evaluation to decide whether there is any reason to refer the young woman for emergency care by:
- Checking the fetal heartbeat (is it within the normal range of 120-160 beats/minute);
- Checking her vital signs: blood pressure, pulse and temperature, to see if they are within the normal ranges (see Section 2.1.1)
- Looking to see if there any signs of bleeding or leaking of amniotic fluid
- Asking her (or someone with her) if she has a headache/blurred vision, difficulty breathing, convulsions, severe abdominal pain
If there are signs of fetal distress (heart rate outside the normal range), or any of the vital signs are outside the normal range, or if any of the danger symptoms are present, you should refer her immediately.
SAQ 2.2 (tests Learning Outcome 2.5)
You are using abdominal palpation as part of your physical assessment of labour for a mother in your care. Fill in the empty boxes in Table 2.1 below.
| Name of palpation | Area of the abdomen to be palpated | What you are checking |
| Fundal palpation | ||
| Hands placed flat on either side of the middle of the abdomen; first one and then the other pushes inwards | ||
| Facing the feet, with hands on the lower part of her abdomen, press inwards with your fingers just above her pubic bone | ||
| Whether the fetal head has engaged in the cervix - if you can only grip it with two finger — width above the mother’s pubic bone, the head is engaged |
Answer
| Name of palpation | Area of the abdomen to be palpated | What you are checking |
| Fundal palpation | With hands near the top of the mother’s abdomen, press your fingers around the fundus of the uterus | Fetal lie – whether it is lying longitudinally (normal), obliquely or transversely |
| Lateral palpation | Hands placed flat on either side of the middle of the abdomen; first one and then the other pushes inwards | An initial diagnosis of how the baby is lying and whether it is ‘head down’ or breech |
| Deep pelvic palpation | Facing the mother’s feet, with hands on the lower part of her abdomen, press inwards with your fingers just above her pubic bone | Confirmation of whether the presentation is cephalic (head down) or breech (bottom down) |
| Pawlick’s grip | Fingers grip the fetal head just above the mother’s pubic bone | Whether the fetal head has engaged in the cervix – if you can only grip it with two finger-widths above the mother’s pubic bone the head is engaged |
SAQ 2.3 (tests Learning Outcomes 2.3 and 2.4)
Makeda has come to your Health Post. You have done your initial rapid assessment, and there is no need for instant referral. You are now taking her history. How do you go about doing this and what information do you need to check with her?
Answer
(a) To take Makeda’s history you will need to make her feel comfortable talking to you. You do this by following the principles of woman-friendly care in how you put your questions, and by listening carefully, answering her questions and keeping what she tells you private (look again at Box 2.1 for all the details of woman-friendly care).
(b) Information that you need from Makeda:
- Her name, age, height, address, religion (if she is willing to tell you) and occupation (if she is employed).
- What is her ‘presenting symptom’ (e.g. labour pains, feelings of bearing down?)
- Whether she has had previous pregnancies and births (how many and whether there were any complications).
- When was the first day of her last normal menstrual period?
- Whether she has noticed any danger symptoms (e.g. vaginal bleeding, headache, abnormal vaginal discharge).
SAQ 2.4 (tests Learning Outcomes 2.6 and 2.7)
You now have Makeda’s history and are carrying out a physical examination. What do you do first and what are you looking for?
Answer
Before starting the vaginal examination remember to follow the principles of woman-friendly care and reassure Makeda about her privacy. Then wash your hands thoroughly and put on new surgical gloves. During the examination you check:
- The extent of cervical dilation
- The size of Makeda’s pelvis and the adequacy of the passage for the fetus
- The extent of any moulding (overlapping) of the fetal skull bones because of pressure from the birth canal
- Any abnormal, foul smelling discharge, any scarring, or swelling (all of these are warning signs and if you detect any refer Makeda to a health facility).
SAQ 2.5 (tests Learning Outcome 2.1)
Which of the following statements is false? In each case, say what is incorrect.
- a.A temperature of 39°C indicates a high grade fever.
- b.The gestational age is how old the mother is when she becomes pregnant.
- c.Parity is the number of babies delivered alive after 28 weeks of gestation.
- d.Gravidity is the total number of previous pregnancies regardless of the outcome.
- e.The three points to look out for when inspecting a women’s abdomen in labour are size, shape and scars.
- f.Fundal palpation is the drum-like beat you sometimes hear when listening to the baby’s heart with a fetoscope.
- g.Breech presentation indicates potential complications during delivery.
- h.Ausculation is the sound mothers in labour sometimes make.
Answer
- a.A is True. A high grade fever is a temperature above 38.5ºC (low grade fever is between 37.5-38.4ºC.
- b.B is false. The gestational age is the number of weeks the fetus has been in the uteral calculated from the date when the women’s last normal menstrual period (LNMP) began.
- c.C is false. Parity is the number of babies delivered either alive or dead after 28 weeks of gestation.
- d.D is true. Gravidity is the total number of previous pregnancies regardless of the outcome.
- e.E is true. An abdominal scar indicates the possibility of scarring of the uterus which increases the risk of uterine rupture.
- f.F is false. Fundal palpation means palpating the dome-shaped upper part of the uterus called the fundus to check the position of the fetal head.
- g.G is false. Breech presentation is when the buttocks are the presenting part indicating potential difficulties at delivery and the need for referral.
- h.H is false. Auscultation is listening to sounds inside the abdomen.