Use 'Print preview' to check the number of pages and printer settings.
Print functionality varies between browsers.
Printable page generated Thursday, 2 July 2026, 8:22 AM
Your first questions
1 Writing good questions and feedback
Start by recognising that writing questions that explore students’ understanding of their subject is a skilled activity. Add in writing feedback that enables students who respond incorrectly to correct their misunderstanding and the task grows … but so does the student engagement.
So on a pedagogic level good questions:
- Embrace the patience of computers in helping students establish the basic knowledge on which understanding can be built. For example before conversing in a foreign language it is essential to have a vocabulary.
- Test understanding not simply recall.
- Are presented in an engaging fashion, are written well, utilise different question types, include images and are laid out well. Please be aware that there is an ebb and flow to dialogue between student and computer in interactive questions that often requires a different writing style to that used in non-interactive texts.
- For formative assessment are preferably answered one by one with instant feedback. This arrangement encourages students to engage with the question and the feedback c.f. submitting say 25 responses at once where the student's eye goes straight to their overall score.
- Include targeted feedback for common mistakes that enable students to correct their misunderstanding.
- Give all students the correct final answer with reasoning.
It is necessary to differentiate the task of creating the question, response matching and feedback from the task of entering it into the computer. Just because Moodle provides forms which make it easy to enter certain question types into the computer, it does not follow that writing such questions is easy.
A Good question should be functionally correct:
- The question must be appropriately phrased such that the required answer can be readily handled by a computer.
- The question must be unambiguous.
- The response must be marked accurately.
- The feedback should reflect the marking.
- Common mistakes should receive targeted feedback especially if the question is interactive and the student has another try; if there is a useful explanation in the main teaching materials held elsewhere online then reference that explanation.
2 Writing your first True/false question
The True/False question is the simplest question type available but it contains the common question features of all questions and so is a good place to start.
The Figure shows the True/False question that you met in the Tour of the Moodle Quiz
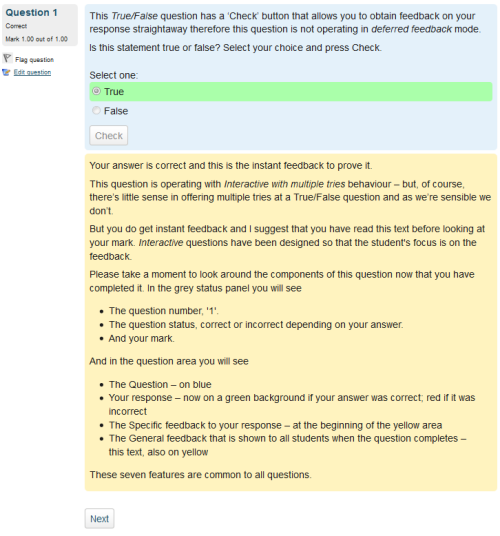
This question can be broken in three main sections.
- The question stem which is shown on a blue background.
- The user's interaction, here it follows the question.
- The feedback to their choice on a yellow background.
The next section shows how the authoring form supports this interaction and provides the information required to enable the status panel (the small grey box to the top left of the figure) to be completed with the mark.
2.1 Common question features
The True/False question shows the question features which are common to all questions. These are
- The question stem.
- The response matching.
- The feedback specific to each response.
- The general feedback which is shown to all users.
Question stem and general feedback
The question and the solution go naturally together and are presented together on the authoring form along with the marks available.

Current category: Store your question in a sensible category so that you can find it again.
Save in category: One of a variety of methods provided for saving/moving questions between categories.
Question name: A descriptive name is sensible. This name will not be shown to students.
Question text: You may use the full functionality of the editor to state the question. If you have already written your questions in Word you will find that Word's formatting and the editor are not directly compatible. Please copy your question text from Word then select the 'paste from Word' tool (the one with a ‘W’ on it) from the editor's tool bar. Then paste your text into the window that opens and select 'insert'. If you do not do this you are likely to paste in lots of formatting information that Word deems necessary but the VLE doesn't use, or worse that interferes with the VLE's own formatting.
Images may be included by clicking on the 'add image' icon; a tree. This icon allows you to upload images from your hard disk where they will be stored with the question. We recommend that images that appear within questions should not exceed 570 pixels wide so that the final quiz will fit nicely on a 1024 pixel wide screen.
Default mark: Decide on how to score your questions and be consistent. N.b. If you are asking a question that you do not wish to count towards the total score you should set the Default mark to zero. However you will still need to mark one response as correct with a Grade of 100%.
General feedback: We recommend that all questions should have this box completed with the correct answer and a fully worked explanation. The contents of this box will be shown to all students irrespective of whether their response was correct or incorrect. We do not recommend that authors rely on using the machine generated 'Right answer' (from the iCMA definition form) as this is:
- Written by a computer.
- Frequently not the full right answer.
- Cumbersome for some question types and non-existent for others.
Response matching and specific feedback
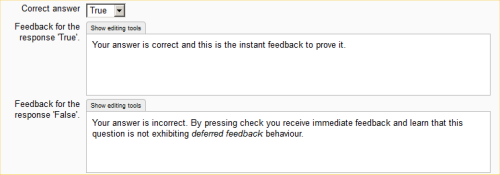
The format of these fields differs across questions. This example is from our True/False question example.
Correct answer: Either True or False.
Specific feedback: That is feedback that is specific to the response. In this instance to the possible answers of True and False.
Please spend a little time looking at how these parts of the authoring form come together to give the completed question shown in Figure 2.1. Pay particular attention to how the specific feedback and general feedback are made to read nicely when put together.
2.2 The Create. Preview, Edit cycle
Create your first True/False question
Now that you have seen how to do it please create your own True/False question.
Exercise 2.1 Create your first True/False question
- From the Question bank menu choose Questions.
- Change the 'Select a category' dropdown to 'Interactive'.
- From the 'Create a new question' chooser select 'True/False'.
- Complete the authoring form with your own question.
- When you have completed the form scroll to the bottom and click on Save changes. Your question is now saved and you are returned to the Question Bank.
Preview your first question
Having written your first question the next step is to 'preview' it. That is to look at it as your students will look at it.
Exercise 2.2 Preview your first question
- Preview your question by clicking on the magnifying glass icon alongside the question name in the question bank.
- Set How questions behave to 'Interactive with multiple tries'. (Clearly True/False questions can't have multiple tries but the system remembers this setting for future use.)
- Set Whether correct to 'Shown'
- Set Marks to 'Show mark and max'
- Set Specific feedback to 'Shown'
- Set General feedback to 'Shown'
- Set Right answer to 'Not shown' (Do not rely on the automatically generated right answer as this can be very cumbersome for some question types and not the whole story for others. Instead get used to writing your own solution.
- Set Response history to 'Not shown'. (It just gets in the way when you are developing.)
- Try three responses, true, false and nothing (don't select either answer but just 'Submit and finish'). Pay particular attention to how the specific feedback and general feedback read when put together and note how the Status panel is updated.
Edit your first question
You may, or may not, wish to amend your words, but what you do need to know is how to make such amendments.
Exercise 2.3 Edit your first question
- Edit your question by clicking on the 'Edit icon' (which may be a notepad or a cog wheel) alongside the question name in the question bank.
- When you have completed your editing scroll to the bottom and click on Save changes. Your question is now saved and you are returned to the Question Bank.
In this way you may edit your questions as often as you require.
2.3 Pros and Cons of True/False questions
Pros
- The question type has a very simple structure.
- And consequently is a good point to start learning how to write questions.
Cons
- The student is provided with the statement.
- Their choice is then one of only two options, True or False.
- The probability of guessing the correct answer is high at 50%.
- If the quiz pass mark is 40% and the quiz consisted solely of True/False questions then a large majority of students could simply pass by guessing.
3 Writing your first Numerical question
Mathematical techniques are best learned by practice and in the computer you have a patient ally that will never get bored.
In this question we will include three other important additions to your knowledge of the question editor.
- Firstly you will learn how to format mathematics nicely.
- Secondly you will see how to include mathematical symbols such as π.
- Thirdly we will introduce you to how to give a student multiple tries at a question if their first try was wrong.
As before the question can be broken in three main sections.
- The question stem which is shown on a blue background.
- The users interaction, here there is an 'edit box' for them to type into.
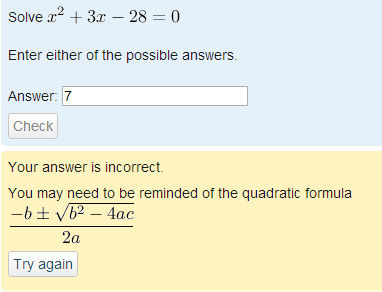
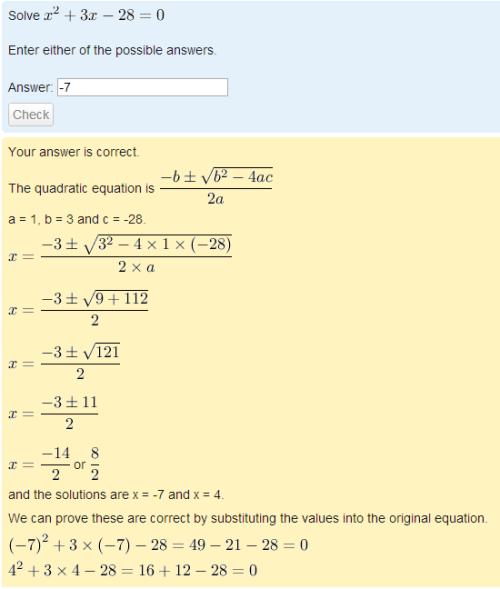
- The feedback to their response on a yellow background. But this time the feedback can also be a hint with an option to Try again (Figure 3.1).
The next section shows how the authoring form supports this interaction and provides the information required to enable the status panel (not shown here) to be completed with the mark.
3.1 The question form
The Question, default mark and general feedback
As with the True/False question the Numerical question type starts with
- the question stem.
- the default mark.
- the general feedback which is shown to all users.

But here you will see what looks like something special surrounded by '$$'. What that something special is, is TeX (you might like to Google it) and TeX allows you to create properly formatted mathematics on the screen. For our purposes we are not going to go much further than displaying a fraction (e.g. the TeX for one half is \frac{1}{2}) but it's important to know that there are features for handling mathematics properly and if you are a mathematician or a physicist then you will want to explore our variable numeric and the STACK question types in due course.
Response matching. grade and specific feedback
This time the response matching consists of a value and a tolerance (labelled as 'Error').
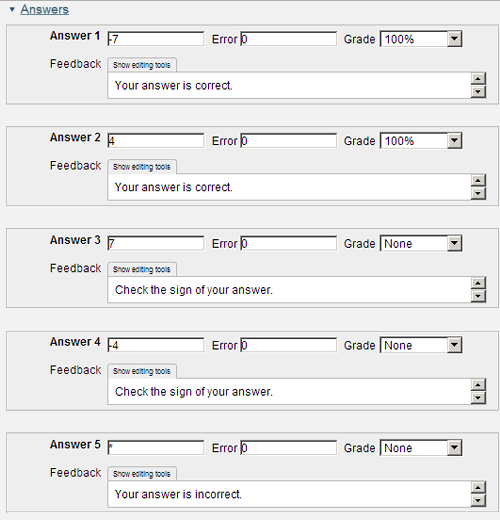
As the example shows you can look for both correct answers and common mistakes and in mathematics there are plenty of known malrules, or common errors, that are best addressed with corrective explanations. Indeed one of the most powerful aspects of eAssessment is that the computer will store and analyse all your students' answers so if multiple students give the same incorrect response then you will be able to track that, and do something about it.
For the Error please do remember that you are dealing with a digital computer that holds numbers in binary form. That binary form cannot hold exact values for some common numbers. A typical example is 1/3. As a decimal number this is 0.33333 with the 3 recurring forever. But in binary form there are a fixed number of bits allocated. Once the number goes beyond that number of bits you lose accuracy. So if the answer you are looking for is 0.3333 and the student answers 0.33333 then you need to allow a suitable tolerance.
But it is both worse and better than that. Why is is worse? In the example above can you be sure that -7 is indeed accurately held as exactly -7 down to the last bit? As you don't know the inner working of the computer you can't answer that. So is an Error of 0 OK? At this point things get better because behind the scenes Moodle adds a tolerance to the 0 and Moodle's tolerance is based on the precision used on your computer. So the Moodle engineers have ensured that the above question will work as shown.
The value for Grade should be set between None and 100%. This is then applied to the default mark when calculating the student's mark for the question. You will find that the system will demand that at least one of your response matching options must be worth 100%.
At run-time the student's response is compared to each of the answers included on the form in turn. If the response match succeeds the specific response is displayed and the response matching terminates. If a response match fails then the next one is tried.
Note the final Response match of '*'. This is a wild-card meaning match any other response. So this catches all those students who have failed to give one of your anticipated answers.
Once the response matching has been completed what happens next depends on the grade and whether there are more hints to be displayed.
Multiple tries
This is the section of the authoring form that lets you give hints or direct your students to part of your teaching materials that they should perhaps study again.
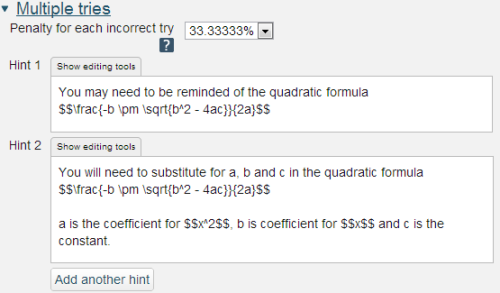
It is worth noting that a proportion of students who answer incorrectly at the first try will be able to correct their answer with no further help. It is usual therefore for the first hint to say little more than "Pay attention and try again."
Here we give two hints so the student gets a maximum of three tries.
And as we're giving hints we also apply a penalty, again as a percentage of the default score. In our example a correct answer at the second attempt will score 66.66667% x 1 and a correct answer at the third attempt will score 0.333333.
Please spend a little time looking at how these parts of the authoring form come together to give the completed question shown in Figure 3.1 and 3.2. Pay particular attention to how the specific feedback and general feedback are made to read nicely when put together.
Unit handling, Units, Tags, Created/last saved
These are sections that are used less often and in fact we will not be using them at all.
3.2 Create, Preview, Edit
Create your first Numerical question
Now it's your turn. Start with something that does not include TeX so you can be clear how the response matching works.
Exercise 3.1 Create your first Numerical question
- From the Question bank menu choose Questions.
- Change the 'Select a category' dropdown to 'Interactive'.
- From the 'Create a new question' chooser select 'Numerical'.
- Complete the authoring form with your own question.
- When you have completed the form scroll to the bottom and click on Save changes. Your question is now saved and you are returned to the Question Bank.
Preview your first question
Having written your first Numerical question the next step is to 'preview' it. That is to look at it as your students will look at it.
Exercise 3.2 Preview your Numerical question
- Preview your question by clicking on the magnifying glass icon alongside the question name in the question bank. Remember to set the Preview options as follows:
- Set How questions behave to 'Interactive with multiple tries'.
- Set Whether correct to 'Shown'
- Set Marks to 'Show mark and max'.
- Set Specific feedback to 'Shown'.
- Set General feedback to 'Shown'
- Set Right answer to 'Not shown'. In the example shown 'Right answer' would only give the first answer worth 100%. That is 'Right answer is:-7'. The other right answer of 4 would never be mentioned. As indicated earlier, do not rely on the automatically generated Right answer but write your own solution.
- Set Response history to 'Not shown'.
- Try two responses, one right and one wrong. And try giving the right answer at the first, second and third try, noting your mark each time. Again pay particular attention to how the specific feedback, hints and general feedback read when put together and note how the Status panel is updated.
Edit your first Numerical question
Again use the Edit feature to massage your words, but this time include some TeX too.
Exercise 3.3 Edit your Numerical question and include some TeX
- Edit your question by clicking on the Edit icon alongside the question name in the question bank..
- In the question text enter
 . If I tell you that pm means the plus-minus symbol you can probably work out what the rest will do. Users of OU Moodle can use the 'insert equation' icon which will let you preview how the TeX renders.
 - When you have completed your editing scroll to the bottom and click on Save changes. Your question is now updated and you are returned to the Question Bank.
Now Preview your question. Did the TeX display as properly formatted mathematics? If you are using a new, local version installed on your computer it probably didn't. Here's how to turn the TeX 'filter' on.
- In your browser go to http://localhost/admin
- Expand the Plugins menu
- Open the Filters menu.
- Click on Manage filters
- Change the setting for TeX notation to 'On'.
Now return to your course by clicking on Home and then your course name. Return to the Question bank and the Interactive category. And preview your question again. And this time you should see a plus-minus sign, a square root and a fraction all nicely displayed.
3.3 Pros and Cons of Numerical questions
Pros
- The Numerical question type is a constructed response question. That is the student has to construct their own answer and have sufficient confidence to submit it. This is good.
- There is little chance of guessing the right answer.
- With the TeX filter Moodle is able to display mathematics in the correct format.
Cons
- If no units are used then the question is straightforward to use.
- Students learn mathematics by practise so really you would like multiple versions of this question. With the Numerical question type this means making lots of copies and then altering the numerical values in each. How much better it would be if the question could use variables such that the computer could generate lots of different versions. We will come to questions that allow the use of variables later in this course.
4 Writing your first Short answer question
The Short answer question is the textual equivalent of the Numerical question type but the response matching features are too limited for this question type to be of much practical use. Consequently we will not spend long on this question type. Later on we will come back to response matching textual answers with the Pattern match question type.
Here is the single short answer question from An interactive tour of the Moodle Quiz. As you will see later there is only one correct answer.
As before the question can be broken in three main sections.
- The question stem which is shown on a blue background.
- The users interaction, here there is an 'edit box' for them to type into.
- The feedback to their response on a yellow background.
With this third question you will be beginning to recognise that there is a similar pattern to all the question types and a rhythm to the interaction between student and machine.
4.1 The question form
The Question, default mark and general feedback
As with the previous questions the short answer question type starts with
- The question stem.
- The default mark.
- The general feedback which is shown to all users.
Note the row of underscores in the question text. At run time they will be replaced by an input box of equivalent width.
Response matching, grade and specific feedback
The Short answer question type will search for a sequence of consecutive characters within a response. The wildcard character '*' allows other words and characters, including the space character, to be present.
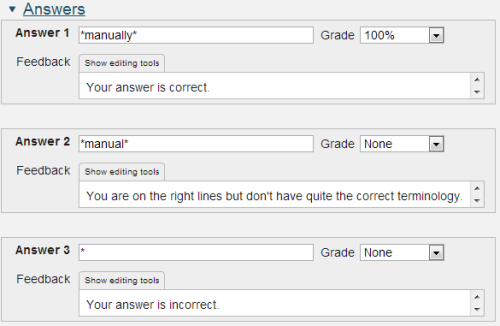
The value for Grade should be set between None and 100%. This is then applied to the default mark when calculating the student's mark for the question. You will find that the system will demand that at least one of your response matching options must be worth 100%.
At run-time the student's response is compared to each of the answers included on the form in turn. If the response match succeeds the specific response is displayed and the response matching terminates. If a response match fails then the next one is tried.
Note the final Response match of '*'. This is a wild-card meaning match any other response. So this catches all those students who have failed to give one of your anticipated answers.
Once the response matching has been completed what happens next depends on the grade and whether there are more hints to be displayed.
Multiple tries
This is the section of the authoring form that lets you give hints or direct your students to part of your teaching materials that they should perhaps study again.

Here just one hint is given.
Once again a penalty is applied.
4.2 Create and Preview
Create your first Short answer question
Now it's your turn. As you write your question ask yourself how many alternative correct answers you can think of but do not try and response match them all. Be content to cover the most obvious responses and leave it at that.
Exercise 4.1 Create your first Short answer question
- From the Question bank menu choose Questions.
- Change the 'Select a category' dropdown to 'Interactive'.
- From the 'Create a new question' chooser select 'Short answer'.
- Complete the authoring form with your own question.
- When you have completed the form scroll to the bottom and click on Save changes. Your question is now saved and you are returned to the Question Bank.
Preview your Short answer question
Having written your Short answer question the next step is to 'preview' it. That is to look at it as your students will look at it.
Exercise 4.2 Preview your Short answer question
- Preview your question by clicking on the magnifying glass icon alongside the question name in the question bank. Remember to set the Preview options as follows:
- Set How questions behave to 'Interactive with multiple tries'.
- Set Whether correct to 'Shown'.
- Set Marks to 'Show mark and max'.
- Set Specific feedback to 'Shown'.
- Set General feedback to 'Shown'.
- Set Right answer to 'Not shown'.
- Set Response history to 'Not shown'.
- Try two responses, one right and one wrong. And try giving the right answer at the first and second try, noting your mark each time. Again pay particular attention to how the specific feedback, hints and general feedback read when put together and note how the Status panel is updated.
4.3 Pros and Cons of Short answer questions
Pros
- The Short answer question type is a constructed response question. That is the student has to construct their own answer and have sufficient confidence to submit it.
- Modern browsers have an in-built spelling checker and you can ask your students to only submit correctly spelled answers. If I tell you that I have seen 14 different spellings of 'temperature' you will understand that such a variation makes accurate response matching very difficult. Ensuring you are only dealing with correctly spelled words is an important first step.
Cons
The response matching features are too limited.
- There is no feature for handling synonyms yet we all know that languages are very rich, extensive, fertile, …..
- There is no feature for accepting a different word order.
- The browser spelling checker is unlikely to include specialist scientific and medical words. Also it will only use the language used on the computer and will not check the spelling of foreign words.
- Catering for misspellings is difficult.
- Unless your required answer is very specific you will have to allow time to check how your response matching copes with real student responses. And also time to adjust your response matching in the light of those answers.
Short answer questions are consequently useful if you want an exact spelling, perhaps of a word or two.
5 Writing your first Multiple choice question
The Multiple choice question is probably the most commonly used question type in the Moodle Quiz. Question 14 of An interactive tour of the Moodle Quiz will have shown you that you can include other media elements in questions and we will use this question to show you how.
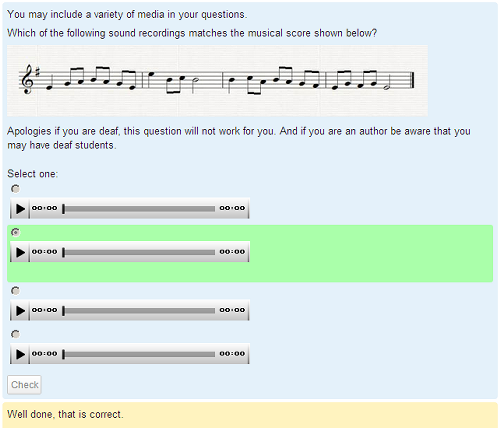
This question includes a picture of the score and four sound files. As before the question can be broken in three main sections.
- The question stem which includes the score and is shown on a blue background.
- The users interaction, here there are four choices and the student is asked to select one.
- The feedback to their response on a yellow background.
5.1 The question form
The Question, default mark and general feedback
As with the previous questions the Multiple choice question type starts with
- The question stem.
- The default mark.
- The general feedback which is shown to all users.
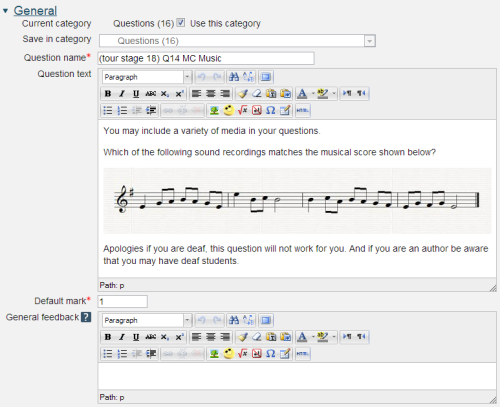
Here we have uploaded the image of the score, having previously resized the image to make it fit nicely. If you export this question then the image will be exported as part of the question.
Note that here the general feedback is empty, but only because there is nothing more to say to someone who answered correctly. As you will see the Multiple choice question type, along with some other question types, has another section on the form that can be used to give feedback to all wrong answers.
We recommend that you only use this question type for questions that require a single choice. We will come to question types that allow multiple choices later.
Response matching, grade and specific feedback
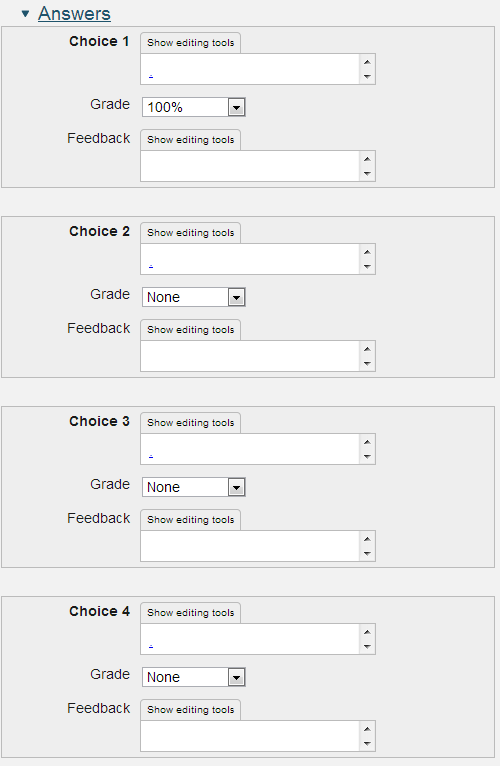
This consists of the music files uploaded using the 'link' icon as explained on the following page. OU Moodle allows the normal file text link name to be hidden by replacing the text with a dot. Behind the scenes each audio track is specified by something similar to the following
The value for Grade is set between None and 100% but again we have chosen not to give feedback here.
At run-time the student can click on the sound player to hear each recording in turn.
Once the response matching has been completed what happens next depends on the grade and whether there are more hints to be displayed.
Combined feedback
All questions that require the student to make one or more selections have a 'Combined feedback' section that comments on the combination of their answers. For this question the author chose to use this section for the feedback. Multiple choice questions have a variety of sections for giving feedback that you can use as you please.
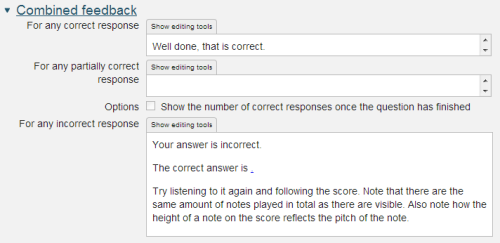
Multiple tries
This time the section is empty and the student is allowed just one try at this question.
5.2 Create, Preview, Edit
Create your first Multiple choice question
Now it's your turn. Before you start, find a picture that you can use in your question.
Exercise 5.1 Create your first Multiple choice question
- From the Question bank menu choose Questions.
- Change the 'Select a category' drop-down to 'Interactive'.
- From the 'Create a new question' chooser select 'Multiple choice'.
- Complete the authoring form with your own question. To include a picture
- Place the text editing cursor where you wish the picture to be shown.
- Click on the 'Insert/edit image' icon in the editor tool bar.
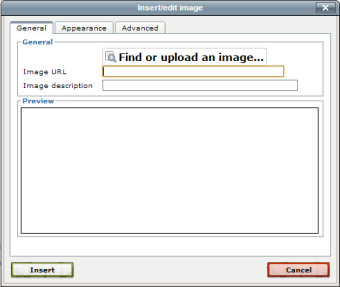
Click on 'Find or upload an image'.
- Click on 'Choose file'.
- When the file and folder selector appears navigate to your image and select it.
- Upload it.
- Give it a description.
In standard Moodle, sound and video files may be imported in a similar manner using the 'Insert Moodle media' icon.
In OU Moodle authors should however highlight a word and select the 'Insert/edit link' icon. then the 'Browse' icon and carry on from 'Choose file' as above.
- For this Multiple choice question please ensure that students are asked for 'Only one answer'.
- Shuffling the answers is one of the anti-plagiarism tools. If a student chose to tell a friend that the sound that matched the score above was the second option then shuffling makes taking such advice a gamble.
- When you have completed the form scroll to the bottom and click on Save changes. Your question is now saved and you are returned to the Question Bank.
Preview your Multiple choice question
Having written your Multiple choice question the next step is to 'preview' it. That is to look at it as your students will look at it.
Exercise 5.2 Preview your Multiple choice question
- Preview your question by clicking on the magnifying glass icon alongside the question name in the question bank. Remember to set the Preview options as follows:
- Set How questions behave to 'Interactive with multiple tries'.
- Set Whether correct to 'Shown'.
- Set Marks to 'Show mark and max'.
- Set Specific feedback to 'Shown'.
- Set General feedback to 'Shown'.
- Set Right answer to 'Not shown'.
- Set Response history to 'Not shown'.
- Try two responses, one right and one wrong.
Exercise 5.3 Edit your question
- Try putting some feedback into the Feedback boxes in the 'Answers' section and then rerun the preview to see how this feedback appears.
5.3 Pros and Cons and Advice
Pros
- The Multiple choice question type can be used with all subject areas.
- And as the musical score example shows it can be used imaginatively to test higher order skills.
- Common errors can be exposed by suitable distractors and feedback specific to that misunderstanding can be provided.
Cons
- The student is provided with the correct answer as one of the choices.
- Choosing the answer by recognising it is not the same as constructing the answer.
- There is a probability of guessing the correct answer. If there are four choices the probability is 25%. To discourage guessing various penalty mechanisms have been suggested and implemented. Moodle allows the author to attach negative marks to options and also includes the ability to use Certainty Based Marking. However most authors use neither of these facilities and score the correct choice at 100% and incorrect choices at 0%.
- It is not necessarily easy to provide plausible distractors. At least three are required and implausible distractors are better omitted. The skill in writing multiple choice questions is in providing questions that expose misunderstanding of the materials under test such that suitable distractors can be written. The response to the distractors can then be used to provide remedial feedback to help students overcome their misunderstanding. But writing good distractors is difficult. Not only is it difficult but it deflects the author and the student from learning about the correct answer and why it is correct. The result is often a set of distractors that are provided solely to comply with the style of the question rather than to test the students knowledge of the subject.
Advice on writing multiple choice questions
- Provide a sufficient number of distractors.
- Distractors based on common student errors are very effective.
- Correct statements that do not answer the question are often strong distractors.
- Do not create distractors that are so close to the correct answer that they may confuse students who really know the answer to the question.
- Avoid resorting to using complex wording in distractors otherwise your test may become a test of reading comprehension rather than an assessment of whether the student knows the subject matter.
- Be especially aware of ambiguity. Ask a colleague to review your questions.
- Avoid making the correct answer longer than the rest. This happens because the author wants to get the shades of meaning exactly right. Students know this and act on it.
- Be careful in your use of grammar. For example the correct answer to An animal with a trunk is an [dog / elephant / frog]. is given away by the 'an'.
- And finally ensure that there is only one correct response
6 Writing your first Description
Descriptions are created in the same way as questions but are used solely to impart information to the student. There is no interaction.
Descriptions help to break the test into sections and there were quite a few dotted throughout An interactive tour of the Moodle Quiz
Here is one of those descriptions.

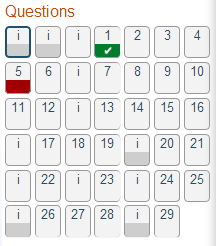
And in the questions navigation panel Descriptions are indicated by the letter 'i' (i for Information).
6.1 The editing form
The Question and general feedback
While the Description is not a question it uses the same tools as the questions to allow you to complete the form. So it has fields for:
- The question stem.
- The general feedback.
But you will normally only use the first field. And, of course, there is no mark.

6.2 Create and Preview
Create your first Description
Now it's your turn.
Exercise 6.1 Create your first Description
- From the Question bank menu choose Questions.
- Set the 'Select a category' dropdown to 'Interactive'.
- From the 'Create a new question' chooser select 'Description'.
- Complete the authoring form with your own words.
- When you have completed the form scroll to the bottom and click on Save changes. Your question is now saved and you are returned to the Question Bank.
Preview your Description
Having written your description the next step is to 'preview' it.
Exercise 6.2 Preview your Description
- Preview your description by clicking on the magnifying glass icon alongside the question name in the question bank.
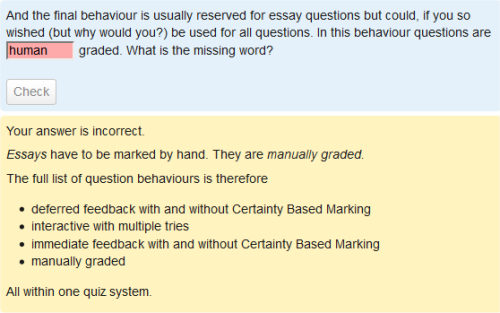
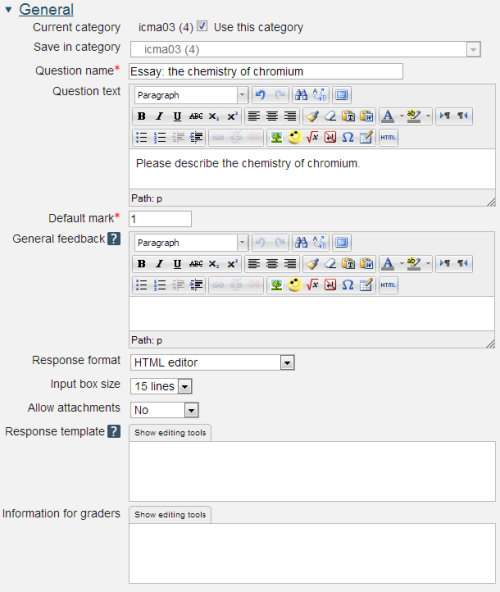
7 The Essay question type
Essays are created in the same way as other questions but essays are not automatically marked and consequently there is no response matching section.
When answering Essays students are provided with the normal editing tools and can be allowed to attach other documents to their answers. After submission the essays are accessed by tutors and marked in the time honoured way.
Essays can also be used for obtaining student feedback too; just be sure to set the default mark to zero so that they are not graded.
And note that Essays can be included in interactive with multiple tries tests even though they are not marked automatically.
7.1 The Essay form
The Essay question form
7.2 Create and Preview
Create your first Essay
Now it's your turn.
Exercise 7.1 Create your first Essay
- From the Question bank menu choose Questions.
- Set the 'Select a category' dropdown to 'Interactive'.
- From the 'Create a new question' chooser select 'Essay'.
- Complete the authoring form with your own words.
- When you have completed the form scroll to the bottom and click on Save changes. Your question is now saved and you are returned to the Question Bank.
Preview your Essay
Having written your Essay the next step is to 'preview' it.
Exercise 7.2 Preview your Essay
- Preview your essay by clicking on the magnifying glass icon alongside the question name in the question bank.
- Note that there is no Check button even if you set 'How questions behave' to interactive with multiple tries.
8 Review your knowledge
You have now seen questions that handle student responses containing
- Numbers
- Words
- Selections
and it's time to step back and review what you have learned. The next quiz tests your knowledge so far. Please try it when you are ready, and as you know you are allowed to leave the quiz, find the answer, and return.