Use 'Print preview' to check the number of pages and printer settings.
Print functionality varies between browsers.
Printable page generated Wednesday, 1 July 2026, 7:24 PM
Antenatal Care Module: 22. Starting IV Fluid Therapy and Catheterising the Pregnant Woman
Study Session 22 Starting IV Fluid Therapy and Catheterising the Pregnant Woman
Introduction
In this session you will learn about two very important techniques for emergency care of the pregnant woman who is either:
- haemorrhaging (losing blood very quickly from her uterus), for reasons already described in Study Sessions 20 and 21; or who
- cannot urinate (pass urine) because there is an obstruction preventing her from emptying her bladder. Usually this is because the pressure of the baby is blocking the urethra – the tube that brings urine down from her bladder.
This study session is preparation for the practical skills training in both these techniques, which you will receive during an attachment in a health centre or hospital. Here we introduce you to the equipment you will need, and describe how to start and maintain IV fluid therapy and how to catheterise the bladder of the pregnant woman. You will also learn to follow infection control procedures while performing these techniques.
Before you begin either of these techniques, explain to the woman in local language what you are going to do and why she needs this procedure. Tell her that as soon as you have finished doing it, she must go to the higher health facility for further treatment.
Make sure that transportation is being arranged while you are setting up the IV fluid therapy or bladder catheterisation.
Learning Outcomes for Study Session 22
22.1 Define and use correctly all of the key words printed in bold. (SAQs 22.1, 22.2 and 22.3)
22.2 Explain the reasons for giving IV fluid therapy or catheterising the bladder of a pregnant woman. (SAQ 22.1 and 22.3)
22.3 Describe the equipment, the preparation and the procedure for starting intravenous (IV) fluid therapy, including selecting a suitable venipuncture site, and inserting and removing a cannula from a vein. (SAQs 22.1 and 22.2)
22.4 Describe how you would monitor IV fluid therapy. (SAQ 22.1)
22.5 Describe the equipment, the preparation and the technique of how to insert and remove a urinary catheter. (SAQs 22.1 and 22.3)
22.6 Describe the infection control procedures required to reduce the risk of infection resulting from IV fluid therapy or catheterising the bladder. (SAQ 22.1 and 22.2)
22.1 Starting intravenous (IV) fluid therapy
22.1.2 When to start IV fluid therapy
A pregnant woman who is haemorrhaging will rapidly develop a state of shock; unless you take action quickly she will soon become unconscious and die.
What are the signs of shock? (You learned this in Study Session 20.)
The woman will look pale, especially inside her lower eyelids and the palms of her hands; her diastolic blood pressure (the bottom number) is below 60mmHg – sometimes much lower; and her pulse is high, often more than 100 beats per minute.
In order to save her life, you need to know how to start intravenous (IV) fluid therapy (also known as IV fluid resuscitation or IV infusion). This means getting special fluids into her blood circulation through a hollow needle called a cannula inserted into a vein, to replace the fluid part of the blood she is losing. You should do this before you urgently refer her to a hospital or health centre, where they will give her a blood transfusion. Women in labour, or soon after delivery of the baby, may also haemorrhage (as you will learn in the Labour and Delivery Care Module). You should start IV therapy quickly whenever you detect that a woman is haemorrhaging.
22.1.2 Setting up the IV fluid therapy equipment
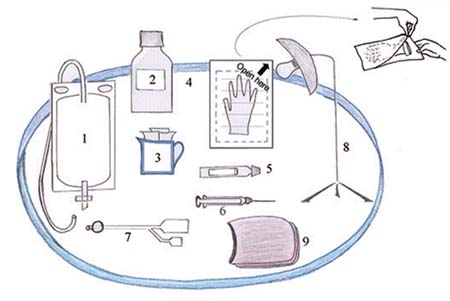
The first step in the process of initiating IV fluid therapy is to assemble and check the equipment you need (see Figure 22.1). You can place everything on a very clean large dish or locally available tray. We will describe the equipment in detail after you have looked at Figure 22.1.
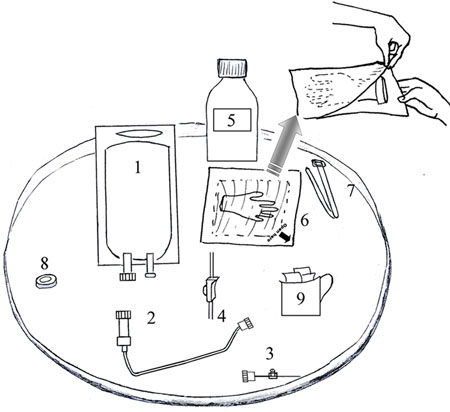
- Sterile IV fluid in a plastic bag; the main types are called Normal Saline (NS) and Ringer’s Lactate (RS) solution.
- Sterile IV tubing (sometimes called an IV line) with a connector at one end to join it to the IV fluid bag, and a connector at the other end to join it to the cannula. It comes sealed in a sterile plastic package (not shown in Figure 22.1).
- Sterile IV cannula. It comes sealed in a sterile plastic package (not shown in Figure 22.1). There is a larger diagram later in this study session (Figure 22.6).
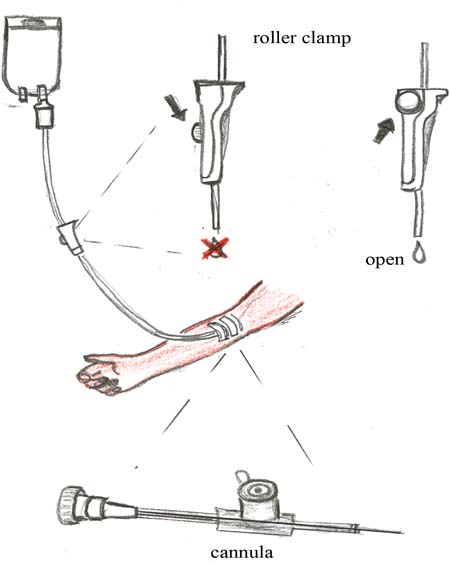
- Roller clamp, which you attach to the IV tubing and tighten or loosen to control the flow of fluid along the tube.
- Bottle of alcohol to use with the cotton swabs (9) to clean the area of skin where the cannula is inserted; if alcohol is not available you can use soap and water.
- Sterile surgical gloves in a sealed bag. If you open the bag carefully (as shown in Figure 22.1), you can lay the sterile paper on the tray with the inside facing upwards, and use the paper as a sterile surface. If you do not have sterile gloves, you should use very clean gloves swabbed with alcohol or scrubbed with soap and water.
- A belt or rope, or a piece of cloth or bandage, to use as a tourniquet (Tourniquet is pronounced ‘torn-ee-kay’)– something you tie around the person’s arm to obstruct the flow of blood for a short time while you insert the needle at the end of the cannula into a vein.
- A plaster to stick over the cannula when it is in the person’s arm to keep it securely in place. If you do not have a plaster you may use a clean bandage or locally available material, e.g. a piece of clean cloth.
- Cotton swabs or small pieces of very clean cloth, to use with the alcohol for cleaning the person’s skin before you insert the cannula.
22.1.3 Sterile techniques for IV fluid therapy
When you prepare to give a person IV fluid therapy you have to keep everything clean and use sterile techniques (free from germ contamination) as much as possible. This may be difficult in a rural home, but you can reduce the risk of infection if you follow the instructions in Box 22.1.
Box 22.1 Preventing infection during IV fluid therapy
- The most important precaution is to wash your hands thoroughly with soap and clean water for at least two minutes before and after you handle patients or sterile equipment.
- Use alcohol to clean the tray or dish for your equipment, or (if not available) use soap and water and make sure it is thoroughly air-dried before using it.
- Put on sterile or very clean gloves. You must wear gloves all the time because you will be coming in contact with the patient’s blood.
- The cannula, the IV tubing and the surgical gloves come sealed in sterile plastic or paper packages. The inside surface of these sterile packages can be opened out and laid flat to serve as a sterile surface for the equipment until you need it.
- The patient should be lying down in a comfortable position. Swab her skin with alcohol or soap and water around the area where the cannula will be put into a vein.
- Open the sterile package holding the IV tubing and connect it to the fluid infusion bag. Hang the bag on hook in a wall above the patient, or ask someone to hold it up for you. Make sure the tip of the tubing which will be connected to the cannula is kept untouched and sterile.
22.1.4 Selecting the IV cannula
Gauge is pronounced ‘gage’. The largest commonly available cannula is gauge 18 or 20.
You must choose a cannula with the appropriate size of needle for the required purpose. The size is referred to as the gauge of the cannula, and each size is given a number – the larger the number, the bigger the cannula.
Why do you think you should choose a large gauge cannula if you are giving IV fluid therapy to a pregnant woman who is haemorrhaging?
The woman has lost a significant amount of blood. Therefore, you need to get replacement fluids into her blood system as quickly as possible. You need a large gauge cannula so you can infuse a large amount of fluid into her vein in a short time.
22.1.5 Selecting the venipuncture site
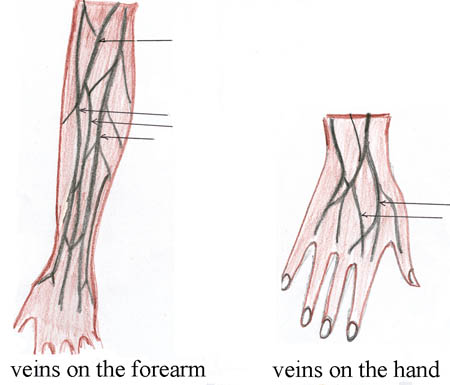
The next step is identifying a good venipuncture site, that is the site where you will ‘puncture a vein’ by inserting the IV cannula. Figure 22.2 shows some commonly used sites in the hand and forearm.
In selecting the site for venipuncture:
- Ask the patient which is the hand she most often uses, e.g. to hold a knife or a tool. If she says she is ‘right handed’, this is her ‘dominant’ hand and her left is her ‘non-dominant’ hand.
- Look first at possible venipuncture sites on her non-dominant hand and then look higher up the arm.
- Select a vein which is large enough for the cannula, avoiding sites near to joints like the wrist or the elbow.
- Make sure that when you insert the cannula, it will not interfere with woman’s ability to move her hand or arm.
- Avoid a site which is painful to touch.
The visibility of the veins can be improved by encouraging the woman to close her hand into a fist and then open it again several times, lowering the arm and stroking the chosen venipuncture site. As you become more experienced, you will find it easier to choose a suitable vein which is easily visible, not twisted, where you think you can enter your cannula easily.
22.1.6 Inserting the IV cannula
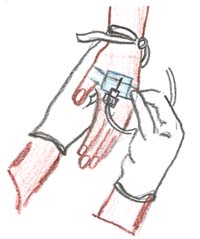
Once you decide where to insert your IV cannula, apply a tourniquet about three finger-widths above the chosen venipuncture site (Figure 22.3a). Then feel for the vein with your gloved finger (Figure 22.3b). Clean the site with alcohol (Figure 22.3c) or soap and water.
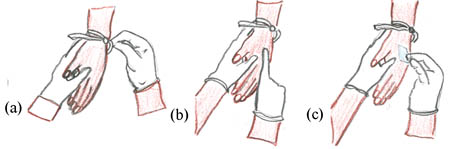
Then stretch the skin taut and stabilise the vein with your non-dominant hand — meaning keeping it stretched so that it does not move easily and you miss your target with the needle. Pierce the skin with the IV cannula over vein at a 45 degree angle; first you push the needle into the skin and then aim at the vein (Figure 22.4). As you approach the vein, lower the angle to about 10 degrees and insert the cannula into the vein.

Look for blood ‘flash back’ (blood shooting back along the barrel of the cannula), which tells you that the needle is in the vein. Release the tourniquet at this point, then push the cannula further into the vein until you are well into the vein.
The cannula is a metal needle with plastic over it, and it is the plastic part that remains in the vein. Gently remove the metal needle part of the cannula, leaving the plastic part in the vein.
You then stabilise the plastic part of the cannula with a plaster, or clean rope or cloth wrapped around the venipuncture site (Figure 22.5).
Connect the IV tubing to the IV fluid bag and open the roller clamp to let fluid flow down the tube. Do this before connecting the other end of the tubing to the cannula. Flushing with fluid ensures there are no air bubbles in the tube before you begin infusing fluid into the patient.
22.3 Monitoring during IV therapy
Once the IV tubing has been connected to the cannula, push the roller to the top of the clamp (see Figure 22.6). This allows the fluid to run down the tube and into the woman’s vein as quickly as possible. The flow rate should be as fast as you can run it because the woman is losing a lot of blood. Maintain this high flow rate at all times, including during transportation to the health facility. Make sure the IV fluid bag is kept higher than the woman’s arm, or the flow rate will slow down even if the roller clamp is fully ‘open’.
22.3.1 Establishing a monitoring routine
A routine has to be established for monitoring the progress of IV fluid therapy, beginning at the bag of fluid and ending at the venipuncture site. The flow rate should be checked every 15 minutes for as long as the woman is with you. If the flow has slowed down, check if the IV tubing has twisted, or if the position of the woman’s hand or arm has twisted to obstruct the flow, and straighten them out. The flow rate in emergency fluid replacement should run as fast as possible.
Make sure you monitor the woman’s pulse and blood pressure every 15 minutes.
If you are giving IV fluid therapy to treat shock due to blood loss, what would you expect to happen to the pulse rate and blood pressure as the IV fluids are infused?
With adequate infusion the pulse rate will decrease and blood pressure will increase. (After infusing two to three bags of IV fluid, the expectation is for the pulse to slow down and the blood pressure to start rising towards normal.)
As soon as you have completed the IV fluid therapy set up, refer the woman to a higher health facility as quickly as possible. Go with her if you can.
22.3.2 When to stop IV infusion
Look for any swelling around the venipuncture site compared with the other hand (or arm), as this may signal that the cannula has moved and the fluid is running into the soft tissue instead of into the vein. If you see swelling, loosen the plaster and remove the IV cannula. Choose a new venipuncture site and use a new sterile IV cannula to enter a new vein and reconnect the IV fluid bag.
IV fluid therapy is stopped when the woman does not need additional fluid any more, or when the venipuncture site has developed an infection (the skin around the site will be red and will feel painful to the patient if you touch it). Sometimes patients may be given too much IV fluid in a short time and this may put stress on the heart because the blood volume has become too large. Fluid can also get into the lungs and in such cases the patient will have difficulty breathing, cough and sometimes become confused. This is not likely to happen while the patient is with you because you will refer her immediately after you started the IV infusion. But in case you encounter this situation, stop the infusion and refer the woman to the next higher facility immediately for further treatment.
You can stop the infusion by closing the roller clamp so no more fluid runs down the tube. Leave the cannula in place for someone at the health facility to remove under sterile conditions.
- To stop an infusion you need sterile or very clean gloves, a clean dry swab, an antiseptic wipe or swab soaked in alcohol, and a new plaster.
Explain what you will be doing to the patient, put on your gloves and turn the roller clamp to the ‘off’ position. Check that the flow of fluid along the tube has stopped. Remove the plaster or other stabilising material over the cannula while holding the cannula in place with your other gloved hand. With a clean dry swab held over the venipuncture site, withdraw the cannula and apply pressure with your fingers to the site for a minute or two. Then swab the site with antiseptic or alcohol to remove any germs that may be near the puncture hole. When the skin is dry, cover the site with a plaster if you have one.
Always make sure the cannula is intact and dispose of it safely in a puncture-proof container.
22.4 Bladder catheterisation
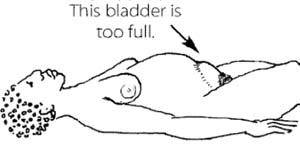
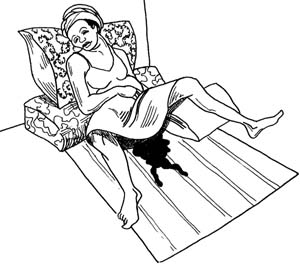
A pregnant woman in labour who cannot urinate as a result of compression on the outflow tube (urethra) from the bladder, will have great discomfort. At the same time, the full bladder will further obstruct the passage of the unborn baby by occupying space in the pelvis. She needs to have a catheter (sterile rubber or plastic tube) inserted into her bladder to let the urine out before you refer her to a higher health facility. The technique is called catheterisation. This procedure may even allow the birth of the baby to progress. Without it, if labour begins, she may be unable to give birth normally. Women who are a long time in labour may also need catheterisation if their bladder becomes obstructed. If the woman’s bladder is distended it will feel like a soft bag of water lying above her pubic bone. When she is lying flat on her back, you may see the full bladder as a rounded mass.
Tell her what you are going to do and why she needs the procedure. Then ask her to lie on her back with her head lifted and her legs flexed, with feet wide apart. Cover her lower body except the genital area with a clean cloth to reduce embarrassment for her if other people are present.
22.4.1 Bladder catheterisation equipment
Assemble the necessary equipment for the procedure and lay them on a very clean dish or tray (see Figure 22.7). We will describe the equipment in detail after you have looked at Figure 22.7.
- Sterile drainage tubing with a collection bag to hold the urine draining from the bladder. It will come in a sterile plastic package (not shown in Figure 22.7).
- Alcohol or antiseptic cleaning solution to clean the genital area; if you do not have it, use soap and water.
- Cotton swabs or small pieces of very clean cloth.
- Sterile gloves; if you do not have them use very clean gloves.
- Tube of lubricant (slippery gel to help the catheter go in more easily).
- Syringe containing sterile water to inflate the catheter balloon.
- Sterile catheter of the correct size; the size in common use is 16FC (FC or Foley Catheter, is the unit used to indicate the size of the catheter). It will come in a sterile plastic package (not shown in Figure 22.7). Notice the side tube which connects to an inflatable balloon at the tip of the catheter.
- Good light source; a battery operated torch may serve the purpose, but you will need to ask someone to hold it for you.
- Cloth to drape over the woman’s lower body.
22.4.2 Steps in the catheterisation procedure
What is the first thing you should do before you open any of the sterile equipment packages?
Wash your hands thoroughly with soap and water for at least 15 seconds.
Once your patient is prepared and informed and your equipment is ready, put on the sterile or very clean gloves and clean around the woman’s vulva and perineal area with antiseptic solution or alcohol, starting from the urethral opening and swabbing outwards (Figure 22.8a). If you don’t have antiseptic solution, clean the area thoroughly with soap and water.
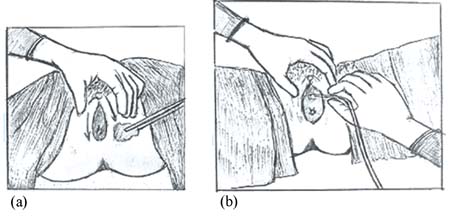
Why do you think it is important to clean the area starting with the urethral opening and swabbing outwards?
This avoids wiping germs from the perineal area towards the urethral opening; they could be carried inside when the catheter is inserted.
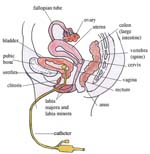
Use your non-dominant hand to carefully pull back the labia majora to fully expose the urethral opening. (You may wish to look back at the detailed drawing of the female external genitalia in Figure 3.2 in Study Session 3.) Lubricate the 16FC catheter if you have proper lubricant (don’t use anything else) and slowly insert the catheter into the urethral opening (Figure 22.8b).
Once well into the bladder, you will see urine flowing out through the end of the catheter. Use the syringe to inject 5 ml of sterile water into the tube leading to the catheter balloon; this makes the balloon swell up and anchors the catheter in the bladder so it won’t pull out when the patient moves (see Figure 22.9). Pull on the catheter very gently to feel the resistance.
Then connect the catheter to the sterile drainage tubing so the urine flows into the collecting bag. Make sure the collecting bag is placed below the level of the bladder, or the urine will not flow into it. If you do not have a sterile collecting bag, then let the urine drain into a very clean container. This is called an ‘open’ system and it carries a bigger risk of infection passing up the drainage tube and into the bladder. Ideally, the drainage should be a ‘closed’ system with the urine draining into a sterile bag.
As soon as you have completed the procedure, refer the woman to a higher health facility as quickly as possible. Go with her if you can.
22.4.2 General care for the catheterised person
When you are providing care to the woman who is catheterised, understand that she may feel some discomfort in her bladder area. Reassure her to reduce anxiety by explaining why you want to keep the catheter in place.
You should also keep her clean by wiping away any urine that might have leaked from the catheter; this may make her wet and embarrass her, or irritate her skin and also increase her anxiety.
22.4.3 Removing the catheter
When it is time to remove the catheter, prepare the necessary items on a very clean tray or dish.
- The equipment you will need are sterile or very clean gloves, and a syringe to remove the water from the catheter balloon.
- Tell the patient you are going to remove the catheter and this may cause a little discomfort. Put on the gloves and without disconnecting the drainage tube use the syringe to collapse the balloon by sucking the sterile water back into the syringe. When all the water has been withdrawn, slowly pull out the catheter.
Explain to the woman that she may feel some soreness or slight burning pain when she urinates normally for the first few times, but her bladder will soon be functioning normally.
22.5 In conclusion
This concludes the Antenatal Care Module. You have learned many things in the 22 study sessions about looking after the pregnant woman who is healthy and whose pregnancy is progressing normally, and also about the interventions you should make if you detect danger signs and symptoms. Your knowledge and skill can prevent many complications and save the lives of women and their unborn babies who get into difficulties. In the next Module, you will learn about Labour and Delivery Care.
Summary of Study Session 22
In Study Session 22 you have learned that:
- Intravenous (IV) fluid therapy is required to replace lost fluids in a pregnant woman who is losing a lot of blood.
- Giving IV fluid therapy includes knowing how to assemble the necessary equipment, identify a suitable venipuncture site, insert a cannula into a vein and stabilise it, and maintain a rapid flow rate of fluid into the woman’s circulation.
- Reasons for stopping IV fluid therapy include: the woman’s blood pressure and pulse return to normal, fluid leaks into the tissues around the venipuncture site instead of running into the vein, there are signs of infection around the venipuncture site, or the woman has received too much fluid and is showing signs that her heart or lungs may be affected.
- Catheterisation of the bladder involves introducing a sterile rubber or plastic tube through the urethra and into the bladder to drain excess urine. The procedure is necessary when the bladder is distended due to an obstruction preventing the woman from urinating normally, e.g. during a long or obstructed labour.
- The catheter is anchored in the bladder by injecting sterile water into the catheter balloon to inflate it and hold the catheter in place.
- A closed drainage system is important for collecting the urine; an open system can result in infection travelling back up the tubing into the bladder.
- Infection control procedures should be observed at all times when giving IV fluid therapy or catheterising the bladder; wash hands thoroughly before and after the procedure, wear sterile or very clean gloves, and swab the surrounding area of skin with antiseptic solution or alcohol before inserting the IV cannula or the urinary catheter.
- Make sure you inform the patient what you are going to do before you begin these procedures and explain why it is necessary to help her in this way.
- Refer the woman to a higher health facility immediately you have completed the procedure. Go with her if you can.
Self-Assessment Questions (SAQs) for Study Session 22
Now that you have completed this study session, you can assess how well you have achieved its Learning Outcomes by answering the questions that follow below. Write your answers in your Study Diary and discuss them with your Tutor at the next Study Support Meeting. You can check your answers with the Notes on the Self-Assessment Questions at the end of this Module.
SAQ 22.1 (tests Learning Outcomes 22.1, 22.2, 22.3, 22.4, 22.5 and 22.6)
Which of the following statements is false? In each case, explain what is incorrect.
A A woman who is in shock due to loss of blood should be referred immediately without beginning IV fluid therapy.
B Remove and reposition the IV cannula if the venipuncture site swells and is painful.
C If you don’t have a plaster to put over the venipuncture site there is no need to stabilise the IV cannula in the vein.
D You can stop giving IV fluid if the woman’s blood pressure and pulse return to normal and she is no longer bleeding.
E The syringe is for injecting sterile water into the bag collecting urine from the drainage tube in the bladder.
F Wash your hands thoroughly with soap and water before you touch the patient or the equipment.
G The flow rate should be as fast as possible when you start IV fluid therapy for a woman who is in shock.
Answer
A is false. A woman who is in shock (low blood pressure and rapid pulse) due to blood loss needs IV fluid therapy to be started before referral.
B is true. You should remove and reposition the IV cannula if the venipuncture site swells and is painful. This indicates that the fluid is going into the tissues instead of into the vein.
C is false. If you don’t have a plaster to put over the venipuncture site, you should stabilise the IV cannula by tying very clean cloth around it. If the cannula is not stabilised it can pull out of the vein.
D is true. You can stop giving IV fluid if the woman’s blood pressure and pulse return to normal and she is no longer bleeding.
E is false. The syringe is for injecting sterile water into the catheter balloon (not the collecting bag) to inflate the balloon so it anchors the catheter in the bladder.
F is true. You should wash your hands thoroughly with soap and water before you touch the patient or the equipment.
G is true. The flow rate should be as fast as possible when you start IV fluid therapy for a woman who is in shock.
SAQ 22.2 (tests Learning Outcomes 22.1, 22.3 and 22.6)
Rearrange the following list into the correct sequence of actions when you start IV fluid therapy.
Two lists follow, match one item from the first with one item from the second. Each item can only be matched once. There are 9 items in each list.
Wash your hands.
Put the patient in the lying down position.
Put on sterile or very clean gloves.
Identify the possible site for the IV cannula insertion.
Tie a tourniquet about three finger-widths above the venipuncture site.
Clean the venipuncture site with antiseptics, alcohol or soap and water.
Take the cannula from the sterile package and insert it at the venipuncture site; then withdraw the needle, leaving the plastic cannula in the vein.
Open the sterile IV tubing and connect the tubing to the bag of IV fluid and hang it higher than the patient or ask someone to hold it up for you.
Connect the cannula to the bag of IV fluid and open the roller clamp.
Match each of the previous list items with an item from the following list:
a.7.
b.5.
c.6.
d.3.
e.1.
f.9.
g.2.
h.4.
i.8.
- 1 = e,
- 2 = g,
- 3 = d,
- 4 = h,
- 5 = b,
- 6 = c,
- 7 = a,
- 8 = i,
- 9 = f
SAQ 22.3 (tests Learning Outcomes 22.1, 22.2 and 22.5)
Define what catheterisation means and why it may be necessary in the pregnant woman in labour. List at least five items of equipment you need to conduct this procedure.
Answer
Catheterisation of the bladder means introducing a sterile rubber or plastic tube into the urethra and then into the bladder to drain urine when the bladder is obstructed. Bladder obstruction can happen in a long or obstructed labour when the baby presses down on the urethra and blocks the normal flow of urine. The items of equipment you need are:
- Sterile catheter of the correct size (16FC)
- Sterile drainage tubing with a urine collection bag
- Syringe containing sterile water to inflate the catheter balloon
- Sterile or very clean gloves
- Alcohol or antiseptic cleaning solution and swabs
- Tube of lubricant
- A good light source
- Cloth to drape over the woman’s lower body.