Use 'Print preview' to check the number of pages and printer settings.
Print functionality varies between browsers.
Printable page generated Tuesday, 21 July 2026, 5:45 PM
Immunization Module: The Cold Chain
Study Session 6 The Cold Chain
Introduction
In this study session you will learn about the cold chain — the equipment and procedures that you will use to keep vaccines within the correct temperature range (between 2oC and 8oC), so that they remain in good condition. Vaccines should be stored carefully at all times, beginning at the factory where they are manufactured and at every stage until the moment they are given to children and mothers. Excess heat or cold will reduce the vaccine potency (strength), increasing the risk that recipients will not be protected against vaccine-preventable diseases.
The cold chain has three main components: equipment for vaccine transport and storage, well-trained personnel, and efficient management procedures. In this study session, and the next two sessions, you will learn how all three components are required to ensure that vaccines are transported and stored safely.
Learning Outcomes for Study Session 6
- 6.1 Define and use correctly all of the key words printed in bold. (SAQs 6.1 and 6.2)
- 6.2 Describe the common types of cold chain equipment and their uses in your Health Post. (SAQs 6.1, 6.2, 6.5 and 6.6)
- 6.3 Describe how you can monitor the effectiveness of the cold chain for vaccines at your Health Post and when you are transporting vaccines. (SAQs 6.1, 6.2, 6.5 and 6.7)
- 6.4 Describe how vaccines can be spoiled and how to prevent this from happening. (SAQs 6.4, 6.6 and 6.7)
- 6.5 Describe how to load vaccines and diluents correctly into cold chain equipment. (SAQ 6.3, 6.4 and 6.6)
- 6.6 Briefly describe how to maintain cold chain equipment (undertake minor repairs). (SAQs 6.5 and 6.7)
6.1 Components of the cold chain
The cold chain has three main components, each of which must combine to ensure safe vaccine transport and storage:
- transport and storage equipment
- trained personnel
- efficient management procedures.
This study session is about the first of these components. You can see the cold chain equipment in Figure 6.1, together with the storage temperatures required at each storage place, from arrival in the country to the storage in your Health Post. Next we will describe the common cold chain equipment you will use when you collect vaccines from the health centre and in your practice at the Health Post and in the community.

6.2 Cold chain equipment in Health Posts
The common cold chain equipment used in Health Posts are refrigerators, cold boxes, vaccine carriers, ice-packs and foam pads. In this section, the correct use of each of these will be described.
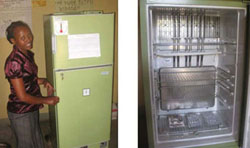
6.2.1 Refrigerators
A refrigerator is a cooling apparatus. Health facility refrigerators may be powered by electricity, kerosene, paraffin, bottled gas or solar energy. Electric refrigerators are usually the least costly to run and the easiest to maintain, but they must have a reliable electricity supply, which is not often possible in rural Health Posts in Ethiopia. Different refrigerators have different capacities for storing vaccines and for freezing and storing ice-packs (Figure 6.2).
A refrigerator in a Health Post should be able to hold:
- One month’s supply of vaccines and diluents in the refrigerator compartment.
- A minimum stock of one to two weeks’ supply of vaccines and diluents (i.e. an additional 25% of the standard stock).
- Frozen ice-packs (strong, specially made plastic bottles containing frozen water) standing in the freezer compartment for at least 24 hours to become fully frozen.
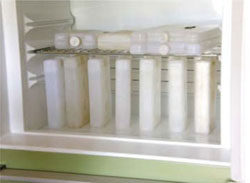
- Unfrozen chilled ice-packs in the refrigerator compartment (Figure 6.3); they help to keep the refrigerator cold for a while if there is a power failure. You can also keep ordinary plastic bottles filled with chilled water in the refrigerator for the same purpose.
 Do not put frozen ice-packs into the main refrigerator compartment! They could cause the temperature to drop too low and destroy the freeze-sensitive vaccines.
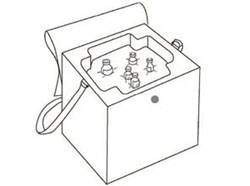
6.2.2 Cold boxes and vaccine carriers
A cold box is an insulated container that can be lined with ‘conditioned’ ice-packs to keep vaccines and diluents cold — but not frozen — during transportation of vaccine supplies from the health centre, or to outreach sites. (We will explain what ‘conditioning’ ice-packs means in the next section.) Cold boxes can also be used for short periods of vaccine storage (from two to seven days, depending on the manufacturer) when the refrigerator is out of order or being defrosted, or if vaccines are being transported in a vehicle for a few days by mobile immunization teams.
Cold boxes are quite large. At Health Post level you may instead use a smaller insulated container called a vaccine carrier (Figure 6.4). Vaccine carriers are also lined with conditioned ice-packs to keep vaccines and diluents cold during transportation from the collection store at the health centre, or on journeys to outreach sites, and for temporary storage during Health Post immunization sessions. They are smaller than cold boxes and are easier to carry if walking, but they do not stay cold for as long — at most 36–48 hours with the lid closed (depending on the type).

6.2.3 Ice-packs
Ice-packs are flat, rectangular plastic bottles filled with water and then either kept at refrigerator temperature (Figure 6.3 above), or frozen and then conditioned for use in vaccine carriers and cold boxes (Figure 6.4a). The number of ice-packs required for a cold box or vaccine carrier varies.
Every Health Post should have a minimum of two sets of ice-packs for each of their cold boxes and vaccine carriers, one in the process of being frozen or refrigerated, and the other conditioned for use in a cold box or vaccine carrier.
Freezing ice-packs
The proper freezing and conditioning of ice-packs is essential for maintaining the potency of vaccines. To freeze ice-packs, follow the steps in Box 6.1.
Box 6.1 Freezing ice-packs
- Fill the ice-packs with water, leaving about 20% air space at the top, and put the cap on tightly.
- Hold each ice-pack upside down and squeeze it to make sure it does not leak.
- Put the ice-packs upright in the freezer compartment of the refrigerator, so that the surface of each ice-pack is touching the evaporator plate, and close the door.
- Leave ice-packs in the freezer for at least 24 hours to freeze solid. After 24 hours they should be ready to use.
- After each vaccination session put the melted ice-packs back in the freezer as soon as possible.
Keep extra unfrozen ice-packs that do not fit in the freezer in the bottom part of the main refrigerator compartment (look back at Figure 6.3). This helps the water in these chilled ice-packs to freeze relatively quickly when you put them into the freezer, and it also helps to keep this section of the refrigerator cold in case of a power failure.
Conditioned ice-packs and chilled water packs
Conditioned ice-packs have first been fully frozen, and then removed from the freezer and left at room temperature for a short time (it may take over 30 minutes if the room is cold). Allow the frozen ice-packs to sit at room temperature until the ice begins to melt and water starts to form. Check to see if each ice-pack has been conditioned properly by shaking it and listening for the sound of water moving inside. This prevents the ice-packs from freezing the vaccines inside a cold box or vaccine carrier, and damaging the freeze-sensitive vaccines.
Studies conducted in many countries on cold chain temperatures have revealed that many vaccines are damaged more severely by freezing than by heat. So it is crucial to use properly conditioned ice-packs or chilled water packs when transporting freeze-sensitive vaccines like pentavalent, PCV10 and TT. Chilled water packs can be made by almost filling the ice-pack containers or ordinary plastic water bottles with water and placing them in the main compartment of the refrigerator for about 24 hours. Using chilled water packs may be more efficient than using conditioned ice-packs, because it takes more electricity, gas or kerosene, and more time, to freeze ice-packs and then condition them. Also, there is a risk that if frozen ice-packs are not conditioned properly, they may expose freeze-sensitive vaccines to damage from freezing during transport in vaccine carriers or cold boxes.
6.2.4 Foam pads
A foam pad is a piece of soft foam that fits on top of the conditioned ice-packs in a cold box or a vaccine carrier (Figure 6.5). There are some cuts in the foam to allow vaccine vials to be inserted in the pad. During immunization sessions, the foam pad can be used as a temporary lid to keep unopened vaccines inside the carrier cool, while providing a surface to hold and protect opened vaccine vials and keep them cool (Figure 6.6). Vaccines are protected from heat damage during an immunization session if they are inserted in the foam pad above the ice-packs in the vaccine carrier.

6.3 Cold chain monitoring equipment in your Health Post
It is important to know about the common cold chain monitoring equipment for keeping a record of the temperature that vaccines and diluents are exposed to during transportation and storage. The items of equipment used are vaccine vial monitors, freeze indicators and thermometers.
6.3.1 Vaccine vial monitors
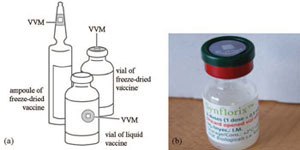
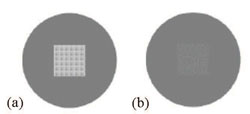
A vaccine vial monitor (VVM) is a label that changes colour when the vaccine vial or ampoule has been exposed to temperatures above 8ºC over a period of time. Before opening a vaccine container, the status of the VVM must be checked to see whether the vaccine has been damaged by heat. Manufacturers attach VVMs to vials and ampoules of most vaccines. The VVM is printed on the label or cap, or the neck of ampoules of freeze-dried vaccines (Figure 6.7). It looks like a square inside a circle. As the vaccine vial is exposed to more heat, the square becomes darker.
You should only use vaccines where the inner square in the VVM is lighter in colour than the outside circle (Figure 6.8, top row). Vials with VVMs in which the inner square has begun to darken, but is still lighter than the outer circle (Figure 6.8, second row), should be used first, i.e. before vials where the VVM square has not begun to darken. Vials with VVMs in which the inner square matches the colour of the outer square, or in which the inner square is darker than the outer circle, have reached or gone beyond the discard point and should not be used (Figure 6.8, bottom two rows).

VVMs respond to heat — but not to freezing!
VVMs respond to heat — they do not measure exposure to freezing temperatures. A vaccine may have been frozen and have lost its potency, but the VVM cannot tell you this. So even if the VVM indicates that the vaccine has not been exposed to heat, the vaccine may still have been frozen. Therefore, for freeze-sensitive vaccines, it is important to establish that they have not been frozen before using them. Inspect the freeze indicator, as described next.
6.3.2 Freeze indicators
Freeze indicators are devices used to monitor the exposure of vaccines to freezing. Freeze indicators are packed with batches of freeze-sensitive EPI vaccines (pentavalent, PCV10 and TT), as well as with other freeze-sensitive vaccines such as HepB, which may be used to protect healthcare workers. The most commonly used type of freeze indicator is the freeze-tag (Figure 6.9). This is an irreversible temperature indicator that shows if a product, such as a vaccine, has been exposed to freezing. It consists of an electronic temperature measuring circuit with a liquid crystal display (LCD). A small blinking dot of light in the corner of the display shows that the freeze-tag is functioning correctly.

If the freeze-tag is exposed to a temperature below 0oC (with a range between +0.3 oC and –0.3 oC) for more than 60 minutes (with a range of between 57 to 63 minutes), the display will change from the ‘good status’ (Figure 6.9a) to the ‘alarm status’ (Figure 6.9b).
Vaccines that have been exposed to freezing may have been damaged and should be checked by using the shake test, as described below.
6.3.3 The shake test
The shake test is how you check whether freeze-sensitive vaccines (pentavalent, PCV10, TT or HepB) have been subjected to freezing temperatures, which are likely to have damaged them. To perform the shake test, follow the steps below:
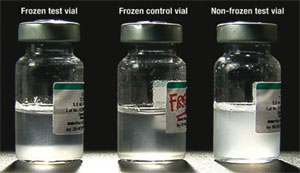
Step 1 — Prepare a frozen control vial: Take a vial of vaccine of the same type and batch number as the vaccine you want to test, and from the same manufacturer. Freeze the vial until the contents are solid (at least 10 hours at –10°C) and then let it thaw. This is the frozen control vial (the middle vial in Figure 6.10). Mark the vial clearly so that it is easily identifiable and will not be used by mistake.
Step 2 — Choose a test vial: Take a vial (or vials) of vaccine from the batch that you suspect has been frozen. This is the suspected frozen test vial (on the left in Figure 6.10).
Step 3 — Shake the control and test vials: Hold the frozen control vial and the suspected frozen test vial together in one hand and shake them vigorously for 10–15 seconds.
Step 4 — Allow the vials to rest: Leave both vials to rest by placing them on a table side by side and not moving them further. A freeze-sensitive vaccine that has not been frozen appears as a uniformly cloudy liquid (see the vial on the right in Figure 6.10). After freezing, the vaccine tends to form flakes that quickly settle at the bottom of the vial to form a sediment when you leave it to rest after vigorous shaking. The speed at which the flakes settle is called the sedimentation rate. Note that some vials have large labels that conceal the vial contents. This makes it difficult to see the sedimentation process. In such cases, turn the control and test vials upside down and observe sedimentation taking place in the neck of the vials.
Step 5 — Compare the vials: Observe the difference in sedimentation rates in the frozen control and suspected frozen test vials for a maximum of 30 minutes. View both vials against the light to compare the sedimentation rate. If the vaccine in the suspected test vial shows a much slower sedimentation rate than the vaccine in the frozen control vial, you can conclude that the test vaccine has most probably not been frozen and can be used.
What should you conclude if the sedimentation rate is similar in the suspected test vial and the frozen control vial?
You should conclude that the test vial has probably been damaged by freezing and the vaccine should not be used.
The shake test should be conducted for all vaccines with the following characteristics:
- Vaccines packed in boxes that have a freeze indicator (e.g. freeze tag, see Figure 6.9), which is found to be activated.
- Refrigerator temperature records that show the temperature has fallen below +2ºC.
- Where you suspect that the vaccines may have been frozen by mistake, for example by placing too close to the freezer plate in the refrigerator, or touching frozen ice-packs.
If the vaccine fails the ‘shake test’ it must be discarded. There is no need to conduct a shake test if a liquid vaccine vial is already frozen solid — simply discard it. Also discard any vials that develop white lumps of sediment attached to the glass, which cannot be dispersed despite vigorous shaking. This can happen if pentavalent vaccine is exposed to freezing below 0ºC.
6.3.4 Thermometers
A thermometer is an instrument for monitoring the temperature of your cold chain equipment — refrigerator, cold box or vaccine carrier. It enables you to adjust the temperature to the correct range for the storage and transport of vaccines.
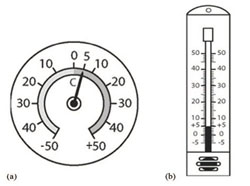
At a Health Post, either a dial or a stem (bulb) thermometer may be used to monitor the equipment temperature. On a dial thermometer, the needle moves around the scale, pointing to plus (+) numbers when it is warmer, and to minus (–) numbers when it is colder (Figure 6.11a). On a stem (or bulb) thermometer, coloured fluid in the bulb moves up the scale as it becomes warmer, and down the scale as it becomes colder (Figure 6.11b).
What temperature is showing on the thermometers in Figure 6.9? Is this a safe temperature for the storage of liquid vaccines?
Both thermometers are recording a temperature of +5oC. This is safe for storing liquid vaccines, which should be maintained between +2oC and +8oC.
6.4 How to load cold chain equipment
Refrigerators, cold boxes and vaccine carriers must be loaded correctly to keep the temperature of the vaccines and diluents inside within the acceptable range. All health workers in a Health Post should know how to monitor the cold chain equipment and what action to take if the temperature is too high or too low.
6.4.1 The design of vaccine refrigerators
All electric powered refrigerators have a thermostat. The thermostat is a device that automatically responds to temperature changes by activating switches controlling the cooling equipment to maintain the refrigerator compartments at the correct temperature. You can alter the setting of the thermostat if the temperature of the refrigerator is found to be too high or too low when you check the thermometer. Gas or kerosene refrigerators are adjusted by altering the size of the flame.
To ensure that the refrigerator is effective for storing your vaccines, there are a number of guidelines that you should follow (Box 6.2).
Box 6.2 Guidelines for storing vaccines in a refrigerator
- Do not keep opening and closing the refrigerator door, since this raises the temperature inside the refrigerator.
- Do not put vaccines on the door shelves. The temperature in this part of the refrigerator is too warm to store vaccines, and when the door is opened the door shelves are instantly exposed to room temperature.
- Discard all expired vaccines (past their expiry date), or vaccines with VVMs that have reached or are beyond their discard point, or vaccines that have been reconstituted for more than six hours.
- Do not return reconstituted vaccines (BCG, measles) or opened PCV10 vials to the refrigerator. They should be discarded at the end of the immunization session or after six hours, whichever comes soonest.
- The refrigerator should not be packed too full. Approximately half of the total space inside should be left empty to allow air to circulate around the vaccines and diluents and keep them cool.
- Vaccines, diluents and ice-packs should ideally be kept in a separate refrigerator from other items. However, if your Health Post has only one refrigerator and you need to store other heat-sensitive supplies in it, such as drugs, ointments, serum and blood samples, be sure to label them clearly and keep them on a separate shelf from the vaccines and diluents.
- Food and drinks should NEVER be stored in a vaccine refrigerator.
There are a number of different types of refrigerator. Some front-loading refrigerators have one door, with a second freezing compartment inside. Others have two separate compartments, with different doors (look back at Figure 6.2, and see the diagram in Figure 6.12).
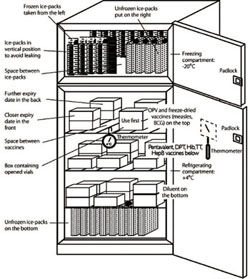
The two compartments shown in Figure 6.12 should be used as follows:
- The main compartment (the refrigerator), in which the temperature should be kept between +2ºC and +8ºC, is used for storing vaccines and diluents.
- The top compartment (the freezer) is used for freezing ice-packs. If the refrigerator is working properly, this compartment will be between –15ºC and –20ºC.
Notice the ‘use first’ box, for multi-dose vaccines that have been opened, or unopened vials that have been taken out for an immunization session but not used. These vials should be used before other vials.
Remember that you must not return opened vials of PCV10 vaccine to the refrigerator; it is a liquid vaccine without preservative and once it is opened any remaining vaccine in the two-dose vial should be discarded after six hours or at the end of the immunization session, whichever comes soonest.
Boxes containing vials with long expiry dates are stored at the back, and those with shorter expiry dates are at the front.
6.4.2 Loading a vaccine refrigerator
A vaccine refrigerator should be loaded as illustrated in Figure 6.12 and as described in Box 6.3.
Box 6.3 Guidelines for loading a vaccine refrigerator
- Freeze and store ice-packs in the freezer compartment.
- Store all the vaccines and diluents in the refrigerator compartment.
- If there is not enough space, diluents can be stored at room temperature.
- It is important to chill diluents by putting them in the refrigerator for several hours before you use them to reconstitute BCG or measles vaccines.
- Arrange the boxes of vaccine so air can move between them.
- Keep boxes of freeze-sensitive vaccines (pentavalent, PCV10, TT and HepB) away from the freezing compartment, the refrigeration plates, and the side or bottom linings of the refrigerator, where they might become frozen by accident.
- Keep melted ice-packs or ordinary plastic water bottles filled with chilled water on the bottom shelf of a front-loading refrigerator. These help to keep the temperature cool in case of a power cut.
- Store vaccines in locations appropriate to the style of refrigerator you use. For a front-loading refrigerator with the freezing compartment on the top (Figure 6.12), vaccines should be stored as follows:
- OPV and freeze-dried vaccines (BCG and measles) on the top shelf
- all other vaccines on the middle shelves
- diluents on the bottom.
- Some refrigerators have ice-packs lining the freezing compartment. This type is called an ice-lined refrigerator (Figure 6.13). In this type, all the vaccines should be stored in the basket provided with the refrigerator as follows:
- measles vaccine, BCG and OPV are stored in the bottom only
- freeze-sensitive vaccines (pentavalent, PCV10, TT and HepB) in the top only.
6.4.3 Loading cold boxes and vaccine carriers
When you are loading vaccines into cold boxes and vaccine carriers before an immunization session, it is important to follow the steps in Box 6.4.
Box 6.4 Guidelines for loading cold boxes and vaccine carriers
- At the beginning of the day of the immunization session, take all the frozen ice-packs you need from the freezer compartment of the refrigerator and close the door.
- Allow the frozen ice-packs to sit at room temperature until the ice begins to melt and water starts to form. This is important because if the ice packs are too cold, freeze-sensitive vaccines may be damaged by freezing.
- Check to see if each ice-pack has been prepared properly by shaking it and listening for the sound of water moving around the ice inside. Ice-packs in which the ice has begun to melt are called conditioned ice-packs.
- Put conditioned ice-packs against each of the four sides of the cold box or vaccine carrier, and also on the bottom of the cold box. Ordinary plastic bottles of chilled water can also be used.
- Put the vaccines and diluents in the middle of the cold box or carrier.
- In vaccine carriers, place a foam pad on top of the conditioned ice-packs. In cold boxes, place conditioned ice-packs on top of the vaccines.
- Close the lid of the cold box or vaccine carrier tightly. It is then ready to be taken to the immunization session.
6.5 Maintaining the correct temperature of cold chain equipment
It is important to maintain the correct temperature in your cold chain equipment, and to adjust the temperature of your vaccine refrigerator if it is too high or too low.
Why is it important to monitor the temperature of your vaccine refrigerator?
All vaccines are heat-sensitive and most are freeze-sensitive. Therefore it is important to monitor the temperature of the refrigerator, so that the vaccines are prevented from becoming too warm or freezing.
6.5.1 Monitoring the temperature of your vaccine refrigerator
It is important to monitor the temperature of the main section of a refrigerator, so that you can ensure that it stays within the acceptable range for storage of vaccines.
What is the acceptable temperature range for vaccine storage?
It is between +2ºC and +8ºC.
To monitor the temperature of your refrigerator, you will need a thermometer and a temperature chart (see Figure 6.14), which you should tape to the outside of the refrigerator door. Then follow the steps in Box 6.5.
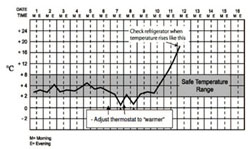
Box 6.5 Guidelines for monitoring the refrigerator temperature
- Set the refrigerator thermostat during the coldest part of the day to around +2ºC to +4ºC.
- Measure the temperature of the refrigerator first thing in the morning and before you leave the Health Post in the evening. If the temperature is between +2ºC to +8ºC, do not adjust the thermostat.
- Record the temperature at least twice every day (every morning and every evening, seven days a week) on the refrigerator temperature chart, as shown in Figure 6.14.
When a temperature monitoring chart has been completed, replace it with a new one. Keep the completed charts in a record book for future reference. Action should be taken when the temperature goes out of the safe range, as illustrated in the example in Figure 6.14.
According to Figure 6.14, what was the temperature of the refrigerator on the 7th day of the month: (a) in the morning, and (b) in the evening? Would any action have been required to adjust the temperature on that day, and if so, what should that action be?
Based on the temperature chart in Figure 6.14, you should have noticed that:
- a.In the morning of the 7th day of the month, the temperature of the refrigerator was about +2ºC, which is within the acceptable temperature range. No adjustment was needed.
- b.In the evening, the temperature had dropped to below +1ºC, which is below the acceptable range. The thermostat should have been adjusted to ‘warmer’, as described in the next section.
6.5.2 Adjusting the temperature of your vaccine refrigerator
The +2ºC to +8ºC safe margin may be difficult to maintain, especially for a kerosene refrigerator, so you should frequently check the condition of the vaccines. Here we give some guidelines on what to do if the temperature of your refrigerator becomes too low or too high.
Kerosene and gas refrigerators
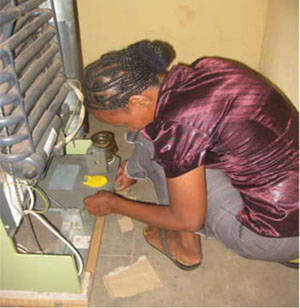
The temperature of a kerosene or gas refrigerator is adjusted by increasing or decreasing the size of the flame. If the temperature inside the main refrigerator compartment is too low, you can increase the temperature by decreasing the flame size. A smaller flame means less cooling, so the temperature in the refrigerature will rise. If the refrigerator temperature is too high, you can reduce it by increasing the flame size. A bigger flame means more cooling, so the temperature in the refrigerature will fall. Monitor the change in temperature frequently – about every 15 minutes – after adjusting the flame, until the temperature remains steadily between +2oC to +8oC, to ensure that it does not rise too high or fall too low.
Electric refrigerators: if the temperature is too low
If the refrigerator temperature falls too low (below +2°C), you should take the following actions:
Thermostat dials in most refrigerators are labelled from 1 to 6, where 1 is the warmest and 6 is the coldest setting.
- Adjust the thermostat so that the arrow points to a lower number, e.g. if the thermostat dial was set at 5, adjust it to 4. This will make the refrigerator get warmer.
- Check freeze-sensitive vaccines to see whether they have been damaged by freezing. You can do this by using the shake test, which you learned about earlier (Section 6.3.3).
Electric refrigerators: if the temperature is too high
If the refrigerator temperature becomes too high (above +8°C), you should take the following actions:
- Make sure that the refrigerator is working. If not, check if the power supply is present.
- Check whether the door of the refrigerator or the freezing compartment closes properly. The seal may be broken, allowing warm air to leak into the refrigerator. If the seal is broken, it will need to be replaced.Do not adjust the thermostat to a colder setting immediately after a power cut, or just after you have put a new batch of vaccine into the refrigerator. The refrigerator could become too cold and freeze the vaccines
- Adjust the thermostat so that the dial points to a higher number, e.g. if the dial was set at 3, adjust it to 4. This will make the refrigerator get colder.
- Check whether ice is preventing cold air in the freezing compartment from entering the refrigerator compartment. If the refrigerator is blocked with too much ice, it may be necessary to defrost it (remove the ice).
If the temperature cannot be maintained between +2ºC and +8ºC, store vaccines in another place, such as a vaccine carrier, and try to get the refrigerator repaired as soon as possible.
6.5.3 Maintaining the correct temperature in cold boxes and vaccine carriers
It is just as important to maintain the correct temperature in cold boxes and vaccine carriers as it is in your refrigerator. To do this, you should follow the steps below:
- Place an adequate number of conditioned (melting) ice-packs or chilled water bottles in the cold box or vaccine carrier.
- Always place the cold box or vaccine carrier in the shade – never in a sunny place.
- Avoid opening the lid of your cold box or vaccine carrier except when you are removing a vaccine, and close it again immediately afterwards.
- Use the foam pad above the conditioned ice-packs to hold vials during immunization sessions.
If the ice-packs have completely melted
If you find that the ice-packs inside the cold box or vaccine carrier have completely melted during an immunization session, you should follow the steps below:
- Discard all vials of reconstituted vaccines (BCG and measles).
- Check the VVM status of the vaccines, and return those that can still be used to a refrigerator at the correct temperature as soon as possible.
- Place them in the ‘use first’ box, and use them before other vials at your next immunization session.
6.6 How to maintain cold chain equipment
In this section we give some basic guidelines on how to maintain your cold chain equipment.
6.6.1 Maintaining vaccine refrigerators
A refrigerator works well only if it is properly installed, cleaned and defrosted (ice is removed) regularly. Thick ice in the freezer compartment does not keep a refrigerator cool. Instead, it makes the refrigerator work harder and uses more electricity, gas or kerosene. You should defrost the refrigerator when ice becomes more than 0.5 cm thick, or once a month, whichever comes first.
What to do when a vaccine refrigerator is out of order
If your vaccine refrigerator stops working, protecting the vaccines is the first priority. Move them to another cold place until the refrigerator is repaired. If you think that the problem will last only a short time, you may use a cold box or vaccine carrier lined with conditioned ice-packs or chilled water bottles for temporary storage. If the breakdown is likely to last a long time, you should move the vaccines to another refrigerator as quickly as possible — for example, by transporting them in a vaccine carrier to the nearest health centre.
When you have moved your vaccines to a safe place, check the electricity, gas or kerosene supply that keeps the refrigerator cold. If it is not working because the gas or kerosene has run out (Figure 6.15), try to get a new supply delivered as soon as possible. If the breakdown is due to a mechanical problem, try to repair the refrigerator if you can. If this is not possible, report the problem to the repair technician and your supervisor at the nearby health centre. Don’t forget to record the breakdown on the daily temperature recording chart.
6.6.2 Maintaining cold boxes and vaccine carriers
- Always dry your vaccine carriers and cold boxes after use. If they are left wet with the lids closed, they will become mouldy. Mould may affect the seal of the cold boxes and vaccine carriers.
- Store your cold boxes and vaccine carriers with the lid open if possible, when they are not being used.
- Avoid placing cold boxes and vaccine carriers in the sun, as sunlight can cause cracks in their walls and the lids. If a cold box or vaccine carrier wall has a small crack you may be able to repair it with adhesive tape until you can get an undamaged one.
Summary of Study Session 6
In Study Session 6, you have learned that:
- Vaccines should be stored carefully between +2ºC and +8ºC at all times, from the factory where they are manufactured until they are used. Excess heat or cold will reduce the vaccine potency (strength), increasing the risk that recipients will not be protected against vaccine-preventable diseases.
- Health Posts should have a vaccine refrigerator and enough cold boxes and vaccine carriers to hold one month’s supply of vaccines and diluents, and one to two week’s reserve stock, to ensure that routine immunizations can continue if the refrigerator is temporarily out of working order.
- Cold chain equipment, including refrigerators, cold boxes and vaccine carriers, must be loaded correctly to maintain the temperature of the vaccines and diluents inside. Ice-packs should be conditioned (allowed to begin to melt) before use in cold boxes and vaccine carriers.
- Vaccines and diluents should be stored in the refrigerator compartment. If there is not enough space, diluents can be stored at room temperature, but they should be chilled to between +2ºC and +8ºC before use.
- Freeze-sensitive vaccines (pentavalent, PCV10, TT and HepB) should be kept away from the freezing compartment, refrigeration plates, side linings or bottom linings of refrigerators, and frozen ice-packs.
- A vaccine vial monitor (VVM) is a label that changes colour when the vaccine vial has been exposed to heat over a period of time. Before opening a vial, the status of the VVM must be checked to see whether the vaccine has been damaged by heat. Vials which have passed their discard point should be thrown away.
- VVMs do not measure exposure to freezing temperatures. Inspect the freeze-indicator and use the shake test to make sure that freeze-sensitive vaccines have not been frozen.
- A refrigerator works well only if it is properly installed, cleaned and defrosted (ice is removed) regularly.
Self-Assessment Questions (SAQs) for Study Session 6
Now that you have completed this study session, you can assess how well you have achieved its Learning Outcomes by answering the following questions. Write your answers in your Study Diary and discuss them with your Tutor at the next Study Support Meeting. You can check your answers with the Notes on the Self-Assessment Questions at the end of this Module.
SAQ 6.1 (tests Learning Outcomes 6.1, 6.2 and 6.3)
Which of the following statements is false? In each case, explain what is incorrect.
- A Vaccine Vial Monitors (VVMs) measure exposure to freezing temperatures.
- B It is safe to use vaccines that have reached the VVM discard point if the expiry date has not passed.
- C The thermometer is an instrument for measuring the temperature in a refrigerator.
- D Diluents should always be kept in the main refrigerator compartment.
Answer
- A is false. The VVM records exposure of vaccines to heat over a period of time, but it does not record exposure to freezing temperatures.
- B is false. Even if the expiry date has not passed, it is unsafe to use vaccines that have reached the discard point indicated by the VVM.
- C is true. A thermometer measures the temperature in a refrigerator.
- D is false. Diluents can be kept at room temperature if there is not enough space in the refrigerator, but should be chilled thoroughly before use.
SAQ 6.2 (tests Learning Outcomes 6.1, 6.2 and 6.3)
Figure 6.16 shows the VVM attached to two different vials of vaccine. Would you use the vaccines with the VVM shown below in (a) and (b)? Explain your answer.
Answer
- a.The vaccine can be used because the inner square of the VVM is lighter than the outer circle. This means that the vaccine has not been damaged by excessive heat.
- b.This vaccine should not be used because the inner square of the VVM is almost as dark as the outer circle. This means that the vaccine has been damaged by excessive heat and should be discarded.
SAQ 6.3 (tests Learning Outcome 6.5)
Complete Table 6.1 by putting a cross in the appropriate empty column for each vaccine to show which shelf it should be stored on in a front-loading refrigerator.
| Vaccine | Top shelf | Middle shelf |
|---|---|---|
| Measles | ||
| Pentavalent or DPT | ||
| TT | ||
| OPV | ||
| BCG | ||
| PCV10 |
Answer
The completed version of Table 6.1 appears below, with the correct shelf for storing each vaccine marked with a cross.
| Vaccine | Top shelf | Middle shelf |
|---|---|---|
| Measles | X | |
| Pentavalent | X | |
| TT | X | |
| OPV | X | |
| BCG | X | |
| PCV10 | X |
SAQ 6.4 (tests Learning Outcomes 6.4 and 6.5)
On Friday, Abeba decides to defrost and clean her refrigerator because a lot of ice has collected around the freezer compartment. She puts conditioned ice-packs in a vaccine carrier and then places the vaccines from the refrigerator in the middle. There is not enough room in the vaccine carrier for everything, so she puts the diluents on the window ledge. She thought to herself: ‘The diluents will be safe here until I can put them back in the refrigerator. Diluent doesn't lose its strength as vaccine does.’
The following Monday is immunization day at the Health Post and many children come in for measles immunization. Abeba takes the measles vaccine out of the refrigerator, but at first she cannot find the diluent. Eventually she sees it on the window ledge.
- a.Can the diluent be used to reconstitute the measles vaccine?
- b.What should Abeba do before she can immunize the children?
Answer
- a.Abeba must not reconstitute the vaccine using the diluent which has been on the window ledge for several days because it will be warm. Warm diluent damages the vaccine.
- b.Abeba should put the diluent back into the refrigerator and only use it when it is cold again (between +2ºC and +8 ºC). She should apologise to the parents and explain that they can either wait for several hours for the diluent to reach the correct temperature, or come back for the next immunization session.
SAQ 6.5 (tests Learning Outcomes 6.2, 6.3, 6.4 and 6.6)
Figure 6.17 shows a dial thermometer used to measure the temperature of a vaccine refrigerator. Is this temperature safe for storing vaccines? What actions should be taken?

Answer
The thermometer shows a temperature of +22oC. This is much too high a temperature for storing vaccines! They have to be stored between +2oC and +8oC. This refrigerator is not working at all and must be repaired, or the power may have been cut off. Check the gas, electricity or kerosene supply, and call your supervisor to report the problem. Move the vaccines and diluents into cold boxes and transport them quickly to the nearest health centre for cold storage.
SAQ 6.6 (tests Learning Outcomes 6.2, 6.4 and 6.5)
How do you keep the following vaccines cold during an immunization session?
- a.Vaccine in opened vials that you are using.
- b.Vaccine in unopened vials.
Answer
- Opened vials that you are using should be put on the foam pad that rests above the conditioned ice-packs on top of the vaccine carrier. Make sure that the vaccine carrier is in a shady place, not in sunshine.
- Unopened vials should be put inside the vaccine carrier with conditioned ice-packs or chilled water bottles and the lid closed until you need them.
SAQ 6.7 (tests Learning Outcomes 6.3, 6.4 and 6.6)
Look at the refrigerator temperature chart in Figure 6.14.
- a.What was the temperature on the 11th day of the month, and what actions should the Health Extension Practitioner have taken on that day?
- b.What happened on the 12th day of the month, and what actions should have been taken then?
Answer
- a.On the morning of the 11th day of the month, the temperature of the refrigerator had risen to above +8ºC, which is above the acceptable temperature range. The refrigerator should have been checked on that day. The thermostat should have been adjusted to ‘colder’. If this action was taken, and the temperature still continued to rise, the vaccines should have been moved into a vaccine carrier and attempts made to repair the refrigerator or restore the power supply (e.g. the kerosene may have run out).
- b.Figure 6.14 shows that the temperature continued to rise, and reached about +18ºC by the morning of the 12th of the month. This is much too high for safe storage of vaccines. It would be important to check the VVM on any vaccines which had remained in the refrigerator during this time, and throw away any which had reached their discard point.