Use 'Print preview' to check the number of pages and printer settings.
Print functionality varies between browsers.
Printable page generated Sunday, 26 July 2026, 1:46 AM
TI-AIE: Making students believe they CAN do mathematics: operations on fractions
What this unit is about
Students often find fractions a difficult topic to understand – and one that can trigger negative emotional responses in students. Learning about operations on fractions presents a further challenge.
In this unit you will explore the use of techniques to enable students to visualise when reading mathematical notations. Visualisation can also act as a tool for students who get stuck, as it can help to reduce their ‘mathematical trauma’. This unit also builds on ideas developed in the unit Asking questions that challenge thinking: fractions.
Pause for thought Think back to when you last taught operations on fractions. Think of a student who was not finding it easy to understand what to do. Try to remember what was getting in the way of their understanding. |
What you can learn in this unit
- How to help your students build their understanding of operations on fractions.
- Some effective ways to teach students to visualise the mathematical system used in operations on fractions.
- Ways to teach your students to read and write mathematical notation.
This unit links to teaching requirements of the NCF (2005) and NCFTE (2009) outlined in Resource 1.
1 Some issues with learning mathematics – ‘mathematical trauma’
‘Mathematical trauma’ sounds rather dramatic. However, more and more research provides evidence that points to students experiencing real, distressing trauma while studying mathematics. It may seem easy to dismiss or ignore, and say ‘Well, they just don’t get it’, or ‘They should study harder and practise more’. But there are real reasons to believe that this trauma is what is stopping people using mathematics in later life, with many negative consequences to them and to society as a whole.
Mathematical trauma may come from students feeling and believing that they should not and cannot act or think for themselves when learning mathematics. Lange and Meaney (2011) describe mathematical trauma as: ‘being deprived of opportunities for expression, interpretation and agency in relation to mathematics, and hence positioned as passive receivers of superficial mathematical knowledge amounts’.
Mathematical trauma can have serious consequences for those students who are affected. They may reject mathematics as something that they are not able to do. They may get into a spiral of self-fulfilling prophecies because the moment they cannot make sense of an area in mathematics, they believe it is because they simply do not ‘get it’ and they will never be capable of doing so. This can also affect their belief in themselves as being capable in other areas of mathematics. They begin to feel they have no choice or control. This is also known as ‘having no agency’.
One of the triggers for mathematical trauma is the language of mathematics itself. This is both the symbolic representation and mathematical vocabulary, which can seem very alien and hard to connect to existing language knowledge and structures.
2 Issues with learning about operations on fractions
Research suggests that one of the main hindrances for students when learning to understand operations on fractions is that they are often taught procedures and rules without building on the conceptual understanding behind why these rules and procedures work (Fazio and Siegler, 2011). It is suggested that ‘one way to improve students’ conceptual understanding is to use manipulatives and visual representations of fractions. Studies that have taught fraction arithmetic using visual representations of fractions have shown positive effects on students’ computational skills’ (Fazio and Siegler, 2011, p. 12). In this unit you explore using visual representation as part of your teaching the topic of operating on fractions.
The next activity aims to address the issue of visualisation when adding and subtracting fractions, and finding out why a common denominator is needed for these operations. In order to develop the students’ visualisation skills, it will be important to give students sufficient time and opportunity to come up with their own methods and approaches. If they are not completely correct, any misconceptions revealed can then be addressed in whole-class discussions.
Before attempting to use the activities in this unit with your students, it would be a good idea to complete all, or at least part, of the activities yourself. It would be even better if you could try them out with a colleague as that will help you when you reflect on the experience. Trying for yourself will mean you get insights into learners’ experiences that can, in turn, influence your own teaching and experiences as a teacher.
When you are ready, use the activities with your students and reflect again on the way the activity went and the learning that happened. This will help you to develop a more student-focused teaching environment.
Activity 1: Visualising adding and subtracting fractions
Part 1: Adding fractions
Square paper will help the students to do this activity faster and with more precision. This activity works well in pairs or small groups so that students can generate more ideas between themselves. Make sure the groups are small enough and the drawings big enough so all students in the group can see and participate. Coloured pencils and scissors are useful but not essential. An important aspect of this activity is to allow plenty of time for the students to work on each part, so that they have a good understanding of what they need to do and enough time to think about, visualise and discuss the operations on fractions. This may mean giving the students at least two lessons to carry out all of the tasks in this activity.
(same denominator)
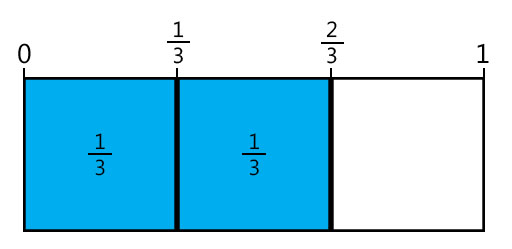
Ask your students to:
- draw three rectangles with a length of 6 cm and a height of 2 cm
- colour in or shade of the first rectangle
- colour in or shade of the second rectangle
- cut out both the coloured or shaded s and place them together in the third rectangle so that it shows.
How will they work out the answer to by using these rectangles? Give them three minutes or so to think of a way.
Discuss with the class how it could be done. Ask some students to come and draw their suggestions on the blackboard. A solution could look like Figure 1:
(Note to teacher: if there are no scissors or coloured pencils available, students can draw both fractions in one rectangle and use shading to indicate the two fractions.)
(same denominator)
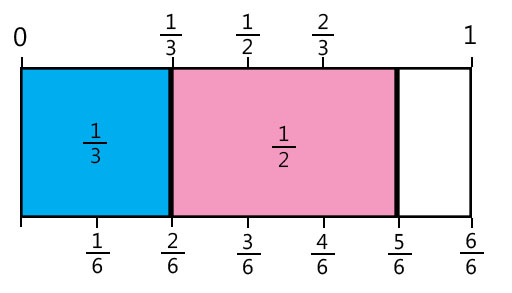
- Ask the students to do the same as they did with , but now for fractions . Make sure they use the same size rectangles because they will re-use these in the next question (different denominator)
- Tell the students to place together their cut out and shaded and in the third rectangle so that it shows .
- Ask the students how they will work out the answer to by using these rectangles. Give them five minutes or so to think of a way.
- Discuss with the whole class how it could be done. Ask some students to come and draw their suggestions on the blackboard. If needed give a hint that using a common denominator (how many equal parts the whole is divided into) might help.
A solution could look like Figure 2:
Other fraction sums
The same approach can be used for other fraction sums. It helps students to use rectangles with a lengths that are a common multiple of the two denominators. For example, for working out , use a rectangle of length 8; for working out , use a rectangle of length 14. Asking students to suggest the size of rectangle is an important step in understanding adding fractions.
Part 2: Subtracting fractions
Your students should know that subtraction is the same as ‘taking away’, and that ‘taking away’ can be done physically. For example, 8 – 3 is the same as having eight objects and then taking away three. Using the same approach as in Part 1, can be shown by drawing and then erasing of this. If the fractions and are cut out, the fraction piece of can be covered by the fraction piece of and the students then work out what is left uncovered. Or a part of the fraction piece can be cut off of the same measurement as the fraction piece .
(same denominator)
Ask your students to:
- draw three rectangles with a length of 6 cm and a height of 2 cm
- colour in or shade of the first rectangle
- colour in or shade of the second rectangle
- cut out both coloured or shaded fraction pieces and place them together in the third rectangle so that it shows
How will they work out the answer to by using these rectangles? Give them three minutes or so to think of a way.
Discuss with the whole class how it could be done. Ask some students to come and draw their suggestions on the blackboard.
(same denominator)
- Ask the students to do the same as they did with , but now for fractions . Make sure they use the same size rectangles, because they will re-use them in the next question.
- Discuss with the students why is the same as one whole.
(different denominator)
Ask your students to place together their cut-out and shaded and in the third rectangle so that it shows .
How will they work out the answer to using these rectangles? Give them five minutes or so to think of a way.
Discuss with the class how it could be done. Ask some students to come and draw their suggestions on the blackboard. If required, give a hint that using a common denominator (how many equal parts the whole is divided into) might help.
Other fraction differences
The same approach can be used for other fraction sums. As before, it will help students to build their understanding if they use rectangles that have a length that is a common multiple of the two denominators and that their attention is drawn to this. For example, for working out , use a rectangle of length 8; for working out , use a rectangle of length 21.
Video: Planning lessons |
Case Study 1: Mrs Mehta reflects on using Activity 1
This is the account of a teacher who tried Activity 1 with her elementary students.
I was rather shaken by reading about mathematical trauma – I could immediately think of several students who might be experiencing this. I also have to admit that up to now, I have taken the stance that some students ‘get it’ and others do not. Perhaps this is because I myself never struggled with mathematics that much, and have never thought about mathematics in a really negative way – just that it can be difficult sometimes.
So before starting on this activity I made myself promise I would really really try to support students by giving them enough time and opportunity to come up with their own methods and approaches, even if not completely correct – and not interfere or just tell them how to do it.
I had expected this activity to require quite a bit of prompting and supporting to get them to engage, but they all got busy straight away. The students worked in groups of four or five. There were not enough scissors for each group, but the students were happy with passing the few scissors that there were, from group to group. I noticed that they actually also used the opportunity of having a quick look at each other’s work – and picked up ideas from each other that way as well.
They worked out the rule for adding fractions with a common denominator pretty easily. Finding the method for adding fractions with a different denominator was harder, and we actually had two whole-class discussions. In the first one, after some five minutes, I ended up talking about equivalent fractions and that 3/6 is the same as ½, and so on. On reflection I was not that happy that I just told them about that – but I thought they had understood that concept from previous lessons on equivalent fractions. Somehow they had not internalised that learning. After I reminded them, I gave them another ten minutes to work out the answers, but I added that I wanted more than one answer. During the second whole-class discussion, we shared that , and I think the students learned much more about equivalent fractions.
Perhaps as a result of those deep discussions when adding fractions, they worked out the rules for subtracting fractions really quickly, and they could argue well about why they needed a common denominator. We even started discussing why you could end up with a negative fraction.
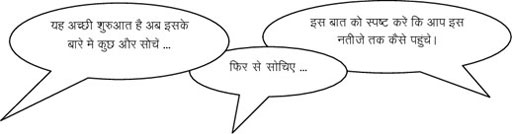
Pause for thought Mrs Mehta’s lesson used visualisation effectively to support students’ understanding of operations on fractions. However, even when a lesson goes well, there may be some students who still do not fully understand what the mathematical ideas being taught. Thinking about Mrs Mehta’s lesson, what opportunities did the lesson present for monitoring and giving feedback to students on their learning? You may want to have a look at the Resource 2, ‘Monitoring and giving feedback’, to help you think about this. |
Reflecting on your teaching practice
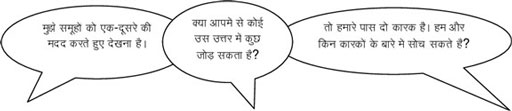
When you do such an exercise with your class, reflect afterwards on what went well and what went less well. Consider the questions that led to the students being interested and being able to progress, and those you needed to clarify. Such reflection always helps with finding a ‘script’ that helps you engage the students to find mathematics interesting and enjoyable. If they do not understand and cannot do something, they are less likely to become involved. Use this reflective exercise every time you undertake the activities, noting, as Mrs Mehta did some quite small things that made a difference.
Pause for thought Good questions to trigger such reflection are:
|
3 Reading multiplying and dividing fractions differently to help understanding
When you look at mathematical problems in a textbook, they can look daunting. To students, they may look like a string of alien symbols that are supposed to make sense – a feeling that can be very intimidating! This is not restricted to operations on fractions. The examples do make sense once you engage with the writing and the deciphering of the mathematical symbols.
When asked to multiply or divide fractions, it is even harder to think about what that might actually mean visually than with addition and subtraction. A way to help students overcome that sense of feeling overwhelmed by the symbolic notation of multiplying and dividing fractions is by thinking how a mathematical sentence can be read differently.
For example, the sum can be read as:
- ‘One third times one sixth’
- ‘One third multiplied by one sixth’
- ‘One third of one sixth.’
Similarly, ‘’can be read as:
- ‘One third divided by one sixth’
- ‘One third shared between one sixth’
- ‘How many sixths are there in one third?’
The beauty of mathematics is that you can decide which way works best for you to read mathematical sentences. You can then pick the way that is most conducive to working out the mathematical question – and finding the answer.
The expressions ‘one third of one sixth’ and ‘how many sixths are there in one third?’ are more conducive to thinking of a visual picture of multiplying and dividing fractions. The next activity asks the students to explore this.
Activity 2: Picturing multiplying and dividing fractions
Part 1: Making a dictionary
As for Activity 1, it is very important to allow your students plenty of time to work on each part of this activity.
Ask the students to discuss and write down as many different ways as they can think of for saying the following mathematical sentences:
- 2 × 3
- 7 × 8
Some of the answers could be:
- ‘… times …’
- ‘… multiplied by …’
- ‘… of …’
- ‘… lots of …’
Ask the students to do the same for:
Write the answers on the blackboard and leave it there for the next parts of this activity. Some of the answers could be:
- ‘… divided by …’
- ‘… shared between …’
- ‘how many … are there in …?’
Part 2: Picturing multiplication of fractions
In this part of the activity, you will ask your students to work in pairs or groups. To help with planning, you may wish to look at Resource 3, ‘Using pair work’.
Write the following multiplications on the blackboard, next to the answers from the previous part of this activity:
Now do the following:
- Ask the students to work in pairs or groups, and draw a picture that would show these multiplications in a rectangle with a length of 6 cm and a height of 2 cm – as they did in Activity 1. Point out to them that the answers still on the blackboard from Part 1 can help them.
- Tell them their ideas will be discussed with the whole class in ten minutes, and that the they do not need to have finished all the examples.
- After ten minutes, discuss their ideas and ask some of the students to come and draw their pictures on the blackboard.
- Discuss any misconceptions.
- Then ask the students to draw pictures for all the examples.
- If they finish early, ask them to make up some examples of their own.
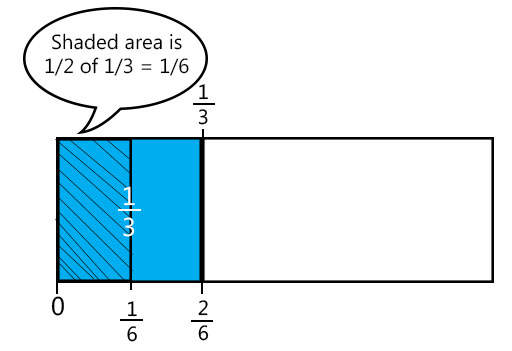
(Note for teacher: to draw a picture of these multiplications, the students think of these as ‘… of …’. So for example, for , the students would first shade in of their rectangle and then say ‘I need to find one half of this’, thereby halving the shaded third. If they have done Activity 1, they should be able to see that this equals of the rectangle.)
A solution for could look like Figure 3:
Part 3: Picturing division of fractions
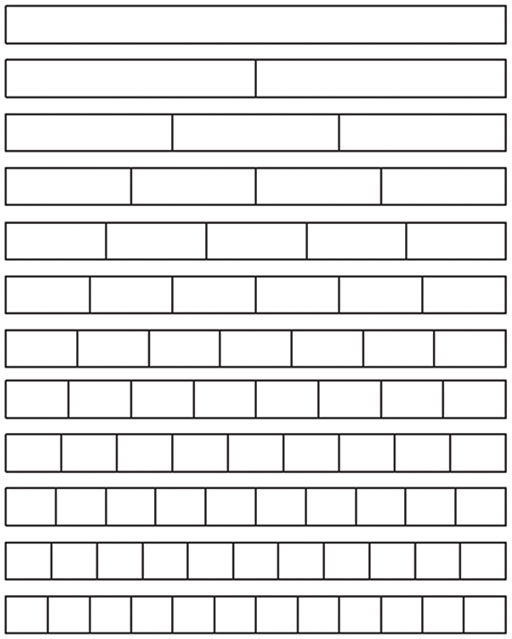
Preparation
Fraction strips are very useful for this activity. You can find some example blank fraction strips in Resource 4. You can ask the students to write in the fractions that these strips represent.
The activity
Write the following division sums on the blackboard, next to the answers from the previous part of this activity:
Then complete the drawing in the same way as Part 2.
(Note for teacher: Visualising how to divide a fraction by a fraction is hard. The important thing is to remember that division means many things, but in this case you are asking ‘how many … are there in …?’ So for , you are asking how many s are there in a . Draw a square or rectangle, divide it into ½ and cut out one of these halves. Draw the same square or rectangle, divide it into quarters cut them out. How many quarters are there in one half? Easy – there are two! The sum divided by can be tackled in the same way, as can some seemingly harder sums such as divided by . But you will soon run out of fraction division sums that can easily be visualised. However, the students will by now have developed some conceptual understanding of dividing fractions and can use their procedural knowledge for the harder sums.)
Video: Involving all |
Case Study 2: Mr Aparajeeta reflects on using Activity 2
I do get disheartened when so many of my students manage to get the rules for multiplying and dividing fractions all mixed up, especially when it is on a test or exam. Some students remember how to do it, but so many do not. So I decided to give this activity a go. Because visualising multiplying and dividing fractions was new to me, I first had a go at doing the questions in the activity myself and then with my sister at home. I really got enthused by this, and then shared the activity with two of my colleagues at school. So by the time I tried it out with the students, I knew what could happen.
What I learned from trying it out myself is that I needed some time and opportunity to experiment and play with the drawing, colouring in and cutting out of the fractions. So when I did it with my students I made sure I gave them sufficient time to do the same, and not to rush. I think building an image in your head takes time, especially when it is new to you.
The students seemed relieved to find out that multiplying and dividing fractions actually meant something – that you could see what it means and that you could say what it means. It made me realise that mathematical notation and symbols are different from ‘normal’ text, and that not much attention is paid to learning to read and interpret mathematical symbols.
For all the parts in the activity, the students worked in pairs. I thought that would work well for the experimenting and give students some time to think for themselves quietly.
I used the fraction strips [see Resource 4]. Because we do not have a photocopier at school and I did not fancy drawing fraction strips for so many students – I have more than 80 in my class – I planned for this and asked each student to make these at home using paper from their exercise books the night before. Of course, some had forgotten to do it or bring it in, but we had enough so that each pair of students had at least one set of fraction strips.
There were two girls in the class I had been getting worried about before – they always seemed so anxious in maths lessons, never putting their hand up and always looking at what other students were doing. I asked them to work together as a pair on this. At first they were not engaging with the activity at all, and looked at other students to see what they were doing. But after about four minutes they started to have a go, and they started talking to each other as well. They seemed to relax. In the whole-class discussion I asked one of them for their ideas and they answered, although in a quiet voice. A first step!
Pause for thought
|
4 Summary
This unit has encouraged you to think about how to use techniques of visualisation. Visualisation helps students to develop their understanding of operations on fractions such as adding, subtracting, multiplying and dividing by providing ways for them to see, or visualise, what is happening for each operation.
Developing ways to visualise helps students make sense of mathematical notations in many areas – not just fractions. These ideas are important because many students find learning mathematics so traumatic that they simply do not want to think about it. Overcoming this fear will take time and persistence, but making sure that your students are involved in their lessons using the ways such as those described in this unit will help to make sure that your students believe that they can do mathematics.
Pause for thought Identify ideas that you have used in this unit that would work when teaching other topics. Make a note now of two topics you have to teach soon where those ideas can be used with some small adjustments. |
Resources
Resource 1: NCF/NCFTE teaching requirements
This unit links to the following teaching requirements of the NCF (2005) and NCFTE (2009) and will help you to meet those requirements:
- View students as active participants in their own learning and not as mere recipients of knowledge; how to encourage their capacity to construct knowledge; how to shift learning away from rote methods.
- Let students learn important mathematics and see mathematics is more than formulas and mechanical procedures.
Resource 2: Monitoring and giving feedback
Improving students’ performance involves constantly monitoring and responding to them, so that they know what is expected of them and they get feedback after completing tasks. They can improve their performance through your constructive feedback.
Monitoring
Effective teachers monitor their students most of the time. Generally, most teachers monitor their students’ work by listening and observing what they do in class. Monitoring students’ progress is critical because it helps them to:
- achieve higher grades
- be more aware of their performance and more responsible for their learning
- improve their learning
- predict achievement on state and local standardised tests.
It will also help you as a teacher to decide:
- when to ask a question or give a prompt
- when to praise
- whether to challenge
- how to include different groups of students in a task
- what to do about mistakes.
Students improve most when they are given clear and prompt feedback on their progress. Using monitoring will enable you to give regular feedback, letting your students know how they are doing and what else they need to do to advance their learning.
One of the challenges you will face is helping students to set their own learning targets, also known as self-monitoring. Students, especially struggling ones, are not used to having ownership of their own learning. But you can help any student to set their own targets or goals for a project, plan out their work and set deadlines, and self- monitor their progress. Practising the process and mastering the skill of self-monitoring will serve them well in school and throughout their lives.
Listening to and observing students
Most of the time, listening to and observing students is done naturally by teachers; it is a simple monitoring tool. For example, you may:
- listen to your students reading aloud
- listen to discussions in pair or groupwork
- observe students using resources outdoors or in the classroom
- observe the body language of groups as they work.
Make sure that the observations you collect are true evidence of student learning or progress. Only document what you can see, hear, justify or count.
As students work, move around the classroom in order to make brief observation notes. You can use a class list to record which students need more help, and also to note any emerging misunderstandings. You can use these observations and notes to give feedback to the whole class or prompt and encourage groups or individuals.
Giving feedback
Feedback is information that you give to a student about how they have performed in relation to a stated goal or expected outcome. Effective feedback provides the student with:
- information about what happened
- an evaluation of how well the action or task was performed
- guidance as to how their performance can be improved.
When you give feedback to each student, it should help them to know:
- what they can actually do
- what they cannot do yet
- how their work compares with that of others
- how they can improve.
It is important to remember that effective feedback helps students. You do not want to inhibit learning because your feedback is unclear or unfair. Effective feedback is:
- focused on the task being undertaken and the learning that the student needs to do
- clear and honest, telling the student what is good about their learning as well as what requires improvement
- actionable, telling the student to do something that they are able to do
- given in appropriate language that the student can understand
- given at the right time – if it’s given too soon, the student will think ‘I was just going to do that!’; too late, and the student’s focus will have moved elsewhere and they will not want to go back and do what is asked.
Whether feedback is spoken or written in the students’ workbooks, it becomes more effective if it follows the guidelines given below.
Using praise and positive language
When we are praised and encouraged, we generally feel a great deal better than when we are criticised or corrected. Reinforcement and positive language is motivating for the whole class and for individuals of all ages. Remember that praise must be specific and targeted on the work done rather than about the student themselves, otherwise it will not help the student progress. ‘Well done’ is non-specific, so it is better to say one of the following:
Using prompting as well as correction
The dialogue that you have with your students helps their learning. If you tell them that an answer is incorrect and finish the dialogue there, you miss the opportunity to help them to keep thinking and trying for themselves. If you give students a hint or ask them a further question, you prompt them to think more deeply and encourage them to find answers and take responsibility for their own learning. For example, you can encourage a better answer or prompt a different angle on a problem by saying such things as:
It may be appropriate to encourage other students to help each other. You can do this by opening your questions to the rest of the class with such comments as:
Correcting students with a ‘yes’ or ‘no’ might be appropriate to tasks such as spelling or number practice, but even here you can prompt students to look for emerging patterns in their answers, make connections with similar answers or open a discussion about why a certain answer is incorrect.
Self-correction and peer correction is effective and you can encourage this by asking students to check their own and each other’s work while doing tasks or assignments in pairs. It is best to focus on one aspect to correct at a time so that there is not too much confusing information.
Resource 3: Using pair work
In everyday situations people work alongside, speak and listen to others, and see what they do and how they do it. This is how people learn. As we talk to others, we discover new ideas and information. In classrooms, if everything is centred on the teacher, then most students do not get enough time to try out or demonstrate their learning or to ask questions. Some students may only give short answers and some may say nothing at all. In large classes, the situation is even worse, with only a small proportion of students saying anything at all.
Why use pair work?
Pair work is a natural way for students to talk and learn more. It gives them the chance to think and try out ideas and new language. It can provide a comfortable way for students to work through new skills and concepts, and works well in large classes.
Pair work is suitable for all ages and subjects. It is especially useful in multilingual, multi-grade classes, because pairs can be arranged to help each other. It works best when you plan specific tasks and establish routines to manage pairs to make sure that all of your students are included, learning and progressing. Once these routines are established, you will find that students quickly get used to working in pairs and enjoy learning this way.
Tasks for pair work
You can use a variety of pair work tasks depending on the intended outcome of the learning. The pair work task must be clear and appropriate so that working together helps learning more than working alone. By talking about their ideas, your students will automatically be thinking about and developing them further.
Pair work tasks could include:
- ‘Think–pair–share’: Students think about a problem or issue themselves and then work in pairs to work out possible answers before sharing their answers with other students. This could be used for spelling, working through calculations, putting things in categories or in order, giving different viewpoints, pretending to be characters from a story, and so on.
- Sharing information: Half the class are given information on one aspect of a topic; the other half are given information on a different aspect of the topic. They then work in pairs to share their information in order to solve a problem or come to a decision.
- Practising skills such as listening: One student could read a story and the other ask questions; one student could read a passage in English, while the other tries to write it down; one student could describe a picture or diagram while the other student tries to draw it based on the description.
- Following instructions: One student could read instructions for the other student to complete a task.
- Storytelling or role play: Students could work in pairs to create a story or a piece of dialogue in a language that they are learning.
Managing pairs to include all
Pair work is about involving all. Since students are different, pairs must be managed so that everyone knows what they have to do, what they are learning and what your expectations are. To establish pair work routines in your classroom, you should do the following:
- Manage the pairs that the students work in. Sometimes students will work in friendship pairs; sometimes they will not. Make sure they understand that you will decide the pairs to help them maximise their learning.
- To create more of a challenge, sometimes you could pair students of mixed ability and different languages together so that they can help each other; at other times you could pair students working at the same level.
- Keep records so that you know your students’ abilities and can pair them together accordingly.
- At the start, explain the benefits of pair work to the students, using examples from family and community contexts where people collaborate.
- Keep initial tasks brief and clear.
- Monitor the student pairs to make sure that they are working as you want.
- Give students roles or responsibilities in their pair, such as two characters from a story, or simple labels such as ‘1’ and ‘2’, or ‘As’ and ‘Bs’). Do this before they move to face each other so that they listen.
- Make sure that students can turn or move easily to sit to face each other.
During pair work, tell students how much time they have for each task and give regular time checks. Praise pairs who help each other and stay on task. Give pairs time to settle and find their own solutions – it can be tempting to get involved too quickly before students have had time to think and show what they can do. Most students enjoy the atmosphere of everyone talking and working. As you move around the class observing and listening, make notes of who is comfortable together, be alert to anyone who is not included, and note any common errors, good ideas or summary points.
At the end of the task you have a role in making connections between what the students have developed. You may select some pairs to show their work, or you may summarise this for them. Students like to feel a sense of achievement when working together. You don’t need to get every pair to report back – that would take too much time – but select students who you know from your observations will be able to make a positive contribution that will help others to learn. This might be an opportunity for students who are usually timid about contributing to build their confidence.
If you have given students a problem to solve, you could give a model answer and then ask them to discuss in pairs how to improve their answer. This will help them to think about their own learning and to learn from their mistakes.
If you are new to pair work, it is important to make notes on any changes you want to make to the task, timing or combinations of pairs. This is important because this is how you will learn and how you will improve your teaching. Organising successful pair work is linked to clear instructions and good time management, as well as succinct summarising – this all takes practice.
Resource 4: Fraction strips
Additional resources
- A newly developed maths portal by the Karnataka government: http://karnatakaeducation.org.in/ KOER/ en/ index.php/ Portal:Mathematics
- National Centre for Excellence in the Teaching of Mathematics: https://www.ncetm.org.uk/
- National STEM Centre: http://www.nationalstemcentre.org.uk/
- National Numeracy: http://www.nationalnumeracy.org.uk/ home/ index.html
- BBC Bitesize: http://www.bbc.co.uk/ bitesize/
- Khan Academy’s math section: https://www.khanacademy.org/ math
- NRICH: http://nrich.maths.org/ frontpage
- Art of Problem Solving’s resources page: http://www.artofproblemsolving.com/ Resources/ index.php
- Teachnology: http://www.teach-nology.com/ worksheets/ math/
- Math Playground’s logic games: http://www.mathplayground.com/ logicgames.html
- Maths is Fun: http://www.mathsisfun.com/
- Coolmath4kids.com: http://www.coolmath4kids.com/
- National Council of Educational Research and Training’s textbooks for teaching mathematics and for teacher training of mathematics: http://www.ncert.nic.in/ ncerts/ textbook/ textbook.htm
- AMT-01 Aspects of Teaching Primary School Mathematics, Block 1 (‘Aspects of Teaching Mathematics’), Block 2 (‘Numbers (I)’), Block 3 (‘Numbers (II)’), Block 4 (‘Fractions’): http://www.ignou4ublog.com/ 2013/ 06/ ignou-amt-01-study-materialbooks.html
- LMT-01 Learning Mathematics, Block 1 (‘Approaches to Learning’) Block 2 (‘Encouraging Learning in the Classroom’), Block 4 (‘On Spatial Learning’), Block 5 (‘Exploring Numbers’), Block 6 (‘Thinking Mathematically’): http://www.ignou4ublog.com/ 2013/ 06/ ignou-lmt-01-study-materialbooks.html
- Manual of Mathematics Teaching Aids for Primary Schools, published by NCERT: http://www.arvindguptatoys.com/ arvindgupta/ pks-primarymanual.pdf
- Learning Curve and At Right Angles, periodicals about mathematics and its teaching: http://azimpremjifoundation.org/ Foundation_Publications
- Textbooks developed by the Eklavya Foundation with activity-based teaching mathematics at the primary level: http://www.eklavya.in/ pdfs/ Catalouge/ Eklavya_Catalogue_2012.pdf
- Central Board of Secondary Education’s books and support material (also including List of Hands-on Activities in Mathematics for Classes III to VIII) – select ‘CBSE publications’, then ‘Books and support material’: http://cbse.nic.in/ welcome.htm
References
Acknowledgements
This content is made available under a Creative Commons Attribution-ShareAlike licence (http://creativecommons.org/ licenses/ by-sa/ 3.0/), unless identified otherwise. The licence excludes the use of the TESS-India, OU and UKAID logos, which may only be used unadapted within the TESS-India project.
Every effort has been made to contact copyright owners. If any have been inadvertently overlooked the publishers will be pleased to make the necessary arrangements at the first opportunity.
Video (including video stills): thanks are extended to the teacher educators, headteachers, teachers and students across India who worked with The Open University in the productions.