Use 'Print preview' to check the number of pages and printer settings.
Print functionality varies between browsers.
Printable page generated Wednesday, 24 June 2026, 6:26 AM
TI-AIE: Using manipulatives: decomposition and regrouping
What this unit is about
Written addition and subtraction algorithms depend on composition and decomposition, and on re-grouping, especially when the numbers are more than single digits. Allowing students to first fully understand the concept of composition – that is, how the number system works in groups of tens, hundreds, tenths and so on – will help when they learn how to subtract.
Your students will take time to develop number concepts. Number is a very abstract concept, even though it is used extensively in society. The ultimate goal is that students will be able to use addition and subtraction algorithms fluently for all types of numbers. However, if students do not understand the meaning behind the algorithms before they start, they may forget what to do and make unnecessary mistakes.
Manipulatives are objects that students can handle for themselves. They offer a concrete representation of abstract mathematical ideas. The manipulatives in this unit have been designed to enable students to actually compose and decompose numbers, feeling and thinking about what they are doing and in the process, building a fundamental understanding of what to do. These activities are about helping students understand the underlying concepts behind manipulatives as effective teaching and learning tools.
What you can learn in this unit
- Some ideas on how best to use manipulatives to allow your students to help them understand the ideas of composition and decomposition.
- Effective ways to teach students to add and subtract numbers with more than one digit.
- How to observe how your students talk about mathematics in order to identify their misconceptions and to help you shape your teaching around their learning.
This unit links to the teaching requirements of the NCF (2005) and NCFTE (2009) outlined in Resource 1.
1 Composition and decomposition
Pause for thought Think back to when you last taught addition and subtraction algorithms. Think in particular about any students who were not finding it easy to understand what to do. Try to remember what was getting in the way of their understanding. |
Decomposition is an important concept for students to understand when they are learning to add and subtract numbers. First students must have a clear idea of how numbers are composed.
Composing numbers
The decimal system is used world-wide and students will need to understand that numbers in differing positions have different values, and that a whole number is composed of those values.
For example, the number 357 is made up (or composed) of three hundreds, five tens and seven ones:
3 × 100 + 5 × 10 + 7 × 1 = 300 + 50 + 7 = 357
The number 35.7 is made up (or composed) of three tens, five ones and seven tenths:
3 × 10 + 5 × 1 + 7 × 0.1 = 30 + 5 + 0.7 = 35.7
It is important not to forget to use examples of numbers containing a zero so that the students understand that sometimes there are no tens and/or no units.
For example, the number 907 is made up (or composed) of 9 hundreds and 7 units. Note that there are no ‘tens’ recorded, which might confuse the students with the number 97. In fact, the number 907 is composed of:
9 × 100 + 0 × 10 + 7 × 1 = 900 + 0 + 7 = 907
The students need to clearly understand that numbers are made up in this way before they start to add or subtract them. One way to be sure that they do understand is to check that they are able to articulate the way that numbers are composed. Often this stage is overlooked. Once students have a secure understanding of how numbers are composed then decomposition makes much more sense!
Adding numbers – adding on and adding all together
There are basically two different ways that numbers can be added together. One way to add numbers is to ‘add on’. That is, you start counting upwards from the largest number and count on the smallest number, one at a time, to get the total. This is often the most efficient way to add, certainly if you are adding mentally.
The written addition algorithm that is required in Indian schools uses the ‘count all together’ way of thinking about addition. This means that you take, say, seven items – stones or sweets or whatever – and then take five more. When you put them all together and count them, you get 12.

Pause for thought When Rizwana was teaching her Class II students she noticed that Satish had written out his working for adding 23 to 37 like this: What is wrong with this answer? Why did Satish write his answer in this way? How could you resolve this misconception? What other misconceptions do you commonly encounter when teaching addition? |
2 Using concrete representations to develop students’ understanding
Number lines
‘Adding on’ can be shown using a number line. Students often find a number line is a concrete idea that they can work with in order to understand addition and subtraction. If your students have never used a number line they will quickly become accustomed to using one. Number lines can be displayed on the classroom walls so that students can see them all the time or they can draw one for themselves in their books.
Here are some examples of how number lines can be used.
Using a number line for adding on
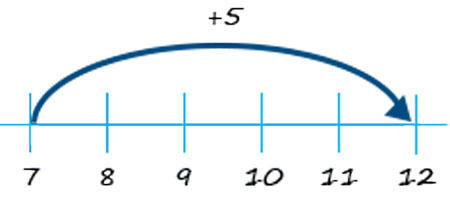
Take the addition of 7 + 5:
Start at 7, and add on 5 to get 12.
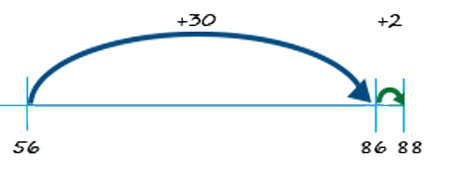
Next, the addition of 32 + 56:
Start at 56, add on 30, then 2, and you get 88.
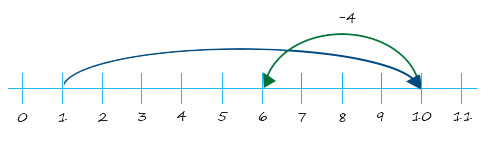
Using a number line for subtraction
Number line showing 10 – 4 = 6:
Once students are used to using number lines for basic addition and subtraction with positive numbers then the line can be naturally extended to negative numbers.
Number lines are also easily extendable to two- or three-digit numbers.
3 Ways to demonstrate grouping and decomposition
Abacuses can be used to give a concrete representation of how the number system works when adding or subtracting numbers. On a basic spike abacus only nine beads or rings will fit onto each spike, so that can lead to a natural discussion of what needs to be done when the number you are adding on reaches ten.
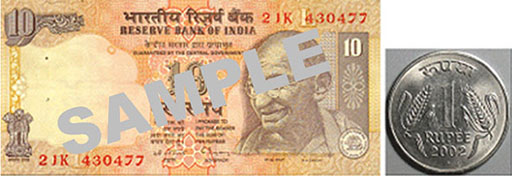
Money can also represent ideas of composition and decomposition. Many students will have begun to understand that ten single rupee coins will buy the same as one Rs. 10 note. Show the class some Rs. 1 coins and Rs. 10 and Rs. 100 notes – this will help bring the real world into the classroom.
You can show them that composition and decomposition does really happen. You could use stones to represent single rupees and pieces of paper with Rs. 10 and Rs. 100 written on them so that the students can actually work using their own ‘money’. Perhaps you could bring in some small items that the students can pretend to buy using their pretend money. Working out change is another way to model decomposition.
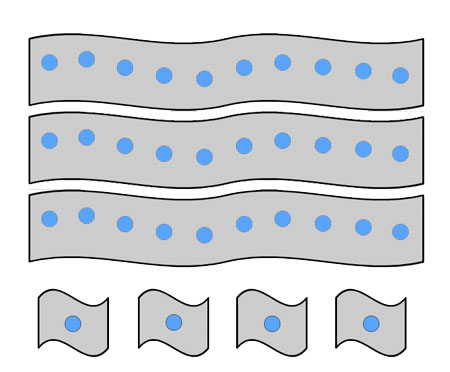
Two of the activities in this unit use strips of paper with 10 dots on them to represent tens. These can be easily ripped into singles in order to show decomposition. Make sure that your students understand the ‘count all together’ method of counting before doing the next activity, which is designed to help them understand that if the units ‘make a ten’ then you add that ten onto the other tens.
Before attempting to use the activities in this unit with your students, it would be a good idea to complete all, or at least part, of the activities yourself. It would be even better if you could try them out with a colleague as that will help you when you reflect on the experience. Trying for yourself will mean you get insights into a learner’s experiences that can in turn influence your teaching and your experiences as a teacher. When you are ready, use the activities with your students and reflect again on the way the activity went and the learning that happened. This will help you to develop a more learner-focused teaching environment.
Activity 1: ‘Make a ten’ – learning the written addition algorithm
Preparation
Make many strips of paper of the same length and then draw ten equally spaced dots on each of these strips as shown in Figure 7. Rip several of these strips into ten single dots. If you have access to a computer with a printer you may be able to save some time by creating and printing out strips.
The activity
Part 1

- Ask the students to show you 24 using the strips and then to show you 36 and several other numbers.
- Make sure that they notice that the left-hand digit indicates how many strips of 10 are needed and the right-hand digit indicates how many separate ones (or units) there are.
- Ask the students how many ones (units) are needed to make one strip
Part 2
Now lead the students through addition.
- Add 24 and 12:
- Show 24 in strips.
- Now put 12 in strips next to it.
- Now put them together. How many have you got? (You have 3 ten strips and 6 ones, so 24 + 12 = 36.)
- Add a few more numbers together like this, but make sure there is no ‘carry’ – that is, the ones digits do not add to 10 or more.
- Add 24 and 38:
- Show 24 in strips.
- Put 38 in strips next to it.
- Put them together. How many do you have? (You have 5 tens strips and 12 ones.)
- Is there a problem with this? Hopefully someone will say that if you put 10 dots together, you could make a ten strip so you have 6 tens strips. If not, show them that when they can ‘make a ten’ they have to add it to the tens column in the decimal system.
- Ask the students to do several more similar sums using their strips.
Have a few sheets with 100 dots on them to represent the 100 column so that students who grasp the ideas quickly can move on to adding numbers where the tens digits add to more than 10.
Video: Using local resources |
Case Study 1: Mrs Kapur reflects on using Activity 1
This is the account of a teacher who tried Activity 1 with her elementary students.
I wanted to teach my students the written addition algorithm and I knew from previous years that many of them would just add the columns separately as Satish had done in the ‘Pause for thought’. I liked the simplicity of the idea of strips of 10 dots on spare paper that could be ripped into singles.
I knew it would take a long time to prepare, so I set up two helpful students to do it in the lunch break. Yogesh and Rani took far more care over spacing the dots than I would have done, and they made the dots bold and black which was great.
I asked the students to work in groups of four so that I had enough strips for each group and showed the class how to use the strips to represent numbers. I stressed that numbers had developed this way because we have ten fingers and that the strips showed handfuls. The class had seen two-digit numbers before so they knew that this was the way that numbers were written. I made sure that they knew we were doing this to help them understand the arithmetic better.
Each group laid out their strips as instructed and then pushed them altogether and counted what they had. They enjoyed doing this, laughing about pushing the carefully laid-out strips and singles together and then sorting out what they had, before copying down the sum that their strips represented that I wrote on the board.
Then we moved on to the sums where the ones digit added to ten or more. I was worried that they would not notice that ten ones make a ten. However, as I moved around the class I overheard several of them talking and realised that they had already noticed that the singles were just a ten strip ripped up.
So this time when I asked them to put all their strips together a few hands shot up to ask if they could change ten of their bits of paper for a single strip. I asked them why they would want to do that, and they said because the ones bits of paper are messy and it’s easier to use the ten strips. I was so happy at this explanation of why when you can ‘make a ten’ you can get rid of ten of those troublesome bits of paper and just add up the tens strips.
I asked them to use the strips to do several more sums before I showed them how to do this type of addition using the formal written algorithm. I wanted them to play a little with this idea so that they really knew what was happening when you ‘carry’ one into the tens column. I observed what was happening, and most groups laid out their strips for the two numbers and then immediately counted out ten singles and exchanged them for a ten strip. I thought they were ready for the formal algorithm so I showed them ‘how people write this down in their books’.
In the next lesson we carried on using the strips and I saw that several of them had made their own at home, which was great as that saved me a job, and they obviously thought that this would help them. I wrote the sums on the board. They used the strips to show what was happening and then wrote it out with the ‘carry’ in the right place. I saw that several of the students were saying, OK, well those singles will ‘make a ten’ with this many left over, so the strips had helped them to say what they were doing. Two or three groups had stopped using the strips altogether by the end of the lesson but they still talked about ‘making a ten strip’.
I was really pleased with how this representation helped them with the idea of carrying a ten into the next column. I made sure that I asked a student to collect up all the strips and singles carefully after each lesson as I could see we would use them for lots more lessons in the future.
Reflecting on your teaching practice
When you do such an exercise with your class, reflect afterwards on what went well and what went less well. Consider the questions that led to the students being interested and being able to progress, and those you needed to clarify. Such reflection always helps with finding a ‘script’ that helps you engage the students to find mathematics interesting and enjoyable. If students do not understand and cannot do something, they are less likely to become involved. Use this reflective exercise every time you undertake the activities, noting as Mrs Kapur did some quite small things that made a difference.
Pause for thought Good questions to trigger such reflection are:
|
4 Decomposition
Decomposition refers to breaking down tens into ones (or hundreds into tens) so that the required subtraction can take place. If you need to pay Rs. 7 as your share of an autorickshaw fare but you only have a Rs. 10 note then you may have to exchange the note for 10 single Rs. 1 coins in order to pay the correct fare. This is decomposition in action!
Sometimes you decompose tens into ones, but you may also need to decompose 100 into tens, or ones into tenths and so on. It will be easier for young students to learn decomposition using tens and ones, but don’t forget to show that it is something that happens for all other parts of the number system.
Activity 2: Decomposition – learning to use the written subtraction algorithm
Preparation
Use strips as in Activity 1. If you did Activity 1 with your students then ask them to bring in their own strips so that you only have to make new strips for those who forget.
Ask the students to work in groups of four or five, and make sure that each group has lots of ‘ten strips’ and a few singles.
The activity
- Ask each group to sort out strips to represent 34 and check that everyone can do this.
- Tell your students they now have to ‘subtract 16 from 34’. Write the subtraction on the board and ask the students to do it using the strips.
- Give them a few minutes to discuss what to do and then ask for suggestions.
- Say to the students that taking away 10 is of course easy, the difficult bit is taking 6 ones away when you only have four ones. Can they think of a way to get more ones? Encourage the students to rip up one tens strip into ten singles if no one has already suggested it, which they may do if they have done Activity 1. Ask: ‘How many singles do you have now? Can you take away 6 now? What is the answer to ‘subtract 16 from 34’? Is that the same as ‘34 take away 16’?’
- Give the students several more examples of subtraction before explaining the formal written subtraction algorithm. They will need to be confident about ripping up or decomposing a ten, and realising that they therefore have one less ten, before they see how this ‘action’ is written down.
- Of course, you could use this method to continue into hundreds, although drawing the dots for two hundred might be tedious (perhaps ask for volunteers to do this during a lunch break). It would be useful though to rip the hundred sheet into tens strips sometimes so that the connection is made.
Video: Talk for learning |
Case Study 2: Mrs Kapur talks about using Activity 2
I had used the strips for Activity 1 several months before and most of my class kept a few strips tucked into the back of their exercise book just in case they needed to ‘see what to do’. I had encouraged them to use the strips so that they felt confident in what they were doing. I know how feeling unsure can stop students enjoying mathematics and ultimately make them think they cannot do it.
I used the number line to show subtraction so that they had the idea of taking away and the number reducing. It was natural therefore for me to use the strips when teaching the formal subtraction algorithm, and so when I asked them to bring in lots of strips themselves they knew it would be worth doing and brought them in.
They had no trouble laying them out and when I asked, ‘What shall we do, we do not have enough ones to take away 6?’ Some of the students replied, ‘Unmake the ten, rip it up!’ So we did, but first I asked some of the children who had quickly understood what to do to explain their thinking to the rest of the class. This was because I felt that quite a few students had not fully understood at this point in the lesson.
Many students needed to use the strips a great deal before they could see immediately what to do. I encouraged them to make up their own sums and to use the strips to show what was happening until I could see that they had developed confidence in what they were doing.
Of course some of them saw it straight away. I asked these students to form a group together and to discuss how this could be written down in the same way that we wrote down our additions formally. This made them think hard and when they were ready they showed the rest of the class their way. It was almost the same as I would have taught them, which delighted me. The only difference was that they talked about taking one ten and ‘ripping it up’ so that it could go in the ones column, but if that is the way they want to talk about it, it is fine by me!
Pause for thought An important part of this activity is the opportunity it provides for students’ to learn through discussion and explaining their thinking. Do you feel that there were any additional opportunities in Mrs Kapur’s lesson for the students to engage in talk for learning? You may want to have a look at the key resource ‘Talk for learning’ to help you think about this. Now reflect on how your students responded to the activity and answer the following questions:
|
5 Summary
In studying this unit you have explored how using manipulatives can help students to understand how the formal addition and subtraction algorithms work. The manipulatives help students to have a real picture of what they are doing as they regroup ones into tens in addition and as they decompose tens into ones in subtraction.
You have also considered how talking can help students explore their understanding of the decimal number system.
Requirements for teaching from NCF (2005) and NCFTE (2009) were used as ambitious goals.
Pause for thought Identify three techniques or strategies you have learnt in this unit that you might use in your classroom in further learning mathematics. |
Resources
Resource 1: NCF/NCFTE teaching requirements
This unit links to the following teaching requirements of the NCF (2005) and NCFTE (2009) and will help you to meet those requirements:
- View learners as active participants in their own learning and not as mere recipients of knowledge; how to encourage their capacity to construct knowledge; how to shift learning away from rote methods.
- Let students see mathematics as something to talk about, to communicate through, to discuss among themselves, to work together on.
Additional resources
- A newly developed maths portal by the Karnataka government: http://karnatakaeducation.org.in/ KOER/ en/ index.php/ Portal:Mathematics
- National Centre for Excellence in the Teaching of Mathematics: https://www.ncetm.org.uk/
- National STEM Centre: http://www.nationalstemcentre.org.uk/
- National Numeracy: http://www.nationalnumeracy.org.uk/ home/ index.html
- BBC Bitesize: http://www.bbc.co.uk/ bitesize/
- Khan Academy’s math section: https://www.khanacademy.org/ math
- NRICH: http://nrich.maths.org/ frontpage
- Art of Problem Solving’s resources page: http://www.artofproblemsolving.com/ Resources/ index.php
- Teachnology: http://www.teach-nology.com/ worksheets/ math/
- Math Playground’s logic games: http://www.mathplayground.com/ logicgames.html
- Maths is Fun: http://www.mathsisfun.com/
- Coolmath4kids.com: http://www.coolmath4kids.com/
- National Council of Educational Research and Training’s textbooks for teaching mathematics and for teacher training of mathematics: http://www.ncert.nic.in/ ncerts/ textbook/ textbook.htm
- AMT-01 Aspects of Teaching Primary School Mathematics, Block 1 (‘Aspects of Teaching Mathematics’), Block 2 (‘Numbers (I)’), Block 3 (‘Numbers (II)’): http://www.ignou4ublog.com/ 2013/ 06/ ignou-amt-01-study-materialbooks.html
- LMT-01 Learning Mathematics, Block 1 (‘Approaches to Learning’) Block 2 (‘Encouraging Learning in the Classroom’), Block 4 (‘On Spatial Learning’), Block 6 (‘Thinking Mathematically’): http://www.ignou4ublog.com/ 2013/ 06/ ignou-lmt-01-study-materialbooks.html
- Manual of Mathematics Teaching Aids for Primary Schools, published by NCERT: http://www.arvindguptatoys.com/ arvindgupta/ pks-primarymanual.pdf
- Learning Curve and At Right Angles, periodicals about mathematics and its teaching: http://azimpremjifoundation.org/ Foundation_Publications
- Textbooks developed by the Eklavya Foundation with activity-based teaching mathematics at the primary level: http://www.eklavya.in/ pdfs/ Catalouge/ Eklavya_Catalogue_2012.pdf
- Central Board of Secondary Education’s books and support material (also including List of Hands-on Activities in Mathematics for Classes III to VIII) – select ‘CBSE publications’, then ‘Books and support material’: http://cbse.nic.in/ welcome.htm
References
Acknowledgements
Except for third party materials and otherwise stated below, this content is made available under a Creative Commons Attribution-ShareAlike licence (http://creativecommons.org/ licenses/ by-sa/ 3.0/). The material acknowledged below is Proprietary and used under licence for this project, and not subject to the Creative Commons Licence. This means that this material may only be used unadapted within the TESS-India project and not in any subsequent OER versions. This includes the use of the TESS-India, OU and UKAID logos.
Grateful acknowledgement is made to the following sources for permission to reproduce the material in this unit:
Figure 6: Indian currency sample – Indian government.
Every effort has been made to contact copyright owners. If any have been inadvertently overlooked the publishers will be pleased to make the necessary arrangements at the first opportunity.
Video (including video stills): thanks are extended to the teacher educators, headteachers, teachers and students across India who worked with The Open University in the productions.