Use 'Print preview' to check the number of pages and printer settings.
Print functionality varies between browsers.
Printable page generated Sunday, 28 June 2026, 11:59 PM
TI-AIE: Using rich tasks: area and perimeter
What this unit is about
The concepts of area and perimeter permeate our lives. In everyday life area and perimeter are used constantly – for example, for describing the size of a house by talking about its floor area, or for working out how much wire is needed to fence off a field. In the mathematics curriculum at school they are addressed from the elementary years, through to the concept of area in calculus.
Because the concepts of area and perimeter are so much present in everyday life, elementary students will already have an intuitive understanding before encountering the topics in maths lessons.
In this unit you will learn how to nurture this intuitive understanding and transform it into a more theoretical understanding, and to link outside life experiences with classroom practice.
You will also focus on using rich questions that act as triggers for effective group discussions and paired work. When we ask students to discuss something, we first need to give them something to discuss!
Several of the activities in this unit have a similar structure, but different focuses or concepts are used to show how a set of rewarding tasks can be turned into another rich activity by keeping the structure and making small changes to the focus.
What you can learn in this unit
- Some effective ways to build on your students’ intuitive understanding by using real-life objects and examples.
- How to support your students to learn through discussion in paired and groupwork.
- How to develop rich tasks by making small changes to the focus while keeping the structure of existing rich tasks.
This unit links to the teaching requirements of the NCF (2005) and NCFTE (2009) outlined in Resource 1 and will help you to meet those requirements.
1 Issues with learning about area and perimeter
Pause for thought Think about your life outside the mathematics classroom. Where else do you need to work with the concepts of area and perimeter? Note down some examples.
|
Although the concepts of area and perimeter are widely used in everyday life, it is often considered a confusing topic when it comes to studying these concepts as part of the mathematics curriculum in school (Watson et al., 2013). Some of the issues students have about learning about area and perimeter are listed here.
- They may see area, and also sometimes perimeter, as purely an application of formulae without understanding what area and perimeter actually are.
- They sometimes mix up the concepts of area and perimeter.
- They have difficulty developing an understanding of dimension. Often they do not understand that perimeter is a length, which is one-dimensional and measured in units of length such as metres, centimetres or inches, while area is measured in squares with bases of a certain length and hence is expressed in two-dimensional units such as m2 (metres squared, or square metres).
- They might not have the experience of measuring in other unconventional units of measurement such as hands, twigs, etc. and therefore do not know why it is better to use standard units of measurement – for example using metres instead of hand-spans, which vary between individuals.
- They may not link their everyday experiences and intuitive understanding of area and perimeter to what they learn in the mathematics classroom.
In the activities in this unit you will use teaching approaches that address these issues.
Pause for thought Think back to when you taught area and perimeter on a previous occasion.
|
2 Developing an understanding of perimeter
Mathematical vocabulary is not always straightforward and may act as a barrier to learning. It is often helpful for students to appreciate this, and for the teacher to draw special attention to mathematical words and where they come from. Greek students do not tend to find the word perimeter difficult to understand because the word comes from the Greek words peri (which means around) and meter (which means measure).
In the first activity you will ask the students to explore perimeters by describing, tracing and working out the perimeter of everyday objects. Then you will ask them to use this knowledge to explore possible variations in drawing different rectangles with the same perimeter, and to generalise their observations.
Before attempting to use the activities in this unit with your students, it would be a good idea to complete all, or at least part, of the activities yourself. It would be even better if you could try them out with a colleague, as that will help you when you reflect on the experience. Trying them for yourself will mean you get insights into learners’ experiences which can, in turn, influence your teaching and your experiences as a teacher.
When you are ready, use the activities with your students and, once again, reflect on how well the activity went and the learning that happened. This will help you to develop a more student-focused teaching environment.
Activity 1: Finding perimeters of objects that surround us
In preparation for these tasks, ask your students to point out, and if possible trace around, the perimeters of several objects they can see in the classroom. Discuss with them the mathematical definition of perimeter, which is the path around a two-dimensional shape.
Part 1
The students work in pairs. Ask them to find the perimeter of at least three objects they can find in their bags and around the classroom. Give them a time limit (for example four minutes). Stand back and observe – there is no need to interrupt, or give more hints. To help your preparation for the pair work you can use Resource 2, ‘Managing pairs to include all’.
Part 2
At the end of the time limit ask the students for feedback. Because they will have worked out the perimeter of different objects, they will not all have the same results.
Now ask the students to feedback some information about the shape of the object they found the perimeter of, and then their method of finding it out. Write these answers on the blackboard (leave these answers on the blackboard – you can use these in Activity 2), or ask the students to come and write them on the blackboard.
Part 3
For this part of the activity it is helpful to have squared paper for the students to work on.
The students continue to work in pairs. Ask the students to draw as many rectangles or squares that they can think of with a perimeter of 16 and to prepare to answer the question, ‘How do you know you have got all solutions?’
Take feedback about possible solutions and how they know they have got all possible solutions. Try not to tell the students the reason (two numbers that can be added together to make six), but try and let the students formulate this observation.
Video: Monitoring and giving feedback |
Case Study 1: Mrs Aparajeeta reflects on using Activity 1
This is the account of a teacher who tried Activity 1 with her elementary students.
When I asked the students to point out perimeters and areas in the classroom I was surprised that they did not say ‘this is the perimeter of the door’ and point at the edges of the door. What happened was that a few students explained how to calculate the perimeter and others looked a bit bewildered.
I really needed to prompt them, and give an example myself before they could say ‘this is the perimeter of the door’ or ‘the perimeter of the blackboard would be this’ and use their hands and fingers to indicate and point this out. By spending some time on this, the other parts of the activity went very smoothly and I got the impression that most of the students now understood what they were talking about and what they were finding out, and understood better their methods for finding out the perimeter.
When Part 1 of the activity was given out they were all very enthusiastic. They took some items from their bags to find the perimeters. One brave student, Dheeraj, was trying to find the perimeter of his pencil. He got hold of a thread and tried to wrap it round the pencil to get the answer, so I asked him to note down the difficulty he had in doing this and that we would discuss this with the rest of the class.
Then we had a lively discussion about the items they had found the perimeters of, and how they had gone about finding the perimeter. At that point I asked Dheeraj to share his predicament with the rest of the class. So then while discussing it, it came out that perimeter is something they can find for two-dimensional things and so we had more discussion about dimensions and solids and if we had been working with solids then what could we find the perimeter of (different faces, different cross-sections, etc.). I was amazed by this discussion, not only because of the mathematics that we discussed but also by the students’ ability to express themselves and come up with mathematical ideas and theories themselves – even those who are usually shy and quiet.
Drawing the rectangles with a fixed perimeter was really fun for the class. They did this very quickly. Some did make a mistake because they added just two sides to get 16 cm and so there was a great discussion amongst them of how their perimeter was not 16 cm but 32 cm. As for whether they had got all the options in Part 3, this was explained by Shanu very well. To also get the other students involved in that discussion I asked them whether they agreed with Shanu, understood the reasoning, and could explain it in another way.
Reflecting on your teaching practice
When you do such an exercise with your class, reflect afterwards on what went well and what went less well. Consider the questions that led to the students being interested and able to progress, and those you needed to clarify. Such reflection always helps with finding a ‘script’ that helps you engage the students to find mathematics interesting and enjoyable. If they do not understand and cannot do something, they are less likely to become involved. Use this reflective exercise every time you undertake the activities, noting as Mrs Aparajeeta did, some quite small things that made a difference.
Pause for thought In Mrs Aparajeeta’s lesson, Dheeraj’s attempt to find the perimeter of the pencil led to some discussion that went beyond Mrs Aparajeeta’s original plans for the lesson. What do you think are the advantages or disadvantages of allowing students’ discussion to move in a different direction? What might be the implications of this for planning future lessons? Now think about how your own class got on with the activity and reflect on the following questions:
|
3 Developing time-effective formulae for perimeter
Learning formulae often relies on memorisation, or learning ‘by rote’. Some students become very good at this method of learning, whilst others struggle. However, for all students the key question is, what kind of learning does memorisation afford?
Memorisation does not focus on comprehension, nor on building understanding, nor does it support an exploration of what concepts could mean, or how they are connected to other areas of mathematics. This method focuses on accurate reproduction of remembered routines. It can therefore become problematic when studying more complex aspects of a subject or learning formulae and algorithms that entail complex steps. Because there is little or no understanding of the underlying meaning, elements get missed out, details muddled up, stress increases and exams can be failed.
These barriers to learning about formulae can be overcome if the students are given the opportunity to deduce the formulae themselves and give meaning to the formulae, even from a young age.
In the next activity the aim is to give your students the opportunity to deduce formulae themselves by building on the understanding they developed in Activity 1. This entails using their examples and asking them to construct different ways to express formulae for calculating the perimeter of rectangles. You will also ask them to think about why these different expressions are equivalent, and tell them the purpose for developing formulae, which is to become more efficient and save time.
Activity 2: Formulae and time-efficiency
For this task, use the feedback of Part 2 of Activity 1 that you wrote down on the blackboard.
- Ask the students, in pairs, to discuss for three minutes how they could come up with a way to calculate perimeter of a rectangle that would take less time (there might already be some examples on the blackboard).
- Take their feedback and discuss it with the class. Make sure the students end up with the different forms for calculation of perimeter (otherwise ask the students whether they know of any others), for example: length + width + length + width and 2(l + w) and 2l + 2w.
- Let the students discuss why these different formulae will give the same results.
Video: Using pair work |
Case Study 2 : Mrs Aparajeeta reflects on using Activity 2
I liked doing this activity. It was very fast paced. There were quite a few examples on the blackboard from Activity 1, but I still asked quickly for some more examples. I did this because I wanted to make the link clear with Activity 1, give the students even more ownership of the mathematics they were doing, and also because I thought it might give students a better opportunity to experience generalising from many examples.
Asking the students to first discuss with a partner also worked well. It gave them the opportunity to phrase their thinking, to sort out any questions they had between themselves and not be exposed to comments from the whole class. This also worked for me, as the teacher, because they had practised what they would be saying and so we got really nice and comprehensible arguments in the class discussion!
Pause for thought
|
Activity 3: Working out the area of shapes using the counting squares method
To prepare for this task ask your students to point to the areas of several objects they can see in the classroom.
Part 1: Whole-class discussion on the method of counting squares to calculate area
Show students a combined shape, drawn on squared paper without measurements, for which it would be difficult to calculate the area using formulae. The idea is that the students have to think of another approach to working out the area instead of using formulae. An example is the shape in Figure 1.
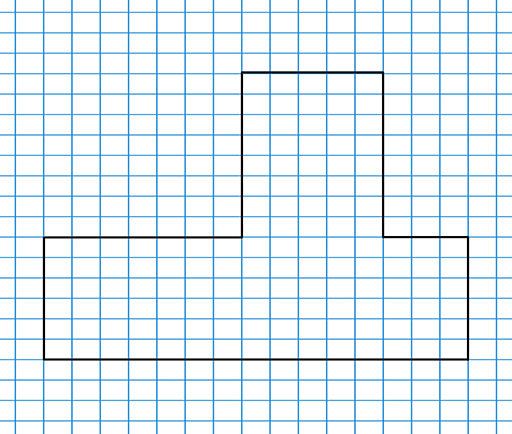
- Ask the students to point out what the perimeter of this shape would be. Then ask them to point out what the area of this shape would be.
- Ask the students for suggestions on how they could find the area of this shape. If students do not come up with the option of counting squares, suggest this as a simple and effective way when working with squared paper.
Part 2: Constructing shapes with the same area
- On squared paper (1 cm2 squared paper works well here) ask students, working in pairs, to construct at least three shapes with an area of 12. You may wish to specify that the length of each
side must be in whole units. However, if you choose not to set this condition, you may find that some of your more enterprising students experiment with fractions of units to create additional shapes. This will help them to extend their thinking further.
Ask students to share their work with others sitting near to them, and then to report back on how they constructed their favourite example.
Video: Planning lessons |
Case Study 3: Mrs Aparajeeta reflects on using Activity 3
As with the first part of Activity 1, the students actually found it hard to point out what the area and perimeter were for the shape. They wanted to calculate it using formulae. But I insisted, and asked students to come to the blackboard to show with their hands and fingers the area and perimeter.
One of the misconceptions that surprised me was when a student pointed to the longest length and the longest height and said that was the area, suggesting that they actually did not know what area is. So I am really pleased I persevered and did not just tell them, or point out what the area and perimeter were.
When I asked the students to find the area of the combined shape, at first some of the students were puzzled. Some of the students even partitioned the shape into rectangles and squares and calculated the area of these using the formula that they remembered. So I prompted them to think of another method that would work.
Student Sarika and her group then suggested counting the squares. Once that idea had been explored and demonstrated with the whole class I asked the students to make at least three shapes with an area of 12 cm2. I was amazed at the number of examples the students came up with, and their complexity.
The activity also made me think about tweaking tasks that I know are good and rich to turn them into other rich tasks. In the coming weeks I will put aside the tasks I use that I think are rich, and think about how I could tweak them so I can also use them as rich tasks for teaching other mathematical concepts.
Pause for thought
|
4 Making a distinction between the concepts of area and perimeter
One of the issues when learning about area and perimeter is students not understanding the distinction between the two concepts. This seems to affect even mature students. Reinke (1997) reported that when elementary pre-service teachers were asked to find the perimeter and area of a shaded geometric figure, many of them incorrectly used the same method for finding both perimeter and area.
To make students aware of this distinction, in the next activity you will use the same structure as previous activities but slightly tweaked. You then ask the students to construct first shapes that have the same area but different perimeters, and then shapes which have the same perimeter but different areas.
Activity 4: Exploring areas and perimeters concurrently
This activity provides good opportunities for improving students’ performance through monitoring them and giving feedback as they work. You may want to have a look at the key resource ‘Monitoring and giving feedback’ to help you plan for this.
- Ask the students to construct at least three shapes that have:
- the same area but different perimeters
- the same perimeter but different areas.
- Ask students to share their work with others on their table, then to report back on how they constructed their favourite examples and to pay attention to the units used for measurements (for example, centimetres for perimeter and cm2 for area).
- Ask students for their thoughts on why they think they should use these measurements.
Case Study 4: Mrs Aparajeeta reflects on using Activity 4
The first question was done quite quickly and with great enthusiasm. Once they had realised that they could rearrange the unit squares as they wanted, they could easily make squares with the same area.
Some students came up with a further question: coming up with shapes with the same area and perimeter. This led to a heated discussion about measurements and dimensions; that perimeter and area could not be the same because perimeter is expressed in a one-dimensional measurement (cm) and area is two-dimensional and expressed in cm2.
I also noted that the students looked back at the earlier examples they had made in the previous activities, linking their previous learning to the new learning – I liked that. It also made it easier for them to access the second question and explore it.
Pause for thought
|
5 Units of measurement and working with bigger dimensions
In the last section you focused on the measurements used in working out area and perimeter. Students tend to be told to use units of measurements such as metres, centimetres, inches, etc. but without letting them understand from their own experience why it is actually a good idea to do so. A unit of measurement is a measure defined and adopted as a standard by convention or by law, such as a metre, a gram or a litre.
In the next activity you will ask your students to explore in groups any areas and perimeters they can find outside the classroom using their own measures, and then to compare and discuss their findings with other students in the class. Taking the mathematics outside of the classroom in this way also allows the students to become aware that mathematics is all around us. At the same time, it gives them the opportunity to experience working with larger shapes than pencil and paper allow.
Activity 5: Finding out area and perimeter of large regular shapes using different unit measures
This out-of-the-classroom activity works well when students work in groups of four or five and they have been assigned roles within their groups. For example, two students can be asked to measure, one student to oversee, one or two students to record the observations. If your students have access to digital cameras or mobile phones with an integral camera, these could be used to take photographs of the shapes that the students measure in their groups. Alternatively, a tape recorder could be used to record the measurements instead of writing them down when the students are working out-of-the-classroom.
Part 1: Working out perimeter and area of large shapes
The task you are asking the students to do is to measure and work out the perimeter of as many large shapes as they can within a certain time period outside of the classroom. For example, they could measure the perimeter and area of the playground, the flower bed, the water pump area. Decide with the students on a list of which shapes to measure so that the measurements can be compared later.
The students are not to use any metric measures like metres, but their own ‘measures’ such as sticks, feet, steps, etc.
Part 2: Comparing findings
Back in the classroom, ask the students for their findings and write these on the blackboard.
Ask the students whether they came up with the same measurements. What was the same and what was different? Did they encounter any difficulties when measuring? Can they think of more effective and accurate ways to make such measurements?
Case Study 5 : Mr Mehta reflects on using Activity 5
The class thought it would be very easy to complete this activity but when they actually started they found that there were a lot of challenges. Some used a piece of wood they found, some used their tread length, some used their arm length and so on.
During the discussion we found that the pupils had been wondering what to write for units. This helped them realise that there was an issue about comparisons when each group uses a different ‘unit’ of measurement. They came up with the suggestion themselves that using standard units of measurement might be a good idea!
During the discussion, the students talked about aspects of dimension as well as different dimensional measurements in a playful way, such as describing the area in twig2!
6 Summary
This unit has focused on exploring the mathematical concepts of area and perimeter by helping the students to develop an understanding of and distinction between the concepts. The activities asked the students to use examples and objects that they can find around them and build on their intuitive understanding.
In reading this unit you will have thought about how to enable your students to create examples themselves, think mathematically and reflect on the thinking processes involved.
You will also have considered how to help your students to understand the concepts of area and perimeter by learning through talking in pairs, in groups and in whole-class discussions.
Pause for thought Identify three ideas that you have used in this unit that would also work well when teaching other topics. Make a note of two topics that you have to teach soon where those ideas can be used with some small adjustments. |
Resources
Resource 1: NCF/NCFTE teaching requirements
This unit links to the teaching requirements of the NCF (2005) and NCFTE (2009) below and will help you to meet those requirements:
- View students as active participants in their own learning and not as mere recipients of knowledge; how to encourage their capacity to construct knowledge; how to shift learning away from rote methods.
- Let students see mathematics as something to talk about, to communicate through, to discuss among themselves, to work together on.
Resource 2: Managing pairs to include all
Pair work is about involving all. Since students are different, pairs must be managed so that everyone knows what they have to do, what they are learning and what your expectations are. To establish pair work routines in your classroom, you should do the following:
- Manage the pairs that the students work in. Sometimes students will work in friendship pairs; sometimes they will not. Make sure they understand that you will decide the pairs to help them maximise their learning.
- To create more of a challenge, sometimes you could pair students of mixed ability and different languages together so that they can help each other; at other times you could pair students working at the same level.
- Keep records so that you know your students’ abilities and can pair them together accordingly.
- At the start, explain the benefits of pair work to the students, using examples from family and community contexts where people collaborate.
- Keep initial tasks brief and clear.
- Monitor the student pairs to make sure that they are working as you want.
- Give students roles or responsibilities in their pair, such as two characters from a story, or simple labels such as ‘1’ and ‘2’, or ‘As’ and ‘Bs’). Do this before they move to face each other so that they listen.
- Make sure that students can turn or move easily to sit to face each other.
During pair work, tell students how much time they have for each task and give regular time checks. Praise pairs who help each other and stay on task. Give pairs time to settle and find their own solutions – it can be tempting to get involved too quickly before students have had time to think and show what they can do. Most students enjoy the atmosphere of everyone talking and working. As you move around the class observing and listening, make notes of who is comfortable together, be alert to anyone who is not included, and note any common errors, good ideas or summary points.
At the end of the task you have a role in making connections between what the students have developed. You may select some pairs to show their work, or you may summarise this for them. Students like to feel a sense of achievement when working together. You don’t need to get every pair to report back – that would take too much time – but select students who you know from your observations will be able to make a positive contribution that will help others to learn. This might be an opportunity for students who are usually timid about contributing to build their confidence.
If you have given students a problem to solve, you could give a model answer and then ask them to discuss in pairs how to improve their answer. This will help them to think about their own learning and to learn from their mistakes.
If you are new to pair work, it is important to make notes on any changes you want to make to the task, timing or combinations of pairs. This is important because this is how you will learn and how you will improve your teaching. Organising successful pair work is linked to clear instructions and good time management, as well as succinct summarising – this all takes practice.
Additional resources
- A newly developed maths portal by the Karnataka government: http://karnatakaeducation.org.in/ KOER/ en/ index.php/ Portal:Mathematics
- National Centre for Excellence in the Teaching of Mathematics: https://www.ncetm.org.uk/
- National STEM Centre: http://www.nationalstemcentre.org.uk/
- National Numeracy: http://www.nationalnumeracy.org.uk/ home/ index.html
- BBC Bitesize: http://www.bbc.co.uk/ bitesize/
- Khan Academy’s math section: https://www.khanacademy.org/ math
- NRICH: http://nrich.maths.org/ frontpage
- Art of Problem Solving’s resources page: http://www.artofproblemsolving.com/ Resources/ index.php
- Teachnology: http://www.teach-nology.com/ worksheets/ math/
- Math Playground’s logic games: http://www.mathplayground.com/ logicgames.html
- Maths is Fun: http://www.mathsisfun.com/
- Coolmath4kids.com: http://www.coolmath4kids.com/
- National Council of Educational Research and Training’s textbooks for teaching mathematics and for teacher training of mathematics: http://www.ncert.nic.in/ ncerts/ textbook/ textbook.htm
- AMT-01 Aspects of Teaching Primary School Mathematics, Block 1 (‘Aspects of Teaching Mathematics’), Block 2 (‘Numbers (I)’), Block 3 (‘Numbers (II)’), Block 5 (‘Measurement’): http://www.ignou4ublog.com/ 2013/ 06/ ignou-amt-01-study-materialbooks.html
- LMT-01 Learning Mathematics, Block 1 (‘Approaches to Learning’) Block 2 (‘Encouraging Learning in the Classroom’), Block 4 (‘On Spatial Learning’), Block 6 (‘Thinking Mathematically’): http://www.ignou4ublog.com/ 2013/ 06/ ignou-lmt-01-study-materialbooks.html
- Manual of Mathematics Teaching Aids for Primary Schools, published by NCERT: http://www.arvindguptatoys.com/ arvindgupta/ pks-primarymanual.pdf
- Learning Curve and At Right Angles, periodicals about mathematics and its teaching: http://azimpremjifoundation.org/ Foundation_Publications
- Textbooks developed by the Eklavya Foundation with activity-based teaching mathematics at the primary level: http://www.eklavya.in/ pdfs/ Catalouge/ Eklavya_Catalogue_2012.pdf
- Central Board of Secondary Education’s books and support material (also including List of Hands-on Activities in Mathematics for Classes III to VIII) – select ‘CBSE publications’, then ‘Books and support material’: http://cbse.nic.in/ welcome.htm
References
Acknowledgements
This content is made available under a Creative Commons Attribution-ShareAlike licence (http://creativecommons.org/ licenses/ by-sa/ 3.0/), unless identified otherwise. The licence excludes the use of the TESS-India, OU and UKAID logos, which may only be used unadapted within the TESS-India project.
Every effort has been made to contact copyright owners. If any have been inadvertently overlooked the publishers will be pleased to make the necessary arrangements at the first opportunity.
Video (including video stills): thanks are extended to the teacher educators, headteachers, teachers and students across India who worked with The Open University in the productions.