Use 'Print preview' to check the number of pages and printer settings.
Print functionality varies between browsers.
Printable page generated Sunday, 28 June 2026, 10:12 PM
TI-AIE: Using embodiment, manipulatives and real-life examples: teaching about angles
What this unit is about
It would be difficult to envisage our lives without angles. Angles are around us everywhere we look. There are angles in houses, roofs, chairs, desks and beds, in mountains and waves. There is talk about angles from an early age, in work and play.
In school mathematics, students learn about angles in a formal context from elementary school onwards. It is one of the basic concepts in trigonometry, which students will encounter in later years.
Working with students on angles provides an opportunity to build on their existing and intuitive knowledge and also to link what happens and can be observed in real life with the world of the mathematics classroom.
Unfortunately students often do not experience the richness, connections and the creativity that working on angles allows. Instead, they often perceive such work as another memory exercise, with vocabulary to learn and forget.
This unit shows you how to work on angles with your students in a playful and creative way, using intuitive knowledge and mental thinking powers which all students have. The activities ask you to take your students outdoors and to use manipulatives and embodiment techniques to develop visual images.
What you can learn in this unit
- How to use manipulatives to help students to understand angles.
- Some ideas to link school mathematics with real life, both inside and outside the classroom.
- How to use embodiment to help students to understand angles.
This unit links to the teaching requirements of the NCF (2005) and NCFTE (2009) outlined in Resource 1.
1 Using embodiment of angles to make learning about angles more meaningful
Pause for thought Whenever you look around, there are angles everywhere. Look around you now and make a list of ten angles that you can see. Do you notice any mathematical relationships between them? |
Mathematics is often perceived as something you do in the mathematics classroom, perhaps with some applications to real life in manufacturing and architecture. But much more excitingly, mathematics also relates to us as humans and to our lives – and the angles in our bodies are a beautiful example of this. We bend our arms and legs at an angle, we turn our heads at an angle, we move our fingers at different angles. Doing activities like these with students requires them to ‘be’ or ‘do’ the mathematics – to represent maths in a bodily form.
According to research (Dreyfus, 1996; Gibbs, 2006), the ideas behind ‘body mathematics’ are:
- embodiment – giving concrete form to an abstract concept
- embodied cognition – using the body to shape the thinking of the mind.
As such, the aims of ‘body mathematics’ are to:
- overcome the barrier of seeing maths as a theoretical subject, far removed from the students’ life experiences
- build imagery for mathematical concepts
- make an emotional and playful link with mathematical properties.
Your body is full of angles, and angles are an important part of you! So in the first activity you will ask your students to find examples of angles using parts of their body.
Before attempting to use the activities in this unit with your students, it would be a good idea to complete all, or at least part, of the activities yourself. It would be even better if you could try them out with a colleague as that will help you when you reflect on the experience. Trying them for yourself will mean you get insights into a learner’s experiences which can, in turn, influence your teaching and your experiences as a teacher.
Before starting a series of lessons on a mathematical topic such as angles, it is important to find out what the students already know and can do prior to instruction, and to share with the students what you expect them to learn from the series of lessons. You can use Resource 2 to help you plan how you will assess your students’ progress and performance during the activities in this unit.
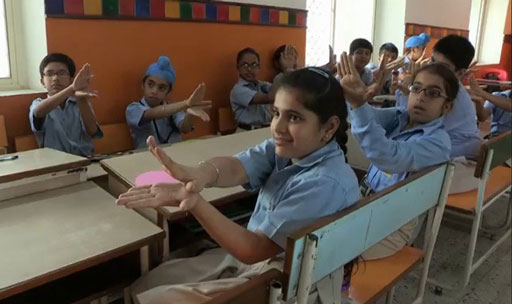
Activity 1: Embodying angles
Part 1: Using hands
Ask your students to show the following angles using their two hands joined at the wrist:
- an angle of 90 degrees
- an angle of 0 degrees
- an angle of 180 degrees
- an angle of 45 degrees
- an angle of 135 degrees
- a straight angle
- an obtuse angle
- a right angle
- an acute angle.
Different examples are possible for the obtuse and acute angle. Discussing the validity of these different examples offers a good opportunity to talk about definitions and possible variations within these definitions.
It is also an appropriate time to introduce (or reinforce) the shorthand notation of the degree symbol – for example, 90° for a right angle.
Part 2: Using one arm
- Repeat the questions from Part 1, now asking the students to use one arm, with their armpit acting as the centre of rotation of the angle. To depict the angle of 0°, the arm would hang down, and be held against the side of the body.
- Point out that an angle is not a static position, but that the word ‘angle’ describes the amount of a turn – that is, an angle is a measurement of a turn or rotation.
Part 3: Using other parts of the body to depict angles
- Arrange the students into groups of four or five. Ask them to come up with other ways to depict angles using other parts of their body and to prepare to show the same angles as in Parts 1 and 2. Give them a few minutes to prepare for this.
- Ask the students, in their groups, to demonstrate to the whole class what they came up with.
- Discuss with the class whether these examples are valid mathematically, or show them what is lacking.
Case Study 1: Mrs Nagaraju reflects on using Activity 1
This is the account of a teacher who tried Activity 1 with her elementary students.
I have used hands in the past to show angles when I introduced the concept of angle. However, I seldom asked students to do it themselves – I just demonstrated it to them. On reading this activity I thought it would not be much different, but anyway, I would give it a go. I saw it as building on something I already did, and that it did not involve much change to my teaching, to be honest.
Well, it was very different. The students were so involved, so interested, I have never seen them so engaged with making angles! When I asked them to depict an obtuse angle, many different examples were shown. So I asked the students to keep their hands as they were and to look around them at what other students had come up with.
We then had a lovely mathematical discussion about what an obtuse angle was, what it limits are, what the possible variations are. We automatically then had a similar discussion about an acute angle, a right angle and also talked about a reflex angle.
The students loved the third part and came up with many ideas such as using both arms held up in front of them, rolling eyes, bending fingers, turning heads and problems that gives when trying to show a reflex angle, and so on.
In the feedback part of the activity the students surprised me by being critical of themselves and of others but in a supportive way – saying things like ‘if you made your back a bit straighter it would make a better right angle, because the lines that make an angle should be straight’ or as one of my students phrased it ‘to be critical in a good way’. As a teacher I learned so much more about my students’ thinking and learning.
Reflecting on your teaching practice
When you do such an exercise with your class, reflect afterwards on what went well and what went less well. Consider the questions that led to the students being interested and being able to progress, and those you needed to clarify. Such reflection always helps with finding a ‘script’ that helps you engage the students to find mathematics interesting and enjoyable. If they do not understand and cannot do something, they are less likely to become involved. Use this reflective exercise every time you undertake the activities, noting as Mrs Nagaraju did some quite small things that made a difference.
Pause for thought Good questions to trigger such reflection are:
|
2 Using paper folding as a manipulative to learn about angles
Using manipulatives such as blocks, plates, rods or counters in the learning of mathematics requires the students to use their hands to work out some mathematical problem. The idea is that this physical involvement helps the students to develop mental images of the concepts. The physical movements help students to think more actively about the mathematical processes involved and make mathematics more concrete and practical instead of a merely theoretical subject.
One of the challenges with using manipulatives to learn mathematics can be how to move from the manipulatives to a pen and paper approach without losing the imagery that has been developed by the use of manipulatives. The students must eventually move on to the symbolic representation of mathematics that they will encounter in textbooks.
Bruner (1966), an eminent educator, labelled these different ‘worlds’ as enactive, iconic and symbolic. Activity 2 aims to make that transition, and take the learning from ‘doing’ the mathematics in a physical way (Bruner’s enactive phase), to making or drawing pictures that represent enactive learning (Bruner’s iconic phase), to using mathematical symbolic notation and making sense of it (Bruner’s symbolic phase), as is found in textbooks and examination papers.
The second part of the activity addresses this challenge. Students bring their folded angles to the blackboard and trace them. By then asking the students to annotate this traced shape with symbols such as the angle symbol, the right-angle symbol and the size of the angle, the students move to the symbolic representation of mathematics.
Activity 2: Folding paper to learn about different angles
Old newspapers are relatively easy to obtain in large quantities. If you don’t have newspaper, try to find other paper. The first part of the next activity uses newspaper as a resource for paper folding. The students are asked to fold their paper to construct angles of the same measurements as in Activity 1.
Part 1: Constructing angles of different measures by paper folding
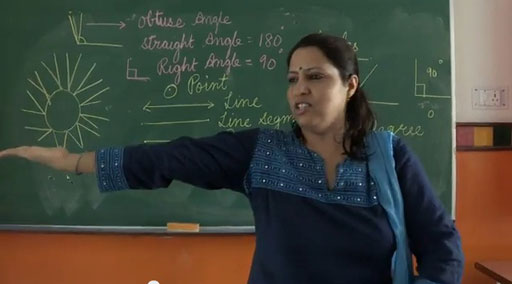
Show the students how to fold the paper so they get an angle of 180°.
Show using your fingers where the straight angle on a straight line would actually be (otherwise students sometimes cannot make the link between a straight line and a straight angle of 180°).
Ask the students to fold their paper, one at a time and holding it up so all can see, so they construct angles of the following measures:
- an angle of 90°
- an angle of 0°
- an angle of 180°
- an angle of 45°
- an angle of 135°
- a straight angle
- an obtuse angle
- a right angle
- an acute angle
- (in groups or pairs of students) several different right angles.
As in Activity 1, different examples are possible for the acute and obtuse angles. Discussing the validity of these different examples offers a good opportunity to talk about definitions and possible variations within these definitions. Doing this will again help the students to refine their understanding, refine the mathematical language they use and help them to memorise the ideas. The aim of the last point is for students to realise that right angles are the same even when the shape is enlarged.
Part 2: Moving on to iconic and symbolic representation of the angles
Using paper folding, ask the students again to now quickly construct, folding, one at a time, angles of the following measures:
- an angle of 90°
- an angle of 0°
- an angle of 180°
- an angle of 45°
- an angle of 135°
- a straight angle
- an obtuse angle
- a right angle
- an acute angle.
After each constructed angle ask a student to come to the blackboard to trace their constructed angle. Ask the student to annotate this traced shape with symbols such as the angle symbol, the right-angle symbol and the size of the angle (for example, 90°).
Video: Involving all |
Case Study 2: Mrs Nagaraju reflects on using Activity 2
The students had never done a paper folding exercise before, or at least not for a long time, and therefore they seemed to be a little confused at the start. Somehow they seemed to find the concept that you can ‘half an angle’ unusual.
I had asked them to each construct their own angles, but they were also allowed to talk to a nearby student. I think that helped them in understanding more quickly what to do, without me telling them or demonstrating how to do it. As suggested, I asked them the same questions as I did in Activity 1, and deliberately asked students who normally never volunteer answers. They did it well, and it must have been reassuring for them that they could ‘talk mathematics’.
I very much liked the step from enactive to iconic to symbolic, and I can see the potential of this. Hopefully, when the students now encounter a symbolic representation of an angle in their textbook they will think back to how this is the same as the angle they constructed using paper, and that is the same as the angle they can depict using their own bodies. Perhaps they will not do this at first, but I will try and remind them from time to time.
What I also liked about that part of the activity is that we really paid attention to the symbols used, how to write them correctly, and how to ‘say’ them. I think I too often forget that knowing the meaning of symbols is not something we are born with and that needs to be learned.
Pause for thought
|
3 Finding angles all around us
Angles play an important role in life. Yet somehow, students often do not see these angles around them or associate them with the angles that they work with in the classroom. When the students do not notice the angles around them, they are less likely to understand the importance of angles or to figure out how two angles are related.
In the next activity you will ask your students to identify different angles, first in the classroom, then in the school grounds. The activity then asks them to think about the importance of the measurements of the angles, and what would happen if they were changed.
Activity 3: Finding angles in the classroom and outside
Part 1: Finding angles in the classroom
Arrange the students in groups of four or five. Ask the students to:
- find different angles in the classroom and to make a note of these
- estimate the size of these angles and make a note of them
- categorise these angles into acute, obtuse, etc. and make notes.
Part 2: Finding angles outside the classroom
When taking students to work in the school grounds you should always make sure your students are aware of safety hazards they might encounter such as moving vehicles or building works, and prepare for changes in the weather.
Arrange the students in groups of four or five. Give the students their instructions before taking them out to the school grounds. Tell each group to find at least three examples of each different type of angle, such as obtuse, acute or straight angles. Then ask them:
- to find different angles in the school grounds, and to make a note and a drawing of these
- to estimate the size of these angles and make notes
- to categorise these angles into acute, obtuse, etc. and make notes.
If your students have access to digital cameras or mobile phones with an integral camera, these could be used to take photographs of the angles that the students find when they are working out-of-the-classroom. This would be an exciting alternative way for them to record their findings. If you have access to a computer a printer, you may be able to print out some of the students’ photographs and make an exciting display on angles to go on the classroom wall.
Part 3: Feedback to the whole class
Back in the classroom ask the groups to report back to the whole class on some of their findings – reporting back on all of their findings might take too long.
Ask the students:
- What would happen if the angles you found where reduced to smaller angles?
- What would happen if the angles you found where increased to larger angles?
Video: Using local resources |
Pause for thought
|
4 Summary
This unit has focused on developing the concept of angle and recognising their presence in real life through your teaching.
You have seen how you can use outdoor spaces as a mathematical arena where ideas can be explored and links and relationships in mathematics can be established.
You have also explored how to enable your students to develop visual images from embodiment, how to work with manipulatives such as paper folding, and how to make the links between enactive, iconic and symbolic representations in mathematics (Bruner’s theory). In doing so you have considered how to help students understand that angles are all around us, and that measuring angles is an important everyday skill.
Helping students to work in this way can help them become independent learners, able to think through the ideas they have studied in the classroom and apply them outside.
Pause for thought Identify three techniques or strategies you have learned in this unit that you might use in your own classroom. |
Resources
Resource 1: NCF/NCFTE teaching requirements
This unit links to the following teaching requirements of the NCF (2005) and NCFTE (2009) and will help you to meet those requirements:
- View students as active participants in their own learning and not as mere recipients of knowledge; how to encourage their capacity to construct knowledge; how to shift learning away from rote methods.
- Let students see mathematics as something to talk about, to communicate through, to discuss among themselves, to work together on.
- Appreciate the potential of hands-on experience as a pedagogic medium both inside and outside the classroom; and work as integral to the process of education.
Resource 2: Assessing progress and performance
Assessing students’ learning has two purposes:
- Summative assessment looks back and makes a judgement on what has already been learnt. It is often conducted in the form of tests that are graded, telling students their attainment on the questions in that test. This also helps in reporting outcomes.
- Formative assessment (or assessment for learning) is quite different, being more informal and diagnostic in nature. Teachers use it as part of the learning process, for example questioning to check whether students have understood something. The outcomes of this assessment are then used to change the next learning experience. Monitoring and feedback are part of formative assessment.
Formative assessment enhances learning because in order to learn, most students must:
- understand what they are expected to learn
- know where they are now with that learning
- understand how they can make progress (that is, what to study and how to study)
- know when they have reached the goals and expected outcomes.
As a teacher, you will get the best out of your students if you attend to the four points above in every lesson. Thus assessment can be undertaken before, during and after instruction:
- Before: Assessing before the teaching begins can help you identify what the students know and can do prior to instruction. It determines the baseline and gives you a starting point for planning your teaching. Enhancing your understanding of what your students know reduces the chance of re-teaching the students something they have already mastered or omitting something they possibly should (but do not yet) know or understand.
- During: Assessing during classroom teaching involves checking if students are learning and improving. This will help you make adjustments in your teaching methodology, resources and activities. It will help you understand how the student is progressing towards the desired objective and how successful your teaching is.
- After: Assessment that occurs after teaching confirms what students have learnt and shows you who has learnt and who still needs support. This will allow you to assess the effectiveness of your teaching goal.
Before: being clear about what your students will learn
When you decide what the students must learn in a lesson or series of lessons, you need to share this with them. Carefully distinguish what the students are expected to learn from what you are asking them to do. Ask an open question that gives you the chance to assess whether they have really understood. For example:
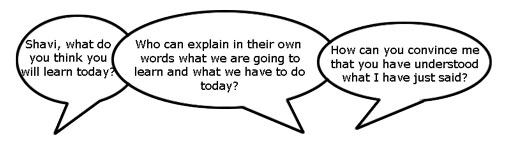
Give the students a few seconds to think before they answer, or perhaps ask the students to first discuss their answers in pairs or small groups. When they tell you their answer, you will know whether they understand what it is they have to learn.
Before: knowing where students are in their learning
In order to help your students improve, both you and they need to know the current state of their knowledge and understanding. Once you have shared the intended learning outcomes or goals, you could do the following:
- Ask the students to work in pairs to make a mind map or list of what they already know about that topic, giving them enough time to complete it but not too long for those with few ideas. You should then review the mind maps or lists.
- Write the important vocabulary on the board and ask for volunteers to say what they know about each word. Then ask the rest of the class to put their thumbs up if they understand the word, thumbs down if they know very little or nothing, and thumbs horizontal if they know something.
Knowing where to start will mean that you can plan lessons that are relevant and constructive for your students. It is also important that your students are able to assess how well they are learning so that both you and they know what they need to learn next. Providing opportunities for your students to take charge of their own learning will help to make them life-long learners.
During: ensuring students’ progress in learning
When you talk to students about their current progress, make sure that they find your feedback both useful and constructive. Do this by:
- helping students know their strengths and how they might further improve
- being clear about what needs further development
- being positive about how they might develop their learning, checking that they understand and feel able to use the advice.
You will also need to provide opportunities for students to improve their learning. This means that you may have to modify your lesson plans to close the gap between where your students are now in their learning and where you wish them to be. In order to do this you might have to:
- go back over some work that you thought they knew already
- group students according to needs, giving them differentiated tasks
- encourage students to decide for themselves which of several resources they need to study so that they can ‘fill their own gap’
- use ‘low entry, high ceiling’ tasks so that all students can make progress – these are designed so that all students can start the task but the more able ones are not restricted and can progress to extend their learning.
By slowing the pace of lessons down, very often you can actually speed up learning because you give students the time and confidence to think and understand what they need to do to improve. By letting students talk about their work among themselves, and reflect on where the gaps are and how they might close them, you are providing them with ways to assess themselves.
After: collecting and interpreting evidence, and planning ahead
While teaching–learning is taking place and after setting a classwork or homework task, it is important to:
- find out how well your students are doing
- use this to inform your planning for the next lesson
- feed it back to students.
The four key states of assessment are discussed below.
Collecting information or evidence
Every student learns differently, at their own pace and style, both inside and outside the school. Therefore, you need to do two things while assessing students:
- Collect information from a variety of sources – from your own experience, the student, other students, other teachers, parents and community members.
- Assess students individually, in pairs and in groups, and promote self-assessment. Using different methods is important, as no single method can provide all the information you need. Different ways of collecting information about the students’ learning and progress include observing, listening, discussing topics and themes, and reviewing written class and homework.
Recording
In all schools across India the most common form of recording is through the use of report card, but this may not allow you to record all aspects of a student’s learning or behaviours. There are some simple ways of doing this that you may like to consider, such as:
- noting down what you observe while teaching–learning is going on in a diary/notebook/register
- keeping samples of students’ work (written, art, craft, projects, poems, etc.) in a portfolio
- preparing every student’s profile
- noting down any unusual incidents, changes, problems, strengths and learning evidences of students.
Interpreting the evidence
Once information and evidence have been collected and recorded, it is important to interpret it in order to form an understanding of how each student is learning and progressing. This requires careful reflection and analysis. You then need to act on your findings to improve learning, maybe through feedback to students or finding new resources, rearranging the groups, or repeating a learning point.
Planning for improvement
Assessment can help you to provide meaningful learning opportunities to every student by establishing specific and differentiated learning activities, giving attention to the students who need more help and challenging the students who are more advanced.
Additional resources
- A newly developed maths portal by the Karnataka government: http://karnatakaeducation.org.in/ KOER/ en/ index.php/ Portal:Mathematics
- National Centre for Excellence in the Teaching of Mathematics: https://www.ncetm.org.uk/
- National STEM Centre: http://www.nationalstemcentre.org.uk/
- National Numeracy: http://www.nationalnumeracy.org.uk/ home/ index.html
- BBC Bitesize: http://www.bbc.co.uk/ bitesize/
- Khan Academy’s math section: https://www.khanacademy.org/ math
- NRICH: http://nrich.maths.org/ frontpage
- Art of Problem Solving’s resources page: http://www.artofproblemsolving.com/ Resources/ index.php
- Teachnology: http://www.teach-nology.com/ worksheets/ math/
- Math Playground’s logic games: http://www.mathplayground.com/ logicgames.html
- Maths is Fun: http://www.mathsisfun.com/
- Coolmath4kids.com: http://www.coolmath4kids.com/
- National Council of Educational Research and Training’s textbooks for teaching mathematics and for teacher training of mathematics: http://www.ncert.nic.in/ ncerts/ textbook/ textbook.htm
- AMT-01 Aspects of Teaching Primary School Mathematics, Block 1 (‘Aspects of Teaching Mathematics’), Block 2 (‘Numbers (I)’), Block 3 (‘Numbers (II)’), Block 5 (‘Measurement’): http://www.ignou4ublog.com/ 2013/ 06/ ignou-amt-01-study-materialbooks.html
- LMT-01 Learning Mathematics, Block 1 (‘Approaches to Learning’) Block 2 (‘Encouraging Learning in the Classroom’), Block 4 (‘On Spatial Learning’), Block 6 (‘Thinking Mathematically’): http://www.ignou4ublog.com/ 2013/ 06/ ignou-lmt-01-study-materialbooks.html
- Manual of Mathematics Teaching Aids for Primary Schools, published by NCERT: http://www.arvindguptatoys.com/ arvindgupta/ pks-primarymanual.pdf
- Learning Curve and At Right Angles, periodicals about mathematics and its teaching: http://azimpremjifoundation.org/ Foundation_Publications
- Textbooks developed by the Eklavya Foundation with activity-based teaching mathematics at the primary level: http://www.eklavya.in/ pdfs/ Catalouge/ Eklavya_Catalogue_2012.pdf
- Central Board of Secondary Education’s books and support material (also including List of Hands-on Activities in Mathematics for Classes III to VIII) – select ‘CBSE publications’, then ‘Books and support material’: http://cbse.nic.in/ welcome.htm
References
Acknowledgements
This content is made available under a Creative Commons Attribution-ShareAlike licence (http://creativecommons.org/ licenses/ by-sa/ 3.0/), unless identified otherwise. The licence excludes the use of the TESS-India, OU and UKAID logos, which may only be used unadapted within the TESS-India project.
Every effort has been made to contact copyright owners. If any have been inadvertently overlooked the publishers will be pleased to make the necessary arrangements at the first opportunity.
Video (including video stills): thanks are extended to the teacher educators, headteachers, teachers and students across India who worked with The Open University in the productions.