Use 'Print preview' to check the number of pages and printer settings.
Print functionality varies between browsers.
Printable page generated Monday, 27 July 2026, 3:10 AM
TI-AIE: Building your students' confidence to speak English
What this unit is about
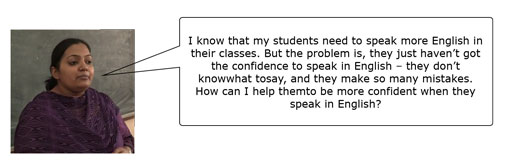
Learning to speak is an important aspect of language education. It can also be the most fun. Most students are motivated to improve their speaking because they are aware of the advantages of being able to speak English well, but lack the confidence to speak freely in English.
In this unit, you will be introduced to activities that you can do with students to develop their confidence when speaking English and make speaking English easier for them. You can do this by:
- using your knowledge of your students to choose a topic that they will find interesting
- giving them the language they need to talk about that topic
- monitoring and giving feedback .
In these activities, you will focus on promoting fluency and not accuracy. When you promote fluency, you focus on the meaning of what students want to say and help them to learn how to express their own ideas. You will not focus on whether what they say is accurate. While accuracy – or grammatical correctness – is important, it should not be a focus of your teaching all the time. Activities that are particularly useful for promoting fluency include telling stories and role play (covered in this unit) and interviews and discussions (covered in the unit Supporting speaking in English: pair and group work).
What you can learn in this unit
- To prepare simple speaking activities on topics that interest your class.
- To prepare and undertake class activities such as describing an event or telling a story.
- To monitor and give feedback to students after a speaking activity that helps them to develop and builds their confidence.
1 Choosing topics to stimulate your students to speak in English
Many of your students will agree that it is useful to speak English well, and they will be motivated to learn the language. You can support their interest in learning English by providing interesting topics for them to talk about in your classes. If students are interested in a topic and have something to say about it, then they are more likely to speak in class and participate actively in learning.
Activity 1: Choosing topics that your students are interested in
How well do you know your students? Which topics do you think your students would be interested in and like to talk about? Write them down. How could you find out which topics they are interested in?
Look at the list of topics you have written. Are these topics in the textbooks that you use to teach English?
Table 1 shows some topics from the NCERT textbooks for secondary English. Read the topics and make a note of the ones that you think your class would enjoy talking about. Discuss the list with a colleague if you can.
Accidents Animals (pets, wild animals, desert animals) Beauty Boring or household chores Childhood Climbing Everest Courage Diaries Different places in India Disability Dreams and ambitions Education and school | Fairs and festivals Faith Friendship and family relationships Fears Flying Flying kites Heroes and heroines (for example, Einstein, Anne Frank, Nelson Mandela) Historical events Hobbies Homes | Homework Memory and forgetting things Monsoons Prejudice Quarrels Success and hard work Traditional stories Travel and trips Tsunami Vanity Wedding ceremonies Work and jobs |
You and your colleagues may disagree about which topics you think your students will want to talk about, but it is likely that you feel that some topics will be of more interest to secondary students than others. If you feel that your students will not be interested in the topics in the textbook, there are ways that you can relate these topics to students’ lives and make them more interesting for them.
In the case study below, a teacher wants to get his students speaking as much English as possible. He does this by adapting the textbook topic to make it more relevant to his students’ lives.
Case Study 1: Mr Rangan adapts a textbook topic for discussion
Mr Rangan teaches English to Class IX. He is trying to think of ways to get his students to speak more English in class.
After each reading in the textbook there are speaking activities. For example, in the Class IX Beehive textbook, there is an activity on page 108 that asks students to prepare a short speech motivating female athletes to dream big. I tried this activity, but it didn’t work out. Some students just read out some of the sentences from the lesson in English. Others discussed it in Hindi. Many just sat quietly. Most of the time, students don’t have much to say about topics from the textbook, and this kind of activity is difficult for them. But I have noticed that they talk to each other before and after class about their hobbies and interests.
I started to think of ways that I could develop their speaking skills through making the textbook lessons more interesting and relevant for them. We were looking at the chapter with a passage about the tennis champion Maria Sharapova. I know that most of my students may not have heard of Maria Sharapova or Wimbledon – they don’t really know that much about tennis, so they may not feel that the text is relevant to them. But I know that my students are interested in sport, and enjoy talking about it.
So I thought that I would try a speaking activity around the topic of sport. I asked my students to name their favourite sporting heroes. Then I wrote some sentences on the board and I told them to write down the sentences and complete them:

I then asked students to sit in groups of four or five. I asked them to compare their answers and agree on who their greatest sports hero is. I gave them five minutes for this activity.
As they discussed the subject, I walked around the room and I listened to the groups. Some of the groups were very animated and disagreed about the choices. I left them to their discussions.
I always prefer if students speak English, and I encourage them to do so. But I didn’t mind too much about what language they were using for this activity because it is about discussing something and finding consensus. I didn’t want to hinder their motivation if they were excitedly discussing the topic in Hindi!
One group was not talking at all. I decided to sit down with them and help them. I looked at their notebooks and said: ‘Ravi likes Lionel Messi the football player, but Santosh prefers Sachin Tendulkar. Is Messi better than Tendulkar? What do you think?’
In another group, I noticed that some students were using their home languages at times, and some were mixing English and their home languages. Where this was the case, I tried to help them with translations for words or phrases in English. For example, I told them that ‘चैंपियनशिप’ was called ‘championship’ in English.
After five minutes I stopped the activity. I asked one student from each group to say who the greatest sports hero is. I then asked the students if they had heard of Maria Sharapova. They hadn’t, so I asked if they could guess what sport she was famous for. The students guessed a few sports. Then I asked them to open their books at page 105 so that we could start the textbook activity. They were much more interested about reading the text than they usually are.
Now, whenever I think that a topic in the textbook is difficult for students to talk about, I try to relate it to their lives and interests. This helps them to speak in English and build on this knowledge with the textbook activity.
Activity 2: Try in the classroom – relating a textbook topic to your students’ lives
In Case Study 1, the teacher tried to make the lesson more accessible by relating it to the students’ interests. Follow these steps to try this technique in your classroom:
What is the next topic in your textbook? Do you think it is one that your students would enjoy talking about?
If it is, write down some sentences about the topic that they can complete. For example, if the topic is ‘wedding ceremonies’, you could write sentences such as:
- ‘The last wedding I went to was …’
- ‘A good wedding should have …’
- ‘The best food at a wedding is …’
If the topic is more difficult for them to talk about, then you could think about a topic that might only be loosely related to the lesson, but would be of more interest to your students. For example, if the topic is about a hero that your students don’t know, then you could write some statements such as:
- ‘My hero is …’
- ‘I like this person because …’
- ‘This person’s greatest achievement is …’
In class, write the statements on the board, and ask your students to complete them. Give them a time limit of three or four minutes for this.
Next, organise your class into groups of four or five, and tell them to show their sentences to each other. Ask them to decide on one response. Allow five minutes for this task.
As they discuss this, walk around the room and give help to students who need it. Encourage everyone to use English where possible. See Resource 1, which will help you carry out this activity in English.
You may feel that talking about something that is it not in the textbook might be a poor use of class time, but activities like this can be very beneficial because they encourage students’ interest in learning English and give them opportunities to practise useful language skills. For more ideas about resources beyond the textbook that you can use as discussion points in your classes, see the unit Using resources beyond the textbook.
Pause for thought Here are some questions for you to think about after trying this activity. If possible, discuss these questions with a colleague.
|
It is good if your students use English in activities like this and you should praise them for doing so. If they are struggling to find words, you could offer them a translation or provide them with some useful phrases. But don’t discourage them from using other languages; the main purpose is to help them feel more confident and motivated to use English.
If you are looking for more topics to discuss in your classes, you could ask your students what they would like to talk about. You could show them the list of topics listed above in Table 1 and ask them to vote for the topics that interest them.
If you found it difficult to set up the groupwork activity and get all students to participate, see Resource 2.
2 Giving your students the language skills they need to talk about a topic
Students may find speaking in English difficult for many reasons. Another reason is that they may not have the language skills they need to speak English.
Imagine that your students have the following task: ‘Talk about a time when you were frightened.’ They may be attracted to this topic, and may enjoy hearing their classmates’ stories about when they were frightened. However, it is quite difficult to tell a story – even in your home language. Most students need some support for this kind of activity, and some students need more help than others. They need help with both the grammar and vocabulary.
Pause for thought
|
You could help students with the language they need to tell a story using any of the following techniques:
- You could demonstrate what kind of story you mean by telling the class about a day when you were frightened. Keep the account short, and tell the story slowly. Use grammar and vocabulary that you think your students know. Prepare the story in advance.
- Ask a few students to give some examples of when they were frightened. They could do this in their home language if necessary. You could write some of the key words on the board in English as they talk.
- Write some useful phrases and sentences on the board, for example: ‘One day, I was …’, ‘I heard/saw …’, ‘It was a …’, ‘I felt very frightened/scared/afraid …’, and so on. Prepare these words and phrases before the class.
- Remind them that they need to use the past tense, and quickly revise some common past tenses.
- Remind them of words and phrases that are useful when telling a story, such as sequencers (‘first’, ‘next’, ‘then’).
- Give your class some time to think about and note down the words and phrases they will need. Note that it is useful to give students time to think about the event too. They may need some time to think of a time when they were frightened.
You will now read about a group of students who are practising telling a story in English. As you read Case Study 2, think about how the teacher supports them, and helps them with English language.
Case Study 2: Mrs Vasanthi helps her students to tell a story
Mrs Vasanthi is an English teacher who recounts an activity she did recently with Class VIII.
We were studying Chapter 2 from the NCERT Class VIII textbook, Honeydew, which had a story about an ant and a cricket. My students know many different folk tales about animals, so I thought that they could learn to tell one in English. I decided to use one of my daughter’s favourite stories: the Panchantra tale called ‘The Snake and the Crows’. [See Resource 4 for a simple version of this story.] This story is quite easy, and the level of English is below that in our textbook. But many of my students have trouble reading those texts, so I wanted to make sure that everyone would be able to understand.
I began the story by showing my class pictures of three animals: a snake, a crow and a fox [Figure 1]. I found the pictures in my daughter’s story book.
 Figure 1 A snake, a crow and a fox.
I drew a tree on the board and stuck the picture of the crow at the top of the tree, and stuck the snake at the bottom of the tree. Then I told the simple story, asking questions along the way. Here is an example:
By asking lots of questions and using the pictures, I told the story to the group. Since I chose an easy story, most of the students were able to follow it. This gave them confidence, which they needed because they soon had to tell the story themselves. Once the story was finished, I invited my students to tell me the story again in English: one told the first line, another told the second and so on. As they told the story, I wrote key words on the board (‘crows’, ‘nest’, ‘at the top’, ‘snake’, ‘at the bottom’, ‘upset’) and I also wrote some key verbs in the past tense (‘lived’, ‘liked’, ‘wanted to eat’, ‘climbed’). I reminded everyone that we use the past tense to tell stories.
Then I put students into groups of four or five. They are used to working in groups, as we often do this, so they got into groups quickly. Then I told everyone to start telling the story to each other. I told them that one student would start the story, the next would continue and so on. The groups started to tell the story, and as they spoke, I walked around the room listening to make sure that they understood the task and to see how they were performing the task and speaking in English. For this activity, it was important that the students tried to speak in English and tried to use the vocabulary that I made them aware of when I told the story.
When most groups had finished telling the story, I told everyone to stop, and asked them:

Most students agreed that they could tell the story better, so I asked them to tell the story again. This time, I asked them to choose different parts of the story, so that the person who began the previous time would not begin this time.
Groups began telling the story again and as they spoke, I moved around the room once more, listening to two or three groups. I noticed that they were better this time. There was an improvement in the use of language, and students could speak more quickly and confidently. They were more fluent. They made some mistakes, of course, but I didn’t interrupt them – I just listened. Some of the more advanced students added some detail to the story.
When most groups were ready to finish, I asked students to stop the activity, and I told them that they were better the second time they told the story. My students were pleased that they could tell a story together.
Activity 3: Helping your students to tell a story
Listening to and telling stories can be interesting for students of all ages and language levels. But you need to choose a story that you think will be interesting for your students and appropriate to their level of English. If you do this kind of activity often, you can progressively use more difficult texts.
Follow these steps to try a similar activity in your classroom:
- Choose a story that you and your students can tell. The story could be one of the following:
- A story of your or your students’ choice – see Resource 3 for examples of simple stories.
- Events from a story or passage that they have read in class. For example, they imagine that they are a character from the story and describe what happened.
- A local news story that has captured the interest of your class.
- A story from a film or a television ‘soap’ drama.
- An event from personal experience (for example, a time when you were frightened or very happy, or a day at a fair, wedding or picnic).
Before the class, find some pictures that relate to the story. They could be pictures from a story book or the textbook; a picture from a magazine or newspaper; or a photo of an event, such as a wedding or picnic. You could also draw a picture on the board, or ask a student to draw a picture.
Practise telling the story. Remember to ask questions as you tell the story. Practise these questions too.
- In class, tell the story. If students don’t know it already, tell them the story simply and slowly. If they already know the story, ask more questions so that you and the students tell the story together. (See Resource 1 for some of the classroom language that you might need to do this activity).
As you tell the story, write useful words and phrases on the board. You can adjust the amount that you write on the board depending on the level and ability of your students. Students who are not used to speaking English may need more support with language.
- Provide students with some of the language that they will need to tell the story themselves. If the story is ‘A day at a picnic’, you might write the following phrases:

- Now tell students that they will tell the story themselves. Put them into groups and ask them to take turns to tell part of the story to the students in their group. Remember that when groups are speaking at the same time, it might be noisy.
- Move around the room while your students tell the stories. Listen to some groups. Make sure that you listen to different students each time you do a speaking activity, and listen to ones from the back of the room as well as the front.
When most groups have finished telling their stories, end the activity. If you have time, students could tell their stories again. This time, each student could tell a different part of the story. This would provide further motivation for students to listen to each other’s stories.
Pause for thought After trying this activity in class, think about the following questions:
|
Some students may enjoy speaking in class. Others might need to be encouraged to speak more. Make sure to call on the ones who are shy as well. Be patient and encouraging, giving them time to choose their words. Allow them to use their home language if they need to.
If you find that some students do not participate, it might help to change the groups that students are in so that some students will be more comfortable to speak.
It will take time for students to develop confidence and abilities in speaking English. Activities in this unit may not work the first time you do them. If they don’t, just try them again. Keep notes on what you think went well and what you think you could have done better to remind yourself the next time you do a speaking activity.
3 Giving students useful and positive feedback
So far in this unit you have learned about techniques to help students be more motivated about speaking, and to speak more confidently in English, but this does not mean that they will not make mistakes when they speak. Learning to speak another language takes time, and the only way to learn is by trying to use new language. It is therefore important to make your classroom an encouraging place to be – a place where you and your students can try things out without criticism.
In Case Study 2, you read about a teacher who did a storytelling activity in groups with her students. Did you notice that the teacher said the following?

Pause for thought
|
There is evidence that correcting mistakes does not help learners of a language speak more accurately (Edge, 1993). Making mistakes is part of the language learning process. If students are to become fluent, confident speakers of English, then they need to practise using English and to be allowed to experiment with it and make mistakes. Classes need to include activities in which they can speak without being interrupted or stopped. A good activity for students to build up confidence and fluency in speaking is role play.
Role play activities can help young students develop confidence to speak in different social situations (see the video below). They are particularly useful for English language teaching, because with them you can create a lifelike situation for your students to practise. Each student is given a character. With other students in a group they have to act out a situation as if they were that character. For example, students could be customers and shopkeepers in a tea shop (or see Resource 1 in the unit Supporting speaking in English: pair and groupwork). Role play works best when students are encouraged to play the roles as realistically as possible, so, for example, the shopkeepers don’t know what the customers will order.
When acting out a role, students should experiment with new language. This means that they will make mistakes. Your feedback on these activities should help students improve their abilities and confidence. Read Case Study 3, in which a teacher describes how she gives feedback to her students after a role play activity.
Case Study 3: Mrs Elam feedback to students on a speaking activity
Mrs Elam is a secondary English teacher who reflects on how she gave feedback to her students after a role play activity.
My Class X students had just been studying the passage ‘Tea from Assam’ from Chapter 7 of the NCERT Class X textbook First Flight [see Resource 5]. Students had discussed information about tea: its popularity around the world; the best tea and how to make it; the history of growing and drinking it; and legends surrounding the drink.
This lesson about tea was good preparation for an activity where students could do a role play about buying and selling tea in a tea shop, so I told the class that we were going to do a role play about that.
I first asked the students to imagine that they wanted to buy some tea at a tea shop. I asked them what phrases they might use to buy tea and I wrote them on the board.
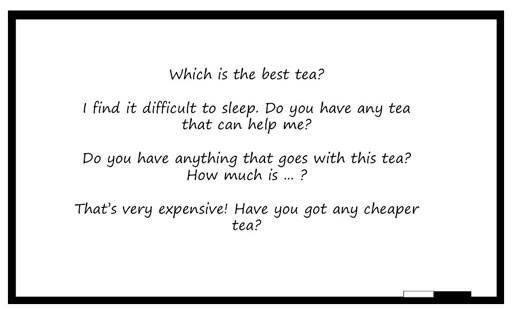
Then I asked students to imagine that they owned a tea shop. I told them to think about what they sold in the shop and to write a menu with prices. I gave them around five minutes to do this. I then asked them what phrases they might use to sell their items and wrote them on the board.

Finally, I put the students together in groups of four. I gave them these instructions:

I told the groups to begin, and they began playing the roles of shop owners and customers.
It wasn’t possible for me to listen to all of the groups in that time, so I concentrated on three groups. I always make sure that I focus on different groups of students each time we do a speaking activity in class. As they spoke, I listened and made a note of mistakes that they were making. I didn’t note down every mistake, of course, but I noted down mistakes that were common. I focused on the language that we had been learning in the most recent lessons. For example, in this lesson there are exercises about using prepositions like ‘over’, ‘by’ and ‘through’. I also noted down some good phrases that students were using.
After four minutes or so, I told everyone to swap roles – that is, the shop owners were now customers and vice versa. This time they were really getting into the roles and were making some good bargains!
When they had finished, I looked at my notes and told the class what they had done well, giving some examples of good language use. Then I copied ten of the sentences with mistakes on the board. I chose mistakes that many of the students made, and I was careful not to say who made the mistakes, as that could be humiliating. Here are some examples of the sentences with mistakes:

I then said:

I gave everyone five minutes to write the sentences correctly, and then I asked them for the correct versions. As they read out the correct versions, I corrected the sentences on the board. Doing this helps students to think about their mistakes and grammar, and it also helps them to see that we are correcting their mistakes when they do speaking activities.
The notes I make when students are speaking are also useful for me in keeping records. After speaking activities, I make notes about the students I listen to, and it helps me to see their progress and assess them.
Activity 4: Responding to students after a speaking activity
In Case Study 3, students did a speaking activity in groups. They played the roles of a shop owner and a customer. As they acted out the roles, the teacher listened to some groups and noted down some common, typical mistakes. You can use this technique when your students are doing any speaking activity. Follow these steps:
- The next time your students carry out a speaking activity in groups, focus on one or two of the groups. Make sure you choose different groups and students each time.
- Write down common and typical mistakes in your notebook. Remember that you can write down positive things too, such as phrases that are used very well.
- After the activity, write no more than ten of the sentences with mistakes on the board.
- Tell students that the sentences have mistakes, but don’t tell them what the mistakes are. Remember not to tell students who made the mistakes, as this can be humiliating for them. (See Resource 1 for some of the classroom language you might need to do this activity.)
- Give your students some time to think about and correct the mistakes individually.
- Ask students to work together to correct the mistakes on the board. Make sure you correct the versions written on the board.
- Always make sure you tell your class what they did well too.
- Note down the mistakes that many students are making and think about how you can create a lesson to support students in improving in this area.
Pause for thought After trying this activity in class, think about how an activity like this can help you record and assess your students’ learning. |
The notes you make in an activity like this can be used as records about students’ performance in speaking. Make notes about different students each time they do a speaking activity. Think about how you can support students to improve in the areas that they need it. (See the unit Supporting language learning through formative assessment.)
Remember that students respond to positive feedback too. Reward them for using English in the classroom. You could create a chart that lists all your students’ names. Each time one of your students speaks some English in class, you could add a star next to their name.
4 Summary
Learning to speak in another language is difficult and requires confidence, particularly when students are learning to communicate in activities like telling stories and role play. In this unit, you have been introduced to three ways that you can build students’ confidence and motivation to speak, by giving them:
- interesting topics to speak about (that relate to their lives)
- the language they need to take part in speaking activities
- positive and constructive feedback after speaking activities.
These techniques can be used in any English language class across a range of topics to help your students to develop their abilities to communicate in English.
What next?
If you would like to develop your own speaking skills, see Resource 1. See also the additional resources section for links to further reading.
5 Resources
Resource 1: Developing your own English
Here is a list of phrases that could be useful for carrying out the activities in this unit.
Helping students speak
- Can you read out what you have written, please?
- Tell us what you have written.
- Can I see your sentence?
- I don’t agree with you.
- Do you agree with her?
- The word you are looking for is XXX.
- What I think you mean is XXX.
Telling a story
- Would you like to hear a story?
- One day, many years ago, there was a …
- What do you think happened next?
- Can you guess?
- How did he/she feel? What do you think?
- Now it’s your turn.
Correcting mistakes after a speaking activity
- You spoke very well.
- Look at these phrases on the board.
- There are some mistakes.
- What are the mistakes?
- What’s wrong with this sentence?
- What’s wrong with this word?
- Does anyone know the correct word?
- Can anyone write the correct sentence?
Here are some tips for developing your own speaking skills:
- Listen to as much English as you can, for example on the radio or the Internet.
- Watch movies or TV programmes in English if you can.
- Read English texts aloud to yourself. If you can, record yourself and listen to it. Then do it again!
Practise speaking with your colleagues or anyone else who speaks English. Perhaps you could start a local English club where you chat in English for one hour a week?
Resource 2: Using groupwork
Groupwork is a systematic, active, pedagogical strategy that encourages small groups of students to work together for the achievement of a common goal. These small groups promote more active and more effective learning through structured activities.
The benefits of groupwork
Groupwork can be a very effective way of motivating your students to learn by encouraging them to think, communicate, exchange ideas and thoughts, and make decisions. Your students can both teach and learn from others: a powerful and active form of learning.
Groupwork is more than students sitting in groups; it involves working on and contributing to a shared learning task with a clear objective. You need to be clear about why you are using groupwork for learning and know why this is preferable to lecturing, pair work or to students working on their own. Thus groupwork has to be well-planned and purposeful.
Planning groupwork
When and how you use groupwork will depend on what learning you want to achieve by the end of the lesson. You can include groupwork at the start, the end or midway through the lesson, but you will need to allow enough time. You will need to think about the task that you want your students to complete and the best way to organise the groups.
As a teacher, you can ensure that groupwork is successful if you plan in advance:
- the goals and expected outcomes of the group activity
- the time allocated to the activity, including any feedback or summary task
- how to split the groups (how many groups, how many students in each group, criteria for groups)
- how to organise the groups (role of different group members, time required, materials, recording and reporting)
- how any assessment will be undertaken and recorded (take care to distinguish individual assessments from group assessments)
- how you will monitor the groups’ activities.
Groupwork tasks
The task that you ask your students to complete depends on what you what them to learn. By taking part in groupwork, they will learn skills such as listening to each other, explaining their ideas and working cooperatively. However, the main aim is for them to learn something about the subject that you are teaching. Some examples of tasks could include the following:
- Presentations: Students work in groups to prepare a presentation for the rest of the class. This works best if each group has a different aspect of the topic, so they are motivated to listen to each other rather than listening to the same topic several times. Be very strict about the time that each group has to present and decide on a set of criteria for a good presentation. Write these on the board before the lesson. Students can the use the criteria to plan their presentation and assess each other’s work. The criteria could include:
- Was the presentation clear?
- Was the presentation well-structured?
- Did I learn something from the presentation?
- Did the presentation make me think?
- Problem solving: Students work in groups to solve a problem or a series of problems. This could include conducting an experiment in science, solving problems in mathematics, analysing a story or poem in English, or analysing evidence in history.
- Creating an artefact or product: Students work in groups to develop a story, a piece of drama, a piece of music, a model to explain a concept, a news report on an issue or a poster to summarise information or explain a concept. Giving groups five minutes at the start of a new topic to create a brainstorm or mind map will tell you a great deal about what they already know, and will help you pitch the lesson at an appropriate level.
- Differentiated tasks: Groupwork is an opportunity to allow students of different ages or attainment levels to work together on an appropriate task. Higher attainers can benefit from the opportunity to explain the work, whereas lower attainers may find it easier to ask questions in a group than in a class, and will learn from their classmates.
- Discussion: Students consider an issue and come to a conclusion. This may require quite a bit of preparation on your part in order to make sure that the students have enough knowledge to consider different options, but organising a discussion or debate can be very rewarding for both you and them.
Organising groups
Groups of four to eight are ideal but this will depend on the size of your class, the physical environment and furniture, and the attainment and age range of your class. Ideally everyone in a group needs to see each other, talk without shouting and contribute to the group’s outcome.
- Decide how and why you will divide students into groups; for example, you may divide groups by friendship, interest or by similar or mixed attainment. Experiment with different ways and review what works best with each class.
- Plan any roles you will give to group members (for example, note taker, spokesperson, time keeper or collector of equipment), and how you will make this clear.
Managing groupwork
You can set up routines and rules to manage good groupwork. When you use groupwork regularly, students will know what you expect and find it enjoyable. Initially it is a good idea to work with your class to identify the benefits of working together in teams and groups. You should discuss what makes good groupwork behaviour and possibly generate a list of ‘rules’ that might be displayed; for example, ‘Respect for each other’, ‘Listening’, ‘Helping each other’, ‘Trying more than one idea’, etc.
It is important to give clear verbal instructions about the groupwork that can also be written on the blackboard for reference. You need to:
- direct your students to the groups they will work in according to your plan, perhaps designating areas in the classroom where they will work or giving instructions about moving any furniture or school bags
- be very clear about the task and write it on the board in short instructions or pictures. Allow your students to ask questions before you start.
During the lesson, move around to observe and check how the groups are doing. Offer advice where needed if they are deviating from the task or getting stuck.
You might want to change the groups during the task. Here are two techniques to try when you are feeling confident about groupwork – they are particularly helpful when managing a large class:
- ‘Expert groups’: Give each group a different task, such as researching one way of generating electricity or developing a character for a drama. After a suitable time, re-organise the groups so that each new group is made up of one ‘expert’ from all the original groups. Then give them a task that involves collating knowledge from all the experts, such as deciding on what sort of power station to build or preparing a piece of drama.
- ‘Envoys’: If the task involves creating something or solving a problem, after a while, ask each group to send an envoy to another group. They could compare ideas or solutions to the problem and then report back to their own group. In this way, groups can learn from each other.
At the end of the task, summarise what has been learnt and correct any misunderstandings that you have seen. You may want to hear feedback from each group, or ask just one or two groups who you think have some good ideas. Keep students’ reporting brief and encourage them to offer feedback on work from other groups by identifying what has been done well, what was interesting and what might be developed further.
Even if you want to adopt groupwork in your classroom, you may at times find it difficult to organise because some students:
- are resistant to active learning and do not engage
- are dominant
- do not participate due to poor interpersonal skills or lack of confidence.
To become effective at managing groupwork it is important to reflect on all the above points, in addition to considering how far the learning outcomes were met and how well your students responded (did they all benefit?). Consider and carefully plan any adjustments you might make to the group task, resources, timings or composition of the groups.
Research suggests that learning in groups need not be used all the time to have positive effects on student achievement, so you should not feel obliged to use it in every lesson. You might want to consider using groupwork as a supplemental technique, for example as a break between a topic change or a jump-start for class discussion. It can also be used as an ice-breaker or to introduce experiential learning activities and problem solving exercises into the classroom, or to review topics.
Resource 3: ‘The Snake and the Crows’
There were two crows that had a nest at the top of a banyan tree. A snake lived at the bottom of the tree. The crows had four eggs in the nest, and didn’t want to leave the nest. They were afraid that the snake would eat the eggs. Eventually, they were hungry and flew from the nest to find food.
While they were away, the snake climbed the tree and ate the eggs. The crows were very sad.
A few weeks later, they had four more eggs in their nest. They were afraid to leave the nest so they stayed there as long as they could. Eventually, they needed to leave to look for food. One again, the snake climbed the tree and ate the eggs. The crows were very upset.
They talked to a fox who gave them a cunning plan. The crows flew to the King’s palace and stole the princess’s favourite necklace. They flew past the guards, showing the necklace. The guards chased the crows towards the tree. The crows dropped the necklace onto the snake. The guards killed the snake and got the necklace. Now that the snake was dead, the crows did not have to be afraid to leave their nests any more. They could have some babies.
Find many more stories on these websites:
- Animation stories: http://www.jingukid.com/ videos/ animation-stories/
- Stories for kids: http://www.mocomi.com/ fun/ stories/
Resource 4: Techniques that can help students tell stories on their own
Using pictures
Pictures can be a good way to get students speaking. You can show students a picture and ask them to guess what is happening, or you can use them to help students understand a story. In the case study, the teacher used the pictures as prompts when the class was ready to tell the story.
Using the board
The teacher wrote key words and phrases on the board. When students told the story in groups, less confident students were able to use the support on the board, and more confident members of the class were able to use different words and phrases if they wanted.
Working in groups
If you ask one or two individuals from a class to tell a story, then only those individuals get to practise speaking. If students work in groups to tell a story, then everybody gets a chance to speak. Telling a story in groups is easier and less intimidating than standing up and speaking to the whole class. Also, students in groups can give each other feedback and support.
Doing the activity twice
It can be very useful for students to sometimes do a speaking activity twice. The first time is a kind of rehearsal and allows them to practise what they are going to say. The second time, it will be easier for them to use the new language, and they will be more fluent and confident.
Resource 5: ‘Tea from Assam’
Pranjol, a youngster from Assam, is Rajvir’s classmate at school in Delhi. Pranjol’s father is the manager of a tea-garden in Upper Assam and Pranjol has invited Rajvir to visit his home during the summer vacation.
‘CHAI-GARAM … garam-chai,’ a vendor called out in a high-pitched voice. He came up to their window and asked, ‘Chai, sa’ab?’
‘Give us two cups,’ Pranjol said.
They sipped the steaming hot liquid. Almost everyone in their compartment was drinking tea too.
‘Do you know that over eighty crore cups of tea are drunk every day throughout the world?’ Rajvir said.
‘Whew!’ exclaimed Pranjol. ‘Tea really is very popular.’
The train pulled out of the station. Pranjol buried his nose in his detective book again. Rajvir too was an ardent fan of detective stories, but at the moment he was keener on looking at the beautiful scenery. It was green, green everywhere. Rajvir had never seen so much greenery before. Then the soft green paddy fields gave way to tea bushes.
It was a magnificent view. Against the backdrop of densely wooded hills a sea of tea bushes stretched as far as the eye could see. Dwarfing the tiny tea plants were tall sturdy shade-trees and amidst the orderly rows of bushes busily moved doll-like figures. In the distance was an ugly building with smoke billowing out of tall chimneys.
‘Hey, a tea-garden!’ Rajvir cried excitedly. Pranjol, who had been born and brought up on a plantation, didn’t share Rajvir’s excitement.
‘Oh, this is tea country now,’ he said. ‘Assam has the largest concentration of plantations in the world.
‘You will see enough gardens to last you a lifetime!’
‘I have been reading as much as I could about tea,’ Rajvir said. ‘No one really knows who discovered tea but there are many legends.’
‘What legends?’
‘Well, there’s the one about the Chinese emperor who always boiled water before drinking it. One day a few leaves of the twigs burning under the pot fell into the water giving it a delicious flavour. It is said they were tea leaves.’
‘Tell me another!’ scoffed Pranjol.
‘We have an Indian legend too. Bodhidharma, an ancient Buddhist ascetic, cut off his eyelids because he felt sleepy during meditations. Ten tea plants grew out of the eyelids. The leaves of these plants when put in hot water and drunk banished sleep.
‘Tea was first drunk in China,’ Rajvir added, ‘as far back as 2700 BC! In fact words such as tea, “chai” and “chini” are from Chinese. Tea came to Europe only in the sixteenth century and was drunk more as medicine than as beverage.’
The train clattered into Mariani junction. The boys collected their luggage and pushed their way to the crowded platform. Pranjol’s parents were waiting for them. Soon they were driving towards Dhekiabari, the tea-garden managed by Pranjol’s father. An hour later the car veered sharply off the main road. They crossed a cattle-bridge and entered [the] Dhekiabari Tea Estate.
On both sides of the gravel-road were acre upon acre of tea bushes, all neatly pruned to the same height. Groups of tea-pluckers, with bamboo baskets on their backs, wearing plastic aprons, were plucking the newly sprouted leaves. Pranjol’s father slowed down to allow a tractor pulling a trailer-load of tea leaves to pass.
‘This is the second-flush or sprouting period, isn’t it, Mr Barua?’ Rajvir asked. ‘It lasts from May to July and yields the best tea.’
‘You seem to have done your homework before coming,’ Pranjol’s father said in surprise.
‘Yes, Mr Barua,’ Rajvir admitted. ‘But I hope to learn much more while I’m here.’
(An extract from Chapter 7 of the NCERT Class X textbook, First Flight.)
Additional resources
Here are some links to articles and tips for teachers of English about helping students to speak in English:
- ‘Teaching speaking skills 1’: http://www.teachingenglish.org.uk/ articles/ teaching-speaking-skills-1
- ‘Getting teenagers talking’: http://www.teachingenglish.org.uk/ article/ getting-teenagers-talking
- ‘Reluctant talkers 1’: http://www.teachingenglish.org.uk/ language-assistant/ teaching-tips/ reluctant-talkers-1
- ‘Reluctant talkers part 2’: http://www.teachingenglish.org.uk/ language-assistant/ teaching-tips/ reluctant-talkers-part-2
- ‘Speaking for better communication’: http://orelt.col.org/ module/ 2-speaking-better-communication
An article about correcting mistakes in speaking activities:
- ‘Classroom management: speaking correction techniques’: http://www.onestopenglish.com/ support/ methodology/ classroom-management/ classroom-management-speaking-correction-techniques/ 146455.article
A series by the BBC’s World Service about improving speaking skills:
- ‘Talk about English: better speaking’: http://www.bbc.co.uk/ worldservice/ learningenglish/ webcast/ tae_betterspeaking_archive.shtml
Articles and websites about storytelling:
- ‘Storytelling – benefits and tips’: http://www.teachingenglish.org.uk/ article/ storytelling-benefits-tips
- ‘Telling a story’: http://www.teachingenglish.org.uk/ article/ telling-a-story-0
- ‘Storytelling in the classroom’: http://www.storyarts.org/ classroom/
- ‘Storytelling in the EFL speaking classroom’: http://iteslj.org/ Techniques/ Jianing-Storytelling.html
References
Acknowledgements
Except for third party materials and otherwise stated below, this content is made available under a Creative Commons Attribution-ShareAlike licence (http://creativecommons.org/ licenses/ by-sa/ 3.0/). The material acknowledged below is Proprietary and used under licence for this project, and not subject to the Creative Commons Licence. This means that this material may only be used unadapted within the TESS-India project and not in any subsequent OER versions. This includes the use of the TESS-India, OU and UKAID logos.
Grateful acknowledgement is made to the following sources for permission to reproduce the material in this unit:
Resource 5: extract from Chapter 7 of the NCERT Class X textbook First Flight (2006), http://ncert.nic.in.
Every effort has been made to contact copyright owners. If any have been inadvertently overlooked the publishers will be pleased to make the necessary arrangements at the first opportunity.
Video (including video stills): thanks are extended to the teacher educators, headteachers, teachers and students across India who worked with The Open University in the productions.