Use 'Print preview' to check the number of pages and printer settings.
Print functionality varies between browsers.
Printable page generated Tuesday, 16 June 2026, 7:28 AM
TI-AIE: Pair work: life processes
What this unit is about
Using pair work is a very simple strategy that enables all students, whatever the size of your class, to take part in the lesson. Encouraging students to talk and share their ideas on topics will stimulate their thinking and keep them interested in the work that they are doing. Pair work can be used for a range of purposes and is easy to organise
A key purpose of using pair work is to enable students to talk together about what they are doing and trying to learn. Talking about a problem helps you to clarify the issues and stimulates your thinking to find solutions (Mercer and Littleton, 2007). With a topic like life processes, it is easy for students to talk to each other and share their ideas without being embarrassed or nervous at talking in front of the whole class. Together they can develop their understanding without being humiliated in front of the whole class by giving a ‘wrong’ answer. Often students have ideas that are not fully developed. By allowing them to talk about their ideas, they can safely explore the confusion they may have about a topic.
This unit explores how pair work can be used to enhance students’ abilities to talk to each other more effectively.
What you can learn in this unit
- The advantages of encouraging talk in science.
- Ways of using pair work, including peer assessment.
- Developing your skills in using pair work.
Why this approach is important
Talking and being able to talk is a key dimension to learning in classrooms. Language development and conceptual understanding are deeply linked. Thought requires language and language requires thought, but many teachers do not allow students to talk. If they did, the learning outcomes for their students would be greatly enhanced (Vygotsky, 1978).
In order for students to explore their understanding of scientific concepts (and therefore use scientific terms appropriately), they need opportunities to talk about their ideas and understanding of scientific concepts. To do this, students need help in how to speak and listen to each other effectively. Using pair work to achieve this is a good starting point for younger students because it gives them a safe and supportive context to learn in.
Pause for thought
|
1 Planning to use pair work
It is easy to assume that students know how to talk to each other. That is not always true, however, and even older students will need guidance on how to work well together. They will need to be given a task to complete and guidance on what is expected.
Working with a partner can also be a useful technique for you when planning lessons on topics that you find difficult to teach. Everyone has areas they like to teach more than others. Sharing thoughts and ideas on how to teach any topic – particularly on your less favoured topics – will stimulate your thinking and help you clarify your understanding of the topic. You will also see a clear pathway to teach the topic.
Case Study 1: Pair work planning
Mrs Ritesh, an elementary science teacher in a large school near Bhopal, asked a colleague who teaches some of the same topics to other classes to plan with her. After attending a local DIET course that explored different teaching techniques on how to improve science teaching, Mrs Ritesh wanted to share some of the techniques and ideas she had learnt. One idea was to plan with colleagues, sharing ideas and solving problems together about approaches to take that would help students’ learning. She describes below how they planned sessions on life processes.
I asked Meena if she would like to plan the next three science sessions together and she agreed. She is fairly new to teaching and welcomed the support of working together. We were about to do some work on life processes, so we identified the key things that we wanted the students to learn. We wanted to make the student experience more interactive. Life processes include all the characteristics of living things and how different animals carry out these seven processes. The amount of practical work can be difficult to think about, so I hoped that planning together would help us to devise some useful and interesting activities that motivated our students. We agreed that, since we were enjoying working as a pair, it would be good for the students to work in pairs.
Because we both had such large classes, we decided to use some very simple activities such as bending their arm, standing and sitting down, or lying down. We agreed to write the simple actions as a list on the blackboard, and then the questions for each activity were:
- What happens to your muscles and bones as you do these actions?
- How do the actions happen?
- How do your muscles work?
They were to try the actions and (if their partner was happy to do so) they could feel what happened as their partner bent their arm. They would then talk together about what was happening and record their ideas.
I asked the students to share their ideas with the rest of the class and listed the common ideas that they had. I noticed that some of the students did not understand about how muscles and bones work together, so I said we would explore ideas like this more next lesson.
I shared my experience with Meena and she had found similar confusions with her class. We decided to make some simple models of how a joint works [see Resource 1] for the next lesson to show muscles working in pairs. To see the students so interested and still talking about their bodies and how they moved as we left the classroom was very pleasing. We decided that we would continue to plan together, because it helped us to think more creatively about ways to interest and enthuse students by sharing ideas.
Pause for thought
|
Pair work is a very useful and supportive way to work when both partners share and respect each other’s ideas and agree to compromise on ways forward. Mrs Ritesh and Meena benefited from sharing ideas and supporting each other as they extended their strategies for teaching. This was especially important when things did not go as they planned, because they were able to explore what had happened without blaming each other. This trust took time to establish – but because they both liked to talk about their work, the trust grew.
Activity 1: Sharing planning
If you have a colleague who teaches the same topics as you, ask them if you can plan a lesson together where you use pair work with your class. Both of you should read Resource 2, ‘Planning lessons’, before you start, as it will help you in your task. If you do not have a colleague to do this, you may want to talk with another teacher in the school about your ideas, either before you do your planning or as you work through the plan and encounter any problems.
Talking with another person you will stimulate your own thinking about what to do and help you think more deeply about the lesson you are planning.
Pause for thought After doing the planning, think about the impact this sharing has had on the depth and detail of your planning.
|
Building such trust and being able to explore wider possibilities will lead to you being a more interactive and exciting teacher for your students. Using this same approach in your classroom will help students achieve more.
2 Using pair work in the classroom
Now read Case Study 2.
Case Study 2: Talking in pairs
Mrs Roshni wanted to explore what her class knew about respiration and decided to start with exploring their ideas about breathing in and out. She explains what she did and why.
I really like science and want my class to enjoy it too. Ever since I trained as a teacher and had a science tutor who made it such fun, I have wanted to do the same for my students. It is not always easy because the school I teach in is rural and does not have a lot of equipment and resources for science. But my tutor said that there were enough resources around to make science exciting. He also said that students need to be able to talk about science and do practical tasks. I decided to start by getting my Class VI to work in pairs so that everyone had the chance to do the activities and to talk about their experiences.
We had been looking at the characteristics of living things as that was the next topic in their textbooks, but I did not want to just read the chapter with the students. I heard my tutor saying in my head that they need to investigate things and I wanted to know what they knew about respiration, so I started with breathing.
I asked them to first work on their own, placing their hands on their ribs and breathing in slowly and out again. As they breathed in and out, I asked them to think about what they could feel happening to their rib cage and their mouth and nose, and why this might be. Next, I asked them to do the same with their neighbour, putting their hands on their partner’s rib cage as their partner breathed in and out. This caused lots of discussion, laughter and interest as they tried it several times each.
While they were working I walked around and listened carefully to the conversations. I gave them time to share ideas about what they thought was happening before I asked some pairs for comments. I chose pairs who I knew had some interesting ideas.
Their responses included:
- the chest moves out
- the ribs appear to move up
- the ribs spread out
- you can feel air going in your nose and mouth
- your chest gets bigger
- you suck air in.
Then they discussed in pairs why this happened, and I asked some other pairs for their thoughts. It was clear that most pairs were able to say that it was to let more air in, but they could not explain why the expansion of the chest helped air to enter.
The idea that the air pressure is reduced by expanding the capacity of the chest and lungs, which causes the air to rush in and balance the forces, was not something that any of my students grasped. So I spent the rest of the lesson showing them how this worked and exploring air pressure and balancing forces.
The next step will be to explore breathing further, looking at how other animals breathe to add real examples. This will link with the textbook and help them to remember and understand better.
Video: Talk for learning |
Pause for thought Mrs Roshni used active pair work to give her students the opportunity to link experience and their ideas of breathing and respiration. Do you undertake such simple activities regularly with your class? If not, how could you do this? |
Activity 2: Using pair work in class
Now teach your planned lesson using pair work, enabling your students to talk about how we breathe, what happens to food as we swallow, how we excrete waste or any other topic you are teaching in science.
Think about what you will do while they are talking, and about how you will:
- introduce your class to pair work
- organise the students
- tell them what they are they going to talk about
- decide how long they will talk for
- find out about their learning.
It is important to give your students advice about how to listen and respect each other’s ideas so that together they can build up an understanding that they both agree with. Gather together any resources you need and then teach your lesson.
Pause for thought How did the lesson go? Were the students interested? How do you know this? What did they do or not do? Did you find out more about what they know about breathing or digestion, or your chosen topic from working in pairs? How could you improve the use of pair work next time? |
3 Advantages of pair work
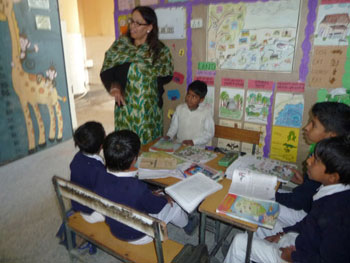
There are some clear advantages to using pair work in the classroom (Figure 1). These include:
- giving more students the opportunity to speak about a science idea, share ideas and develop their scientific understanding
- enabling students to learn from each other
- giving students a degree of privacy and allowing them to try ideas in a less public forum
- giving responsibility for learning to the student
- helping shy and reserved students gain confidence in their ability to take part in lessons
- giving you as the teacher space and the opportunity to gather evidence of those who understand and those who may need extra support
- the opportunity to intervene and help students increase their knowledge and confidence as you interact with pairs discreetly.
Figure 1 Students feeding back after talking in pairs.
Pair work does not need to be limited to one stage of the lesson. Students can be put in pairs for a great variety of tasks, which may include:
- discussion
- checking answers
- thinking about a problem
- generating ideas about a question or issue
- reading to one another about a topic and exploring its meaning.
You can also play a game together to practise and reinforce learning.
Some teachers argue that collaborative work reduces individual thought. But many suggest that in fact it does just the opposite, and that interaction is crucial to promoting individual thought. Vygotsky (1978) says that the construction of knowledge is not an isolated individual task, but that learning is a social process. Understanding an idea or concept appears first in a social setting; as the student agrees with the idea, it is then absorbed into the student’s individual understanding. The social process of building ideas together is key to learning and stimulating thinking for all students in different ways, so providing such opportunities is essential. Read the key resource ‘Involving all’ for more detail to help you plan and use these ideas of supporting all learners in your lessons.
Activity 3: Ways of using pair work
Think how you could use pair work in other classes you teach, as well as what different ways you could use it to support the diverse learning needs of your students. Note down some of your ideas and use these over the next few weeks to build up your confidence with this strategy in the classroom.
Video: Involving all |
4 Using peer assessment
Another way to use pair work in your class is to develop your students’ ability to evaluate their own work – not just for its presentation but also for the content. Most of your students will respond well to feedback on their work and participation. Research shows that one of the best ways to improve your students’ achievements is to give them constructive feedback on the work they do that goes beyond it being neat and tidy (Harlen et al., 2003). Students need feedback that will help them develop as competent learners, showing them their strengths and the areas that they need to work on to develop their understanding. Any feedback needs to be seen as useful by your students, otherwise they will not respond to it.
As well as encouraging your students to assess their own work, it is possible to develop your students’ ability to assess each other’s work and give feedback to their peers. Both approaches – often called assessment for learning (Black and Wiliam, 1998) – will have a significant impact on your students’ achievements and their perception of themselves as effective learners. Assessment is part of the teaching and learning cycle, but to be helpful it should be a regular part of everyday work in science in the classroom. Any feedback should be constructive and encourage students to take more responsibility for their own learning (Hodgson, 2010).
For peer assessment to be effective, you will have to help your students develop their evaluative skills. Language will play a key role in any feedback’s usefulness. It will take time and practice for them to develop the language and evaluation skills, but the results are worth the effort. There are key rules that you should introduce to help students value their work and role. These should include making sure that any feedback always starts with the positive and continues with those areas that need development, which should be presented constructively. Feedback should provide guidance as to how to improve their work using such statements as ‘When explaining how we breathe in, you needed to describe the stages more clearly and in the right order’.
Case Study 3: Using pair work for students to assess each other’s work
Mrs Nayal works with Class VII and describes what she did.
I had been doing some work on digestion with my class. I wanted to find out what each student understood and where any misunderstandings still existed. Because I have large class and I wanted this to be relatively quick, I decided to involve the students in evaluating each other’s knowledge. I gave them a task to do individually, and then asked them to exchange their responses with their partner. Each person would then examine what their partner had written and share their thoughts.
I set some rules to help them be constructive and supportive:
- Start with a positive comment.
- If you do not understand an answer, ask the student what they meant.
- Suggest how the work can be improved.
We discussed what this might sound like. For example, I told them that they could say: ‘I think you have put the labels in the right order, but you need to explain how the food moves along the digestive tract more clearly.’
The students worked on their own, putting the labels of the organs in order from mouth to anus. They then had to explain how the food moves along the alimentary canal. After five minutes, I asked them to exchange their answers with their partner. They had to look carefully at their partner’s answers and look for the correct answers first, then seek out anything they didn’t understand, and finally suggest how to improve their understanding. I gave them five minutes to do this and then asked them to talk to each other, taking it in turns to give feedback. As they did this I walked round and listened to how they spoke to each other and what they were saying. I only interacted if there was a problem, as they needed to try to do the task themselves without my correcting them.
I asked students to write down what was said and think about how helpful they found the feedback. I asked for a show of hands from those who had found it useful and had received some helpful advice to improve their work. The majority were very positive, which made me feel that I wanted to develop this way of getting my students to evaluate their own and others’ work.
Activity 4: Using peer assessment in your classroom
Think about what work you will be doing with your classes about life processes. This will vary depending on the age of the students.
- With younger students, if you are working on types of food and a balanced diet, you could ask them to each draw a picture of a healthy meal. They can then share this with their partner, and each student has to say whether they think their partner’s meal is healthy, explaining their reasoning.
- With older students, if you are looking at how animals move, you could devise a task for each person to do about how they run. They can then exchange answers with their partner to consider how the muscles are involved.
Plan your lesson and gather the resources you need. Think how you will introduce students to the idea of giving each other feedback in their discussion. Set up the task for the students. Walk round the classroom as they work and listen to their talk. Only interact with them if they need help or support either with the science, or with listening and responding to each other.
Pause for thought How did the students react to giving reach other feedback on their work? Do you think they learnt more about themselves as learners and how to give feedback? How do you know this? |
For more information about helping students and yourself develop your expertise in giving feedback, see the key resource ‘Monitoring and giving feedback’.
Providing a safe context to try out ways of doing new things is important for most of us. Giving your students the opportunity to look at each other’s work and talk about it in a supportive environment will help them to develop good evaluative skills. They will also develop an understanding of the sensitivity needed to provide positive feedback. Read Resource 3, ‘Using pair work’, to remind you of what you have learnt by doing this unit. Pair work provides a supportive context for learning the skills and language necessary when assessing their own and each other’s work.
5 Summary
If you are working with large classes and limited equipment and resources, it is important to use strategies that involve students in science lessons more. Pair work can do this easily. Allowing talking in the science classroom will:
- stimulate student thinking
- develop their ability to use scientific terms correctly
- encourage creativity through sharing ideas.
Providing the opportunity for pairs to talk is an easy step to try in your classroom (especially if you have a large class) and raises student interest and motivation. It could also be the first step towards moving on to group work, where more voices and ideas are shared to reach understanding.
Resources
Resource 1: Antagonistic muscles
Muscles work by getting shorter. We say that they contract, and the process is called contraction.
Muscles are attached to bones by strong tendons. When a muscle contracts, it pulls on the bone, and the bone can move if it is part of a joint.
Muscles can only pull and cannot push. This would be a problem if a joint were controlled by just one muscle: as soon as the muscle contracted and pulled on a bone, it would not be able to move the bone back again. The problem is solved by having muscles in pairs, called antagonistic muscles.
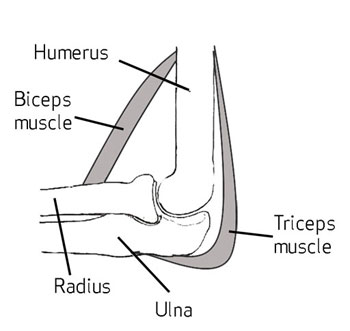
The elbow joint (Figure R1.1) lets our forearm move up or down. It is controlled by two muscles on the upper arm: the biceps on the front and the triceps on the back. The biceps and the triceps are antagonistic muscles.
- When the biceps muscle contracts, the forearm moves up.
- When the triceps muscle contracts, the forearm moves down.
Figure R1.1 A model of a hinge joint.
Resource 2: Planning lessons
Why planning and preparing are important
Good lessons have to be planned. Planning helps to make your lessons clear and well-timed, meaning that students can be active and interested. Effective planning also includes some in-built flexibility so that teachers can respond to what they find out about their students’ learning as they teach. Working on a plan for a series of lessons involves knowing the students and their prior learning, what it means to progress through the curriculum, and finding the best resources and activities to help students learn.
Planning is a continual process to help you prepare both individual lessons as well as series of lessons, each one building on the last. The stages of lesson planning are:
- being clear about what your students need in order to make progress
- deciding how you are going to teach in a way that students will understand and how to maintain flexibility to respond to what you find
- looking back on how well the lesson went and what your students have learnt in order to plan for the future.
Planning a series of lessons
When you are following a curriculum, the first part of planning is working out how best to break up subjects and topics in the curriculum into sections or chunks. You need to consider the time available as well as ways for students to make progress and build up skills and knowledge gradually. Your experience or discussions with colleagues may tell you that one topic will take up four lessons, but another topic will only take two. You may be aware that you will want to return to that learning in different ways and at different times in future lessons, when other topics are covered or the subject is extended.
In all lesson plans you will need to be clear about:
- what you want the students to learn
- how you will introduce that learning
- what students will have to do and why.
You will want to make learning active and interesting so that students feel comfortable and curious. Consider what the students will be asked to do across the series of lessons so that you build in variety and interest, but also flexibility. Plan how you can check your students’ understanding as they progress through the series of lessons. Be prepared to be flexible if some areas take longer or are grasped quickly.
Preparing individual lessons
After you have planned the series of lessons, each individual lesson will have to be planned based on the progress that students have made up to that point. You know what the students should have learnt or should be able to do at the end of the series of lessons, but you may have needed to re-cap something unexpected or move on more quickly. Therefore each individual lesson must be planned so that all your students make progress and feel successful and included.
Within the lesson plan you should make sure that there is enough time for each of the activities and that any resources are ready, such as those for practical work or active groupwork. As part of planning materials for large classes you may need to plan different questions and activities for different groups.
When you are teaching new topics, you may need to make time to practise and talk through the ideas with other teachers so that you are confident.
Think of preparing your lessons in three parts. These parts are discussed below.
1 The introduction
At the start of a lesson, explain to the students what they will learn and do, so that everyone knows what is expected of them. Get the students interested in what they are about to learn by allowing them to share what they know already.
2 The main part of the lesson
Outline the content based on what students already know. You may decide to use local resources, new information or active methods including groupwork or problem solving. Identify the resources to use and the way that you will make use of your classroom space. Using a variety of activities, resources, and timings is an important part of lesson planning. If you use various methods and activities, you will reach more students, because they will learn in different ways.
3 The end of the lesson to check on learning
Always allow time (either during or at the end of the lesson) to find out how much progress has been made. Checking does not always mean a test. Usually it will be quick and on the spot – such as planned questions or observing students presenting what they have learnt – but you must plan to be flexible and to make changes according to what you find out from the students’ responses.
A good way to end the lesson can be to return to the goals at the start and allowing time for the students to tell each other and you about their progress with that learning. Listening to the students will make sure you know what to plan for the next lesson.
Reviewing lessons
Look back over each lesson and keep a record of what you did, what your students learnt, what resources were used and how well it went so that you can make improvements or adjustments to your plans for subsequent lessons. For example, you may decide to:
- change or vary the activities
- prepare a range of open and closed questions
- have a follow-up session with students who need extra support.
Think about what you could have planned or done even better to help students learn.
Your lesson plans will inevitably change as you go through each lesson, because you cannot predict everything that will happen. Good planning will mean that you know what learning you want to happen and therefore you will be ready to respond flexibly to what you find out about your students’ actual learning.
Resource 3: Using pair work
In everyday situations people work alongside, speak and listen to others, and see what they do and how they do it. This is how people learn. As we talk to others, we discover new ideas and information. In classrooms, if everything is centred on the teacher, then most students do not get enough time to try out or demonstrate their learning or to ask questions. Some students may only give short answers and some may say nothing at all. In large classes, the situation is even worse, with only a small proportion of students saying anything at all.
Why use pair work?
Pair work is a natural way for students to talk and learn more. It gives them the chance to think and try out ideas and new language. It can provide a comfortable way for students to work through new skills and concepts, and works well in large classes.
Pair work is suitable for all ages and subjects. It is especially useful in multilingual, multi-grade classes, because pairs can be arranged to help each other. It works best when you plan specific tasks and establish routines to manage pairs to make sure that all of your students are included, learning and progressing. Once these routines are established, you will find that students quickly get used to working in pairs and enjoy learning this way.
Tasks for pair work
You can use a variety of pair work tasks depending on the intended outcome of the learning. The pair work task must be clear and appropriate so that working together helps learning more than working alone. By talking about their ideas, your students will automatically be thinking about and developing them further.
Pair work tasks could include:
- ‘Think–pair–share’: Students think about a problem or issue themselves and then work in pairs to work out possible answers before sharing their answers with other students. This could be used for spelling, working through calculations, putting things in categories or in order, giving different viewpoints, pretending to be characters from a story, and so on.
- Sharing information: Half the class are given information on one aspect of a topic; the other half are given information on a different aspect of the topic. They then work in pairs to share their information in order to solve a problem or come to a decision.
- Practising skills such as listening: One student could read a story and the other ask questions; one student could read a passage in English, while the other tries to write it down; one student could describe a picture or diagram while the other student tries to draw it based on the description.
- Following instructions: One student could read instructions for the other student to complete a task.
- Storytelling or role play: Students could work in pairs to create a story or a piece of dialogue in a language that they are learning.
Managing pairs to include all
Pair work is about involving all. Since students are different, pairs must be managed so that everyone knows what they have to do, what they are learning and what your expectations are. To establish pair work routines in your classroom, you should do the following:
- Manage the pairs that the students work in. Sometimes students will work in friendship pairs; sometimes they will not. Make sure they understand that you will decide the pairs to help them maximise their learning.
- To create more of a challenge, sometimes you could pair students of mixed ability and different languages together so that they can help each other; at other times you could pair students working at the same level.
- Keep records so that you know your students’ abilities and can pair them together accordingly.
- At the start, explain the benefits of pair work to the students, using examples from family and community contexts where people collaborate.
- Keep initial tasks brief and clear.
- Monitor the student pairs to make sure that they are working as you want.
- Give students roles or responsibilities in their pair, such as two characters from a story, or simple labels such as ‘1’ and ‘2’, or ‘As’ and ‘Bs’). Do this before they move to face each other so that they listen.
- Make sure that students can turn or move easily to sit to face each other.
During pair work, tell students how much time they have for each task and give regular time checks. Praise pairs who help each other and stay on task. Give pairs time to settle and find their own solutions – it can be tempting to get involved too quickly before students have had time to think and show what they can do. Most students enjoy the atmosphere of everyone talking and working. As you move around the class observing and listening, make notes of who is comfortable together, be alert to anyone who is not included, and note any common errors, good ideas or summary points.
At the end of the task you have a role in making connections between what the students have developed. You may select some pairs to show their work, or you may summarise this for them. Students like to feel a sense of achievement when working together. You don’t need to get every pair to report back – that would take too much time – but select students who you know from your observations will be able to make a positive contribution that will help others to learn. This might be an opportunity for students who are usually timid about contributing to build their confidence.
If you have given students a problem to solve, you could give a model answer and then ask them to discuss in pairs how to improve their answer. This will help them to think about their own learning and to learn from their mistakes.
If you are new to pair work, it is important to make notes on any changes you want to make to the task, timing or combinations of pairs. This is important because this is how you will learn and how you will improve your teaching. Organising successful pair work is linked to clear instructions and good time management, as well as succinct summarising – this all takes practice.
Additional resources
References
Acknowledgements
Except for third party materials and otherwise stated below, this content is made available under a Creative Commons Attribution-ShareAlike licence (http://creativecommons.org/ licenses/ by-sa/ 3.0/). The material acknowledged below is Proprietary and used under licence for this project, and not subject to the Creative Commons Licence. This means that this material may only be used unadapted within the TESS-India project and not in any subsequent OER versions. This includes the use of the TESS-India, OU and UKAID logos.
Grateful acknowledgement is made to the following sources for permission to reproduce the material in this unit:
Figure 1: Jane Devereux.
Every effort has been made to contact copyright owners. If any have been inadvertently overlooked the publishers will be pleased to make the necessary arrangements at the first opportunity.
Video (including video stills): thanks are extended to the teacher educators, headteachers, teachers and students across India who worked with The Open University in the productions.