Use 'Print preview' to check the number of pages and printer settings.
Print functionality varies between browsers.
Printable page generated Wednesday, 24 June 2026, 2:31 PM
TI-AIE: Using groupwork: floating and sinking
What this unit is about
This unit looks at how simple actions such as allowing students to talk to each other can help them understand scientific concepts better. It focuses on ideas related to water, with an emphasis on floating and sinking. This provides a suitable context to explore how to make the best use of groupwork in the classroom.
Even with large classes, simple tasks like talking and working together are possible without major reorganisations of the classroom. The benefits in terms of aiding student learning are great. This unit explores different ways of organising and working with groups in large or small classes, and how groupwork enhances students’ enthusiasm and motivation for science.
What you can learn in this unit
- How to use groupwork to help students explore ideas more deeply.
- Why groupwork is a good strategy to use to enhance participation and creativity.
- How to plan and use groupwork effectively to help students predict, explore and hypothesise about why things float or sink.
Why this approach is important
Capturing and maintaining learners’ interest is key to motivating them to want to know more about the world around them. Many students are shy of speaking in large groups and so remain silent, not asking questions if they do not understand. Encouraging more students to participate more actively in their lessons will make a big difference to their achievements. Using groupwork will achieve this.
1 Using groupwork to explore ideas
Many students have half-formed ideas about why things float and sink that they have developed through experience. Perhaps they have never had the concepts relating to why things float or sink explained well, or have never had the opportunity to talk about why things really float and sink.
Understanding such a basic concept is quite important for health and safety reasons. For example, many people who transport goods and people around their community using the local waterways, rivers and the sea need to understand the principles.
Groupwork allows students to talk legitimately about their ideas and share both good and half-formed ideas with others. Together, such groups can share their understanding and test out ideas that they are not sure about by doing investigations. The reason that groupwork rather than pair work might be better in some instances is that if all your students have half-formed but different understandings about floating, then they are more likely to reach a better understanding with more elements to integrate together. Your role as a teacher is to help the students link together their ideas, organising them into the accepted understanding of why things float or sink. Talking to a small group while others are working on another task means that you can support these students in clarifying their thinking by asking questions and providing relevant information.
Now read Case Study 1, about how a teacher explored early ideas about floating and sinking with her young students in Class I.
Case Study 1: Using small groups to explore early ideas
Mrs Khanday teaches Class I and tries to offer her class a stimulating environment by providing times when students can choose what they do. Over time she has gathered together materials that she can put out for the students to play with. She has made dolls out of scraps of fabric and made clothes so that students can role play with them. She also has a big plastic tub that she fills with water and puts toys and containers in for the students to enjoy water play. She describes how she joined a group of students playing in the water.
I had organised a session for my students to choose what they did. There were lots of different things for them to do. I decided I was going to stay with the water tub to listen and interact with the children as they played with the toys and containers that I had put in the water. I wanted to explore their ideas about the properties of water and especially why things float. They were playing with stones and putting them into the different containers.
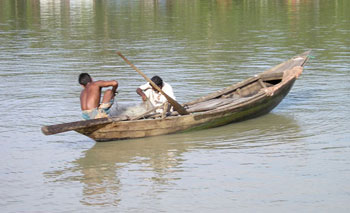
As they played they were talking to each other. Two girls were putting one stone in each of their containers and floating them across the tub. As I asked them what they were doing, they said they were taking people across the river and the boys were carrying stones from the quarry across to the road. One boy said: ‘If I put all the stones in this pot, it will be quicker.’ He did this and the tub sank. The other boy said that you have to do it one stone at a time. At this point one of the girls said that there should only be one person ‘because that’s how my dad takes people across the river in my village’ [Figure 1].
They then talked about what was best, so I asked them what would happen if they tested their tubs to see how much they would hold. I asked them if they could find out. One boy put all his stones into his tub, as he did not think that his would sink like his friend’s. His tub did sink, so I asked what would happen if he put a stone in one at a time. As he did this, we tried counting each one. Some students were better at counting than others, but this provided a good opportunity for them to practice their counting skills.
The boat sank and I suggested they could count the number of stones again to check. I asked them what would happen if they put just six stones in the tub? Would it float or sink? The group of five students was divided, with two saying it would still sink and the rest that it would float. It floated, and so after that I suggested they tried the different sized foil tubs I had collected to see if they all sank with the same number of stones.
My students played for a long time, testing their ideas, and then returned to their role play of ferrying people across the river. The stones became people crossing back and forwards across the river. There was much talk about what they were also taking or what they were going to do on either side of the river. There was much discussion about not overloading the boat or it would sink. The students were fully involved in exploring the idea of floating and sinking within the context of their story and role play, and working together as a group.
Pause for thought
|
Groupwork gives students of any age the time and a safe environment to share their ideas, ask questions and make suggestions. Often, as adults, we do not have as many ideas or think as deeply about an issue until we talk with others and share ideas. It is no different for students in school.
Learning is a social process (Vygotsky, 1978), and being able to talk with others about what is happening in science will help students to make better sense of what they see or experience than if they had to do it on their own. Talking with others about why we think something happens helps us to think more deeply about the problem. In fact, often it isn’t until students talk about an issue or problem that they begin to think of possible solutions or reasons as to why something happens.
Using groupwork as a way of organising your class will give all students more chance to speak and take risks with ideas without being embarrassed or shy in front of a larger audience. See Resource 1, ‘Talk for learning’, especially the section on planning talk for learning activities in the classroom. This will build up their confidence and interest. However, just asking children to work in groups is not enough. You need to think carefully about how to compose the groups, what task they will do and what will happen after the discussion. The rest of this unit will help you think about these issues.
Groupwork is a natural progression from using pair work, but once you use groupwork it does not exclude you from still using pair work. Each method has its merits and helps you manage large or small classes in different ways. The focus should always be on using the best strategy to achieve the intended learning outcomes for as many students as possible.
2 Methods and benefits of using groupwork
Groupwork can be used in so many ways to help students and other learners, including adults, to explore and share ideas in an atmosphere that is supportive but challenging. Groups give individuals confidence to take risks and try out new or strange ideas in a community that is supportive and will not ridicule them. Many ideas can be disposed of because they do not hold up on investigation, but no one has lost status.
Another important aspect of using groups is that by being able to talk, the brain is stimulated to think more deeply. Students can therefore achieve more because they are challenged and supported, and thinking is extended. It takes time to be confident in using groupwork and exploring the ways to set up groups, but once established, appropriate use of groups will help many more of your students make better progress.
There are several ways to organise groupwork. Understanding their potential is important in helping you use them more effectively for students’ learning. Table 1 shows the advantages of four ways of organising groups. Look at it closely.
Table 1 Advantages of types of groups.
| Group composition | Advantages |
|---|---|
| Mixed ability groups | The more able students can explain their ideas and thinking. The less able students can gain new ideas and extend their understanding without exposing their lack of knowledge to a wide audience. |
| Same ability groups | All students are the same ability and learning can be supported or extending according to their collective needs. Different kinds of task can be given to different ability groups. More structured activities will help. |
| Friendship groups | Students may be more motivated and comfortable to participate with friends. |
| Random groups | Students have the opportunity to work with students they know less well. Groups can be quicker to organise, because students do not necessarily have to move places. |
Pause for thought When would you use each type of group listed in Table 1? How would you set up these different types of groups? Make notes on the type of group you would like to try first. |
Now read the case study below before you plan and teach your own lesson with groups. As you read, think how you could try something like this in your classroom using one of the group types listed above.
Case Study 2: Grouping the class for practical investigations
Mrs Vimala was teaching her class about floating and sinking, and wanted them to have a chance to predict which objects would float or sink before they tested their predictions in groups.
I have 43 children and only enough equipment for four groups, so I decided to teach the class in two halves. I hoped that by working with half the class (21 students) I could give them more time to talk, think and share ideas with their classmates.
While I did the floating and sinking activity with half the class, the other half did some research work in groups on another aspect of our topic using a sheet of information that I had prepared. They had to answer some questions and solve a problem that they wrote up in their books. I would look at this work when the whole class finished the floating and sinking activity.
I sorted out four sets of similar objects and called the first half of the class to the front half of the classroom while the others were working at the back.
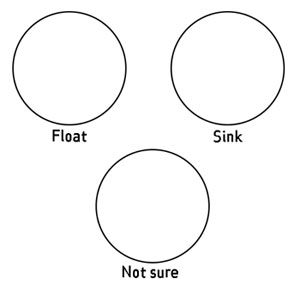
At the front I divided the students into four groups, gave them their collection and asked them to predict the ‘floaters’ and ‘sinkers’ by filling in a sheet [see Resource 2]. I encouraged them to reach a consensus if possible, but if there was any disagreement they should put objects they were not sure of in the ‘not sure’ circle. As they discussed their ideas I went around the back half of the class and helped any students who needed support before returning to the front of the class and listening to the students talking about what floats. I only intervened if they were really confused, or I asked simple questions like ‘Why do you think that?’, so that they had to think more about why they think objects float or sink.
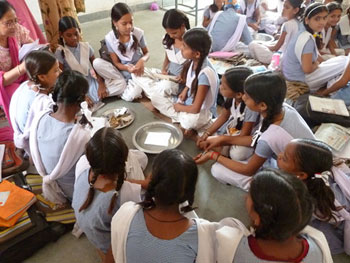
When all the groups had finished I gave them each a bowl of water [Figure 2]. I used old washing up bowls and a big empty tin, as we do not have much equipment in school. I give them five minutes to test their ideas and record their results by ticking those that did what they predicted and leaving the others unmarked. Out of all the objects they tested, the students suggested that a stone, a coin, a piece of concrete, pieces of wood, a piece of metal, a spoon, a pan, a dish, a feather, some paper and a pencil would sink.
Next I asked the students to discuss in their groups why they thought things sank or floated. I listed their key ideas before I then asked them to take one object that sank and work out a way to make it float. After giving them time to discuss this, I ask for volunteers to come out and try to make their sinkers float. One student put his coin on a piece of wood that floated and the coin ‘floated’ because it was on the wood. I asked whether this was true floating, which prompted much discussion. For their homework I ask them to write their own ideas about why things floated or sank.
At the end of the session I was very pleased at how interested the students were and impressed at their level of thinking about why things float or sink. My next lesson will help the whole class clarify their ideas when they have all completed the task. What pleased me most was the way that some students who very rarely speak in whole class lessons participated much more in the smaller groups – and they had much to say.
Pause for thought Think about how you might use some or all of Mrs Vimla’s strategies and actions to stimulate group activity in your teaching. This teacher wanted to have closer contact and interaction with a smaller number of students so that she could find out their current understanding of floating and sinking. How can you use groupwork to explore your students’ thinking more? |
Activity 1: Planning and teaching using groupwork
Using your thoughts about which type of group you would like to use with your class plan, either on your own or with a colleague plan a lesson about water and its properties related to floating and sinking. Think about the following:
- What science do you want the students to learn about? What are your learning objectives?
- How will working in groups support student learning?
- How will you support those with special educational needs as they work in groups?
- How you are going to introduce your class to the idea of working together?
- What type of group will you use?
- How will your organise the groups? Or will you work with one group at a time, or a few groups at a time?
- How will you explain what they have to do so that they are able to work well together?
- What do you want your students to learn about working together?
- What equipment will you need? How will this determine how you do the activity?
- What will you do as the students work in groups?
- How will you know and assess what the students have learnt?
Having planned your lesson, gather together your resources for the session and – when you are ready – teach the lesson.
Activity 2: How did it go?
Immediately after the lesson, answer the following questions about the experience for yourself:
- How did the lesson go?
- What worked well? Why did it go well?
- What did not go quite as you hoped?
- Why do think this was?
- What could you do next time to improve your skills in using groups?
Make notes about your responses before doing the last activity, which is to ask your class what they liked about the lesson.
Activity 3: What do your students like about groupwork?
Spend at least 15 minutes doing this with your class. Write these questions on the board:
- What do you like about working in groups?
- Do you think it helped you to learn about the science?
- Why do you think this?
- What would you like to change to help you learn more?
Explain how you want their constructive feedback on what they liked and what could be improved when they work in groups. The purpose of using groups is to help them learn better. Do not go round the groups while they are talking.
They may not want to talk directly to you, so they could write their responses if they prefer. Give the students time to talk in groups before asking them to either give a group feedback or individual responses to the questions, either orally or in writing.
It is important that you listen to your students’ perspectives on what they think about working in groups. Thank them for their time and responses, and take these away to examine more closely. Most students have their own ideas about what makes a good teacher and what helps them learn best.
Pause for thought
|
Look at the video on groupwork. As you watch try to link what you see to your own experience and think about how you can further develop your skills.
Video: Using groupwork |
3 Developing routines for groupwork
Research has shown that when teachers act as ‘guides’ in classroom groupwork, students are more focused on their work and are better behaved, as well as making more rapid progress (Baines et al., 2007). Obviously, setting up groupwork well is important in making them effective. If you have a large class, groupwork can be very helpful in allowing more students to participate more actively in lessons and share their ideas.
Developing class routines so that students know how to move quickly into groups will help you and them. To do this you need to think about the types of groups you might use, such as, for example, friendship, same ability or mixed ability groups. This is explored further in Case Study 3.
Case Study 3: Routines for organising groupwork
Mr Khan is a strong supporter of using groupwork in his science lessons because of experiences he had whilst training as a teacher.
I liked working in groups as I trained and wanted to use them with my students when appropriate. I think that they give me the opportunity to support student learning more precisely.
Each year I induct my classes into how to form their groups quickly so that we do not waste time in the lesson. This usually takes a couple of lessons. I use three types of groups most often: friendship (A), mixed ability (B) and same ability groups (C). I also sometimes use gender groups (D), but mostly try not to separate boys and girls when they are working as I feel they should respect each other as learners regardless of gender. If I have planned to use groups in my lesson, I say to the class, ‘Please move into your B groups’, and they move into their place without fuss.
Occasionally I move students about, especially if I know that one student understands something better than the rest of their group. It is important to me that the groups are flexible. Students need to be able to work with those students who will support their learning best.
Pause for thought How could you use any of these group formations in your lessons? Think how you could blend these ideas with the feedback you received from your students in Activity 3. |
However, not all lessons and activities lend themselves to groupwork, so the skill is in choosing the most appropriate times to use them for your students’ learning needs. The more you use groups, the more you will be able to see the advantages, noting what works best for your students and for the topic you are teaching. Being confident about the choices you make comes with practice and a sound knowledge of the advantages of using groupwork. Reading the key resource ‘Using groupwork’ will help you to consolidate what you have done in this unit.
4 Summary
Science and the development of scientific skills such as hypothesising, observing and predicting are particularly well served by groupwork. This unit has shown how listening to each other and sharing ideas helps students to think. It has given you some insight into the important collaborative nature of learning by showing how speaking and working together stimulates deeper thoughts and sparks creativity in students’ thinking. Groupwork also provides a supportive environment for students to take risks with ideas and to help each other understand scientific phenomena better. The benefits to both you and your students have been discussed and you have had the opportunity to plan lessons using these strategies to see these benefits.
Resources
Resource 1: Talk for learning
Why talk for learning is important
Talk is a part of human development that helps us to think, learn and make sense of the world. People use language as a tool for developing reasoning, knowledge and understanding. Therefore, encouraging students to talk as part of their learning experiences will mean that their educational progress is enhanced. Talking about the ideas being learnt means that:
- those ideas are explored
- reasoning is developed and organised
- as such, students learn more.
In a classroom there are different ways to use student talk, ranging from rote repetition to higher-order discussions.
Traditionally, teacher talk was dominant and was more valued than students’ talk or knowledge. However, using talk for learning involves planning lessons so that students can talk more and learn more in a way that makes connections with their prior experience. It is much more than a question and answer session between the teacher and their students, in that the students’ own language, ideas, reasoning and interests are given more time. Most of us want to talk to someone about a difficult issue or in order to find out something, and teachers can build on this instinct with well-planned activities.
Planning talk for learning activities in the classroom
Planning talking activities is not just for literacy and vocabulary lessons; it is also part of planning mathematics and science work and other topics. It can be planned into whole class, pair or groupwork, outdoor activities, role play-based activities, writing, reading, practical investigations, and creative work.
Even young students with limited literacy and numeracy skills can demonstrate higher-order thinking skills if the task is designed to build on their prior experience and is enjoyable. For example, students can make predictions about a story, an animal or a shape from photos, drawings or real objects. Students can list suggestions and possible solutions about problems to a puppet or character in a role play.
Plan the lesson around what you want the students to learn and think about, as well as what type of talk you want students to develop. Some types of talk are exploratory, for example: ‘What could happen next?’, ‘Have we seen this before?’, ‘What could this be?’ or ‘Why do you think that is?’ Other types of talk are more analytical, for example weighing up ideas, evidence or suggestions.
Try to make it interesting, enjoyable and possible for all students to participate in dialogue. Students need to be comfortable and feel safe in expressing views and exploring ideas without fear of ridicule or being made to feel they are getting it wrong.
Building on students’ talk
Talk for learning gives teachers opportunities to:
- listen to what students say
- appreciate and build on students’ ideas
- encourage the students to take it further.
Not all responses have to be written or formally assessed, because developing ideas through talk is a valuable part of learning. You should use their experiences and ideas as much as possible to make their learning feel relevant. The best student talk is exploratory, which means that the students explore and challenge one another’s ideas so that they can become confident about their responses. Groups talking together should be encouraged not to just accept an answer, whoever gives it. You can model challenging thinking in a whole class setting through your use of probing questions like ‘Why?’, ‘How did you decide that?’ or ‘Can you see any problems with that solution?’ You can walk around the classroom listening to groups of students and extending their thinking by asking such questions.
Your students will be encouraged if their talk, ideas and experiences are valued and appreciated. Praise your students for their behaviour when talking, listening carefully, questioning one another, and learning not to interrupt. Be aware of members of the class who are marginalised and think about how you can ensure that they are included. It may take some time to establish ways of working that allow all students to participate fully.
Encourage students to ask questions themselves
Develop a climate in your classroom where good challenging questions are asked and where students’ ideas are respected and praised. Students will not ask questions if they are afraid of how they will be received or if they think their ideas are not valued. Inviting students to ask the questions encourages them to show curiosity, asks them to think in a different way about their learning and helps you to understand their point of view.
You could plan some regular group or pair work, or perhaps a ‘student question time’ so that students can raise queries or ask for clarification. You could:
- entitle a section of your lesson ‘Hands up if you have a question’
- put a student in the hot-seat and encourage the other students to question that student as if they were a character, e.g. Pythagoras or Mirabai
- play a ‘Tell Me More’ game in pairs or small groups
- give students a question grid with who/what/where/when/why questions to practise basic enquiry
- give the students some data (such as the data available from the World Data Bank, e.g. the percentage of children in full-time education or exclusive breastfeeding rates for different countries), and ask them to think of questions you could ask about this data
- design a question wall listing the students’ questions of the week.
You may be pleasantly surprised at the level of interest and thinking that you see when students are freer to ask and answer questions that come from them. As students learn how to communicate more clearly and accurately, they not only increase their oral and written vocabulary, but they also develop new knowledge and skills.
Resource 2: Recording predictions sheet
Resource 3: Planning lessons
Why planning and preparing are important
Good lessons have to be planned. Planning helps to make your lessons clear and well-timed, meaning that students can be active and interested. Effective planning also includes some in-built flexibility so that teachers can respond to what they find out about their students’ learning as they teach. Working on a plan for a series of lessons involves knowing the students and their prior learning, what it means to progress through the curriculum, and finding the best resources and activities to help students learn.
Planning is a continual process to help you prepare both individual lessons as well as series of lessons, each one building on the last. The stages of lesson planning are:
- being clear about what your students need in order to make progress
- deciding how you are going to teach in a way that students will understand and how to maintain flexibility to respond to what you find
- looking back on how well the lesson went and what your students have learnt in order to plan for the future.
Planning a series of lessons
When you are following a curriculum, the first part of planning is working out how best to break up subjects and topics in the curriculum into sections or chunks. You need to consider the time available as well as ways for students to make progress and build up skills and knowledge gradually. Your experience or discussions with colleagues may tell you that one topic will take up four lessons, but another topic will only take two. You may be aware that you will want to return to that learning in different ways and at different times in future lessons, when other topics are covered or the subject is extended.
In all lesson plans you will need to be clear about:
- what you want the students to learn
- how you will introduce that learning
- what students will have to do and why.
You will want to make learning active and interesting so that students feel comfortable and curious. Consider what the students will be asked to do across the series of lessons so that you build in variety and interest, but also flexibility. Plan how you can check your students’ understanding as they progress through the series of lessons. Be prepared to be flexible if some areas take longer or are grasped quickly.
Preparing individual lessons
After you have planned the series of lessons, each individual lesson will have to be planned based on the progress that students have made up to that point. You know what the students should have learnt or should be able to do at the end of the series of lessons, but you may have needed to re-cap something unexpected or move on more quickly. Therefore each individual lesson must be planned so that all your students make progress and feel successful and included.
Within the lesson plan you should make sure that there is enough time for each of the activities and that any resources are ready, such as those for practical work or active groupwork. As part of planning materials for large classes you may need to plan different questions and activities for different groups.
When you are teaching new topics, you may need to make time to practise and talk through the ideas with other teachers so that you are confident.
Think of preparing your lessons in three parts. These parts are discussed below.
1 The introduction
At the start of a lesson, explain to the students what they will learn and do, so that everyone knows what is expected of them. Get the students interested in what they are about to learn by allowing them to share what they know already.
2 The main part of the lesson
Outline the content based on what students already know. You may decide to use local resources, new information or active methods including groupwork or problem solving. Identify the resources to use and the way that you will make use of your classroom space. Using a variety of activities, resources, and timings is an important part of lesson planning. If you use various methods and activities, you will reach more students, because they will learn in different ways.
3 The end of the lesson to check on learning
Always allow time (either during or at the end of the lesson) to find out how much progress has been made. Checking does not always mean a test. Usually it will be quick and on the spot – such as planned questions or observing students presenting what they have learnt – but you must plan to be flexible and to make changes according to what you find out from the students’ responses.
A good way to end the lesson can be to return to the goals at the start and allowing time for the students to tell each other and you about their progress with that learning. Listening to the students will make sure you know what to plan for the next lesson.
Reviewing lessons
Look back over each lesson and keep a record of what you did, what your students learnt, what resources were used and how well it went so that you can make improvements or adjustments to your plans for subsequent lessons. For example, you may decide to:
- change or vary the activities
- prepare a range of open and closed questions
- have a follow-up session with students who need extra support.
Think about what you could have planned or done even better to help students learn.
Your lesson plans will inevitably change as you go through each lesson, because you cannot predict everything that will happen. Good planning will mean that you know what learning you want to happen and therefore you will be ready to respond flexibly to what you find out about your students’ actual learning.
Additional resources
- Testing whether something sinks or floats: http://sciencenetlinks.com/ lessons/ sink-or-float/
- Pinterest board of objects sinking or floating: http://www.pinterest.com/ mumsmakelists/ science-float-sink/
References
Acknowledgements
Except for third party materials and otherwise stated below, this content is made available under a Creative Commons Attribution-ShareAlike licence (http://creativecommons.org/ licenses/ by-sa/ 3.0/). The material acknowledged below is Proprietary and used under licence for this project, and not subject to the Creative Commons Licence. This means that this material may only be used unadapted within the TESS-India project and not in any subsequent OER versions. This includes the use of the TESS-India, OU and UKAID logos.
Grateful acknowledgement is made to the following sources for permission to reproduce the material in this unit:
Figure 1: adapted from photograph by Jane Devereux.
Every effort has been made to contact copyright owners. If any have been inadvertently overlooked the publishers will be pleased to make the necessary arrangements at the first opportunity.
Video (including video stills): thanks are extended to the teacher educators, headteachers, teachers and students across India who worked with The Open University in the productions.