Use 'Print preview' to check the number of pages and printer settings.
Print functionality varies between browsers.
Printable page generated Monday, 13 July 2026, 5:22 PM
TI-AIE: Concept mapping: water
What this unit is about
You may have already learned about brainstorming as a way of eliciting students’ prior knowledge and ideas in the unit Brainstorming: sound. Concept mapping is a very different but complementary technique that is concerned with the organisation of ideas and relationships between concepts. (The term ‘concept’ is used to mean any word or phrase that has a scientific meaning.) The concepts are linked with an arrow and words explain the link. The direction of the arrow shows the way the sentence should be read. An example is given in Figure 1.

Concept maps are particularly appealing to visual learners, but all students can benefit from using them because they are a strategy that can be used in a variety of ways. This unit aims to develop your understanding of how to use the technique of concept mapping as a teaching strategy and assessment tool through the topic of ‘water’.
What you can learn in this unit
- How to construct a concept map.
- How to introduce concept mapping to your students to help them explore their own understanding.
- How to use concept maps in your teaching to assess students’ understanding and progress.
Why this approach is important
All your students will have some knowledge of most topics that you teach, but students’ ideas and understandings will differ and may not be the same as the scientific understanding. Assessing your students’ knowledge and understanding is an important part of your role as a teacher both at the start of a new topic and at the end of a topic to find out what they have learnt.
Concept mapping is important because it can:
- help you find out what your students know and understand before you teach a topic so that you can target your teaching more precisely to their learning needs
- help your students communicate complex ideas more easily and quickly than writing prose
- help students integrate new concepts with existing ones
- show how students see the relationship between ideas or people (White and Gunstone, 1992)
- be used to find out how your students’ understanding has developed
- be used as a teaching tool and as a revision aid.
Resource 1, ‘Assessing progress and performance’, gives insight into why you need to use techniques such as concept mapping to monitor students’ progress and to plan to support and extend their learning more effectively. Read the section on formative assessment in the resource before you try a concept mapping task yourself so that you can understand the thinking involved in constructing them.
1 Developing concept maps
Now try Activity 1.
Activity 1: Developing a simple concept map
Before you learn more about using concepts maps in your teaching, you need to understand the nature of the process of producing a map. Resource 2 explains how to construct a simple map and provides a completed example. Read this first and then construct your own concept using the following concepts:
- rain
- water
- clouds
- rivers
- soil
- oceans
- sun.
Now answer these questions:
- How does this process elicit understanding?
- How easy did you find developing your concept map?
- What were the challenges and how did you overcome them?
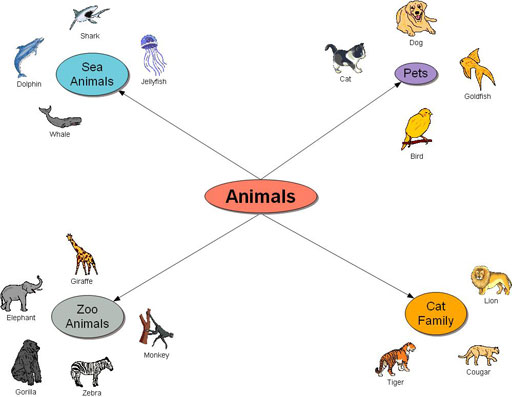
The emphasis on making connections between the words used in a concept map helps you to explore your understanding. Concept maps can be very simple or can be more complex and hierarchical in nature, with general concepts at the top and more specific concepts at the bottom (see Figure 2).


You can use concept mapping without ordering concepts from general to specific. With younger students, you would use fewer terms that are closely linked to what you have been learning about and not worry about hierarchical maps. With older students, you might attempt hierarchical mapping, but a lot of useful assessment information can be gathered through concept maps that are not hierarchical. Your students will need to be introduced to concept mapping before you can use them in your teaching to explore their current thinking, but first you need to consider how you can interpret such maps.
2 Interpreting a concept map
A concept map will tell you what your students understand by:
- the words used to link pairs of concepts
- the number of links made (any concepts that are not well connected or left out are not well understood)
- the complexity and sophistication of the map.
Activity 2: Interpreting concept maps
Resource 3 shows another example of the water concept map that you developed in Activity 1. Compare this concept maps with the one given in Resource 2. Answer the following questions:
- Which map do you think shows the most advanced understanding? What are your reasons?
- Which map shows the lowest level of understanding and why?
- What misconceptions are revealed by each map?
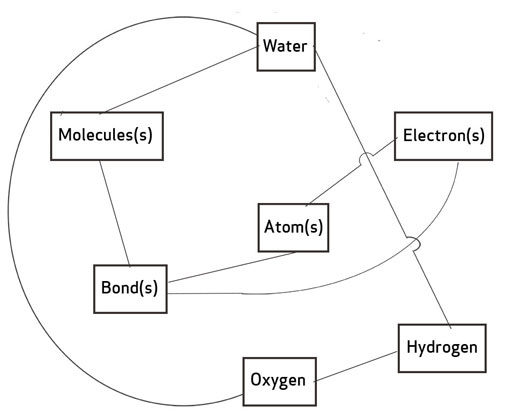
One misunderstanding revealed by the concept map in Resource 3 is that molecules are surrounded by water. This suggests that the student believes water is not made from molecules, but they are part of it. The concept of ‘electron’ only has one link, which indicates it is not a well understood concept. The use of simple link words and phrases also indicates a lack of confidence or unsophisticated understanding.
Pause for thought
|
Once your students are able to create concept maps, you will be able to use them to assess their understanding and progress. The first step is teaching your students how to create a concept map. The following case study shows how one teacher used concept mapping in her teaching.
Case Study 1: Mrs Mohanty uses concept mapping
Mrs Mohanty was going to be teaching water to her Class VII. She explains how she used concept mapping to find out what her students knew about water before she started teaching about the water cycle.
I wanted to find out what my students already knew about water. I picked out key words from the chapter in the textbook beforehand. In the classroom I put a glass of dirty water and a glass of clean water on the desk so that everyone could see. I asked the students to tell me what came into their heads when they thought about water and looked at the dirty and clean water. I put the word ‘water’ in a circle in the middle of the blackboard. As they gave me their ideas, I wrote them around the word ‘water’. When there were no more ideas, I underlined the ten key words that are in the topic. I then got the students to work in pairs and start linking pairs of words. I gave them the example of:
ICE > melts and becomes > WATER.
I then checked to see if they had understood by giving them two more words, ‘WATER’ and ‘STEAM’.
Next I told them they had 15 minutes to work in pairs to come up with linking words and that they could make more links if they wanted. This was very interesting. Students linked the two words in many ways, for example:
WATER > turns into > STEAM
STEAM > is different to > WATER
When I was sure they understood, I told them to work with a classmate to make as many links between pairs of words as they could. I then showed them how words could be linked as a map and they worked in pairs to make their own maps.
The concept maps gave me a lot of information about what the students knew already. Most had a good understanding of the states of water, but few had knowledge of pollution or how it happens. So I decided to focus on this in the next lesson.
Pause for thought Concept mapping can be hard to do at first and students need to be taught how to do it. How did Mrs Mohanty help her students understand concept mapping? |
‘Planning lessons’ in Resource 4 at the end of this unit, explains some key principles of planning that might help you make your planning more focused.
3 Teaching concept mapping
As with anything new, students need time to learn how to make concept maps. In the next case study, Mrs Bhatia explains how she taught her students about concept mapping.
Case Study 2: Teaching students concept mapping
My name is Mrs Bhatia. I wanted to use concept maps with my students when I was teaching them about the chemistry of water.
First I had to teach them how to make a concept map. I started by modelling how to do it using a topic that was simple, familiar and outside the topic I was going to teach. I did this because I wanted them to focus on the concept mapping process, rather than the topic. The topic I chose was ‘countries’. We brainstormed what came to mind. I selected six key words (‘country’, ‘sea’, ‘land’, ‘state’, ‘continent’ and ‘border’) to keep it as simple as possible. I put the words on pieces of paper, big enough so that they could all see them. I explained the process and took them through the steps, building up the concept map on the blackboard. I used questions to get them involved – for example, ‘How are state and country linked?’
Then, once I had shown them, I gave them the chance to do one for themselves. This time the topic was ‘living things’. Again, we brainstormed what came to mind. I circled nine key words on the blackboard: ‘living things’, ‘animals’, ‘plants’, ‘cow’, ‘tree’, ‘grass’, ‘water’, ‘air’ and ‘human’. They did their own maps. I went around and encouraged and helped them to make links between pairs of words. When they had finished, they compared their map with a classmate’s.
Pause for thought What preparation would Mrs Bhatia have had to do for teaching her students about concept mapping? |
Before you can do Activity 4, you will need to teach your students how to construct a concept map.
Select a topic that your students will be familiar with but is not necessarily what they will be studying next. It does not have to be associated with something you are teaching. The aim is for them to understand the technique and the nature of concept maps rather than produce a concept map that covers an entire topic or assesses their understanding.
Activity 3: Introducing your students to concept mapping
Plan the activity first. You could follow all the following steps as a lesson plan or amend them as you wish.
- Place a glass of water on the desk in front of the class and explain to your students that you are going to show them how to create a concept map.
- Write ‘water’ in the centre of the blackboard and draw a box around it. Ask them to tell you what comes to mind. Ask questions to prompt their thinking – for example:
- What does water look like?
- What does water feel like?
- What does it smell or taste of?
- What are its uses?
- What are the sources of water?
- How does water behave?
- Now choose five to ten concepts that are linked, for example ‘water’, ‘liquid’, ‘rain’, ‘river’, ‘sea’, ‘ice’ and ‘cloud’.
- Ask the students to choose two terms that are connected to one another. Write these on the blackboard, leaving space for the link words. Ask the students how these two terms can be linked. Stress that there are different ways and there are no right answers.
- Get the students to make links between pairs of other words.
- While they are doing that, write the concept words on the blackboard as the basis for the concept map.
- Show the pupils how to link the pairs of concept words with arrows and make them into a concept map. Ask the students for possible link words between pairs of concept words. Write the link words on the blackboard with the lines and arrows to complete the map.
- Next, give your students the opportunity to construct their own concept map as individuals. You could use any topic or use these words:
- ‘liquid’, ‘solid’, ‘gas’, ‘ice’, ‘water’, ‘water vapour’, ‘air’, ‘water’
- ‘washing’, ‘soap’, ‘towel’, ‘drying’, ‘clothes’, ‘hands’, ‘water’.
When you have carried out his activity, note your answers to the following questions:
- How did your students respond to the concept mapping activity?
- If you did the activity again, what would you do differently to improve it?
- Did some students find it more difficult to understand than others?
- How did you help the students that found it difficult?
Pause for thought How could you use concept maps with your younger students? How could you support students who are struggling with using concept maps? |
Supporting all students
Here are some ideas you might consider:
- With younger students, and students who need support, you could put together a very simple concept map as a class or small group. You can use images instead of words or get your students to stick these onto the map themselves (Figure 3).
- If you are teaching older students, you can encourage them to revisit their concept maps and add ideas as their learning progresses through a topic. Using a different-coloured pen each time will allow you to track the students’ additions.
- Older students should also be encouraged to use maps to plan, track and develop their ideas independently. They should be given opportunities to identify how their ideas have developed while studying a particular topic. They can also use concept maps to help them identify areas of weakness in their knowledge and consider what to focus on next.
4 Using concept mapping to promote learning
Concept mapping can promote learning through discussion and debate. It is a purposeful activity where there is no single correct answer. If you get your students to work in groups of two to five to produce a concept map, you can listen to them as they discuss the links. Not only will this give you useful information about their understanding, but you will also be able to focus teaching on the areas where they struggle. You can also support those who need that extra help in understanding as you go round the groups. Students can learn even more if they are asked to comment on the concept maps of other groups. Concept mapping is a very student-centred activity that is easily tailored to individuals.
Pause for thought How does using concept mapping in this way affect your role as a teacher? |
There are a number of different ways that you can use concept maps in your teaching. For example, you could give your students a concept map with some blank boxes and ask them to find out what goes in the missing boxes. Similarly, you could give a concept map and get them to complete the linking words. Resource 5 gives some examples and more detail of ways to use concept maps.
Pause for thought Can you think of other ways you could use concept maps? |
Having a variety of ways of working provides opportunities for students to talk together and so share their ideas and build up their understanding and confidence. As a teacher, you become a guide and facilitator rather than a provider of knowledge.
Case Study 3: Promoting learning
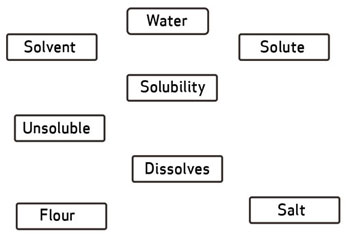
In this case study, Mrs Kapur uses a concept map when she is teaching her Class VI students about solubility.
I use concept mapping quite a lot in my lessons. My students are used to it and enjoy doing them.
I was teaching my class about solubility. The students have been investigating the solubility of different substances in water and how the temperature affects how much of a substance will dissolve. Some students find this topic difficult, because there are so many terms and concepts that they get confused. To help reinforce the key ideas in this topic, I created a concept map of the topic and drew it on the blackboard, but without the lines and links [Resource 5]. The students worked in small groups of three or four to complete the map.
The students enjoyed this activity and it was very useful for them. It helped them to learn about the terms and concepts, and it also gave them a diagrammatic view rather than lots of notes. I had to help some groups of students by asking questions to get them to focus on pairs or words and help them remember what they had done in class, but all groups completed the concept map.
Pause for thought Why is the way that Mrs Kapur used the concept map more of a teaching strategy than an assessment for learning strategy? |
Concept maps are always useful in finding out what your students understand so that you can then adapt your teaching. Concept mapping is therefore a very useful assessment for learning strategy. However, when your students work in groups to create a concept map, it will not tell you what the individuals understand. Its value therefore is more in discussing and sharing ideas.
You are now going to teach a lesson with your class using concept mapping. You can only do this after you have taught your students how to create a concept map.
You will need to decide the purpose of the concept map activity beforehand. For example, will you use it to:
- assess your students’ understanding at the end of a topic?
- find out what they already know before you teach a topic?
- promote discussion and the sharing of ideas like Mrs Kapur did?
Alternatively, you might use one of the ideas in Resource 6.
Activity 4: Using concept mapping in your teaching
Before your students do the concept mapping activity, you will need to remind them of how to construct a concept map.
If you are using this activity to assess your students’ understanding, you could choose the terms in advance and let them carry out the procedure given in Resource 2. Concept mapping can take some time to do. The time you need to allow for the activity will depend on the nature of the task you choose to do. It is a good idea to try it yourself before the lesson.
As your students construct their concept maps, you must circulate the classroom and check that they understand what they have to do, helping them if they have problems. You may even sit and work with a group if they are struggling to make links.
Collect in their maps so that you can examine them later.
Pause for thought After completing the concept map activity, think about and make notes on the following questions:
|
Video: Monitoring and giving feedback |
5 Summary
Concept mapping is a powerful assessment tool that you can use to reveal your students’ understanding and how they see how concepts are linked. There is no one correct way of creating a concept map and there is no one correct map for any given topic or set of concept. In this way, a concept map is unique to the individual or group that creates it.
You can adapt concept mapping to your class and use it in a number of ways. It is also a useful teaching strategy that you can use to help students learn through small groupwork and discussion. However you decide to use concept maps, your students will need to be taught how to create a concept map. It is worth investing time in doing this, because once students have grasped the principle of concept mapping, it is a very worthwhile and useful technique to use in your teaching.
Resources
Resource 1: Assessing progress and performance
Assessing students’ learning has two purposes:
- Summative assessment looks back and makes a judgement on what has already been learnt. It is often conducted in the form of tests that are graded, telling students their attainment on the questions in that test. This also helps in reporting outcomes.
- Formative assessment (or assessment for learning) is quite different, being more informal and diagnostic in nature. Teachers use it as part of the learning process, for example questioning to check whether students have understood something. The outcomes of this assessment are then used to change the next learning experience. Monitoring and feedback are part of formative assessment.
Formative assessment enhances learning because in order to learn, most students must:
- understand what they are expected to learn
- know where they are now with that learning
- understand how they can make progress (that is, what to study and how to study)
- know when they have reached the goals and expected outcomes.
As a teacher, you will get the best out of your students if you attend to the four points above in every lesson. Thus assessment can be undertaken before, during and after instruction:
- Before: Assessing before the teaching begins can help you identify what the students know and can do prior to instruction. It determines the baseline and gives you a starting point for planning your teaching. Enhancing your understanding of what your students know reduces the chance of re-teaching the students something they have already mastered or omitting something they possibly should (but do not yet) know or understand.
- During: Assessing during classroom teaching involves checking if students are learning and improving. This will help you make adjustments in your teaching methodology, resources and activities. It will help you understand how the student is progressing towards the desired objective and how successful your teaching is.
- After: Assessment that occurs after teaching confirms what students have learnt and shows you who has learnt and who still needs support. This will allow you to assess the effectiveness of your teaching goal.
Before: being clear about what your students will learn
When you decide what the students must learn in a lesson or series of lessons, you need to share this with them. Carefully distinguish what the students are expected to learn from what you are asking them to do. Ask an open question that gives you the chance to assess whether they have really understood. For example:

Give the students a few seconds to think before they answer, or perhaps ask the students to first discuss their answers in pairs or small groups. When they tell you their answer, you will know whether they understand what it is they have to learn.
Before: knowing where students are in their learning
In order to help your students improve, both you and they need to know the current state of their knowledge and understanding. Once you have shared the intended learning outcomes or goals, you could do the following:
- Ask the students to work in pairs to make a mind map or list of what they already know about that topic, giving them enough time to complete it but not too long for those with few ideas. You should then review the mind maps or lists.
- Write the important vocabulary on the board and ask for volunteers to say what they know about each word. Then ask the rest of the class to put their thumbs up if they understand the word, thumbs down if they know very little or nothing, and thumbs horizontal if they know something.
Knowing where to start will mean that you can plan lessons that are relevant and constructive for your students. It is also important that your students are able to assess how well they are learning so that both you and they know what they need to learn next. Providing opportunities for your students to take charge of their own learning will help to make them life-long learners.
During: ensuring students’ progress in learning
When you talk to students about their current progress, make sure that they find your feedback both useful and constructive. Do this by:
- helping students know their strengths and how they might further improve
- being clear about what needs further development
- being positive about how they might develop their learning, checking that they understand and feel able to use the advice.
You will also need to provide opportunities for students to improve their learning. This means that you may have to modify your lesson plans to close the gap between where your students are now in their learning and where you wish them to be. In order to do this you might have to:
- go back over some work that you thought they knew already
- group students according to needs, giving them differentiated tasks
- encourage students to decide for themselves which of several resources they need to study so that they can ‘fill their own gap’
- use ‘low entry, high ceiling’ tasks so that all students can make progress – these are designed so that all students can start the task but the more able ones are not restricted and can progress to extend their learning.
By slowing the pace of lessons down, very often you can actually speed up learning because you give students the time and confidence to think and understand what they need to do to improve. By letting students talk about their work among themselves, and reflect on where the gaps are and how they might close them, you are providing them with ways to assess themselves.
After: collecting and interpreting evidence, and planning ahead
While teaching–learning is taking place and after setting a classwork or homework task, it is important to:
- find out how well your students are doing
- use this to inform your planning for the next lesson
- feed it back to students.
The four key states of assessment are discussed below.
Collecting information or evidence
Every student learns differently, at their own pace and style, both inside and outside the school. Therefore, you need to do two things while assessing students:
- Collect information from a variety of sources – from your own experience, the student, other students, other teachers, parents and community members.
- Assess students individually, in pairs and in groups, and promote self-assessment. Using different methods is important, as no single method can provide all the information you need. Different ways of collecting information about the students’ learning and progress include observing, listening, discussing topics and themes, and reviewing written class and homework.
Recording
In all schools across India the most common form of recording is through the use of report card, but this may not allow you to record all aspects of a student’s learning or behaviours. There are some simple ways of doing this that you may like to consider, such as:
- noting down what you observe while teaching–learning is going on in a diary/notebook/register
- keeping samples of students’ work (written, art, craft, projects, poems, etc.) in a portfolio
- preparing every student’s profile
- noting down any unusual incidents, changes, problems, strengths and learning evidences of students.
Interpreting the evidence
Once information and evidence have been collected and recorded, it is important to interpret it in order to form an understanding of how each student is learning and progressing. This requires careful reflection and analysis. You then need to act on your findings to improve learning, maybe through feedback to students or finding new resources, rearranging the groups, or repeating a learning point.
Planning for improvement
Assessment can help you to provide meaningful learning opportunities to every student by establishing specific and differentiated learning activities, giving attention to the students who need more help and challenging the students who are more advanced.
Resource 2: How to construct a concept map
There is not one way to construct a concept map. However, there are some key principles that need to be kept in mind:
- A concept map is not the same as a brainstorm diagram (see the unit Brainstorming: sound). The main difference is that pairs of concepts are linked by words that describe their relationship to one another connecting in a concept map (Figure R2.1).
Figure R2.1 Linking two concepts.
- Writing in the link words is a crucial step. Without this, concept maps are of little value (White and Gunstone, 1992).
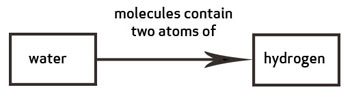
- The arrow indicates the direction in which to read – which word is first. The example in Figure R2.2 shows why taking notice of the arrow is very important!
Figure R2.2 The direction of the arrows in a concept map is important.

- Concept maps are not flow diagrams. Although a concept might be linked to several others, the reading of relationship is between pairs of words only. You do not link three concepts to make a whole phrase, for example. Each pair of linked concepts is independent of others.
The following instructions to construct a concept map are adapted from Probing Understanding by White and Gunstone (1992).
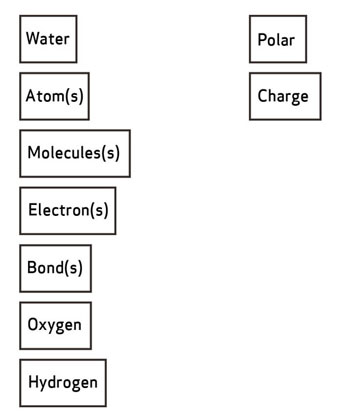
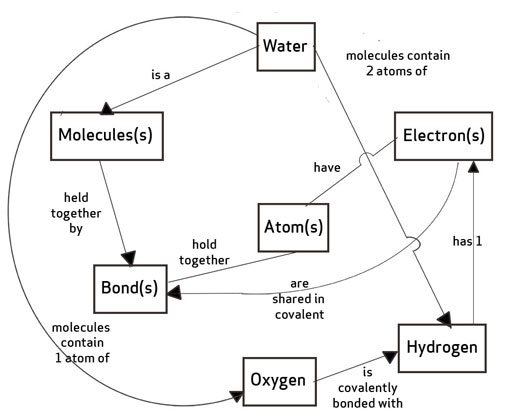
- Identify the key concepts. This might be through a brainstorm or looking at the chapter in the textbook. Single words should be used to represent each concept, so for example, the chemistry of water might include ‘molecule(s)’, ‘water’, ‘electron(s)’, ‘charge’, ‘polar’, ‘atom(s)’, ‘bond(s)’, ‘oxygen’ and ‘hydrogen’.
- Write the concept words on small pieces of paper so that they can be moved about. Sort through the concepts and leave out ones you do not know or do not think are related to the other terms (Figure R2.3).
Figure R2.3 Sorting concepts.
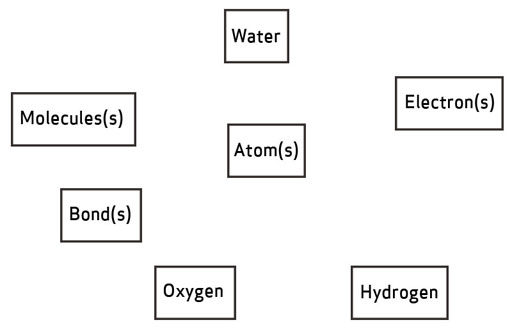
- Put the remaining concept words on a sheet of paper. Arrange them in a way that makes sense to you, so that terms that you see as closely connected are near each other (Figure R2.4).
Figure R2.4 Arranging concepts.
- When you are happy with your arrangement, stick them to the paper.
- Draw lines between pairs of concept words that you see as being positively connected (Figure R2.5).
Figure R2.5 Linking concepts.
- Write words on the lines to show how the concepts are connected. Put the arrow head on the line to show the direction it should be read (Figure R2.6).
Figure R2.6 Adding details.
- Go back to any concept words that you did not include in the first step and see if you can add them in.
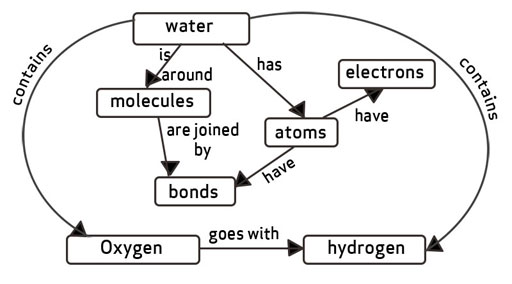
Resource 3: An example of a concept map
Resource 4: Planning lessons
Why planning and preparing are important
Good lessons have to be planned. Planning helps to make your lessons clear and well-timed, meaning that students can be active and interested. Effective planning also includes some in-built flexibility so that teachers can respond to what they find out about their students’ learning as they teach. Working on a plan for a series of lessons involves knowing the students and their prior learning, what it means to progress through the curriculum, and finding the best resources and activities to help students learn.
Planning is a continual process to help you prepare both individual lessons as well as series of lessons, each one building on the last. The stages of lesson planning are:
- being clear about what your students need in order to make progress
- deciding how you are going to teach in a way that students will understand and how to maintain flexibility to respond to what you find
- looking back on how well the lesson went and what your students have learnt in order to plan for the future.
Planning a series of lessons
When you are following a curriculum, the first part of planning is working out how best to break up subjects and topics in the curriculum into sections or chunks. You need to consider the time available as well as ways for students to make progress and build up skills and knowledge gradually. Your experience or discussions with colleagues may tell you that one topic will take up four lessons, but another topic will only take two. You may be aware that you will want to return to that learning in different ways and at different times in future lessons, when other topics are covered or the subject is extended.
In all lesson plans you will need to be clear about:
- what you want the students to learn
- how you will introduce that learning
- what students will have to do and why.
You will want to make learning active and interesting so that students feel comfortable and curious. Consider what the students will be asked to do across the series of lessons so that you build in variety and interest, but also flexibility. Plan how you can check your students’ understanding as they progress through the series of lessons. Be prepared to be flexible if some areas take longer or are grasped quickly.
Preparing individual lessons
After you have planned the series of lessons, each individual lesson will have to be planned based on the progress that students have made up to that point. You know what the students should have learnt or should be able to do at the end of the series of lessons, but you may have needed to re-cap something unexpected or move on more quickly. Therefore each individual lesson must be planned so that all your students make progress and feel successful and included.
Within the lesson plan you should make sure that there is enough time for each of the activities and that any resources are ready, such as those for practical work or active groupwork. As part of planning materials for large classes you may need to plan different questions and activities for different groups.
When you are teaching new topics, you may need to make time to practise and talk through the ideas with other teachers so that you are confident.
Think of preparing your lessons in three parts. These parts are discussed below.
1 The introduction
At the start of a lesson, explain to the students what they will learn and do, so that everyone knows what is expected of them. Get the students interested in what they are about to learn by allowing them to share what they know already.
2 The main part of the lesson
Outline the content based on what students already know. You may decide to use local resources, new information or active methods including groupwork or problem solving. Identify the resources to use and the way that you will make use of your classroom space. Using a variety of activities, resources, and timings is an important part of lesson planning. If you use various methods and activities, you will reach more students, because they will learn in different ways.
3 The end of the lesson to check on learning
Always allow time (either during or at the end of the lesson) to find out how much progress has been made. Checking does not always mean a test. Usually it will be quick and on the spot – such as planned questions or observing students presenting what they have learnt – but you must plan to be flexible and to make changes according to what you find out from the students’ responses.
A good way to end the lesson can be to return to the goals at the start and allowing time for the students to tell each other and you about their progress with that learning. Listening to the students will make sure you know what to plan for the next lesson.
Reviewing lessons
Look back over each lesson and keep a record of what you did, what your students learnt, what resources were used and how well it went so that you can make improvements or adjustments to your plans for subsequent lessons. For example, you may decide to:
- change or vary the activities
- prepare a range of open and closed questions
- have a follow-up session with students who need extra support.
Think about what you could have planned or done even better to help students learn.
Your lesson plans will inevitably change as you go through each lesson, because you cannot predict everything that will happen. Good planning will mean that you know what learning you want to happen and therefore you will be ready to respond flexibly to what you find out about your students’ actual learning.
Resource 5: Mrs Kapur’s concept map
Resource 6: Some ways to use concept maps
Concept maps can be used in a number of ways to assess your student’s understanding and support your teaching and their learning. Also, they do not always have to construct a map themselves. You can use concept maps in the following ways:
- Fill-in concept map: Construct a concept map and then remove all the concept words, but keeping the links. Ask the students to work out what goes in the empty boxes so that the concept makes sense. You can provide students with a list of possible words if they need help. This activity makes a good activity for revision and also helps those who find science more difficult.
- Missing links concept map: Construct a concept map and then remove all the linking words, but keeping the arrowed lines and concept words. Ask the students to complete the linking words. For those who you know are not as sure about the key ideas, you could give them the linking words and let them choose where to place them. This activity also makes a good group activity for revision and for consolidating new ideas.
- Skeleton concept map: Construct the concept map and then remove all the lines and linking words, leaving only the terms in the boxes. Students then complete the maps, deciding which links and linking words to add. This could be done in groups or individually, and is a way to find out who really understands. For those who do not find this easy, you may have to provide extra support to clarify their ideas.
- Guided choice concept map: In this approach you give a list of concept words. Students choose ten of these to construct their maps.
References
Acknowledgements
Except for third party materials and otherwise stated below, this content is made available under a Creative Commons Attribution-ShareAlike licence (http://creativecommons.org/ licenses/ by-sa/ 3.0/). The material acknowledged below is Proprietary and used under licence for this project, and not subject to the Creative Commons Licence. This means that this material may only be used unadapted within the TESS-India project and not in any subsequent OER versions. This includes the use of the TESS-India, OU and UKAID logos.
Grateful acknowledgement is made to the following sources for permission to reproduce the material in this unit:
Figure 2: adapted from http://ecrp.uiuc.edu/ v8n2/ birbili.html.
Every effort has been made to contact copyright owners. If any have been inadvertently overlooked the publishers will be pleased to make the necessary arrangements at the first opportunity.
Video (including video stills): thanks are extended to the teacher educators, headteachers, teachers and students across India who worked with The Open University in the productions.