Use 'Print preview' to check the number of pages and printer settings.
Print functionality varies between browsers.
Printable page generated Saturday, 30 May 2026, 12:34 PM
TI-AIE: Pupils’ questioning: sorting and classifying things
What this unit is about
There is much discussion and research into the kinds of questions that teachers use in lessons to assist learning. Another important dimension to asking questions is to examine the kind of questions or statements that students ask. Encouraging students to ask questions about the world around them is part of stimulating students’ interest in science. Many students already ask a lot of questions, but they often ask them when their parents or you are very busy, so answering them is not always convenient. But if time is not given to students’ questions, there is a risk of stifling their interest in science.
This unit explores the kinds of questions or statements that students ask. It also looks at ways to handle such questions in order to provoke students’ interest and encourage them to ask more productive questions that lead to deeper understanding through investigations.
What you can learn in this unit
- How to handle the range of students’ questions.
- How to help and support your students to raise their own productive questions.
- The importance of sorting and classifying objects and materials in science.
Why this approach is important
Encouraging your students to ask questions about all kinds of materials and objects is important to their learning in science. It is a way to stimulate interest and capture attention. Students need to develop their scientific literacy in order to make informed choices about their lifestyle and work. Being able to question science activities and findings is therefore a crucial skill to develop in your students.
Students’ questions give you an insight into the issues and problems that they are trying to understand and may be struggling to make sense of. It is as they raise these questions that they try to link together new ideas or observations with what they already know. It is important, therefore, that you as their teacher pay attention to their questions and handle them effectively. Students’ questions help you to evaluate their learning.
Being able to sort and classify is an important skill for everyone because it allows us to choose and select the best material, object, substance or way of working to do a task effectively. Key to sorting and classifying effectively is being able to raise questions about the objects being sorted to identify similarities and differences. Collections of objects and materials present good starting points for helping students to raise their own questions.
1 Why students ask questions
Students ask lots of questions from an early age for a variety of reasons, including wanting to know more about the world around them. Often their questions are raised to help them make links with what they know.
Not all their questions are easy to answer and some do not need answering immediately, but all of them should be respected and taken seriously. This is not always easy when you are very busy or the question seems irrelevant to what you are teaching. However, acknowledging the question and answering it will show students that you value their request and their ideas. This will encourage them to continue to be curious about their surroundings. But to ignore or ridicule their efforts could have detrimental effects on their participation in science and belief in themselves as learners.
Activity 1: Analysing children’s questions
Look at this list of questions (adapted from Harlen, 1985) from students:
- What is a baby dog called?
- Why do I get sick?
- If I mix red and green paint, what colour will I get?
- How long do snakes live?
- Are there people on other planets?
- Why can I see myself in a pond?
- How does a car work?
- Why is the sky blue?
- If God made the world, who made God?
- When will it rain next?
How would you respond to each of these spontaneous questions? Which of these questions would you find easy to answer? Which would be harder to answer? Why do you think this?
Depending on the types of questions that students ask, there are strategies you can use to help answer the question and maintain students’ interest. Not all questions need to be answered immediately or at all. Not all questions are productive questions to lead to ‘hands on’ science, but nonetheless they need some kind of response; this may be that you do not know the answer and will find out, or you cannot answer because nobody knows the answer.
Some of these questions can be answered very easily, because the students just want the information. Others are not so simple. For example, your response to Question 9 depends on your own beliefs. For Question 5, you cannot say no and you would need to say something like ‘We do not know yet’. The other questions can all be answered, but some are more difficult for younger students, as they do not have enough experience to understand the explanation. With some careful further questioning by you, Question 3 (for example) could be used to start some investigations into aspects of the science involved. These are more productive types of questions as they hint at possible further action or investigations.
You may not even know the answers to some of the questions unless you do some research. Many teachers may fear letting their students raise their own questions in case they cannot answer the question for the students.
2 What kinds of questions do students ask?
Now read Case Study 1.
Case Study 1: Mrs Das’s students raise questions to sort and classify objects
Mrs Das teaches 57 students in Class III. She is keen to help her students investigate the local environment and science using local resources. She explains how she set up a sorting activity and encouraged her students to ask questions about the objects.
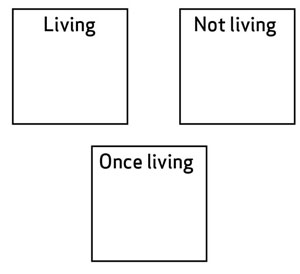
I have always enjoyed doing practical activities with my class. I wanted to help them explore the difference between living and dead things, so I collected together a group of objects from around the classroom and outside. I also included a few pictures that I cut out of magazines of some animals. I prepared two labels (‘Living’ and ‘Not living’) and put these on the table in front of my students [Figure 1].
I worked with two groups of six students while the rest of the class did other tasks. I did this over two lessons with five groups in the first and the same in the second. I gave each pair of students one object and asked them to think what questions they wanted answered about their object. All of them suggested questions like:
- What is it?
- Is it a plant or animal?
- Where does it live?
- What does it eat?
- Is it real?
- Where did you find it?
- Is it dead?
- Is this living?
- Is it dangerous?
- Is it poisonous?
All of these were the sort of questions you would expect students of this age to ask. They were more focused on naming them and fitting the simple information into their current understanding and experience.
After they had all done the task I asked them if anyone could answer these questions. They could answer some but not others. Mostly they were able to name the objects, including most of the animal pictures but not as many of the plants and just a few of the other objects. Picking up on their question ‘Is it dead?’, I asked the students if they could sort the objects into living and not living.
All the students participated – even those who are normally very reticent to answer questions in whole-class discussions. I asked questions when the group struggled with its discussion, but otherwise I just listened. I asked one group why they had put a dead leaf into ‘Not living’ and the other group why they had put their dead leaf into ‘Living’. It was clear that they were confused about the leaf and so we discussed if it had ever been alive, and agreed in the end to add it to a new group labelled ‘Once living’.
My students found it easy to decide about a piece of metal but found a piece of cotton cloth difficult to group, as it had once been living and was now made into fabric. The discussion and their questioning helped my students to clarify their thinking about the difference between living and non-living things. Their curiosity was aroused by the interactive task.
Pause for thought How does such an activity help students to be more observant and curious, or ask more productive questions? |
3 Categorising students’ questions
Learning how to handle students’ questions needs you to extend your understanding of the types of questions that students raise and develop your skills in handling these. Table 1 (adapted from Harlen et al., 2003) lists the five key categories of questions that students ask.
| Category | Categorisation of children’s question | Children’s question |
|---|---|---|
| (a) | Questions that are really statements expressed as a questions | Why are birds so clever they can weave nests with their beaks? |
| (b) | Questions requiring simple factual answers | Where was the bird’s nest found? |
| (c) | Questions requiring more complex answers | Why do some birds nest in trees and some on the ground? |
| (d) | Questions that lead to enquiry by the student(s) | What is the nest made of? |
| (e) | Philosophical questions | Why are birds made so that they can fly and not other animals? |
Learning to recognise the categories of questions listed in Table 1 takes practice.
Activity 2: Ways to handle student questions
A teacher brought some caterpillars on a branch into the classroom to give their students the opportunity to raise questions about what they saw. You could also read the key resource ‘Talk for learning’ before you do the task to extend your understanding of why talking is so important in the classroom to help learning. Relate what you read to your experience of doing this task with a colleague.
Look at the list of questions raised by the students below. Then use the table in Resource 1 to categorise the questions and think how you might handle the question. You may want to do this activity with a colleague because it is often only when you start to talk with someone else that you develop your ideas and thinking about such an issue.
- Why are they called caterpillars?
- Are they worms?
- What do they eat?
- Can they see me?
- Will they turn into butterflies?
- What do they feel like?
- How does it change into a pupa?
- How old are they?
- Why are they so wiggly?
- Why do some things turn into something else, like tadpoles into frogs?
Pause for thought
|
Look at a Resources 2 and 3, which summarise the ways to handle each type of question and give possible ways to respond to the questions above. This is to help you become more skilled at answering students’ questions, or rather handling students’ questions. Practice identifying the types of questions and how to handle them by listening to your students and giving them opportunities to raise questions. Students should then be encouraged to investigate the more productive questions themselves by research or practical hands-on activities whenever possible. The video resource below also illustrates how talking and forming their own questions can promote learning.
4 Encouraging the students to ask questions
A first step to helping your students raise questions is to stimulate their interest by giving them direct contact with materials that raise their curiosity. This is not as difficult as it may seem, because students will be interested in many things they have not seen before or in a group of objects that you would not expect to be together. Objects that have a particular meaning for your students might also raise their curiosity and provoke discussion.
The more you do this, the better will be the quality of the questions that your students raise. The first kinds of question that students will ask are ‘Why have you brought them into the class?’ and ‘What are they going to do with them?’
Case Study 2: Mrs Pandya encourages her students to ask questions
Mrs Pandya, working with Class IV students, is starting work on devising and using criteria to identify the many different species of plants and animals found around the school and in the community.
I decided that the first step I had to take with my students was to develop their understanding of the key features of plants and animals. They could then use this as the basis for looking at the similarities and differences among a collection of living things. In the first lesson I explored with them the common features of animals. To do this, I collected together a lot of pictures of animals found in India that I cut out of magazines and newspapers. I displayed the pictures on the wall, so that everyone could see them, before asking the students to talk with their partners about what questions they could ask about all the animals. My class is used to working in pairs. The pictures I used were of a tiger, elephant, cow, monkey and a horse.
After a few minutes I asked for volunteers to suggest questions, which I recorded on the blackboard. Then I asked them to explore how they can sort the animals using their questions as criteria for classifying them. The questions ranged from things like which animals were the same colour to whether the animals gave birth to live young. Their criteria that arose from their questions included the following similarities: a head, two eyes, a mouth, teeth, nose, nostrils, tails, four legs, body and skin, which I listed on the blackboard.
Next I asked what differences they could see between the animals when they looked at the pictures. The students responded with colour, size, shape, skin and different patterns on their skin as examples. Next we discussed which features were best for sorting the animals into groups and how we have common features. I suggested that we vary among ourselves but that we all belong to the same group (i.e. humans), and therefore have common features. In the next lesson I plan to bring in some more pictures of different types of birds, especially local birds, and ask the students to think what criteria they could use to differentiate such a variety of birds so that they see how much more detailed and closer they have to look when sorting and classifying one group of animals or plants.
I was pleased with how interested my students were in talking about how to group animals and the quality of questions they raised.
Pause for thought How could you do something like this with your students? |
Deciding which questions to answer and which ones to use to lead into investigations is your professional judgement. It is not always possible to do investigations for every question, but giving students the time to raise their own questions pushes them into thinking more deeply about any topic. For that reason alone, it is a worthwhile activity.
Activity 3: Raising questions with your students
Think about the next topic you are teaching your class. Gather together a collection of objects that will provoke their curiosity. Depending on the age of your students and the topic you are studying, these could be some simple toys, a collection of seeds or a collection of different types of leaves.
- Decide how you will organise the students. Are you going to be working with the whole class or one group at a time? See the key resource ‘Using groupwork’ in Resource 5, especially the section on ways to plan and organise groups.
- Ask your students the simple question, ‘What would you like to know about these objects?’
- Give them time to talk either in pairs or in small groups about the objects and ask them to write down their questions about what they want to know.
- Ask your students to display their questions on the wall or take it in turns for each group to feedback their questions.
- Write their questions on the blackboard and ask them if the students can answer any of them. Someone else in the class may be able to answer for them, or you can.
- Tell them that the rest of the questions will be answered as they study the topic. Leave the questions on the wall or note them down so that you can return to them later and students can see what questions they have answered.
- Ask if they enjoyed the exercise and why.
After the lesson, look more closely at the questions and identify those that could be answered by students from their textbook or other science books, or by investigating their ideas.
Pause for thought
|
Video: Using questioning to promote thinking |
Watching the video will help consolidate some of the ideas you have met in this unit.
5 Capturing the students’ interest
Now read Case Study 3.
Case Study 3: Mr Kumar stimulates the students’ curiosity
Mr Kumar was working on developing his Class VIII’s knowledge about plants by exploring ways to classify them, and wanted to stimulate his students’ curiosity. He explains what he did to start the topic.
I gathered together a collection of leaves from local trees and put these on the table at the side in the classroom. I did not name them, but numbered them from one to ten and put up a notice that asked my students to look at the leaves and to think what sort of questions they would like to ask about them. I left a pen and some small pieces of paper beside a box labelled ‘Questions’. Students did not have to put their name on their piece of paper.
I was not sure if I would get any questions, but several students noticed the display as they came in and I saw them looking and talking about the leaves. Some tried to identify them and others were thinking about questions. At the end of the week I found seven questions in the box. This pleased me, especially as they were good questions, such as:
- How do we classify leaves?
- Why do leaves have different vein patterns?
- Why are there so many different leaf shapes?
- Do all leaves have the same internal structure?
- What do leaves do?
I told the class that I would be using some of their questions in the next lesson. I planned to think about which questions could be used for investigations that the students could do. My first thoughts were to look at ways of sorting and classifying leaves by their shape. I prepared a sheet [see Resource 5] to help students think about the criteria and questions that they could use to sort them.
Pause for thought
|
By providing contexts for students to raise purposeful and productive questions, you are encouraging them to be more curious and observant about the world around them. Arousing curiosity is an important part of science education, because it encourages interest in what things are and why they do what they do. Students want to know and understand. Such experiences can affect how your students respond to their environment and develop empathy for their world.
Activity 4: Other ways to stimulate students’ questions
Think how you could stimulate your students’ curiosity in your next topic. What small change could you make in your classroom that would raise their interest and ask questions? For example, could you do any of the following?
- Display an article from the paper about a problem and leave a sheet of paper for students to ask what more they would like to know about the problem.
- Set up a display that asks student to add their questions to it.
- Use a photograph.
- Use an object or collection of objects.
- Set up a question box for each new topic.
- Identify what you want to do. Then set it up and watch your students’ reaction, setting a time limit for the questions.
Think how you will respond to their questions. Remember that you do not have to answer all the questions immediately and you may want to look again at Resource 2, which shows you how you could respond to the different categories of questions.
Pause for thought
|
A topic like plants is not always seen as exciting by most students. But by doing more practical, hands-on activities – such as encouraging the students to handle pictures and objects, talk about their various features, and raise questions about their structure, shape and colour – they are much more likely to be interested and remember. So using both your own questioning skills to stimulate interest and encouraging your students to raise questions will bring science to life – see Resource 6, ‘Using questioning to promote thinking’.
Just telling your students ‘This is a mango leaf’ and giving the correct biological name will not necessarily help them retain the information, as there is no context. Allowing them to raise their own questions and using these as the starting point will give them much more ownership of the topic. More productive questions that your students raise can then lead to research or investigations, which also stimulates their interest.
6 Summary
This unit has explored how to help students raise their own questions, and how this encourages positive attitudes to science and works towards developing a questioning and critical mind. Such activities lead to investigative work, which helps students to think more deeply about the topic and supports them in adjusting their understanding towards currently accepted ideas.
Working in a more interactive way brings many rewards, both for you and the students. For you as a teacher, being more involved in the lesson in an active and enthusiastic way, exploring with your students their ideas and trying to extend their thinking, is more rewarding. Through stimulating their questioning skills, you provide yourself with much more insight into what they already know, and you can be more proactive in supporting their learning. Being respected by you and being asked their ideas mean that students will become more confident and interested in their work, which will raise their achievement.
Resources
Resource 1: Categorising students’ questions
This table is to be used with Activity 2.
| Question | Category | How to handle the question |
|---|---|---|
| 1 | ||
| 2 | ||
| 3 | ||
| 4 | ||
| 5 | ||
| 6 | ||
| 7 | ||
| 8 | ||
| 9 | ||
| 10 |
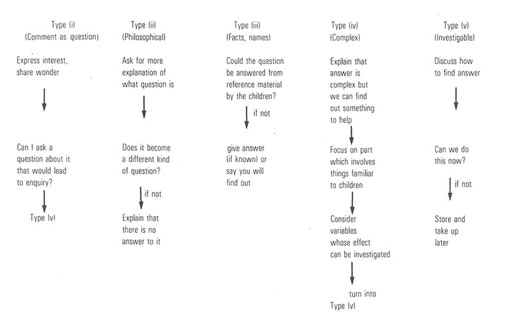
Resource 2: Flow diagram for handling students’ questions
Resource 3: Ways of handling students’ questions
| Question | Category | How to handle the question |
|---|---|---|
| 1. Why are they called caterpillars? | (b) or maybe (e) | ‘It’s the name given to this stage of their growth before they become a butterfly, but I don’t know why it has this name.’ |
| 2. Are they worms? | (b) | ‘No, although they look like worms in some ways.’ |
| 3. What do they eat? | (d) | ‘That’s something you could find out or even see as we keep them in the classroom for the lesson. Can you suggest how we can do this?’ |
| 4. Can they see me? | (d) | ‘We could try to find out. How would you do that?’ |
| 5. Will they turn into butterflies? | (b) and (d) | ‘Yes. If we keep them in the right way, you will see that for yourself.’ |
| 6. What do they feel like? | (b) but perhaps (a) | ‘It’s best not to touch them, as some of their hairs may irritate your skin. They look very soft. What do you think they feel like?’ |
| 7. How does it change into a pupa? | (c) | ‘They form a shell and then inside that they slowly change. But what happens inside is something you could find out later in your science classes.’ |
| 8. How old are they? | (b) or (d) | If known tell the students when they hatched; if not, they could look up how long they stay as caterpillars. |
| 9. Why are they so wiggly? | (a) | ‘They’re always moving, aren’t they?’ |
| 10. Why do some things turn into something else, like a tadpole into a frog? | (e) or maybe (c) | If this question is categorised as (e), this isn’t something we know or can find. |
Footnotes
(Adapted from Harlen et al., 2003)Resource 4: Using groupwork
Groupwork is a systematic, active, pedagogical strategy that encourages small groups of students to work together for the achievement of a common goal. These small groups promote more active and more effective learning through structured activities.
The benefits of groupwork
Groupwork can be a very effective way of motivating your students to learn by encouraging them to think, communicate, exchange ideas and thoughts, and make decisions. Your students can both teach and learn from others: a powerful and active form of learning.
Groupwork is more than students sitting in groups; it involves working on and contributing to a shared learning task with a clear objective. You need to be clear about why you are using groupwork for learning and know why this is preferable to lecturing, pair work or to students working on their own. Thus groupwork has to be well-planned and purposeful.
Planning groupwork
When and how you use groupwork will depend on what learning you want to achieve by the end of the lesson. You can include groupwork at the start, the end or midway through the lesson, but you will need to allow enough time. You will need to think about the task that you want your students to complete and the best way to organise the groups.
As a teacher, you can ensure that groupwork is successful if you plan in advance:
- the goals and expected outcomes of the group activity
- the time allocated to the activity, including any feedback or summary task
- how to split the groups (how many groups, how many students in each group, criteria for groups)
- how to organise the groups (role of different group members, time required, materials, recording and reporting)
- how any assessment will be undertaken and recorded (take care to distinguish individual assessments from group assessments)
- how you will monitor the groups’ activities.
Groupwork tasks
The task that you ask your students to complete depends on what you what them to learn. By taking part in groupwork, they will learn skills such as listening to each other, explaining their ideas and working cooperatively. However, the main aim is for them to learn something about the subject that you are teaching. Some examples of tasks could include the following:
- Presentations: Students work in groups to prepare a presentation for the rest of the class. This works best if each group has a different aspect of the topic, so they are motivated to listen to each other rather than listening to the same topic several times. Be very strict about the time that each group has to present and decide on a set of criteria for a good presentation. Write these on the board before the lesson. Students can the use the criteria to plan their presentation and assess each other’s work. The criteria could include:
- Was the presentation clear?
- Was the presentation well-structured?
- Did I learn something from the presentation?
- Did the presentation make me think?
- Problem solving: Students work in groups to solve a problem or a series of problems. This could include conducting an experiment in science, solving problems in mathematics, analysing a story or poem in English, or analysing evidence in history.
- Creating an artefact or product: Students work in groups to develop a story, a piece of drama, a piece of music, a model to explain a concept, a news report on an issue or a poster to summarise information or explain a concept. Giving groups five minutes at the start of a new topic to create a brainstorm or mind map will tell you a great deal about what they already know, and will help you pitch the lesson at an appropriate level.
- Differentiated tasks: Groupwork is an opportunity to allow students of different ages or attainment levels to work together on an appropriate task. Higher attainers can benefit from the opportunity to explain the work, whereas lower attainers may find it easier to ask questions in a group than in a class, and will learn from their classmates.
- Discussion: Students consider an issue and come to a conclusion. This may require quite a bit of preparation on your part in order to make sure that the students have enough knowledge to consider different options, but organising a discussion or debate can be very rewarding for both you and them.
Organising groups
Groups of four to eight are ideal but this will depend on the size of your class, the physical environment and furniture, and the attainment and age range of your class. Ideally everyone in a group needs to see each other, talk without shouting and contribute to the group’s outcome.
- Decide how and why you will divide students into groups; for example, you may divide groups by friendship, interest or by similar or mixed attainment. Experiment with different ways and review what works best with each class.
- Plan any roles you will give to group members (for example, note taker, spokesperson, time keeper or collector of equipment), and how you will make this clear.
Managing groupwork
You can set up routines and rules to manage good groupwork. When you use groupwork regularly, students will know what you expect and find it enjoyable. Initially it is a good idea to work with your class to identify the benefits of working together in teams and groups. You should discuss what makes good groupwork behaviour and possibly generate a list of ‘rules’ that might be displayed; for example, ‘Respect for each other’, ‘Listening’, ‘Helping each other’, ‘Trying more than one idea’, etc.
It is important to give clear verbal instructions about the groupwork that can also be written on the blackboard for reference. You need to:
- direct your students to the groups they will work in according to your plan, perhaps designating areas in the classroom where they will work or giving instructions about moving any furniture or school bags
- be very clear about the task and write it on the board in short instructions or pictures. Allow your students to ask questions before you start.
During the lesson, move around to observe and check how the groups are doing. Offer advice where needed if they are deviating from the task or getting stuck.
You might want to change the groups during the task. Here are two techniques to try when you are feeling confident about groupwork – they are particularly helpful when managing a large class:
- ‘Expert groups’: Give each group a different task, such as researching one way of generating electricity or developing a character for a drama. After a suitable time, re-organise the groups so that each new group is made up of one ‘expert’ from all the original groups. Then give them a task that involves collating knowledge from all the experts, such as deciding on what sort of power station to build or preparing a piece of drama.
- ‘Envoys’: If the task involves creating something or solving a problem, after a while, ask each group to send an envoy to another group. They could compare ideas or solutions to the problem and then report back to their own group. In this way, groups can learn from each other.
At the end of the task, summarise what has been learnt and correct any misunderstandings that you have seen. You may want to hear feedback from each group, or ask just one or two groups who you think have some good ideas. Keep students’ reporting brief and encourage them to offer feedback on work from other groups by identifying what has been done well, what was interesting and what might be developed further.
Even if you want to adopt groupwork in your classroom, you may at times find it difficult to organise because some students:
- are resistant to active learning and do not engage
- are dominant
- do not participate due to poor interpersonal skills or lack of confidence.
To become effective at managing groupwork it is important to reflect on all the above points, in addition to considering how far the learning outcomes were met and how well your students responded (did they all benefit?). Consider and carefully plan any adjustments you might make to the group task, resources, timings or composition of the groups.
Research suggests that learning in groups need not be used all the time to have positive effects on student achievement, so you should not feel obliged to use it in every lesson. You might want to consider using groupwork as a supplemental technique, for example as a break between a topic change or a jump-start for class discussion. It can also be used as an ice-breaker or to introduce experiential learning activities and problem solving exercises into the classroom, or to review topics.
Resource 5: Leaf shapes for simple or more sophisticated sorting
Resource 6: Using questioning to promote thinking
Teachers question their students all the time; questions mean that teachers can help their students to learn, and learn more. On average, a teacher spends one-third of their time questioning students in one study (Hastings, 2003). Of the questions posed, 60 per cent recalled facts and 20 per cent were procedural (Hattie, 2012), with most answers being either right or wrong. But does simply asking questions that are either right or wrong promote learning?
There are many different types of questions that students can be asked. The responses and outcomes that the teacher wants dictates the type of question that the teacher should utilise. Teachers generally ask students questions in order to:
- guide students toward understanding when a new topic or material is introduced
- push students to do a greater share of their thinking
- remediate an error
- stretch students
- check for understanding.
Questioning is generally used to find out what students know, so it is important in assessing their progress. Questions can also be used to inspire, extend students’ thinking skills and develop enquiring minds. They can be divided into two broad categories:
- Lower-order questions, which involve the recall of facts and knowledge previously taught, often involving closed questions (a yes or no answer).
- Higher-order questions, which require more thinking. They may ask the students to put together information previously learnt to form an answer or to support an argument in a logical manner. Higher-order questions are often more open-ended.
Open-ended questions encourage students to think beyond textbook-based, literal answers, thus eliciting a range of responses. They also help the teacher to assess the students’ understanding of content.
Encouraging students to respond
Many teachers allow less than one second before requiring a response to a question and therefore often answer the question themselves or rephrase the question (Hastings, 2003). The students only have time to react – they do not have time to think! If you wait for a few seconds before expecting answers, the students will have time to think. This has a positive effect on students’ achievement. By waiting after posing a question, there is an increase in:
- the length of students’ responses
- the number of students offering responses
- the frequency of students’ questions
- the number of responses from less capable students
- positive interactions between students.
Your response matters
The more positively you receive all answers that are given, the more students will continue to think and try. There are many ways to ensure that wrong answers and misconceptions are corrected, and if one student has the wrong idea, you can be sure that many more have as well. You could try the following:
- Pick out the parts of the answers that are correct and ask the student in a supportive way to think a bit more about their answer. This encourages more active participation and helps your students to learn from their mistakes. The following comment shows how you might respond to an incorrect answer in a supportive way: ‘You were right about evaporation forming clouds, but I think we need to explore a bit more about what you said about rain. Can anyone else offer some ideas?’
- Write on the blackboard all the answers that the students give, and then ask the students to think about them all. What answers do they think are right? What might have led to another answer being given? This gives you an opportunity to understand the way that your students are thinking and also gives your students an unthreatening way to correct any misconceptions that they may have.
Value all responses by listening carefully and asking the student to explain further. If you ask for further explanation for all answers, right or wrong, students will often correct any mistakes for themselves, you will develop a thinking classroom and you will really knowwhat learning your students have done and how to proceed. If wrong answers result in humiliation or punishment, then your students will stop trying for fear of further embarrassment or ridicule.
Improving the quality of responses
It is important that you try to adopt a sequence of questioning that doesn’t end with the right answer. Right answers should be rewarded with follow-up questions that extend the knowledge and provide students with an opportunity to engage with the teacher. You can do this by asking for:
- a how or a why
- another way to answer
- a better word
- evidence to substantiate an answer
- integration of a related skill
- application of the same skill or logic in a new setting.
Helping students to think more deeply about (and therefore improve the quality of) their answer is a crucial part of your role. The following skills will help students achieve more:
- Prompting requires appropriate hints to be given – ones that help students develop and improve their answers. You might first choose to say what is right in the answer and then offer information, further questions and other clues. (‘So what would happen if you added a weight to the end of your paper aeroplane?’)
- Probing is about trying to find out more, helping students to clarify what they are trying to say to improve a disorganised answer or one that is partly right. (‘So what more can you tell me about how this fits together?’)
- Refocusing is about building on correct answers to link students’ knowledge to the knowledge that they have previously learnt. This broadens their understanding. (‘What you have said is correct, but how does it link with what we were looking at last week in our local environment topic?’)
- Sequencing questions means asking questions in an order designed to extend thinking. Questions should lead students to summarise, compare, explain or analyse. Prepare questions that stretch students, but do not challenge them so far that they lose the meaning of the questions. (‘Explain how you overcame your earlier problem. What difference did that make? What do you think you need to tackle next?’)
- Listening enables you to not just look for the answer you are expecting, but to alert you to unusual or innovative answers that you may not have expected. It also shows that you value the students’ thinking and therefore they are more likely to give thoughtful responses. Such answers could highlight misconceptions that need correcting, or they may show a new approach that you had not considered. (‘I hadn’t thought of that. Tell me more about why you think that way.’)
As a teacher, you need to ask questions that inspire and challenge if you are to generate interesting and inventive answers from your students. You need to give them time to think and you will be amazed how much your students know and how well you can help them progress their learning.
Remember, questioning is not about what the teacher knows, but about what the students know. It is important to remember that you should never answer your own questions! After all, if the students know you will give them the answers after a few seconds of silence, what is their incentive to answer?
Additional resources
- ‘It’s not fair – or is it? A guide to developing children’s ideas through primary science enquiry’ by Jane Turner, Brenda Keogh, Stuart Naylor and Liz Lawrence: http://www.ase.org.uk/ documents/ its-not-fair-sample/ inf-sample.pdf
References
Acknowledgements
Except for third party materials and otherwise stated below, this content is made available under a Creative Commons Attribution-ShareAlike licence (http://creativecommons.org/ licenses/ by-sa/ 3.0/). The material acknowledged below is Proprietary and used under licence for this project, and not subject to the Creative Commons Licence. This means that this material may only be used unadapted within the TESS-India project and not in any subsequent OER versions. This includes the use of the TESS-India, OU and UKAID logos.
Grateful acknowledgement is made to the following sources for permission to reproduce the material in this unit:
Activity 1: adapted from Harlen, W. (1985) Taking the Plunge. Portsmouth, NH: Heinemann.
Figure R2.1: Harlen, W. (1992) The Teaching of Science. London: David Fulton Publisher.
Table R3.1: adapted from Harlen, W., Macro, C., Reed, K. and Schilling, M. (2003) Making Progress in Primary Science. London: RoutledgeFalmer.
Figure R5.1: Nix, S. (undated) ‘Parts of a tree, use these tree parts to identify a tree’ in http://forestry.about.com/od/treephysiology/ss/part_of_tree_2.htm.
Every effort has been made to contact copyright owners. If any have been inadvertently overlooked the publishers will be pleased to make the necessary arrangements at the first opportunity.
Video (including video stills): thanks are extended to the teacher educators, headteachers, teachers and students across India who worked with The Open University in the productions.