Use 'Print preview' to check the number of pages and printer settings.
Print functionality varies between browsers.
Printable page generated Monday, 27 July 2026, 4:59 PM
TI-AIE: Observing patterns: shadows and night & day
What this unit is about
All scientific inquiry begins with the skill of observation. Observation is a fundamental part of the scientific method: it is involved in analysing, interpreting and concluding.
This unit looks at ways to help students observe more carefully and systematically so that they can see patterns emerge. The context for the unit is shadows and night & day. This topic is one that students will have formed ideas about prior to coming to school. They will have experienced day and night, observed the sky, and noticed shadows. This unit examines how you as a teacher can build on students’ informal learning in the school context.
Safety warning!
Students must be advised never to look at the Sun directly or through a mirror. Sunlight can damage their eyes even if they are wearing sunglasses.
Students need to know the dangers of hazards that they might encounter outside the classroom, and should never investigate electrical equipment, telephones or communications equipment, or play or work in areas where machinery or vehicles are likely to operate.
What you can learn in this unit
- How to develop your students’ observation skills and ability to see patterns in data.
- How to plan, organise and manage observational activities to develop a range of observational skills in the context of shadows and night & day.
- How to plan and use opportunities for your students to discuss and question what they see
Why this approach is important
Developing students’ ability to observe closely is a fundamental part of effective science education. Children are naturally curious and want to know how the world works, so observing is a natural activity for them. For example, many children (and adults) judge the passing of time and the day by looking at the sky – but what patterns do they notice through their observations? How do they make sense of how day and night happen, or how shadows are formed? How can you organise your students to maximise their learning?
Observing patterns over time is important because it:
- utilises the students’ natural curiosity and observational skills, promoting deeper curiosity and engagement
- supports a more scientific approach to observation, looking beyond the obvious features
- can help to develop students’ scientific understanding of phenomena over time, such as shadows and night & day
- helps students to recognise the regular patterns of change that occur though a day, a month and a year
- provides opportunities for discussion and questioning, which helps to develop students’ understanding.
1 Developing observation skills
Encouraging your students to look more closely and accurately will take time and involves giving them opportunities to observe and investigate their world. However, it is a worthwhile investment as it will make them more interested and enthusiastic about their world and in science as a subject.
There are a number of activities that you can use to help your students observe and learn about shadows. These include shadow puppets, a shadow game where students have to catch someone by stepping on their shadow as well as more methodical investigations of shadows. For younger students, encouraging them to play with such ideas is important before they meet the more accepted ideas of how shadows are formed and change shape.
Through playing, students begin to construct their own ideas about what is happening – these will not all be the same for each student. Your role is to develop, extend and challenge their thinking to accept what really happens. To do this, you will also need to provide opportunities for them to talk together about their ideas.
Case Study 1: Observing shadows during the day.
Mrs Latika, a Class V science teacher, tried this activity with her students. Here she explains what she did
At first, I wanted to find out if my students understood how shadows are formed. I started by asking them a riddle: ‘What follows you around all day, but sometimes disappears?’ They guessed it was a shadow. I asked them what made their shadow. I used a torch and showed them how a shadow is made when an object blocks a light source. They then made their own shadows in the playground using the sun, and in the classroom using a torch. The students really enjoyed making funny shapes and animal shadows using their hands and seeing how they could change the shape of the shadow by moving the torch.
In the next lesson, I asked the students ‘Does the shadow stay the same through the day?’ Some of them had noticed they change, but some students had not. I asked ‘How do they change?’ They weren’t too sure exactly how they changed, so I asked them to work in small groups to discuss how we could investigate whether shadows changed and how they did change. The discussion was very lively and they had lots of ideas as to how we could observe the shadows. In the end, we decided it was easiest to observe the shadow of an object in the playground at different times of the day to confirm our ideas.
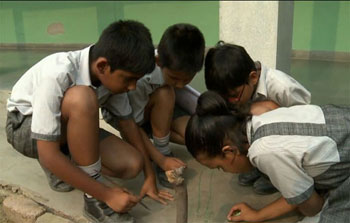
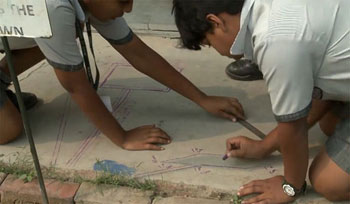
The groups chose their object and took a piece of chalk and a notebook and pencil out, as well as a ruler. In the playground they made their shadows and marked the spot where they did the measuring (so that they could go back to the same spot each time) and drew the shadow on the ground with their chalk [Figure 2]. Some students did their shadows on the hard ground where the chalk didn’t work. They decided to use a stick to draw the shadow on the ground and then did their measurements. The students measured the length and width of their shadows and noted down the time of day. They also noted where the sun was in the sky, although I made sure to tell them not to look at the sun directly. One person in each group drew the shadow in their notebook and put in the observations they had made. During the day, we went out another three times to do more measurements. I noticed how much they talked about what they were doing and shared their ideas about what would happen over the day. I also took photos of them at work and of their shadows over the day for them to see later in order to compare and identify the changes.
At the end, I asked the students to look at their drawings and observations and discuss what they could deduce. Most of the students understood that the shadows changed and also moved around, and that it was the position of the sun in the sky that caused changes to shadows. Others found it easier to see the difference from the photos on my phone.
Pause for thought How did Mrs Latika find out what ideas her students already had about shadows? |
Mrs Latika was very pleased with the outcome of this activity, because more students this year understood about how shadows are formed and how they change than they did the previous year, when they learnt from the textbook alone. She felt this was because they had done the observations and been able to see a pattern over time. They were also able to talk in their groups about their observations and photographs agree what they had found out. (You may want to look at the key resources ‘Using groupwork’ and ‘Talk for learning’ to learn more about how to plan and organise your classroom for groups and talk.)
The way you start a lesson or new topic can have a big influence on how your students respond and participate in lessons. Spending some time thinking of creative and stimulating ways to capture students’ interest and finding out what they know is therefore important. Mrs Latika introduced the idea of shadows by using a riddle. You could use a story. Write a short story about shadows or use a traditional tale with your students to capture their interest about shadows. For example, your story might be about a child who is lonely and befriends his or her shadow, and is sad when the shadow keeps disappearing.
Activity 1: Observing patterns in the classroom
Before you do some of these activities with your students, try those listed below for yourself and consider how much they would help your students develop their understanding of the patterns. You may need time to gather information about your students’ observation skills.
- Try ‘playing’ with shadows and different light sources yourself. What patterns can be seen? How valuable will allowing your students some time to ‘play’ with phenomena like shadows be to their understanding?
- Try the activity that the students did in the playground with the stick in Case Study 1. What do you think your students could learn from doing an investigation like this?
- How developed are your students’ observation skills? How do you know this? How often do you provide opportunities for them to observe and record information to use later in an investigation or for problem solving? How could you extend the opportunities?
Make notes about what you think students would learn and think how you could use them with your students.
You are now going to set up an observation investigation for your students. You could do a similar activity to the one done by Mrs Latika, or plan a simple observation based on the activity given below. If you are located near to the equator, a sundial will not produce obvious changes. In this case you might get your students to investigate changes to shadows when the light source (such as a lamp or torch) is at different distances from the object being measured.
Activity 2: Planning and teaching for observation
Read through the activity description and also read Resource 1, ‘Planning lessons’, to help you do this task and identify what you want your students to learn and how. Create a lesson plan that is suited to the ages and abilities of the students in your class.
Making a sundial
- Choose a sunny spot in an outdoor area that is not shady and is free of shadows.
- Organise your students into small groups of three or four.
- Choose a tall object that will stand up by itself, such as a brick or bottle of sand, or ask the students to push a thick stick or pole into the ground. Whatever you use, the object needs to be stable and cast a measurable shadow.
- Tell your students to mark the shadow that is created by the tall object or stick, placing a small stone at the shadow’s tip or making a chalk mark. Write the time on the stone or next to the chalk mark.
- Repeat this activity throughout the day.
- Ask your students to describe what is happening to the shadows over time. Ask them to explain why they think the shadows are changing.
- The following day, show your students how to use the sundial to tell the time. Take your students outside at half past the hour and ask them to tell you what the time is.
- In the classroom, ask your students to write a report or draw a picture of what they observed. This can be displayed in the classroom.
- Ask your students to draw a diagram that explains how shadows are created.
Extending the activity
- You could extend this activity by asking your students to measure the length of each shadow and to create a bar chart that represents the changes that occur. Can the students identify any patterns in the data? Can they explain any of the patterns that they find?
As the lesson proceeds, watch how the students work and listen to them as they talk. Afterwards, think about the following:
- What went well during the activity? What would you change for next time you teach this topic?
- How did the students respond to the activity?
- What did the students learn? How do you know this?
- What did your students need support with?
How did you challenge your more able students?
Video: Planning lessons |
2 Observation skills
Encouraging careful observation usually leads your students to ask questions. This is the beginning of a scientific investigation! Also, scientists need to be able to repeat the experiments of other scientists exactly to check the conclusions and findings. This means observing systematically and recording observations carefully. It may also involve deciding what to look for, feel or hear before starting so that everyone observes in the same way. This allows the data gathered to be compared across groups. This activity is one way to help your students to develop the necessary skills and understanding about the importance of the rigorous nature of science investigations.
Many of the ideas that are associated with this topic are difficult for students to grasp because of their abstract nature. It is not possible to actually see that the Earth is spinning on its axis – it requires imagination. Also, in everyday language we talk about the sun moving across the sky, when in fact it is the Earth that is spinning. Although we can see the effects of that spinning, we can’t feel the movement. Just explaining how this all happens tends to confuse students, or they hold the real explanation and their own ideas as two parallel sets of ideas that do not relate to each other. So for many of these ideas, you need to use models to help students understand. It is, therefore, very important that you give your students the chance to observe, record and investigate these changes for themselves before introducing them to the models that will help them assimilate the accepted ideas of how they are formed or happen.
Pause for thought
|
Case Study 2: Observing the Moon
The phases of the Moon are something that students will have observed informally. In this activity, Mrs Chadha explains how she helped her students to make and record more systematic observations of the phases of the Moon over time. You may want to now read Resource 2, ‘Using local resources’, to explore the issues about working beyond the classroom.
I told the students that they were going to observe the Moon closely for one month. I chose to start the activity when the Moon was full so that it was easier for them to see the changes. They had to draw a picture of the moon every night. I decided to get them to do this as a group so that each member of the group had to do two observations each week. Each group produced two drawings of the Moon each night, in case one student forgot.
Every day I reminded the students to look at the Moon before they went to bed and draw its shape in their notebook with the date. I checked who was going to draw the Moon for their group.
Because most of the Indian festivals are based on the lunar calendar, I asked the students to interview their family elder about the festivals or rituals observed by them and mark these on the drawings they made while observing the phases of the Moon. Some of them recorded the talk on their phones and we were able to listen to some in groups in class.
As the drawings were made, students put them on the wall to see how it was changing. They really enjoyed seeing their drawings displayed and the progress of the task.
After one complete lunar cycle (28 days), we looked at the drawings and I asked the students if they could see a pattern. They noticed the change in the shape of the Moon in the sky and that in one month the shapes showed a regular change until they again became a full moon. The students really enjoyed this activity and asked lots of questions about the Moon. I was really pleased with the displays that gradually went up on the walls. It was very satisfying to see the students enjoy their learning. I thought in the next lesson I would use a model to explain the phases of the Moon and relate this to their displays.
During the following month many of my students commented about the shape of the Moon the night before and I saw many of them looking at their chart again and comparing the sequence of shapes.
Pause for thought Mrs Chadha noticed how motivated her students were by this task. Why do you think this was? What effect do you think this will have on their learning? How could you use some of these ideas? |
Linking their observations of the phases of the Moon with the religious festivals related to different parts could be a good starting point to interest your students. Making contexts meaningful and relevant to students will heighten their interest and awareness so that they observe more closely and accurately. By providing opportunities for close observation, students will open their minds to the world and become more interested and motivated to find out more.
What you expect your students to be able to do will depend on their age. Older students might be expected to make more detailed observations and make notes. You could do this activity with young students as a simple observation activity, or use it as the basis of understanding why the Moon appears to change once the students are familiar with the rotation of the Earth, day and night, and the Moon being a satellite of the Earth. In Resource 5 there is a template that you could use to help students record their observations; see also Resource 4, which looks at using resources.
The ideas that students bring about shadows, night and day, the seasons, and the night sky can also make it difficult for them to develop a more scientific understanding. Many cultures around the world have created fascinating stories and myths to explain the mystery of the changing appearance of the Moon. Some of these stories remain part of our culture and continue to be shared today. Our understanding of the Moon has nevertheless been transformed since the first humans landed there in 1969.
The everyday language that we use to talk about the Moon can be misleading too. We talk about ‘moonlight’ and the ‘shining Moon’. It is not surprising, therefore, that students can find it difficult to understand that the Moon is not a light source, but simply reflects the Sun’s light. Most students will have observed the Moon passing through its different phases, and may be familiar with the terms ‘new moon’, ‘crescent’, ‘full moon’, etc. However, they may believe that these phases are created by the Earth casting a shadow on the Moon, rather than light being reflected to the Earth from the Moon at different angles (Driver et al., 1992).
These concepts can be challenging to teach, especially if classroom resources are limited. The simple activity below may help your students develop a better understanding of why the Moon appears to radiate light and to change in size and shape.
Activity 3: Understanding the phases of the moon
This activity is suitable for older elementary students but similar activities using modelling can be used with younger students. For this classroom activity you will need a torch and a large white ball. (You could use a melon or other large round fruit if a ball is not available.) You will be demonstrating a model of the cause of the phases of the Moon (see Resource 4). Practice the demonstration before you do it with the students, so that you are confident and know what questions you are going to ask and how you will respond to your students’ questions.
- You need to do this demonstration in a dark room. Before beginning the activity, block out as much light as possible from the classroom. Use rugs, curtains or pieces of cloth or paper to block as much light as possible from the windows and doors.
- Create a large space in the room by moving the chairs and desks to the sides.
- Ask the students to sit close together in a circle near the centre of the room. You may need to create an inner and outer circle, depending on how big your class is. Explain that the circle they are in represents the Earth. The torch represents the Sun and the ball represents the Moon.
- Switch off the lights. Hold up the ball and ask the students if they can see it clearly. Ask them if the ‘Moon’ is radiating light.
- Ask one student to stand away from the circle and hold the torch and switch it on. Place the ball in the beam of light from the torch. Explain that the ‘Moon’ is not lighting up, but is reflecting light from the ‘Sun’ (Figure 3).
Figure 3 An activity that helps students to understand the phases of the moon.
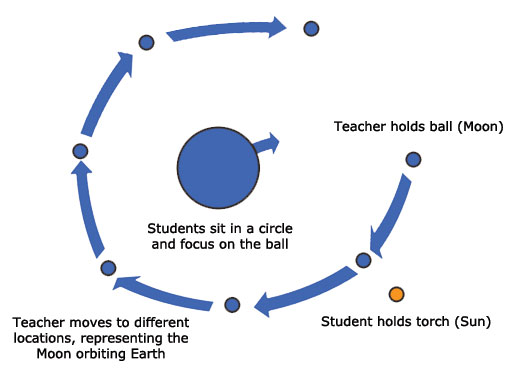
- Ask the students to sit still, look straight ahead and not follow you with their eyes. Ask the student with the torch to remain still. Then move around the circle with the ‘Moon’, stopping at regular intervals to give the students time to observe what they see. Explain that you are the ‘Moon’ orbiting the ‘Earth’.
- Ask the students, ‘Does the Moon change shape as it passes?’ and ‘How much of the Moon can you see?’ (Prompt them by asking ‘All of it?’, ‘Half of it?’, ‘Not all of it?’, etc.)
- Rearrange the students and repeat the activity several times so that all the students have the opportunity to make clear observations. Students with less understanding of how day and night work will need more time and opportunities to try this activity and similar activities to help them accept the ideas.
- As you are orbiting the ‘Earth’, keep the same part of the ‘Moon’ facing towards the students. Explain that the same part of the Moon always faces the Earth.
After completing this demonstration, ask your students to draw a diagram of the Sun, the Moon and the Earth, using arrows to indicate how light is reflected from the Sun.
A light source (such as a torch, lamp or candle) and a ball can also be used to demonstrate that we experience daytime when our part of the Earth faces the Sun, and that the parts of the Earth facing away from the Sun are experiencing night time.
Once the activity has been completed, note your answers to the following questions:
- What did you like about this activity?
- What went well? How do you know this?
- What didn’t go as you expected? Why?
What would you do differently next time to improve the effectiveness of the activity?
Activity 3 used a mixture of modelling and observation to help students understand the phases of the Moon. You can use this technique to help your students understand day and night. Students sit around the room. One student stands in the centre with the torch, representing the Sun, and another student represents the Earth. By turning around slowly, they can observe how half of the Earth is dark and half is light. You can also use this idea to help them understand how the Earth orbits the Sun and that a year is one orbit.
With younger students, learning about objects in the sky should be entirely observational and qualitative in nature. This is to develop their skills in observing and help them to become more accurate and competent at gathering data. The Sun, Moon, stars, clouds, birds and aircraft all have properties, locations and movements that can be observed and described over time. Observations and patterns are also an important part of learning about living things in the environment. For example, looking at where and how plants grow.
3 Summary
The learning activities you have done in this unit are long-term, interdisciplinary and student-centred. You, as a teacher, can plan investigative experiences that result in an in-depth understanding of important ideas in science. When your students are more in control of their learning, they can draw upon their strengths and create projects that incorporate their own interests, native language, cultural background and aptitudes.
Students’ understanding of the relationships between the Earth, the Sun and the Moon may include various misconceptions. Sometimes it may be necessary to create a simulation of events – through drama, for example – so that students can gain a deeper understanding of why things happen. This unit has presented some ideas for exploring the movements of the Earth, the Sun and the Moon through classroom and outdoor activities.
The phases of the Moon are a familiar natural phenomenon that can be approached by first considering the nature and characteristics of shadows cast by sunlight. Observing and describing shadows, and using classroom models, can lead naturally on to describing and identifying the phases of the Moon.
Creating opportunities for all students, but especially those with special educational needs, to observe and record the natural phenomena around them can help them to realise the connections between the Earth, the Sun and the Moon in a more practical and concrete way.
Resources
Resource 1: Planning lessons
Why planning and preparing are important
Good lessons have to be planned. Planning helps to make your lessons clear and well-timed, meaning that students can be active and interested. Effective planning also includes some in-built flexibility so that teachers can respond to what they find out about their students’ learning as they teach. Working on a plan for a series of lessons involves knowing the students and their prior learning, what it means to progress through the curriculum, and finding the best resources and activities to help students learn.
Planning is a continual process to help you prepare both individual lessons as well as series of lessons, each one building on the last. The stages of lesson planning are:
- being clear about what your students need in order to make progress
- deciding how you are going to teach in a way that students will understand and how to maintain flexibility to respond to what you find
- looking back on how well the lesson went and what your students have learnt in order to plan for the future.
Planning a series of lessons
When you are following a curriculum, the first part of planning is working out how best to break up subjects and topics in the curriculum into sections or chunks. You need to consider the time available as well as ways for students to make progress and build up skills and knowledge gradually. Your experience or discussions with colleagues may tell you that one topic will take up four lessons, but another topic will only take two. You may be aware that you will want to return to that learning in different ways and at different times in future lessons, when other topics are covered or the subject is extended.
In all lesson plans you will need to be clear about:
- what you want the students to learn
- how you will introduce that learning
- what students will have to do and why.
You will want to make learning active and interesting so that students feel comfortable and curious. Consider what the students will be asked to do across the series of lessons so that you build in variety and interest, but also flexibility. Plan how you can check your students’ understanding as they progress through the series of lessons. Be prepared to be flexible if some areas take longer or are grasped quickly.
Preparing individual lessons
After you have planned the series of lessons, each individual lesson will have to be planned based on the progress that students have made up to that point. You know what the students should have learnt or should be able to do at the end of the series of lessons, but you may have needed to re-cap something unexpected or move on more quickly. Therefore each individual lesson must be planned so that all your students make progress and feel successful and included.
Within the lesson plan you should make sure that there is enough time for each of the activities and that any resources are ready, such as those for practical work or active groupwork. As part of planning materials for large classes you may need to plan different questions and activities for different groups.
When you are teaching new topics, you may need to make time to practise and talk through the ideas with other teachers so that you are confident.
Think of preparing your lessons in three parts. These parts are discussed below.
1 The introduction
At the start of a lesson, explain to the students what they will learn and do, so that everyone knows what is expected of them. Get the students interested in what they are about to learn by allowing them to share what they know already.
2 The main part of the lesson
Outline the content based on what students already know. You may decide to use local resources, new information or active methods including groupwork or problem solving. Identify the resources to use and the way that you will make use of your classroom space. Using a variety of activities, resources, and timings is an important part of lesson planning. If you use various methods and activities, you will reach more students, because they will learn in different ways.
3 The end of the lesson to check on learning
Always allow time (either during or at the end of the lesson) to find out how much progress has been made. Checking does not always mean a test. Usually it will be quick and on the spot – such as planned questions or observing students presenting what they have learnt – but you must plan to be flexible and to make changes according to what you find out from the students’ responses.
A good way to end the lesson can be to return to the goals at the start and allowing time for the students to tell each other and you about their progress with that learning. Listening to the students will make sure you know what to plan for the next lesson.
Reviewing lessons
Look back over each lesson and keep a record of what you did, what your students learnt, what resources were used and how well it went so that you can make improvements or adjustments to your plans for subsequent lessons. For example, you may decide to:
- change or vary the activities
- prepare a range of open and closed questions
- have a follow-up session with students who need extra support.
Think about what you could have planned or done even better to help students learn.
Your lesson plans will inevitably change as you go through each lesson, because you cannot predict everything that will happen. Good planning will mean that you know what learning you want to happen and therefore you will be ready to respond flexibly to what you find out about your students’ actual learning.
Resource 2: Using local resources
Many learning resources can be used in teaching – not just textbooks. If you offer ways to learn that use different senses (visual, auditory, touch, smell, taste), you will appeal to the different ways that students learn. There are resources all around you that you might use in your classroom, and that could support your students’ learning. Any school can generate its own learning resources at little or no cost. By sourcing these materials locally, connections are made between the curriculum and your students’ lives.
You will find people in your immediate environment who have expertise in a wide range of topics; you will also find a range of natural resources. This can help you to create links with the local community, demonstrate its value, stimulate students to see the richness and diversity of their environment, and perhaps most importantly work towards a holistic approach to student learning – that is, learning inside and outside the school.
Making the most of your classroom
People work hard at making their homes as attractive as possible. It is worth thinking about the environment that you expect your students to learn in. Anything you can do to make your classroom and school an attractive place to learn will have a positive impact on your students. There is plenty that you can do to make your classroom interesting and attractive for students – for example, you can:
- make posters from old magazines and brochures
- bring in objects and artefacts related to the current topic
- display your students’ work
- change the classroom displays to keep students curious and prompt new learning.
Using local experts in your classroom
If you are doing work on money or quantities in mathematics, you could invite market traders or dressmakers into the classroom to come to explain how they use maths in their work. Alternatively, if you are exploring patterns and shapes in art, you could invite maindi [wedding henna] designers to the school to explain the different shapes, designs, traditions and techniques. Inviting guests works best when the link with educational aims is clear to everyone and there are shared expectations of timing.
You may also have experts within the school community (such as the cook or the caretaker) who can be shadowed or interviewed by students related to their learning; for example, to find out about quantities used in cooking, or how weather conditions impact on the school grounds and buildings.
Using the outside environment
Outside your classroom there is a whole range of resources that you can use in your lessons. You could collect (or ask your class to collect) objects such as leaves, spiders, plants, insects, rocks or wood. Bringing these resources in can lead to interesting classroom displays that can be referred to in lessons. They can provide objects for discussion or experimentation such as an activity in classification, or living or not-living objects. There are also resources such as bus timetables or advertisements that might be readily available and relevant to your local community – these can be turned into learning resources by setting tasks to identify words, compare qualities or calculate journey times.
Objects from outside can be brought into the classroom – but the outside can also be an extension of your classroom. There is usually more room to move outside and for all students to see more easily. When you take your class outside to learn, they can do activities such as:
- estimating and measuring distances
- demonstrating that every point on a circle is the same distance from the central point
- recording the length of shadows at different times of the day
- reading signs and instructions
- conducting interviews and surveys
- locating solar panels
- monitoring crop growth and rainfall.
Outside, their learning is based on realities and their own experiences, and may be more transferable to other contexts.
If your work outside involves leaving the school premises, before you go you need to obtain the school leader’s permission, plan timings, check for safety and make rules clear to the students. You and your students should be clear about what is to be learnt before you depart.
Adapting resources
You may want to adapt existing resources to make them more appropriate to your students. These changes may be small but could make a big difference, especially if you are trying to make the learning relevant to all the students in the class. You might, for example, change place and people names if they relate to another state, or change the gender of a person in a song, or introduce a child with a disability into a story. In this way you can make the resources more inclusive and appropriate to your class and their learning.
Work with your colleagues to be resourceful: you will have a range of skills between you to generate and adapt resources. One colleague might have skills in music, another in puppet making or organising outdoor science. You can share the resources you use in your classroom with your colleagues to help you all generate a rich learning environment in all areas of your school.
Resource 3: A template for pupils to record the shape of the Moon
| Monday | Tuesday | Wednesday | Thursday | Friday | Saturday | Sunday | |
|---|---|---|---|---|---|---|---|
| Week 1 | |||||||
| Week 2 | |||||||
| Week 3 | |||||||
| Week 4 | |||||||
| Week 5 |
Resource 4: The Moon and its relationship to the Earth and the Sun
The Moon is a spherical body that is illuminated by the Sun and reflects some of its light. But how is the Moon placed in relation to the Sun and the Earth, and how does it move?
We know that:
- the Moon is visible at different times during the day and/or night
- the time at which the Moon is visible is closely related to the shape and size of its bright part (phases)
- the Moon is much less bright than the Sun and emits a negligible amount of heat
- the complete cycle of lunar phases has a period of about 29.5 solar days
- the Moon is visible, albeit at different times, for some part of each solar day (provided that it is not hidden by clouds)
- the Moon shows the same face to the Earth at all times
- the Moon is always of the same apparent size
- the apparent size of the Moon is about the same as that of the Sun
- eclipses of the Moon occur relatively rarely (no more than twice a year).
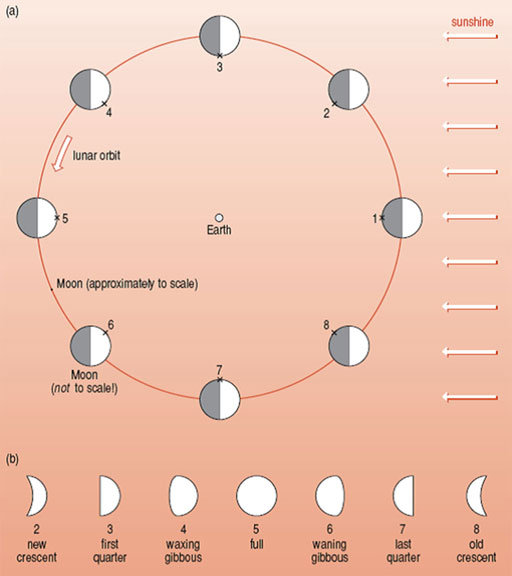
Figure R4.1 will help you to make sense of how the Moon moves around the Earth. It shows how we only see different-sized portions of the Moon at different stages in its orbit. It shows how the phases of the moon arise from its orbit around the Earth. The time between occurrences of the same phase (e.g. full) is, on average, 29.5 days.
You will see that the moon always presents the same face to the Earth: the moon rotates on its axis in the same time that it orbits the Earth, and in the same direction. Moreover, whenever you see a full moon, everyone else on the same side of the Earth will also see a full moon. This applies to a new moon and to every other phase of the Moon as well. The
Please note: You will need to reverse the sequence in the diagram for the southern hemisphere.
Additional resources
- A list of Hindu festivals related to the Moon: http://en.wikipedia.org/ wiki/ List_of_Hindu_festivals
- Developing observational skills: http://www.blockpub.com/ pages/ ed/ observation.html
- ‘Observation as an important enquiry skill’ by Jane Johnston:http://www.ase.org.uk/ journals/ primary-science/ 2009/ 01/ 106/ 1086/ PSR106Jan-Feb2009p15.pdf
References
Acknowledgements
This content is made available under a Creative Commons Attribution-ShareAlike licence (http://creativecommons.org/ licenses/ by-sa/ 3.0/), unless identified otherwise. The licence excludes the use of the TESS-India, OU and UKAID logos, which may only be used unadapted within the TESS-India project.
Every effort has been made to contact copyright owners. If any have been inadvertently overlooked the publishers will be pleased to make the necessary arrangements at the first opportunity.
Video (including video stills): thanks are extended to the teacher educators, headteachers, teachers and students across India who worked with The Open University in the productions.