Use 'Print preview' to check the number of pages and printer settings.
Print functionality varies between browsers.
Printable page generated Sunday, 26 July 2026, 9:01 PM
TI-AIE: Language in the science classroom: cells
What this unit is about
This unit will help you to increase your understanding of the central role of language in the development of students’ understanding of science. It provides you with some simple strategies to use in your classroom that will help your students to improve their scientific literacy.
Learning science involves an initiation into a new language – the language of science. But this language can be a major barrier to most students in learning science. The problems that they experience in using scientific language can be a major block to their understanding and reasoning in science. Good teachers will be aware of their students’ understanding of scientific words and will have strategies to help them to develop shared understandings of specialist words.
The techniques here are illustrated in the context of the topic of ‘The fundamental unit of life’ (cells). However, the techniques and suggestions described can be used in many topics in the science curriculum.
What you can learn in this unit
- The importance of clear planning for language development in science.
- A number of techniques for tackling science language difficulties.
- Ways in which you can support your students’ language development by encouraging them to write about science.
Why this approach is important
Language development and conceptual development are deeply linked: thought requires language and language requires thought. So it is important to think about your students’ language development when planning your science lessons.
Many of your students will be multilingual so the language of the classroom may be different to the language that they use outside their lessons. This makes it even more important that you make time during your lessons for students to learn and practise using new words.
You can do this by giving them the opportunity to use the words by talking in pairs or in groups. Even the pronunciation will sometimes be difficult, let alone understanding the meaning of a new word. Using the words in writing tasks will also help your students develop understandings of the proper scientific meanings. If students do not understand crucial science words, their understanding of scientific concepts will be limited.
1 Making sense of difficult words
Science has a specialised and technical language that makes it a unique curriculum subject. There are three main types of problems faced by students in learning scientific vocabulary:
- Unfamiliar words: Scientists often use scientific words for familiar objects. For example, a scientist will say ‘aqua’ instead of ‘water’, ‘photo’ instead of ‘light’ or ‘micro’ when they mean ‘small’. Many of these words are then put together to make complicated, compound words, like photosynthesis or microscope.
- Specialist meanings: Many words in science have everyday meanings as well as specific scientific meanings, words such as energy, conduct or potential. Students often get confused about which meaning to use and need to be taught the accepted scientific meaning for different contexts.
- Difficult concepts: There are many non-technical words used in science like ‘illuminate’, ‘factor’ or ‘theory’. Teachers often assume that their students know the meaning of words like these. This is because they are easy to read. But often these words refer to complex difficult scientific concepts. Students may only have a partial or incorrect understanding of these abstract concepts.
2 Decoding complicated compound words
Many scientific words in English have been created in a systematic way by the combination of Greek or Latin word roots or stems. For example, ‘chlorophyll’ consists of two parts: ‘chloro–’, which means green, and ‘–phyll’, which means leaf. So, a good guess at the meaning of the word would be something to do with green leaves.
This is a good strategy to use to help your students to decode words. If students can work out the meaning of a word for themselves, they are more likely to remember it in the future. It will help their recognition of similar words and help them to build links between different parts of the curriculum. For example, ‘photo–’ links ‘photosynthesis’ in biology and to ‘photon’ or ‘photodiode’ in physics.
Pause for thought
|
Decoding scientific words can help students to learn how to spell them. It can also help them to guess the meaning, or at least something about what the word might mean, if the word is unfamiliar to them. There is a list of the more commonly used Latin and Greek word roots and stems in Resource 1. There are many websites that give more detailed lists.
Top tips for decoding
When you are decoding words, the order of the words may not always seem to make sense, but do not worry about that. You may only be able to find one part of a word but that can give you a good indication of the meaning. Extra letters like ‘o’, ‘a’ or ‘i’ between two parts of a word can be ignored.
Activity 1: Decoding unfamiliar words
This is a short activity that you could do at the end of a lesson. The purpose is to help your students realise that they will not be the only person who does not understand a particular word and to encourage them to develop strategies for guessing what the word might mean.
Write some words on the blackboard related to your topic. You could choose words from the chapter in your textbook. For example, you might choose:
- phototropic
- photosynthesis
- thermochromic
- photochromic.
Ask your students to work in pairs to figure out the meanings of the words from the following stems:
- ‘photo’ – light
- ‘chrom’ – colour
- ‘therm’ – heat
- ‘synthesis’ – make or build up
- ‘tropic’ – turning.
If you have different words, you will need to give your students some more ‘word stems’. Use Resource 1 to help you.
3 Scientific words with dual meanings
There is often a conflict between scientific language and the everyday meanings that students give to words. For example, they think of the word ‘work’ as being linked to employment or to activity in the fields. However, they need to understand that in science, ‘doing work’ has a very specific meaning and involves moving a force over a distance. Other words like this are ‘energy’, ‘tissue’ and ‘force’. You will be able to think of others across the curriculum.
It is helpful to explain the origins of words to your students. ‘The fundamental unit of life’ is about cells, and ‘cells’ was first used as a scientific term by Robert Hooke when he first looked at a piece of cork through a microscope in 1665.
There are many new words associated with the study of cells and you need to make sure that your students have the chance to practise using them. Activity 2 is for you do on your own or with a colleague in preparation for teaching. Activity 3 is for you to do with your students and Case Study 1 shows how Teacher Padam introduced his class to scientific terms by creating a word wall.
Activity 2: Identifying difficult words at the start of the cells topic
This activity is for you do on your own or with a colleague as part of your planning to teach ‘The fundamental unit of life’. The purpose of the activity is to check your own understanding of the scientific terms in this topic and to help you to think about the difficulties that your students will encounter.
- Go through the chapter in your textbook that you are teaching and write down all the technical words associated with learning about cells.
- With a highlighter pen or pencil, highlight the ones that students might have met before but in a completely different context.
- Underline the specialist scientific words that will be new to them.
- Make yourself a glossary – a list of words with their definitions. Try to write each of the definitions as simply as possible. If you can think of any analogies that might be helpful, write them down as well. For example, the cell membrane behaves like a sieve. The size of the holes is such that some molecules can pass through, but some cannot.
Keep this glossary to use with your class when you start to use the new words or the words that have specific scientific meanings. You might encourage your students to develop their own glossaries.
Activity 3: Key words
The key words are the most important words in the topic that your students need to know about. Key words can be names, processes or concepts. Names are the easiest key words to understand. Processes and concept key words can be harder for students to understand. Each chapter will have lots of names. There are less process words per chapter and only one or two concept words.
Make a key word list for the chapter that you are working on. A good key word list will include a range of each different type. For example, for the cells chapter, some key words would be:
- Names: ‘nucleus’, ‘endoplasmic reticulum’, ‘plastid’, ‘mitochondria’, ‘vacuole’ …
- Processes: ‘reproduction’, ‘osmosis’, ‘membrane biogenesis’ …
- Concepts: ‘adaptation’ …
Approximately 10–15 key words per chapter will usually be enough. Lower-attaining students should have a less difficult but not as long set of key words.
The key words should be given to your students at the very start of each chapter. One way to do this is to write them on a poster that is kept by the main blackboard. Your students will be able to see them every lesson. They should be used and referred to regularly (little and often) throughout the chapter as part of your normal teaching.
If you have used your key words well, by the end of the topic your students will be familiar with them. They should be using them accurately and routinely to communicate their ideas about the topic to others. You will notice a big improvement in their explanations and understanding of the chapter.
When you have done this a few times your students will start to be able to make their own key word lists, they can share these in the class and use them for revision.
Case Study 1: Creating a key word wall for ‘The fundamental unit of life’ chapter
Teacher Padam created a word wall of key words with another colleague who was teaching the same chapter.
In Class IX, some of my students come from homes where there are books and their parents talk to them about their school work. However, quite a few come from poor backgrounds. They only use books when in school and don’t have chance to talk about school at home. Their attendance is not very good as they are often required to stay at home and work for their family.
I realised that our next topic, ‘The fundamental unit of life’, has many new and difficult words. With a colleague, we picked out 15 scientific words from the topic to be our key words. We wrote each of them with a felt pen on a piece of paper. I stuck the pieces of paper on one of the walls of the classroom. I left enough spaces between the words for us to add definitions.
When Class IX came in they were intrigued to see the words on the wall. So I started by telling them: ‘Work in pairs and make three lists: those you know the meaning of, those you have never heard of before and those you have heard of but are not sure what the word means.’ I told them that as we learnt about cells, we would return to the list and by the end of the topic the aim was to be able to put all the words in the first list.
Near the end of the chapter, I asked my students to find their lists and to check how many of the words they now knew. Walking round the class, I was able to see which students were still feeling unconfident about some of the words, so that in my next lesson I could do some more activities around those words to help them.
4 Speaking and listening in science
Students learning any new language need a chance to practice speaking it and listening to it. This is also true when your students are learning the language of science.
Case Study 2: Key word conversations
Mrs Gupta recounts a lesson where her students played a speaking and listening game using key words.
My classroom is a very quiet place. I am very proud of this. One day there was a big disturbance coming from the classroom down the corridor. I went in to complain because I could not hear myself speak. I was quite shocked at what I saw – but not in a bad way. Teacher Padam explained what he was doing and why. I liked what I saw so much that I plan to try this idea out very soon with my own students. This is what he told me:
Mrs Gupta, I need to make sure that all my students have the chance to practise using the key words in conversations in the classroom. I think this will help them to understand the scientific ideas better.
I thought of a game that we can play for five minutes at the end of each lesson, which is what you seeing now. I give a definition of a key word and ask for a volunteer to tell me what the word is. Each time, the person who guesses the word has to provide a definition for another one. It also works well the other way round. One student chooses a word and they nominate someone else to give a definition.
It means that all my students have the opportunity to hear and use the key words.
One of my students, Sanjay, suggested an alternative, which is also good fun. Write all the words on separate pieces of paper and put them in a bowl. Invite someone to pick a word from the bowl. The other students have to ask them questions to try and guess which word they had picked, but they can only answer ‘yes’ or ‘no’.
There are many other word games that you could play with your students. The unit on ‘Using games’ has more ideas. Games can be very motivating and give students the opportunity to learn. Often they do not realise that they are learning as it is good fun. Word games provide a good opportunity for students to talk about science. This will help their understanding. You can find more information in Resource 2, 'Talk for learning'.
If your students are finding it difficult to pronounce scientific words, you could always encourage them to practise and record themselves on a mobile phone. They could listen to each other's recording and provide feedback.
5 Writing in science
It is likely that most of the writing that students do is copying from the blackboard or the textbook, or writing down notes that you have dictated. They will also write down the answers to questions. This is clearly important as you want your students to have a record of the things they need to know for the exams.
However, giving your students the opportunity to write about science in their own words will be very helpful to them and for you, too. It will give them the chance to formulate ideas for themselves and it will tell you about their level of understanding.
Writing frames can help to support students’ thinking if they are not used to writing freely on their own. Starting off an activity with a blank page can be very daunting even for the most confident students. A writing frame is a template that structures and guides your students through a particular activity. They are easy to construct but you can find an example at the end of this unit. If you have access to the web, there are many examples on the internet. You can make writing frames easier or harder to match the needs of lower or higher-attaining students.
Pause for thought
|
Activity 3: Using a writing frame
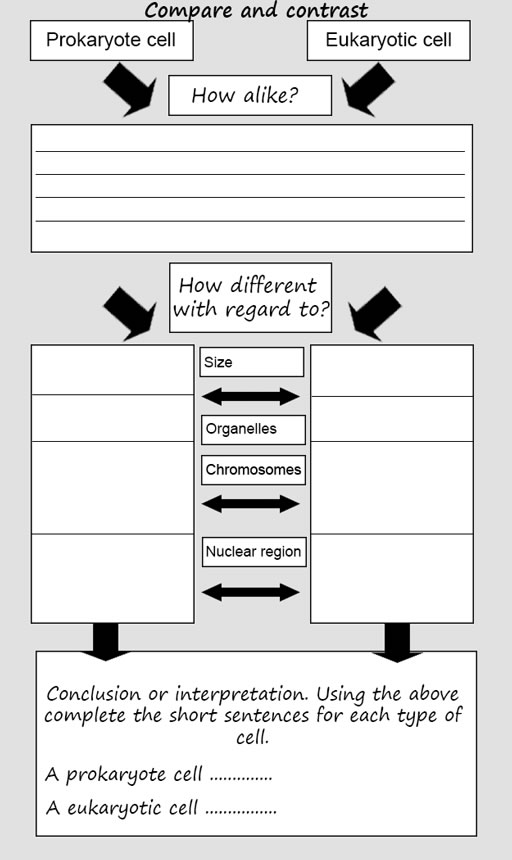
This activity is for you to do with your class. It gives you and your students the time to practice using a simple writing frame. The context is a ‘compare and contrast’ activity based on two important types of cells from the cells chapter.
- Tell your students that they are going to compare and contrast a prokaryotic ell and a eukaryotic cell.
- Copy the writing frame in Resource 2 onto the blackboard.
- Do your normal teaching explanation of prokaryotic cell and a eukaryotic cell.
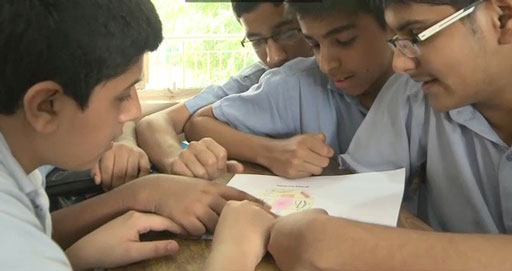
- Group your students into threes. Ask them to copy the writing frame from the blackboard onto a piece of blank paper.
- Allow them five minutes talking time then ask them to complete the writing frame.
- Ask nearby groups to swap writing frames with each other. Allow five minutes of discussion of each other’s work.
- Finally take some feedback on whether your students found this a helpful exercise to learn about the two types of cells and then to write about them. Were any key words used?
This activity used a simple but effective writing frame. For the next topic, try to develop your own writing frames. You can share ideas for writing frames with other teachers in your school or cluster.
6 Summary
Language can create a barrier to learning and it is important that you help your students to access the words that they need to know in order to be able to understand the scientific concepts. This is the case in all the topics that you need to teach.
It is the constant use and repetition of the words that is most important, so speaking, reading and writing activities will all help to build your students’ understanding of key words.
Identify two techniques or strategies that you have learned in this unit that you might use in your classroom in the next topic you are going to teach.
Resources
Resource 1: Common word roots and stems used in science
Table R1.1 Common word roots and stems used in science.
Prefix ab– adipo– alb– amphi–/amp– andr– angio– ante– anthropo– anti– aqua– arbor– arthro– aster– audi– auto– bi– bio– bronch– card– carn– cell– cephalo– chlor– chrom– chron– coel– com–/con–/co– Prefix contra– cran– cyt– de– deca– derm– |
Meaning away from fat white of both kinds male vessel (blood) before humans against water tree jointed star hear, sound self two, twice life, living windpipe (lungs) heart meat storeroom head green color time hollow with, together Meaning against head cell from, away ten skin |
Prefix den– di– dia– dis–/dif– e–/ef–/ex– echin– ect– en– encephal– epi– extra– gastro– gene– geo– glottis– gymno– hepato– hetero– hiber– homo– hydro– hyper– hypo– inter– intra– ichty– immunis– Prefix leuc– lith– luna– macro– meta– micro– |
Meaning tooth two, double through, across apart from, deprive out, out of, from spiny outside in brain on, above outside, beyond stomach origin, birth earth mouth of windpipe uncovered liver different winter same, alike water over, above below, under, less between within, during, inside fish free Meaning white stone moon large change small |
Prefix mono– multi– morph– neo– non– neur– oculo– odont– olf– omni– opthal– oss–/ost– phag– photo– plasm– pneumo– pre– prot–/proto– pseudo– retro– rota– rupt– sub– super–/sur– tele– therm– Prefix trans– tri– trop– ventr– uni– zo– |
Meaning single many form new not nerve eye tooth smell all eye bone eat light form lungs before first fake, false backward, back turn, wheel break, burst under, beneath above, upon at a distance temperature Meaning across, beyond three turning belly one ani |
Suffix –able/–ible –algia –ectomy –graph –ism –itis –meter –ology/–logy –phyll –pod/–ped –scope –sect –sperm |
Meaning able to, capable of pain cut out instrument for making records act of, condition inflammation (swelling) or disease measure study of, science of leaf foot, feet look, observe cut seed |
Resource 2: Talk for learning
Why talk for learning is important
Talk is a part of human development that helps us to think, learn and make sense of the world. People use language as a tool for developing reasoning, knowledge and understanding. Therefore, encouraging students to talk as part of their learning experiences will mean that their educational progress is enhanced. Talking about the ideas being learnt means that:
- those ideas are explored
- reasoning is developed and organised
- as such, students learn more.
In a classroom there are different ways to use student talk, ranging from rote repetition to higher-order discussions.
Traditionally, teacher talk was dominant and was more valued than students’ talk or knowledge. However, using talk for learning involves planning lessons so that students can talk more and learn more in a way that makes connections with their prior experience. It is much more than a question and answer session between the teacher and their students, in that the students’ own language, ideas, reasoning and interests are given more time. Most of us want to talk to someone about a difficult issue or in order to find out something, and teachers can build on this instinct with well-planned activities.
Planning talk for learning activities in the classroom
Planning talking activities is not just for literacy and vocabulary lessons; it is also part of planning mathematics and science work and other topics. It can be planned into whole class, pair or groupwork, outdoor activities, role play-based activities, writing, reading, practical investigations, and creative work.
Even young students with limited literacy and numeracy skills can demonstrate higher-order thinking skills if the task is designed to build on their prior experience and is enjoyable. For example, students can make predictions about a story, an animal or a shape from photos, drawings or real objects. Students can list suggestions and possible solutions about problems to a puppet or character in a role play.
Plan the lesson around what you want the students to learn and think about, as well as what type of talk you want students to develop. Some types of talk are exploratory, for example: ‘What could happen next?’, ‘Have we seen this before?’, ‘What could this be?’ or ‘Why do you think that is?’ Other types of talk are more analytical, for example weighing up ideas, evidence or suggestions.
Try to make it interesting, enjoyable and possible for all students to participate in dialogue. Students need to be comfortable and feel safe in expressing views and exploring ideas without fear of ridicule or being made to feel they are getting it wrong.
Building on students’ talk
Talk for learning gives teachers opportunities to:
- listen to what students say
- appreciate and build on students’ ideas
- encourage the students to take it further.
Not all responses have to be written or formally assessed, because developing ideas through talk is a valuable part of learning. You should use their experiences and ideas as much as possible to make their learning feel relevant. The best student talk is exploratory, which means that the students explore and challenge one another’s ideas so that they can become confident about their responses. Groups talking together should be encouraged not to just accept an answer, whoever gives it. You can model challenging thinking in a whole class setting through your use of probing questions like ‘Why?’, ‘How did you decide that?’ or ‘Can you see any problems with that solution?’ You can walk around the classroom listening to groups of students and extending their thinking by asking such questions.
Your students will be encouraged if their talk, ideas and experiences are valued and appreciated. Praise your students for their behaviour when talking, listening carefully, questioning one another, and learning not to interrupt. Be aware of members of the class who are marginalised and think about how you can ensure that they are included. It may take some time to establish ways of working that allow all students to participate fully.
Encourage students to ask questions themselves
Develop a climate in your classroom where good challenging questions are asked and where students’ ideas are respected and praised. Students will not ask questions if they are afraid of how they will be received or if they think their ideas are not valued. Inviting students to ask the questions encourages them to show curiosity, asks them to think in a different way about their learning and helps you to understand their point of view.
You could plan some regular group or pair work, or perhaps a ‘student question time’ so that students can raise queries or ask for clarification. You could:
- entitle a section of your lesson ‘Hands up if you have a question’
- put a student in the hot-seat and encourage the other students to question that student as if they were a character, e.g. Pythagoras or Mirabai
- play a ‘Tell Me More’ game in pairs or small groups
- give students a question grid with who/what/where/when/why questions to practise basic enquiry
- give the students some data (such as the data available from the World Data Bank, e.g. the percentage of children in full-time education or exclusive breastfeeding rates for different countries), and ask them to think of questions you could ask about this data
- design a question wall listing the students’ questions of the week.
You may be pleasantly surprised at the level of interest and thinking that you see when students are freer to ask and answer questions that come from them. As students learn how to communicate more clearly and accurately, they not only increase their oral and written vocabulary, but they also develop new knowledge and skills.
Resource 3: Writing frame for Activity 3
Additional resources
- A searchable online science dictionary that has various other useful science resources, including an online science magazine for students: http://worldofscience.in/ dictonary.aspx (accessed 20 May 2014)
- Resources on diffusion and osmosis (including ribosomes, eukaryotes and prokaryotes): https://www.khanacademy.org/ science/ biology (accessed 20 May 2014)
- An OpenLearn unit, A tour of the cell: http://www.open.edu/ openlearn/ science-maths-technology/ science/ tour-the-cell/ content-section-0 (accessed 20 May 2014)
- Multiple podcasts and video animations of various aspects of the cell. Some resources require a subscription, but the animations and podcasts are free: http://www.neok12.com/ (accessed 20 May 2014)
- A complete set of resources for the practical teaching of osmosis including annotated student work: http://resources.edb.gov.hk/ gifted/ tr/ 200707-05034-S1S2/ P.2.html (accessed 20 May 2014)
- Building a model of a cell: http://www.raftbayarea.org/ ideas/ Animal%20Cells.pdf (accessed 20 May 2014)
References
Acknowledgements
Except for third party materials and otherwise stated, this content is made available under a Creative Commons Attribution–ShareAlike licence: http://creativecommons.org/ licenses/ by-sa/ 3.0/. The material acknowledged below is Proprietary and used under licence, and not subject to Creative Commons Licence. This means that this material cannot be re-used without permission from rights-holders in subsequent OER versions. This includes the use of the TESS–India, OU and UKAID logos.
Grateful acknowledgement is made to the following sources for permission to reproduce material in this unit:
Resource 1: adapted from ‘Language of science’ (http://teachers.sduhsd.k12.ca.us/ wslijk/ documents/ LanguageofScience.doc).
Every effort has been made to contact copyright owners. If any have been inadvertently overlooked, the publishers will be pleased to make the necessary arrangements at the first opportunity.