Use 'Print preview' to check the number of pages and printer settings.
Print functionality varies between browsers.
Printable page generated Monday, 29 June 2026, 12:13 AM
TI-AIE: Building mental models: teaching carbon and its compounds to Class X
What this unit is about
Science is often described as a ‘hard’ subject. By the time students in secondary school approach public examinations, success in science depends on the ability to handle abstract concepts and models as well as being, numerate, literate and able to recall a body of factual knowledge. Teachers help students to improve their understanding by providing structured experiences that help students to develop increasingly sophisticated mental models, moving from concrete to abstract.
Physical models use real objects to represent parts of a system. Mental models are also representations of systems and processes, but are usually more abstract than physical models. They are schematic rather than concrete, and often use diagrams and equations. The Class X textbook chapter, ‘Carbon and its compounds’, introduces students to different ways of representing molecular structures. If students are to become proficient in their understanding of the topic, they need to make effective use of mental models of molecular structures. All models have their strengths and limitations, and students need to be aware of the strengths and limitations of the models that they use.
In this unit the focus will be on helping your students to develop mental models in the context of carbon and its compounds. What you learn about developing mental models will also be applicable to other topics.
What you can learn in this unit
- About some of the aspects of carbon chemistry that students often find challenging.
- How developing appropriate mental models is an important part of learning about carbon compounds.
- How you can use physical models to support the development of mental models when teaching about carbon and its compounds .
Why this approach is important
The study of carbon compounds is something that many students find challenging. There is a lot of new terminology to learn, and success depends on the ability to relate the properties of compounds to their molecular structure. Students have to retain and manipulate mental models to represent chemical reactions and they have to think about the molecular structure of the reactants.
As in the rest of science, when students learn about carbon and its compounds they need to start from concrete experiences and prior learning. They need to be supported in developing increasingly abstract approaches – the activities and case studies in this unit will you provide that support. Initially, you might show your students some three-dimensional molecular models, but they will still have to make the connection between real three-dimensional molecular structures and two-dimensional diagrams that represent the same structure. Students have to learn the conventions of these diagrams but also have to remember what is not shown by the diagrams but is still relevant to the chemistry of the situation.
1 Using different types of models to represent carbon compounds
When students learn to use electron dot structures to represent carbon compounds, these diagrams relate a molecular formula such as CH4 or C2H6 to the number of covalent bonds available as a consequence of the number of valence electrons for each kind of atom.
Once this concept is established, electron dot structures are not a convenient way to represent anything other than the simplest molecules, as large numbers of circles and dots can become a distraction: it will be a useful approach again when students need to learn about reaction mechanisms, but for now the model has served its purpose and students begin to use diagrams of molecular structure which represent each covalent bond by a single line.
Both of these models identify the numbers of bonds in a molecule, but they do not convey information about the true shape of the molecules, or that parts of molecules are able to rotate relative to each other. Students have previously learnt that particles in a gas are in rapid motion relative to each other, but have treated the molecules as simple spheres in rapid motion. Those who go on to study chemistry further will learn about infra-red spectroscopy and will relate spectral features to rotation and vibration around particular bonds within molecules. Class X students are still building their use of mental models, however, as a first step they need to recognise that the diagrams they have been using are two-dimensional representations of three-dimensional molecular structures.
One of the problems for students in learning about carbon compounds is that they sometimes treat a diagram of structure too literally. For example, when they are asked to work out structural isomers for a given formula, many students cannot see that some of the structures that they have drawn are equivalent. It is much easier to do this once students have seen a physical model of the molecule and have seen the effect of rotating it.
[If you have access to computer applications that allow students to generate molecular structures and see them rotating, this would also be very useful.]
Pause for thought
|

Case Study 1: Comparing molecular models to diagrams
Mrs Gupta constructed some molecular models and compared these to diagrams of the structures.
I wanted to teach about functional groups, and from past experience, I knew that many of my students would find it difficult to see that certain substitution positions are actually equivalent, if I only relied on using diagrams of the structure. I decided to use molecular models to help my students review what they already knew about alkanes in order to prepare for learning about functional groups. At the same time, I wanted to remind my class that the diagrams in the textbook are only one way of representing a molecule’s structure. Using the physical models would help them to realise some of the limitations of using diagrams.
Before the lesson, I constructed a model of a methane molecule and of a hexane molecule. I kept the hexane molecule out of sight and began the lesson by showing the model of a methane molecule to my class. I told them it was a molecular model of methane and asked them what they noticed about it. They told me they could see four white balls attached to a black ball by plastic rods. They said that the four white balls must be hydrogen atoms, the black ball must be a carbon atom and the rods must be the bonds, like the lines in the diagrams.
Next, I told them all to look at Table 4.2 in the textbook and asked, ‘What is different about the model from what you can see in the table?’ Nobody answered. ‘Look at the angles’, I said. ‘Can you see any right angles? Is the molecule flat?’ Now they knew what to look for, of course they could see that the model was not flat, but formed a tetrahedron with all the hydrogen atoms as far away from each other as possible.
I got out the other model that I had made before the lesson. I told one of my students, ‘Count how many carbon atoms there are and how many hydrogen atoms, then tell the rest of the class.’ Then I asked what they thought it must be. They identified it as hexane, because there were six carbon atoms.
We looked again at the two models and compared them to the diagrams in the table. This time, my students were ready to tell me that these molecular models were certainly not flat, and in fact were beginning to look a bit wiggly. The ‘spine’ of the molecule was not straight; the carbon atoms at each could rotate around, so the hydrogen atoms and their bonds were like propellers on a boat or plane.
I passed the methane model to a student and asked him to turn it into a butane molecule. At the same time, I passed the hexane model to a student and told her to turn it into another model of a butane molecule.
So I then had two identical butane molecules. I explained that it was possible to make a new carbon compound by replacing one of the hydrogen atoms by a chlorine atom and that we would represent the chlorine atom in the models by using a green ball with one link point. I gave a ‘butane molecule’ and a ‘chlorine atom’ to two students and asked them to make a new molecule.
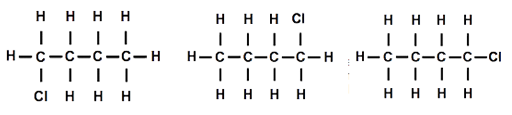
Both students had replaced a hydrogen atom on one end of the molecule. I held both models up for everyone to see ‘Are they the same or different?’ I asked. As one hydrogen seemed to be at the opposite end from the other hydrogen, everyone thought they must be different, but as I rotated the molecules around the ‘spine’ of the molecule, then end over end and then made the ends of the molecule rotate, they began to see that the molecules were actually the same. I drew three diagrams of the structure that looked different but actually represented the same molecular structure [Figure 2].
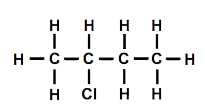
I asked my students how I could make one of the molecules different from the other. After a few moments thought, someone suggested that replacing a hydrogen connected to a carbon in the middle of the chain should make a different molecule. I drew a diagram of the structure [Figure 3].
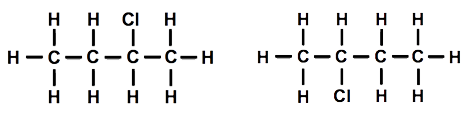
Then one student suggested that we could move the chlorine atom to another carbon atom. We tried this out, and it was indeed different. Using the other model and moving the chlorine atom so that it was attached to one of the carbon atoms in the middle, we also established that it was impossible to tell middle carbon atoms apart once the model was rotated, even though the diagrams might look different [Figure 4].
Even though I only have one modelling kit, I think using it with my students helped them to understand the relationship between the physical models and the diagrams in the book. Now that I’ve used the models in my lessons, I might organise my students into groups and let each group have a turn at building with the modelling kit.
Activity 1: Building models
This activity will help you to develop your planning and in-class teaching.
You will need a molecular modelling kit for this activity (either a ‘ball and stick’ type or a ‘space-filling’ type). Alternatively, you can use toothpicks and modelling clay to represent bonds and atoms.
Look at Section 4.2.2 in the Class X textbook.
Figures 4.8a, 4.8b and 4.9 show the carbon skeleton of a molecule and then the complete molecule.
- In what way does showing the skeleton first help students understand the structure of the molecules?
- What features would you draw attention to in discussing these diagrams with your students?
- What do the diagrams suggest about the branched structure?
Now create models for each of the structures shown in Figures 4.8a, 4.8b and 4.9. Compare these models to the related diagrams in the textbook.
- In what ways are they similar?
- In what ways are they different?
- What features would you draw attention to on these models, if you were to show them to your class? How would you do this?
2 Using mental models to generalise and predict
One of the wonderful things about carbon chemistry is the myriad of compounds that are possible. The huge number of different compounds would be very difficult to study if we had to learn about each compound individually. Fortunately, it is possible to organise compounds into groups sharing common structural features and common chemical properties. The simplest example of these is the alkanes, which can all be represented by a common formula CnH2n+2. Once we recognise common features we can start to make predictions about how compounds in a particular family will behave based on what we know about the behaviour of one or two members of the family and about the effect of differences such as the mass of the molecule.
In order to generalise and make predictions about carbon compounds, your students will learn to apply the concepts of a homologous series and functional groups.
The first mental model they will have to build is that every member of a homologous series shares the same general molecular formula, such as CnH2n+2 for alkanes or CnH2n for alkenes. For each of these series, adding a –CH2 unit to a molecule will produce the next molecule in the series.
The next mental model that your students need, is that you can replace one of the hydrogen atoms attached to a carbon atom by something else called a functional group such as a chlorine or bromine atom, or one of the other groups shown in Tables 4.3 or 4.4 in the textbook. The chemical properties of the new compound will depend on what functional group you use to replace a hydrogen atom.
Combining these two models allows your students to produce a homologous series of alcohols, carboxylic acids or other chemical families, such as those shown in Table 4.4. Every compound in a homologous series will have similar chemical properties to all the other compounds in the series.
These can be difficult concepts for students to understand, it is wise to try to introduce the content in small ‘chunks’, a small amount of new information in each lesson so that students have time to process the information and see patterns.
Case Study 2: Teaching homologous series through diagrams and mental models
Mr Bulsara used diagrams and mental models to teach about homologous series.
I decided to introduce the idea of homologous series to my students as a ‘spot the connection’ game. I asked everyone to close their textbook and I began by writing the molecular formula for methane, ethane and propane on the blackboard:
CH4 C2H6 C3H8
I asked my students, ‘Predict the next two items in the sequence and tell me how you worked it out.’
They told me that the next two items would be C4H10 and C5H12, and that each time you had to add one C and two Hs.
Then I asked, ‘Work out what the answer should be if it started with C10, and to explain how they arrived at the answer.’ I asked them to discuss the answer in pairs, before I chose someone to reply.
Ravi told me that the answer should be C10H22, and one of my students said that whatever number you had for C, you should double it and add 2 to get the number for H. I wrote this down as CnH2n+2, then told them that this was a general formula for the family known as the alkanes. A family like this is also called a homologous series.
I also wanted my students to relate what they had just discussed to the structural diagrams for molecules in these two series, as they would need to recognise both ways of representing the same molecule.
I provided the structural diagrams for CH4 and C2H6 and asked everyone to draw diagrams for C4H10 and C5H12. As they already understood the rules of the homologous series, everyone managed this easily.
I suggested that next time they visited an internet café, they should find some images of carbon molecules so they could see some of the different ways of representing them.
Activity 2: Extending the models with functional groups
This activity will help you to develop your planning and in-class teaching.
Look at the list of functional groups in Table 4.4 in the Class X textbook. It shows the effect of substituting the functional group for one or more hydrogen atoms on a propane molecule.
- If you were to use the approach in Case Study 1 for teaching the homologous series for alkenes, what would be the key feature to look out for when you start using structural diagrams? How will you know if your students have the correct metal model for this series?
- Why is it helpful to use propane as the starting structure to be modified in all the examples in the table?
- Another way of helping your students to become familiar with homologous series for different functional groups is to provide a pack of cards, each with a different diagram of molecular structure drawn on it, and tell your students to sort the cards into different homologous series as quickly as possible. If you wanted to work on recognition of alcohols, aldehydes, ketones and carboxylic acids, you would include examples with different chain lengths for each of these functional groups. What mental model would you expect your students to have to distinguish:
- alcohols from carboxylic acids?
- aldehydes from ketones?
- aldehydes from carboxylic acids?
Read Resource 1, ‘Planning lessons’, for more information.
3 Returning to different models to help understanding
In learning about carbon and its compounds, your students use a range of ways of representing information about molecules. One recurring model is the electron dot structure model resulting from carbon having four valence electrons. Structural diagrams are another way of encapsulating the same information about ‘where the bonds are?’. Every time a new type of compound or reaction is introduced, students need to go back to one or more models of molecular structure, to refresh, recall recent concepts and to scaffold a new understanding.
For a great deal of the time, one or both of these two-dimensional approaches may be sufficient for your students, but occasionally it will be helpful to remind your students of the three-dimensional nature of the molecules by using physical models.
When learning about soaps and detergents, your students may be puzzled why the structures called micelles are shown as zig-zags with a Na+ on one end. Why a zig-zag? Well, it’s a convention. Yes, but why this convention? Using physical models of alkanes with increasing numbers of carbon atoms makes it very evident that the ‘spine’ of a carbon compound is more like a zig-zag than a straight line.
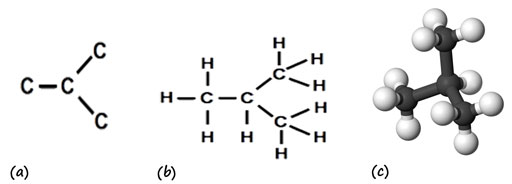
Using physical models can help to remind students that diagrams only represent some aspects of a molecule’s structure, but can be actively misleading. The diagram of the branched structure for C4H10 in Figure 4.8 in the textbook and the related carbon skeleton in Figure 4.7 suggests that two of the carbon atoms are closer together, for example, whereas a physical model would show that the skeleton is a tetrahedral structure with rotational symmetry about more than one axis (Figure 5).
Sometimes, a combination of approaches is useful to help students to understand what is happening in a reaction. For example, students learn that one of the reactions of ethanoic acid is with an alcohol to produce an ester and water. There are several ways that you could examine this reaction with your students:
- Generalisation and prediction. This reaction is an example of esterification. As ethanoic acid is one of a homologous series of carboxylic acids, the reaction will always produce an ester plus water (Table 1).
| Reactants | Products |
|---|---|
CH3COOH + CH3CH2OH (ethanoic acid) (ethanol) |
CH3COOCH2CH3 + H2O (ester) (water) |
CH3CH2COOH + CH3CH2OH (propanoic acid) (ethanol) |
CH3CH2COOCH2CH3 + H2O (ester) (water) |
- Examining the reaction by using diagrams of the molecular structures (Figure 6).
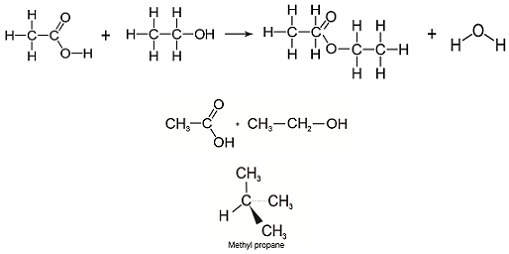
Using this approach can help to make it more clear what the molecular structures are.
- Focusing on the functional groups, the oxygen of the alcohol functional group attaches to the carbon of the carboxylic acid group (Figure 7).
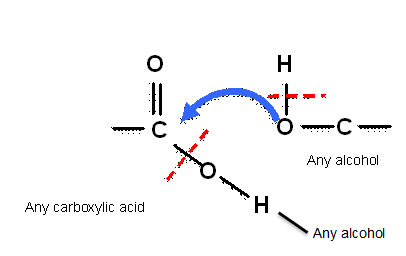
This is a more abstract approach, but shows ‘where’ the reaction happens and emphasises that the rest of the reactant molecule is unchanged.
- Using physical models of the reactants, then demonstrating how these molecules combine to produce the product molecules. This makes it clear that the hydrogen is lost from the alcohol functional group and combines with the –OH group from the carboxylic acid to make water. For some students, seeing the reaction happen using models may help them to remember the process.
Each of these models provides a different way of viewing the same event.
Pause for thought
|
Activity 3: Teaching the chemical properties of carbon compounds
This activity will help you to develop your planning and in-class teaching about the chemical properties of carbon compounds. You may find it useful to carry out this activity as a discussion with a colleague.
- Identify one aspect or section of the topic that your students are likely to find difficult.
- What are the key concepts that you want your students to remember about this section?
- What mental models or concepts do your students need to draw on in order to understand it? Which of these have students met and used before?
- Do you need to help them develop any additional mental models?
- How will you present this to your students?
- Will you use electron dot models, diagrams of molecular structures or physical models?
- What question will you use to direct your students’ attention to the important details?
- How can you increase student participation in the lesson?
- Can you ask your students to draw diagrams on the blackboard?
- And to explain reactions to your students?
- Could you ask your students to try to answer each other’s questions about this topic?
4 Summary
In this unit you have learned about some of the things that make carbon compounds a difficult topic, and how you can use different approaches to help your students to develop appropriate mental models.
Whatever topic you are teaching, it is important to use a range of approaches to help your students develop appropriate mental models. This unit has focussed on a small range of strategies. A key element in all of these is the use of questions to help your students to become aware of the features of the model they are using, including any possible limitations. It is also important to use these models to structure and reinforce the learning process, don’t try to introduce too many ideas in any one lesson.
Resources
Resource 1: Planning lessons
Why planning and preparing are important
Good lessons have to be planned. Planning helps to make your lessons clear and well-timed, meaning that students can be active and interested. Effective planning also includes some in-built flexibility so that teachers can respond to what they find out about their students’ learning as they teach. Working on a plan for a series of lessons involves knowing the students and their prior learning, what it means to progress through the curriculum, and finding the best resources and activities to help students learn.
Planning is a continual process to help you prepare both individual lessons as well as series of lessons, each one building on the last. The stages of lesson planning are:
- being clear about what your students need in order to make progress
- deciding how you are going to teach in a way that students will understand and how to maintain flexibility to respond to what you find
- looking back on how well the lesson went and what your students have learnt in order to plan for the future.
Planning a series of lessons
When you are following a curriculum, the first part of planning is working out how best to break up subjects and topics in the curriculum into sections or chunks. You need to consider the time available as well as ways for students to make progress and build up skills and knowledge gradually. Your experience or discussions with colleagues may tell you that one topic will take up four lessons, but another topic will only take two. You may be aware that you will want to return to that learning in different ways and at different times in future lessons, when other topics are covered or the subject is extended.
In all lesson plans you will need to be clear about:
- what you want the students to learn
- how you will introduce that learning
- what students will have to do and why.
You will want to make learning active and interesting so that students feel comfortable and curious. Consider what the students will be asked to do across the series of lessons so that you build in variety and interest, but also flexibility. Plan how you can check your students’ understanding as they progress through the series of lessons. Be prepared to be flexible if some areas take longer or are grasped quickly.
Preparing individual lessons
After you have planned the series of lessons, each individual lesson will have to be planned based on the progress that students have made up to that point. You know what the students should have learnt or should be able to do at the end of the series of lessons, but you may have needed to re-cap something unexpected or move on more quickly. Therefore each individual lesson must be planned so that all your students make progress and feel successful and included.
Within the lesson plan you should make sure that there is enough time for each of the activities and that any resources are ready, such as those for practical work or active groupwork. As part of planning materials for large classes you may need to plan different questions and activities for different groups.
When you are teaching new topics, you may need to make time to practise and talk through the ideas with other teachers so that you are confident.
Think of preparing your lessons in three parts. These parts are discussed below.
1 The introduction
At the start of a lesson, explain to the students what they will learn and do, so that everyone knows what is expected of them. Get the students interested in what they are about to learn by allowing them to share what they know already.
2 The main part of the lesson
Outline the content based on what students already know. You may decide to use local resources, new information or active methods including groupwork or problem solving. Identify the resources to use and the way that you will make use of your classroom space. Using a variety of activities, resources, and timings is an important part of lesson planning. If you use various methods and activities, you will reach more students, because they will learn in different ways.
3 The end of the lesson to check on learning
Always allow time (either during or at the end of the lesson) to find out how much progress has been made. Checking does not always mean a test. Usually it will be quick and on the spot – such as planned questions or observing students presenting what they have learnt – but you must plan to be flexible and to make changes according to what you find out from the students’ responses.
A good way to end the lesson can be to return to the goals at the start and allowing time for the students to tell each other and you about their progress with that learning. Listening to the students will make sure you know what to plan for the next lesson.
Reviewing lessons
Look back over each lesson and keep a record of what you did, what your students learnt, what resources were used and how well it went so that you can make improvements or adjustments to your plans for subsequent lessons. For example, you may decide to:
- change or vary the activities
- prepare a range of open and closed questions
- have a follow-up session with students who need extra support.
Think about what you could have planned or done even better to help students learn.
Your lesson plans will inevitably change as you go through each lesson, because you cannot predict everything that will happen. Good planning will mean that you know what learning you want to happen and therefore you will be ready to respond flexibly to what you find out about your students’ actual learning.
Additional resources
- A set of molecular models that can be rotated http://www.creative-chemistry.org.uk/ molecules/ (accessed 21 May 2014)
- Information on practical activities to help teach chemical concepts: http://www.nuffieldfoundation.org/ practical-chemistry (accessed 21 May 2014)
- The ECLIPSE project has examples of students’ ideas about chemical concepts: http://www.educ.cam.ac.uk/ research/ projects/ eclipse/ (accessed 21 May 2014)
- Videos of preparation, properties and reactions: http://www.nationalstemcentre.org.uk/elibrary/ resource/4592/chemistry-captured-video-materials-for-teachers-of-chemistryand http://www.nationalstemcentre.org.uk/ elibrary/ resource/ 4910/ chemistry-captured-ii-video-materials-for-teachers-of-chemistry (both accessed 21 May 2014)
- Plastics and covalent chemical bonds: https://blossoms.mit.edu/videos/lessons/plastics_and_ covalent_chemical_bonds (accessed 21 May 2014)
References
Acknowledgements
This content is made available under a Creative Commons Attribution-ShareAlike licence (http://creativecommons.org/ licenses/ by-sa/ 3.0/), unless identified otherwise. The licence excludes the use of the TESS-India, OU and UKAID logos, which may only be used unadapted within the TESS-India project.
Every effort has been made to contact copyright owners. If any have been inadvertently overlooked the publishers will be pleased to make the necessary arrangements at the first opportunity.
Video (including video stills): thanks are extended to the teacher educators, headteachers, teachers and students across India who worked with The Open University in the productions.