Use 'Print preview' to check the number of pages and printer settings.
Print functionality varies between browsers.
Printable page generated Wednesday, 1 July 2026, 10:48 PM
TI-AIE: Practical work and investigations: teaching gravitation to Class IX
What this unit is about
Practical work is an important aspect of science education. It includes a range of activities and is also used for a range of purposes, such as:
- illustrating a concept or idea to help students generate arguments from evidence in the process of knowledge construction
- developing practical, manipulative laboratory skills and learning how to use science equipment such as a microscope
- developing observational skills, such as the structure of a cell or observing changes on heating a chemical
- developing specific science enquiry skills, such as devising suitable tests or examining evidence critically (in science investigations)
- developing experience and understanding of ‘the nature of science’ and how scientists work.
The National Curriculum Framework (NCERT, 2005) for science says that the science curriculum should encourage inventiveness and creativity, and that ‘inquiry skills should be supported and strengthened’ (p. 49). Practical work, and in particular investigative approaches to science, can help your students to learn about how scientists work and to develop their own enquiry skills.
This unit is about using practical approaches – particularly investigative practical approaches – to help students to learn about gravitation. The strategies and techniques that you will learn in this unit will apply to other topics as well.
What you can learn in this unit
- How group practical work can support student learning about gravitation.
- The importance of investigative approaches to practical work .
- How to plan for effective investigative work.
- How to evaluate the effectiveness of practical work.
Why this approach is important
Science is a practical subject. Although practical activities can help students to learn, careful planning is required to make sure that they are effective. Some practical activities may provide opportunities for students to practise standard procedures, but do not require or promote much thinking about scientific concepts or understanding of the nature of science, for example. This unit will help you to make sure that your students use practical activities as an opportunity to think about scientific ideas and processes, as well as learning practical skills.
Investigative practical work poses questions: ‘What factors affect …?’, ‘Is there a relationship between …?’, ‘What are the likely causes of …?’ In order to carry out an investigative task, students have to think about related science concepts and apply them, as well as using science skills and techniques.
The emphasis in this unit is on making sure that the practical work that you do is purposeful and supports learning about science and about how scientists work. It is important to plan practical work carefully so that it does not increase the time taken on a topic without increasing the learning.
1 What kind of practical work?
Effective practical work is practical work that leads to more effective learning. It is both ‘hands on’ and ‘minds on’. There are several broad types of practical work, each with its own benefits and planning issues:
- demonstration
- structured practical
- ‘rotating’ practical or ‘circus’ practical
- investigation
- problem solving.
With the exception of demonstrations, all the types of practical work involve students working in pairs or groups. Investigations and problem solving practicals give students the opportunity for independent, creative work, while structured practicals are good for becoming familiar with and practising standard techniques. Circus practicals can help reduce the need for equipment. You can find more about each type of practical work in Resource 1.
The choice of what kind of practical work to use depends on the purpose of the activity as well as on time and resource constraints. ‘Purpose’ or ‘what students should learn’ refers to the conceptual science knowledge or laboratory procedures. It also refers to investigative skills, presentation and communication skills, and group working skills: all skills need to be taught and practised.
It is useful to spend time teaching students a set of routines for carrying out group practical activities. This will enable students to spend relatively more time on the key purpose of the activity as they will know what is expected of them in a practical activity.
An effective group practical lesson depends on effective planning before the lesson; you need to select the best type of activity and also think about timing, organisation and what you will do during the practical activity.
For any activity, it is important to ask ‘What do I want students to learn?’ and ‘Where does the learning happen in this activity?’
Pause for thought
|
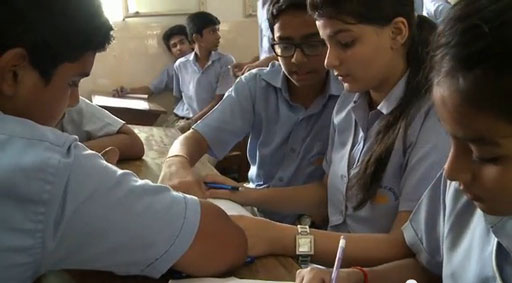
Case Study 1: Teaching gravitation and using activities
Mr Gupta decides to review his plans for Class IX practical activities on gravitation.
Previously, I have used demonstrations for most of the practical activities with Class IX. This year, I would like to introduce some different types of practical work into my lessons. The next topic will be gravitation, so I have decided to review the different activities in the Class IX gravitation chapter and decide which ones to keep as demonstrations and which ones might work better if I planned them as group practicals.
Three issues will affect my decisions:
- There are many students in Class IX and I do not have a lot of equipment.
- I have not done much group practical work before, and I am a bit worried that it may be difficult to control some of my students when they are working in groups.
- Whatever way I choose to plan an activity, my students must see the point of the activity quickly and not get distracted.
Today I made a table for all the practical activities in Chapter 10 [Table 1]. I filled in information about each activity, and my reasons for using a demonstration or a group practical activity:
| Activity | Key teaching points | Type of activity | Reasons and comments |
|---|---|---|---|
| 10.1 | Circular motion at a steady speed involves acceleration. For circular motion there must be a force on the object directed towards the centre of the circle. Without this force, the object moves in a straight line. Gravitational force keeps the Moon in orbit around the Earth, etc. | Teacher demonstration | Projectile hazard when the stone is released – too risky – I need to control this! Demonstration can be done quickly and will keep student’s attention |
| 10.2 | Gravitational force – objects fall back to earth when thrown upwards. Objects in freefall show constant acceleration towards the surface of the Earth | Teacher demonstration | Potential hazard/control issue – over-enthusiastic stone throwing! I need to do this |
| 10.3 | Effect of air resistance means paper does not fall as rapidly as a stone. But without air resistance, all objects fall at the same rate. | Demonstration by selected students for the air part, then teacher demonstration – or video clip of astronaut demo on the Moon if no vacuum pump available. You could download a clip onto your mobile phone and pass it around for all to see. | More motivating to get some students actively involved. |
| 10.4 | Need to push down on a bottle containing air to keep it underwater by overcoming buoyancy force from water. Upthrust – upward force on an object in a liquid | Group practical | More memorable and more fun if students experience the force themselves, But if they are over-excited then it could be a demonstration with student participation |
| 10.5 and 10.6 | Nail sinks in water but cork floats. If weight > upthrust force, object sinks. Upthrust depends on density of liquid and density of object; if object density > liquid density, object sinks | Demonstration with additional directed questioning | Potentially messy and students think they already know the answer. Quick demonstration with directed questions will give a chance to check their understanding of the forces involved |
| 10.7 | Apparent weight measured by a spring balance/extended spring/taut string decreases as object lowered into water – this is due to upthrust from the liquid | Group practical | Doesn’t need much equipment and worth letting students experience the effect on the spring/string/elastic band for themselves |
So I am planning to try group practicals instead of demonstrations for just two of the activities in this topic, but I am going to make more use of student helpers for some of the demonstrations.
Activity 1: Planning practical activities
This activity will help you to plan practical activities for your class.
Mr Gupta uses the textbook produced by the National Council of Educational Research and Training. Use your own textbook to make a table similar to the one that Mr Gupta made for the chapter on gravitation. Look at the range of practical activities that you could do. Use Resource 1 to make sure that you plan at least two different types of practical work. Keep this plan to use it as you teach gravitation.
Pause for thought What are your key issues when you plan for practical work? |
Obviously you need to think about the equipment that you have and how to improvise if necessary. However, you also need to think about how to organise your students into groups, what they will actually do and what they will learn by doing it. You can find out more in Resource 2, 'Planning lessons'.
Activity 2: Planning a structured practical
This activity will help you to plan for using practical work to help students learn about gravitation. You will need to refer to Resources 1 and 3.
In this activity you are going to plan for a structured practical.(For example, teaching about buoyancy using Activity 10.4 in the textbook.) The key teaching points for this activity are noted in Table 1.
Use Resource 1 to identify the key features and benefits of a structured practical. Then look at Resource 3. Use it to help you plan for doing this activity with your class, using the checklist below (Table 2). Some boxes have been partially filled in already.
| Issues and information | Action needed/notes | |
|---|---|---|
| What do I want students to learn? | ||
| Forward planning: what equipment do I need? | Access to sinks Bowls – big enough to immerse bottles Plastic bottles with screw tops |
Check there will be enough bowls or sinks for each group. Ask students to bring in a small plastic drinks bottle with a screw cap for lesson on … |
| Timing: how long should the practical activity take? How much time should I allow for setting up and putting away? | ||
| Groups: how big should they be? Who should be in each group? Where will each group work? | ||
| Safety: What are the potential problems? | Water splashes and spillages – slippery floor | Make sure students mop up any spillages straight away |
| Issues and information | Action needed/notes | |
|---|---|---|
| Where does the learning happen? What are the key things tor students to notice? | ||
| What information will my students need to know before they do the activity? Do I need to add any questions or information to the textbook activity? | ||
| What routines or standard procedures will my students need to carry out this activity? | ||
Now use this plan to help you carry out the practical activity with your students. Were all students involved in the activity? Were all the male and female students involved? Will you use these student groups next time?
2 Using an investigative approach in practical work on gravitation
Using an investigative approach can help your students to learn about the way in which scientists work. It will encourage them to ask questions and think about how they will test ideas. They also have to think about what they might expect to happen and why, and compare their results to their predictions.
Science teachers use investigations for a range of purposes, and different teachers will do investigations in different ways. There is no ‘right’ way to carry out investigations. You need to decide on the purpose and plan the activity to deliver the outcomes you want.
Investigations will usually include one or more of the following learning activities:
- raising questions
- planning
- making observations
- using practical skills
- analysing data and looking for patterns
- explaining and predicting.
Some investigations are relatively closed because there is an accepted view on what happens. Examples of this type of investigation include:
- ‘Investigate the effect of temperature on the rate of reaction.’
- ‘Investigating the relationship between the extension of a spring and the load (Hooke’s law).’
- ‘Determine the value of g using the period of a pendulum.’
In these investigations, some students may already know the results they are aiming for, but they will still need to engage with many of the learning activities in the list above.
In order to learn how scientists work, students need the opportunity to investigate something where the answer is not known. For example, they could investigate which popular drink is the most acidic. In this case, they would have to think carefully about how to conduct a fair test, what measurements to make and how they would decide which was the most acidic.
You can also make investigations more open by asking your students to identify the factors they will investigate rather than telling them what factors to investigate. The more open an investigation is, the more students have to think about what will happen based on their understanding of the underlying science, and about what their results show in relation to these predictions. Open-ended investigations might have questions like: ‘What might be the best way to …?’ or ‘How can I find out what is the most likely cause of …?’
If your students are used to being told what to do, you cannot expect them to know how to plan an investigation. You will need to build their investigative skills by introducing more opportunities for discussing aspects such as choice of procedure, or what results they might expect and how they will analyse their results.
The activities in the textbook are usually structured practicals rather than investigations. However, you could adapt some of the activities to make them more like investigations and help your students develop investigative skills.
Case Study 2: Helping students to develop investigative skills
Mrs Bulsara discussed some strategies for developing investigative skills with colleagues at a local training session.
When I went to a training session last week, we discussed some things we might do during practical activities to help students to develop investigative skills.
The trainer gave each group of teachers two suggestions, and asked us to think how they might help our students. The two suggestions were as follows:
- When you are telling students about the practical activity they are going to do, ask them to predict what will happen and say why they think that.
- When students are working, ask them if their results are what they expected, and why.
We thought that asking for a prediction was helpful because it meant your students had to think about what they already know and relate it to this situation. If students make a prediction but can’t say why, then they haven’t understood something – so you need to help them.
We thought that the second suggestion was related to the first one, because you cannot be surprised by your results if you didn’t have some expectations of what they should be. If the result is something different from what you predicted, then you have to think what might be causing it. Maybe there was something odd with your procedure?
Next, we had to give two suggestions of our own. Here are our ideas:
- Before your students start any practical activity, ask them what they are going to measure or observe, why they are going to do that, and how they are going to do that. We thought this would be helpful because sometimes students just follow instructions step by step and don’t really think about the activity as a whole or why they are doing it in a particular way.
- When students are working, ask them if they have made enough measurements or observations yet. We thought this would be useful because students should have at least five measurements before they try to plot a graph of their results. Also, as they look at their results, they should be able to see if there is a trend emerging, or if some results look ‘odd’. This should mean they take some more measurements to check if the ‘odd’ reading was a mistake, or if there is something that is really happening that they need to look at more closely.
Pause for thought What suggestion would you make? |
Mrs Bulsara makes the point that you can help students develop investigative skills by thinking carefully about how to present the practical work that you would normally do, in a more thoughtful manner. In Activity 3 you will tackle a standard experiment in a more investigative way; in Case Study 3, Mr Raja sets his class an open-ended investigation and reflects on the results.
Activity 3: Adapting an activity
This activity will help you to develop your in-class practice in managing a student investigation.
In this activity you are going to start from the existing set of instructions and associated text for Activity 10.7 (Archimedes’ Principle) in the Class IX textbook. You will adapt the activity so that it is more investigative.
What is the purpose of doing this experiment? It is to help students to understand Archimedes’ Principle. The activity described here will still do this, but it will replace some instructions with questions, and try to extend your students’ thinking about thrust and pressure.
Write these instructions and questions on the blackboard:
- Take a piece of stone and tie it to one end of a rubber string or a spring balance. Hold the balance or the string so the stone is suspended. What is the reading on the balance or the length of the string?
- You are going to slowly dip the stone into a container of water. What do you think will happen to the reading on the balance or the length of the string? Why do you think this will happen?
- Dip the stone into the water and watch carefully what happens to the reading on the balance, or the length of the string. Record the new reading. Was it what you expected? What happens when the stone is fully immersed? How far as the level of the water risen? (This will tell you the volume of the stone.)
- Repeat the experiment for stones of different sizes. What is the connection between the volume of the stone and the change in the reading on the balance?
- Prediction with a reason: what would be the effect of lowering the stone into other liquids, such as oil or molasses?
- (Extension) Prediction and reason: suppose we placed the stone in a small dish, weighed the stone plus dish in and out of water, and then wrapped it tightly in foil or clay having the same mass as the dish before weighing it in and out of water. What would we observe?
Using different liquids should lead students to relate the change in extension (and hence apparent change in weight) to change in upthrust from different densities of liquid: the greater the density of the liquid, the more upthrust it provides when displaced.
The last point should allow students to find out that increasing the volume displaced (by putting the stone into a dish) increases the apparent weight loss. The upthrust is greater as more water is displaced.
Case Study 3: An investigation in class
Mrs Bulsara runs an investigation with her students.
Having attended a training session at the DIET, I was very keen to let my students do a proper investigation. I decided to do the helicopter investigation (see Resource 5).
First of all I made a simple helicopter. I stood on a chair and dropped it vertically. I asked Raki to time how long it took to fall. I then asked my students how we could make it fall faster. Someone suggested making the ‘wings’ smaller. Then I attached a paper clip and dropped it again. I explained that I wanted each group to think of something about the helicopter that they could change and then to investigate the effect of that change on the time it took to fall.
They worked in groups of six. Some groups made the wings progressively smaller, some added paper clips and one group made helicopters out of different types of paper. They had to decide how to measure the time and how to record their results. I asked each group to write a question to summarise what they were trying to find out.
Junta’s group realised that it was difficult to measure the time accurately so they made sure the same person did it every time and they took three measurements for each drop so they could work out the average time.
They got lots of readings very quickly so they had plenty of time to think about how to present the results and how to explain their conclusion.
My students really enjoyed the lesson and everyone was involved. When I thought about it afterwards, I realised that they had done lots of things that real scientists do. They had thought of a question to investigate, they had worked out how to make it a fair test, they had done trial runs in order to work out how best to manage the timing, they had decided how to record their results and they had written a conclusion. In other words they had discovered something that they didn’t already know.
I told each group, ‘Prepare a poster to describe what you have done and present it to the rest of the class.’ Finally I asked them how confident they were about their conclusion, what they had found difficult and how they could have improved the reliability of their results.
3 Evaluating the effectiveness of a practical activity
Pause for thought Think of two practical activities that have worked well with your students. What type of activity were they? What did you see that made you think they were particularly effective? |
This unit is about adapting the way you plan and carry out practical work to make it more effective. But how can you judge the effectiveness of a practical activity? Is an effective activity where:
- everyone is following a set of instructions and getting the expected results?
- everyone learns how to carry out a particular technique?
- students are surprised by what they observe and have to rethink their understanding of what is happening?
You can only judge the effectiveness of an activity against intended learning outcomes. The first step is to be clear about what you want from an activity, then decide what you will look for as evidence during or after the lesson.
Activity 4: Developing your planning and in-class practice
This activity will help you to develop your planning and in-class practice.
You will use a checklist to evaluate the effectiveness of an activity against intended learning outcomes in your lesson plan.
- Look at the activities in the Class IX textbook chapter on gravitation. Select one activity that you would like to work on.
- You will also need Resource 3. This includes a list of suggested key purposes or outcomes for an activity
- Think about how you intend to use your chosen activity as part of your teaching sequence for gravitation. What is its key purpose? What types of outcome or outcomes do you want from it? For example, is the key purpose to help recall, improve practical skills or evaluate evidence?
- For each key purpose or outcome, the checklist provides one or more questions to ask yourself. Before you add these to your lesson plan, you need to decide when you will get the evidence to answer the following questions:
- Will you observe as your students are working?
- Will you need to question students as they are working, or in a plenary session?
- Will you need to look at your students’ written work?
- Add these extra notes to your lesson plan.
- Carry out the activity using your modified plan.
- After the lesson, review your evidence. How effective do you think the activity was, based on your evidence? What would you change before you do this activity again?
4 Summary
In this unit, you have learnt about some of the ways in which group practical work can support learning about gravitation, and about the importance of investigative approaches. You have also learnt about strategies for making group practical work more effective. The focus has been on using and adapting existing practical activities; you could apply this approach to other Class IX or X topics. It is important to evaluate the effectiveness of each practical activity and to look for opportunities to try out different practical approaches.
Resources
Resource 1: Different types of practical work and their uses
Different types of practical work make different demands on teachers and students, and offer different benefits. Table R1.1 summarises the characteristics and benefits of some types of practical work. As the emphasis of this unit is on group practical work, ‘Demonstration’ is included solely for comparison.
| Type of practical work | What the teacher does/what the students do | Why choose this approach? What are the potential benefits? |
|---|---|---|
| Demonstration | Teacher carries out the practical as the students watch | For more hazardous or complex practical activities: allows greatest control Ensures students see correct procedures and intended results Where specialist equipment needed – reduces equipment demand Teacher can direct attention to chosen focus |
| Structured practical | Students work in groups All groups are doing the same thing at roughly the same time Teacher provides the instruction for them to follow and questions for them to answer Teacher circulates to manage the activity |
‘Hands on’ activity Good for learning and practising standard procedures Possibility for all students to be actively involved Possibility of students helping each other through group discussion |
| ‘Rotating’ or ‘circus’ practical | There are different activity stations around the room. There are as many groups of students as there are activity stations. Each group of students moves from one ‘station’ to another, and carries out the activity at each station The teacher manages the movement of groups around each of the stations |
Reduces the need for equipment As each activity is relatively short, this can inject some pace into the lesson |
| Investigation | Each group of students carries out the investigation The teacher manages the overall activity and circulates around the groups to provide support as necessary |
Potential for all students to be actively engaged Possibility of applying concepts and testing ideas Potential for more open-ended work Possibility for students to develop better understanding of scientific enquiry (in general, or specific aspects) |
| Problem solving | As for ‘Investigation’ | Potential for all students to be actively engaged Possibility of applying concepts and testing ideas Potential for more open-ended work |
Resource 2: Planning lessons
Why planning and preparing are important
Good lessons have to be planned. Planning helps to make your lessons clear and well-timed, meaning that students can be active and interested. Effective planning also includes some in-built flexibility so that teachers can respond to what they find out about their students’ learning as they teach. Working on a plan for a series of lessons involves knowing the students and their prior learning, what it means to progress through the curriculum, and finding the best resources and activities to help students learn.
Planning is a continual process to help you prepare both individual lessons as well as series of lessons, each one building on the last. The stages of lesson planning are:
- being clear about what your students need in order to make progress
- deciding how you are going to teach in a way that students will understand and how to maintain flexibility to respond to what you find
- looking back on how well the lesson went and what your students have learnt in order to plan for the future.
Planning a series of lessons
When you are following a curriculum, the first part of planning is working out how best to break up subjects and topics in the curriculum into sections or chunks. You need to consider the time available as well as ways for students to make progress and build up skills and knowledge gradually. Your experience or discussions with colleagues may tell you that one topic will take up four lessons, but another topic will only take two. You may be aware that you will want to return to that learning in different ways and at different times in future lessons, when other topics are covered or the subject is extended.
In all lesson plans you will need to be clear about:
- what you want the students to learn
- how you will introduce that learning
- what students will have to do and why.
You will want to make learning active and interesting so that students feel comfortable and curious. Consider what the students will be asked to do across the series of lessons so that you build in variety and interest, but also flexibility. Plan how you can check your students’ understanding as they progress through the series of lessons. Be prepared to be flexible if some areas take longer or are grasped quickly.
Preparing individual lessons
After you have planned the series of lessons, each individual lesson will have to be planned based on the progress that students have made up to that point. You know what the students should have learnt or should be able to do at the end of the series of lessons, but you may have needed to re-cap something unexpected or move on more quickly. Therefore each individual lesson must be planned so that all your students make progress and feel successful and included.
Within the lesson plan you should make sure that there is enough time for each of the activities and that any resources are ready, such as those for practical work or active groupwork. As part of planning materials for large classes you may need to plan different questions and activities for different groups.
When you are teaching new topics, you may need to make time to practise and talk through the ideas with other teachers so that you are confident.
Think of preparing your lessons in three parts. These parts are discussed below.
1 The introduction
At the start of a lesson, explain to the students what they will learn and do, so that everyone knows what is expected of them. Get the students interested in what they are about to learn by allowing them to share what they know already.
2 The main part of the lesson
Outline the content based on what students already know. You may decide to use local resources, new information or active methods including groupwork or problem solving. Identify the resources to use and the way that you will make use of your classroom space. Using a variety of activities, resources, and timings is an important part of lesson planning. If you use various methods and activities, you will reach more students, because they will learn in different ways.
3 The end of the lesson to check on learning
Always allow time (either during or at the end of the lesson) to find out how much progress has been made. Checking does not always mean a test. Usually it will be quick and on the spot – such as planned questions or observing students presenting what they have learnt – but you must plan to be flexible and to make changes according to what you find out from the students’ responses.
A good way to end the lesson can be to return to the goals at the start and allowing time for the students to tell each other and you about their progress with that learning. Listening to the students will make sure you know what to plan for the next lesson.
Reviewing lessons
Look back over each lesson and keep a record of what you did, what your students learnt, what resources were used and how well it went so that you can make improvements or adjustments to your plans for subsequent lessons. For example, you may decide to:
- change or vary the activities
- prepare a range of open and closed questions
- have a follow-up session with students who need extra support.
Think about what you could have planned or done even better to help students learn.
Your lesson plans will inevitably change as you go through each lesson, because you cannot predict everything that will happen. Good planning will mean that you know what learning you want to happen and therefore you will be ready to respond flexibly to what you find out about your students’ actual learning.
Resource 3: Planning issues for group practical activities
As with any effective lesson, effective practical work is all about good planning before the lesson and good management during it. Group practical activities present a number of challenges or issues for teachers and students. This resource considers some strategies for improving the effectiveness of group practical work.
Issue 1: Effective groups
In effective group work, everyone in the group knows what to do, understands the purpose of what they are doing and makes a positive contribution to the group’s work.
This means that everyone:
- has a significant role and knows how to carry out the role effectively
- contributes to the discussions and decision making (nobody is ‘sitting it out’ or simply copying what someone else says).
You can facilitate groups to function more effectively by:
- choosing a suitable group size for the activity, so everyone can be involved in group discussions and decisions
- identifying who will belong to each group
- identifying clearly what needs to be done (e.g. setting up equipment, taking measurements, recording measurements) so that group members can share out these responsibilities – some jobs may need several people doing them in the same group
- (if necessary) either assigning roles to each group member yourself or making someone in each group responsible for doing that
- checking how well each group works during the activity and praising examples of effective group work.
Bear in mind that in mixed groups, boys can often tend to seize control of the equipment and get the girls to do the recording and tidying up!
Issue 2: Safety
Carrying out a risk assessment is an essential part of planning for any practical activity. Where group work is involved, the planning has to take account not only of the intrinsic hazards associated with using particular chemicals, equipment or procedures, but also the effect of large numbers of students doing the activity. Aspects of planning for safe group practical work include the following:
- Identify all the likely hazards before the lesson. Make sure you have a plan for dealing with any accidents that do happen.
- Keep unnecessary movement around the room to a minimum. This reduces the risks of collision between people and equipment, and makes it easier for you to see what is going on.
- You can also reduce the risk of accidents by:
- establishing routines for working safely
- limiting the number of different activities going on simultaneously
- keeping the number of different chemicals needed to a minimum
- providing appropriate, small quantities of chemicals rather than giving students access to stock bottles.
- Make sure that your students know the correct, safe way to carry out a procedure before you let them use the procedure as part of an investigation. Include any likely hazards and how to deal with them.
- Make sure your students know what to do if during a practical activity they burn/scald/cut themselves, spill any chemicals or damage any equipment.
Use the starter to:
- ensure that students are aware of any specific safety aspects related to the activity
- demonstrate any procedure that students do not already use regularly.
Issue 3: Establishing routines for practical activities
Establishing some basic routines for practical activities reduces the amount of explanation you have to give, so students can concentrate on the practical activity itself. Types of routines might include the following:
- Getting ready for a practical activity: what to put away, what to take with you and where to go.
- Moving around safely.
- Setting up the practical activity: checking what is needed, collecting basic equipment, collecting specific items.
- Basic techniques: using a pipette, using a measuring cylinder, folding a filter paper or heating something in a beaker or test tube.
- Dealing with hot objects, spilt liquids or broken glass.
- Clearing away.
- ‘Attention, everybody!’ There are times when you will need to interrupt a practical activity. Whatever the reason, it is important that students know what is expected when you call for their attention.
Issue 4: Making best use of limited time and resources
Whatever type of group practical activity you have decided to use, don’t forget to allow time for a starter and plenary!
Students will be impatient to get on with the practical, but it is vital to take a few minutes to ensure that everyone knows what they are meant to be doing and why. It is also important to take time at the end of the session – when everything is cleared away – to spend a few minutes on a plenary session. Lots of different things will have been happening during the practical, and it is therefore especially important to help students to ‘pull it all together’ and refocus on the learning outcomes before they leave the room. The way you organise a practical activity can make a big difference to the resources you need to use. Two approaches that can reduce the amount resources needed are ‘circus practicals’ and ‘shared investigations’.
Approach 1: ‘Circuses’ or ‘rotating practicals’
‘Circuses’, or ‘rotating practicals’, offer a way of providing group practical activities without using many sets of equipment. In this type of practical there are several short activities. Each activity takes place at a different ‘station’, in a different part of the room. Each group visits each station, carries out the activity and moves on to another station. The simplest way is to have stations round the edge of the room and groups moving from one station clockwise round the room to get to the next one.
For this type of activity to work well, there are several things to consider in planning:
- Keep it focused: Use the circus to support a small number of key ideas effectively.
- Limit the number of stations: The more stations to visit, the longer the whole practical session will need, because moving around will take up more time.
- Smaller groups make it easier for students to feel involved: The number of groups needs to be the same as the number of practical stations you can provide. If you can run two complete, identical circuses, then you can halve the group size.
- Activities should prompt students to observe and think (and discuss!), not just manipulate equipment: Some stations in a circus could just be an object or image that serves as support for a question.
- Everyone needs to be clear about how the circus practical works: How long do they have at each station? How will you signal that it is time to stop and move on to the next station? Each group needs to know the order or sequence in which to visit stations: if it is not simply a question of (for example) moving clockwise to the next station, then you will need to identify each station with a number or letter and give each group a sequence list.
- Keep each activity simple, short and clear: When students arrive at a station, it must be clear what they have to do and what they need to find out. Do they need to record anything? How should they leave things for the next group?
- What should they do while they are waiting? Ideally, each station should take the same amount of time. In practice, some groups will complete an activity more quickly than others. Perhaps you could set the whole class a problem to think about and come up with suggestions at the end of the lesson.
Approach 2: Shared investigations
Where there are several factors to be investigated, it can save on time and resources if different groups take responsibility for investigating one particular aspect. Each group reports back to the whole class so that everyone can benefit from all the results.
Issue 5: ‘Hands on’ and ‘minds on’
The phrase ‘Hands on, minds on’ has often been used in relation to the design of interactive exhibits in museums, but it can also be applied to classroom-based activities. It refers to the importance of ensuring that students are not just ‘busy doing’ but also actively learning from the experience. For this to happen, students need to know the purpose of an activity as well as what they need to do.
Use the starter to:
- identify a maximum of four learning outcomes
- direct attention to key questions to ask or things to look out for during the practical activity
- help student relate what they are about to do to what they have already learnt about.
During the practical activity:
- check that students understand why they are doing something in relation to the underpinning science, not just procedurally
- ask students to make predictions (and explain them)
- ask students to comment on what they have observed or are observing – is it what they expected?
During the plenary:
- ask each group of students to summarise what they found out – whether it what they expected, or if they found anything odd or surprising.
Resource 4: Evaluating the effectiveness of a practical activity
Identify what the key purpose of a practical activity should be, then what you could do to check that. Some questions you might ask, depending on the purpose, are listed in Table R4.1.
Table R4.1 Questions to ask that evaluate and activity based on its purpose.
| Key purpose or outcome |
Some questions to ask yourself |
|---|---|
| Motivation | Did students seem engaged with the task? Did they tell you they enjoyed it? |
| Conceptual knowledge and understanding – improved recall | Could students tell you what they had seen, done or found out in the following lesson? |
| Conceptual knowledge and understanding – applying ideas | Could students apply ideas as intended during the investigation? |
| Practical skills | Could students set up the apparatus correctly? Could they carry out procedures as intended? Did students see what you intended them to see? |
| Learning about the nature of science or scientific inquiry | Could students tell you what they had learned? Did they understand the purpose of the investigation? |
| Develop scientific method skills – planning investigations | Did students understand what they were being asked to do? Were students able to produce a plan as intended? |
| Develop scientific method skills – handling data | Were students able to collect and present data as intended? Were they able to process the data as intended? |
| Develop scientific method skills – evaluating evidence | Could students evaluate the evidence as intended? Did they identify the key features as intended? Were students able to evaluate the investigation as intended? Could they identify what had gone well and areas for improvement? |
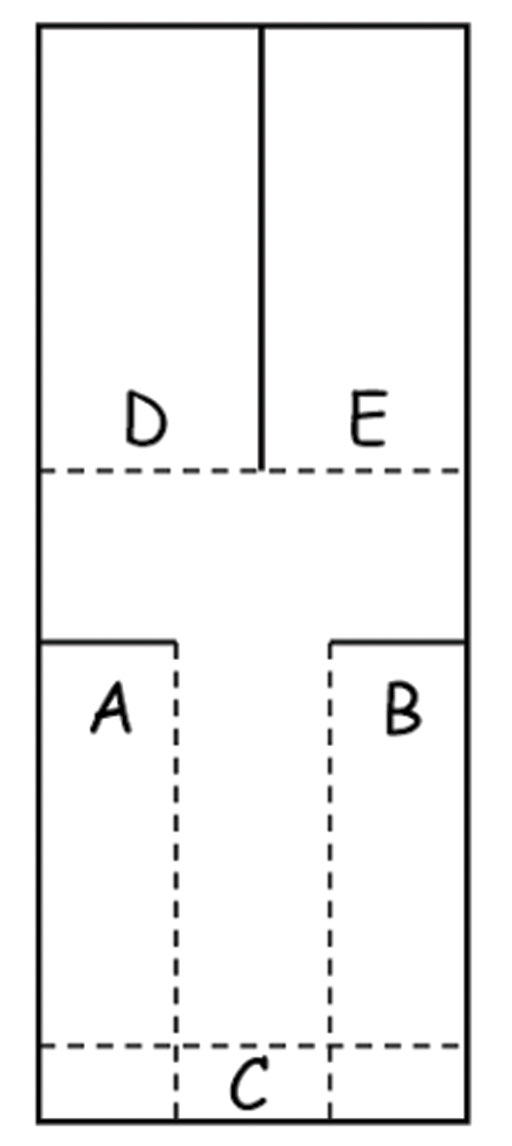
Resource 5: Template for paper helicopter
Additional resources
- Information on practical activities in physics for 11–19-year-olds: http://www.nuffieldfoundation.org/ practical-physics
- Practical work for learning: http://www.nuffieldfoundation.org/ practical-work-learning/ about-project
- ‘Gravity at work’: https://blossoms.mit.edu/ videos/ lessons/ gravity_work
- ‘Free fall’: https://blossoms.mit.edu/ videos/ lessons/ free_fall
References
Acknowledgements
This content is made available under a Creative Commons Attribution-ShareAlike licence (http://creativecommons.org/ licenses/ by-sa/ 3.0/), unless identified otherwise. The licence excludes the use of the TESS-India, OU and UKAID logos, which may only be used unadapted within the TESS-India project.
Every effort has been made to contact copyright owners. If any have been inadvertently overlooked the publishers will be pleased to make the necessary arrangements at the first opportunity.
Video (including video stills): thanks are extended to the teacher educators, headteachers, teachers and students across India who worked with The Open University in the productions.