Use 'Print preview' to check the number of pages and printer settings.
Print functionality varies between browsers.
Printable page generated Saturday, 13 June 2026, 3:50 PM
TI-AIE: Effective project work: sources of energy
What this unit is about
Project work is an active approach to teaching. It gives students the opportunity to explore a particular aspect of science in greater depth, in an extended and collaborative way. Project-based learning puts students at the centre of the learning process. Students learn by doing and they can become knowledge creators when they undertake project work – this is one of the aims of the NCF (2005). Project work in science also allows students to work as real scientists do.
Research suggests that students using project-based learning are likely to retain the knowledge they acquire for longer (Thomas, 2000). Other benefits are that it develops students’ information gathering and processing skills, presentation skills, confidence, and independence. In a competitive global world, these skills are very important.
This unit will introduce you to some teaching strategies that will enable you to undertake project work with your students with confidence. Managing project work well requires teachers to adopt a facilitative role. These strategies will give you practical support in being an effective facilitator.
The strategies are explained using examples from the Class X topic ‘sources of energy’, but these ideas can be used in other parts of the science curriculum.
What you can learn in this unit
- The benefits of developing your students’ project-based learning skills.
- How to successfully implement project-based work in your classroom .
- How to use assessment criteria to evaluate project work.
Why this approach is important
This approach is important because it gives students the opportunity to work independently. They will have to gather, process and structure information. They will have to make decisions about what information to include, what not to include and how to present the information. These are all skills that they will need when they leave school.
Projects also give your students the opportunity to become ‘experts’ in their chosen field. Projects can be used to provide gifted students with additional assignments and enrichment activities. This will give them confidence that will benefit their learning in science. The project should be based on a topic in the science curriculum, but it could include aspects of other topics within science. It could even be a cross -curricular project that incorporates aspects of mathematics or geography, or even English. In this way, project work can help your students to make connections between topics and therefore improve their overall understanding of science and its relevance to their lives.
Pause for thought In order to realise the benefits of project work, you will need to plan carefully. What do you think you could do in order ensure that the project work is a success? |
How you set up and introduce the project work is very important. For students to be motivated and engaged, they must be interested in the topic, so you need to offer them some choice of questions or titles for them to research for their project. The nature of the school curriculum means that you will want to focus the project work on one topic, but you need to be flexible about what they choose to research within that topic. The main benefits of project work are the skills and confidence that it will help your students to develop.
You also need to ensure that they have access to information and that they are clear about the expectations, such as how long the project should be and how their work will be assessed. The rest of this unit will help you to learn how to run project work successfully.
1 Launching project work
Getting off to a good start with a project is important. This section has two activities that will enable you to do this. The first involves organising an event to stimulate interest and the second involves organising your class to discuss possible questions that they could investigate.
Organising a launch event
Very often, the beginning of a project is just like a normal lesson: the teacher hands some papers or books out and tells the students that they are going to do a project. There are much more interesting and exciting ways to start a project with your students. An entry event for a project is a good idea, because it engages your students’ interest and starts them thinking in a critical and creative way.
Starting a project doesn’t have to be very complicated or involve lots of planning. It can be as simple as holding a lively class discussion, or giving your students a thought-provoking picture to look at. It could be asking them to listen to a radio programme or an audio file that you have downloaded. (You could use your mobile phone here if it can be connected to the internet.)
Entry events that would need more planning could include:
- a field trip to a local factory, building, college, habitat, etc.
- a guest speaker from the local community
- a video clip from YouTube or similar.
These type of entry events require more planning and preparation time, but they can have a much greater impact on the students. This leads to better project experiences for all concerned and more learning.
Activity 1: Plan a launch event for a ‘sources of energy’ project
This activity will help you to prepare and carry out a project launch event with your class.
Decide which of the suggested project entry events appeals to you, or think of an alternative entry event that would be equally effective. Plan how to use the entry event with your class to begin a project on sources of energy in an unusual and exciting way.
Whatever launch event you choose, remember that you are looking for something that is not what you would normally do with your class. It needs to be unusual and memorable for the students. Remember, at the end of the launch event you want your students to be full of enthusiasm for their projects.
Pause for thought
|
Deciding on a question for the project
Projects that are framed around questions will stimulate your students’ curiosity. A good question sums up the project in one clear, concise and compelling statement. It should be linked to your planned learning outcomes. Some example questions are:
- ‘Is it safe to drink river water?’
- ‘How can we reduce the pollution in the schoolyard pond?’
- ‘Why do you need tread on your shoes?’
- ‘Why do we need vaccinations?’
Or it can be about an abstract concept:
- ‘How can we better feed our growing population?’
- ‘Which is better: science or superstition?’
Activity 2 will help you develop a question for a project with your class. You could do this activity in order to start the project, or you could do it after a launch event.
Activity 2: Brainstorming a good question with your class for sources of energy
This activity is for you do to with your class. If you have not used brainstorming before with your class, you will find it helpful to look at the unit on brainstorming.
- Tell your class that they are going to begin a project related to the textbook chapter on sources of energy.
- Give your students 15 minutes to read the chapter carefully. Tell them that they must do this on their own.
- Arrange your students into groups of ten with mixed gender and ability. Prepare these groups in advance. Read out the student names for each group and allocate a place in the classroom for each group to sit. Allow the students moving time to get into their groups.
- Give each group a large piece of blank paper. Ask the group to nominate one scribe.
- Tell the scribe to write ‘Sources of energy’ in large writing in the middle of the paper.
- Tell the groups that they have ten minutes to brainstorm all the questions they can think of about sources of energy. They can use the textbook and what they already know about the topic.
- After ten minutes, ask each group to read through their questions. Ask each group to choose the two most real-life, interesting and challenging questions from their brainstorm that could form the basis of a project.
- Write the questions from each group on the blackboard.
Once you have a set of questions, what you do next will depend on whether you want your students to do the project in groups or on their own. They could be given the chance to select a question to investigate or think of another one, or you could ask them to vote for a question that they investigate.
2 Finding information
To do their project well, your students will need access to some resources. Typical resources for student projects include class textbooks, school library reference books and newspapers and magazines. Perhaps the most helpful resources can be found on the Internet or on CD-ROMs. These may not be available to you in your school, so you will have to try to find access for your students in the nearest town. Alternatively, you may be able to produce some basic key fact sheets for your students. Applications such as Google Earth could support a range of different projects.
For a good project you need to plan ahead. Starting several weeks before you intend to begin the project, start to collect information from newspapers, magazines and the internet. Create a folder that you can keep adding to for a few weeks. Enlist your students’ help too. Keep labelled project boxes in your classroom and encourage your students to fill them with materials that they come across that are relevant. Collaborate, share and swap with other teachers in your school. See if you can collaborate with more well-resourced schools – they may be willing to lend you textbooks from time to time.
If you have a friend or colleague who is an expert on the topic you have chosen, you could ask them some questions and record the conversation on your mobile phone. Your students could then listen to it and use some of the information in their project.
Keep student projects from each year – these can act as invaluable resources, providing scientific information for students in subsequent years. Previous years’ projects can be great wall decorations and will show your students what they are aiming for. (Assessment criteria will be discussed later in the unit.) Read Resource 1, ‘Using local resources’, to find out more.
3 Forming and managing project teams
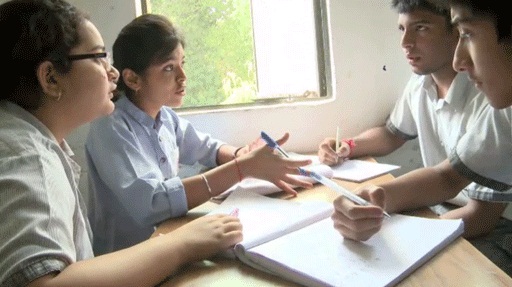
In order to develop their collaborative and social skills, projects are usually best done by students working in small groups (Figure 1), although they can be done in pairs or by individuals. Four students is the usual optimum number for a project team. In bigger groups, each individual student’s contribution can be very small and it is not meaningful for them; in smaller groups, there can be too much for each individual student to complete. But ultimately, you need to decide the group size based on your class size, the resources available and the nature of the project.
Mixed gender groups are generally better than same-sex groups if your students are used to working in this way. The same is true for mixed ability groups. Avoid putting students who do not cooperate in the same group. You might also want to think about where the students live. If you are expecting your students to work on the project outside school, it might be helpful to group students who live near to each other. You would want to make sure that students who have difficulties with reading or writing are grouped with students who are proficient with these skills. The best group will be one where the students’ skills complement each other and where the students support each other. You should decide the groups before the lesson and then read out the groups or pin up the group list on the classroom wall or noticeboard.
Teams work best when each student has a specific role. Roles should be based on the roles that would be needed in the real world to complete the project. You will need to give students suggestions for the roles such as leader, researcher or recorder. Alternatively, students could each work on gathering information on one aspect of the topic and then work together on analysing and presenting it.
Case Study 1: Teacher Samsana begins a project
Teacher Samsana organises her students into project teams.
I decided that Class X was going to work on the chapter on sources of energy as a project. It was ambitious because if they are all here, there are 80 students in the class. There is a good chapter in the textbook, but we are on the outskirts of a large city, so to get access to the internet, you have to go into the city to an internet café. I started collecting information in boxes in the classroom and asked my students to gather information too. I printed some information from the internet one weekend and put it in the boxes.
I organised my students into groups of four. I tried to mix up the girls and boys, and I tried to take account of where they lived and their friends. I mixed the low and higher attainers, making sure that the weakest students were in a group with a friend who could help them. It took me quite a while, and when they got going I had to swap a few students. But I did this quietly because I did not want them to think that they could all move groups! There were unequal numbers of girls and boys, so two girls ended up in groups with three other boys. There were not happy, so I ended up with a group of boys and put the two girls together. I think being flexible was important. I realised that organising groups for project work can be difficult. I will watch them carefully while they are working and try and notice who works well together.
4 Helping students manage their time effectively
Project work requires students to work in an independent way over an extended period. Unless they are used to it, your students will not be very good at managing their time or their work. You may find that by the end of the project, the groups in your class may not have completed their projects or have rushed some parts. Here are some ideas for helping students to manage their time so that they have a better chance of finishing on time and producing good quality work.
You need to decide how long you are going to give your students to complete the project. Your students should know this at the beginning of the project. One of the very first things you should ask your student groups to do is to produce a project plan. The plan should explain how, lesson by lesson, they intend to divide up the project work. It should also explain which team member is responsible for which part of the project.
Use the plan as a working document to record progress of the project. Have a plan wall in your classroom where all the team plans are displayed. Teams can mark off the work they have done in every lesson. Having the plans where everyone can see them can be very motivating for the students.
In every lesson, check that you know how each team is progressing. These can be brief to check their progress against their plan and to discuss problems or concerns.
Case Study 2: Teacher Samsana uses a project wall to manage her class’s project
Teacher Samsana continues with her project and reflects on how useful a project wall was to help her manage her large class’s learning.
I knew from past experience when I have tried to do projects before, the whole thing gets very messy and noisy, and I spend a lot of time rushing around telling students what to do next and to hurry up. I used to get headaches after project lessons. I felt that I was working harder than many of my students!
This time I used a project wall to help me manage the sources of energy project. Running the class project was still hard work, but this time I felt like I was in control. I decided to allow two weeks for the project, as this was the time we usually spend on a chapter. We used the class time and the homework time.
Having organised my students into groups of four, I asked each group to nominate a ‘manager’. At the start of each lesson, the teams went to the project wall and looked at their plan. Then they got on with whatever their plan for that lesson said they had to do. At the start of every lesson I held a quick five-minute meeting with all the team managers and found out what each group was intending to do that lesson. This gave me an overview. Based on this I decided which teams I was going to check up on in detail that lesson. Some of the more organised groups only got two or three meetings with me over the lifetime of the project. The less organised groups got more progress meetings, so I could keep them on track better.
I felt that the situation was much more under control doing it this way. I did have to give my students extra time at the end, but the quality of the projects was better than before. Every group managed to hand in a good piece of project work, so I will definitely use this idea again.
5 Formats for project work
Projects are not just about written work. The project can be presented as a poster, model, play or story. If you have access to computers, it could be in the form of a presentation. If you decide to ask your students to produce posters, remember to photograph them on your mobile phone! Using alternative formats is good for students who find reading and writing more difficult. It gives all students more chances to express themselves differently. This will help their creativity. Allowing students some choice about the format they use is motivating for students.
Case Study 3: Mr Singh asks his class to do presentations of their project
Mr Singh informed his Class X that the format for their ‘sources of energy’ projects was a presentation.
When I have asked students to write up projects in the past, it usually goes two ways. The girls are especially bad at spending too much time fussing over the neatness of their work and the boys just rush through to finish quickly. I wanted them to concentrate on the key issues instead. So this time I asked them to produce a ten-minute presentation. I thought that if they all had to do a presentation, it would level the playing field and focus their minds!
I was right! At our regular progress meetings, I was able to monitor each group’s presentations as they developed. With a few of the less confident students we were able to rehearse their speaking parts. I was able to advise the groups about what they should include and what they should leave out. I told them that I was their critical friend, and that my job was to make their work the best it could be by challenging them on it.
The different presentations were interesting and informative, and not at all dull or repetitive. One group included a rap and another composed a poem. I did stop one group from trying to do the presentation as a Bollywood movie; instead they did a short role play. During the presentations, one minute the whole class was laughing, and the next we were deep in contemplation. I could see that each group expressed themselves very differently, even though they were all sticking to the presentation format.
I was pleased that I had decided to try this strategy. Maybe next time I will attempt some peer review of the presentations. Now that I know that my students can do imaginative presentations, I might also invite in an authentic final audience for them to showcase their work to. I don’t think it would be too hard to arrange invitations for parents, local community representatives or even other teachers.
6 Assessing project work
At the end of the project, the teams’ work needs to be assessed. Rather than marking it yourself, you could try some peer review. Whatever method you decide to opt for, it is important that the students know what the success criteria are for their project from the outset. You can co-construct the success criteria at the start with the students. Doing it this way would be very democratic. This is where examples of previous projects might be useful.
Putting the success criteria on a poster and keeping it on the project wall will allow all your students to see it while they work. This will help keep them focused on the aspects of the work that they will gain credit for.
Activity 3: Devising some assessment criteria for your students’ projects
This is an activity for you to do on your own, or with another teacher.
- Start by brainstorming all the features of a good project and good project team working. This will include things such as being well-written, interesting, scientifically accurate, well-researched and well-presented, involving all members of the group, and demonstrating decision making, critical thinking and interpersonal relationships.
- Group all your points under three main headings. When you are trying to assess a piece of work like this, it is relatively easy to keep three main criteria in your head. You could use headings from the co-scholastic areas such as life skills or literacy and creative skills. You should usually use scientific skills as one of the three headings it will depend on what you want to get out of the project.
- Create a grid with three main headings and three or points under each one. Decide how you will assess each point. You could give a qualitative comment, or you could give that point a mark out of five.
Once you are confident about working in this way, you might try getting your class to decide on the criteria. For example, Teacher Samsana could have asked the group managers to discuss suitable criteria, or she could have shared her criteria with them and let them suggest changes. For more detail, see Resource 2, ‘Assessing progress and performance’.
7 Summary
The main idea behind effective project-based learning is that extended and independent study of real-world issues and problems can secure students’ interest and engagement in a way quite unlike traditional methods of instruction. When students are ‘hooked’ into a meaningful project that is based on some real-life challenge, they learn implicitly, in great depth and also develop many important other social and life skills.
As a teacher, you need to make a big shift in your normal practice to undertake effective project-based learning. You need to facilitate rather than lecture, and should undertake no pre-teaching of material so that your students can learn fully for themselves. Your project-based classrooms will look and sound like very different places. You will have to accept that you cannot possibly know everything there is to know about your project topic. The benefit for you is that you can learn something new about the project topic too!
Resources
Resource 1: Using local resources
Many learning resources can be used in teaching – not just textbooks. If you offer ways to learn that use different senses (visual, auditory, touch, smell, taste), you will appeal to the different ways that students learn. There are resources all around you that you might use in your classroom, and that could support your students’ learning. Any school can generate its own learning resources at little or no cost. By sourcing these materials locally, connections are made between the curriculum and your students’ lives.
You will find people in your immediate environment who have expertise in a wide range of topics; you will also find a range of natural resources. This can help you to create links with the local community, demonstrate its value, stimulate students to see the richness and diversity of their environment, and perhaps most importantly work towards a holistic approach to student learning – that is, learning inside and outside the school.
Making the most of your classroom
People work hard at making their homes as attractive as possible. It is worth thinking about the environment that you expect your students to learn in. Anything you can do to make your classroom and school an attractive place to learn will have a positive impact on your students. There is plenty that you can do to make your classroom interesting and attractive for students – for example, you can:
- make posters from old magazines and brochures
- bring in objects and artefacts related to the current topic
- display your students’ work
- change the classroom displays to keep students curious and prompt new learning.
Using local experts in your classroom
If you are doing work on money or quantities in mathematics, you could invite market traders or dressmakers into the classroom to come to explain how they use maths in their work. Alternatively, if you are exploring patterns and shapes in art, you could invite maindi [wedding henna] designers to the school to explain the different shapes, designs, traditions and techniques. Inviting guests works best when the link with educational aims is clear to everyone and there are shared expectations of timing.
You may also have experts within the school community (such as the cook or the caretaker) who can be shadowed or interviewed by students related to their learning; for example, to find out about quantities used in cooking, or how weather conditions impact on the school grounds and buildings.
Using the outside environment
Outside your classroom there is a whole range of resources that you can use in your lessons. You could collect (or ask your class to collect) objects such as leaves, spiders, plants, insects, rocks or wood. Bringing these resources in can lead to interesting classroom displays that can be referred to in lessons. They can provide objects for discussion or experimentation such as an activity in classification, or living or not-living objects. There are also resources such as bus timetables or advertisements that might be readily available and relevant to your local community – these can be turned into learning resources by setting tasks to identify words, compare qualities or calculate journey times.
Objects from outside can be brought into the classroom – but the outside can also be an extension of your classroom. There is usually more room to move outside and for all students to see more easily. When you take your class outside to learn, they can do activities such as:
- estimating and measuring distances
- demonstrating that every point on a circle is the same distance from the central point
- recording the length of shadows at different times of the day
- reading signs and instructions
- conducting interviews and surveys
- locating solar panels
- monitoring crop growth and rainfall.
Outside, their learning is based on realities and their own experiences, and may be more transferable to other contexts.
If your work outside involves leaving the school premises, before you go you need to obtain the school leader’s permission, plan timings, check for safety and make rules clear to the students. You and your students should be clear about what is to be learnt before you depart.
Adapting resources
You may want to adapt existing resources to make them more appropriate to your students. These changes may be small but could make a big difference, especially if you are trying to make the learning relevant to all the students in the class. You might, for example, change place and people names if they relate to another state, or change the gender of a person in a song, or introduce a child with a disability into a story. In this way you can make the resources more inclusive and appropriate to your class and their learning.
Work with your colleagues to be resourceful: you will have a range of skills between you to generate and adapt resources. One colleague might have skills in music, another in puppet making or organising outdoor science. You can share the resources you use in your classroom with your colleagues to help you all generate a rich learning environment in all areas of your school.
Resource 2: Assessing progress and performance
Assessing students’ learning has two purposes:
- Summative assessment looks back and makes a judgement on what has already been learnt. It is often conducted in the form of tests that are graded, telling students their attainment on the questions in that test. This also helps in reporting outcomes.
- Formative assessment (or assessment for learning) is quite different, being more informal and diagnostic in nature. Teachers use it as part of the learning process, for example questioning to check whether students have understood something. The outcomes of this assessment are then used to change the next learning experience. Monitoring and feedback are part of formative assessment.
Formative assessment enhances learning because in order to learn, most students must:
- understand what they are expected to learn
- know where they are now with that learning
- understand how they can make progress (that is, what to study and how to study)
- know when they have reached the goals and expected outcomes.
As a teacher, you will get the best out of your students if you attend to the four points above in every lesson. Thus assessment can be undertaken before, during and after instruction:
- Before: Assessing before the teaching begins can help you identify what the students know and can do prior to instruction. It determines the baseline and gives you a starting point for planning your teaching. Enhancing your understanding of what your students know reduces the chance of re-teaching the students something they have already mastered or omitting something they possibly should (but do not yet) know or understand.
- During: Assessing during classroom teaching involves checking if students are learning and improving. This will help you make adjustments in your teaching methodology, resources and activities. It will help you understand how the student is progressing towards the desired objective and how successful your teaching is.
- After: Assessment that occurs after teaching confirms what students have learnt and shows you who has learnt and who still needs support. This will allow you to assess the effectiveness of your teaching goal.
Before: being clear about what your students will learn
When you decide what the students must learn in a lesson or series of lessons, you need to share this with them. Carefully distinguish what the students are expected to learn from what you are asking them to do. Ask an open question that gives you the chance to assess whether they have really understood. For example:

Give the students a few seconds to think before they answer, or perhaps ask the students to first discuss their answers in pairs or small groups. When they tell you their answer, you will know whether they understand what it is they have to learn.
Before: knowing where students are in their learning
In order to help your students improve, both you and they need to know the current state of their knowledge and understanding. Once you have shared the intended learning outcomes or goals, you could do the following:
- Ask the students to work in pairs to make a mind map or list of what they already know about that topic, giving them enough time to complete it but not too long for those with few ideas. You should then review the mind maps or lists.
- Write the important vocabulary on the board and ask for volunteers to say what they know about each word. Then ask the rest of the class to put their thumbs up if they understand the word, thumbs down if they know very little or nothing, and thumbs horizontal if they know something.
Knowing where to start will mean that you can plan lessons that are relevant and constructive for your students. It is also important that your students are able to assess how well they are learning so that both you and they know what they need to learn next. Providing opportunities for your students to take charge of their own learning will help to make them life-long learners.
During: ensuring students’ progress in learning
When you talk to students about their current progress, make sure that they find your feedback both useful and constructive. Do this by:
- helping students know their strengths and how they might further improve
- being clear about what needs further development
- being positive about how they might develop their learning, checking that they understand and feel able to use the advice.
You will also need to provide opportunities for students to improve their learning. This means that you may have to modify your lesson plans to close the gap between where your students are now in their learning and where you wish them to be. In order to do this you might have to:
- go back over some work that you thought they knew already
- group students according to needs, giving them differentiated tasks
- encourage students to decide for themselves which of several resources they need to study so that they can ‘fill their own gap’
- use ‘low entry, high ceiling’ tasks so that all students can make progress – these are designed so that all students can start the task but the more able ones are not restricted and can progress to extend their learning.
By slowing the pace of lessons down, very often you can actually speed up learning because you give students the time and confidence to think and understand what they need to do to improve. By letting students talk about their work among themselves, and reflect on where the gaps are and how they might close them, you are providing them with ways to assess themselves.
After: collecting and interpreting evidence, and planning ahead
While teaching–learning is taking place and after setting a classwork or homework task, it is important to:
- find out how well your students are doing
- use this to inform your planning for the next lesson
- feed it back to students.
The four key states of assessment are discussed below.
Collecting information or evidence
Every student learns differently, at their own pace and style, both inside and outside the school. Therefore, you need to do two things while assessing students:
- Collect information from a variety of sources – from your own experience, the student, other students, other teachers, parents and community members.
- Assess students individually, in pairs and in groups, and promote self-assessment. Using different methods is important, as no single method can provide all the information you need. Different ways of collecting information about the students’ learning and progress include observing, listening, discussing topics and themes, and reviewing written class and homework.
Recording
In all schools across India the most common form of recording is through the use of report card, but this may not allow you to record all aspects of a student’s learning or behaviours. There are some simple ways of doing this that you may like to consider, such as:
- noting down what you observe while teaching–learning is going on in a diary/notebook/register
- keeping samples of students’ work (written, art, craft, projects, poems, etc.) in a portfolio
- preparing every student’s profile
- noting down any unusual incidents, changes, problems, strengths and learning evidences of students.
Interpreting the evidence
Once information and evidence have been collected and recorded, it is important to interpret it in order to form an understanding of how each student is learning and progressing. This requires careful reflection and analysis. You then need to act on your findings to improve learning, maybe through feedback to students or finding new resources, rearranging the groups, or repeating a learning point.
Planning for improvement
Assessment can help you to provide meaningful learning opportunities to every student by establishing specific and differentiated learning activities, giving attention to the students who need more help and challenging the students who are more advanced.
Additional resources
- An OpenLearn unit, An introduction to sustainable energy: http://www.open.edu/ openlearn/ science-maths-technology/ science/ environmental-science/ introduction-sustainable-energy/ content-section-1 (accessed 21 May 2014)
- Energy resources: http://www.darvill.clara.net/ (accessed 21 May 2014)
- Educator resources in energy education: http://www.switchenergyproject.com/ education/ (accessed 21 May 2014)
- Energy challenges: http://www.energy4me.org/ energy-facts/ energy-challenges/ (accessed 21 May 2014)
- Links to many aspects of project-based learning: http://www.nea.org/ tools/ 16963.htm (accessed 21 May 2014)
References
Acknowledgements
This content is made available under a Creative Commons Attribution-ShareAlike licence (http://creativecommons.org/ licenses/ by-sa/ 3.0/), unless identified otherwise. The licence excludes the use of the TESS-India, OU and UKAID logos, which may only be used unadapted within the TESS-India project.
Every effort has been made to contact copyright owners. If any have been inadvertently overlooked the publishers will be pleased to make the necessary arrangements at the first opportunity.
Video (including video stills): thanks are extended to the teacher educators, headteachers, teachers and students across India who worked with The Open University in the productions.