Week 4: Working with patterns and formulas
Use 'Print preview' to check the number of pages and printer settings.
Print functionality varies between browsers.
Printable page generated Monday, 2 February 2026, 10:37 PM
Week 4: Working with patterns and formulas
Introduction
You finished last week by using some word formulas from different aspects of everyday life. Some of these examples will not have been relevant for some people (not everyone is an archaeologist!) but they should still have all given you some great practice at using different formulas. This week the course turns to writing your own word formula. You’ll start by looking at spreadsheets and then do some number tricks to amaze your friends and family with. Finally, you’ll use doing and undoing diagrams to change what is being calculated by a formula. This is another aspect of mathematical study that is directly related to building skills for algebra. The final section concentrates on inequalities. These are used in the place of the usual equals sign, to show that something is greater or less than something else.
Watch Maria introduce Week 4:

Transcript
After this week's study, you should be able to:
- understand how to read a spreadsheet
- understand how a spreadsheet is created
- use doing and undoing diagrams to change formulas
- interpret and use notation for inequalities.
1 Your formulas: using a spreadsheet
Last week, the course looked briefly at how to construct a word formula but concentrated on how to use formulas you were given successfully. This week moves onto building your own formulas, starting with a practical application using spreadsheets. As well as having relevance to future university level studies, if you need to work with data that you or somebody else has collected, being able to work with spreadsheets may well come in useful at home or at work, now and in the future. It is also a useful way to learn more about constructing your own formulas.
Before getting going though, it is worth pausing to think about what a spreadsheet is, how they may be useful and the way they are set up.
At the basic level, spreadsheets can be used to display data, such as fuel prices over a number of years, in tables. Once, the data are in a spreadsheet then the real strengths of spreadsheets can be used. You can perform calculations on the data to work out other information from the data and even use a spreadsheet to create charts for you to display the data or results. Spreadsheets come into their own when you have a mountain of data and calculations to perform on it.
Figure 1 shows part of a spreadsheet that has been constructed to record monthly income and outgoings, or expenditure. It is similar to a bank balance sheet that you might draw up by hand to check your monthly income and expenses, the totals, and the overall balance. However, the spreadsheet has been created on a computer and has formulas inserted into it to enable automatic calculations without using a calculator.
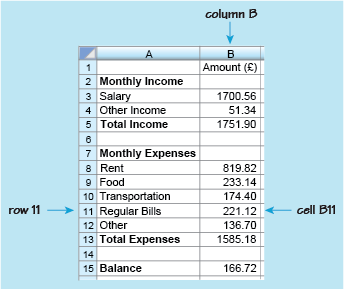
As with any other spreadsheet, this example is made up of rows and columns containing boxes. These boxes are called ‘cells’. The columns are identified by letters and the rows by numbers. This enables you to identify each cell in the spreadsheet. For example in this spreadsheet, the number 221.12 is in column B, row 11, so is in cell B11.
Cells can thus be found, from their reference, by looking down the column and across the row. So cell A3 can be found by looking down column A and across row 3. This cell contains the word ‘Salary’. Notice that cells can contain either text or numbers.
Use this knowledge when completing your first activity of the week.
Activity 1 Spreadsheet cells
Use the spreadsheet in Figure 1 to answer the following questions.
- a.What word or number is contained in the following cells?
- i.A5
- ii.A12
- iii.B15
- iv.B1
Answer
a.
- i.The cell that is in both column A and row 5 contains the words ‘Total Income’.
- ii.Down column A and across row 12, cell A12 contains the word ‘Other’.
- iii.The cell that is in column B, row 15 contains the number 166.72.
- iv.The cell that is in column B, row 1 contains the heading ‘Amount (£)’.
- b.What is the reference for the cells that contain the following?
- i.The number 1585.18.
- ii.The word ‘Food’.
Answer
b.
- i.1585.18 is in column B and row 13, so its reference is B13.
- ii.‘Food’ is in column A and row 9, so its reference is A9.
So, remember when you are referring to a particular cell, you always state the column letter, followed by the row number.
Looking again at Figure 1 you can see what other information it shows. For example, if you look at row 3, this shows that the monthly salary is £1700.56. Although cell B3 only contains the number 1700.56, you know that this is measured in pounds from the heading in cell B1 ‘Amount (£)’. Overall, the spreadsheet shows the items that make up the monthly income and where money has been spent over the month. If you were keeping these records by hand, you would then need to calculate the total income, the total expenses and the balance.
For example, to find the total income for the month, you would need to add the salary of £1700.56 to the other income of £51.34. This gives the total income of £1751.90. In other words, to calculate the value in cell B5, you need to add the values in cells B3 and B4. This can be written as the following formula:
1.1 Finding the balance
A similar approach can be used for working out other values in the spreadsheet. Have a go yourself in this next activity.
Activity 2 Working out the balance
Formulas have also been used to calculate the total monthly expenses and the balance. If you were working these calculations out by hand, what would you do? Write this using the appropriate cell numbers and maths operators as shown in the previous example. Finally, check these comparing your answers using the formulas with the values in cell B13 and B15.
Answer
To calculate the total monthly expenses, you need to add the individual expenses of ‘Rent’, ‘Food’, ‘Transportation’, ‘Regular Bills’, and ‘Other’. The formula will therefore be:
To find the balance, you need to take the expenses away from the total income. So, the formula to calculate the balance will be:
Checking these now:
Comparing these with the values in the spreadsheet, it is clear that they agree. This should give us confidence that the formulas built are correct!
How are these formulas actually put into the spreadsheet though? To do this you type the formula directly into the relevant cell, starting with an equals sign to tell the software that you are entering a formula rather than a word. This is shown in Figure 2:
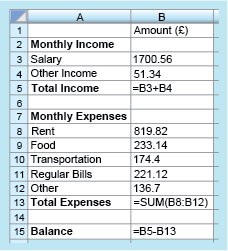
Notice that in cell B13, a shorthand form for the sum (total) has been entered. The formula ‘= B8 + B9 + B10 + B11 + B12’ could have also been entered, but it is much quicker to use the shorthand form ‘= SUM(B8:B12)’, which is shown here. This instruction tells the computer to add the values in all the cells from B8 to B12.
If you have access to spreadsheet software, try and recreate this example now and see how you get on with entering formulas yourself.
Another advantage of using a spreadsheet is that if you change some of the numbers, all the calculations that use that particular number will be automatically updated to reflect the change. For example, in this budget, the amounts for the salary, rent and the regular bills are likely to remain the same from one month to the next, and may only be updated once or twice a year. However, the amounts for food, transportation, other bills and other income will probably change from month to month. These values can be changed easily on the spreadsheet and the revised balance produced immediately, taking some of the work from you and reducing the risk of calculation errors.
1.2 Spreadsheet formulas
There is one final activity in this section on spreadsheets, bringing all these ideas together.
Activity 3 Spreadsheet formulas
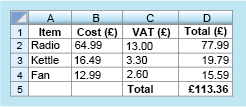
The formulas used in a spreadsheet are displayed as shown in Figure 3. Note that the asterisk (*) is the notation for multiplication used in spreadsheets and that all entries have been rounded to the closest penny. This example shows UK VAT, which was 20 per cent in 2014 (20 per cent as a decimal is 0.2).

- a.The values in columns C and D will be displayed to two decimal places because they represent an amount of money. What values will be displayed in cells C3 and D3?
Answer
a.The formula in C3 is: (to 2 decimal places)
So,
The value in D3 is obtained by adding together the values in B3 and C3.
So,
- b.What do you think is being calculated in the cells in column D? Can you suggest a suitable heading for this column to be entered into D1?
Answer
- b.Column D represents the total cost of the item plus VAT. A suitable heading might be ‘Total (£)’. You can think of other correct titles such as ‘Final Price (£)’.
- c.Cell D5 calculates the sum of the values in D2, D3 and D4. Write down a formula that could be entered in cell D5. What does this value represent?
Answer
c.The sum can be found by adding together the values in cells D2, D3 and D4. The formula ‘=D2+D3+D4’ could therefore be entered into cell D5. (Note that you do not use the formulas that are present in each of the cells you are adding. Just the cell title is sufficient.) Alternatively, you could use ‘SUM(D2:D4)’, which also adds together the cells from D2 to D4. The resulting entry represents the total cost (including VAT) of the radio, kettle and fan together.
With these changes, and the title ‘Total (£)’ typed into cell C5, the spreadsheet will look like the example shown here:
This section has served a few purposes. It has introduced spreadsheets and shown you how you can use these to carry out calculations as well as helping you make a start on writing your own formula. The next section leaves spreadsheets behind to continue with this latter skill, to build your confidence with formulas further.
2 Your own formulas
Let’s start this section by looking at a number trick and seeing if a formula can derived, or built, for it. The aim of the trick is to end up with the name of an animal.
To do this follow the instructions listed below. The final number represents a letter of the alphabet, numbered in ascending order from A to Z. So, A is 1, B is 2, C is 3 etc. Then write down the name of an animal beginning with that letter.
The instructions for the trick are:
- Think of a number.
- Add 5.
- Double this.
- Subtract 8.
- Divide by 2.
- Take away the number you first thought of.
- Add 4.
- The final number represents a letter of the alphabet, numbered in ascending order from A to Z. So, A is 1, B is 2, C is 3 etc.
- Now write down the name of an animal beginning with that letter.
Activity 4 What animal?
Carry out the number trick, starting with the number 3 and then any other number you would like to start with. What do you notice about the result in both cases?
Answer
Starting with 3, the instructions work out as follows
| Instruction | Expression |
|---|---|
| Add 5 | |
| Double it | |
| Subtract 8 | |
| Divide by 2 | |
| Take away the number you first thought of | |
| Add 4 |
You will find that you always get 5, whatever number you start with! This gives the letter E. Most people will then think of elephant, although you cannot always guarantee that. The odd eel or emperor penguin may sneak in!
What is really interesting here though, to a mathematician, is how the trick works. The activity in the next section will help you to work this out.
2.1 Understanding the number trick
One way to understand how the previous number trick works is to use a visual representation of each stage of the instructions, and that is how you are asked to approach this next activity. Take your time, and read over the instructions and hints carefully to start you off.
Activity 5 How does this trick work?
To see how this trick works, read through the instructions from before. Because you could have thought of any number, replace this unknown number with a thought bubble like this:
Keep the thought bubble as part of the new number that you get at each stage. So after the first step you will have something like this:
 + IIIII (to represent 5).
Comment
When doubling, draw the cloud and associated number twice.
Answer
This is what our visualised representation of the number trick looks like:
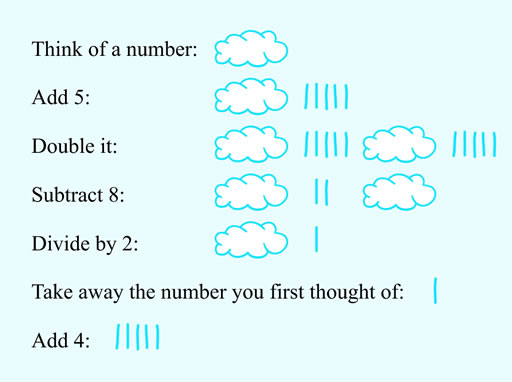
This shows that the numerical answer is always going to be 5. It does not depend on which number was chosen first since there are no clouds, representing the initial number, involved in the final answer. So the letter of the alphabet chosen is always E. There are not many animals with names beginning with E and most people do think of an elephant first, but we’ve already thought about the pitfalls of that!
Rather than using a cloud to represent the number and explaining the trick visually, you could write this in a more mathematical way by using either a word or letter to represent the initial number. In maths unknown numbers are usually represented using a letter. Using ‘n’ to stand for this number the trick can be written out again without the clouds like this:
| Instruction | Expression |
|---|---|
| Think of a number | |
| Add 5 | |
| Double it | This can be re-written as is the same as 2 lots of , so can be written in shorthand as So |
| Subtract 8 | |
| Divide by 2 | Dividing each part by 2 separately is the same as dividing the whole of , by 2. Taking this former approach helps us show the next step more clearly. 2 lots of n divided by 2 gives 1 lot of n, and clearly 2 divided by 2 gives 1. So, finally giving: |
| Take away the number you first thought of | |
| Add 4 |
This gives the same result, where n is not involved in the final answer. This time a more conventional mathematical representation was used rather than a cloud!
At first this may have appeared to be quite a daunting example, using both numbers and letters but hopefully you found that by working your way carefully through each stage you were able to understand how the final answer was obtained. Working step by step carefully through problems will really pay dividends as problems and concepts start to look more complicated. Remember this when completing the next activity with another number trick.
2.2 Another number trick
Here is another number trick which uses the same techniques you learned in the last section to see how it works.
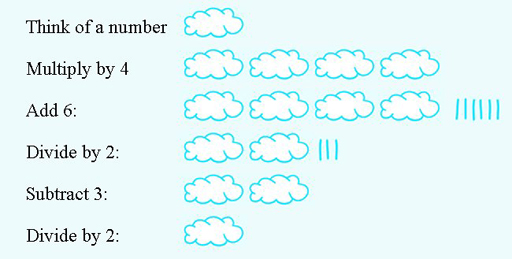
Activity 6 Another number trick
Try the following trick several times; make a note of the number you started with and your final answer each time:
- Think of a number between 1 and 10 (this will work with numbers greater than 10, but the restriction is to keep the arithmetic manageable).
- Multiply by 4.
- Add 6.
- Divide by 2.
- Subtract 3.
- Divide by 2.
What do you notice about the answer? See if you can explain why this happens, either by using a diagram or by writing down the expressions for the answer at each stage, replacing your initial number with n again.
Answer
You should find that this time the answer is always the number you chose at the start. Both ways of showing why the number trick works are shown below.
| Instruction | Expression |
|---|---|
| Think of a number between 1 and 10 | |
| Multiply by 4 | |
| Add 6 | |
| Divide by 2 | |
| Subtract 3 | |
| Divide by 2 |
These two number tricks are sets of instructions that can be used to build, or derive, a formula. They are in essence not much different from those you looked at for spreadsheets. They just involved a few more steps to reach the answer.
Sometimes the answer and the set of instructions are available, while, for some reason, the starting value is not known. For example, imagine something had happened to your bank balance spreadsheet and the starting balance was no longer displayed but you still knew the final balance and all the formulas. Could you then rebuild the spreadsheet to work out initial balance? The next section shows you how.
3 Doing and undoing
The next example helps you to start to think about how to work out an initial number if you know the answer and instructions using a more straightforward example than our spreadsheet. This time there are only two instructions:
- Think of a number.
- Add 4.
If my answer is 11, can you work out what number I was thinking of? You might have said ‘What number do I have to add to 4 to get 11?’ or perhaps ‘If I take away 4 from 11, what number do I get?’. In both cases, you should have arrived at the answer 7.
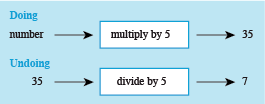
In the second method, ‘subtracting 4’ undoes the ‘adding 4’ in the original instructions, and this can be illustrated with a ‘doing-undoing diagram’ (see Figure 7).
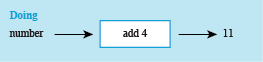
In the ‘doing’ part of the diagram, start with the number and write down the operations applied in turn until you get the answer. Here there is just one operation: ‘add 4’.
For the ‘undoing’ part of the diagram, start on the right with the answer, in this case 11. Then work back towards the left, undoing each operation in turn until you find the starting number. In this case, ‘subtract 4’ undoes ‘add 4’ and
You can then construct an undoing diagram that starts from the left, as shown in Figure 8. Notice how the arrows indicate the direction to read the diagram.
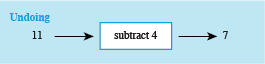
So this also shows that the number first thought of was 7.
3.1 Doing some doing and undoing
Now you’ve had a look at an example, see how you get on with the next activity.
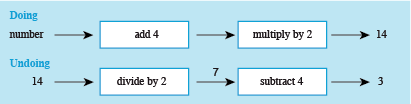
Activity 7 Working out the number
Try to work out what number was thought of in the following problems. You may find it helpful to use some doing-undoing diagrams to visualise, and keep track of these.
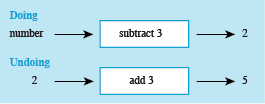
- a.Think of a number, subtract 3, and the answer is 2.
- b.Think of a number, multiply by 5, and the answer is 35.
c.Think of a number, add 4, double it, and the answer is 14.
Click on ‘reveal comment’ if you would like a hint
Comment
When you have to deal with more than one operation, just take each step in turn. Write down the doing diagram and draw the undoing one underneath, working backwards to undo each operation.
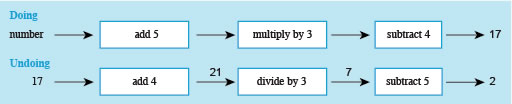
- d.Think of a number, add 5, multiply by 3 and subtract 4. The answer is 17.
You may be wondering what is the point of all this doing/undoing business! Sometimes there is a need to change a formula so that you can work out something different from it. This is called rearranging the formula and does occur quite frequently in any subject area that uses formulas. The same technique that you have been looking at in this section on ‘undoing’ instructions can be used when rearranging formulas, as you’ll see in the next section.
4 Rearranging formulas
Rearranging a formula makes it possible to show the formula in a different way, whilst making sure the relationships between the various elements that it describes are not changed. If these relationships are changed, the formula will no longer work as expected. Thinking about rearranging using the ‘doing’ and ‘undoing’ technique from the last section will help to ensure that the relationships are maintained.
Instead of a using a set of instructions, the next example is from Week 3. Hopefully, you recognise this word formula:
How could a visitor from Europe use this word formula to convert euros into pounds, say, while shopping on holiday? They would need a formula for the number of pounds based on the number of euros. This can tackled by drawing the ‘doing and undoing’ diagrams for this situation.
In this case, the starting point for the doing diagram will be number of pounds on the left, the operation in the box will be multiply by 1.18 and output on the right will be number of euros (our answer). Therefore, to undo the operation in the box divide by 1.18. So, the diagrams will look like those shown in Figure 13.
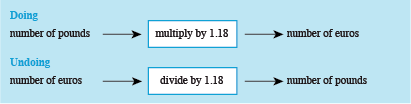
From the undoing diagram the new word formula can be built. This gives:
This just needs to be swapped around, so that the formula is shown in the conventional way with what you are calculating stated first. This results in:
Now use what you have learned here in this next activity.
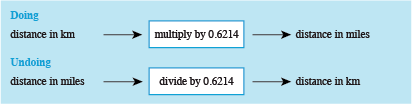
Activity 8 Miles and kilometres
To change kilometres into miles, you can use the formula:
Starting with ‘distance in kilometres’, draw a doing diagram to show how to calculate the distance in miles. Then draw the undoing diagram and write down the formula for changing miles into kilometres.
Your formula should start ‘distance in kilometres = ...’.
4.1 Time formula
There is just one last activity for you to complete now before moving on to a different subject area. This will give you another opportunity to rearrange a word formula but with a few more elements to consider.
Activity 9 How many minutes for chatting?
This was the formula for the monthly cost in £ of a mobile phone that was used in week 3:
The owner wishes to stick to a monthly budget of £45. To do this they need to know the maximum number of minutes they can use, so that they don’t exceed the budget. Use doing and undoing diagrams to work the maximum number of minutes. Substitute ‘Total monthly cost in £’ for £45.
See if you can then write a word formula that will allow the number of minutes to be calculated for any budget.
Answer
Here is the doing diagram:

Undoing each step in turn gives the following undoing diagram.

Applying these operations in turn gives:
- Subtracting 20 gives:
- Dividing by 0.4 gives:
- Adding 300 gives:
So, 362 minutes can be used for a monthly budget of £45.
Now all you need to do to provide a word formula for any monthly budget is to change from £45 back to ‘Total monthly cost in £’.
So the word formula will be:
or
Mathematicians prefer the second way of showing this formula just because it looks much neater – otherwise there is no difference between them.
The last part of the activity was more challenging than our other examples, so well done for having a go at it. What you may not realise is that during these last few sections you have been taking your first steps into the wonderful world of algebra. This is one of the fundamental tools of most maths, science and technology, so if you continue into university level study in any of these areas you will certainly find these skills useful. You won’t be using doing and undoing diagrams but techniques used for rearranging formulas (and equations) will be just the same – looking for what ‘undoes’ each operation.
In the next section you are going to look at inequalities. This is the name mathematicians use for expressions that use notation meaning, for example ‘greater than’ and ‘less than’. You have actually come across three examples of these in this week’s and last week’s study, as you will discover when you move on.
5 Inequalities: greater than or less than?
There have been three occasions in these last two weeks when checks have been made to see whether a result is greater than or less than some other value. These were when:
- calculating the BMI and determining whether the person was overweight or underweight
- determining from footprints whether a person was walking or running
- checking whether a phone had been used for more than 300 minutes.
In all these situations the statements could have also been written mathematically using inequality symbols.
This checking of whether values are greater than, or less than, some limit happens frequently – occasions when you may see this could be safety issues or age limits. For example, medicines may have to be stored at a temperature of 25 °C or less; child train tickets can be bought for children who are over 5 but under 16 years old.
Rather than writing out ‘greater than’ or ‘less than’, shorthand notation is often used – as shown below.
- > greater than
- ≥ greater than or equal to
- < less than
- ≤ less than or equal to
If you have difficulty remembering these symbols, you can think of them as arrows that point to the smaller number or note that ‘<’ looks like an ‘L’, which stands for ‘less than’.
The symbols are read from left to right. For example, ‘11 > 9’ is read as ‘11 is greater than 9’; the cost of a holiday in pounds < 1000 is read as ‘the cost of a holiday is less than £1000’.
To use the symbols in your own writing, decide what you want to say first, then use the symbol. For example, since 10 is greater than 5, this would be written as ‘10 > 5’. On the number line, because –4 lies to the left of –3, –4 is less than –3; this would be written as ‘–4 < –3’.
Similarly, the instructions for the medicine that has to be stored at a temperature of 25 °C or less could be written as ‘Medicine storage temperature in °C ≤ 25’.
Sometimes, it can be helpful to draw a number line to visualise this kind of information. For example, the ages that children are eligible for the child train fare are from their fifth birthday up to, but not including, their sixteenth birthday. This means that the age has to be greater than or equal to 5 and less than 16. This range is shown on the number line below. Does this help you to visualise the information?
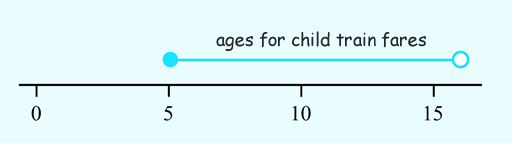
The empty circle means that this number (16) is not included and the filled-in circle means that this number (5) is included in the interval. This is then written as ‘5 ≤ age for child train fare < 16’.
Note carefully the format in which this last inequality is written. The variable that is being described – that is, the age for a child train fare – is always in the centre when defining a range of values with an upper and lower limit. This is the maths convention that is followed with ranges of values. This can be a little confusing, as you have to turn your logic around for the lower limit. You are in effect saying that 5 is less than, or equal to, a child train fare, rather than a child train fare is greater than, or equal to, 5. This amounts to exactly the same thing, but how you may usually think about the lower limit is turned on its head!
Now put these ideas into practice in this final activity for the week.
Activity 10 Inequalities
- a.Which symbol (< or >) should go in the blank spaces below? Click on ‘reveal comment’ if you would like a hint to get going.
- i.4__7
- ii.18__10
- iii.3__–2
Comment
Write the inequality using words first and then convert this to the correct symbol.
Answer
a.
- i.4 < 7
- ii.18 > 10
- iii.3 > –2
- b.Work out what the following mathematical statements mean. Write your answers as full sentences and be as precise as you can.
- i.Balance in account > 0.
- ii.Speed (in mph) on motorway ≤ 70.
- iii.18 ≤ age (in years) ≤ 50.
Answer
- b.Your answers may be worded slightly differently, but they should still have the same meaning:
- i.The balance in the account is greater than zero.
- ii.The speed on the motorway is less than or equal to 70 mph.
- iii.The age in years is between 18 and 50, inclusively.
- c.Rewrite the following sentences as statements using the inequality symbols:
- i.The refrigerator temperature should be less than 4 °C.
- ii.There must be at least five people on the committee.
- iii.For an ideal weight, a person’s BMI should be greater than 20 and less than 25.
Answer
- c.Your answers may be worded slightly differently again, but they should still have the same meaning:
- i.Refrigerator temperature (in ºC) < 4.
- ii.Number of people on committee ≥ 5.
- iii.20 < BMI < 25
As well as in the examples given here, inequalities are also an important part of many computer programs. So you can see that maths pops up in all sorts of areas of study and everyday lives.
This is the end of this section on inequalities and the week as a whole. You may have found some ideas that were new to you here and others that were more familiar. Whatever the case for you, hopefully you feel even more confident with your maths skills now.
6 This week's quiz
Well done, you've just completed the last of the activities in this week's study before the weekly quiz.
Go to:
Remember, this quiz counts towards your badge. If you're not successful the first time you can attempt the quiz again in 24 hours.
Open the quiz in a new tab or window (by holding ctrl [or cmd on a Mac] when you click the link).
7 Summary
This week completes your study of patterns and formulas. Starting in Week 3 with describing a visual pattern and looking for number patterns in the famous Pascal’s triangle, you moved on to using word formulas and writing your own. Finally, you learned how to rearrange a word formula so that you could find out something new from it before taking a quick look at inequalities. These have been a busy two weeks as well as an important two weeks, as you’ve been developing skills that will stand you in good stead for any future studies that involve algebra. So, congratulations on making it to the end of another week. Next week will be all about using powers, and in particular how they can help to write very large and very small numbers concisely. See you there!
You should now be able to:
- understand how to read a spreadsheet
- understand how a spreadsheet is created
- use doing and undoing diagrams to change formulas
- interpret and use notation for inequalities.
You are now half way through the course. The Open University would really appreciate your feedback and suggestions for future improvement in our optional end-of-course survey, which you will also have an opportunity to complete at the end of Week 8. Participation will be completely confidential and we will not pass on your details to others.
You can now go to Week 5.
Acknowledgements
This course was written by Hilary Holmes and Maria Townsend.
Except for third party materials and otherwise stated (see FAQs), this content is made available under a Creative Commons Attribution-NonCommercial-ShareAlike 4.0 Licence.
Every effort has been made to contact copyright owners. If any have been inadvertently overlooked, the publishers will be pleased to make the necessary arrangements at the first opportunity.
Don't miss out:
1. Join over 200,000 students currently studying with The Open University – http://www.open.ac.uk/
2. Enjoyed this? Find out more about this topic or browse all our free course materials on OpenLearn – http://www.open.edu/ openlearn/ free-courses/
3. Outside the UK? We have students in over a hundred countries studying online qualifications – http://www.openuniversity.edu/ – including an MBA at our triple accredited Business School.