Part 2: Surveying
| Site: | OpenLearn Create |
| Course: | Garden and planting design |
| Book: | Part 2: Surveying |
| Printed by: | Guest user |
| Date: | Saturday, 11 July 2026, 5:44 PM |
2. Elements of a garden survey
A garden survey is made up of three main elements:
- Client brief: a list of what the client wants from their garden
- Site analysis: information about what is currently at the site (including soil type, drainage, services, for example, electric cables and water pipes, existing trees etc)
- Site survey: the measurements which allow you to draw up a plan

3. Site survey and analysis
A site survey and analysis should be completed before a design is attempted.
Once your site survey is complete you will use this information to inform your design process. If this step is not carried out properly, your design will not function properly when it is built.
The site survey and analysis should include:
| Element | Example(s) |
|---|---|
| Information about aspect | A north point and a note of which areas are sunny and which are shady at different times of day to allow planning for seating areas |
| Ground conditions in each area | Boggy areas which may require drainage, soil pH and soil type |
| Views from the garden – both good and bad | Is the garden overlooked by neighbours, are there any eye sores which will need to be screened, are there any good views which should be kept? |
| A list of features which are to be kept and any relevant info for them |
"Large oak tree (root zone must be protected from compaction during build." "Manhole cover for access to septic tank (must be left accessible, perhaps in planting or gravel area)." "Wheelie bins need to be kept here, so they are close to the door and front gate." "Shed should be kept, and will need a path to access bikes from the back gate." "Rodding point for drains must be kept accessible." |
| Measurements | All the measurements for the boundaries, existing features which are to be kept and levels |
There are several techniques that can be used to survey a garden, some of which are described in the following pages. Don’t worry too much about which method to use if you find it confusing, the best thing to do is to go out into the garden with a tape measure and start practicing.
Tip: There are many useful videos online which describe survey methods if you want to try out some different techniques.
4. Client brief

When you first meet with a client you should:
- ask a list of questions in order to understand what your client wants from their garden
- accurately record the responses
- send a copy to the client after the meeting to make sure they agree with what you have written and haven’t changed their minds about anything or forgotten to include something.
Examples of questions
Who uses the garden and what for? (Children playing, adults entertaining, elderly or disabled access, dogs, chickens etc).
Are there any current features you would like to retain?
Do you have/use your lawn? (Sometimes a lawn can be removed or reduced to make room for other desirable features).
Would you like to grow vegetables/fruit/herbs?
What are your favourite plants? Any favourite colours?
Do you prefer a certain style of garden? (Cottage, formal, informal, Japanese etc).
Do you need a bin store/washing line/shed/greenhouse/compost bin etc?
Are there certain times of day that you use the garden? (They may want a sunny spot to sit in for morning coffee, or a patio in the evening sun for barbeques for example).
Would you like water to be included in the garden?
Take a list of basic questions with you which you can use as a prompt to make sure you don’t forget anything, but let the client take the lead if they feel happy to describe what they would like. You may not be the first designer they have met with and they might be well practised by the time you meet them.
Sometimes taking pictures of different types of gardens with you is a useful prompt for clients who struggle to imagine or describe what they like – they can then point to things and tell you what they like and don’t like.
Try to make sure that all the main users of the garden are present for the meeting so that you hear everyone’s opinion and can try to make sure any disagreements between users are settled before you start designing.
5. Linear/running survey
This is the simplest way to survey in a small garden or space, especially if there is a house nearby which gives an easy point of reference to measure from.
It simply involves measuring straight lines and then drawing these to scale on a plan. The straight lines measured include:
- distances between objects
- lengths of fences and walls
- perimeters and diagonals.
A running survey is a technique in which you lay a measuring tape along a known line, for example, the front of a house, and then measure the distance to features at right angles from this line, marking both how far along the measuring tape each feature is and the distance to the feature.
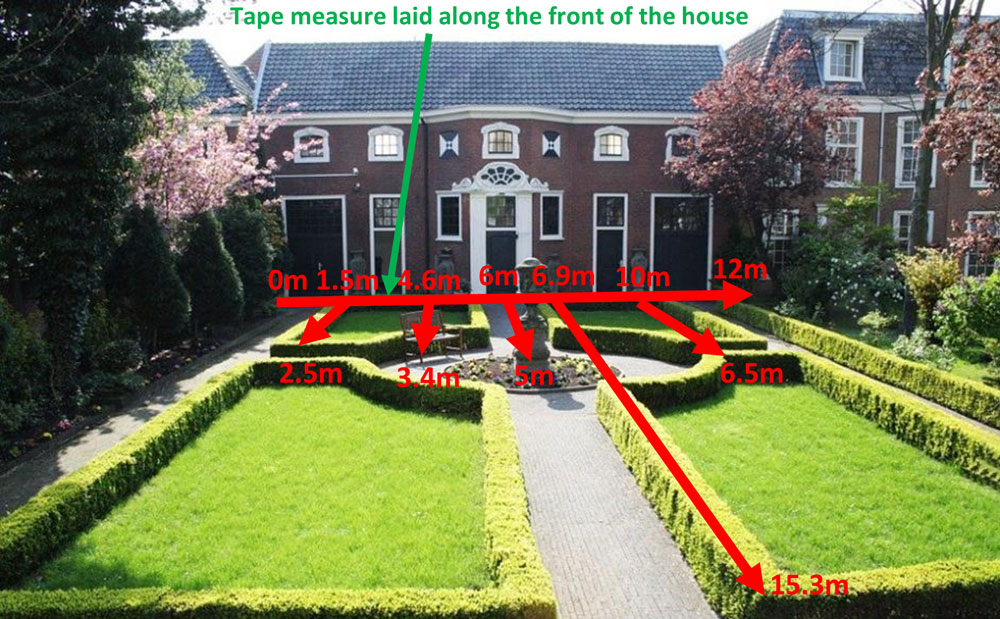
These can then be drawn out to scale on a plan:

6. Trilateration
The technique of trilateration measures three sides of a triangle in order to locate objects. It is really useful if the object you are trying to survey is a long way from a known point, for example the house, but you can locate it from some other points in the garden.
Note that many sources mix up the terms ‘trilateration’ and ‘triangulation’, a simple way to remember it is:
Trilateration = distances
Triangulation = angles
Trilateration process
1. Choose two fixed, known, points, for example, two corners of a house (A and B).

2. The object or feature that you want to locate becomes the third point of a triangle (C), in this case the corner of the path.
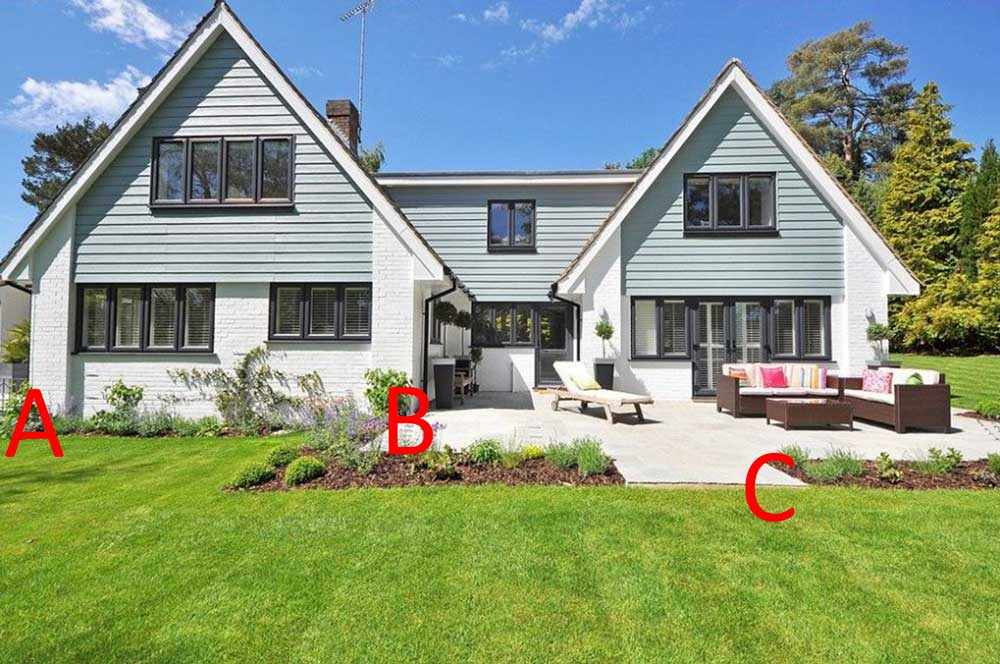
3. Measure and record the distances in a straight line between each of the three points.
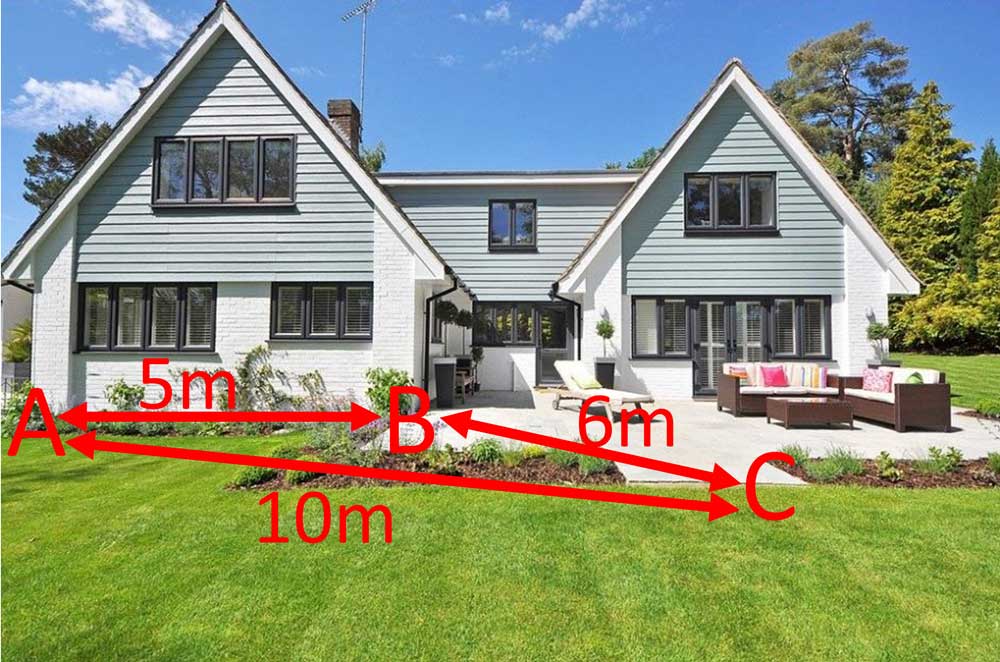
4. On your paper draw the line between A and B to an appropriate scale.

5. Using a set of compasses and a ruler, set the gap between the point of the compass and the pencil to the length of the line A to C (to scale).

6. Draw an arc on the paper, sticking the point of the compasses into point A.

7. Reset your compasses to the length (to scale) between points B and C and draw another arc, this time sticking the point of your compasses into point B. Your arcs will cross at the correct location for point C.

7. Triangulation
Triangulation also uses triangles, but this time it uses one distance and two angles to work out the location of the object or feature, rather than the three distances used in trilateration. This can be useful if there are obstacles in the way, or the distances are very long for measuring. It is also useful for measuring the height of something, for example how tall a tree is, or how high the height of the house.
Triangulation process:
1. The process starts the same as trilateration; measure and plot points A and B. These can be any two fixed points that you already know the location of, in this case topiary (A) and a statue (B).

Amber Crowley / public domain

2. Set up a theodolite or dumpy level at point A and look through it to point B, set this as 0 degrees.

3. Swivel the theodolite or dumpy level until you ae looking at point C (in this example, a tree) and record how many degrees it is.

4. Move the theodolite or dumpy level to point B and set it up so that when you are looking at point A it reads 0°. Then swing round and measure the degrees from B to C.

5. On your paper draw a line between A and B and then use a protractor to measure the angles of 40° from point A and 65° from point B. Draw lines from point A and B in the correct direction of each angle until the lines cross. Where they cross is point C:

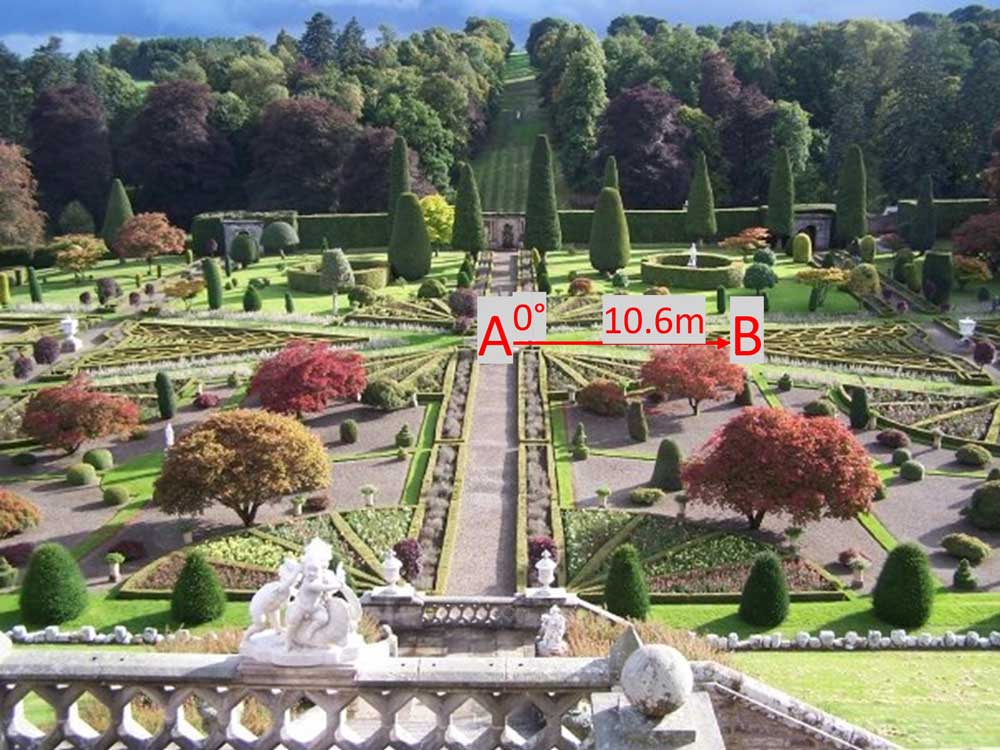
8. Bearing and distance
In this technique of surveying, you use the bearing (angle) and distance to each object. It is a useful technique if lots of features of the garden can be viewed from one place somewhere in the centre.
Bearing and distance process:
1. Set up a theodolite or dumpy level in the centre of the space (point A). Record one direction (a corner of a house or a significant feature) as 0°, this is point B. Record the distance from A to B.
Amber Crowley / public domain
2. Turning in a full circle record the bearing and distance for each feature that you would like to plot.

3. Using a protractor and ruler these can then be transferred to paper using a protractor and a scale ruler.

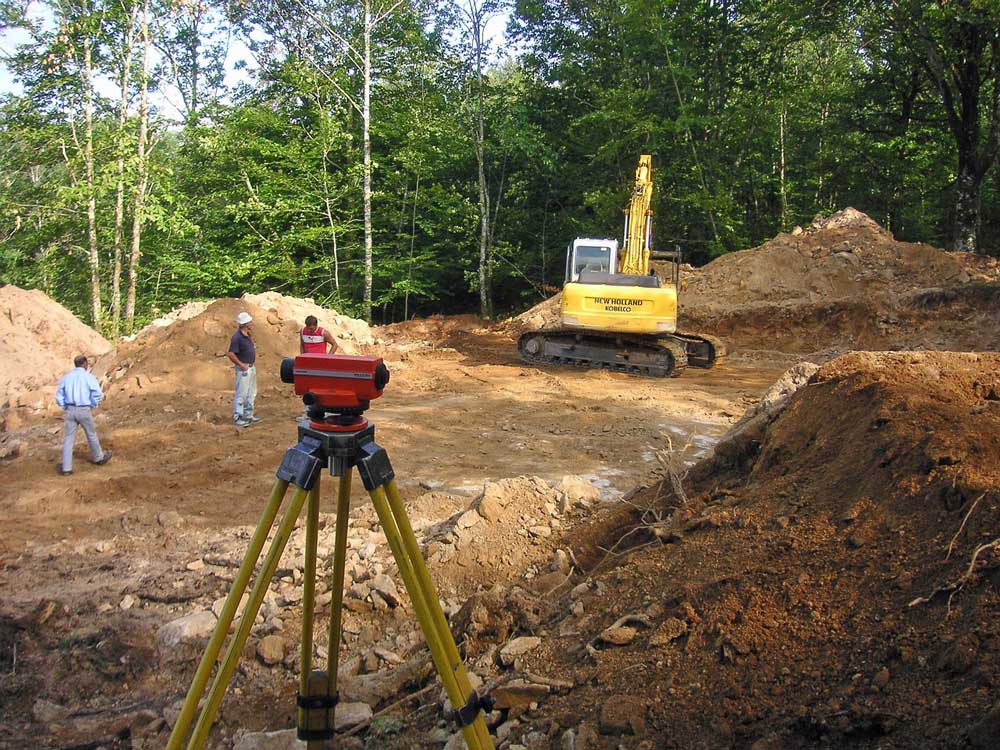
9. Area levelling techniques
Levelling is the technique of determining one level of ground relative to another. Often a theodolite, dumpy or laser level is used but water levellers, string levels and spirit levels can be used in small spaces.
Process for taking levels with a theodolite, dumpy or laser level
1. Set up the level.
2. Put the measuring staff vertically at each point you want a measurement for and label the points A, B, C etc. To locate the points that have been measured a bearing and distance method or coordinates can be used.
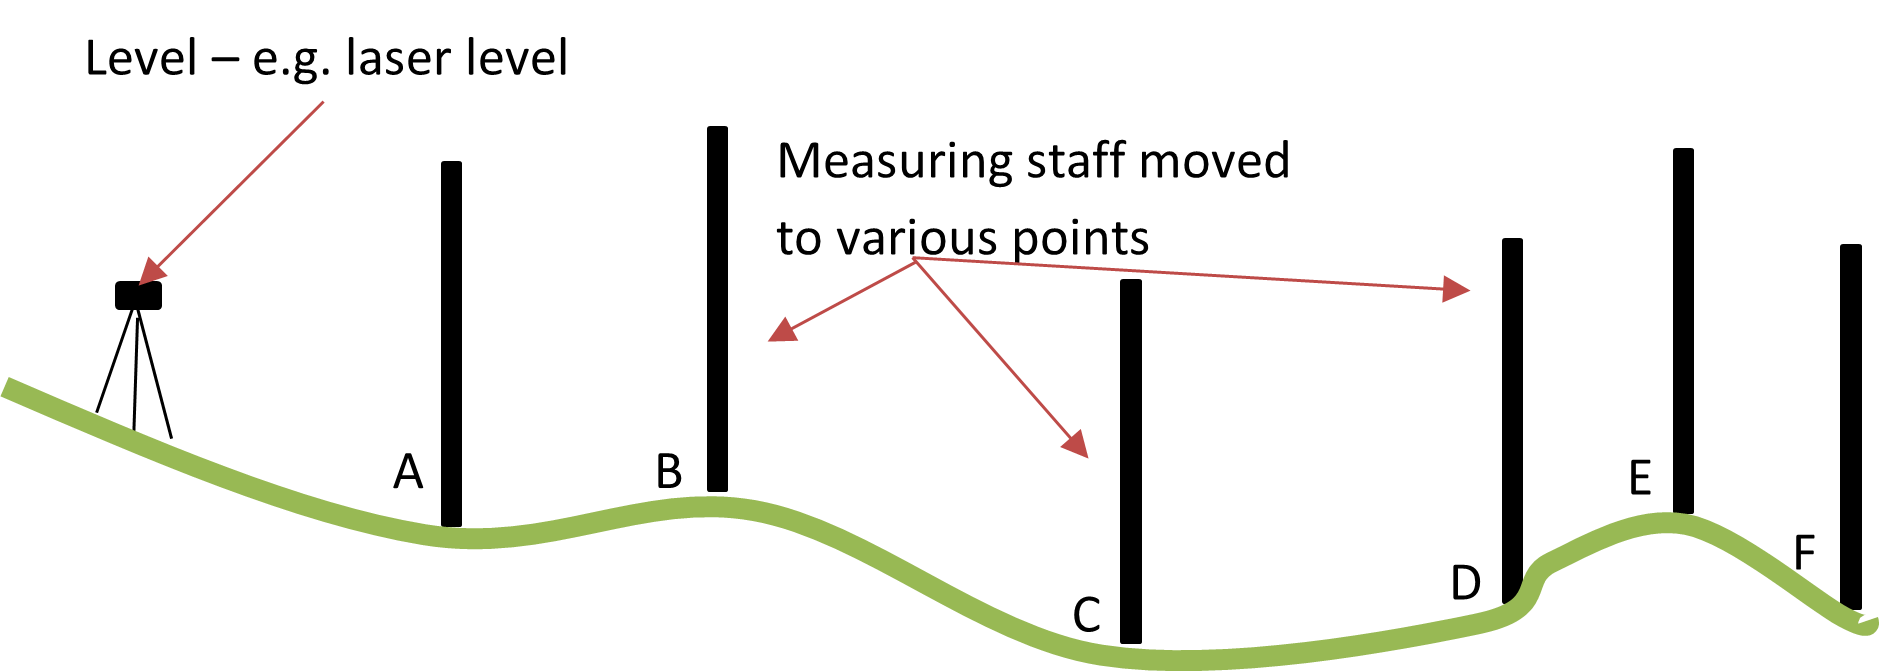
3. Read the level from the staff at each point it is placed.

4. Plot the slope into CAD software or onto graph paper.
Tip: Some mobile phones now have apps for surveying and although measurements should be checked for accuracy, they can give good results.
For more complicated landscapes it is sometimes worth hiring a specialist surveying company to do all this for you!
Go into a garden, it can be any garden at all, and have a think about how you would go about surveying it. Ask yourself these questions:
- Which survey technique would I use? (Linear, trilateration, triangulation, bearing and distance) or would I use a combination of techniques for this space?
- What information would go along with my measurements?
- What features are there?
- Which ones would I keep?
- Which areas are sunny and which are shady? How would this change through the day?
- What is the soil like?