Use 'Print preview' to check the number of pages and printer settings.
Print functionality varies between browsers.
Printable page generated Tuesday, 23 June 2026, 2:10 AM
Immunization Module: Vaccine Preparation and Administration Routes of the EPI Vaccines
Study Session 4 Vaccine Preparation and Administration Routes of the EPI Vaccines
Introduction
In this study session you will learn how to prepare the EPI vaccines used in Ethiopia, which were described in Study Sessions 2 and 3. Some vaccines come as fully prepared liquids for injection or administering by drops into the mouth. Other vaccines comes as powders that have to be reconstituted — mixed with a special liquid (a diluent) before they can be used. We will teach you how to do this and about the safe handling of needles and syringes for injecting vaccines.
Appropriate vaccine administration and safe vaccination practices are both very important for vaccine effectiveness. The recommended site, route and dosage for each vaccine are based on research and practical experience. In the final sections of this study session you will learn about the correct routes of administration for each of the EPI vaccines, together with instructions for positioning the child or adult client. The four administration routes are:
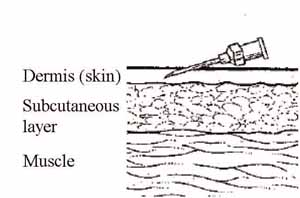
- Intradermal (ID): the vaccine is injected into the top layers of the skin.
- Subcutaneous (SC): the vaccine is injected into the fatty tissue below the skin and above the muscle.
- Intramuscular (IM): the vaccine is injected into the muscle.
- Oral: the vaccine is given by drops into the mouth.
Learning Outcomes for Study Session 4
When you have studied this session, you should be able to:
- 4.1 Define and use correctly all of the key words printed in bold. (SAQs 4.1 and 4.3)
- 4.2 Summarise the standard precautions to minimise the risk of infection or injury when handling vaccines, diluents and injection equipment. (SAQs 4.2 and 4.3)
- 4.3 Describe how to reconstitute BCG and measles vaccines with the correct diluent before administration. (SAQs 4.1 and 4.3)
- 4.4 Describe the correct route of administration for each of the injectable EPI vaccines. (SAQs 4.1 and 4.3)
- 4.5 Describe the correct preparation and administration of oral polio vaccine (OPV). (SAQ 4.5)
4.1 Preparing to give injectable vaccines
In this section, you will learn about the necessary steps before administration of the injectable EPI vaccines in routine use in Ethiopia.
4.1.1 Standard procedures for giving safe injections
First, you should always follow the standard procedures (also known as universal precautions) for preventing infection and injury when you are giving an injection.
What standard procedures should you take before giving an injection?
Standard procedures are described in several parts of this curriculum, including the Antenatal Care, Labour and Delivery Care, and Communicable Diseases Modules.
You should:
- Wash your hands thoroughly with soap and water, and allow them to ‘air dry’.
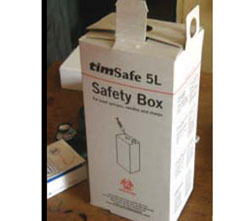 Figure 4.1 A standard safety box. (Photo: Basiro Davey)
 - Prepare all the equipment you need and lay it out on a clean tray that has been swabbed with antiseptic solution.
- Organise your equipment to minimise the risk of injury from needles and broken glass.
- Make sure there is a safety box nearby for the safe disposal of used syringes and needles (Figure 4.1).
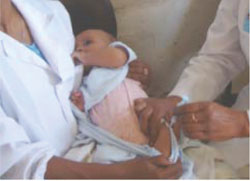
- Make sure that children are securely held by someone they know and trust, in the correct position to enable you to give the injection (Figure 4.2). You cannot hold the child because you need both hands to give the injection.
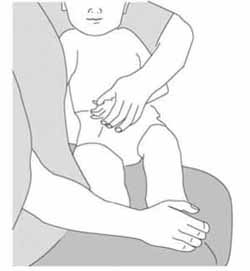 Figure 4.2 The mother or another caregiver should hold the child securely like this. (Source: WHO, 2004, Immunization in Practice, Manual 4, Ensuring Safe Injections, Figure 4-D)
 - The skin at the site of the injection should be swabbed cleaned with an appropriate antiseptic solution. After giving the injection, press a clean cotton swab onto the site until all bleeding stops.
You will learn about these and other immunization safety issues in more detail in Study Session 7.
4.1.2 Preparing injection equipment
Careful preparation before giving an immunization is very important, and includes selection of the correct syringes and needles.
Syringe selection
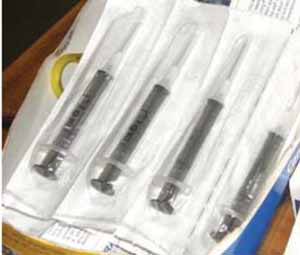
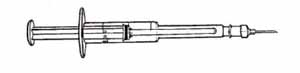
A separate syringe should be used for each injection. BCG vaccine should be injected using a 0.1 ml syringe; for all other EPI vaccines, use a 1 ml syringe. Disposable syringes are supplied in sterile plastic packages and are designed to be used once only and then put into a safety box. The safest type recommended by the World Health Organization is the auto-disable (AD) syringe (Figure 4.3). This has the needle already attached and a plunger mechanism that prevents the syringe from being used a second time. If the syringe and needle are supplied separately, when you remove a syringe from its package, take care not to touch the syringe adapter shown in Figure 4.4.
Needle selection
The needle used should be of the appropriate diameter for the vaccine. Typically, vaccines are not very thick liquids, and therefore a fine needle size of 22–26 gauge (outer diameter) can be used. A new needle and syringe is used for each injection. Note that for vaccines that need to be reconstituted with diluent before use, you should use a separate ‘mixing’ syringe and needle (like those shown in Figure 4.4) for reconstitution. Use a new auto-disable (AD) syringe and needle to inject the client.

Figure 4.4 shows the parts of a needle — none of which should be touched. Open the protective wrapping around the needle and remove it without touching the adaptor. The needle is inside a plastic outer case. Holding the needle by the outer case, push the needle adapter onto the syringe adapter until they ‘lock’ together firmly.
Vaccine reconstitution is taught in the next section. Diluents were introduced in Study Session 2.
4.1.3 Inspecting vials and ampoules of vaccines and diluents
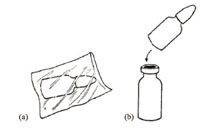
Vaccines and diluents are supplied in either a vial or an ampoule. A vial is a glass bottle with a thin rubber membrane across the top, which is held in place by a metal or plastic cap (Figure 4.5a). An ampoule is a sealed sterile glass or plastic bottle with a thin ‘neck’ (Figure 4.5b). The ampoule has to be broken open at the neck before the vaccine (or diluent) can be withdrawn. Note that some injectable vaccines are supplied in single-dose vials, and some contain more than one dose. You will learn how to use multi-dose vials in Study Session 7.
Vaccines (e.g. BCG) that are sensitive to light are supplied in dark glass vials or ampoules.

Vials and ampoules should be carefully inspected for damage or contamination prior to use. The expiry date printed on the vial or ampoule, or the box they came in, should be checked. The expiry date gives the last day of the month that the vaccine or diluent can be used, unless otherwise stated on the package labelling. Expired vaccines and diluents should never be used. You will learn more about stock control to avoid wastage in Study Session 5.
Check the vaccine vial monitor (VVM), which is a label that changes colour when the vaccine vial has been exposed to heat over a period of time. The VVM enables you to check if the vaccine has not passed the discard point due to heat exposure. It cannot tell you if the vaccine has been damaged by freezing. You will learn more about this, and other components of the ‘cold chain’ for preserving vaccines, in Study Session 6.
What is the correct temperature for storing vaccines supplied as liquids?
It is between 2oC and 8oC, as you learned in Study Sessions 2 and 3.
4.1.4 Reconstituting BCG and measles vaccines with diluent
It is very important to reconstitute a powder vaccine using only the diluent provided by the manufacturer specifically for that vaccine
Reconstitution is the process of mixing vaccines that come as powders with the diluent provided with the vaccine. This section will also explain how to open vials and ampoules. BCG and measles vaccines are the two routine EPI vaccines that require reconstitution, following the steps below:
1 Wash your hands and organise your equipment and work area
Wash your hands with clean water and soap and follow the standard procedures outlined in Section 4.1. Your aim is to minimise the risk of infection or injury to yourself, your clients and their caregivers.
2 Inspect the vaccine vial or ampoule
Measles vaccine powder (and most fully liquid vaccines) come in vials, but BCG vaccine powder comes in ampoules. Check that the vial or ampoule is not cracked. Check the vaccine vial monitor (VVM) and the expiry date as described above, and discard any vaccines that are no longer safe to use.
3 Tap the vial or ampoule
To make sure that all of the vaccine powder is at the bottom of the vial or ampoule, tap it with your finger.
4 Open the vaccine vial
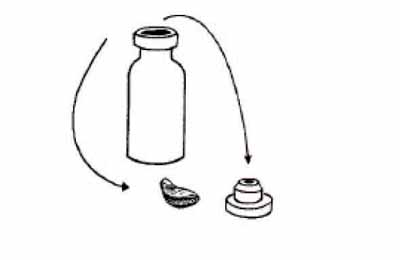
The centre of the metal cap on a vaccine vial is pre-cut so that it can be removed easily. Lift the centre of the metal cap and bend it back, using a metal file. Some vials have plastic stoppers instead of metal caps. Flip off the stopper with your thumb. When the cap or stopper is removed, it reveals the rubber membrane on top of the vial, protecting the vaccine (Figure 4.6). How to open an ampoule of BCG vaccine is described in step 6.
5 Inspect the diluent
Most diluents for reconstituting vaccines come in sealed ampoules, which you open by breaking off their pointed tops. Check that the ampoule is not cracked and that it has been chilled to between 2ºC and 8ºC before use.
Make sure that you are using the diluent the manufacturer sent with the vaccine, and that the expiry date has not passed. Each vaccine has its own diluent and must not be reconstituted with anything else. Deaths have resulted when vaccines were incorrectly mixed with liquids other than the specific diluent approved by the manufacturer for use with the vaccine.
Even if the main ingredient of the diluent is sterile normal saline or sterile water, you must never use normal saline or water instead of the correct diluent.
6 Open the ampoule of diluent
The process for opening an ampoule of BCG vaccine is exactly the same as for opening an ampoule of diluent.
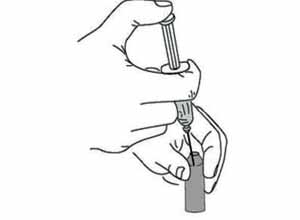
Hold the ampoule between your thumb and middle finger, and use your index finger to support the top (Figure 4.7a). Use the metal file packed with the ampoules to scratch hard around the neck of the ampoule. Wrap the ampoule in a piece of clean cloth and gently break off the top. It breaks where you made the scratch (Figure 4.7b). If you injure your hand while doing this, discard the ampoule because the diluent may have become contaminated. Cover the wound before opening a new ampoule.

7 Draw diluent into the mixing syringe
Use a new disposable mixing syringe (0.1 ml for BCG and 1 ml for other vaccines) attached to an appropriate-sized needle. Hold the ampoule at an angle (as shown in Figure 4.8), and put the needle into the open top. Pull back the plunger to draw all the diluent from the ampoule into the syringe.

8 Reconstitute the vaccine
Insert the needle of the mixing syringe through the rubber membrane on top of the vaccine vial, or (for BCG) into the open neck of the vaccine ampoule (Figure 4.9). Push the syringe plunger in with your thumb to empty the diluent into the vaccine vial or ampoule, where it begins to mix with the vaccine powder. Draw them both up slowly into the syringe and inject them back slowly into the vial or ampoule. Repeat this mixing step several times until the vaccine powder is thoroughly mixed with the diluent.
Discard the mixing syringe and needle in a safety box and use new ones for the immunization. Ideally, you should use an auto-disable (AD) syringe for the immunization.
9 Keep reconstituted vaccines cold
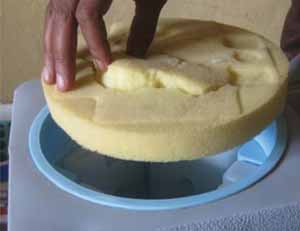
Place the vial or ampoule of reconstituted vaccine into the spaces in the foam pad (a piece of soft foam that fits on top of the ice-packs; Figure 4.10) to keep it cold during your immunization session. You will learn more about the use of foam pads and ice-packs in Study Session 6.
10 Do not keep unused reconstituted vaccine
Unused reconstituted vaccine must be administered within the time limit stated by the manufacturer (usually six hours). Any unused vaccine should be thrown away after six hours, or at the end of the immunization session if you finish before the time limit has passed.
Why should you throw away reconstituted vaccines after an immunization session is completed?
Reconstituted vaccines lose their potency (strength) quickly. As you learned in Study Sessions 2 and 3, reconstituted BCG vaccine is quickly damaged by sunlight and heat, and reconstituted measles vaccine is also damaged by heat.
4.2 Routes of immunization for injectable vaccines
In this section you will learn about the routes of administration for the injectable EPI vaccines. The injection routes are either intradermal (ID), subcutaneous (SC) or intramuscular (IM). Figure 4.11 shows the correct needle position for each of these routes. In all cases, you should follow the standard procedures for reducing the risk of infection and injury (Section 4.1).

4.2.1 Intradermal immunization with BCG vaccine
Intradermal (ID) means within or between the layers of the skin (dermis). BCG vaccine is the only EPI vaccine which is given intradermally. BCG vaccine should be reconstituted with the appropriate diluent before administration, as described in Section 4.2 above.
Swab the outer surface of the child’s outer upper right arm with antiseptic solution and allow it to dry. Select a sterile 0.1 ml syringe with a 26 gauge needle (Figure 4.12) and draw 0.05 ml of the reconstituted BCG vaccine into the syringe. Hold the syringe with the needle pointing upwards and tap the syringe so any air bubbles float to the top of the barrel. Gently push the plunger just enough to expel the air through the needle — you should see a tiny drop of vaccine emerging from the tip of the needle. This ensures that you do not inject air into the child’s skin. Make sure the vaccine dose is exactly 0.05 ml by checking the scale on the barrel of the syringe.
Ideally you should use auto-disable (AD) syringes with needles attached.
Why should you use a 0.1 ml syringe to inject BCG vaccine and a 1 ml syringe for all other injected EPI vaccines?
The dose of BCG vaccine is very small – only 0.05 ml. In order to measure and inject such a small dose accurately you must use a 0.1 ml syringe. All other injected vaccines are given in doses of 0.5 ml, so you should use a 1 ml syringe.
Inject the recommended dose of 0.05 ml of reconstituted BCG vaccine into the most superficial layers of the skin (intradermally) in the upper right arm. You should insert the tip of the needle just under the skin by inserting the bevel and a little bit more of the needle into the skin, while keeping the bevel facing upwards (Figures 4.13). The syringe should be lying along the child’s arm (Figure 4.14.)
The reason for injecting the vaccine in the same place (upper right arm) for each child is to make it easy to find the BCG scar subsequently. This enables you to check that the immunization has been effective. If the child does not develop a sore at the injection site, which heals to form a small scar (see Figure 2.3 in Study Session 2), the BCG vaccination should be repeated.
4.2.2 Subcutaneous immunization with measles vaccine
Where vitamin A deficiency is common among children, as in Ethiopia, vitamin A drops are given at the same time as measles vaccine, as described in Study Session 3.
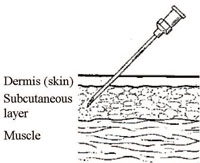
Subcutaneous (SC) injections are given into the fatty tissue below the skin and above the muscle. Measles vaccine is the only routine EPI vaccine which is administered subcutaneously. The vaccine comes in powder form and must be reconstituted before use with the approved diluent (as described in Section 4.1.4), and used within six hours of reconstitution.
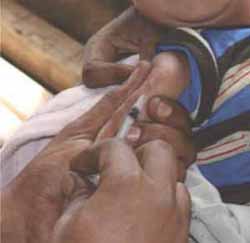
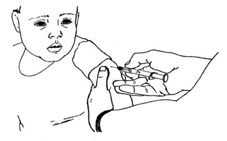
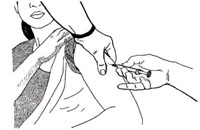
For the immunization, select a sterile 1 ml auto-disable (AD) syringe or a sterile syringe attached to a 23 gauge needle, and draw 0.5 ml of the reconstituted measles vaccine into the syringe. Expel any air bubbles as described above for BCG immunization (Section 4.2.1). Swab the skin of the child’s outer upper arm with antiseptic solution and let it air dry. Hold the child’s arm from below, and pinch the skin with your fingers and thumb (as shown in Figure 4.15), to push up a fold of skin on top of the arm. Push the needle a little way under the pinched-up skin. The needle should go in at a sloping angle (Figure 4.16), not straight down. Inject 0.5 ml of the vaccine into the fatty subcutaneous layer below the skin, but above the muscle.
The child shown in Figure 4.15 should be held securely by a caregiver to prevent sudden movements
4.2.3 Subcutaneous immunization with yellow fever vaccine
Yellow fever vaccine is not currently used routinely in the EPI in Ethiopia, but may be required by travellers going abroad to countries where the disease is common. It is the only other vaccine, apart from measles vaccine, which is injected subcutaneously, and is also given into the outer upper arm.
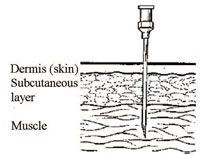
4.2.4 Intramuscular immunization with all other EPI vaccines
All the other EPI vaccines in routine use in Ethiopia are injected intramuscularly. Intramuscular (IM) injections are administered into the muscle layer below the skin and subcutaneous tissue, using a 1 ml syringe with a 26 gauge needle pointing straight down into the muscle (Figure 4.17).
Pentavalent and pneumococcal vaccines
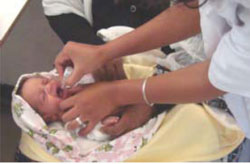
Pentavalent vaccine and the new pneumococcal vaccine (PCV10) are injected intramuscularly into the opposite thighs. Swab the thigh area with antiseptic solution and let it air dry, then inject 0.5 ml of vaccine as shown in Figure 4.18. Make sure the child is held securely.
Note that pentavalent vaccine and PCV10 must be given as two separate injections into opposite thighs (pentavalent on the left and PCV10 on the right).
Tetanus toxoid (TT) vaccine
Tetanus toxoid is commonly given separately on its own to pregnant women and non-pregnant women of childbearing age. Before giving TT vaccine, you should shake the vial so that any particles of vaccine that have settled to the bottom of the vial are mixed completely with the liquid. If the tetanus toxoid is not well mixed, the correct dose may not be given.
Inject 0.5 ml of TT vaccine intramuscularly (IM) using a sterile 1 ml syringe and a sterile 22 gauge needle into the muscle of the upper left or right arm, depending on the woman’s preference (Figure 4.19). At least two doses, and ideally five doses, should be given for maximum protection of women and their newborns from tetanus.
You learned about the effectiveness of different numbers of TT vaccine doses in Study Session 2, Table 2.7.
The shake test
Pentavalent, PCV10 and TT vaccines are all damaged by freezing. After freezing, the vaccine tends to form flakes that quickly settle at the bottom of the vial after shaking. If you suspect the vaccine has been accidentally frozen, you should check for damage by conducting a shake test before you use it. (You will learn how to do the shake test in Study Session 6.)
4.3 Oral administration of vaccines
The oral route of administration is used for polio vaccine (OPV) and will also be used for the rotavirus vaccine (RotarixTM) when it becomes available in the EPI in Ethiopia.
4.3.1 Oral administration of OPV
OPV is a clear red or yellow liquid vaccine that may come in either of two types of containers:
- Small plastic bottles that work like droppers – the drops are given directly from the dropper into the baby’s mouth.
- Glass vials with a dropper (also made of glass) supplied in a separate plastic bag. Remove the metal or plastic cap from the vial of OPV. Then cut open the plastic bag containing the dropper and fit it onto the top of the OPV vial (Figure 4.20) before use.
Ask the parent or carer to hold the child firmly with the child lying on its back. Then open the child’s mouth by squeezing the cheeks gently between your fingers to make the child’s lips point outward. Hold the dropper over the child’s mouth at an angle of 45 degrees (Figure 4.21) and let two drops of the vaccine fall from the dropper onto the child’s tongue. If the child spits out the vaccine or vomits, give another dose immediately.
4.3.2 Oral rotavirus vaccine
Rotavirus vaccine is also administered orally in a similar way as described for OPV, but RotarixTM is supplied in single-dose ‘squeeze-tube’ vials. Each vial contains 1.5 ml of vaccine which is squeezed slowly — drop by drop — into the infant’s open mouth. You will be given more detailed instructions when the vaccine is introduced into the EPI in Ethiopia.
4.4 In conclusion
Table 4.1 summarises what you should know about the routes and sites of administration of the EPI antibacterial and antiviral vaccines.
| Vaccine | Route of administration | Injection site |
|---|---|---|
| OPV and rotavirus vaccine (RotarixTM) | Oral | None (given by mouth) |
| BCG | Intradermal (ID) | Outer upper right arm |
| Measles | Subcutaneous (SC) | Outer upper arm |
| Pentavalent (DPT-HepB-Hib) | Intramuscular (IM) | Outer left upper thigh |
| Tetanus toxoid (TT) for women of childbearing age | Intramuscular (IM) | Outer upper arm |
| Pneumococcal vaccine (PCV10) | Intramuscular (IM) | Outer right upper thigh |
Summary of Study Session 4
In Study Session 4, you have learned that:
- Correct preparation before giving an immunization is very important to minimise the risk of infection or injury to yourself, your clients or their caregivers, and to maintain the effectiveness of the vaccine during transfer from the manufacturer’s vial to the syringe and finally to the client.
- Correct vaccine preparation includes using standard procedures (hand washing, skin preparation using antiseptics, etc.), selection of an appropriate syringe and needle, inspection of vials and ampoules to check the expiry date and vaccine vial monitors (VVMs) to ensure that vaccines and diluents are in good condition, vaccine reconstitution for those vaccines that require it, and keeping vaccines cold during the immunization session.
- Always use the appropriate diluents provided specifically for the reconstitution of BCG or measles vaccines before use. Never use sterile normal saline or sterile water as a substitute for the correct diluent.
- The injectable EPI vaccines are each given by a specific route and site: BCG vaccine is injected intradermally into the upper right arm; measles vaccine is injected subcutaneously into the upper arm; pentavalent vaccine and pneumococcal vaccine (PCV10) are injected intramuscularly into opposite upper thigh muscles; tetanus toxoid vaccine is injected intramuscularly into the woman’s upper arm.
- Oral polio vaccine (OPV) is given by two drops into the infant’s mouth. Rotavirus vaccine (RotarixTM) is given as 1.5 ml of drops into the infant’s mouth.
Self-Assessment Questions (SAQs) for Study Session 4
Now that you have completed Study Session 4, you can assess how well you have achieved its Learning Outcomes by answering the following questions. Some questions test your understanding of some Learning Outcomes for previous study sessions, as well as those in this one. Write your answers in your Study Diary and discuss them with your Tutor at the next Study Support Meeting. You can check your answers with the Notes on the Self-Assessment Questions at the end of this Module.
SAQ 4.1 (tests Learning Outcomes 4.1, 4.3 and 4.4)
Place a cross in the appropriate boxes in Table 4.2 to indicate the correct route of administration for each vaccine, and whether it is supplied as a liquid or if it has to be reconstituted with diluent before use.
| Route of administration | Reconstitution? | |||||
|---|---|---|---|---|---|---|
| Vaccine | ID | SC | IM | Oral | Yes | No |
| BCG | ||||||
| Pentavalent | ||||||
| Measles | ||||||
| Polio (OPV) | ||||||
| Pneumococcal (PCV10) | ||||||
| Rotavirus (RotarixTM) | ||||||
| TT (in women) | ||||||
Answer
| Route of administration | Reconstitution? | |||||
|---|---|---|---|---|---|---|
| Vaccine | ID | SC | IM | Oral | Yes | No |
| BCG | X | X | ||||
| Pentavalent | X | X | ||||
| Measles | X | X | ||||
| Polio (OPV) | X | X | ||||
| Pneumococcal (PCV10) | X | X | ||||
| Rotavirus (RotarixTM) | X | X | ||||
| TT (in women) | X | X | ||||
SAQ 4.2 (tests Learning Outcomes 2.4, 3.4 and 4.2)
Read Case Study 4.1 and then answer the questions that follow it.
Case Study 4.1 Bekelech’s immunization clinic
Three worried mothers have brought their sick babies to the Health Post one week after the babies received their scheduled EPI vaccines at six weeks of age. When Bekelech, the Health Extension Practitioner, checks the babies, she finds that they each have red and painful swellings on the left upper thigh and moderate fever. When they were immunized at the Health Post a week previously it had been a very busy day. Over 25 parents brought their children for immunizations, five pregnant women needed TT vaccine, and several people arrived with other health problems. Bekelech remembered that things kept going wrong that day and she had to rush to finish immunizing all the clients before nightfall.
- a.What is the swelling in the thighs of the three sick babies, and what could have caused it?
- b.What should Bekelech do about this problem?
Answer
(a) The red and tender swelling on the babies’ left thighs is likely to be an abscess at the site where they received the pentavalent vaccine by intramuscular injection the previous week. An abscess at an injection site is usually caused by a contaminated needle or syringe, or incorrect vaccine preparation, or incorrect injection technique. The fact that Bekelech was so busy that day last week may have resulted in poor adherence to standard procedures when she immunized the babies. For example, she may have:
- used the same needle and syringe for more than one injection
- touched the needle with unclean hands before giving the injection
- placed the needle and syringe on a table top or other unclean surface
- failed to keep the vaccine cold during the long immunization session.
(b) Bekelech should:
- Treat the abscesses by giving the babies amoxicillin syrup three times daily and placing clean, warm compresses on the affected area. She should ensure that the mothers take their babies to a health centre urgently for further assessment.
- Take care in future to ensure that standard procedures are followed when giving immunizations.
SAQ 4.3 (tests Learning Outcomes 4.1, 4.2, 4.3 and 4.4)
Read Case Study 4.2 and then answer the question that follows it.
Case Study 4.2 Fatuma’s immunization clinic
Fatuma is preparing to give BCG vaccinations to a number of babies. Before giving the vaccination, she washes her hands, checks that the expiry date on the vaccine ampoule has not passed, she taps the ampoule to make sure all the vaccine powder is at the bottom, and opens the ampoule. She inspects the diluent and uses it to reconstitute the vaccine. She places the reconstituted vaccine on a foam pad placed on top of conditioned ice-packs in a vaccine carrier, and administers it intradermally to each baby in the upper right arm.
- What two things has Fatuma forgotten to do? In each case, explain why this is important and what could happen as a result of it being forgotten.
Answer
Fatuma forgot to check the VVM on the vaccine ampoule. She checked the expiry date of the vaccine, but this will not tell her if the vaccine has been exposed to heat and lost its potency. She should check the VVM and if it has passed the discard point she should discard it.
Fatuma also forgot to clean the injection site. She should clean the skin with antiseptic solution and leave it to dry before giving the vaccination. Pushing a needle through dirty skin could introduce an infection into the baby’s body.
SAQ 4.4 (tests Learning Outcome 4.5)
What is incorrect in the following statement?
- OPV is given to babies by first withdrawing the liquid vaccine into a sterile syringe, and then pushing the plunger just enough to let 2 drops of vaccine drip from the syringe into the baby’s mouth.
Answer
OPV is never given to babies using a syringe as a substitute for the glass dropper supplied with the vaccine or the dropper incorporated into the vaccine vial. Using the correct dropper ensures that the correct dose of OPV is given in two drops of vaccine.